1
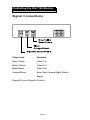
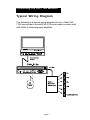
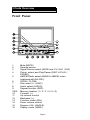
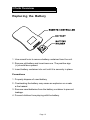
Table of Contents 1 Before You Begin ............................................ 2 2 Installing the DA-7169 Monitor ....................... 4 3 Parts Overview ................................................. 8 4 Operating the DA-7169 Monitor ................... 11 5 Specifications ................................................ 16 6 Appendix ........................................................ 17 1 Before You Begin Welcome to the In-Dash DA-7169 Operating Guide. Before you begin, read the following warnings and notes carefully. Warning! To avoid serious harm or injury to you, others, the vehicle, or the remote control unit, follow the instructions below. To avoid short-circuiting the electrical system: • When replacing a blown fuse, disconnect all power supplies and power off the unit. Be sure to use the correct replacement fuse. • If the unit shows signs of overheating or malfunction, power off the unit and consult your dealer immediately. Do not open the unit; there are no serviceable parts inside. To avoid damaging the LCD panel: • Do not drop the LCD display panel or subject it to direct impact. • If the LCD panel breaks, avoid contact with any broken glass or leaking fluids. If you come into contact with these materials, flush and clean the affected areas with water. Seek medical attention immediately. This unit uses high-quality electronic components and is manufactured under a stringent quality-control system. Properly maintain the remote control unit to ensure optimal performance: • Replace the batteries regularly. To avoid damage to new batteries, do not use new and used batteries at the same time. Battery life is six months. • Use a soft, damp cloth (a lens cloth) to wipe dirt and fingerprints off the screen. Chemical solvents, cleaning agents, or corrosive detergents can cause irreparable damage. Page 2 1 Before You Begin • Do not drop metal or foreign objects between the display screen and enclosure. Doing so may impede the motorized tray and cause an electrical short. Important Notes • When using the unit with a radio/TV tuner (model DA-2301), reception quality will vary with geographical location and climatic conditions. • For safety, this unit can only be activated when the vehicles hand break is engaged. See your dealer for details. • Do not install the screen where it may distract the driver. • Avoid installing the display screen in direct sunlight or near hot air vents. Operating temperature for the display screen is 0oC to 60oC. If the internal temperature of the vehicle is extremely high, cool down the inside of the vehicle before operating the unit. • Install the unit in a dry location, away from condensation. • To avoid a fire hazard, use the correct fasteners and connecting cables during installation. • The unit contains high voltages. To avoid electrical shock, do not open the unit; there are no user serviceable parts inside. • See your authorized dealer if unsure how to proceed. Before installing this display system, ensure you are in compliance with local traffic rules and regulations. Page 3 2 Installing the DA-7169 Monitor Precautions 1 This unit should be installed by a qualified service technician. 2 This product is designed to operate with a 12-Volt, negative ground battery. 3 Disconnect the ground wire from the battery terminal before connecting this unit to the electrical system. 4 Other products or accessories may have wires that are color-coded similarly to those for this unit. Refer to the electrical diagrams of any other products before installation of the unit to avoid making wrong connections. 5 To avoid short-circuiting the electrical system, use proper insulation and fastening materials. 6 Do not connect the units yellow wire directly to the battery terminal. Connect the units red wire to the ACC of the ignition switch. Failure to connect the red and yellow wires properly may drain the vehicles battery. 7 To avoid damaging the unit, use only the accessories supplied with the unit. 8 Do not install this product at an angle exceeding ±30°. 9 Do not install this product in a position that may cause injury to passenger(s) during an accident. Page 4 2 Installing the DA-7169 Monitor Electrical Connections Color Code Function Black Red Yellow Blue Ground ACC +12 V +12 V Out (Max 1 Amp) Page 5 2 Installing the DA-7169 Monitor Signal Connections Color Code Function Grey /Yellow Video 1 In Black /Yellow Video 2 In Black/Black Video Out Orange/Brown Rear View Camera/Night Switch Signal Signal & Control Signal & Control Page 6 2 Installing the DA-7169 Monitor Typical Wiring Diagram The following is a typical wiring diagram for an In-Dash DA7169 connected to model DVA-310x and a radio receiver with a 40-Watt, 4-channel power amplifier. Page 7 3 Parts Overview Front Panel 1 2 3 4 5 6 7 8 9 7/8/9 10 11 12 13 14 15 16 Mute (MUTE) Remote sensor Signal Source select (SRCE and CH / AV1 / AV2) Player select and Play/Pause (DISC & PLAY / PAUSE) AM/FM Radio select (BAND & AM/FM; when interfaced with DA-2301) OPEN / CLOSE Disc select +/- (DISC) Audio select (AUDIO) Repeat function (REP) Memory location (1 / 2 / 3 / 4 / 5 / 6) Forward (>) Up volume control Backward (<) Function mode (SEL) Down volume control Degree of tilt (ANGLE) Display mode (WIDE) Page 8 3 Parts Overview Remote Control Unit Frequently Used Buttons CHANNEL SELECT: Selects TV channels, disc title, or desired settings on the MENU screen. MODE: Selects the input video source. i.e. TV / AV1 / AV2. MENU: Displays menu screen of functions available. POWER: Open (ON) or close (OFF) the monitor enclosure. VIEWING ANGLE & DISPLAY MODE: Press once to activate angle adjustment function. While in this mode, press por q to set the tilt angle of the screen. Press and hold to activate display mode functions: ZOOM / CINEMA / NORMAL / FULL. Page 9 3 Parts Overview Replacing the Battery 1 Use a small coin to remove battery container from the unit. 2 Remove old battery and insert new one. The positive sign (+) should face upward. 3 Insert battery container into unit until it is securely in place. Precautions 1 Properly dispose of used battery. 2 Overheating the battery may cause an explosion or create a fire hazard. 3 Remove used batteries from the battery container to prevent leakage. 4 Prevent children from playing with the battery. Page 10 4 Operating the DA-7169 Monitor Operating the In-Dash DA-7169 Color Display Monitor To take full advantage of the In-Dash DA-7169s features, read these operating instructions before using the monitor. Note: The color and brightness of the LCD display screen is factory preset. To adjust picture quality, follow the instructions in this guide. Ejecting and Opening the Display Monitor • To eject/open the display monitor, press the OPEN / CLOSE button (#6 on the Front Panel Overview on page 7) once. The display monitor will automatically eject from its DIN enclosure. Caution: To prevent damage to the driver motor and gear train, do not obstruct the movement of the monitor tray. • If the ejection of the display monitor is stopped halfway, press the OPEN / CLOSE button once to return the monitor to the closed position. Press OPEN / CLOSE to activate the ejection process again until the monitor is fully extended. • The display monitor returns to the closed position when the ignition is turned OFF or when pressing the OPEN / CLOSE button when the monitor is in the open position. Adjusting the Position of the Monitor • Press the ANGLE + / - button (#15) to adjust the viewing angle of the monitor. Page 11 4 Operating the DA-7169 Monitor Note: To prevent damage to the gear train, do not use force to adjust the display screen. • The display monitor returns to the preset position whenever the system is turned ON. Selecting the Screen Size • Press the WIDE button (#16) to change the screen size. There are four options: ZOOM: Picture is stretched vertically and horizontally. CINEMA: Picture is displayed with uniform enlargement horizontally. NORMAL: When 4:3 picture is played on a wide screen, black bands appear on both side of the picture. FULL: 16:9 picture is fully displayed on screen. Adjusting Features of the Display Monitor • Press the SEL button (#13) to scroll through the following screen options: COLOR: Color adjustment CONTRAST: Contrast setting BRIGHT: Brightness setting TINT: Color saturation DIMMER: When set to ON, the brightness of the screen adjusts automatically when vehicle headlights are turned ON. REV VID: (Reverse Video) ON or NORMAL. When set to ON, reverse video automatically runs when monitor is connected to a rear view camera. RESET: Resets COLOR, CONTRAST, BRIGHT and TINT Page 12 4 Operating the DA-7169 Monitor to factory defaults. Note: The SEL button will have different functions when the monitor is connected to model DA-2301. Refer to the user manual for details. • Once the correct option is visible, press the forward/ backward keys (< and >) to confirm your selection. If no key is pressed, then the SEL mode will turn off in about five seconds. Choosing NTSC or PAL Display System • Once input video source (TV / AV1 / AV2) is selected by pressing SRCE (#3), use the forward/backward keys (< and >) to toggle between NTSC or PAL display system. Note: The function of the forward/backward keys (< and >) changes when this monitor is connected to model DA-2301 or DVD player DVA-310x. Refer to the respective manuals for details. Adjusting the Volume • When the monitor is connected to DA-2301, use the UP / DOWN keys (#11 & 14) to adjust the volume. Note: Refer to the DA-2301 user manual for details. Muting the Volume • Press the MUTE button (#1). Note: This button is only activated when the monitor is connected to model DA-2301. Refer to the DA-2301 user manual for details. Page 13 4 Operating the DA-7169 Monitor Selecting the Video Source • Press the SRCE button (#3) to choose between AV1 and AV2. Note: Refer to Choosing NTSC or PAL Display System on previous page. Note: The SRCE button activates TV (CH) mode when the monitor is connected to model DA-2301. Selecting the Audio Channel • Use the AUDIO button (#8) to select the desired channel when the monitor is connected to a DVD player or VCD/ CD changer (model DA-2301). • The AUDIO button is also used to select the audio language as recorded in the DVD. • When playing back VCD, use the AUDIO button to toggle between AUDIO LL, AUDIO RR, or AUDIO STEREO. Note: Refer to the respective user manuals for details. Playing and Pausing the Disc Player • When the monitor is connected to a DVD player or VCD/ CD changer via model DA-2301, press the PLAY/PAUSE/ DISC key (#4) to turn on the disc player, play the disc, and pause the disc player. Turning On and Changing the Radio Station • When the monitor is connected to the DA-2301, press the BAND button (#5) to turn ON the radio and play the last selected channel. • When the radio is ON, press the BAND button to toggle between radio bands (AM, FM1, FM2, FM3). Page 14 4 Operating the DA-7169 Monitor Selecting Preprogrammed Radio Stations • When the monitor is connected to model DA-2301, Use buttons 1 / 2 / 3 / 4 / 5 / 6 (buttons #7-9 on the Front Panel Overview on page 7) to select preprogrammed radio stations. Note: Refer to the DA-2301 user manual for details. Selecting a Disc to Play • When the monitor is connected to a DVD or VCD/CD multidisc player via model DA-2301, press the disc selection key (#4) to select the disk you wish to play. Using the Play Back Feature • Press the REPEAT button (#9) to activate the play back feature and selection from the following options: OFF, CHAPTER, and TITLE. Page 15 5 Specifications Specifications • Monitor Display System: 7 in. (18 cm) Active Matrix Color LCD Display; NTSC/PAL selectable • Display Format: 112,320 pixels • Resolution: 336,960 dots / 1,440 (W) x 234 (H) dots • Aspect Ratio: 16:9 • Active Area: 155.5 mm (W) x 87.8 (H) mm • Front Panel: Anti-glare glass • Back Light: 10,000 hours normal operation • Mechanism: Fully Motorized Open/Close • Viewing Angle: Adjustable Up/Down; Off-axis Viewing Angle (<) 120° • Master Control: TV/AM/FM (DA-2301) and CD/VCD/DVD (DVA-310x) interfaces • Source: Composite video input x 2; Composite video output x 1 • Operating Voltage: 12-Volt DC • Operating Current: 1.5 Amp (Nominal) • Mounting: Single DIN/In-Dash mount • Weight: 1.8 kg • Dimensions: 17.8 cm (W) x 18.5 cm (D) x 5.0 cm (H) All specifications are subject to change without prior notice. Page 16