1
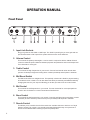
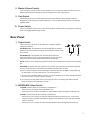
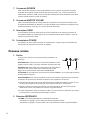
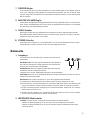
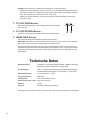
IMPORTANT SAFETY INSTRUCTIONS
• Read these instructions.
• Keep these instructions.
• Heed all warnings.
• Follow all instructions.
• Do not use this apparatus near water.
• Mains powered apparatus shall not be exposed to dripping or
splashing. No objects filled with liquids, such as vases or drinking
glasses, shall be placed on the apparatus.
• Clean only with dry cloth.
• Do not block any ventilation openings. Install in accordance with
the manufacturer’s instructions.
• Do not install near any heat sources such as radiators, heat
registers, stoves, or other apparatus (including amplifiers) that
produce heat.
• WARNING—This apparatus shall be connected to a mains
socket outlet with a protective earthing connection.
• Do not defeat the safety purpose of the polarized or groundingtype plug. A polarized plug has two blades with one wider than
the other. A grounding type plug has two blades and a third
grounding prong. The wide blade or the third prong are provided
for your safety. If the provided plug does not fit into your outlet,
consult an electrician for replacement of the obsolete outlet. (for
USA and Canada)
• Protect the power cord from being walked on or pinched,
particularly at plugs, convenience receptacles, and the point
where they exit from the apparatus.
• Only use attachments/accessories specified by the manufacturer.
• Unplug this apparatus during lightning storms or when unused
for long periods of time.
• Turning off the power switch does not completely isolate this
product from the power line.
• Keep the power plug easily accessible. Do not install this
equipment far from a power outlet and/or power strip.
• Refer all servicing to qualified service personnel. Servicing is
required when the apparatus has been damaged in any way,
such as power-supply cord or plug is damaged, liquid has been
spilled or objects have fallen into the apparatus, the apparatus
has been exposed to rain or moisture, does not operate normally,
or has been dropped.
• Do not install this equipment in a confined space, such as a
moving box or other enclosure.
• Excessive sound pressure from earphones and headphones can
cause hearing loss.
• Use only with the cart, stand, tripod, bracket, or table specified
by the manufacturer, or sold with the apparatus. When a cart is
used, use caution when moving the cart/apparatus combination
to avoid injury from tip-over.
The lightning flash with arrowhead symbol,
within an equilateral triangle, is intended to alert
the user to the presence of uninsulated
“dangerous voltage” within the product’s
enclosure that may be of sufficient magnitude
to constitute a risk of electric shock to persons.
The exclamation point within an equilateral
triangle is intended to alert the user to
the presence of important operating and
maintenance (servicing) instructions in the
literature accompanying the product.
THE FCC REGULATION WARNING (for USA)
This equipment has been tested and found to comply with the limits
for a Class B digital device, pursuant to Part 15 of the FCC Rules.
These limits are designed to provide reasonable protection against
harmful interference in a residential installation. This equipment
generates, uses, and can radiate radio frequency energy and, if
not installed and used in accordance with the instructions, may
cause harmful interference to radio communications. However,
there is no guarantee that interference will not occur in a particular
installation. If this equipment does cause harmful interference to
radio or television reception, which can be determined by turning
the equipment off and on, the user is encouraged to try to correct
the interference by one or more of the following measures:
• Reorient or relocate the receiving antenna.
• Increase the separation between the equipment and receiver.
• Connect the equipment into an outlet on a circuit different from
that to which the receiver is connected.
• Consult the dealer or an experienced radio/TV technician for help.
Unauthorized changes or modification to this system can void the
user’s authority to operate this equipment.
Notice regarding disposal (EU only)
When this “crossed-out wheeled bin” symbol is displayed
on the product, owner’s manual, battery, or battery
package, it signifies that when you wish to dispose of this
product, manual, package or battery you must do so in an
approved manner. Do not discard this product, manual,
package or battery along with ordinary household waste.
Disposing in the correct manner will prevent harm to human health
and potential damage to the environment. Since the correct
method of disposal will depend on the applicable laws and
regulations in your locality, please contact your local
administrative body for details. If the battery contains heavy
metals in excess of the regulated amount, a chemical symbol is
displayed below the “crossed-out wheeled bin” symbol on the
battery or battery package.
IMPORTANT NOTICE TO CONSUMERS
This product has been manufactured according to strict
specifications and voltage requirements that are applicable in
the country in which it is intended that this product should be
used. If you have purchased this product via the internet, through
mail order, and/or via a telephone sale, you must verify that this
product is intended to be used in the country in which you reside.
WARNING: Use of this product in any country other than that
for which it is intended could be dangerous and could invalidate
the manufacturer’s or distributor’s warranty. Please also retain
your receipt as proof of purchase otherwise your product may be
disqualified from the manufacturer’s or distributor’s warranty.
* All product names and company names are the trademarks or
registered trademarks of their respective owners.
2
Introduction
Congratulations on your purchase of the VOX Guitar Amplifier TB18C1 amplifier. This amplifier has been designed in collaboration with legendary American boutique amp designer Tony Bruno who has taken the VOX
sound ‘across the pond’ to create an all new addition to the VOX line up.
This tone machine is an elegant single channel amp designed to unleash every last bit of tone in any situation.
From the reverb design to the all new Tony Bruno ‘Dark’ switch this amp will give you all the tools you need to
leave any set of ears begging for more!
About Tony Bruno:
Tony Bruno is a highly respected and sought after boutique amp designer from the U.S.A. He has hand built
over 1000 amplifiers in his career which are regarded as some of the finest sounding amplifiers in the world.
Long time friend of VOX, Tony Bruno’s unparalleled knowledge of boutique amplifier design has been utilized
by VOX in the past on projects including the VOX Night Train, AC Custom series amps and also the new AC30
& AC15 Hand Wired amplifiers.
The Story
After establishing a strong working relationship we decided to do a full collaboration and allow Tony to design a
circuit that we would put into mass production. This was a first for both VOX and Tony Bruno. So, Utilizing Tony
Bruno’s expertise of American style boutique amplifiers and VOX resources and development team, we set sail
on the seas of tone, into unchartered waters to bring boutique sound and quality to the masses.
First, Tony personally hand built a handwired prototype to his uncompromising standards that we would use as
a benchmark and continually reference throughout the project. After evaluating Tony’s amp we at VOX made
a replica of the unit using a PCB design instead of Tony’s usual handwired method. We then unleashed Tony
onto the new sample and allowed him to modify and add new features to the unit. After many rigorous voicing
sessions with Tony it was agreed we had something that not only shared the same excellent tonal quality of the
original unit, but also included features that would otherwise be impossible to create without the use of VOX’s
modern development and production resources.
The TB18C1 amplifier is the result of an uncompromising collaboration between VOX and Tony Bruno. Enjoy!
3
OPERATION MANUAL
Front Panel
1
2
3 4 5
6
7
8 9
10
1. Input Jack Sockets
Plug your guitar into the HIGH or LOW input. The ‘HIGH’ input will give you more gain and output volume and the ‘LOW’ input will be quieter and have more clean headroom.
2. Volume Control
This controls the preamp volume/gain. It can be used in conjunction with the ‘Master Volume’
control to create the perfect balance between pre/power amp distortion and overall output level.
Turn clockwise for more gain.
3. Treble Control
This controls the high frequencies in your sound—from soft and smooth when turned down
(counter clockwise) to bright and cutting when cranked (clockwise) and all points in-between.
4. Mid Boost Switch
The Mid boost switch is a mid/gain boost. This specially voiced mod is ideal for players wanting
to boost their solos or leads. You can also leave this switch permanently activated dramatically
changing the sound of your amp and allowing you to take your search for tone even further!
5. Mid Control
This controls the mid frequencies in your sound. Turn anti clockwise for a scooped spacious
sound or turn clockwise for a more focused and full bodied tone.
6. Bass Control
This controls the low frequencies in your sound—from thin and light when turned down (counter
clockwise) to warm and heavy when turned up full (clockwise) and all points in-between.
7. Reverb Control
This allows you to control the level of the reverb from a subtle shimmer to luscious ‘surf’ style
waves of sound. This control is very sensitive and was designed this way so any amount of
reverb can be obtained without having to push the preamp hard.
4
8. Master Volume Control
This controls the overall volume of your amplifier. Use in conjunction with the volume control to
find the perfect balance between pre/power amp distortion and output volume.
9. Dark Switch
This switch allows you to further tweak your amps tonal diversity. When the Dark switch is
engaged, the high frequencies are dramatically cut. This makes the amp feel like a completely
different beast!
10. Power Switch
This is the ON/OFF switch for the power to the amplifier. Please ensure the amplifier is switched
off and unplugged before being moved.
Rear Panel
1. Output Jacks
This is where you can hook up an extension or external speaker
cabinet(s) if desired.
EXTENSION SP: This speaker jack runs parallel with the internal
speakers which are wired for 16 Ohms. The extension cabinet must
be 16 Ohms.
EXTERNAL SP: This speaker jack will mute (disconnect) the
internal speakers and you can hook up either a 16 Ohm or 8 Ohm
cabinet. Be sure to set the Output Select switch accordingly.
1
2
NOTE! Hooking up a cabinet through the External jack will mute (disconnect) the internal speakers!
WARNING! To ensure that your system works correctly, you must observe the following points.
a)Don’t use an extension cabinet whose impedance is other than 16 ohms.
b)Don’t connect a speaker whose rated input capacity is less than 18 Watts. The speaker may
be destroyed if you ignore this caution—not recommended!
c) You must use a speaker cable to connect an external speaker. Don’t use a shielded cable like
the one you use to connect a guitar to an amp.
d)You must turn off the power before connecting the cable. Connecting the cable while the
power is turned on may damage your amp.
2. IMPEDANCE Select Switch
16 OHMS: Combos allow for the following configurations;
• Set it to this if you use the internal speakers only.
• Set it to this if you connect an external 16 Ohm speaker cabinet through the External jack.
8 OHMS: Combos allow for the following configurations;
• Set it to this if you connect an extension cabinet through the Extension jack. You’ll be running the internal and external speakers in parallel. The impedance of the extension cabinet
must be 16 Ohms.
• Set it to this if you connect an external 8 ohm speaker cabinet through the External jack.
5
3. FX Loop Send Jack
Connect this to the input of your effect.
4. FX Loop Return Jack
Connect this to the output of your effect.
5. MAINS INPUT Connector
3 4
This is where the supplied, detachable Mains (power) cord is connected.
NOTE! Use only the power cable that is included with the TB18C1. Using another power cable
may cause malfunctions.
The specific mains input voltage rating that your amplifier needs to run at is located on the rear
panel of your amplifier. Before making any connections or powering up the amplifier, make sure
the correct voltage is set. If you have any doubt, refer to your local VOX dealer.
Specification
Controls:
Volume (preamp), Bass, Mid, Treble, Reverb, Master volume, Mid
Boost, Dark switch, Master Volume
I/O:
Guitar Input High and Low, External speaker out, Extension speaker
out, FX Loop Send, FX Loop Return
Tube Complement:
2 x ECC83/12AX7, 2 x 6V6
Output Power:
18Watts RMS
Speaker(s):
1 x 12” 16ohm Celestion G12-65
Dimensions (W x D x H): 588 x 257 x 552 mm / 23.15 x 10.12 x 21.73 inches
Weight:
17.8 kg / 39.24 lbs.
Accessory:
Power cable, Owner’s manual
Specifications and appearance are subject to change without notice for improvement.
6
CONSIGNES IMPORTANTES DE
SÉCURITÉ
• Vewuillez lire ces consignes.
• Conservez ces consignes.
• Tenez compte de tous les avertissements.
• Suivez toutes les instructions.
• N’utilisez pas ce produit à proximité d’eau.
• Un produit branché au secteur ne peut pas être exposé à des
gouttes ou des éclaboussures. Ne placez aucun conteneur de
liquide (vase, verre) sur le produit.
• Nettoyez le produit avec un chiffon sec uniquement.
• N’obstruez aucun orifice d’aération. Installez le produit
conformément aux consignes du fabricant.
• Ne l’installez pas à proximité de sources de chaleur comme des
radiateurs, des bouches d’air chaud, des poêles ou d’autres
appareils générateurs de chaleur (amplificateurs compris).
• AVERTISSEMENT—Ce produit doit être branché à une prise
secteur disposant d’une connexion de sécurité à la terre.
• Ne supprimez pas la sécurité offerte par la fiche polarisée ou
dotée d’une broche de terre. Une fiche polarisée dispose de deux
lames dont une plus large que l’autre. Une fiche avec broche de
terre dispose de deux lames (ou broches) et d’une broche de
terre. La lame plus large ou la troisième broche est conçue pour
votre sécurité. Si la fiche fournie ne s’adapte pas à votre prise
de courant, consultez un électricien pour faire remplacer cette
ancienne prise. (Pour les États-Unis et le Canada)
• Protégez le cordon d’alimentation pour éviter qu’il ne soit piétiné
ou abîmé notamment à la hauteur des fiches, des rallonges et
au point de connexion du produit.
• Utilisez exclusivement des fixations ou accessoires spécifiés par
le fabricant.
• Débranchez cet appareil en cas d’orage ou s’il doit rester inutilisé
durant une période assez longue.
• Le fait de couper l’interrupteur n’isole pas complètement le
produit de la source de courant.
• Maintenez un accès facile à la prise d’alimentation. N’installez
pas ce produit trop loin d’une prise secteur et/ou d’un multiprise.
• Pour tout dépannage ou entretien, veuillez consulter un
service ou un technicien qualifié. Il est impératif de faire appel
à un technicien qualifié si l’appareil a été endommagé d’une
quelconque façon, notamment, si le cordon d’alimentation ou
la fiche est endommagée, si du liquide s’est renversé ou si des
objets sont tombés dans l’appareil, si l’appareil a été exposé à la
pluie ou à l’humidité, s’il ne fonctionne plus normalement ou s’il
est tombé.
• N’installez pas ce produit dans un espace confiné comme un
flightcase ou autre meuble de ce type.
• Une pression sonore excessive en provenance d’oreillettes ou
d’un casque peut entraîner une perte auditive.
• Utilisez cet appareil exclusivement avec un chariot, stand, pied,
support ou table du type spécifié par le constructeur ou livré
avec l’appareil. Si vous utilisez un chariot, soyez prudent lors de
son déplacement afin d’éviter que le produit ne bascule et ne
blesse quelqu’un.
Le symbole d’éclair dans un triangle équilatéral
est destiné à avertir l’utilisateur de la présence
d’une tension dangereuse non isolée au sein
du produit. Cette tension est suffisante pour
constituer un risque d’électrocution.
Le point d’exclamation dans un triangle
équilatéral avertit l’utilisateur de la présence
d’importantes consignes de manipulation ou
d’entretien dans la documentation accompagnant ce produit.
Note concernant les dispositions (Seulement EU)
Quand un symbole avec une poubelle barrée d’une
croix apparait sur le produit, le mode d’emploi, les piles
ou le pack de piles, cela signifie que ce produit, manuel
ou piles doit être déposé chez un représentant compétent, et non pas dans une poubelle ou toute autre
déchetterie conventionnelle. Disposer de cette manière, de prévenir les dommages pour la santé humaine et les
dommages potentiels pour l’environnement. La bonne méthode d’élimination dépendra des lois et règlements applicables dans votre localité, s’il vous plaît, contactez votre
organisme administratif pour plus de détails. Si la pile contient
des métaux lourds au-delà du seuil réglementé, un symbole
chimique est affiché en dessous du symbole de la poubelle
barrée d’une croix sur la pile ou le pack de piles.
REMARQUE IMPORTANTE POUR LES CLIENTS
Ce produit a été fabriqué suivant des spécifications sévères et
des besoins en tension applicables dans le pays où ce produit
doit être utilisé. Si vous avez acheté ce produit via l’internet,
par vente par correspondance ou/et vente par téléphone, vous
devez vérifier que ce produit est bien utilisable dans le pays où
vous résidez.
ATTENTION: L’utilisation de ce produit dans un pays autre
que celui pour lequel il a été conçu peut être dangereuse et
annulera la garantie du fabricant ou du distributeur. Conservez
bien votre récépissé qui est la preuve de votre achat, faute
de quoi votre produit ne risque de ne plus être couvert par la
garantie du fabricant ou du distributeur.
* Tous les noms de produits et de sociétés sont des marques
commerciales ou déposées de leur détenteur respectif.
7
Introduction
Félicitation et merci d’avoir porté votre choix sur l’amplificateur VOX TB18C1! Cet amplificateur a été conçu
en collaboration avec le légendaire créateur d’amplis boutique Tony Bruno. Il a fait franchir l’Atlantique au son
VOX afin de proposer un tout nouveau modèle VOX.
Cet élégant ampli à un canal est conçu pour délivrer un son parfait dans n’importe quelle situation.
De l’effet de réverbération classique à l’innovant commutateur DARK de Tony Bruno, cet ampli fournit tous les
outils nécessaires pour que même les oreilles les plus difficiles en redemandent!
Un mot sur Tony Bruno:
Tony Bruno est un concepteur d’amplis boutique extrêmement respecté et sollicité aux Etats-Unis. Au cours de
sa carrière, il a fabriqué plus d’un millier d’amplificateurs, comptant parmi les meilleurs au monde.
Ami de longue date de l’équipe VOX, Tony Bruno a déjà mis son incomparable connaissance des amplis boutique au service de VOX pour des projets tels que le Night Train, les amplis de la série AC Custom ainsi que
les amplis faits main AC30 & AC15.
Contexte
Au vu de l’excellente relation de travail, nous avons décidé de nous lancer dans une collaboration à part
entière: Tony conçoit le circuit et nous le produisons en masse. C’était une première, tant pour nous, l’équipe
VOX, que pour Tony Bruno. En exploitant le savoir-faire de Tony Bruno dans le domaine des amplis boutique
américains et toutes les ressources de l’équipe VOX, nous nous sommes lancés dans un projet unique en son
genre, visant à rendre le son et la qualité d’un ampli boutique accessibles au plus grand nombre.
Tony a commencé par fabriquer un prototype fait main, conformément à ses critères de qualité sans compromis, qui allait nous servir de référence tout au long du projet. Après avoir étudié l’ampli de Tony sous toutes
ses coutures, l’équipe VOX en a réalisé une réplique en remplaçant les soudures manuelles de Tony par une
carte de circuit imprimé. Nous avons ensuite “lâché” Tony sur le nouveau prototype pour qu’il le revoie, le corrige et y ajoute quelques nouveautés. Après de nombreuses sessions de mises au point très rigoureuses avec
Tony, notre prototype affichait non seulement la même qualité et le même éventail sonore que l’original mais
il proposait en plus des caractéristiques qu’il aurait été impossible de créer sans exploiter les ressources de développement et de production de pointe de l’équipe VOX.
Les amplis TB18C1 est le fruit d’une collaboration excluant tout compromis entre l’équipe VOX et Tony Bruno.
Bon amusement!
8
Mode d’emploi
Panneau avant
1
2
3 4 5
6
7
8 9
10
1. Prises INPUT
Branchez votre guitare à l’entrée HIGH ou LOW. L’entrée “HIGH” génère plus de gain et un niveau de sortie plus élevé tandis que l’entrée “LOW” a un niveau plus bas et une réserve de son
clair plus importante.
2. Commande VOLUME
Cette commande détermine le volume/gain. Elle peut être combinée avec la commande MASTER VOLUME pour atteindre un compromis idéal entre la distorsion du préampli et de l’ampli de
puissance, d’une part, et le niveau de sortie global d’autre part. Tournez-la vers la droite pour
augmenter le gain.
3. Commande TREBLE
Cette commande règle les hautes fréquences du son; vous pouvez aller d’un son doux et rond
(à gauche toute) à un son tranchant et éclatant (à fond à droite) en passant par tous les stades
intermédiaires.
4. Commutateur MID BOOST
Le commutateur MID BOOST accentue le médium et le gain. Cette combinaison est conçue
pour les guitaristes souhaitant imposer leur solo ou leur partie lead. Vous pouvez aussi laisser
ce commutateur activé en permanence pour changer radicalement le son de votre ampli et aller
toujours plus loin dans vos expérimentations sonores.
5. Commande MIDDLE
Elle règle les fréquences moyennes du son. Tournez-la vers la gauche pour obtenir un son spacieux et diffus ou vers la droite pour un son plus resserré et plus plein.
6. Commande BASS
Cette commande règle les basses fréquences du son; vous pouvez aller d’un son fin et léger (à gauche toute) à un son chaud et gras (à fond à droite) en passant par tous les stades intermédiaires.
9
7. Commande REVERB
Cette commande contrôle le niveau de réverbération et vous permet de passer d’une petite
ondulation aux superbes vagues sonores dans le plus pur style “surf”. Cette commande est
extrêmement sensible et a été conçue pour générer suffisamment de réverbération sans devoir
pousser excessivement le niveau du préampli.
8. Commande MASTER VOLUME
Cette commande détermine le volume global de l’amplificateur. Elle peut être combinée avec
la commande VOLUME pour atteindre un compromis idéal entre la distorsion du préampli et de
l’ampli de puissance, d’une part, et le niveau de sortie d’autre part.
9. Interrupteur DARK
Ce commutateur permet de diversifier encore votre éventail de sons. Quand vous activez le
commutateur DARK, les hautes fréquences sont coupées de façon assez radicale. L’ampli devient alors une toute autre bête!
10. Commutateur POWER
Commutateur de mise sous/hors tension de l’amplificateur. Coupez toujours l’alimentation de
l’amplificateur et débranchez-le avant de le déplacer.
Panneau arrière
1. Sorties
Vous pouvez y brancher une (des) enceinte(s) d’extension ou
externe(s).
EXTENSION SP: Cette sortie pour enceinte est parallèle aux hautparleurs internes (16Ω). L’enceinte d’extension doit donc faire 16Ω.
EXTERNAL SP: Cette sortie coupe (déconnecte) les haut-parleurs
internes et vous pouvez utiliser une enceinte de 16Ω ou 8Ω.
Réglez alors correctement le commutateur IMPEDANCE.
ATTENTION! Si vous branchez une enceinte à la prise EXTERNAL, vous coupez (déconnectez)
les haut-parleurs internes!
1
2
AVERTISSEMENT! Pour que votre système fonctionne correctement, respectez les points suivants.
a)Utilisez exclusivement une enceinte d’extension dont l’impédance est de 16Ω.
a)Ne branchez pas d’enceinte dont la capacité d’entrée nominale est inférieure à 18W. Si vous
ne tenez pas compte de cette remarque, vous risquez de détruire le haut-parleur!
a)Utilisez un câble d’enceinte pour brancher une enceinte externe. Ne vous servez pas de
câble blindé comme celui utilisé pour brancher une guitare à ampli.
a)Coupez l’alimentation avant de brancher le câble. Si vous branchez le câble alors que l’ampli
est sous tension, vous risquez d’endommager ce dernier.
2. Sélecteur IMPEDANCE
16 OHMS: Les combos permettent les configurations suivantes:
• Choisissez ce réglage si vous n’utilisez que les haut-parleurs internes.
• Choisissez ce réglage si vous branchez une enceie externe de 16Ω à la prise EXTERNAL.
10
8 OHMS: Les combos permettent les configurations suivantes:
• Choisissez ce réglage si vous branchez une enceinte d’extension à la prise EXTENSION.
Les haut-parleurs internes et externes sont parallèles. L’enceinte d’extension doit donc avoir
une impédance de 16Ω.
• Choisissez ce réglage si vous branchez une enceinte externe de 8Ω à la prise EXTERNAL.
3. Prise FX LOOP SEND
Branchez cette la prise à l’entrée de votre effet.
4. Prise FX LOOP RETURN
Branchez cette la prise à la sortie de votre effet.
5. Prise MAINS INPUT
3 4
Prise pour le câble d’alimentation.
ATTENTION! Utilisez exclusivement le cordon d’alimentation fourni avec le TB18C1. L’utilisation
de tout autre cordon peut provoquer des dysfonctionnements.
La tension indiquée pour votre amplificateur est précisée en face arrière de l’amplificateur. Avant
d’effectuer la moindre connexion ou de mettre l’ampli sous tension, vérifiez que la tension est
correcte. En cas de doute, contactez votre revendeur VOX.
Fiche technique
Commandes:
VOLUME (préampli), BASS, MIDDLE, TREBLE, REVERB, MASTER VOLUME, Commutateurs MID BOOST, DARK
E/S:
Entrées de guitare HIGH et LOW, Sortie d’enceinte EXTERNAL,
Sortie d’enceinte EXTENSION, FX Loop Send, FX Loop Return
Lampes:
2 x ECC83/12AX7, 2 x 6V6
Puissance de sortie:
18W RMS
Haut-parleur(s):
1x12” 16Ω Celestion G12-65
Dimensions (L x P x H):
588 x 257 x 552 mm
Poids:
17,8 kg
Accessoires
Câble d’alimentation, Manuel d’utilisation
Les caractéristiques et l’aspect du produit sont susceptibles d’être modifiés sans avis préalable
en vue d’une amélioration.
11
WICHTIGE SICHERHEITSHINWEISE
•Bitte lesen Sie sich die Hinweise durch.
•Bewahren Sie diese Hinweise auf.
•Befolgen Sie alle Warnungen.
•Führen Sie alle Anweisungen aus.
•Verwenden Sie das Gerät niemals in der Nähe von Wasser.
•Ein netzgespeistes Gerät darf niemals Regen- oder
Wassertropfen ausgesetzt werden. Außerdem darf man keine
Flüssigkeitsbehälter wie Vasen, Gläser usw. auf das Gerät
stellen.
•Reinigen Sie es nur mit einem trockenen Tuch.
•Versperren Sie niemals die Lüftungsschlitze. Stellen Sie das
Gerät nur den Herstelleranweisungen entsprechend auf.
•Stellen Sie das Gerät niemals in die Nähe von Wärmequellen
wie Heizkörper, Öfen bzw. Geräte (darunter auch Verstärker),
die ausgesprochen heiß werden.
•WARNUNG—Dieses Gerät darf nur an eine geerdete
Steckdose angeschlossen werden.
•Versuchen Sie niemals, die Erdung des Netzkabels zu
umgehen. Ein polarisierter (englischer) Stecker weist zwei
unterschiedlich breite Stifte auf. Ein geerdeter Stecker ist
hingegen mit drei Stiften versehen. Der Erdungsstift dient
Ihrer Sicherheit. Wenn der beiliegende Stecker nicht in
Ihre Steckdose passt, bitten Sie einen Elektriker, diese zu
ersetzen. (Für die USA und Kanada.)
•Sorgen Sie dafür, dass das Netzkabel nicht gequetscht wird
(was vor allem in der Nähe des Steckers passieren kann) und
dass man nicht darüber stolpern kann.
•Verwenden Sie nur Halter und Ständer, die ausdrücklich vom
Hersteller empfohlen werden.
•Lösen Sie im Falle eines Gewitters oder wenn das Gerät
längere Zeit nicht verwendet werden soll, den Netzanschluss.
•Auch nach dem Ausschalten bleibt die Netzverbindung
dieses Gerätes bestehen.
•Sorgen Sie dafür, dass man den Netzstecker jederzeit
problemlos erreichen kann. Stellen Sie das Gerät niemals
weit von der Steckdose/Anschlussleiste entfernt auf.
•Überlassen Sie alle Wartungsarbeiten einem qualifizierten
und befugten Techniker. Das ist z.B. notwendig, wenn das
Produkt Schäden aufweist (z.B. beschädigtes Netzkabel,
Eintritt von Flüssigkeit oder Fremdkörpern, wenn das Gerät
im Regen gestanden hat), sich nicht erwartungsgemäß
verhält oder hingefallen ist.
•Dieses Gerät darf sich während des Betriebs nicht in einem
geschlossenen Behälter/einem Flightcase befinden.
•Ein hoher Schalldruck kann bei Verwendung von Ohrhörern
bzw. eines Kopfhörers zu einem bleibenden Hörschaden
führen.
•Verwenden Sie nur Wagen, Ständer, Halterungen usw.,
die vom Hersteller vertrieben oder empfohlen werden. Bei
Verwendung eines Wagens ist darauf zu achten, dass er
während des Transports nicht umkippt.
Der Blitz in einem gleichwinkligen Dreieck
bedeutet, dass das Gerät nicht-isolierte
Spannungen erzeugt, die einen Stromschlag
verursachen können.
Das Ausrufezeichen in einem gleichwinkligen
Dreieck soll den Anwender auf wichtige
Bedienhinweise aufmerksam machen, die in
der beiliegenden Dokumentation enthalten
sind.
Hinweis zur Entsorgung (Nur EU)
Wenn Sie das Symbol mit der „durchgekreuzten
Mülltonne“ auf Ihrem Produkt, der dazugehörigen
Bedienungsanleitung, der Batterie oder dem Batteriefach
sehen, müssen Sie das Produkt in der vorgeschriebenen
Art und Weise entsorgen. Dies bedeutet, dass dieses
Produkt mit elektrischen und elektronischen
Komponenten nicht mit dem normalen Hausmüll entsorgt
werden darf. Für Produkte dieser Art existiert ein separates,
gesetzlich festgelegtes Entsorgungssystem. Gebrauchte
elektrische und elektronische Geräte müssen separat entsorgt
werden, um ein umweltgerechtes Recycling sicherzustellen.
Diese Produkte müssen bei benannten Sammelstellen
abgegeben werden. Die Entsorgung ist für den Endverbraucher
kostenfrei! Bitte erkundigen sie sich bei ihrer zuständigen
Behörde, wo sie diese Produkte zur fachgerechten Entsorgung
abgeben können. Falls ihr Produkt mit Batterien oder
Akkumulatoren ausgerüstet ist, müssen sie diese vor Abgabe
des Produktes entfernen und separat entsorgen (siehe oben).
Die Abgabe dieses Produktes bei einer zuständigen Stelle hilft
ihnen, dass das Produkt umweltgerecht entsorgt wird. Damit
leisten sie persönlich einen nicht unerheblichen Beitrag zum
Schutz der Umwelt und der menschlichen Gesundheit vor
möglichen negativen Effekten durch unsachgemäße Entsorgung
von Müll. Batterien oder Akkus, die Schadstoffe enthalten, sind
auch mit dem Symbol einer durchgekreuzten Mülltonne
gekennzeichnet. In der Nähe zum Mülltonnensymbol befindet
sich die chemische Bezeichnung des Schadstoffes. Cd oder
NiCd steht für Cadmium, Pb für Blei und Hg für Quecksilber.
WICHTIGER HINWEIS FÜR KUNDEN
Dieses Produkt wurde unter strenger Beachtung von
Spezifikationen und Spannungsanforderungen hergestellt, die
im Bestimmungsland gelten. Wenn Sie dieses Produkt über das
Internet, per Postversand und/oder mit telefonischer Bestellung
gekauft haben, müssen Sie bestätigen, dass dieses Produkt für
Ihr Wohngebiet ausgelegt ist.
WARNUNG: Verwendung dieses Produkts in einem anderen
Land als dem, für das es bestimmt ist, verwendet wird, kann
gefährlich sein und die Garantie des Herstellers oder Importeurs
hinfällig lassen werden. Bitte bewahren Sie diese Quittung als
Kaufbeleg auf, da andernfalls das Produkt von der Garantie des
Herstellers oder Importeurs ausgeschlossen werden kann.
* Alle Produkt- und Firmennamen sind Warenzeichen oder
eingetragene Warenzeichen der betreffenden Eigentümer.
12
Vorweg
Erstmal vielen Dank für Ihre Entscheidung zu einem VOX TB18C1 Gitarrenverstärker. Dieser Verstärker wurde
in Zusammenarbeit mit dem legendären amerikanischen Boutique-Verstärkerbauer Tony Bruno entwickelt, der
den VOX-Sound „ins Amerikanische übersetzt“ und VOX gleichzeitig um eine weitere Amp-Serie bereichert
hat.
Dieser elegante Verstärker bietet einen Kanal, der in so gut wie allen Situationen einen perfekten Sound liefert.
Von der Hallschaltung bis zum neuen DARK-Schalter von Tony Bruno bietet dieser Amp alles, um einen Gitarristen wunschlos glücklich zu machen!
Über Tony Bruno:
Tony Bruno ist sowohl in den USA als auch anderswo auf der Welt ein angesehener Boutique-Verstärkerdesigner. Bis dato hat er über 1000 Verstärker gebaut, die mit zu dem Besten gehören, was man sich als Gitarrist
nur wünschen kann.
Tony Bruno ist seit langem mit den Jungs des VOX-Teams befreundet und hat sein Boutique-Fachwissen
bereits in zahlreiche VOX-Projekte einfließen lassen, so z.B. beim VOX Night Train, AC Custom und AC30 &
AC15.
Hintergrundinfos
Angesichts der bisherigen perfekten Zusammenarbeit haben wir uns überlegt, Tony eine Schaltung entwickeln
zu lassen und diese dann in Serie zu vertreiben. Das war sowohl für VOX als auch für Tony Bruno ein völlig
neuer Ansatz. Tony Brunos Erfahrung als Bauer amerikanischer Boutique-Verstärker und die Ressourcen des
VOX-Teams mussten unserer Ansicht nach ganz einfach zu einer Verstärkerserie führen, die den Sound und
die Wertigkeit eines Boutique-Amps endlich einer großen Anwendergemeinde zugänglich macht.
Tony lötete den ersten Prototypen höchst persönlich und lieferte uns damit eine Vorlage, die wir „nur noch“
perfekt nachzubauen brauchten. Selbstverständlich haben wir uns Tonys Amp ausgiebig angehört und damit
„herumgespielt“. Und dann baute das VOX-Team eine Kopie, die statt der handverlöteten Schaltungen eine Leiterplatte verwendete. Diese Kopie legten wir Tony mit der Bitte vor, die gewünschten Aspekte doch bitte noch
nachzubessern und möglichst neue Funktionen hinzuzufügen. Nach zahlreichen „Voicing“-Sessions mit Tony
stand fest, dass unser Prototyp mit der gleichen Sound-Vielfalt und Qualität aufwarten konnte wie das Original
und zugleich Funktionen bot, die nur dank der Flexibilität der VOX-Ressourcen überhaupt möglich waren.
Die TB18C1 Verstärker ist jedenfalls das Ergebnis einer kompromisslosen Zusammenarbeit zwischen VOX
und Tony Bruno. Viel Spaß damit!
13
Bedienungsanleitung
Frontplatte
1
2
3 4 5
6
7
8 9
10
1. INPUT-Buchsen
Schließen Sie Ihre Gitarre an den HIGH- oder LOW-Eingang an. Die HIGH-Buchse hebt den
Eingangspegel stärker an, so dass das Signal lauter wird. Der LOW-Eingang ist leiser und bietet
daher eine höhere „Clean“-Reserve.
2. VOLUME-Regler
Hiermit kann die Lautstärke/Pegelanhebung eingestellt werden. Im Zusammenspiel mit dem
MASTER VOLUME-Regler kann man hiermit die perfekte Balance zwischen Vorverstärkerübersteuerung und Endstufenleistung einstellen. Drehen Sie ihn nach rechts für eine stärkere
Pegelanhebung.
3. TREBLE-Regler
Hiermit können die hohen Frequenzen angehoben und abgesenkt werden – von „dünn und
unscheinbar“ (ganz links) bis „hell und gemein“ (ganz rechts). Auch die Zwischenstadien lohnen
sich.
4. MID BOOST-Schalter
Mit dem MID BOOST-Schalter werden die Mitten und der Pegel angehoben. Diese Sound-Kombination ist für Gitarristen gedacht, die mit durchsetzungsfähigen Soli und Lead-Parts aufwarten
möchten. Selbstverständlich kann man diesen Schalter auch einfach an lassen, wenn man auf
diesen exquisiten Sound steht!
5. MIDDLE-Regler
Hiermit regeln Sie den Mittenbereich Ihres Sounds. Drehen Sie ihn nach links, um einen „hohlen“ Sound zu erzielen bzw. nach rechts, wenn Sie eher auf einen fetten Sound stehen.
6. BASS-Regler
Hiermit können die tiefen Frequenzen angehoben und abgesenkt werden – von „dünn und
unaufdringlich“ (ganz links) bis „warm und fett“ (ganz rechts). Zwischenlösungen sind ebenfalls
empfehlenswert.
14
7. REVERB-Regler
Hiermit stellen Sie den Pegel des Halleffekts ein. Dieser Effekt eignet sich bei Bedarf sogar für
echte „Surf“-Hallorgien. Dieser Regler ist überraschend empfindlich, was den Vorteil hat, dass
man den Pegel des Vorverstärkers nicht besonders anzuheben braucht, um über ausreichend
Hall zu verfügen.
8. MASTER VOLUME-Regler
Hiermit kann die allgemeine Ausgangslautstärke des Amps eingestellt werden. Im Zusammenspiel mit dem VOLUME-Regler kann man hiermit die perfekte Balance zwischen Vorverstärkerübersteuerung und Endstufenpegel erzielen.
9. DARK-Schalter
Mit diesem Schalter kann die Klangfarbe des Verstärkers ziemlich radikal geändert werden.
Der DARK-Schalter beschneidet den oberen Frequenzbereich nämlich recht brutal. Und dann
reagiert der Amp völlig anders auf Ihr Spiel!
10. POWER-Schalter
Hiermit wird der Verstärker ein- und ausgeschaltet. Vor Lösen des Netzanschlusses und dem
anschließenden Transport müssen Sie den Amp unbedingt ausschalten.
Rückseite
1. Ausgänge
Hier können Sie eine Erweiterungs- und/oder eine externe Box
anschließen.
EXTENSION SP: Eine hier angeschlossene Box wird parallel zu
den internen Lautsprechern (16Ω) getrieben. Die Impedanz der
externen Box muss ebenfalls 16Ω betragen.
1
2
EXTERNAL SP: Eine hier angeschlossene Box (16Ω oder 8Ω)
schaltet die internen Lautsprecher stumm.
Vergessen Sie nicht den IMPEDANCE-Schalter richtig einzustellen.
ACHTUNG! Wenn Sie an die EXTERNAL-Buchse ein Kabel anschließen, werden die internen
Lautsprecher stummgeschaltet!
WARNUNG! Das System funktioniert nur, wenn Sie folgende Punkte beachten.
a)Verwenden Sie ausschließlich eine Erweiterungsbox mit einer Impedanz von 16Ω.
b)Die externe Box muss eine Kapazität von mindestens 18W haben. Boxen, die diese Anforderungen nicht erfüllen, nehmen schnell Schaden und sollten daher nicht gebraucht werden!
c) Für die Verbindung der Box benötigen Sie ein Lautsprecherkabel. Geschirmte, d.h. Gitarrenkabel eignen sich hierfür nicht.
d)Schalten Sie den Verstärker vor Anschließen der Box aus. Wenn Sie das nicht tun, überlebt
der Amp den Anschlussversuch nämlich eventuell nicht.
2. IMPEDANCE-Wahlschalter
16 OHMS: Combos können in folgenden Konfigurationen verwendet werden:
• Wählen Sie diese Einstellung, wenn Sie nur die internen Lautsprecher verwenden.
• Wählen Sie diese Einstellung, wenn Sie eine 16Ω-Box an die EXTERNAL-Buchse angeschlossen haben.
15
8 OHMS: Combos können in folgenden Konfigurationen verwendet werden:
• Wählen Sie diese Einstellung, wenn Sie eine Box an die EXTENSION-Buchse angeschlossen haben. Die internen Lautsprecher und die externe Box werden dann parallel angesprochen. Die Impedanz der externen Box muss „16Ω“ lauten.
• Wählen Sie diese Einstellung, wenn Sie eine 8Ω-Box an die EXTERNAL-Buchse angeschlossen haben.
3. FX LOOP SEND-Buchse
Diese Buchse können Sie mit dem Eingang des externen Effektgeräts verbinden.
4. FX LOOP RETURN-Buchse
Schließen Sie diese Buchse an den Ausgang des Effektgeräts an.
3 4
5. MAINS INPUT-Buchse
Hier muss das beiliegende Netzkabel angeschlossen werden.
ACHTUNG! Verwenden Sie ausschließlich das zum Lieferumfang der TB18C1 gehörige Netzkabel. Die Verwendung anderer Kabel könnte zu Schäden führen.
Die vorausgesetzte Netzspannung wird auf der Geräterückseite erwähnt. Überprüfen Sie vor
Herstellen des Netzanschlusses und Einschalten des Verstärkers, ob er mit der am Einsatzort
angebotenen Netzspannung betrieben werden darf. Wenden Sie sich im Zweifelsfall an Ihren
VOX-Händler
Technische Daten
Bedienelemente:
VOLUME (Vorverstärker), BASS, MIDDLE, TREBLE, REVERB,
MASTER VOLUME, MID BOOST-, DARK-Taster
Ein-/Ausgänge:
HIGH- und LOW-Gitarreneingang, EXTERNAL-Boxenausgang,
EXTENSION-Boxenausgang, FX Loop Send, FX Loop Return
Röhrenbestückung:
2 x ECC83/12AX7, 2 x 6V6
Ausgangsleistung:
18W RMS
Lautsprecher:
1x12” 16Ω Celestion G12-65
Abmessungen (B x T x H): 588 x 257 x 552 mm
Gewicht:
17,8 kg
Zubehör:
Netzkabel, Bedienungsanleitung
Änderungen der technischen Daten und des Designs ohne vorherige Ankündigung vorbehalten.
16
INSTRUCCIONES DE SEGURIDAD
IMPORTANTES
•Lea todas las instrucciones antes de utilizar el producto.
•GUARDE ESTAS INSTRUCCIONES
•Cumpla estas instrucciones
•No utilice este producto cerca del agua; por ejemplo, cerca de
una bañera, lavabo, lavadero, en un sótano húmedo, o cerca de
una piscina o similar.
•Este producto sólo debe ser utilizado en el soporte recomendado
por el fabricante.
•Este producto, ya sea solo o en combinación con un amplificador
y auriculares o altavoces puede causar pérdida auditiva
permanente. No lo utilice durante largo tiempo a gran volumen,
o a un volumen que resulte incómodo. Si nota alguna pérdida de
audición, consulte con un especialista.
•El producto debe ser colocado en tal forma que no se interfiera
con su adecuada ventilación.
•El producto debe ser situado lejos de fuentes de calor, como
radiadores, calefactores u otros aparatos que produzcan calor.
•El producto debe ser conectado a una fuente de corriente
eléctrica del tipo descrito en las instrucciones de funcionamiento
o tal como esté marcado en el producto.
•El cable de alimentación debe ser desenchufado cuando no se
vaya a utilizar el aparato durante largo tiempo.
•Debe ponerse especial cuidado en que no caigan objetos o
líquidos en el interior por las aberturas.
•Debe ponerse especial cuidado en que las aberturas de
ventilación estén libres y que haya suficiente espacio de aire
alrededor de la unidad.
•El producto debe ser revisado por personal cualificado cuando:
El cable de alimentación o el enchufe se haya dañado, o Hayan
caído objetos o líquidos en el producto, o El producto haya sido
expuesto a la lluvia, o El producto no funcione normalmente o
exhiba un cambio importante de prestaciones, o El producto se
haya caído, o el chasis se haya dañado.
•No intente realizar mantenimiento de este producto más que
como se describe en las instrucciones de mantenimiento por
parte del usuario. Todas las demás tareas deben ser llevadas a
cabo por personal cualificado.
•Instale este producto cerca de un enchufe y deje el cable de
corriente accesible.
•ATENCIÓN—Este producto ha de ser conectado a un enchufe
con toma de tierra.
•Use solamente los accesorios y soportes especificados por el
fabricante.
•Desenchufe este aparato durante tormentas eléctricas o si no lo
va a utilizar durante un largo periodo.
•No instale este equipo en una posición alejada de la toma de
alimentación.
•No instale este equipo en un lugar confinado, tal como una caja
o similar.
•La presión sonora excesiva de los auriculares y los propios
auriculares pueden causar pérdida de audición.
•Use este equipo solamente con el carro, soporte, trípode o mesa
especificado por el fabricante. Si usa un carro tenga cuidado al
moverlo para evitar daños a personas si se cae del carro.
El símbolo de un relámpago con punta de flecha,
dentro de un triángulo equilátero, tiene la función de
avisar al usuario de la presencia de un “voltaje
peligroso” no aislado dentro del mueble del producto,
que puede ser de magnitud suficiente para suponer
un riesgo de descarga eléctrica para las personas.
El signo de exclamación dentro de un triángulo
equilátero tiene la función de avisar al usuario
de la presencia de instrucciones importantes de
funcionamiento y mantenimiento (servicio técnico)
en la documentación que se adjunta con el producto.
Nota respecto a residuos y deshechos (solo UE)
Cuando aparezca el símbolo del cubo de basura
tachado sobre un producto, su manual de usuario, la
batería, o el embalaje de cualquiera de éstos, significa
que cuando quiere tire dichos artículos a la basura, ha
de hacerlo en acuerdo con la normativa vigente de la
Unión Europea. No debe verter dichos artículos junto
con la basura de casa. Verter este producto de manera
adecuada ayudará a evitar daños a su salud pública y posibles
daños al medioambiente. Cada país tiene una normativa
específica acerca de cómo verter productos potencialmente
tóxicos, por tanto le rogamos que se ponga en contacto con
su oficina o ministerio de medioambiente para más detalles. Si
la batería contiene metales pesados por encima del límite
permitido, habrá un símbolo de un material químico, debajo
del símbolo del cubo de basura tachado.
NOTA IMPORTANTE PARA EL CONSUMIDOR
Este producto ha sido fabricado de acuerdo a estrictas
especificaciones y requerimientos de voltaje aplicables en
el país para el cual está destinado. Si ha comprado este
producto por internet, a través de correo, y/o venta telefónica,
debe usted verificar que el uso de este producto está
destinado al país en el cual reside.
AVISO: El uso de este producto en un país distinto al cual
está destinado podría resultar peligroso y podría invalidar
la garantía del fabricante o distribuidor. Por favor guarde
su recibo como prueba de compra ya que de otro modo el
producto puede verse privado de la garantía del fabricante o
distribuidor.
* Todos los nombres de productos y compañías son marcas
comerciales o marcas registradas de sus respectivos
propietarios.
17
Introducción
uena por la compra del amplificador de guitarra VOX TB18C1. Este amplificador ha sido diseñado en colaboración con el diseñador de los legendarios Amplificadores boutique, el estadounidense Tony Bruno, quien ha
tomado el Sonido VOX ‘al otro lado del charco’ para crear una nueva adición a la gama VOX.
Esta unidad de tonos es un elegante amplificador de canal único diseñado para dar rienda suelta a hasta el último detalle sonoro en cualquier situación. Desde el diseño de la reverberación hasta el innovador conmutador
Dark de Tony Bruno, este amplificador proporciona todas las herramientas necesarias para que la audiencia
siempre pida más y más.
Acerca de Tony Bruno:
Tony Bruno es un diseñador de Amplificadores boutique altamente respetado de los Estados Unidos. Él ha
construido más de 1000 amplificadores en su carrera que son considerados como algunos de los mejores amplificadores hechos a mano del mundo.
Viejo amigo de VOX, Tony Bruno dispone de un incomparable conocimiento en diseño de amplificadores
boutique que VOX ha aprovechado para sus últimos proyectos, incluyendo los amplificadores de la serie VOX
Night Train, AC Custom y también los nuevos amplificadores AC30 & AC15 de fabricación punto a punto.
La Historia
Después de establecer una sólida relación de trabajo, decidimos hacer una plena colaboración y permitir que
Tony diseñara un circuito que nos serviría para la producción en masa. Esta fue la primera vez de colaboración entre VOX y Tony Bruno. Por lo tanto, la experiencia de Tony de Bruno en amplificadores boutique de
Sonido americano y de los recursos VOX y el equipo de desarrollo, nos lanzó a nuevos Sonidos para traer el
tono boutique y la calidad a tu disposición.
En primer lugar, Tony personalmente construyó a mano un prototipo con sus exigentes estándares que utilizamos como un punto de referencia durante todo el proyecto. Después de evaluar el Amplificador en VOX hicimos una réplica de la unidad mediante un diseño de PCB en lugar del método a mano habitual de Tony. Luego
presentamos a Tony la nueva muestra lo que le permitió modificar y añadir nuevas funciones a la unidad. Después de muchos rigurosos exámenes y sesiones con Tony se acordó que teníamos algo que no sólo comparte
la misma y excelente calidad tonal de la unidad original, sino que también incluye características que de otra
forma serían imposibles de crear sin el uso de los modernos métodos de producción y recursos de VOX.
Los amplificadores TB18C1 es el resultado de una colaboración sin compromisos entre VOX y Tony Bruno.
¡Qué lo Disfrutes!
18
MANUAL DE OPERACIÓN
Panel Frontal
1
2
3 4 5
6
7
8 9
10
1. Tomas de Entrada: Input
Enchufe su guitarra en la entrada HIGH o LOW. La entrada ‘HIGH’ le dará más ganancia y volumen de salida y la entrada ‘LOW’ será más suave y con más espacio sonoro libre.
2. Volume, Control
Este controla el volumen de preamplificación/ganancia. Puede utilizarse en conjunción con el
control ‘Master Volume’ para crear un equilibrio perfecto entre la distorsión del Amplificador y el
nivel de salida global. Gire hacia la derecha para obtener más ganancia.
3. Treble, Control
Controla las frecuencias agudas del sonido, desde suave cuando está bajado (sentido antihorario) a brillante y cortante cuando está al máximo (sentido horario) y todos los puntos intermedios.
4. Conmutador Mid Boos
El conmutador Mid Boost sirve para un aumento de medios/ganancia. Este modelador de voz
especial, resulta ideal para realzar las partes solistas. ¡También es posible dejar este conmutador activado permanentemente para cambiar drásticamente el sonido del amplificador y realizar
una búsqueda del tono todavía más extensiva!
5. Middle, Control
Controla las frecuencias medias de su sonido. Activar hacia la izquierda para un sonido espacioso o gire hacia la derecha para un tono más centrado y completo.
6. Bass, Control
Controla las frecuencias agudas del sonido, desde suave cuando está bajado (sentido antihorario) a cálido y cortante cuando está al máximo (sentido horario) y todos los puntos intermedios.
19
7. Reverb, Control
Esto le permite controlar el nivel de la reverberación desde un Sonido brillante y sutil hasta una
detallada Reverberación. Este control es muy sensible y fue diseñado de esta forma, por lo que
cualquier cantidad de reverberación puede obtenerse sin tener que forzar el preamplificador.
8. Master Volume, Control
Controla el volumen global de su amplificador. Utilizar junto con el control de volumen para encontrar el equilibrio perfecto entre la distorsión del previo/Amplificador de potencia y el volumen
de salida.
9. Conmutador Dark
Este conmutador permite modificar la diversidad tonal de los amplificadores. Cuando se utiliza
el conmutador DARK, las frecuencias altas se cortan considerablemente. ¡Así se consigue que
el amplificador parezca una bestia completamente diferente!
10. Interruptor de alimentación
Este es el interruptor ON/OFF para el encendido del amplificador. Asegúrese de el Amplificador
está apagado y desconectado antes de ser trasladado.
Panel posterior
1. Salidas
Aquí puede conectar una caja de extensión o altavoz externo si lo
desea.
EXTENSION SP: Este conector de altavoz está en paralelo con los
altavoces internos que están cableados para 16 ohmios. La caja de
extensión debe ser de 16 ohmios.
1
2
EXTERNAL SP: TEsta toma silencia (desconecta) los altavoces
internos y puede conectar aquí una caja acústica de 16 Ohm o 8
ohm. Asegúrese de configurar el conmutador Output Select correctamente.
¡NOTA! Al conectar una caja mediante el conector External silencia (desconecta) los altavoces
internos.
¡AVISO! Para asegurar que tu sistema funciona correctamente, debes tener en cuenta los puntos siguientes.
a)No uses una caja acústica de extensión cuya impedancia sea distinta de 16 ohmios.
b)No conectes un altavoz que no pueda soportar al menos 18 vatios de potencia. Si ignoras
esta advertencia podrías destruir el altavoz: ¡no recomendado!
c) Asegúrate siempre de conectar los altavoces con cables de altavoz de alta calidad (no apantallados). No uses nunca cables de guitarra (apantallados).
d)Debes apagar el amplificador antes de conectar el cable de altavoz. Si conectas el cable con
el amplificador encendido puedes dañar tu amplificador.
2. IMPEDANCE, conmutador
16 OHMS: Combos que permiten las siguientes configuraciones;
• Ajústalo así si sólo usas los altavoces internos.
• Ajústalo así si conectas una caja acústica de 16 ohmios a la salida External.
20
8 OHMS: Combos que permiten las siguientes configuraciones:
• Ajústalo así si conectas una caja acústica de extensión. Los altavoces internos y externos
estarán en paralelo. La impedancia de la caja de extensión debe ser 16 Ohmios.
• Ajústalo así si conectas una caja de altavoces externa de 8 ohmios mediante la toma External.
3. Jack FX Loop Send
Se puede conectar a la entrada del efecto.
4. Jack FX Loop Return
Se puede conectar a la salida del efecto.
5. MAINS INPUT, Conector
3 4
T El amplificador se suministra con un cable de alimentación extraíble que debe conectarse
aquí.
¡NOTA! Utilice solamente el cable de alimentación que se incluye con el TB18C1. Utilizar otro
cable de alimentación puede causar fallos de funcionamiento.
El voltaje adecuado para el amplificador está indicado en el panel posterior. Antes de conectarlo por primera vez, asegúrese de que el voltaje es correcto para la zona en la que se encuentra.
Si tiene alguna duda consulte con su distribuidor VOX.
Especificaciones
Controles:
Volume (previo), Bass, Middle, Treble, Reverb, Master
Volume, conmutadores Mid Boost, Dark
Entradas/Salidas:
Tipo de válvulas:
Entrada de guitarra “High” y “Low”, salida de altavoz
External, salida de altavoz Extension, FX Loop Send, FX
Loop Return
2 x ECC83/12AX7, 2 x 6V6
Potencia de salida:
18 Vatios RMS
Altavoz(s):
1 x 12” 16ohm Celestion G12-65
Dimensiones (Anch. x Prof. x Alt.): 588 x 257 x 552 mm
Peso:
17,8 kg
Accesorios:
Cable alimentación, Manual de usuario
Las especificaciones y el aspecto están sujetas a cambios sin previo aviso por mejora.
21