1
User Guide
© 2008 Verizon. All rights reserved.
Verizon and the Verizon logos are trademarks of Verizon Trademark Services LLC.
All other trademarks are the trademarks of their respective owners.
Product photo may differ from actual product, however functionality remains
as stated above.
Specifications are subject to change without notice.
V 5 0 0 A M D U A L L I N E D I G I TA L CO R D L E S S P H O N E
w i t h D U A L K EY P A D a n d D I G I TA L A N S W E R I N G M AC H I N E
D E C T 6 . 0 D I G I TA L T E C H N O L O G Y
UCZZ01954ZZ(0)
© 2008 Verizon
User Guide V300.indd 1
black Pantone 1795 C
Liebreich Medienproduktion
28.02.2008 11:43:18 Uhr
Verizon V500 / USA EN / A31008-M1931-R301-1-6019 / kombi_overview.fm / 30.4.08
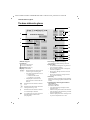
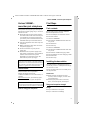
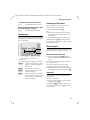
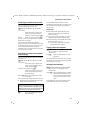
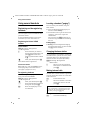
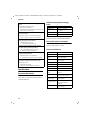
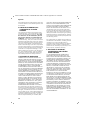
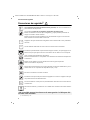
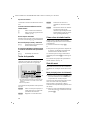
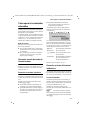
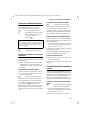
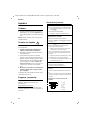
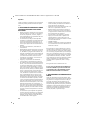
The handset at a glance
The handset at a glance
15
Ä ÕÊ
Ë
INT 1
01/31
e
1
2
9:45 AM
§§§§Menu§§§§
3
4
14
13
5
6
7
12
8
11
9
10
Note:
Pictures in this user manual may differ from
the actual product.
1 Display in idle status
2 Charge status of the batteries
= e U (empty to full)
= flashes: batteries almost empty
= U flashes: batteries charging
3 Display keys (page 13)
4 Control key
t Access to Call Log list.
s Access to directory.
5 Line keys
Answer an incoming call for Line 1/Line 2.
Make a call from Line 1/Line 2.
Start a second call from Line 2 while telephoning from Line 1 (see page 24).
6 End Call key, On/Off key
End call, cancel function, return to idle status, activate/deactivate handset (press and
hold in idle status).
7 2.5-mm socket (mono) for headset
8 Pound (#) key
Enter # symbol.
Keypad lock on/off (press and hold in idle
status).
Switch between uppercase and lowercase
letters for text entry.
9 Redial/Pause key
Open redial list (in idle status) or insert a
dialing pause (when editing a number).
10 Microphone
11 Intercom/Hold/Conference key
Set up an internal call.
Switch between an external call and internal
party (handset/base station), or transfer a
call during an external call.
Set up a conference call between an external line and an internal party (handset/base
station). Press and hold the key in holdintercom mode.
12 Star (*) key
Ring tone on/off (press and hold).
Switch temporarily to tone dialing (DTMF).
Switch between AM and PM during time setting.
Change Call list display format.
13 Handsfree key
Answer or place a call in speaker mode.
Switch between speaker on and speaker off
(in off-the-hook mode).
14 Talk/Flash key
Answer or start a call.
Key flashes: incoming call.
Add a flash (in the directory).
Send FLASH (when off the hook).
15 Signal strength
ÄHandset is linked with the base station.
Ä flashes: out of range.
1
Verizon V500 / USA EN / A31008-M1931-R301-1-6019 / kombi_overview.fm / 30.4.08
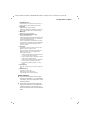
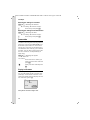
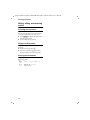
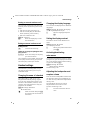
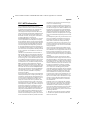
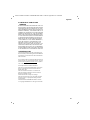
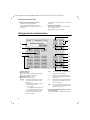
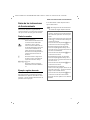
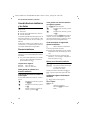
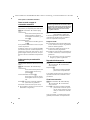
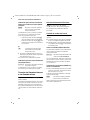
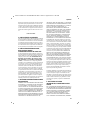
The base station at a glance
The base station at a glance
5
ÊÕÉ×ÅËÕÉ×Å
4
SUN 09:23 AM 01/31
§§§§§§§§§Menu§§§§§§§§§
3
6
7
8
2
9
1
10
11
12
13
14
15
1 Numeric key pad
2 Control key
t Access to Call Log list.
s Access to directory.
3 Display keys (page 13)
4 Display in idle status
Ê ,Ë – Flashes when the respective line
is receiving an incoming call.
– Is on when the respective line is
– Off the hook
– In external talk mode
– On hold or in use mode
– Is displayed in the Call list to
show the line on which the call
came in.
Õ
É
×
Å
2
Flashes when the answer machine
is on.
Flashes when the answer machine’s
message memory is full.
Flashes when the answer machine
is controlled by a handset.
Is on when the ring tone volume of
the base station is set to zero
(see page 28).
5 Answering machine On/Off key
Activate/deactivate answering machine.
6 Volume keys
– In idle mode: change the ring tone volume of the base station.
– During message playback: change the
volume of playback.
– During call: change the volume of the
loudspeaker.
– During call screening: change the volume of call screening.
7 Erase key
Erase the current message during playback.
Erase all old messages (press and hold in idle
mode).
8 Start/Stop key with integrated LED for
Line 1/Line 2
Start/stop playback.
LED status indicator:
– Is on when playing messages on the
respective line.
– Flashes slowly when there is at least one
new message on the answering machine
for the respective line.
– Flashes rapidly when the message memory for the respective line is full.
Verizon V500 / USA EN / A31008-M1931-R301-1-6019 / kombi_overview.fm / 30.4.08
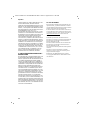
The base station at a glance
9 Redial/Pause key
Open redial list (in idle status) or insert a
dialing pause (when editing a number).
10 Page key
Page handsets (press briefly).
Start the registration procedure (press and
hold in idle mode). You will hear a beep.
11 Mute key
Mute/unmute microphone.
12 Intercom/Hold/Conference key
Set up an internal call.
Switch between an external call and internal
party (handset/base station), or transfer a
call during an external call.
Set up a conference call between an external line and an internal party (handset/base
station). Press and hold the key in holdintercom mode.
13 Line keys
Answer an incoming call for Line 1/Line 2.
Make a call from Line 1/Line 2.
Start a second call from Line 2 while telephoning from Line 1 (see page 24ff.).
LED status indicator:
– Flashes rapidly when the respective line
is receiving an incoming call.
– Flashes slowly when a handset is off the
hook on the respective line.
– Flashes very slowly when the respective
line is on hold on the base station.
– Is on when the base station is in talk
mode.
14 End Call key
End call, cancel function, return to idle status.
15 Talk/Flash key
Answer or start a call.
Add a flash (in the directory)
Send FLASH (when off the hook).
Please remember:
u If the answer machine is being oper-
ated from a handset, or if it is recording
a message, you cannot operate it from
the base station.
u If the start/stop key flashes although
the answer machine is switched off, it
means that there is still at least one
new message that has not been played
back.
3
Verizon V500 / USA EN / A31008-M1931-R301-1-6019 / V500_kombi_IVZ.fm / 30.4.08
Contents
Contents
Using the network mailbox . . . . 23
The handset at a glance . . . . . . . . 1
Configuring the network mailbox
for fast access . . . . . . . . . . . . . . . . . . . 23
The base station at a glance . . . . 2
Using several handsets . . . . . . . 24
Safety precautions
........... 5
Notes on the operating
instructions . . . . . . . . . . . . . . . . . . 6
Symbols used . . . . . . . . . . . . . . . . . . . . 6
Example: menu input . . . . . . . . . . . . . . 6
Verizon V500AM –
more than just a telephone . . . . . 7
First Steps . . . . . . . . . . . . . . . . . . . 7
Pack contents . . . . . . . . . . . . . . . . . . . . 7
Installing the base station . . . . . . . . . . 7
Setting up the handset for use . . . . . . . 8
Area codes . . . . . . . . . . . . . . . . . . . . . 10
Making calls . . . . . . . . . . . . . . . . 11
Making an external call . . . . . . . . . . .
Ending a call . . . . . . . . . . . . . . . . . . . .
Answering a call . . . . . . . . . . . . . . . . .
Caller ID . . . . . . . . . . . . . . . . . . . . . . .
Handsfree operation . . . . . . . . . . . . .
11
11
11
11
12
Registering and de-registering
handsets . . . . . . . . . . . . . . . . . . . . . . .
Locating a handset ("paging") . . . . . .
Changing the base station . . . . . . . . .
Making internal calls . . . . . . . . . . . . . .
Accepting/rejecting call waiting . . . . .
Linking internal callers to
an external call . . . . . . . . . . . . . . . . . .
Making two external calls
simultaneously . . . . . . . . . . . . . . . . . .
24
24
24
24
25
26
26
Handset settings . . . . . . . . . . . . . 27
Changing the name of a handset . . . .
Changing the display language . . . . .
Setting the display contrast . . . . . . . .
Activating/deactivating auto answer .
Adjusting the loudspeaker and
earpiece volume . . . . . . . . . . . . . . . . .
Changing ring tones . . . . . . . . . . . . . .
Activating/deactivating the
key-touch tone . . . . . . . . . . . . . . . . . .
27
27
27
27
27
28
28
Operating the telephone . . . . . . 12
Base station settings . . . . . . . . . 28
Control key . . . . . . . . . . . . . . . . . . . . .
Display keys . . . . . . . . . . . . . . . . . . . .
Returning to idle status . . . . . . . . . . .
Menu guidance . . . . . . . . . . . . . . . . .
Writing, editing, and correcting
entries . . . . . . . . . . . . . . . . . . . . . . . .
System settings . . . . . . . . . . . . . . 29
12
13
13
13
14
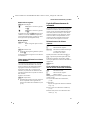
Using the directory and lists . . . 15
Directory . . . . . . . . . . . . . . . . . . . . . . . 15
Last number redial list . . . . . . . . . . . . 16
Calls list . . . . . . . . . . . . . . . . . . . . . . . 16
Operating the answer
machine . . . . . . . . . . . . . . . . . . . . 18
Operation using the base station
keys . . . . . . . . . . . . . . . . . . . . . . . . . . .
Operation using the handset . . . . . . .
Setting up the answer machine . . . . .
Operating when on the move
(remote operation) . . . . . . . . . . . . . . .
4
18
18
21
22
Restoring the default settings . . 30
Appendix . . . . . . . . . . . . . . . . . . . 31
Care . . . . . . . . . . . . . . . . . . . . . . . . . . .
Contact with liquid . . . . . . . . . . . . . . .
Questions and answers . . . . . . . . . . . .
Specifications . . . . . . . . . . . . . . . . . . .
FCC / ACTA Information . . . . . . . . . . . .
Safety precautions . . . . . . . . . . . . . . .
Service (Customer Care) . . . . . . . . . . .
End-user limited warranty . . . . . . . . .
31
31
31
32
33
34
36
36
Index . . . . . . . . . . . . . . . . . . . . . . 40
Verizon V500 / USA EN / A31008-M1931-R301-1-6019 / security.fm / 30.4.08
Safety precautions
Safety precautions*)
$
!
Only use the power supply unit supplied as indicated on the bottom of the
device.
Only insert approved rechargeable batteries of the same type.
Never use ordinary (non-rechargeable) batteries, as they may pose a health
hazard or cause injury.
Do not charge the handset in the charging unit or base station while the headset
is connected.
‹
Make sure the rechargeable battery is inserted in the correct direction.
Œ
Use the battery specified in these operating instructions.
The phone may affect medical equipment, so always turn your phone off before
entering a hospital or doctor's office.
Do not operate the phone in places where there is a risk of explosion
(such as paint workshops).
Do not install the base station in the bathroom. The handset and base station
are not splash-proof (see page 31).
Drivers must not use the phone while driving.
The phone must be turned off at all times in aircraft. Make sure the phone cannot be switched on accidentally.
ƒ
If you give your telephone to someone else, you should also provide the operating instructions.
Dispose of batteries and the phone carefully. Do not pollute the environment.
Emergency numbers cannot be dialed if the keypad lock is activated!
*) also see page 34
5
Verizon V500 / USA EN / A31008-M1931-R301-1-6019 / notes-on-instructions.fm / 30.4.08
Notes on the operating instructions
Notes on the operating
instructions
What you need to do is explained in the
box.
¢ Settings ¢ Handset ¢ Language
¢ English/ Español/ Français
§Menu§
This section explains the meaning of certain symbols and typographical conventions used in this user guide.
Symbols used
On/Off (example)
Select one of the two menu
functions specified.
~
Enter digits or letters.
§Back§
The display keys' current functions are shown in reverse and
are highlighted in the lower
display line. Press the display
key below to launch the function.
q
Press the top or the bottom of
the control key: scroll up or
down.
c / Q / * etc.
Press the corresponding key of
the handset.
Example: menu input
In the user guides, the steps you need to
perform are shown in abbreviated form.
This is illustrated below using "Changing
the display language" as an example.
6
¤ With the handset in idle status, press
the right display key to open the main
menu.
¤ Select Settings using the control key q
– press the control key at the top or
bottom.
¤ Press the §OK§ display key to confirm the
function Settings.
The Settings submenu is displayed.
¤ Press the bottom of the control key s
repeatedly until Handset is selected.
¤ Press the §OK§ display key to confirm the
function.
The Handset submenu is displayed.
¤ Press the bottom of the control key s
repeatedly until Language is selected.
¤ Press the §OK§ display key to confirm the
function.
The Language submenu is displayed.
¤ Select the language you want using
the control key q – press the control
key at the top or bottom.
¤ Press the §OK§ display key to confirm the
selected language.
The language is now changed for all text.
Verizon V500 / USA EN / A31008-M1931-R301-1-6019 / starting.fm / 30.4.08
Verizon V500AM – more than just a telephone
Verizon V500AM –
more than just a telephone
Your phone not only lets you store up to
50 phone numbers (page 15), it can do a
whole lot more:
u Phone directly using the base station:
Your base station has the same keys as
your handset. So nearly all functions
you usually use on the handset are also
available directly on the base station.
u Use two telephone lines with only one
telephone.
u Make conference calls with two external parties (page 27).
u View missed calls on your phone
(page 16).
u ECO DECT uses a power supply with
low power consumption. Your handset
reduces the transmission power
depending on its distance from the
base station (close-up range).
Note:
The transmission power of the base station is
lowered to its minimum level when the handset is placed in the base station and only one
handset is registered on the base station.
Headset socket
Which headsets are compatible?
Please call Verizon Service at
1-866 374 3864 for more information, or
contact
www.verizon.com if you have any questions about the use of your telephone.
Caution:
Do not charge the handset in the charging unit
or base station while the headset is connected.
Have fun using your new phone!
First Steps
Pack contents
u
u
u
u
One base station Verizon V500AM
One telephone line cord
One AC adapter for the base station
One User Guide
For Verizon V500AM-1
u One Verizon V500H handset with battery cover
u Two batteries
u One belt clip
For Verizon V500AM-2
u Two Verizon V500H handsets with battery cover
u One Verizon V100C charging cradle
u One AC adapter for the charging cradle
u Four batteries
u Two belt clips
Installing the base station
The base station is designed for use in
closed, dry rooms in a temperature range
of +41°F to +113°F.
Set up the base station at a central point
on the premises.
Please note:
u Never expose the phone to heat
sources, direct sunlight, or other electrical appliances.
u Protect your phone from moisture,
dust, corrosive liquids, and vapors.
Range and reception strength
Range:
u Up to 984 feet in the open
u Up to 165 feet in buildings
7
Verizon V500 / USA EN / A31008-M1931-R301-1-6019 / starting.fm / 30.4.08
First Steps
Reception strength:
The display shows if the handset is linked
to the base station:
u Ä is on: handset is linked to the base
station.
u Ä flashes: no reception; handset is out
of range or not registered.
Connecting the base station
¤ First connect the power adapter and
then the phone jack as shown below.
1
Setting up the handset for use
Inserting the batteries
Caution:
Use only rechargeable UL-approved AAA batteries. Never use a conventional (nonrechargeable) battery or other battery types as
this could result in significant health risks and
personal injury. For example, the batteries
could explode. The phone could also malfunction or be damaged as a result of using batteries that are not of the recommended type.
Note:
3
If attached, remove the belt clip before opening the battery cover.
¤ Open the battery cover.
2
1 110-V power adapter
2 Back of the base station
3 Phone jack with phone cords
Please note:
u The power adapter must always be
connected, as the phone will not operate without an electrical supply.
u Your answer machine is set to give a
standard announcement.
¤ Insert the batteries according to the
correct polarity (see diagram).
The polarity is indicated in/on the battery
compartment.
¤ Close the cover, and press the top so
that it clicks into place.
Attaching the belt clip
There are notches for attaching the belt
clip on the side of the handset at the same
height as the display.
8
Verizon V500 / USA EN / A31008-M1931-R301-1-6019 / starting.fm / 30.4.08
First Steps
¤ Press the belt clip onto the back of the
handset so that the protrusions on the
belt clip engage the notches.
Placing the handset in the base station
¤ Place the handset in the base station
with the handset's display facing outwards.
Charging the batteries for the first time
¤ To charge the batteries, leave the handset in the base station or charging cradle continuously for ten hours.
The alternately flashing battery icons =
U on the upper right side of the display
screen indicate that the batteries are
being charged.
Note:
– If the handset has turned itself off because
its batteries are empty, and you then place
the handset into the base station, it will
turn on automatically.
– Only place the handset into the base station or charging cradle specifically
intended for it.
– During handset operation, the battery icon
e indicates the charge status of the batteries (page 1).
– The batteries may feel warm when they are
charging. This is not dangerous.
For questions and troubleshooting,
see page 31.
Setting the date and time
You should set the date and time, for
example, to ensure the correct time of
incoming calls is recorded.
To change the time and date, open the
input field using:
¢ s ¢ Settings ¢ Date/Time
¢ Set Date/Time
§Menu§
~
Enter the time and date using
10 digits, for example, Q
M15Q11
5 Q N for January 15,
2008, 07:15 AM. If the 12hour time format is set, use
the * key to switch between
am and pm.
To correct an incorrect entry,
overwrite the character by typing the correct one.
§OK§
Press the display key to save
changes.
You can change the date and time format:
§Menu§ ¢ s ¢ Settings ¢ Date/Time
¢ Set Format
¤ Choose between day/month and
month/day date formats:
s ¢ Date Format ¢ DD/MM/MM/DD
¤ Choose between 12- and 24-hour time
formats:
s ¢ Time Format ¢ 12 Hours/24 Hours
Selecting the line settings
For each handset and the base station,
you can set how your telephone will use
the two telephone lines:
Auto
All incoming calls will ring. For
outgoing calls, your phone
will use whichever line is currently free.
Line 1/Line 2
Only incoming calls on the
respective line can be
answered with the c key.
For outgoing calls, your phone
will always use the selected
line.
If you have selected Line 1 or Line 2, you
can still answer or make a call on the free
line by using the C or h keys.
9
Verizon V500 / USA EN / A31008-M1931-R301-1-6019 / starting.fm / 30.4.08
First Steps
Selecting line settings for a handset
¢ s ¢ Settings ¢ Handset
¢ Line Setting ¢ Auto/Line 1/Line 2
§Menu§
q
Select entry and press §OK§.
Selecting line settings for the base station
¢ s ¢ Settings ¢ Base
¢ Line Setting ¢ Auto/Line 1/Line 2
§Menu§
q
Select entry and press §OK§.
Area codes
To make a call using the Incoming Calls list
(page 16), your phone's area code must
be stored. If you reside in a service area
where Line 1 and Line 2 have been assigned different area codes by your network
provider, you are able to store area codes
for Line 1 and Line 2 independently of
each other.
§Menu§ ¢ s ¢ Settings ¢ System
¢ Area Code
Line 1/Line 2
Select the line for which you
want to set the area code and
press §OK§.
~
Enter your area code and press
§OK§.
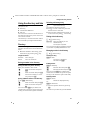
Display in idle status
Once the phone is registered and the time
set, the idle display looks as shown here
(example). If the answer machine is activated, the header will also display the answer machine symbol Õ.
Ä ÕË
INT 1
Ê
01/31
e
9:45
§§§§Menu§§§§
Your phone is now ready to use.
10
Verizon V500 / USA EN / A31008-M1931-R301-1-6019 / telefony.fm / 30.4.08
Making calls
Making calls
Making an external call
External calls are calls using the outside
telephone network.
~c
Enter the number and press
the Talk key c or Handsfree
key d.
Or:
c~
Briefly press the Talk key c
or Handsfree key d, and
then enter the number.
To cancel the dialing operation, press the
End Call key a.
Depending on the line settings of the used
handset/base station (see page 9), the
telephone selects the line. You can use the
line keys C or h instead of the c or
d key to select the line for this call.
You are shown the duration of the call
while the call is in progress.
Note:
Dialing using the directory (page 15) or Calls
list (page 16) saves time re-entering numbers.
Ending a call
a
Press the End Call key.
Answering a call
The handset indicates an incoming call in
three ways: by ringing, by a display on the
screen, and by the flashing Talk key c.
The base station indicates an incoming
call in three ways: by ringing, by a display
on the screen, and by the flashing line key
C or h.
You can accept the call by:
¤ Pressing the Talk key c.
¤ Pressing the line key C or h.
¤ Pressing the Handsfree key d.
Depending on the line settings of the used
handset/base station (see page 9), the
telephone reacts differently:
u If you have selected Auto, you can use
the Talk key c or Handsfree key d
for calls on both lines.
u If you have selected Line 1 or Line 2, you
can only answer calls on the selected
line with the Talk key c or Handsfree
key d. For calls on the other line, you
must use the C key or h key to
answer the call.
If the handset is in the base station or
charger and the Auto Answer function is
activated (page 27), the call will be
answered automatically when you lift the
handset from the base station or charger.
Lifting the handset from the base station
or charger in this case has the same effect
as pressing the Talk key c.
You can press the §Quiet§ display key to mute
the ring tone without answering the call.
You can answer the call as long the call is
displayed on the screen.
Note:
If two calls are ringing simultaneously on the
two lines, your telephone display will switch
from one line to the other every 3 seconds.
Use the C key or h key to answer the
call.
¥
Caller ID
Caller ID (CID) is an optional subscription
service provided by your telephone service provider. This feature supplies incoming caller identification information that
will be displayed on your handset.
11
Verizon V500 / USA EN / A31008-M1931-R301-1-6019 / telefony.fm / 30.4.08
Operating the telephone
Call display with Caller ID/Name
If the number of the caller is stored in your
directory, you will see the caller's name.
The following is displayed in place of the
number:
u External, if no number is transmitted,
or the caller has not subscribed to
Caller ID.
u Withheld, if the caller has withheld
Caller ID.
Handsfree operation
You can activate the speakerphone at any
time to provide handsfree operation during a call.
Activating/deactivating handsfree
Activating while dialing
~d
¤
Enter the number and press
the Handsfree key.
You should inform your caller before
you use the handsfree function so that
the caller knows someone else is listening.
Switching between the earpiece and the
handsfree mode
d
Press the Handsfree key.
During a call and when listening to the
answer machine, turn handsfree on or off.
For how to adjust the volume,
see page 27.
Operating the telephone
Most of the keys are the same on the
handset and on the base station, so that,
with few exceptions, you can operate the
base station the same way as the handset.
Activating/deactivating the handset
a
Press and hold the End Call
key.
Activating/deactivating the keypad
lock of the handset
#
Press and hold the pound key.
Keypad Locked appears in the display when
the keypad lock is activated.
The keypad lock is deactivated automatically if someone calls you. It is re-activated
when the call is finished.
Control key
1
1 Control key
In the description below, the side of the
Control key (up, down), which you must
press depending on the operating
situation, is marked in black, for example,
t for "press up on the Control key".
The Control key has different functions:
When the handset is in idle status
s
t
Open the directory
Open call log list (page 16)
In input fields
You can use the Control key to move the
cursor backwards t or s forwards.
12
Verizon V500 / USA EN / A31008-M1931-R301-1-6019 / telefony.fm / 30.4.08
Operating the telephone
Returning to idle status
In the main menu, lists and submenus
t/s
Scroll up/down line by line.
When the handset is off the hook or when
the answer machine is playing
t/s
Increase/decrease volume
Display keys
The function of the display keys changes
depending on the particular operating situation. Example:
§§§§§Back§§§§§ † §§§§Menu§§§§§
You can return to idle status from anywhere in the menu as follows:
¤ Press the End Call key a.
Or:
¤ Do not press any key: after 2 minutes,
the display will automatically return to
idle status.
Changes that you have not confirmed or
saved by pressing §OK§ will not be saved.
An example of the display in idle status is
shown on page 10.
Menu guidance
1
2
1 The display keys' current functions are
shown on the bottom display line.
2 Display:keys
The most important display symbols are:
§§§§§Menu§§§§
Open the main menu (in idle
mode) or the context-dependent menu.
§§§§§Back§§§§
Go back one menu level.
§§§§§§§OK§§§§§§§
Confirm your choice or save
edited characters.
§§§§Clear§§§§§
Clear key: deletes one character at a time from right to left
(press briefly), or deletes all
characters (hold).
Your phone's functions are accessed using
a menu that has a number of levels.
Main menu (first menu level)
¤ Press the display key §Menu§ with the
handset in idle status to open the main
menu.
The main menu functions are shown on
the screen in a list.
To access a function, open the corresponding submenu (next menu level):
¤ Navigate to the function using the control key q. Pressing the display key §OK§.
Submenus
The functions in the submenus are displayed as lists.
To access a function:
¤ Scroll to the function with the control
key q and press §OK§.
Pressing the §Back§ display key returns you
to the previous menu level. a cancels
the operation.
13
Verizon V500 / USA EN / A31008-M1931-R301-1-6019 / telefony.fm / 30.4.08
Operating the telephone
Writing, editing, and correcting
entries
Correcting incorrect entries
You can correct incorrect characters in the
text by navigating to the incorrect entry
using the control key. You can then:
u Press §§§§Clear§§§§§ to delete the character to
the left of the cursor.
u Insert characters by typing.
Writing and editing names
The following rules apply when creating
an entry:
u Control the cursor with q.
u Press the pound key # to switch
between uppercase and lowercase.
Entering special characters
You can enter special characters using the
Q or 1 key.
Q
1
14
.0,/:;"’!?*+-%\^~|
SPACE 1 @ _ # = < >
()&$[]{}
Verizon V500 / USA EN / A31008-M1931-R301-1-6019 / direct_charges.fm / 30.4.08
Using the directory and lists
Using the directory and lists
The options are:
u Directory
u Last Number Redial list
u Calls list
You can store a maximum of 50 entries in
the directory. Each entry must consist of a
name and a number.
The directory is stored in the base station
and is shared by all registered handsets.
Directory
In the directory, you can store phone
numbers and the names associated with
them.
¤ With the handset in idle status, open
the directory by pressing the s key.
Selecting a directory entry
s
Open the directory.
You have the following options:
u Use q to scroll to the entry until the
desired name is selected.
u Enter the first character of the name, or
scroll to the entry with s, if necessary.
Dialing with the directory
s ¢ q (Select entry)
c/d Press the Talk key or the
Handsfree key.
The number is dialed.
You can press the C or h key instead,
if you want to specify which line to use.
Managing entries in the directory
¢ q (Select entry)
s
Length of entries
Viewing an entry
Number:
Name:
§Menu§
max. 24 digits
max. 16 characters
Saving a number in the directory
¢ View
The entry is displayed.
Go back with §Back§.
Editing entries
¢ Edit Entry
~
Edit the name and press §OK§.
~
Edit the number and press §OK§.
You can use the Clear key to delete one
character at a time from right to left (press
briefly) or all characters (press and hold).
Saving the first entry in the directory
§Menu§
With your handset in idle mode:
~
Enter the number and press
§Save§.
~
Enter the name and press §OK§.
~
Correct the number, if necessary, and press §OK§.
Deleting entries
Saving additional entries in the directory
s ¢ §Menu§ ¢ New Entry
~
Enter the name and press §OK§.
~
Enter the number and press
§OK§.
You can use the Clear key to delete one
character at a time from right to left (press
briefly) or all characters (press and hold).
§Menu§
¢ Delete
Delete the displayed entry.
Or:
§Menu§
¢ Delete List
¤ Confirm question Delete? by pressing
§OK§.
All entries in your directory will be deleted.
15
Verizon V500 / USA EN / A31008-M1931-R301-1-6019 / direct_charges.fm / 30.4.08
Using the directory and lists
Adding a displayed number to the
directory
Numbers that appear in a list, such as the
Calls list or the Last Number Redial list can
be added to the directory. If you have
Caller ID and the name is transmitted, the
first 16 characters of the transmitted
name are copied to the name line.
A number is displayed:
¢ Copy To Dir.
¤ Complete the entry as described in the
§Menu§
section "Saving a number in the directory" (see page 15).
Last number redial list
The Last Number Redial list contains the
ten numbers last dialed with the handset/
the base station (max. 32 digits). If one of
the numbers is in the directory, then the
corresponding name will be displayed. If a
number has been dialed several times,
only the last try is shown in the list.
Manual last number redial
k
q
c/d
Press the key.
Select the entry.
Press the Talk key or the
Handsfree key.
The number is dialed.
You can press the C or h key instead,
if you want to specify which line to use.
When displaying a name, you can have the
respective phone number displayed:
§Menu§ ¢ View
Managing entries in the Last Number
Redial list
k
q
§Menu§
16
Press the key.
Select the entry.
Open menu.
The following functions can be selected
with q:
View (as in the directory, page 15)
Copy To Dir.
Copy an entry to the directory
(page 16)
Delete (as in the directory, page 15)
Delete List (as in the directory, page 15)
Calls list
Requirement: Caller ID Presentation (CIP,
see page 12)
The numbers of the last 10 incoming calls
are stored.
¤ With the handset in idle status, open
the directory by pressing the t (CID)
key.
Dialing with the Calls list
t
¢ q (Select entry)
If necessary, press * key to
change number format for
dialing.
c/d Press the Talk key or the
Handsfree key.
The number is dialed.
You can press the C or h key instead,
if you want to specify which line to use.
Viewing an entry
¢ q (Select entry)
§Menu§ ¢ View
t
The entry is displayed.
Go back with §Back§.
Verizon V500 / USA EN / A31008-M1931-R301-1-6019 / direct_charges.fm / 30.4.08
Using the directory and lists
List entry
New messages are at the top. A list entry
contains the following information:
u List type (in header)
u Status of entry (new entries are marked
with a star in the header)
u Name of caller; if name is transmitted
using CID or stored in directory
Caller's phone number; if only the number is transmitted
External, if no number is transmitted or
the caller has not subscribed to Caller
ID
Withheld, if the caller has withheld
Caller ID
You can add the number of the caller to
the directory (page 16).
u Date and time of call (if set, page 9)
u Line: Ê or Ë behind the text shows
whether the call has come in on Line 1
or Line 2.
You can manage the entries in the same
way as the entries of the Last Number
Redial list (see page 16).
17
Verizon V500 / USA EN / A31008-M1931-R301-1-6019 / answering_m+network-mailbox.fm / 30.4.08
Operating the answer machine
Operating the answer
machine
You can use the answer machine for both
lines or only for one line, depending on
your needs.
You can operate the base station's answer
machine using the handset, using the keypad of the base station (page 2), or using
remote operation (from another phone/
cell phone).
Announcement mode
You can use the answer machine in two
different modes.
u In Answer & Rec. mode, the caller hears
your announcement and can then
leave a message.
u In Answer Only mode, the caller hears
your announcement but cannot leave a
message.
Operation using the base station
keys
You can use the base station keys for the
most commonly used functions of your
answer machine. For more information,
see page 2.
Status of the answer machine
The LED in the Start/Stop key and the symbols in the display of the base station indicate the status of the answer machine.
The LED in the respective Start/Stop key
ø or ù
u Is on when playing messages on the
respective line.
u Flashes slowly when there is at least
one new message on the answering
machine for the respective line.
u Flashes rapidly when the message
memory for the respective line is full.
18
The display of the base station may show
the symbols shown here:
ÊÕÉ×ÅËÕÉ×Å
SUN 09:23 AM 01/31
§§§§§§§§§Menu§§§§§§§§§
The following symbols provide information about the answer machine. Symbols
on the left side of the display refer to Line
1, while symbols on the right side refer to
Line 2.
Õ is on
The answer machine is on.
É flashes The message memory is full.
× flashes
The answer machine is controlled by a handset.
For the other symbols, see page 2.
Operation using the handset
Most of the functions described are also
available using the keys and the display of
your base station.
Call screening
While recording a message, you can automatically listen through the loudspeakers
of the base station, if you have activated
call screening (see page 21).
You can also listen through the loudspeakers of registered handsets:
§Screen§
Press the display key.
The handset loudspeaker is activated. You
can switch it off with the Handsfree key
d.
Verizon V500 / USA EN / A31008-M1931-R301-1-6019 / answering_m+network-mailbox.fm / 30.4.08
Operating the answer machine
Switching the answer machine on/off
You can switch the answer machine on
and off separately for each line.
§Menu§ ¢ Answer Machine ¢ Ans On/Off
Line 1/Line 2
Select the line for which you
want to switch the answer
machine on/off and press §OK§.
On/Off
Select an entry and press §OK§.
The × icon for the respective line is displayed on the screen.
The phone includes a prerecorded
announcement for the answer and record
mode and announce-only mode. If a personal announcement has not been
recorded, the corresponding prerecorded
announcement is used.
Recording a personal announcement/
announce only
You can record different announcements
for each line.
§Menu§ ¢ Answer Machine ¢ Record OGM
Line 1/Line 2
Select the line for which you
want to record an announcement and press §OK§.
Answer & Rec./Answer Only §OK§
Select the mode in which you
want to record the personal
announcement.
Record §OK§ Press the display key to start
recording.
You will hear the ready tone (short tone).
¤ Now record your announcement (must
be at least 3 seconds long).
The recorded announcement will be
played back automatically. You can record
the announcement again by repeating
these steps.
Please note:
u Recording ends automatically if the
maximum recording time of 60 seconds is reached.
u If you cancel the recording, the prerecorded announcement will be used.
u The recording is canceled if the answer
machine memory is full.
¤ If necessary, delete old messages
and repeat the recording.
Playing back announcements
¢ Answer Machine ¢ Record OGM
¢ Line 1/Line 2 ¢ Answer & Rec./
§Menu§
Answer Only
Press the display key to start
Play §OK§
playback.
If a personal announcement has not been
recorded, the corresponding prerecorded
announcement is used.
Deleting announcements
¢ Answer Machine ¢ Record OGM
¢ Line 1/Line 2 ¢ Answer & Rec./
§Menu§
Answer Only
Delete §OK§ Press the display key to delete
the personal announcement.
If no personal announcement
exists, you will hear an error
tone.
After deletion, the corresponding prerecorded announcement will be used.
Note:
When recording your announcement, speak
directly into the handset's microphone, as if
talking on the phone. You can also use the
base station to record announcements.
§OK§
Press the display key to end
the recording.
19
Verizon V500 / USA EN / A31008-M1931-R301-1-6019 / answering_m+network-mailbox.fm / 30.4.08
Operating the answer machine
Selecting an announcement mode
You can choose between Answer & Rec.
and Answer Only.
§Menu§ ¢ Answer Machine ¢ Answer Mode
¢ Line 1/Line 2 ¢ Answer & Rec./
Answer Only
q
Select announcement mode
and press §OK§.
The selected mode is saved even after the
answer machine is deactivated.
Note:
If the message memory is full when in Answer
& Rec. mode, the selection is interrupted and
you will receive instructions to delete old messages.
Delete old messages.
The answer machine automatically switches
back to the mode set once deletion is complete, or you can select another recording
mode.
¥
Playing back messages
The date and time of each message is
logged (provided this has been set,
page 9) and displayed during playback.
Playing back new messages
New messages that you have not yet listened to are indicated by a slowly flashing
LED on the respective Start/Stop key
(see page 2).
§Play§
Press the display key to start
playback.
If you have new messages only for one
line, playback starts immediately.
If you have new messages for both lines:
Line 1/Line 2 Select the line and press §OK§.
The display now shows you the status of
your answer machine.
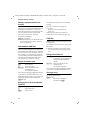
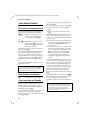
The following example shows a display of
a handset when playing back new messages:
Play
New
01/31
2
1
Ê
01/02
09:45 AM
§§§§§Back§§§§§ U §§§§Menu§§§§
3
4
5
1 Date when message was recorded.
2 New: you have not yet listened to the message.
3 01/02: The first of two messages is played.
4 Time when message was recorded.
5 Line on which message was recorded.
If you have...
u New messages:
New (2) is displayed. The number of
messages (3) only indicates the
number of new messages. The first of
the two new messages is played back.
u Messages that you have already listened to:
New (2) is not displayed. The number of
messages (3) only indicates the
number of old messages: 01/02 means
that the first of two old messages is displayed.
Play
01/31
Ê
01/02
09:45 AM
§§§§§Back§§§§§ U §§§§Menu§§§§
u No messages:
No Messages appears on the display
screen.
Play
No Messages
An announcement tells you if there are
any new messages, just old messages, or
no messages.
20
Verizon V500 / USA EN / A31008-M1931-R301-1-6019 / answering_m+network-mailbox.fm / 30.4.08
Operating the answer machine
If there are new messages, playback
begins with the first new message. After
the last new message, you will be
returned to the Play menu.
After a new message has been played
completely, its status becomes "old".
If the message concerned has been saved
with the date and time, you will hear an
appropriate announcement before playback begins.
Playing back old messages
You can listen to old messages if there are
no more new messages.
§Menu§ ¢ Answer Machine ¢ Play
¢ Line 1/Line 2
§OK§
Press the display key to start
playback.
Controlling playback
During message playback:
§Menu§
Press the display key to enter
the Options menu.
u Repeat
Repeat playback of actual message.
u Next/Previous
Jump to playback of the following or
previous message.
u Delete
Delete current message.
Deleting messages
You can delete old messages all at once or
individually.
Deleting all old messages
¢ Answer Machine ¢ Delete Old
Msgs ¢ Line 1/Line 2
Delete? §OK§ Press the display key to confirm you want to delete all old
messages.
If you have no old messages, you will hear
an error tone and No Messages will display
on the screen.
§Menu§
Deleting individual old messages
During playback:
§Menu§ ¢ Delete
§OK§
Press the display key to delete
the current message.
Picking up a call from the answer
machine
You can pick up a call while the answer
machine is recording a message or being
operated remotely:
c
Press the Talk key.
Recording stops and you can speak to the
caller.
If two seconds of the call have already
been recorded when you pick it up, the
call will be displayed as a new message.
You can accept the call on every handset.
If you use call screening on a handset, only
this handset can answer up the call.
Setting up the answer machine
The answer machine has already been
preconfigured at the factory. Change individual settings using the handset or the
corresponding keys of the base station.
Activating/deactivating call screening
While recording a message, you can listen
through the loudspeakers of registered
handsets and the base station.
§Menu§ ¢ Answer Machine ¢ Settings
¢ Call Screening
If you use the handset for this setting:
Base/Handset
Select this if you want to make
the setting for the handset or
the base station.
On/Off
Press the §OK§ display key to
confirm your selection.
The default setting for the base station is
On; the default setting for the handset is
Off.
21
Verizon V500 / USA EN / A31008-M1931-R301-1-6019 / answering_m+network-mailbox.fm / 30.4.08
Operating the answer machine
For call screening on the handset:
§Screen§
Press the display key to start
call screening.
¢ Answer Machine ¢ Settings
¢ Voice Language ¢ Line 1/Line 2
¢ English/Español/Français
§Menu§
§OK§
Toll-Saver Mode – Call acceptance/
charge saving function for remote
operation
For each line, you can set when you want
the answer machine to respond to calls.
The options are: 2 Rings, 4 Rings, 6 Rings,
8 Rings, as well as the cost-saving setting
Toll Saver.
Note:
The number of rings refers to the ring tones of
the base station. If you have selected another
ring tone, the number of rings you hear may
differ from the selected number of rings.
When Toll Saver is set, the following determines when the answer machine accepts
calls:
u If no new messages are present, the
answer machine accepts calls after 4
Rings.
u If new messages are present, the
answer machine accepts calls after 2
Rings.
When operating remotely, you know there
are no new messages after hearing 2 rings
(otherwise the answer machine would
have already accepted your call). There
will be no call charges if you hang up now.
§Menu§ ¢ Answer Machine ¢ Settings
¢ Ring Delay ¢ Line 1/Line 2
¢ 2 Rings/4 Rings/6 Rings/8 Rings/Toll Saver
§OK§
Press the display key to confirm your selection.
Changing the language of voice
prompts and prerecorded
announcements
You can select English, Spanish, or French
as the language of voice prompts and prerecorded announcements. You can select
different languages for line 1 and line 2.
22
Press the display key to confirm your selection.
Operating when on the move
(remote operation)
You can check or activate the answer
machine from any other telephone (hotel,
pay phone, etc.).
Requirements:
u The phone you are using for remote
operation must have tone dialing
(DTMF), so that you hear different
tones when you press the keys.
u You must activate Remote Access.
Activating Remote Access
¢ Answer Machine ¢ Settings
¢ Remote Access ¢ On/Off
§Menu§
§OK§
Press the display key to confirm your selection.
Calling the answer machine and
playing back messages
~
;~
Dial your own number.
While listening to your
announcement, press the ;
key and enter the system PIN.
You will be informed whether any new
messages have been recorded. The messages are then played back. You can now
operate the answer machine using the
keypad.
Operating the answer machine using the
keypad
The following keys are used:
0
A
Delete the current message.
Repeat the previous message.
Verizon V500 / USA EN / A31008-M1931-R301-1-6019 / answering_m+network-mailbox.fm / 30.4.08
Using the network mailbox
B
3
G
H
9
;
Play the message.
Skip to the next message.
Turn on the answering machine.
Stop message playback.
Turn off the answering machine.
Enter the remote access code if
the answering machine is on.
Note:
After message playback, if no key operation
is detected for 10 seconds, the call will be
terminated.
Activating the answer machine
~
Dial your own number.
¤ Allow the phone to ring until the ring
back tone stops and the phone
answers.
~
Enter system PIN.
G
Press the G key.
You will hear a beep. Your answer
machine is now activated and the activated announcement is played back.
Deactivating the answer machine
~
;~
Dial your own number.
While listening to your
announcement, press the ;
key and enter the system PIN.
9
Press the 9 key.
You will hear a beep. Your answer
machine is now deactivated.
Using the network mailbox
The network mailbox is your network provider's answer machine within the network. You cannot use the network mailbox unless you have requested it from
your network provider.
Configuring the network mailbox
for fast access
Entering the network mailbox number
¢ Voice Mail ¢ Settings
¢ Line 1/Line 2
§Menu§
~ §OK§
Enter the number of the
network mailbox and
press §OK§.
The setting for fast access applies to all
handsets.
If your network voice mail requires a password for access, it is possible to add a password by entering pauses immediately
after entering the mailbox access number,
then entering your password.
Calling your network mailbox
¢ Voice Mail ¢ Call VM
¢ Line 1/Line 2
§Menu§
Select which mailbox you
want to call and press §OK§.
If you have new messages in your network
mailbox:
§Call§
Press the display key to call
your network mailbox.
If you have new messages only for one
network mailbox, the respective mailbox
is immediately called.
If you have new messages for both network mailboxes:
When using a handset:
Line 1/Line 2
Select the line and press §OK§ to
start the call.
When using the base station:
Line 1/Line 2 Press the respective display
key to start the call.
For further operation steps, please refer to
the instructions provided by your mailbox
operator.
§OK§
23
Verizon V500 / USA EN / A31008-M1931-R301-1-6019 / registr_sett.fm / 30.4.08
Using several handsets
Using several handsets
Registering and de-registering
handsets
You can register up to five handsets with
your base station.
A Verizon V500H handset can be registered with up to four base stations.
Registering the Verizon V500H
handset
On the handset
¢ Settings ¢ Registration
¢ Register HS
§Menu§
q
Select the base you want to
register your handset with and
press §OK§. Bases that have
been registered will be marked
by ½.
~
Enter your PIN and press §OK§.
The handset will be registered.
On the base station
Within 60 secs. press and hold the registration/page key on the base station
(see page 2) (approx. 5 secs.).
De-registering handsets
You can de-register any registered handset
from your Verizon V500AM.
§Menu§ ¢ Settings ¢ Registration
¢ Unregister HS
~
Enter your PIN and press §OK§.
Q
Select the handset you want to
de-register and press §OK§.
§OK§
Press the display key to confirm deletion.
Locating a handset ("paging")
You can locate your handset using the
base station.
¤ Press the Registration/Paging key on
the base station briefly.
¤ All handsets will ring at the same time
("paging"), even if the ringers are
switched off.
You can press the §Quiet§ display key to
mute the ring tone without answering
the call.
Ending paging
¤ Briefly press the Registration/Paging
key on the base station or press the Talk
key c on the handset.
Changing the base station
If your handset is registered to more than
one base station, you can set it to a particular base station or to the base station
that has the best reception (Best Base).
§Menu§ ¢ Settings ¢ Registration
¢ Select Base
q
Select one of the registered
base stations or Best Base and
press §OK§.
Making internal calls
Internal calls to other handsets registered
with the same base station or to the base
station are free.
j
Initiate internal call.
q
Select the handset or the base
station you want to call and
press §OK§.
Note:
If only one handset is registered to the base,
the internal call will be established immediately after pressing the j key.
Ending a call
a
24
Press the End Call key.
Verizon V500 / USA EN / A31008-M1931-R301-1-6019 / registr_sett.fm / 30.4.08
Using several handsets
Transferring a call to another handset
Accepting/rejecting call waiting
You can transfer an external call to
another handset (connect) or to the base
station.
¤ Initiate an internal call to the handset
or the base station you want to transfer
the call to (see above).
If you get an external call while conducting another external or internal call, you
will hear the call waiting tone (short
tone). The caller's number or name will
appear on the screen if caller ID is enabled.
Attended call transfer
When the internal party answers:
¤ If necessary, announce the external
call.
a
Press the End Call key.
The external call is transferred to the other
handset/the base station.
If the internal party does not answer,
press the §End§ display key to return to the
external call. If the internal party is busy,
you will hear the busy tone and return
automatically to the external call.
Unattended call transfer
a
Press the End Call key.
The external call is directly transferred to
the other handset.
Then, if the internal party does not
answer, the call will automatically return
to you (the display will show External Call).
Hold while making internal call
When you are speaking to an external
party, you can simultaneously call an
internal party.
¤ Initiate an internal call as described in
the section "Making internal calls"
(see page 24).
The external party hears the hold melody.
Use the j key to switch between the
internal and external parties.
Ending the internal call
¤ Ask the other internal party to end the
call.
You are reconnected to the external caller.
Call waiting while conducting an internal
call
a
¤
Press the End Call key to end
the internal call.
Answer the external call as described in
the section "Answering a call"
(see page 11).
You are connected to the waiting call.
Call waiting while conducting an external
call on the same line as the waiting call
Press the display key to answer
the incoming external call.
The actual call is put on hold. You are connected to the waiting call. You have the
following possibilities:
– Press the Talk key c to switch
between the callers.
– Press end call key a to end the call
with the online party.
§Accept§
Or:
a
Press the End Call key to end
the existing external call.
¤ Answer the external call as described in
the section "Answering a call"
(see page 11).
You are connected to the waiting call.
Call waiting on the other line while
conducting an external call
C/h
Press the line key of the waiting call.
The actual call is put on hold. You are connected to the waiting call.
25
Verizon V500 / USA EN / A31008-M1931-R301-1-6019 / registr_sett.fm / 30.4.08
Using several handsets
Linking internal callers to
an external call
Important: The Listening In function must
be activated.
You are conducting an external call. An
internal caller can listen in on this call and
take part in the conversation. The other
parties are made aware of additional listeners by a signal tone.
Activating/deactivating Listening In
¢ Settings ¢ System ¢ Listening In
¢ On/Off
§Menu§
Default setting is On.
Internal conference call
There are two ways to start an internal
conference call:
u Another handset can join the call using
Listening In
u You can call another handset using the
j key and add it to a conference
Joining the call using Listening In
The line is engaged with an external call.
You want to listen in on the existing
external call.
c/d Press the Talk key or Handsfree
key briefly.
When you join the call. The other parties
hear a signal tone. On both handsets, you
will see Conference on the display.
Calling another handset and adding it to
the conference
¤ Initiate an internal call as described in
the section "Making internal calls"
(see page 24).
When the called handset has answered
the call:
§Conf.§
Press the display key to start
the conference.
On both handsets, you will see Conference
on the display.
26
Ending conference call
a
Press the End Call key.
The other parties hear a signal tone.
If the first internal party presses the End
Call key a, the handset/base station
that has entered the conference call
remains connected to the external caller.
Making two external calls
simultaneously
You can start a second call while already
talking to one party. You can switch
between these two parties or combine
them in a conference call.
Requirement: The other line is not in use.
Starting a second call
The Ê or Ë display icon shows you which
line you are using.
C/h Press the line key of the free
line.
Your actual call is put on hold. The other
line is off the hook.
~
Enter the number for the second party.
A call to the second party is established.
Toggling between two external calls
In the display, you can see which line is
active (icon Ê or Ë) and which line is on
hold.
C/h Press the line key of the line
you want to talk to.
The selected line is now active; the other is
put on hold.
Verizon V500 / USA EN / A31008-M1931-R301-1-6019 / registr_sett.fm / 30.4.08
Handset settings
Starting an external conference call
You can make conference calls with two
external parties by following these three
steps:
1. Call the first party (see page 11).
2. Call the second party as described
above ("Starting a second call").
3. Start the conference call:
§Menu§ ¢ Conference
§OK§
Press the display key to start
the conference.
Ending an external conference call
Ending all calls
a
Press the End Call key.
Talking to one party and putting the other
party on hold
C/h
Press the line key for the party
you want to talk to.
The conference call is ended. You will talk
to the party whose line key you pressed.
The other party will be put on hold.
Handset settings
Your handset is preconfigured, but you
can change these settings to suit your
individual needs.
Changing the name of a handset
The names "INT 1", "INT 2", etc., are
assigned automatically during registration. You can change these names. The
number of the handset, however, never
changes. The changed name is only displayed on this handset.
§Menu§ ¢ Settings ¢ Handset
¢ Handset Name
~
Enter the name and press §OK§.
The name must not exceed 12
characters.
Changing the display language
You can view the display texts in different
languages.
§Menu§ ¢ Settings ¢ Handset ¢ Language
¢ English/Español/Français
q
Select a language and press
§OK§.
Setting the display contrast
You have a choice of five different contrasts.
§Menu§ ¢ Settings ¢ Handset
¢ Display Contrast
q
Select your preferred level and
press §OK§.
Activating/deactivating
auto answer
If you have activated this function, when
you get a call, you can simply lift the handset out of the base station without having
to press the Talk key c.
§Menu§ ¢ Settings ¢ Handset
¢ Auto Answer ¢ On/Off
Default setting is On.
Adjusting the loudspeaker and
earpiece volume
You can set the loudspeaker volume and
the earpiece volume to five different levels. You can only make these adjustments
during a call.
The handsfree volume can only be
adjusted when this function is set.
You are conducting a call.
q
Increase or decrease the volume.
27
Verizon V500 / USA EN / A31008-M1931-R301-1-6019 / registr_sett.fm / 30.4.08
Base station settings
Changing ring tones
To set the ring tones on the base station,
see page 28.
You can set different ring tones for Line1
and Line2.
Volume
You can choose between five volumes
(1–5; for example, volume 4 = ˆ).
¢ Settings ¢ Audio Settings
¢ HS Ring Volume
§Menu§
Line 1/Line 2
q
Select the line for which you
want to set the volume and
press §OK§.
Select the volume and press
§OK§.
Ring tones
Deactivating the ring tone during an
incoming call
s
Press the key until you no
longer hear the ring tone.
Activating the ring tone during incoming
call
t
Press the key until the ring
tone volume reaches the
desired level.
Activating/deactivating the
key-touch tone
Each key press is acknowledged by a beep.
You can deactivate this function:
§Menu§ ¢ Settings ¢ Audio Settings
¢ Key Touch Tone ¢ On/Off
You can choose between 15 different melodies.
§Menu§ ¢ Settings ¢ Audio Settings
¢ HS Ring Tones ¢ Line 1/Line 2
q
Select your preferred melody
and press §OK§.
Base station settings
Activating/deactivating the ring tone
You have a choice of five different contrast
levels.
§Menu§ ¢ Settings ¢ Base ¢ Display
Contrast
q
Select your preferred level and
press §OK§.
You can deactivate the ring tone on your
handset before you answer a call or when
the handset is in idle status; the ring tone
can be deactivated permanently or just for
the current call.
Use the keys on the base station to carry
out these settings.
Setting the display contrast
Deactivating the ring tone permanently
Changing the display language
Reactivating the ring tone
You can view the display texts in different
languages.
§Menu§ ¢ Settings ¢ Base ¢ Language
¢ English/Español/Français
q
Select a language and press
§OK§.
*
Press and hold the star key.
The Åicon appears in the display.
*
Press and hold the star key.
Deactivating the ring tone for the current
call
§Quiet§
Press the display key.
Changing the ring tone volume
¤ Use the volume keys ð and ñ on
the base station to adjust the volume of
the base station ring tone.
28
Verizon V500 / USA EN / A31008-M1931-R301-1-6019 / registr_sett.fm / 30.4.08
System settings
Changing ring tone melodies
You can use a registered Verizon V500H
handset or the keys on the base station to
enter this setting.
You can choose between 5 different melodies.
§Menu§ ¢ Settings ¢ Audio Settings
¢ Base Ring Tones
q
Select your preferred melody
and press §OK§.
System settings
The following base station settings can
only be made using a registered Verizon
V500H handset.
Protecting against unauthorized
access
Protect the system settings of the base station with a PIN known only to you. The
system PIN must be entered when registering/de-registering a handset with/from
the base station.
Changing the system PIN
You can change the 4-digit system PIN set
on the base station (default setting: 0000)
to a 4-digit PIN known only to you.
Caution:
Do not forget the new system PIN! If you forget
it, you must reset your phone to the default
settings (see below).
§Menu§
~
~
~
¢ Settings ¢ System ¢ Change PIN
Enter the old PIN and press
§OK§.
Enter the new PIN and press
§OK§.
To confirm, enter the new PIN
again and press §OK§.
Settings for connecting the base
station to the PABX
The following settings are only needed
when your PABX requires them. Please
refer to the user guide of your PABX.
Changing the dialing mode
The following dialing modes can be
selected:
u Tone dialing (DTMF)
u Pulse dialing (DP)
§Menu§ ¢ Settings ¢ System ¢ Dialing
Mode ¢ Line 1/Line 2 ¢ Tone/Pulse
q
Select the dialing mode and
press §OK§.
Setting the flash time
¢ Settings ¢ System ¢ Flash Time
¢ Line 1/Line 2 ¢ Short/Long
§Menu§
q
Select the flash time (Short =
80 ms, Long = 650 ms) and
press §OK§.
Switching temporarily to tone dialing
(DTMF)
If your PABX still operates with pulse dialing (DP), but you need tone dialing
(DTMF) for a connection (for example to
listen to the network mailbox), you must
switch to tone dialing for the call.
Requirement: You are conducting a call
or have already dialed an external
number.
§Menu§ ¢ Tone Dialing
§OK§
Press the display key to confirm.
Tone dialing is now activated for this call
only.
29
Verizon V500 / USA EN / A31008-M1931-R301-1-6019 / registr_sett.fm / 30.4.08
Restoring the default settings
Restoring the default
settings
You can restore the default values for
most settings. When resetting, all handsets remain registered and the directory
will not be deleted.
¤ Perform the following on a registered
handset Verizon V500H!
§Menu§ ¢ Settings ¢ System ¢ Reset
§OK§
Press the display key to confirm reset.
30
Verizon V500 / USA EN / A31008-M1931-R301-1-6019 / appendix.fm / 30.4.08
Appendix
Appendix
Troubleshooting
The display is blank.
Care
¤ Wipe the base station and handset with
a damp cloth (do not use solvents) or
an antistatic cloth.
Never use a dry cloth. This can cause
static.
Contact with liquid
!
If the handset has come into contact with
liquid:
1. Immediately switch the handset off
and remove the batteries.
2. Allow the liquid to drain from the handset.
3. Pat all parts dry, then place the handset, with the battery compartment
open and the keypad facing down, in a
dry, warm place for at least 72 hours
(not in a microwave oven, convection
oven, or similar place).
4. Do not switch on the handset again
until it has completely dried.
When it has fully dried, you should be able
to use it again normally.
Questions and answers
If you have any questions about the use of
your telephone, you can contact us at any
time at www.verizon.com
The table below (page 31) contains a list
of common problems and possible solutions.
1. The handset is not switched on.
Press a and hold the End Call key.
¥
2. The batteries are empty.
Charge or replace the batteries (page 8).
¥
The handset does not respond to a key press.
The keypad lock is activated.
Press and hold the pound key # (page 1).
¥
Base Search and Ä is flashing on the display
screen.
1. The handset is outside the range of the base
station.
Reduce the distance between handset/
base station.
¥
2. The handset has been de-registered. Please
Register is flashing on the display screen.
Register the handset (page 24).
¥
3. The base station is not switched on.
Check the base station power cord
(page 8).
¥
Handset does not ring.
The ring tone is switched off.
Activate the ring tone (page 28).
¥
You cannot hear the ring tone/dialing tone.
Base station's phone cord has been replaced.
When purchasing a new cord, make sure
that it has the correct pin connections.
¥
¥
3
2
1
Correct phone jack assignment
4
5
6
1
2
3
4
5
6
unused
unused
a
b
unused
unused
The other party cannot hear you.
You have pressed the i (INT) key. The handset is on hold.
Switch the microphone on again (page 1).
¥
The incoming call number is not displayed
although CID is set.
Caller ID is not enabled.
The caller must ask the network provider to
activate Caller ID (CID).
¥
31
Verizon V500 / USA EN / A31008-M1931-R301-1-6019 / appendix.fm / 30.4.08
Appendix
You hear an error tone when keying an
input.
Handset operating times/charging
times
Action has failed/invalid input.
Repeat the operation.
Watch the display and refer to the operating
instructions, if necessary.
¥
Capacity
550 mAh
Standby time
Approx. 130 hours
(5.5 days)
You cannot listen to messages left on the
network mailbox.
Talk time
Approx. 10 hours
Charge time
Approx. 10 hours
Your phone system is set for pulse dialing.
Set your phone system to tone dialing.
¥
The Calls list does not indicate the correct
time messages were received.
The date/time is not set.
Set the date/time (page 9).
¥
You hear an error beep from the answer
machine during remote operation.
The system PIN entered is incorrect.
Enter the system PIN again.
¥
You cannot operate the answer machine
using remote operation.
Remote Access is not activated.
Activate Remote Access (see page 22)
¥
The operating and charge times apply only
when using the recommended batteries.
Base station power consumption
In standby mode: approx. 1.5 watts
During a call: approx. 2 watts
General specifications
DECT 6.0
is supported
No. of channels
60 duplex channels
Radio frequency
range
1920–1930 MHz
The answer machine does not record messages/has switched to "announce only".
Duplex method
Time multiplex, 10-ms
frame length
¥
¥
Its memory is full.
Delete old messages.
Play back new messages and delete.
Channel grid
1728 kHz
Specifications
Language code
32 kbit/s
Transmission
power
10 mW, average power per
channel
Range
Up to 984 feet outdoors,
up to 165 feet indoors
Recommended batteries
Nickel-metal hydride (NiMH):
The handset is supplied with the authorized AAA batteries.
32
Bitrate
1152 kbit/s
Modulation
GFSK
Base station
power supply
110 V ~/60 Hz
Environmental
operating conditions
+41°F to +113°F;
20% to 75% relative
humidity
Dialing mode
DTMF (tone dialing)/DP
(pulse dialing)
Verizon V500 / USA EN / A31008-M1931-R301-1-6019 / appendix.fm / 30.4.08
Appendix
FCC / ACTA Information
Warning: Changes or modifications to this
unit not expressly approved by Siemens
Cordless Products could void the FCC authority
to operate the equipment. This includes the
addition of any external antenna device.
This equipment complies with Part 68 of the
FCC rules and the requirements adopted by the
ACTA. On the bottom of the base station is a
label that contains, among other information,
a product identifier in the format
US:AAAEQ##TXXXX. If requested, this number
must be provided to the telephone company.
A plug and jack used to connect this equipment
to the premises wiring and telephone network
nust comply with the applicable FCC Part 68
rules and requirements adopted by the ACTA.
A compliant telephone cord and modular plug
is provided with this product. It is designed to
be connected to a compatible modular jack that
is also compliant. See installation instructions
for details.
The REN is used to determine the number of
devices that may be connected to a telephone
line. Excessive RENs on a telephone line may
result in the devices not ringing in response to
an incoming call. In most but not all areas, the
sum of RENs should not exceed five (5.0). To be
certain of the number of devices that may be
connected to a line, as determined by the total
RENs, contact the local telephone company.
For products approved after July 23, 2001, the
REN for this product is part of the product identifier that has the format US:AAAEQ##TXXXX.
The digits represented by ## are the REN without a decimal point (e.g., 03 is a REN of 0.3).
For earlier products, the REN is separately
shown on the label.
If this equipment causes harm to the telephone
network, the telephone company will notify you
in advance, that temporary discontinuance of
service may be required. But if advance notice
isn’t practical, the telephone company will
notify the customer as soon as possible. Also,
you will be advised of your right to file a complaint with the FCC if you belive it is necessary.
The telephone company may make changes in
its facilities, equipment, operations or procedures that could affect the operation of the
equipment. If this happens the telephone company will provide advance notice in order for
you to make necessary modifications to maintain uninterrupted service. If you experience
trouble with this telephone system, disconnect
it from the network until the problem has been
corrected or until you are sure that the equipment is not malfunctioning.
If trouble is experienced with this equipment,
for repair or warranty information, please contact Verizon Support at 1-866 374 3864. If the
equipment is causing harm to the telephone
network, the telephone company may request
that you disconnect the equipment until the
problem is resolved. This equipment is of a type
that is not intented be repaired by the Customer
(user).
This telephone system may not be used on coin
service provided by the telephone company.
Connection to party line service is subject to
state tariffs. Contact the state public utility
commission, public service commission or corporation commission for information. Privacy
of communications may not be ensured when
using this phone.
If your home has specially wired alarm equipment connected to the telephone line, ensure
the installation of this equipment does not disable your alarm equipment. If you have questions about what will disable alarm equipment,
consult your telephone company or a qualified
installer.
This telephone system equipment has been
tested and found to comply with the limits for
Class B digital device, pursuant to Part 15 of the
FCC Rules. Operation is subject to the following
two conditions: (1) This device may not cause
harmful interference, and (2) This device must
accept any interference received, including
interference that may cause undesired operation. These limits are designed to provide
reasonable protection against harmful interference in a residential installation. Some cordless
telephones operate at frequencies that may
cause interference to nearby TV’s and VCR’s;
to minimize or prevent such interference, the
system base should not be placed near or on
top of a TV or VCR; and, if interference is experienced, moving the base farther away from
the TV or VCR will often reduce or eliminate
the interference.
However, there is no guarantee that interference will not occur in a particular installation.
If this telephone system does cause harmful
interference to radio or television reception,
which can be determined by turning the system
off and on, the user is encouraged to try to
correct the interference by one or more of the
following measures:
1. Reorient or relocate the receiving antenna.
2. Increase the separation between the base
station and receiver.
33
Verizon V500 / USA EN / A31008-M1931-R301-1-6019 / appendix.fm / 30.4.08
Appendix
3. Connect the base station into an outlet on a
circuit different from that to which the receiver
is connected.
4. Consult the dealer or an experienced radio
TV technician for help.
Notice for Direct Inward Dialing ("DID")
ALLOWING THIS EQUIPMENT TO BE OPERATED
IN SUCH A MANNER AS TO NOT PROVIDE FOR
PROPER ANSWER SUPERVISION AS A VIOLATION
OF PART 68 OF THE FCC‘S RULES.
Notice to Hearing Aid Wearers:
This phone system is compatible with inductively coupled hearing aids.
Power Outage:
In the event of a power outage, your cordless
telephone will not operate. The cordless telephone requires electricity for operation. You
should have a telephone that does not require
electricity available for use during power outages.
Notice:
The installation of the base unit should allow
at least 8 inches between the base and persons
to be in compliance with FCC RF exposure
guidelines.
For body worn operation, the portable part
(handset) has been tested and meets FCC RF
exposure guidelines. Use with an accessory
that contains metal parts may not ensure compliance with FCC RF exposure guidelines.
Notice to telephone company service:
If you need service from your telephone company, please provide them with the information
– Facility interface Code (FIC): 02LS2
– Service Order Code (SOC): 9.0Y
– Universal Service Order Code (USOC)
Jack: RJ11C
as indicated on the label on the bottom side of
the base station.
34
Safety precautions
Before using your telephone equipment, basic
safety instructions should always be followed to
reduce the risk of fire, electric shock and injury
to persons.
1. Read and understand all instructions.
2. Follow all warnings and instructions marked
on the product.
3. Unplug this product from the wall telephone
jack and power outlet before cleaning. Do not
use liquid cleaners or aerosol cleaners. Use
damp cloth for cleaning.
4. Do not use this product near water, for example, near a bathtub, wash bowl, kitchen sink, or
laundry tub, in a wet basement or near a swimming pool.
5. Place this product securely on a stable surface. Serious damage and/or injury may result if
the unit falls.
6. Slots or openings in the cabinet and the back
and bottom are provided for ventilation, to protect it from overheating. These openings must
not be blocked or covered. This product should
never be placed near or over a radiator or heat
register, or in a place where proper ventilation
is not provided.
7. This product should be operated only from
the type of power source indicated on the
marking label. If you are not sure of the type of
power supply to your home, consult your dealer
or local power company.
8. Do not place objects on the power cord.
Install the unit where no one can step or trip on
the cord.
9. Do not overload wall outlets and extension
cords as this can result in the risk of fire or electric shock.
10. Never push objects of any kind into this
product through cabinet slots as they may
touch dangerous voltage points or short out
parts that could result in the risk of fire or electric shock. Never spill liquid of any kind on this
product.
11. To reduce the risk of electric shock or burns,
do not disassemble this product. Take it to a
qualified service center when service is
required. Opening or removing covers may
expose you to dangerous voltages, dangerous
electrical current or other risks. Incorrect reassembly can cause electric shock when the appliance is subsequently used.
12. Unplug the product from the wall outlet and
refer servicing to qualified service personnel
under the following conditions:
Verizon V500 / USA EN / A31008-M1931-R301-1-6019 / appendix.fm / 30.4.08
Appendix
a.) When the power cord is damaged or frayed.
b.) If liquid has been spilled into the product.
c.) If the product has been exposed to rain or
water.
d.) If the product does not operate normally by
following the operating instructions. Adjust only
those controls that are covered by the operating
instructions because improper adjustment of
other controls may result in damage and may
require extensive work by a qualified technician
to restore the product to normal operation.
e.) If the product has been dropped or physically has been damaged.
f.) If the product exhibits a distinct change in
performance.
13. Avoid using a telephone (other than a cordless type) during a thunderstorm. There may be
a remote risk of electrical shock from lightning.
Therefore we suggest a surge arrestor.
14. Do not use the telephone to report a gas
leak in the vicinity of the leak.
15. Emergency/911 numbers may not be dialed
if the keypad is locked.
charge the batteries with any means other than
that specified in the users manual.
7. Periodically clean the charge contacts on
both the charger and handset.
BATTERY SAFETY PRECAUTIONS
To reduce the risk of fire, injury or electric
shock, and to properly dispose of batteries,
please read and understand the following
instructions.
CONTAINS ALKALINE NICKEL METAL HYDRIDE
BATTERY. BATTERY MUST BE RECYCLED OR DISPOSED OF PROPERLY. DO NOT DISPOSE OF IN
MUNICIPAL WASTE.
1. Only use the batteries specified for use with
this product.
2. DO NOT USE ALKALINE NICKEL CADMIUM OR
ALKALINE LITHIUM BATTERIES, or mix batteries
of different sizes or from different manufacturers in this product. DO NOT USE NONRECHARGEABLE BATTERIES.
3. Do not dispose of the batteries in a fire; the
cells may explode. Do not expose batteries to
water. Check with local codes for special disposal instructions.
4. Do not open or mutilate the batteries.
Released electrolyte is corrosive and may cause
damage to the eyes or skin. The electrolyte may
be toxic if swallowed.
5. Exercise care in handling the batteries in
order not to short the batteries with conducting
materials such as rings, bracelets, and keys. The
batteries or conducting material may overheat
and cause burns or fire.
6. Charge the batteries provided with, or identified for use with, this product only in accordance with the instructions and limitations specified in the user’s manual. Do not attempt to
35
Verizon V500 / USA EN / A31008-M1931-R301-1-6019 / appendix.fm / 30.4.08
Appendix
Service (Customer Care)
Customer Care Warranty for Cordless Products
To obtain Customer Care Warranty service,
product operation information, or for problem resolution, call:
Toll Free: 1-866-374-3864
9:00 a.m. – 5:00 p.m. Monday-Saturday
System Information
End-user limited warranty
When talking to the Customer Care service
on the telephone, you may be asked for
the system information of your telephone.
While on the telephone, do the following:
§Menu§ ¢ s ¢ System Info
Operation Hours
Select entry and press §OK§.
The number of hours your system has
been operating.
§Back§
Press display key.
s HS S/W Version
Select entry and press §OK§.
The software version of the handset is displayed. Use q to scroll through complete
information.
§Back§
Press display key.
s Base S/W Ver.
Select entry and press §OK§.
The software version of the base station is
displayed. Use q to scroll through complete information.
§Back§
Press the display key three
times to return to the usual telephone mode.
The Verizon brand and the Verizon trademark
are used under license. This product is covered
by a one year limited warranty. Any repair
replacement or warranty service, and all questions about this product should be directed to:
1-866-374-3864.
36
This limited, non-transferable warranty is provided to the original buyer/end-consumer
("you") for systems, handsets and accessories
(collectively, "Product") provided by Siemens
Home and Office Communication Devices LLC
("Siemens"). Siemens warrants to you that at
the date of purchase, the product is free of
defects in workmanship and materials and the
software included in the Product will perform in
substantial compliance to its program specifications.
1. WARRANTY PERIOD
The Product warranty period is one (1) year
from the original date of purchase by you. Proof
of purchase (e.g., sales slip or invoice) must be
provided with any Product returned during the
warranty period. Batteries supplied with the
Products are warranted to be free from defects
at the time of purchase only.
2. EXCLUSIVE REMEDY
Siemens' entire liability and your exclusive remedy if the Product is defective in materials or
workmanship during the warranty period and is
returned shall be that the Product will be
repaired or replaced as set forth in Section 4
below. Reconditioned replacement components, parts or materials may be used in the
replacement or repair. Data in the memory of
the Product may be lost during repair.
Verizon V500 / USA EN / A31008-M1931-R301-1-6019 / appendix.fm / 30.4.08
Appendix
3.THIS LIMITED WARRANTY DOES NOT
COVER AND IS VOID WITH RESPECT TO
THE FOLLOWING:
– Cosmetic damage, physical damage to the
surface of the Product, including, without
limitation, breakage, cracks, dents,
scratches or adhesive marks on the LCD
screen or outside casing of the Product.
– Products which have been repaired, maintained or modified (including the antenna)
by anyone other than Siemens or a Siemensapproved repair facility, or that have been
improperly installed.
– Cost of installation, removal or reinstallation.
– Damage due to any telephone, electronic,
hardware or software program, network,
Internet or computer malfunctions, failures,
or difficulties of any kind, including without
limitation, server failure or incomplete,
incorrect, garbled or delayed computer
transmissions.
– Equipment and components not manufactured, supplied or authorized by Siemens.
– Modification of the Product's components,
or operation of the Product in an unsuitable
environment or in a manner for which it is
not intended, including but not limited to
failures or defects caused by misuse, abuse,
accidents, physical damage, abnormal operation, improper handling or storage,
neglect, alterations, unauthorized installation, removal or repairs, failure to follow
instructions, problems caused by the carrier's network coverage, exposure to fire,
water or excessive moisture or dampness,
floods, or extreme changes in climate or
temperature, acts of God, riots, acts of terrorism, spills of food or liquids, viruses or
other software flaws introduced into the
Product, or other acts which are not the fault
of Siemens and which the Product is not
specified to tolerate, including damage
caused by mishandling or blown fuses.
– Products which have had warranty stickers,
electronic serial number and/or serial
number label removed, altered, rendered
illegible or fraudulently applied to other
equipment.
– Signal reception problems (unless caused by
defect in material or workmanship in the
Product).
– Products operated outside published maximum ratings.
– Performance of the Products when used in
combination with other products or equip-
–
–
–
–
ment not manufactured, supplied or authorized by Siemens.
Consumables (such as batteries and fuses).
Payments for labor or service to representatives or service centers not authorized to
perform product maintenance by Siemens.
Loss of data.
Testing and examination discloses that the
alleged defect or malfunction in the Product
does not exist.
This warranty does not cover customer education, instruction, installation or removal, set up
adjustments, problems related to service(s)
provided by a carrier or other service provider,
and/or signal reception problems. Siemens
shall not be responsible for software, firmware,
information, or memory data contained in,
stored on, or integrated with any Products
returned for repair, whether under warranty or
not.
This warranty is valid only in the United States.
USE WITH ACCESSORIES NOT SUPPLIED BY
SIEMENS OR NOT OTHERWISE EXPRESSLY
AUTHORIZED BY SIEMENS MAY VOID
WARRANTY.
4. WARRANTY CLAIM PROCEDURE
All warranty claims must be made by notifying
Siemens prior to the expiration of the warranty
period. Siemens' obligation to provide warranty support shall not extend past the end of
the warranty period, except that any product
repaired or replaced during the warranty period
shall continue to be warranted for the balance
of such warranty period or thirty (30) days,
whichever is greater.
Throughout the warranty period, Verizon Support will be available Monday through Saturday
from 9:00 a.m. to 5:00 p.m., excluding National
holidays. Support service will be provided for
you by accessing toll free customer service
number:
1-866-374-3864
5. LIMITATION OF WARRANTY
Siemens makes no warranty or representation
that the software in the Products will meet your
requirements or will work in combination with
any hardware or applications software products
provided by third parties, that the operation of
37
Verizon V500 / USA EN / A31008-M1931-R301-1-6019 / appendix.fm / 30.4.08
Appendix
the software will be uninterrupted or error free,
or that all defects in the software products will
be corrected.
6. LIMITATION ON REMEDIES; NO
CONSEQUENTIAL OR OTHER
DAMAGES
Your exclusive remedy for any breach of this
limited warranty is as set forth above. Except
for any refund elected by Siemens, YOU ARE
NOT ENTITLED TO ANY DAMAGES, INCLUDING BUT NOT LIMITED TO CONSEQUENTIAL
DAMAGES, if the Product does not meet the
limited warranty , and, to the maximum extent
allowed by applicable law, even if any remedy
fails of its essential purpose. The terms below
("Exclusion of Incidental, Consequential and
Certain Other Damages") are also incorporated
into this limited warranty . Some states/jurisdictions do not allow the exclusion or limitation of
incidental or consequential damages, so the
above limitation or exclusion may not apply to
you. This limited warranty gives you specific
legal rights. You may have others which vary
from state/jurisdiction to state/jurisdiction.
7. DISCLAIMER OF WARRANTIES
SIEMENS AND ITS SUPPLIERS PROVIDE THE
PRODUCT AND SUPPORT SERVICES (IF ANY) AS
IS AND WITH ALL FAULTS. THE LIMITED WARRANTY IS IN LIEU OF ANY OTHER EXPRESS WARRANTIES (IF ANY) CREATED BY ANY DOCUMENTATION OR PACKAGING EXCEPT FOR THE LIMITED WARRANTY, AND TO THE MAXIMUM
EXTENT PERMITTED BY APPLICABLE LAW IS IN
LIEU OF ANY IMPLIED OR STATUTORY WARRANTIES, INCLUDING, BUT NOT LIMITED TO, THE
IMPLIED WARRANTIES OF MERCHANTABILITY
AND FITNESS FOR A PARTICULAR PURPOSE, OF
ACCURACY OR COMPLETENESS OR RESPONSES,
OF RESULTS, OF WORKMANLIKE EFFORT, OF
LACK OF VIRUSES AND OF LACK OF NEGLIGENCE, ALL WITH REGARD TO THE PRODUCT,
AND THE PROVISION OF OR FAILURE TO PROVIDE SUPPORT SERVICES. ALSO, THERE IS NO
WARRANTY OR CONDITION OF TITLE, QUIET
ENJOYMENT, QUIET POSSESSION, OR CORRESPONDENCE TO DESCRIPTION OR NONINFRINGEMENT WITH REGARD TO THE PRODUCT. Some states do not allow limitations on
how long an implied warranty lasts or the exclusion or limitation of incidental or consequential
damages, so the above exclusions or limitations
may not apply to you. If an implied warranty or
condition is created by your state and federal or
state law prohibits disclaimer of it, you also
have an implied warranty or condition, BUT
38
ONLY AS TO DEFECTS DISCOVERED DURING THE
PERIOD OF THIS LIMITED WARRANTY (ONE
YEAR). AS TO ANY DEFECTS DISCOVERED AFTER
THE ONE YEAR PERIOD, THERE IS NO WARRANTY OR CONDITION OF ANY KIND. This limited warranty gives you specific legal rights,
and you may also have other rights which vary
from state to state. In no event shall Siemens'
liability exceed the cost of repairing or replacing
defective Products as provided herein, and any
such liabilities will terminate upon expiration of
the warranty period.
Any supplements or updates to the Product or
the software in the Product, including without
limitation, any (if any) software fixes or
upgrades or bug fixes provided to you after the
expiration of the one year limited warranty
period are not covered by any warranty or condition, express, implied or statutory.
8. EXCLUSION OF INCIDENTAL,
CONSEQUENTIAL AND CERTAIN
OTHER DAMAGES
TO THE MAXIMUM EXTENT PERMITTED BY
APPLICABLE LAW, IN NO EVENT SHALL SIEMENS, SELLER OR THEIR SUPPLIERS BE LIABLE
FOR ANY SPECIAL, INCIDENTAL, INDIRECT, OR
CONSEQUENTIAL DAMAGES WHATSOEVER
(INCLUDING, BUT NOT LIMITED TO, DAMAGES
FOR LOSS OF PROFITS OR CONFIDENTIAL OR
OTHER INFORMATION, FOR BUSINESS INTERRUPTION, FOR PERSONAL INJURY, FOR LOSS OF
PRIVACY, FOR FAILURE TO MEET ANY DUTY
INCLUDING OF GOOD FAITH OR OF REASONABLE CARE, FOR NEGLIGENCE, AND FOR ANY
OTHER PECUNIARY OR OTHER LOSS WHATSOEVER) ARISING OUT OF OR IN ANY WAY
RELATED TO THE USE OF OR INABILITY TO USE
THE PRODUCT, THE PROVISION OF OR FAILURE
TO PROVIDE SUPPORT SERVICES, OR OTHERWISE UNDER OR IN CONNECTION WITH ANY
PROVISION OF THIS LIMITED WARRANTY, EVEN
IN THE EVENT OF THE FAULT, TORT (INCLUDING
NEGLIGENCE), STRICT LIABILITY, BREACH OF
CONTRACT OR BREACH OF WARRANTY OF SIEMENS OR SELLER OR ANY SUPPLIER, AND EVEN
IF SIEMENS OR SELLER OR ANY SUPPLIER HAS
BEEN ADVISED OF THE POSSIBILITY OF SUCH
DAMAGES. REPAIR OR REPLACEMENT, AS PROVIDED UNDER THE WARRANTY, IS YOUR SOLE
AND EXCLUSIVE REMEDY FOR BREACH OF THE
LIMITED WARRANTY.
Verizon V500 / USA EN / A31008-M1931-R301-1-6019 / appendix.fm / 30.4.08
Appendix
9. LIMITATION OF LIABILITY AND
REMEDIES
NOTWITHSTANDING ANY DAMAGES THAT YOU
MIGHT INCUR FOR ANY REASON WHATSOEVER
(INCLUDING, WITHOUT LIMITATION, ALL DAMAGES REFERENCED ABOVE AND ALL DIRECT OR
GENERAL DAMAGES), THE ENTIRE LIABILITY OF
SIEMENS, SELLER AND ANY OF THEIR SUPPLIERS
UNDER ANY PROVISION OF THIS LIMITED WARRANTY AND YOUR EXCLUSIVE REMEDY FOR ALL
OF THE FOREGOING (EXCEPT FOR ANY REMEDY
OF REPAIR OR REPLACEMENT ELECTED BY SIEMENS OR SELLER OR SUPPLIER WITH RESPECT
TO ANY BREACH OF THE LIMITED WARRANTY)
SHALL BE LIMITED TO THE GREATER OF THE
AMOUNT ACTUALLY PAID BY YOU FOR THE
PRODUCT OR FIVE DOLLARS ($5.00 USD). THE
FOREGOING LIMITATIONS, EXCLUSIONS AND
DISCLAIMERS SHALL APPLY TO THE MAXIMUM
EXTENT PERMITTED BY APPLICABLE LAW, EVEN
IF ANY REMEDY FAILS ITS ESSENTIAL PURPOSE.
10.GOVERNING LAW
This limited warranty will be governed by the
laws of Texas, and excluding the United Nations
Convention on Contracts for the International
Sale of Goods.
If you want to learn more about Verizon Service
or for Support on your Verizon phone, visit our
web site at http://www.verizon.com or please
call 1-866-374-3864.
Issued by Siemens Cordless Products
Siemens is a registered trademark of Siemens
Home and Office Communication Devices
GmbH & Co. KG.
Siemens Cordless Products is a division of
Siemens Home and Office Communication
Devices GmbH & Co. KG.
Product attributes subject to change.
Siemens reserves the right, to make changes
without notice in equipment design and/or
components.
Part Number:A31008-M1931-R301-1-6019
© Copyright 2008 Verizon. All rights reserved.
39
Verizon V500 / USA EN / A31008-M1931-R301-1-6019 / V500_kombi_SIX.fm / 30.4.08
Index
Index
Symbols
"External" (Calls list). . . . . . . . . . . . . . 17
"Withheld" (Calls list) . . . . . . . . . . . . . 17
A
Access protection . . . . . . . . . . . . . . . 29
Activating
answer machine. . . . . . . . . . . . . . . 19
answer machine
(remote operation) . . . . . . . . . 23
auto answer . . . . . . . . . . . . . . . . . . 27
handset . . . . . . . . . . . . . . . . . . . . . 12
internal conference call . . . . . . . . . 26
keypad lock . . . . . . . . . . . . . . . . . . 12
Announcement (answer
machine) . . . . . . . . . . . . . . . 19, 20
Announcement mode (answer
machine) . . . . . . . . . . . . . . . 18, 20
Answer machine . . . . . . . . . . . . . . . . 18
activating/deactivation . . . . . . . . . . 19
deleting messages . . . . . . . . . . . . . 21
playing back messages . . . . . . . . . . 20
recording a personal announcement/
announce only . . . . . . . . . 19, 23
remote operation . . . . . . . . . . . . . . 22
Answer machine, see
Network mailbox
Area codes . . . . . . . . . . . . . . . . . . . . 10
Attended call transfer . . . . . . . . . . . . 25
Auto answer . . . . . . . . . . . . . . . . 11, 27
B
Base station
changing . . . . . . . . . . . . . . . . . . . . 24
connecting and setting up . . . . . . . . 7
connecting the device . . . . . . . . . . . 8
display contrast . . . . . . . . . . . . . . . 28
display language . . . . . . . . . . . . . . 28
PABX relevant settings . . . . . . . . . . 29
range . . . . . . . . . . . . . . . . . . . . . . . 7
ring tone melody . . . . . . . . . . . . . . 29
ring tone volume . . . . . . . . . . . . . . 28
setting . . . . . . . . . . . . . . . . . . . 28, 29
settings . . . . . . . . . . . . . . . . . . . . . 28
system PIN . . . . . . . . . . . . . . . . . . . 29
Batteries
charge status . . . . . . . . . . . . . . . . . . 1
40
Battery
fitting . . . . . . . . . . . . . . . . . . . . . . . 8
recommended batteries. . . . . . . . . .32
Best base station . . . . . . . . . . . . . . . .24
C
Call
answering. . . . . . . . . . . . . . . . . . . .11
conference call . . . . . . . . . . . . . . . .26
ending . . . . . . . . . . . . . . . . . . . . . .11
external . . . . . . . . . . . . . . . . . . . . .11
internal. . . . . . . . . . . . . . . . . . . . . .24
picking up from answer
machine . . . . . . . . . . . . . . . . . .21
transferring (connecting). . . . . . . . .25
Call acceptance . . . . . . . . . . . . . . . . .22
Call duration . . . . . . . . . . . . . . . . . . .11
Call history . . . . . . . . . . . . . . . . . . . . .16
Call transfer . . . . . . . . . . . . . . . . . . . .25
attended . . . . . . . . . . . . . . . . . . . . .25
unattended . . . . . . . . . . . . . . . . . . .25
Call waiting . . . . . . . . . . . . . . . . . . . .25
internal call . . . . . . . . . . . . . . . . . . .25
Caller ID . . . . . . . . . . . . . . . . . . . . . . .11
Calls list
"External" . . . . . . . . . . . . . . . . . . . .17
"Withheld" . . . . . . . . . . . . . . . . . . .17
dialing . . . . . . . . . . . . . . . . . . . . . .16
list type . . . . . . . . . . . . . . . . . . . . .17
name of caller . . . . . . . . . . . . . . . . .17
number of caller . . . . . . . . . . . . . . .17
status of entry . . . . . . . . . . . . . . . .17
view entry . . . . . . . . . . . . . . . . . . .16
Care of the telephone . . . . . . . . . . . . .31
Changing
dialing mode. . . . . . . . . . . . . . . . . .29
flash time . . . . . . . . . . . . . . . . . . . .29
name of handset . . . . . . . . . . . . . . .27
ring tone. . . . . . . . . . . . . . . . . . . . .28
Changing system PIN . . . . . . . . . . . . .29
Character set table . . . . . . . . . . . . . . .14
Charge saving function . . . . . . . . . . . .22
Charge status of the batteries . . . . . . . 1
Clear key . . . . . . . . . . . . . . . . 13, 14, 15
Conference call . . . . . . . . . . . . . . . . .26
external . . . . . . . . . . . . . . . . . . . . .27
Control key . . . . . . . . . . . . . . . . . .1, 12
Correcting entries . . . . . . . . . . . . . . . .14
Customer Care . . . . . . . . . . . . . . . . . .36
Verizon V500 / USA EN / A31008-M1931-R301-1-6019 / V500_kombi_SIX.fm / 30.4.08
Index
D
Deactivating
answer machine. . . . . . . . . . . . . . . 19
auto answer . . . . . . . . . . . . . . . . . . 27
conference call. . . . . . . . . . . . . . . . 26
handset . . . . . . . . . . . . . . . . . . . . . 12
keypad lock . . . . . . . . . . . . . . . . . . 12
Default settings . . . . . . . . . . . . . . . . . 30
Deleting
announcement for answer
machine . . . . . . . . . . . . . . . . . 19
characters . . . . . . . . . . . . . . . . . . . 14
message . . . . . . . . . . . . . . . . . . . . 21
De-registering handset . . . . . . . . . . . 24
Dialing
Calls list . . . . . . . . . . . . . . . . . . . . . 16
Dialing mode . . . . . . . . . . . . . . . . . . 29
Directory . . . . . . . . . . . . . . . . . . . . . . 15
managing entries . . . . . . . . . . . . . . 15
opening . . . . . . . . . . . . . . . . . . . . . 12
saving entry . . . . . . . . . . . . . . . . . . 15
Display
charge status of the batteries . . . . . . 1
handset . . . . . . . . . . . . . . . . . . . . . . 1
in idle status . . . . . . . . . . . . . . . . . 13
keys . . . . . . . . . . . . . . . . . . . . 1, 2, 13
lighting . . . . . . . . . . . . . . . . . . . . . 27
number (CID/CNID) . . . . . . . . . . . . 11
Display contrast
base station . . . . . . . . . . . . . . . . . . 28
handset . . . . . . . . . . . . . . . . . . . . . 27
Display language
base station . . . . . . . . . . . . . . . . . . 28
handset . . . . . . . . . . . . . . . . . . . . . 27
DP (pulse dialing) . . . . . . . . . . . . . . . 29
DTMF . . . . . . . . . . . . . . . . . . . . . . . . 29
E
Earpiece mode . . . . . . . . . . . . . . . . . 12
Editing entries . . . . . . . . . . . . . . . . . . 14
End Call key . . . . . . . . . . . . 1, 3, 11, 27
Ending, call . . . . . . . . . . . . . . . . . . . . 11
Ending, see Deactivate
Entry
selecting (menu) . . . . . . . . . . . . . . . 6
selecting from directory . . . . . . . . . 15
status (Calls list) . . . . . . . . . . . . . . . 17
writing, editing, correcting . . . . . . . 14
Erase key . . . . . . . . . . . . . . . . . . . . . . 2
Example for menu input . . . . . . . . . . . 6
External
conference call . . . . . . . . . . . . . . . .27
starting second external call . . . . . .26
toggling between two calls . . . . . . .26
two simultaneous calls . . . . . . . . . .26
F
Fast access
answer machine . . . . . . . . . . . . . . .22
network mailbox . . . . . . . . . . . . . . .23
Flash time . . . . . . . . . . . . . . . . . . . . .29
H
Handset
activating/deactivating . . . . . . . . . .12
auto answer . . . . . . . . . . . . . . . . . .27
changing name . . . . . . . . . . . . . . . .27
changing to best reception . . . . . . .24
changing to different base
station . . . . . . . . . . . . . . . . . . .24
contact with liquid . . . . . . . . . . . . .31
deactivating ring tone . . . . . . . . . . .28
de-registering . . . . . . . . . . . . . . . . .24
display contrast . . . . . . . . . . . . . . . .27
display in idle status . . . . . . . . . . . . 1
display language . . . . . . . . . . . . . . .27
idle status . . . . . . . . . . . . . . . . .10, 13
key-touch tone . . . . . . . . . . . . . . . .28
lighting. . . . . . . . . . . . . . . . . . . . . .27
loudspeaker volume . . . . . . . . . . . .27
paging . . . . . . . . . . . . . . . . . . . . . .24
plug for headset . . . . . . . . . . . . . . . 1
reception strength. . . . . . . . . . . . . . 7
registering . . . . . . . . . . . . . . . . . . .24
registering with another
base station . . . . . . . . . . . . . . .24
ring tone melody. . . . . . . . . . . . . . .28
ring tone volume. . . . . . . . . . . . . . .28
settings . . . . . . . . . . . . . . . . . . . . .27
setup . . . . . . . . . . . . . . . . . . . . . . . 8
transferring call . . . . . . . . . . . . . . . .25
using several handsets . . . . . . . . . .24
Handset charge times . . . . . . . . . . . . .32
Handset operating time . . . . . . . . . . .32
Handsfree talking . . . . . . . . . . . . . . . .12
Headset plug . . . . . . . . . . . . . . . . . . . 1
41
Verizon V500 / USA EN / A31008-M1931-R301-1-6019 / V500_kombi_SIX.fm / 30.4.08
Index
Hold while making internal call . . . . . 25
I
Icon
answer machine. . . . . . . . . . . . . . . 19
display . . . . . . . . . . . . . . . . . . . . . . 13
keypad lock . . . . . . . . . . . . . . . . . . 12
new message . . . . . . . . . . . . . . . . . 20
ring tone . . . . . . . . . . . . . . . . . . . . 28
Idle status (display) . . . . . . . . . . . . . . 10
Idle status, returning to . . . . . . . . . . . 13
Intercom/Conference key . . . . . . . . . . . 3
Internal
conference call. . . . . . . . . . . . . . . . 26
making calls. . . . . . . . . . . . . . . . . . 24
simultaneous internal call . . . . . . . . 25
Internal call . . . . . . . . . . . . . . . . . . . . 24
call waiting . . . . . . . . . . . . . . . . . . 25
K
Key 1 (fast access) . . . . . . . . . . . . . . . 22
Keypad lock. . . . . . . . . . . . . . . . . . . . 12
Keys
clear key . . . . . . . . . . . . . . 13, 14, 15
Control key . . . . . . . . . . . . . . . . 1, 12
display keys . . . . . . . . . . . . . . 1, 2, 13
End Call key . . . . . . . . . . . 1, 3, 11, 27
Erase key . . . . . . . . . . . . . . . . . . . . . 2
fast access . . . . . . . . . . . . . . . . . . . 22
intercom/conference key . . . . . . . . . 3
Last Number Redial key . . . . . . . . . 16
Line 1 . . . . . . . . . . . . . . . . . . . . . . . 1
Line 1 with LED . . . . . . . . . . . . . . . . 3
Line 2 . . . . . . . . . . . . . . . . . . . . . . . 1
Line 2 with LED . . . . . . . . . . . . . . . . 3
menu key . . . . . . . . . . . . . 13, 14, 15
mute key . . . . . . . . . . . . . . . . . . . . . 3
mute/unmute microphone . . . . . . . . 1
On/Off key . . . . . . . . . . . . . . . . . . 1, 3
page key . . . . . . . . . . . . . . . . . . . . . 3
Pound key . . . . . . . . . . . . . . . . . 1, 12
redial/pause key . . . . . . . . . . . . . . . . 3
star key . . . . . . . . . . . . . . . . . . . 1, 28
start/stop key with LED . . . . . . . . . . . 2
Talk key . . . . . . . . . . . . . . . . . . . 1, 11
talk/flash key . . . . . . . . . . . . . . . . . . 3
Line keys . . . . . . . . . . . . . . . . . . . . . . 1
Line keys with LEDs . . . . . . . . . . . . . . 3
Line settings. . . . . . . . . . . . . . . . . . . . 9
Liquid . . . . . . . . . . . . . . . . . . . . . . . .31
List
call history . . . . . . . . . . . . . . . . . . .16
missed calls . . . . . . . . . . . . . . . . . .17
List type (Calls list) . . . . . . . . . . . . . . .17
Listening in . . . . . . . . . . . . . . . . . . . .26
Listening in during recording . . . . . . .21
Locating handset . . . . . . . . . . . . . . . .24
Lock
activating/deactivating keypad
lock . . . . . . . . . . . . . . . . . . . . .12
Loudspeaker volume. . . . . . . . . . . . . .27
handset . . . . . . . . . . . . . . . . . . . . .27
M
Making calls
answering a call . . . . . . . . . . . . . . .11
external . . . . . . . . . . . . . . . . . . . . .11
internal. . . . . . . . . . . . . . . . . . . . . .24
Manual last number redial . . . . . . . . .16
Medical equipment. . . . . . . . . . . . . . . 5
Menu
key . . . . . . . . . . . . . . . . . . . 13, 14, 15
menu guidance . . . . . . . . . . . . . . . .13
menu input . . . . . . . . . . . . . . . . . . . 6
Messages . . . . . . . . . . . . . . . . . . . . . .18
deleting . . . . . . . . . . . . . . . . . . . . .21
icon for new message . . . . . . . . . . .20
marking as "new" . . . . . . . . . . . . . .21
playing back . . . . . . . . . . . . . . . . . .20
Microphone . . . . . . . . . . . . . . . . . . . . 1
mute/unmute . . . . . . . . . . . . . . . . . 1
Missed call . . . . . . . . . . . . . . . . . . . . .17
Mute key . . . . . . . . . . . . . . . . . . . . .1, 3
N
Name of caller (Calls list) . . . . . . . . . .17
Network mailbox . . . . . . . . . . . . . . . .23
Number
adding to directory . . . . . . . . . . . . .16
display calling number (CIP). . . . . . .11
saving in directory . . . . . . . . . . . . . .15
Number of caller (Calls list) . . . . . . . . .17
L
O
Last number redial . . . . . . . . . . . . . . 16
Lighting . . . . . . . . . . . . . . . . . . . . . . 27
On/Off key . . . . . . . . . . . . . . . . . . . .1, 3
42
Verizon V500 / USA EN / A31008-M1931-R301-1-6019 / V500_kombi_SIX.fm / 30.4.08
Index
P
PABX
setting dialing mode . . . . . . . . . . . 29
setting flash time . . . . . . . . . . . . . . 29
settings . . . . . . . . . . . . . . . . . . . . . 29
switching to tone dialing . . . . . . . . 29
Pack contents . . . . . . . . . . . . . . . . . . . 7
Page key . . . . . . . . . . . . . . . . . . . . . . . 3
Paging . . . . . . . . . . . . . . . . . . . . . . . 24
Paging, handset . . . . . . . . . . . . . . . . 24
PIN . . . . . . . . . . . . . . . . . . . . . . . . . . 29
Playback
announcement (answer
machine) . . . . . . . . . . . . . 19, 20
Pound key . . . . . . . . . . . . . . . . . . . 1, 12
Power consumption. . . . . . . . . . . . . . 32
Power supply unit . . . . . . . . . . . . . . . . 5
Protecting phone from access . . . . . . 29
Pulse dialing . . . . . . . . . . . . . . . . . . . 29
Q
Questions and answers . . . . . . . . . . . 31
R
Range . . . . . . . . . . . . . . . . . . . . . . . . . 7
Reception strength . . . . . . . . . . . . . . . 7
Redial key . . . . . . . . . . . . . . . . . . . . . 16
Redial/Pause key . . . . . . . . . . . . . . . . . 3
Registering handset . . . . . . . . . . . . . . 24
Remote control . . . . . . . . . . . . . . . . . 22
Ring tone
activating/deactivating . . . . . . . . . . 28
changing . . . . . . . . . . . . . . . . . . . . 28
setting melody (base station) . . . . . 29
setting melody (handset) . . . . . . . . 28
setting volume (base station) . . . . . 28
setting volume (handset) . . . . . . . . 28
S
Safety precautions . . . . . . . . . . . . . . . . 5
Searching in the directory . . . . . . . . . 15
Service (Customer Care) . . . . . . . . . . 36
Setting
date . . . . . . . . . . . . . . . . . . . . . . . . 9
lighting . . . . . . . . . . . . . . . . . . . . . 27
time . . . . . . . . . . . . . . . . . . . . . . . . 9
Setting up, base station . . . . . . . . . . . . 7
Settings
auto answer . . . . . . . . . . . . . . . . . .27
base station . . . . . . . . . . . . . . . . . .28
dialing mode. . . . . . . . . . . . . . . . . .29
display contrast (base station) . . . . .28
display contrast (handset) . . . . . . . .27
display language (base station) . . . .28
flash time . . . . . . . . . . . . . . . . . . . .29
for connecting to PABX . . . . . . . . . .29
handset . . . . . . . . . . . . . . . . . . . . .27
key-touch tone (handset). . . . . . . . .28
line settings . . . . . . . . . . . . . . . . . . 9
loudspeaker volume (handset) . . . . .27
restoring default settings . . . . . . . . .30
ring tone melody (handset) . . . . . . .28
ring tone volume (base station) . . . .28
ring tone volume (handset) . . . . . . .28
system . . . . . . . . . . . . . . . . . . . . . .29
tone dialing . . . . . . . . . . . . . . . . . .29
Setup, handset . . . . . . . . . . . . . . . . . . 8
Sound, see ring tone
Special characters . . . . . . . . . . . . . . . .14
Specifications . . . . . . . . . . . . . . . . . . .32
Star key . . . . . . . . . . . . . . . . . . . . .1, 28
Start/stop key with LED . . . . . . . . . . . . 2
System PIN . . . . . . . . . . . . . . . . . . . . .29
T
Talk key . . . . . . . . . . . . . . . . . . . . .1, 11
Talk/flash key . . . . . . . . . . . . . . . . . . . 3
Tone dialing . . . . . . . . . . . . . . . . . . . .29
Troubleshooting . . . . . . . . . . . . . . . . .31
U
Unattended call transfer . . . . . . . . . . .25
Unknown . . . . . . . . . . . . . . . . . . . . . .12
Unknown caller . . . . . . . . . . . . . . . . .12
V
View
entry from Calls list . . . . . . . . . . . . .16
Volume
handset loudspeaker . . . . . . . . . . . .27
handset ring tone . . . . . . . . . . . . . .28
ring tone. . . . . . . . . . . . . . . . . . . . .28
W
Writing entries . . . . . . . . . . . . . . . . . .14
43
Verizon V500 / ES / A31008-M1931-R301-1-6019 / kombi_overview.fm / 30.4.08
Vista general del terminal inalámbrico
Vista general del terminal inalámbrico
15
Ä ÕÊ
Ë
INT 1
01/31
e
1
2
9:45AM
§§§§Menú§§§§
3
4
14
13
5
6
7
12
8
11
9
10
Nota:
Las imágenes en este manual del usuario
podrían ser distintas del producto real.
1 Pantalla en estado inactivo
2 Indicación del nivel de carga de las baterías
= e U (vacío a lleno)
= parpadea: baterías casi agotadas
= U parpadea: cargando las baterías
3 Teclas de pantalla (p. 14)
4 Tecla de control
t Acceso a la lista de Registro de llamadas.
s Acceso al directorio telefónico.
5 Teclas de línea
Contestar una llamada entrante para la
Línea 1/Línea 2.
Realizar una llamada desde la Línea 1/
Línea 2.
Iniciar una segunda llamada desde la Línea 2
mientras se habla por teléfono en la Línea 1
(ver p. 26).
6 Tecla de colgar, encender/apagar
Tecla de colgar, función de cancelar, regresar al estado inactivo, activar/desactivar el
terminal inalámbrico (presionar prolongadamente en estado inactivo).
7 enchufe de 2,5 mm (mono) para auricular
8 Tecla (#) numeral
Introducir el símbolo #.
Bloquear/desbloquear el teclado (presionar
prolongadamente en estado inactivo).
Conmutar entre letras mayúsculas/minúsculas para ingresar texto.
9 Tecla de rellamada/pausa
Abrir la lista de rellamada (en estado inactivo) o introducir una pausa de marcación
(mientras edita un número).
10 Micrófono
11 Tecla de intercomunicación/espera/
conferencia
Configuración de una llamada interna.
Conmutar entre llamadas externas e interlocutor interno (terminal inalámbrico/estación base), o transferir una llamada durante
una llamada externa.
Configuración de una llamada de conferencia con una línea externa y un interlocutor
interno (terminal inalámbrico/estación
base). Presione prolongadamente la tecla en
el modo retener-intercomunicación.
12 Teclade asterisco(*)
Activar/desactivar los tonos de timbre (presionar prolongadamente).
Conmutar temporalmente a marcación por
tonos (DTMF).
Conmutar entre AM y PM al ajustar la hora.
Conmutar el formato de visualización de la
lista de llamadas.
13 Manos libres: tecla
Contestar o hacer una llamada por la bocina.
Conmutar entre activar/desactivar bocina (si
está descolgado).
1
Verizon V500 / ES / A31008-M1931-R301-1-6019 / kombi_overview.fm / 30.4.08
Vista general de la estación base
14 Tecla de descolgar/tiempo de corte
Contestar o iniciar una llamada.
La tecla parpadea: llamada entrante.
Cómo agregar un tiempo de corte (en el directorio).
Enviar FLASH (tiempo de corte) (si está descolgado).
15 Potencia de recepción
ÄEl terminal inalámbrico está vinculado
con la estación base.
Ä parpadea: fuera de alcance.
Vista general de la estación base
5
ÊÕÉ×ÅËÕÉ×Å
4
6
SUN 09:23 AM 01/31
7
§§§§§§§§§Menu§§§§§§§§§
3
8
2
9
1
10
11
12
13
14
15
1 Teclado numérico
2 Tecla de control
t Acceso a la lista de Registro de llamadas.
s Acceso al directorio telefónico.
3 Teclas de pantalla (p. 14)
4 Pantalla en estado inactivo
Ê ,Ë – Parpadea cuando la línea correspondiente recibe una llamada
entrante.
– Está encendido cuando la línea
correspondiente está
– descolgada.
– en modo de llamada externa.
– en modo de espera o de uso.
– Se muestra en la lista de llamadas para indicar en qué línea
entró la llamada.
2
Õ
É
×
Å
Parpadea cuando el contestador automático está encendido.
Parpadea cuando la memoria de
mensajes del contestador automático está llena.
Parpadea cuando el contestador automático es controlado por un terminal inalámbrico.
Encendido cuando el volumen del
tono de timbre de la estación base
está en cero (ver p. 31).
5 Tecla de encendido/apagado del contestador automático
Activar/desactivar el contestador automático.
Verizon V500 / ES / A31008-M1931-R301-1-6019 / kombi_overview.fm / 30.4.08
Vista general de la estación base
6 Teclas de volumen
– En modo inactivo: cambiar el volumen
del tono de timbre de la estación base.
– Durante la reproducción del mensaje:
cambiar volumen de reproducción.
– Durante una llamada: cambiar volumen
de la bocina.
– Durante el control de llamadas: cambiar
el volumen del control de llamadas.
7 Tecla de borrar
Borrar el mensaje actual durante la reproducción.
Borrar todos los mensajes antiguos (presionar prolongadamente en modo inactivo).
8 Tecla de iniciar/detener con LED integrado para Línea 1/Línea 2
Iniciar/detener reproducción.
Estado del LED:
– encendido cuando se reproduce un
mensaje en la línea correspondiente.
– parpadea lentamente cuando hay por lo
menos un mensaje nuevo en el contestador automático para la línea correspondiente.
– parpadea rápidamente cuando la
memoria de mensajes de la línea correspondiente está llena.
9 Tecla de rellamada/pausa
Abrir la lista de rellamada (en estado inactivo) o introducir una pausa de marcación
(mientras edita un número).
10 Tecla de localización
Localización de terminales inalámbricos
(presione brevemente).
Inicie el proceso de registro (presione prolongadamente en el modo inactivo). Se
escucha un pitido.
11 Tecla Silenciar
Silenciar/activar micrófono.
12 Tecla de intercomunicación/espera/conferencia
Configuración de una llamada interna.
Conmutar entre llamadas externas e interlocutor interno (terminal inalámbrico/estación base), o transferir una llamada durante
una llamada externa.
Configuración de una llamada de conferencia con una línea externa y un interlocutor
interno (terminal inalámbrico/estación
base). Presione prolongadamente la tecla en
el modo retener-intercomunicación.
13 Teclas de línea
Contestar una llamada entrante para la
Línea 1/Línea 2.
Realizar una llamada desde la Línea 1/
Línea 2.
Iniciar una segunda llamada desde la Línea 2
mientras se habla por teléfono en la Línea 1
(ver p. 26ff).
Estado del LED:
– parpadea rápidamente cuando la línea
correspondiente recibe una llamada entrante.
– parpadea lentamente cuando un terminal inalámbrico está descolgado en la
línea correspondiente.
– parpadea lentamente cuando la estación
base está en espera con la línea correspondiente.
– encendido cuando la estación base está
en modo de llamada con la línea correspondiente.
14 Tecla de colgar
Tecla de colgar, función cancelar, regresar al
estado inactivo.
15 Tecla de descolgar/tiempo de corte
Contestar o iniciar una llamada.
Cómo agregar un tiempo de corte (en el directorio)
Enviar FLASH (tiempo de corte) (si está descolgado).
Recuerde:
u Si el contestador automático está
siendo manejado desde un terminal
inalámbrico o si está grabando un mensaje, no puede ser manejado desde la
estación base.
u Si la tecla iniciar/detener parpadea
aunque el contestador automático esté
apagado, significa que aún hay por lo
menos un mensaje nuevo que no ha
sido reproducido.
3
Verizon V500 / ES / A31008-M1931-R301-1-6019 / V500_kombi_IVZ.fm / 30.4.08
Contenido
Contenido
Vista general del terminal
inalámbrico . . . . . . . . . . . . . . . . . . 1
Vista general de la estación base 2
Precauciones de seguridad . . . . . 6
Notas de las instrucciones de
funcionamiento . . . . . . . . . . . . . . 7
Símbolos usados . . . . . . . . . . . . . . . . . 7
Ejemplo: registro de menú . . . . . . . . . . 7
Verizon V500AM –
más que un simple teléfono . . . . 8
Primeros pasos . . . . . . . . . . . . . . . 8
Contenido del paquete . . . . . . . . . . . . . 8
Instalación de la estación base . . . . . . 8
Configuración del terminal inalámbrico
para su uso . . . . . . . . . . . . . . . . . . . . . . 9
Prefijos de área . . . . . . . . . . . . . . . . . . 11
Cómo hacer llamadas . . . . . . . . . 12
Cómo hacer una llamada externa . . .
Cómo finalizar una llamada . . . . . . . .
Cómo responder una llamada . . . . . .
ID de llamantes . . . . . . . . . . . . . . . . . .
Funcionamiento de manos libres . . . .
12
12
12
13
13
Operación del teléfono . . . . . . . 13
Tecla de control . . . . . . . . . . . . . . . . .
Teclas de la pantalla . . . . . . . . . . . . . .
Cómo volver al estado inactivo . . . . .
Guía del menú . . . . . . . . . . . . . . . . . .
Escribir, modificar y corregir entradas
13
14
14
14
15
Uso del directorio telefónico y las
listas . . . . . . . . . . . . . . . . . . . . . . . 16
Directorio telefónico . . . . . . . . . . . . . . 16
Lista de últimos números de
rellamada . . . . . . . . . . . . . . . . . . . . . . 17
Lista de llamadas . . . . . . . . . . . . . . . . 18
Cómo operar el contestador
automático . . . . . . . . . . . . . . . . . 19
Operación usando las teclas de la estación
base . . . . . . . . . . . . . . . . . . . . . . . . . . 19
Operación a través del terminal
inalámbrico . . . . . . . . . . . . . . . . . . . . 19
4
Configuración del contestador
automático . . . . . . . . . . . . . . . . . . . . . 22
Operación en movimiento (funcionamiento remoto) . . . . . . . . . . . . . . . . . . . . . . 24
Cómo usar la bandeja de entrada de
la red . . . . . . . . . . . . . . . . . . . . . . 25
Configurar la bandeja de entrada de la red
para marcación rápida . . . . . . . . . . . . 25
Cómo usar varios terminales
inalámbricos . . . . . . . . . . . . . . . . 26
Cómo registrar y quitar del registro
terminales inalámbricos . . . . . . . . . . .
Buscar un terminal inalámbrico
("localización") . . . . . . . . . . . . . . . . . .
Cambiar de estación base . . . . . . . . . .
Cómo hacer llamadas internas . . . . . .
Contestar/rechazar la llamada en
espera . . . . . . . . . . . . . . . . . . . . . . . . .
Conectar los llamantes internos a una
llamada externa . . . . . . . . . . . . . . . . .
Cómo hacer dos llamadas externas
simultáneamente . . . . . . . . . . . . . . . .
26
26
26
27
27
28
29
Configuración del terminal
inalámbrico . . . . . . . . . . . . . . . . . 30
Cambiar el nombre de un terminal
inalámbrico . . . . . . . . . . . . . . . . . . . . .
Cómo cambiar el idioma de la
pantalla . . . . . . . . . . . . . . . . . . . . . . . .
Ajustar el contraste de la pantalla . . .
Activar/desactivar la función respuesta
automática . . . . . . . . . . . . . . . . . . . . .
Ajuste del volumen de la bocina y del
auricular . . . . . . . . . . . . . . . . . . . . . . .
Cómo cambiar los tonos de timbre . .
Cómo activar/desactivar el tono del
teclado . . . . . . . . . . . . . . . . . . . . . . . .
30
30
30
30
30
30
31
Configuración de la
estación base . . . . . . . . . . . . . . . 31
Configuración del sistema . . . . . 32
Cómo restablecer la configuración
predeterminada . . . . . . . . . . . . . 33
Apéndice . . . . . . . . . . . . . . . . . . . 34
Cuidados . . . . . . . . . . . . . . . . . . . . . . . 34
Contacto con líquidos . . . . . . . . . . . . 34
Verizon V500 / ES / A31008-M1931-R301-1-6019 / V500_kombi_IVZ.fm / 30.4.08
Contenido
Preguntas y respuestas . . . . . . . . . . .
Características técnicas . . . . . . . . . . .
Información sobre la FCC/ACTA . . . . .
Precauciones de seguridad . . . . . . . .
Atención al Cliente . . . . . . . . . . . . . . .
Garantía limitada del
usuario final . . . . . . . . . . . . . . . . . . . .
34
35
36
37
39
39
Índice alfabético . . . . . . . . . . . . . 43
5
Verizon V500 / ES / A31008-M1931-R301-1-6019 / security.fm / 30.4.08
Precauciones de seguridad
Precauciones de seguridad*)
$
!
Use solamente la fuente de alimentación provista, tal como se indica en la
parte inferior del dispositivo.
Use solamente baterías recargables aprobadas del mismo tipo.
Nunca use baterías comunes (no recargables), ya que pueden presentar un
riesgo a la salud o causar lesiones.
Nunca cargue el terminal inalámbrico en la unidad de carga o en la estación
base mientras está conectado el auricular.
‹
Asegúrese de que las baterías recargables están introducidas con la polaridad
correcta.
Œ
Use las baterías indicadas en estas instrucciones de funcionamiento.
El teléfono puede afectar la operación de equipo médico, así que apague su teléfono siempre que vaya a entrar al consultorio de un médico o a un hospital.
Aviso a usuarios de audífonos de sordera:
Este sistema telefónico es compatible con audífonos de sordera de acoplamiento inductivo.
Nunca use el teléfono en sitios donde exista el riesgo de explosión
(tales como talleres de pintura).
No instale la estación base en el cuarto de baño. El terminal inalámbrico y la estación base no son a prueba de salpicaduras (ver p. 34).
No utilice el teléfono mientras conduce.
El teléfono siempre ha de permanecer apagado en un avión. Asegúrese de que
no pueda activarse accidentalmente.
ƒ
Si le da su teléfono a otra persona, también debe darle las instrucciones de funcionamiento.
Deseche las baterías y el teléfono con cuidado. No contamine el medio ambiente.
¡No es posible marcar los números de emergencia si el bloqueo del
teclado está activado!
*) ver también p. 37
6
Verizon V500 / ES / A31008-M1931-R301-1-6019 / notes-on-instructions.fm / 30.4.08
Notas de las instrucciones de funcionamiento
Notas de las instrucciones
de funcionamiento
El contenido del cuadro explica todo lo
que se debe hacer.
¢ Configuración ¢ Terminal Inalám.
¢ Idioma ¢ Inglés/ Español/ Francés
§Menú§
Esta sección explica el significado de
ciertos símbolos y convenciones tipográficas que se usan en esta guía del usuario.
Símbolos usados
Encendido/Apagado (ejemplo)
Seleccionar una de las dos funciones de menú indicadas.
~
Introducir cifras o letras.
§Atrás§
Las funciones actuales de las
teclas de pantalla se muestran
como texto resaltado en la
parte inferior de la pantalla.
Presione la tecla de pantalla siguiente para seleccionar la
función.
q
Presione arriba o abajo en la
tecla de control: para desplazarse hacia arriba o abajo.
c / Q / * etc.
Presione la tecla correspondiente del terminal inalámbrico.
Ejemplo: registro de menú
En las instrucciones de uso, los pasos que
hay que ejecutar se muestran de forma
abreviada. Esto aparece ilustrado a continuación, y se usa "Cambio del idioma en la
pantalla" como ejemplo.
¤ Con el terminal inalámbrico en estado
inactivo, presione la tecla de pantalla
de la derecha para abrir el menú principal.
¤ Seleccione Configuración con la tecla de
control q – presione arriba o abajo en
la tecla de control.
¤ Presione la tecla de pantalla §OK§ para
confirmar la función Configuración.
Aparecerá Configuración el submenú.
¤ Presione repetidamente abajo en la
tecla de control s hasta seleccionar la
función Terminal Inalám.
¤ Presione la tecla de pantalla §OK§ para
confirmar la función.
ApareceráTerminal Inalám. el submenú.
¤ Presione repetidamente abajo en la
tecla de control s hasta seleccionar la
función Idioma.
¤ Presione la tecla de pantalla §OK§ para
confirmar la función.
Aparecerá Idioma el submenú.
¤ Seleccione el idioma que desea con la
tecla de control q – presione arriba o
abajo en la tecla de control.
¤ Presione la tecla de pantalla §OK§ para
confirmar el idioma seleccionado.
Ahora todo el texto aparece en el idioma
cambiado.
7
Verizon V500 / ES / A31008-M1931-R301-1-6019 / starting.fm / 30.4.08
Verizon V500AM – más que un simple teléfono
Verizon V500AM –
más que un simple teléfono
Su teléfono no sólo le permite guardar
hasta 50 números telefónicos (p. 16),
puede hacer mucho más:
u Haga llamadas directas utilizando la estación base: La estación base tiene las
mismas teclas que el terminal inalámbrico. Así que casi todas las funciones
que utiliza habitualmente en el terminal inalámbrico también están disponibles directamente en la estación base.
u Use las dos líneas telefónicas con un
solo teléfono.
u Realice llamadas de conferencia con
dos interlocutores externos (p. 29).
u Ver las llamadas perdidas en el teléfono
(p. 18).
u ECO DECT utiliza una fuente de alimentación con un consumo muy bajo de
energía. Su terminal inalámbrico
reduce automáticamente la potencia
de transmisión dependiendo de la distancia de la estación base (rango cercano).
Primeros pasos
Contenido del paquete
u Una estación base Verizon V500AM
u Un cable de línea telefónica
u Un adaptador de CA para la estación
base.
u Una guía del usuario
Para Verizon V500AM-1
u Un terminal inalámbrico Verizon
V500H con tapa para las baterías
u Dos baterías
u Una presilla para el cinturón
Para Verizon V500AM-2
u Dos terminales inalámbricos Verizon
V500H con tapa para las baterías
u Un soporte de carga Verizon V100C
u Un adaptador de CA para el soporte de
carga
u Cuatro baterías
u Dos presillas para el cinturón
Instalación de la estación base
Nota:
La potencia de transmisión de la estación base
se apaga prácticamente cuando el terminal
inalámbrico se coloca en la estación base y hay
un sólo terminal inalámbrico registrado en la
estación base.
La estación base está diseñada para funcionar en recintos secos a una temperatura comprendida entre +41 °F y +113 °F
(+5 °C y +45 °C).
Coloque la estación base en un lugar
central de su casa o apartamento.
Enchufe del auricular
Tenga en cuenta:
¿Cuáles auriculares son aceptables?
Llame al número de Servicio Verizon
1-866 374 3864 o contáctenos en
http://www.verizon.com para obtener
información.
u Nunca exponga el teléfono a fuentes
Precaución:
Nunca cargue el terminal inalámbrico en la
unidad de carga o en la estación base mientras
está conectado el auricular.
¡Diviértase usando su nuevo teléfono!
8
de calor, luz solar directa ni otros electrodomésticos.
u Proteja su teléfono contra la humedad,
el polvo, los líquidos y los vapores corrosivos.
Verizon V500 / ES / A31008-M1931-R301-1-6019 / starting.fm / 30.4.08
Primeros pasos
Alcance:
Configuración del terminal
inalámbrico para su uso
u Hasta 984 pies en espacios abiertos
u Hasta 165 pies en edificios
Instalación de las baterías
Alcance y potencia de recepción
Potencia de recepción:
La pantalla muestra si el terminal inalámbrico está vinculado con la estación base:
u Ä está encendido: terminal inalámbrico vinculado con la estación base.
u Ä parpadea: no hay recepción, el terminal inalámbrico está fuera del
alcance o no está registrado.
Conexión de la estación base
¤ Primero conecte el adaptador de co-
rriente y luego el enchufe hembra del
teléfono como se muestra.
1
Precaución:
Use solamente baterías AAA recargables y
aprobadas por UL. En otras palabras, no use
nunca una batería común (no recargable) ni
otro tipo de batería ya que esto podría provocar graves riesgos a la salud y lesiones personales. Por ejemplo, las baterías podrían explotar. El teléfono puede funcionar mal o dañarse
como resultado de la utilización de baterías
que no sean del tipo recomendado.
Nota:
Si estaba colocada, retire la presilla para el cinturón antes de abrir la tapa de las baterías.
¤ Abra la tapa de las baterías.
3
2
1 Adaptador de corriente de 110 V
2 Parte de atrás de la estación base
3 Enchufe hembra con cables de teléfono
¤ Coloque las baterías con la polaridad
correcta (vea el diagrama).
La polaridad está indicada en la tapa de las
baterías.
Tenga en cuenta:
u El adaptador de corriente siempre
debe estar enchufado, porque el teléfono no funciona si no recibe corriente
eléctrica.
u El contestador automático viene ajustado con un anuncio estándar.
¤ Cierre la tapa, y deslice la parte superior
hasta que encaje.
9
Verizon V500 / ES / A31008-M1931-R301-1-6019 / starting.fm / 30.4.08
Primeros pasos
Colocación de la presilla para el cinturón
Cómo fijar la fecha y la hora
A los lados del terminal inalámbrico hay
unas muescas para colocar la presilla para
el cinturón a la misma altura de la pantalla.
¤ Presione la presilla para el cinturón en
la parte trasera del terminal inalámbrico para que las protuberancias de la
presilla se enganchen en las muescas.
Ajuste la fecha y la hora, por ejemplo, para
asegurarse de que se registra la hora real a
la que se reciben las llamadas.
Para cambiar la fecha y la hora, abra el
campo de entrada usando:
§Menú§ ¢ s ¢ Configuración ¢ Fecha Y
Hora ¢ Dar Fecha/Hora
~
Ingrese la hora y la fecha con
10 dígitos, por ejemplo, Q
M15Q11
5 Q N para 15 de
enero de 2008, 07:15 am. Si
se fijó el formato de 12 horas
use la tecla * para conmutar entre am y pm.
Para corregir un registro incorrecto, sobrescriba el carácter
tecleando el correcto.
§OK§
Presione la tecla de pantalla
para guardar los cambios.
Se puede cambiar el formato de la fecha y
la hora:
§Menú§ ¢ s ¢ Configuración ¢ Fecha Y
Hora ¢ Sel. Formato
¤ Elija entre día/mes y mes/día como
formatos de fecha:
s ¢ Formato Fecha ¢ DD/MM/MM/DD
¤ Elija entre el formato de 12 o el de
24 horas:
s ¢ Formato Hora ¢ 12 Horas/24 Horas
Cómo colocar el terminal inalámbrico
en la estación base
¤ Coloque el terminal inalámbrico en la
estación base con la pantalla del terminal inalámbrico viendo hacia afuera.
Cómo cargar las baterías por primera
vez
¤ Para ello, deje el terminal inalámbrico
cargando diez horas sin interrupción
en la estación base o en el soporte de
carga.
Los iconos de la batería = U parpadeando en forma alterna del lado derecho superior de la pantalla indican que las baterías se están cargando.
Nota:
– Si el terminal inalámbrico se apagó porque
las baterías se agotaron, y luego se coloca
el terminal inalámbrico en la estación base,
se encenderá automáticamente.
– El terminal inalámbrico sólo debe colocarse
en la estación base o el soporte de carga suministrados.
– Durante el funcionamiento del terminal
inalámbrico, el ícono de la batería e
indica el estado de carga de las baterías
(p. 1).
– Las baterías pueden calentarse durante el
proceso de carga. Esto no es peligroso.
Por preguntas y resolución de problemas
ver p. 34.
10
Verizon V500 / ES / A31008-M1931-R301-1-6019 / starting.fm / 30.4.08
Primeros pasos
Cómo elegir la configuración de la
línea
Para cada terminal inalámbrico y la estación base se puede configurar cómo utilizará su teléfono las dos líneas:
Autom.
Todas las llamadas entrantes
sonarán. Para llamadas salientes, su teléfono utilizará la
línea que esté libre en el momento.
Línea1/Línea2
Solo se pueden contestar llamadas entrantes en las líneas
respectivas con la tecla c.
Para llamadas salientes, su teléfono utilizará siempre la
línea seleccionada.
Si ha seleccionado Línea1 o Línea2, aún
puede contestar en la línea no seleccionada o realizar una llamada utilizando las
teclas de línea C o h.
Cómo seleccionar la configuración para
un terminal inalámbrico
¢ s ¢ Configuración ¢ Terminal
Inalám.
¢ Config. Línea ¢ Autom./Línea1/
Línea2
q
Seleccione la entrada y presione §OK§.
§Menú§
Cómo seleccionar la configuración para la
estación base
¢ s ¢ Configuración ¢ Base
¢ Config. Línea ¢ Autom./Línea1/
§Menú§
q
Línea2
Seleccione la entrada y presione §OK§.
Prefijos de área
Para hacer una llamada usando la lista de
llamadas entrantes (p. 18), deberá estar
guardado el prefijo de área de su teléfono. Si vive en un área de servicio en donde
el proveedor de la red ha asignado a la
Línea 1 y a la Línea 2 diferentes prefijos de
área, podrá almacenar los prefijos de área
para la Línea 1 y para la Línea 2 independientes el uno del otro.
§Menú§ ¢ s ¢ Configuración ¢ Sistema
¢ Código De Área
Línea1/Línea2
Seleccione la línea para la cual
quiere configurar el prefijo de
área y presione §OK§.
~
Ingrese su prefijo de área y
presione §OK§.
Pantalla en estado inactivo
Después de registrar el teléfono y ajustar
la hora, la pantalla tiene el aspecto de
estado inactivo que aparece más abajo
(ejemplo). Si se ha activado el contestador
automático, el encabezamiento de la pantalla también incluye el símbolo del contestador automático Õ.
Ä ÕË
INT 1
Ê
01/31
e
9:45AM
§§§§Menú§§§§
Ahora su teléfono está listo para ser
usado.
11
Verizon V500 / ES / A31008-M1931-R301-1-6019 / telefony.fm / 30.4.08
Cómo hacer llamadas
Cómo hacer llamadas
Cómo hacer una llamada externa
Las llamadas externas son llamadas que se
hacen usando la red telefónica pública.
~c
Ingrese el número y presione
la tecla descolgar c o la
tecla de manos libres d.
O:
c~
Presione brevemente la tecla
de descolgar c o la tecla de
manos libres d y marque el
número de teléfono.
Para interrumpir la marcación, presione la
tecla de colgar a.
Dependiendo de la configuración de línea
del terminal inalámbrico/estación base
(ver p. 11), el teléfono seleccionará la
línea. Puede utilizar las teclas de línea C
o h en lugar de las teclas c o d
para seleccionar la línea para esta llamada.
Durante la comunicación aparece la duración de la llamada.
Nota:
La marcación usando el directorio telefónico
(p. 16) o la Lista de llamadas (p. 18) ahorra
tiempo para reingresar los números.
Cómo finalizar una llamada
a
Presione la tecla de colgar.
Cómo responder una llamada
El terminal inalámbrico indica de tres
formas que hay una llamada entrante:
suena, se muestra en pantalla y parpadea
la tecla de descolgar c.
La estación base indica de tres formas que
hay una llamada entrante: suena, se
muestra en pantalla y parpadea la tecla de
línea C o h.
12
Tiene las siguientes opciones para responder a la llamada:
¤ Presionando la tecla de descolgar c.
¤ Presionando la tecla de línea C o
h.
¤ Presionando la tecla de manos libres
d.
Dependiendo de la configuración de línea
del terminal inalámbrico/estación base
(ver p. 11), el teléfono reacciona de diferente manera:
u Si ha seleccionado Autom. puede utilizar
la tecla de descolgar c o la tecla de
manos libres d para llamadas en
ambas líneas.
u Si ha seleccionado Línea1 o Línea2, solo
puede responder llamadas en la línea
seleccionada con la tecla de descolgar
c o la tecla de manos libres d.
Para llamadas en la otra línea correspondiente, debe utilizar la tecla de
línea C o h para contestar la llamada.
Si el terminal inalámbrico se encuentra en
la estación base o el cargador y la función
Resp. Autom. está activada (p. 30), el terminal inalámbrico aceptará automáticamente una llamada al retirarlo de la estación base o del cargador. Levantar el terminal inalámbrico de la estación base o
cargador en este caso tiene el mismo
efecto que presionar la tecla de descolgar
c.
Puede presionar la tecla de pantalla §Callar§
para desactivar el tono de timbre sin contestar la llamada. Puede aceptar la
llamada mientras se muestre en la pantalla.
Nota:
Si dos llamadas suenan simultáneamente en
las dos líneas, la pantalla del teléfono alternará
entre una línea y otra cada 3 segundos.
Use lla tecla de línea C o h para responder la llamada.
¥
Verizon V500 / ES / A31008-M1931-R301-1-6019 / telefony.fm / 30.4.08
Operación del teléfono
ID de llamantes
El ID de llamantes (CID) es un servicio de
suscripción opcional provisto por su proveedor de servicio telefónico. Esta función
ofrece información de identificación sobre
la llamada entrante que aparece en la pantalla del terminal inalámbrico.
Pantalla de llamada con ID de
llamante/Nombre
Si el número del llamante está guardado
en el directorio telefónico, aparecerá el
nombre en lugar del número.
En lugar del número también se puede
mostrar:
u External, si no se transmite el número o
si el llamante no se ha suscrito a la
transmisión de su número de teléfono,
ID de llamante.
u Withheld, si el llamante suprime la
transmisión de su número de teléfono.
Funcionamiento de manos libres
Es posible activar la función de manos
libres en cualquier momento para tener
las manos desocupadas durante una llamada.
Activar/desactivar la función manos
libres
Durante una llamada y cuando escucha el
contestador automático la función manos
libres puede activarse o desactivarse.
Para ver cómo ajustar el volumen, ver
p. 30.
Operación del teléfono
La mayoría de las teclas son las mismas en
el terminal inalámbrico y en la estación
base, así que salvo raras excepciones,
puede operar la estación base del mismo
modo que el terminal inalámbrico.
Cómo activar/desactivar el terminal
inalámbrico
a
Presione prolongadamente la
tecla de colgar.
Cómo activar/desactivar el bloqueo
del teclado del terminal inalámbrico
#
Presione prolongadamente la
tecla de numeral.
Bloqueo Tecl. aparece en la pantalla cuando
se activa el bloqueo del teclado.
El bloqueo del teclado se desactiva automáticamente al recibir una llamada. Al
término de la llamada, vuelve a activarse.
Tecla de control
Activar durante la marcación
~d
¤
Ingrese el número y presione
la tecla de manos libres.
Antes de usar la función de manos
libres debe informárselo a su interlocutor para que sepa que hay alguien más
escuchando la conversación.
Para conmutar entre los modos de auricular y de manos libres
d
Presione la tecla de manos
libres.
1
1 Tecla de control
En la descripción siguiente, el lado de la
tecla de control (arriba, abajo) que debe
presionarse dependiendo de la situación
funcional , está marcado en color negro,
por ejemplo, t para "presione hacia arriba
en la tecla de control".
13
Verizon V500 / ES / A31008-M1931-R301-1-6019 / telefony.fm / 30.4.08
Operación del teléfono
La tecla de control tiene diferentes funciones:
Cuando el terminal inalámbrico está en
estado inactivo
s
t
§§§§Borr.§§§§§
Abrir el directorio telefónico
Abrir la lista de registro de llamadas (p. 18)
En los campos de entrada
Puede usar la tecla de control para mover
el cursor hacia atrás t o s hacia adelante.
En el menú principal, listas y submenús
t/s
Desplazarse línea a línea hacia
arriba o hacia abajo.
Si el terminal inalámbrico está descolgado
o cuando el contestador está reproduciendo
t/s
Subir/bajar el volumen
Teclas de la pantalla
Las funciones de las teclas de pantalla
cambian en función de la situación de
operación en particular. Por ejemplo:
§§§§§Atrás§§§§§ † §§§§Menú§§§§§
Confirmar su elección o
guardar los caracteres editados.
Tecla borrar: borra un carácter
a la derecha a la vez de
derecha a izquierda (presionar
brevemente) o todos los caracteres (prolongadamente).
Cómo volver al estado inactivo
Puede volver al estado inactivo desde
cualquier lugar del menú como se indica a
continuación:
¤ Presione la tecla de colgar a.
O:
¤ No presione ninguna tecla: después de
2 minutos, la pantalla regresará automáticamente al estado inactivo.
Los cambios que no haya confirmado o
guardado presionando §OK§ no serán guardados.
Encontrará un ejemplo de la pantalla en
estado inactivo en la p. 11.
Guía del menú
1
Se accede a las funciones de su teléfono
mediante un menú que tiene varios niveles.
Menú principal (primer nivel del menú)
2
1 Las funciones actuales de las teclas de pantalla se mostrarán en la línea inferior de la
pantalla.
2 Teclas de pantalla
Los símbolos de la pantalla más importantes son:
§§§§§Menú§§§§
Abrir el menú principal (en el
modo inactivo) o el menú dependiente del contexto.
§§§§§Atrás§§§§
Regresar un nivel del menú.
14
§§§§§§§OK§§§§§§§
¤ Presione la tecla de pantalla §Menú§ con el
terminal inalámbrico en estado inactivo para abrir el menú principal.
Las funciones del menú principal se muestran como una lista en la pantalla.
Para acceder a una función, abra el
submenú correspondiente (siguiente nivel
de menú):
¤ Para ir a la función deseada presione la
tecla de control q. Presione la tecla de
pantalla §OK§.
Verizon V500 / ES / A31008-M1931-R301-1-6019 / telefony.fm / 30.4.08
Operación del teléfono
Submenús
Las funciones de los submenús aparecen
en forma de lista.
Para acceder a una función:
¤ Desplácese a la función con la tecla de
control q y presione §OK§.
Si presiona la tecla de pantalla §Atrás§ vuelve
al nivel anterior del menú. a cancela la
operación.
Escribir, modificar y corregir
entradas
Corrección de entradas incorrectas
Para corregir los caracteres incorrectos en
el texto, vaya hasta el error con la tecla de
control. A continuación, puede:
u Presionar §Borr.§ para borrar el carácter a
la izquierda del cursor.
u Ingrese los caracteres escribiéndolos
con el teclado.
Escribir y modificar nombres
Al crear un registro, tenga en cuenta las siguientes reglas:
u Controle el cursor con q.
u Presione la tecla de numeral # para
alternar entre mayúsculas y minúsculas.
Cómo introducir caracteres especiales
Se pueden seleccionar caracteres especiales usando la tecla Q o1.
Q
1
.0,/:;"’!?*+-%\^~|
ESPACIO 1 @ _ # = < >
()&$[]{}
15
Verizon V500 / ES / A31008-M1931-R301-1-6019 / direct_charges.fm / 30.4.08
Uso del directorio telefónico y las listas
Uso del directorio telefónico
y las listas
Dispone de:
u Directorio
u Lista de rellamada del último número
u Lista de llamadas
Se pueden guardar hasta 50 registros en el
directorio telefónico como máximo. Cada
registro debe consistir de un nombre y un
número.
El directorio telefónico se guarda en la estación base y se comparte entre todos los
terminales inalámbricos registrados.
Directorio telefónico
En el directorio telefónico se guardan los
números y sus correspondientes nombres
asociados.
¤ Con el terminal inalámbrico en estado
inactivo, abra el directorio telefónico
presionando la tecla s.
Longitud de los registros
Número:
Nombre:
máx. 24 cifras
máx. 16 caracteres
Cómo guardar un número en el
directorio telefónico
Cómo guardar en el directorio telefónico el
primer registro
Su terminal inalámbrico está en modo inactivo.
~
Introduzca el número y presione §Guardar§.
~
Introduzca el nombre y presione §OK§.
~
Corrija el número si fuera necesario y presione §OK§.
16
Cómo guardar en el directorio telefónico
los registros siguientes
s ¢ §Menú§ ¢ Nuevo Registro
~
Introduzca el nombre y presione §OK§.
~
Introduzca el número y presione §OK§.
Se puede usar la tecla §Borr.§ para borrar un
carácter a la vez de derecha a izquierda
(presionar brevemente) o todos los caracteres (presionar prolongadamente).
Cómo seleccionar un registro del
directorio telefónico
s
Abra el directorio telefónico.
Tiene las siguientes opciones:
u Use q para desplazarse por el registro
hasta seleccionar el nombre que necesita.
u Ingrese los primeros caracteres del
nombre o, si es necesario, desplácese
hasta el registro con s.
Marcar con el directorio telefónico
s ¢ q (seleccionar registro)
c/d Presione la tecla de descolgar
o la de manos libres.
El número se marca.
Puede presionar la tecla de línea C o
h, si quiere especificar qué línea usar.
Administrar registros del directorio
telefónico
s
¢ q (seleccionar registro)
Ver un registro
§Menú§
¢ Ver
Aparece el registro.
Presione §Atrás§ para volver
atrás.
Verizon V500 / ES / A31008-M1931-R301-1-6019 / direct_charges.fm / 30.4.08
Uso del directorio telefónico y las listas
Modificación de registros
§Menú§
~
¢ Editar Regist.
Modifique el nombre y presione §OK§.
~
Modifique el número y presione §OK§.
Se puede usar la tecla §Borr.§ para borrar un
carácter a la vez de derecha a izquierda
(presionar brevemente) o todos los caracteres (presionar prolongadamente).
Borrar registros
§Menú§
¢ Borrar
Borre el registro que se muestra.
O:
¢ Eliminar Lista
¤ Confirme la pregunta ¿Eliminar? presio§Menú§
nando §OK§.
Se borran todos los registros en su directorio telefónico.
Cómo agregar al directorio un número
que se muestra
Los números que aparecen en una lista,
como la Lista de llamadas o la Lista de
últimos números de rellamada pueden
agregarse al directorio telefónico. Si
dispone de Caller ID y se transmite el
número, los primeros 16 caracteres del
nombre transmitido se copian en la línea
del nombre.
Aparece un número:
§Menú§ ¢ Copiar Al Dir.
¤ Complete el registro tal como se describe en el párrafo "Cómo guardar un
número en el directorio telefónico" (ver
p. 16).
Lista de últimos números de
rellamada
La lista de últimos números de rellamada
contiene los últimos diez números que
marcó con el terminal inalámbrico/la estación base (máx. 32 cifras). Si uno de los
números aparece en el directorio, aparecerá el nombre correspondiente. Si un
número ha sido marcado varias veces,
solo la última vez aparece en la lista.
Rellamada manual de últimos
números
k
q
c/d
Presione la tecla.
Seleccione el registro.
Presione la tecla de descolgar
o la de manos libres.
El número se marca.
Puede presionar la tecla de línea C o
h, si quiere especificar qué línea usar.
Cuando se muestra un nombre, podrá
hacer que aparezca el número de teléfono
respectivo:
§Menú§ ¢ Ver
Cómo administrar los registros de la
lista de últimos números de rellamada
k
q
Presione la tecla.
Seleccione el registro.
§Menú§
Abra el menú.
Las siguientes funciones se pueden seleccionar con q:
Ver (como en el directorio telefónico,
p. 16)
Copiar Al Dir.
Copiar un registro al directorio telefónico (p. 17)
Borrar (como en el directorio telefónico,
p. 17)
Eliminar Lista (como en el directorio telefónico, p. 17)
17
Verizon V500 / ES / A31008-M1931-R301-1-6019 / direct_charges.fm / 30.4.08
Uso del directorio telefónico y las listas
Lista de llamadas
Requisito: Presentación de ID de llamantes (Caller ID, CIP, p. 13)
Se guardan los números de las 10 últimas
llamadas entrantes.
¤ Con el terminal inalámbrico en estado
inactivo, abra el directorio telefónico
presionando la tecla t (CID).
Cómo marcar con la lista de llamadas
t
¢ q (seleccionar registro)
Si es necesario, presione la
tecla * para cambiar el
formato de número para la
marcación.
c/d Presione la tecla de descolgar
o la de manos libres.
El número se marca.
Puede presionar la tecla de línea C o
h, si quiere especificar qué línea usar.
Mostrar registro
t
¢ q (seleccionar registro)
¢ Ver
§Menú§
Aparece el registro.
Presione §Atrás§ para volver
atrás.
Registro de la lista
Los nuevos mensajes están arriba. Un registro de lista contiene la información siguiente:
u El tipo de lista (en el encabezado)
u El estado del registro (los registros
nuevos se identifican con un asterisco
en el encabezado)
u El nombre del llamante, si se transmitió
el nombre por CID o está guardado en
el directorio telefónico.
Número del llamante, si se transmite el
número solamente.
18
External, si no se transmite el número o
si el llamante no se ha suscrito a la
transmisión de su número de teléfono,
ID de llamante.
Withheld, si el llamante suprime la
transmisión de su número de teléfono.
Puede agregar al directorio el número
del llamante (p. 17).
u Fecha y hora de la llamada (si se ha
ajustado previamente, p. 10)
u Línea: Ê o Ë detrás del texto muestra
si la llamada ha ingresado por la línea 1
o la línea 2.
Es posible administrar los registros de la
misma manera que los registros de la Lista
de últimos números de rellamada (ver
p. 17).
Verizon V500 / ES / A31008-M1931-R301-1-6019 / answering_m+network-mailbox.fm / 30.4.08
Cómo operar el contestador automático
Cómo operar el contestador
automático
Puede utilizar el contestador automático
para ambas líneas o para una sola, dependiendo de sus necesidades.
Es posible operar el contestador automático de la estación base usando el terminal
inalámbrico, con el teclado de la estación
base (p. 2), o con la operación remota
(desde otro teléfono o teléfono celular).
Modo de anuncio
Puede usar el contestador automático en
dos modos distintos.
u En el modo Contest./Grab., el llamante
escucha el anuncio y luego puede dejar
un mensaje.
u En el modo Sólo Contestar, el llamante
escucha su anuncio, pero no puede
dejar ningún mensaje.
Operación usando las teclas de
la estación base
u parpadea rápidamente cuando la
memoria de mensajes de la línea correspondiente está llena.
La pantalla de la estación base puede
mostrar los símbolos que se muestran a
continuación:
ÊÕÉ×ÅËÕÉ×Å
SUN 09:23 AM 01/31
§§§§§§§§§Menu§§§§§§§§§
Los siguientes símbolos son importantes
para el contestador automático. Los símbolos de la mitad izquierda de la pantalla
se refieren a la Línea 1, los símbolos de la
mitad derecha se refieren a la Línea 2.
Õ está
encendido
El contestador automático
está encendido.
É parpadea La memoria para mensajes está llena.
× parpadea
El contestador automático
está controlado por un
terminal inalámbrico.
Para los otros símbolos, ver p. 2.
Puede usar las teclas de la estación base
para las funciones más usuales de su contestador automático. Si desea más información, ver p. 2.
Operación a través del terminal
inalámbrico
Estado del contestador automático
La mayoría de las funciones que se describen también están disponibles a través de
las teclas y la pantalla de su estación base.
El LED en la tecla de iniciar/detener y los
símbolos en la pantalla de la estación base
indican el estado del contestador automático.
El LED en la tecla respectiva de Iniciar/
Detener ø o ù
u encendido cuando se reproduce un
mensaje en la línea correspondiente.
u parpadea lentamente cuando hay por
lo menos un mensaje nuevo en el contestador automático para la línea correspondiente.
Control de llamadas
Durante la grabación de un mensaje, se
puede escuchar automáticamente por las
bocinas de la estación base, si se activó el
control de llamadas (ver p. 23).
También se puede escuchar por las
bocinas de los terminales inalámbricos registrados:
§Pant.§
Presione la tecla de pantalla.
Se activa la bocina del terminal inalámbrico. Se puede apagar con la tecla de manos
libres d.
19
Verizon V500 / ES / A31008-M1931-R301-1-6019 / answering_m+network-mailbox.fm / 30.4.08
Cómo operar el contestador automático
Cómo encender o apagar el
contestador automático
Puede encender y apagar el contestador
automático por separado para cada línea.
§Menú§ ¢ Contestador ¢ Cont.Enc./Apag.
Línea1/Línea2
Seleccione la línea para la cual
quiere prender o apagar el
contestador automático y presione §OK§.
Encendido/Apagado
Seleccione la entrada y presione §OK§.
En la pantalla se muestra el icono × para
la línea respectiva.
El teléfono viene con un mensaje grabado
previamente para el modo de respuesta y
grabación y para el de sólo anuncio. Si no
grabó ningún anuncio personal, se reproducirá el anuncio estándar correspondiente.
Grabar anuncios personales/sólo
anuncios
Puede grabar diferentes anuncios en cada
línea.
§Menú§ ¢ Contestador ¢ Grabar Mensaje
Línea1/Línea2
Seleccione la línea para la cual
quiere grabar un anuncio y
presione §OK§.
Contest./Grab./Sólo Contestar §OK§
Seleccione el modo en el que
desea grabar el anuncio personal.
Grabar §OK§ Presione la tecla de pantalla
para iniciar la grabación.
Escuchará el tono de listo (tono corto).
¤ Ahora grabe el anuncio (como mínimo
debe durar 3 segundos)
.
20
Nota:
Durante la grabación de su anuncio, hable
directamente al micrófono del terminal inalámbrico, tal como si hablara por teléfono.
También puede utilizar la estación base
para grabar anuncios.
Presione la tecla de pantalla
para finalizar la grabación.
El anuncio grabado se reproducirá automáticamente. Puede volver a grabar el
anuncio repitiendo estos pasos.
§OK§
Tenga en cuenta:
u La grabación termina automáticamen-
te si se alcanza el tiempo de grabación
máximo de 60 segundos.
u Si cancela la grabación entonces se
usará el anuncio pregrabado.
u Cuando la memoria del contestador automático esté llena, se interrumpirá la
grabación.
¤ Si es necesario, borre los mensajes
antiguos y repita la grabación.
Reproducción de anuncios
¢ Contestador ¢ Grabar Mensaje
¢ Línea1/Línea2 ¢ Contest./Grab./
§Menú§
Sólo Contestar
Reproducir §OK§
Presione la tecla de pantalla
para iniciar la reproducción.
Si no grabó ningún anuncio personal, se
reproducirá el anuncio estándar correspondiente.
Cómo borrar anuncios
¢ Contestador ¢ Grabar Mensaje
¢ Línea1/Línea2 ¢ Contest./Grab./
§Menú§
Sólo Contestar
Borrar §OK§ Presione la tecla de pantalla
para borrar el anuncio personal. Si no hay anuncios personales, se escucha un tono de
error.
Una vez borrado, se utilizará al anuncio
grabado previamente correspondiente.
Verizon V500 / ES / A31008-M1931-R301-1-6019 / answering_m+network-mailbox.fm / 30.4.08
Cómo operar el contestador automático
Selección del modo de anuncio
Puede elegir entre Contest./Grab. y Sólo
Contestar.
§Menú§ ¢ Contestador ¢ Modo Contest.
¢ Línea1/Línea2 ¢ Contest./Grab./
Sólo Contestar
q
Seleccione el modo de
anuncio y presione §OK§.
El modo seleccionado se guarda en la
memoria incluso después de desactivar el
contestador automático.
Nota:
Si la memoria está llena en el modo Contest./
Grab., se interrumpe la selección y recibirá instrucciones de borrar los mensajes antiguos.
Borre los mensajes antiguos.
Después de borrarlos, el contestador automático volverá a activarse automáticamente en el
modo seleccionado. También puede volver a
seleccionar el modo de grabación que prefiera.
¥
Cómo reproducir mensajes
Con cada mensaje se graban la fecha y la
hora de recepción (si se ha ajustado así,
p. 10), y se muestran durante la reproducción.
Cómo reproducir mensajes nuevos
Los mensajes nuevos que todavía no ha
escuchado se indican con un LED que parpadea lentamente en la respectiva tecla
Iniciar/Detener (ver p. 2).
§Reprod§
Presione la tecla de pantalla
para iniciar la reproducción.
Si tiene mensajes nuevos sólo para una
línea, la reproducción comienza inmediatamente.
Si tiene mensajes nuevos para ambas
líneas:
Línea1/Línea2
Seleccione la línea y presione
§OK§.
En la pantalla se muestra ahora el estado
de su contestador automático.
El siguiente ejemplo muestra lo que
aparece en la pantalla de un terminal ina-
lámbrico cuando reproduce mensajes
nuevos
2
1
Reproducir
Nuevo Ê 01/02
01/31
09:45AM
§§§§§Atrás§§§§§ U §§§§Menú§§§
3
4
5
1 Fecha de grabación del mensaje.
2 Nuevo: aún no ha escuchado el mensaje.
3 01/02: Se reproduce el primero de los dos
mensajes.
4 Hora de grabación del mensaje.
5 Línea en que fue grabado el mensaje.
Si tiene…
u Mensajes nuevos:
Aparece Nuevo (2). La cantidad de mensajes (3) indica solamente la cantidad
de mensajes nuevos. Se reproduce el
primero de los dos mensajes nuevos.
u Mensajes que escuchó previamente:
No aparece Nuevo (2). La cantidad de
mensajes (3) indica solamente la cantidad de mensajes antiguos: 01/02 significa que se mostrará el primero de dos
mensajes antiguos.
Reproducir
Ê 01/02
01/31
09:45AM
§§§§§Atrás§§§§§ U §§§§Menú§§§
u Sin mensajes:
Aparece Sin Mensajes en la pantalla.
Reproducir
Sin Mensajes
Un anuncio le indica si hay mensajes
nuevos, solamente mensajes antiguos o si
no tiene mensajes.
Si hay mensajes nuevos, se empezará a reproducir inmediatamente el primer
mensaje nuevo. Después del último
mensaje nuevo, volverá a aparecer el
menú Reproducir.
21
Verizon V500 / ES / A31008-M1931-R301-1-6019 / answering_m+network-mailbox.fm / 30.4.08
Cómo operar el contestador automático
Después de escuchar por completo un
mensaje nuevo, su estado se convierte en
"antiguo".
Si el mensaje se ha grabado con la fecha y
la hora de recepción, antes de la reproducción oirá estos datos.
Reproducción de mensajes antiguos
Cuando no queden mensajes nuevos,
podrá escuchar los mensajes antiguos.
§Menú§ ¢ Contestador ¢ Reproducir
¢ Línea1/Línea2
§OK§
Presione la tecla de pantalla
para iniciar la reproducción.
Control de la reproducción
Durante la reproducción del mensaje:
§Menú§
Presione la tecla de pantalla
para ingresar al menú Opciones.
u Repetir
Repetir la reproducción del mensaje
actual.
u Siguiente/Anterior
Pasar a la reproducción del mensaje siguiente o anterior.
u Borrar
Borrar el mensaje actual.
Cómo borrar mensajes
Puede borrar todos los mensajes antiguos
a la vez o de manera individual.
Cómo borrar todos los mensajes antiguos
¢ Contestador ¢ Elim. Antiguos
¢ Línea1/Línea2
§Menú§
¿Eliminar? §OK§
Presione la tecla de pantalla
para confirmar que desea
borrar todos los mensajes antiguos.
Si no tiene mensajes antiguos, se escucha
un tono de error y aparecerá en la pantalla
Sin Mensajes.
22
Cómo borrar mensajes antiguos
individuales
Durante la reproducción:
§Menú§ ¢ Borrar
§OK§
Presione la tecla de pantalla
para borrar el mensaje actual.
Cómo responder una llamada desde el
contestador automático
Mientras el contestador automático graba
un mensaje o es controlado remotamente,
puede responder una llamada:
c
Presione la tecla de descolgar.
Se detiene la grabación y usted puede
hablar con la persona que llama.
Si ya se han grabado dos segundos de la
llamada cuando responde, la llamada se
mostrará como un mensaje nuevo.
Puede aceptar la llamada en cualquiera de
los terminales inalámbricos. Si utiliza
control de llamadas en un terminal inalámbrico, solo ese terminal inalámbrico
puede responder la llamada.
Configuración del contestador
automático
El contestador automático se suministra
preconfigurado de fábrica. Cambie los
ajustes individuales usando el terminal
inalámbrico o las teclas correspondientes
de la estación base.
Verizon V500 / ES / A31008-M1931-R301-1-6019 / answering_m+network-mailbox.fm / 30.4.08
Cómo operar el contestador automático
Activación/desactivación del control
de llamadas
Mientras se graba un mensaje, puede escucharlo por las bocinas de los terminales
inalámbricos registrados y la estación
base.
§Menú§ ¢ Contestador ¢ Configuración
¢ Filtro Llamada
Si usa el terminal inalámbrico para esta
configuración:
Base/Terminal Inalám.
Seleccione si desea configurar
el terminal inalámbrico o la estación base.
Encendido/Apagado
Presione la tecla de pantalla
§OK§ para confirmar su elección.
La configuración predeterminada para la
estación base es Encendido; la configuración base para el terminal inalámbrico es
Apagado.
Si desea control de llamadas en el terminal
inalámbrico:
§Pant.§
Presione la tecla de pantalla
para iniciar el control de llamadas.
Modo de ahorro: aceptación de
llamada/función de ahorro para la
operación remota
Puede determinar cuándo debe aceptar
una llamada el contestador automático
para cada línea.
Dispone de: 2 Timbres, 4 Timbres, 6 Timbres,
8 Timbres, así como la función de ahorro
Ahorro Tarifa.
Si se fija Ahorro Tarifa, lo que aparece a continuación determina cuándo el contestador automático aceptará llamadas:
u Si no hay mensajes nuevos, el contestador automático tardará 4 Timbres en
aceptar una llamada.
u Si hay mensajes nuevos, el contestador
automático tardará 2 Timbres en
aceptar una llamada.
En caso de funcionamiento remoto,
después de 2 timbres ya sabrá que no hay
mensajes nuevos (de lo contrario, el contestador automático habría aceptado su
llamada). Si cuelga ahora, la llamada no le
costará nada.
§Menú§ ¢ Contestador ¢ Configuración
¢ Retardo Timbre ¢ Línea1/Línea2
¢ 2 Timbres/4 Timbres/6 Timbres/8 Timbres/
Ahorro Tarifa
§OK§
Presione la tecla de pantalla
para confirmar su elección.
Cambio del idioma de las indicaciones
de voz y anuncios pregrabados
Puede seleccionar inglés, español, o
francés como el idioma de las indicaciones
de voz y anuncios pregrabados. Puede seleccionar diferentes idiomas para la línea 1
y la línea 2.
§Menú§ ¢ Contestador ¢ Configuración
¢ Idioma Voz ¢ Línea1/Línea2 ¢ Inglés/
Español/Francés
§OK§
Presione la tecla de pantalla
para confirmar su elección.
Nota:
La cantidad de timbres se refiere a los tonos de
timbre de la estación base. Si ha elegido otro
tono de timbre, la cantidad de timbres que se
escuchan podría ser distinta del número de
timbres seleccionado.
23
Verizon V500 / ES / A31008-M1931-R301-1-6019 / answering_m+network-mailbox.fm / 30.4.08
Cómo operar el contestador automático
Operación en movimiento (funcionamiento remoto)
Puede consultar o activar el contestador
automático desde cualquier teléfono (por
ej., hotel, cabina telefónica, etc.).
Requisitos:
H
9
;
u El teléfono que se utilizará para el fun-
cionamiento remoto debe tener marcación por tonos (DTMF), para que oiga
los distintos tonos cuando presiona las
teclas.
u Se debe activar Acceso Remoto.
Activación Acceso Remoto
¢ Contestador ¢ Configuración
¢ Acceso Remoto ¢ Encendido/Apagado
§Menú§
§OK§
Presione la tecla de pantalla
para confirmar su elección.
Llamar al contestador automático y
reproducir los mensajes
~
;~
Marque su propio número.
Mientras escucha su anuncio,
presione la tecla ; e introduzca el PIN del sistema.
Se le informará si hay mensajes nuevos
grabados. Se empiezan a reproducir los
mensajes. Ahora podrá manejar el contestador automático usando el teclado.
Cómo manejar el contestador automático
usando el teclado
Se usan las teclas siguientes para:
0
A
B
3
G
24
Borrar el mensaje actual.
Repetir el mensaje anterior.
Reproducir el mensaje.
Pasar al mensaje siguiente.
Encender el contestador automático.
Detener la reproducción de un
mensaje.
Apagar el contestador automático.
Ingresar el código de acceso
remoto si el contestador automático está encendido.
Nota:
Después de la reproducción de un mensaje,
si no se detecta la activación de una tecla
pasados 10 segundos, se termina la
llamada.
Cómo activar el contestador
automático
~
Marque su propio número.
¤ Permita que el teléfono suene hasta
que el tono de timbre de rellamada se
detenga y el teléfono conteste.
~
Introduzca el PIN del sistema.
G
Presione la tecla G.
Se escucha un pitido. Su contestador automático ahora está activado y el anuncio
activado se reproduce.
Desactivar el contestador automático
~
;~
Marque su propio número.
Mientras escucha su anuncio,
presione la tecla ; e introduzca el PIN del sistema.
9
Presione la tecla 9.
Se escucha un pitido. Se desactiva el contestador automático.
Verizon V500 / ES / A31008-M1931-R301-1-6019 / answering_m+network-mailbox.fm / 30.4.08
Cómo usar la bandeja de entrada de la red
Cómo usar la bandeja de
entrada de la red
La bandeja de entrada de red es el contestador automático de su proveedor en la
red. Sólo puede utilizar la bandeja de
entrada de la red si lo ha solicitado a su
proveedor de red.
Configurar la bandeja de entrada
de la red para marcación rápida
Introducir el número de la bandeja de
entrada de la red
¢ Correo De Voz ¢ Configuración
¢ Línea1/Línea2
§Menú§
~ §OK§
Introduzca el número de la
bandeja de entrada de la red y
presione §OK§.
Este ajuste de la marcación rápida es
válido para todos los terminales inalámbricos.
Si es necesaria una contraseña para
acceder a su correo de voz de la red, puede
añadir una contraseña introduciendo
pausas inmediatamente después de escribir el número de acceso a la bandeja de
entrada e introduciendo a continuación la
contraseña.
Si tiene mensajes nuevos solo para una
bandeja de entrada de la red, se llama inmediatamente a la bandeja de entrada
respectiva.
Si tiene nuevos mensajes para ambas bandejas de entrada de la red:
Cuando utiliza un terminal inalámbrico:
Línea1/Línea2
Seleccione la línea y presione
§OK§ para iniciar la llamada.
Cuando utilice la estación base:
Línea1/Línea2 Presione la tecla respectiva de
la pantalla para iniciar la llamada.
Si desea más instrucciones de funcionamiento, consulte las instrucciones provistas por el operador de la bandeja de entrada.
Cómo llamar a la bandeja de entrada de la
red
¢ Correo De Voz ¢ Llam. CorreoVoz
¢ Línea1/Línea2
§Menú§
Seleccione la bandeja de
entrada a la que quiere llamar
y presione §OK§.
Si tiene mensajes nuevos en su bandeja de
entrada de la red:
§Llamar§
Presione la tecla de pantalla
para llamar a su bandeja de
entrada de la red.
§OK§
25
Verizon V500 / ES / A31008-M1931-R301-1-6019 / registr_sett.fm / 30.4.08
Cómo usar varios terminales inalámbricos
Cómo usar varios
terminales inalámbricos
Cómo registrar y quitar del
registro terminales inalámbricos
En su estación base puede registrar hasta
cinco terminales inalámbricos.
Un terminal inalámbrico Verizon V500H se
puede registrar en hasta cuatro estaciones
base.
Cómo registrar los terminales
inalámbricos Verizon V500H
En el terminal inalámbrico
¢ Configuración ¢ Registro
¢ Registro Term.
§Menú§
q
Seleccione la base en la cual
desea registrar su terminal
inalámbrico y presione §OK§.
Las bases registradas aparecen
marcadas con ½.
~
Introduzca su PIN y
presione §OK§.
El terminal inalámbrico queda registrado.
En la estación base
Antes de que transcurran 60 segundos,
presione prolongadamente la tecla de
registro/page en la estación base
(ver p. 2) (aprox. 5segundos
Borrar registro de terminales
inalámbricos
Puede borrar el registro de cualquier terminal inalámbrico registrado de su
Verizon V500AM.
§Menú§ ¢ Configuración ¢ Registro
¢ Eliminar HS
~
Introduzca su PIN y
presione §OK§.
26
q
§OK§
Seleccione el terminal inalámbrico del que quiere borrar el
registro y presione §OK§.
Presione la tecla de pantalla
para confirmar la eliminación.
Buscar un terminal inalámbrico
("localización")
Puede localizar el terminal inalámbrico
usando la estación base.
¤ Presione brevemente la tecla de registro/localización en la estación base.
¤ Todos los terminales inalámbricos
sonarán al mismo tiempo ("localizador"), incluso si los tonos del timbre
están apagados.
Puede presionar la tecla de pantalla
§Callar§ para desactivar el tono de timbre
sin contestar la llamada.
Cómo apagar el localizador
¤ Presione la tecla de registro/localiza-
ción en la estación base brevemente o
presione la tecla de descolgar c en el
terminal inalámbrico.
Cambiar de estación base
Si el terminal inalámbrico está registrado
en varias estaciones base, puede ajustarlo
para una estación base determinada o
para la que tenga la mejor recepción
(Mejor Base).
§Menú§ ¢ Configuración ¢ Registro
¢ Sel. Base
q
Seleccione una de las estaciones base registradas o Mejor
Base y presione §OK§.
Verizon V500 / ES / A31008-M1931-R301-1-6019 / registr_sett.fm / 30.4.08
Cómo usar varios terminales inalámbricos
Cómo hacer llamadas internas
Las llamadas internas a terminales inalámbricos registrados en la misma o a la
misma estación base son gratuitas.
j
Inicie la llamada interna.
q
Seleccione el terminal inalámbrico o la estación base a la
que desea llamar y
presione §OK§.
Nota:
Si solamente se registró un terminal inalámbrico en la estación base, la llamada interna se
conecta inmediatamente después de presionar la tecla j.
Cómo terminar una llamada
a
Presione la tecla de colgar.
Transferir una llamada a otro terminal
inalámbrico
Puede transferir una llamada externa a
otro terminal inalámbrico (conectar) o a la
estación base.
¤ Inicie una llamada interna al terminal
inalámbrico o a la estación base a la
cual desea transferir la llamada (ver lo
anterior).
Transferencia de llamada atendida
Cuando conteste el interlocutor interno:
¤ Si es necesario, indique que se trata de
una llamada externa.
a
Presione la tecla de colgar.
Se transfiere la llamada externa al otro terminal inalámbrico o a la estación base.
Si el interlocutor no contesta, presione la
tecla de pantalla §Fin§ para volver a la
llamada externa. Si el interlocutor interno
está ocupado, oirá el tono de ocupado y
volverá automáticamente a la llamada externa.
Transferencia de llamada no atendida
a
Presione la tecla de colgar.
Se transfiere la llamada externa directamente al otro terminal inalámbrico.
Si el interlocutor interno no contesta, la
llamada regresa a usted automáticamente
(en la pantalla aparecerá Llam. Externa).
Espera durante una llamada interna
Mientras habla con un interlocutor externo, puede llamar al mismo tiempo a un interlocutor interno.
¤ Inicie una llamada interna como se describe en el párrafo "Cómo hacer llamadas internas" (ver p. 27).
El interlocutor externo escucha la melodía
de llamada en espera.
Utilice la tecla j para conmutar entre
interlocutores internos y externos.
Finalizar la llamada interna
¤ Solicite al otro interlocutor interno que
finalice la llamada.
Volverá a estar conectado con el llamante
externo.
Contestar/rechazar la llamada en
espera
Si recibe una llamada externa mientras
realiza otra llamada externa o una llamada
interna, oirá el tono de llamada en espera
(tono corto). En la pantalla se indica el
número o el nombre del llamante si la
identificación del llamante está habilitada.
Llamada en espera durante una llamada
interna
a
Presione la tecla de colgar para
finalizar la llamada interna.
¤ Conteste la llamada externa como se
describe en el párrafo "Cómo responder
una llamada" (ver p. 12).
Se conecta con el llamante en espera.
27
Verizon V500 / ES / A31008-M1931-R301-1-6019 / registr_sett.fm / 30.4.08
Cómo usar varios terminales inalámbricos
Llamada en espera durante una llamada
externa en la misma línea que la llamada
en espera
Presione la tecla de pantalla
para contestar la llamada
externa entrante.
La llamada en curso se coloca en espera.
Se conecta con el llamante en espera.
Tiene las siguientes opciones:
– Presione la tecla de descolgar c
para conmutar entre los llamantes.
– Presione la tecla de colgar a para
finalizar la llamada con el interlocutor en línea.
§Acept.§
O:
a
Presione la tecla de colgar
para finalizar una llamada
externa en curso.
¤ Conteste la llamada externa como se
describe en el párrafo "Cómo responder
una llamada" (ver p. 12).
Se conecta con el llamante en espera.
Llamada en espera en la otra línea durante
una llamada externa
C/h
Presione la tecla de línea de la
llamada en espera.
La llamada en curso se coloca en espera.
Se conecta con el llamante en espera.
Conectar los llamantes internos
a una llamada externa
Importante: La función Listening In debe
estar activada.
Se realiza una llamada externa. Un interlocutor interno puede conectarse con esta
llamada y participar en la conversación.
Un tono de señal alerta a todos los interlocutores sobre los participantes adicionales.
28
Activación/desactivación Escuchar
¢ Configuración ¢ Sistema
¢ Escuchar ¢ Encendido/Apagado
§Menú§
La configuración predeterminada es
Encendido.
Llamada de conferencia interna
Hay dos formas de iniciar una conferencia
interna:
u se puede integrar otro terminal inalámbrico a la llamada mediante Escuchar
u puede llamar a otro terminal inalámbrico mediante la tecla j e integrarlo a
una conferencia
Unirse a la llamada mediante Escuchar
La línea está ocupada con una llamada externa. Quiere escuchar una llamada
externa existente.
c/d Presione la tecla de hablar o de
manos libres brevemente.
Se une a la llamada. Todos los interlocutores escuchan un tono de aviso. Verá en la
pantalla de ambos terminales inalámbricos Conferencia.
Cómo llamar a otro terminal inalámbrico y
unirlo a la conferencia
¤ Inicie una llamada interna como se describe en el párrafo "Cómo hacer llamadas internas" (ver p. 27).
Cuando el terminal inalámbrico llamado
contesta la llamada:
§Conf.§
Presione la tecla de pantalla
para iniciar la conferencia.
Verá Conferencia en la pantalla de ambos
terminales inalámbricos.
Verizon V500 / ES / A31008-M1931-R301-1-6019 / registr_sett.fm / 30.4.08
Cómo usar varios terminales inalámbricos
Finalizar la llamada de conferencia
a
Presione la tecla de colgar.
Todos los interlocutores escuchan un tono
de aviso.
Si el primer participante interno presiona
la tecla para colgar a, el terminal inalámbrico/la estación base que ingresó a la
llamada de conferencia sigue conectado al
llamante externo.
Cómo hacer dos llamadas
externas simultáneamente
Puede iniciar una segunda llamada mientras ya está hablando con un interlocutor.
Puede alternar entre estos dos interlocutores o juntarlos en una llamada de conferencia.
Requisito: La otra línea no está siendo utilizada.
Iniciar una segunda llamada
El ícono de la pantalla Ê o Ë muestra
qué línea está usando.
C/h Presione la tecla de línea de la
línea libre.
La llamada en curso se coloca en espera.
La otra línea está descolgada.
~
Ingrese el número del
segundo interlocutor.
Se establece una llamada al segundo interlocutor.
Iniciar una llamada de conferencia
externa
Puede realizar llamadas de conferencia
con dos interlocutores externos, siguiendo estos tres pasos:
1. Llamar al primer interlocutor (ver
p. 12).
2. Llamar al segundo interlocutor como se
describe anteriormente ("Iniciar una
segunda llamada").
3. Iniciar conferencia:
§Menú§ ¢ Conferencia
§OK§
Presione la tecla de pantalla
para iniciar la conferencia.
Finalizar una llamada de conferencia
externa
Cómo finalizar todas las llamadas
a
Presione la tecla de colgar.
Cómo llamar a un interlocutor y dejar al
otro en espera
C/h
Presione la tecla de línea del
interlocutor con el que quiere
hablar.
Se finaliza la llamada de conferencia.
Hablará con el interlocutor de la línea de la
tecla de línea que presionó. El otro interlocutor será puesto en espera.
Conmutar entre dos llamadas externas
En la pantalla, se muestra qué línea está
activa (ícono Ê o Ë) y qué línea está en
espera.
C/h Presione la tecla de línea de la
línea con la que quiere hablar.
La línea seleccionada ahora está activada,
la otra queda en espera.
29
Verizon V500 / ES / A31008-M1931-R301-1-6019 / registr_sett.fm / 30.4.08
Configuración del terminal inalámbrico
Configuración del terminal
inalámbrico
El terminal inalámbrico está preconfigurado. No obstante, puede realizar ajustes individuales.
Cambiar el nombre de un
terminal inalámbrico
Durante el registro, se asignarán automáticamente los nombres "INT1", "INT2", etc.
Estos nombres se pueden cambiar. Sin
embargo, la cantidad de terminales inalámbricos nunca cambia. El nombre cambiado aparece solamente en este terminal
inalámbrico.
§Menú§ ¢ Configuración ¢ Terminal Inalám.
¢ Nombre Terminal
~
Introduzca el nombre y presione §OK§.
El nombre puede tener un
máximo de 12 caracteres.
Cómo cambiar el idioma de la
pantalla
Puede ver los textos de la pantalla en distintos idiomas.
§Menú§ ¢ Configuración ¢ Terminal Inalám.
¢ Idioma ¢ Inglés/Español/Francés
q
Seleccione un idioma y presione §OK§.
Ajustar el contraste de la
pantalla
Se tiene la opción de cinco contrastes diferentes.
¢ Configuración ¢ Terminal Inalám.
¢ Mostrar Contr.
§Menú§
q
30
Seleccione el nivel preferido y
presione §OK§.
Activar/desactivar la función
respuesta automática
Si está activada esta función, basta con
retirar el terminal inalámbrico de la estación base para contestar una llamada, no
hace falta presionar la tecla de descolgar
c.
§Menú§ ¢ Configuración ¢ Terminal Inalám.
¢ Resp. Autom. ¢ Encendido/Apagado
La configuración predeterminada es
Encendido.
Ajuste del volumen de la bocina
y del auricular
Puede ajustar el volumen de la bocina y
del auricular en hasta cinco niveles diferentes. Los ajustes sólo se pueden realizar
durante una llamada.
El volumen de la función manos libres solo
se puede modificar si la misma está activada.
Está realizando una llamada.
q
Suba o baje el volumen.
Cómo cambiar los tonos de
timbre
Para ajustar los tonos de timbre en la estación base, ver p. 31.
Puede seleccionar diferentes tonos de
timbre para la línea 1 y la línea 2.
Volumen
Puede elegir entre cinco niveles de
volumen (1-5; por ejemplo, volumen 4 =
ˆ).
§Menú§ ¢ Configuración ¢ Config. Audio
¢ Vol. Timbre HS
Línea1/Línea2
Seleccione la línea para la cual
quiere configurar el volumen y
presione §OK§.
Verizon V500 / ES / A31008-M1931-R301-1-6019 / registr_sett.fm / 30.4.08
Configuración de la estación base
q
Seleccione el volumen y presione §OK§.
Tonos de timbre
Puede elegir entre 15 melodías distintas.
§Menú§ ¢ Configuración ¢ Config. Audio
¢ Tonos Timb. HS ¢ Línea1/Línea2
q
Seleccione su melodía preferida y presione §OK§.
Activar/desactivar el tono de timbre
Antes de recibir una llamada puede desactivar el tono de timbre del terminal inalámbrico, indefinidamente o solo para la
llamada actual, antes de descolgar o mientras el terminal inalámbrico está en estado
inactivo.
Desactivar indefinidamente el tono de
timbre
*
Presione prolongadamente la
tecla asterisco.
En la pantalla aparece el icono Å.
Reactivar el tono de timbre
*
Presione prolongadamente la
tecla asterisco.
Desactivar el tono de timbre para la
llamada actual
§Callar§
Presione la tecla de pantalla.
Desactivar el tono de timbre durante una
llamada entrante
s
Presione la tecla hasta que
deje de escuchar el tono de
timbre.
Activar el tono de timbre durante una
llamada entrante
t
Presione la tecla hasta que el
volumen de tono de timbre
alcance el nivel deseado.
Cómo activar/desactivar el tono
del teclado
Cada toque de tecla se confirma con un
pitido. Esta función se puede desactivar.
§Menú§ ¢ Configuración ¢ Config. Audio
¢ Tono Teclas ¢ Encendido/Apagado
Configuración de la
estación base
Use las teclas de la estación base para realizar estas configuraciones.
Ajustar el contraste de la pantalla
Se tiene la opción entre cinco contrastes
diferentes.
§Menú§ ¢ Configuración ¢ Base
¢ Mostrar Contr.
q
Seleccione el nivel preferido y
presione §OK§.
Cómo cambiar el idioma de la pantalla
Puede ver los textos de la pantalla en distintos idiomas.
§Menú§ ¢ Configuración ¢ Base ¢ Idioma
¢ Inglés/Español/Francés
q
Seleccione un idioma y presione §OK§.
Cómo cambiar el volumen del tono de
timbre
¤ Use las teclas de volumen ð y ñ de
la estación base para ajustar el
volumen del tono de timbre de la estación base.
31
Verizon V500 / ES / A31008-M1931-R301-1-6019 / registr_sett.fm / 30.4.08
Configuración del sistema
Cómo cambiar las melodías de los
tonos de timbre
Puede utilizar un terminal inalámbrico
Verizon V500H registrado o las teclas de la
estación base para realizar esta configuración.
Puede elegir entre 5 melodías distintas.
§Menú§ ¢ Configuración ¢ Config. Audio
¢ Timbres Base
Configuración para la conexión de la
estación base a una centralita
telefónica
La configuración siguiente se necesita
únicamente cuando su centralita telefónica lo exige. Consulte la guía del usuario de
su centralita telefónica.
Cambiar el modo de marcación
Las siguientes configuraciones solo
pueden realizarse usando un terminal inalámbrico Verizon V500H registrado.
Puede elegir entre los siguientes modos
de marcación:
u Marcación por tonos (DTMF)
u Marcación por pulsos (DP)
§Menú§ ¢ Configuración ¢ Sistema ¢ Modo
Marcado ¢ Línea1/Línea2
¢ Tonos/Pulsos
q
Seleccione el modo de marcación y presione §OK§.
Protección contra el acceso no
autorizado
Configuración del tiempo de corte de
llamada
q
Seleccione su melodía preferida y presione §OK§.
Configuración del sistema
Proteja la configuración del sistema de la
estación base con un PIN que solo usted
conozca. El PIN del sistema debe ser ingresado cuando se registra/se quita del registro un terminal inalámbrico con/desde la
estación base.
Cómo cambiar el PIN del sistema
Puede cambiar los cuatro dígitos del PIN
del sistema en la estación base (predeterminado: 0000) por un PIN de cuatro
dígitos conocidos solamente por usted.
Precaución:
¡No vaya a olvidar el nuevo PIN del sistema! Si
lo olvida, deberá restaurar su teléfono a la configuración predeterminada (ver a continuación).
¢ Configuración ¢ Sistema
¢ Cambiar NIP
§Menú§
~
~
~
32
Introduzca el PIN antiguo y
presione §OK§.
Introduzca el nuevo PIN y presione §OK§.
Para confirmar, ingrese el PIN
nuevo otra vez y presione §OK§.
¢ Configuración ¢ Sistema ¢ Flash
Time ¢ Línea1/Línea2 ¢ Corto/Largo
q
Seleccione el tiempo de corte
de la llamada (Corto = 80ms,
Largo = 650ms) y presione §OK§.
§Menú§
Conmutar temporalmente a marcación por
tonos (DTMF)
Si su centralita telefónica todavía funciona
con marcación por pulsos (DP), pero se requiere la marcación por tonos (DTMF) (por
ej., para escuchar el correo de voz de la
red), deberá cambiar a la marcación por
tonos para la llamada.
Requisito: Está realizando una llamada o
ya marcó un número externo.
§Menú§ ¢ Marcación Voz
§OK§
Para confirmar presione la
tecla de pantalla.
La marcación por tonos se activa sólo para
esta llamada.
Verizon V500 / ES / A31008-M1931-R301-1-6019 / registr_sett.fm / 30.4.08
Cómo restablecer la configuración predeterminada
Cómo restablecer la
configuración
predeterminada
Se pueden restaurar los valores predeterminados de la mayoría de las configuraciones. Al restaurar, todos los terminales
inalámbricos siguen registrados y no se
borra el directorio telefónico.
¤ ¡Realice lo siguiente en un terminal inalámbrico registrado Verizon V500H!
§Menú§ ¢ Configuración ¢ Sistema
¢ Restablecer
§OK§
Presione la tecla de pantalla
para confirmar la restauración.
33
Verizon V500 / ES / A31008-M1931-R301-1-6019 / appendix.fm / 30.4.08
Apéndice
Apéndice
Resolución de problemas
La pantalla está en blanco.
Cuidados
¤ Limpie la estación base y el terminal
inalámbrico con un paño húmedo (no
utilice disolventes) o un paño antiestático.
Nunca utilice un paño seco. Esto puede
causar estática.
Contacto con líquidos
!
Si el terminal inalámbrico entra en contacto con líquidos:
1. Apague el terminal inalámbrico y
retire las baterías de inmediato.
2. Deje que el líquido se drene del terminal inalámbrico.
3. Seque todas las piezas con suaves
toques, luego coloque el terminal inalámbrico con el compartimiento de las
baterías abierto y el teclado hacia abajo
en un lugar seco y tibio, durante al
menos 72 horas (no en un horno por
convección, horno de microondas,
etc.).
4. No vuelva a encender el terminal inalámbrico hasta que se haya secado
por completo.
Lo podrá usar normalmente cuando esté
completamente seco.
Preguntas y respuestas
Si tiene preguntas acerca del uso de su
teléfono, puede comunicarse con
nosotros en
http://www.verizon.com
La tabla siguiente (p. 34) contiene una
lista de problemas comunes y posibles soluciones.
34
1. El terminal inalámbrico no está encendido.
Presione prolongadamente la tecla de
colgar a.
¥
2. Las baterías están agotadas.
Cargue o cambie las baterías (p. 9).
¥
El terminal inalámbrico no responde
cuando presiona una tecla.
El bloqueo del teclado está activado.
Presione la tecla numeral # prolongadamente (p. 1).
¥
Buscar Base y Ä parpadean en la pantalla.
1. El terminal inalámbrico está fuera del
alcance de la estación base.
Reduzca la distancia entre el terminal
inalámbrico y la estación base.
¥
2. El terminal inalámbrico se borró del registro. Favor Registr. está parpadeando en la
pantalla.
Registre el terminal inalámbrico (p. 26).
¥
3. La estación base no está encendida.
Compruebe el cable de alimentación de
la estación base (p. 9).
¥
El terminal inalámbrico no suena.
El tono de timbre está apagado.
Active el tono de timbre (p. 31).
¥
No se escucha el tono de timbre ni el tono
de marcar.
Se cambió el cable de teléfono de la estación
base.
Cuando compre un nuevo cable, asegúrese
de que los contactos tengan la distribución
correcta.
¥
¥
3
2
1
Distribución correcta del enchufe
hembra
4
5
6
1
2
3
4
5
6
libre
libre
a
b
libre
libre
Verizon V500 / ES / A31008-M1931-R301-1-6019 / appendix.fm / 30.4.08
Apéndice
Su interlocutor no lo oye.
Características técnicas
¥
Baterías recomendadas
Ha presionado la tecla i (INT). El terminal
inalámbrico está en espera.
Vuelva a activar el micrófono (p. 1).
El número de teléfono del llamante no se visualiza, a pesar de que se ha activado CID.
No está activada la ID del llamante.
El llamante debe solicitar al proveedor de
red la activación de la ID del llamante (CID).
¥
Oye un tono de error cuando ingresa un
dato
No se pudo completar una acción/el dato es inválido.
Repita la operación.
Mire la pantalla y consulte las instrucciones
de funcionamiento si fuera necesario.
¥
No se escuchan los mensajes en la bandeja
de entrada de la red.
Su sistema telefónico utiliza la marcación por
pulsos.
Ajuste su sistema telefónico para que use la
marcación por tonos.
¥
La lista de llamadas no indica la hora correcta de recepción de los mensajes.
No se ajustaron la fecha y la hora.
Ajuste la fecha y la hora (p. 10).
¥
Se escucha un tono de error del contestador
automático durante la operación remota.
El PIN del sistema introducido no es correcto.
Ingrese nuevamente el PIN del sistema.
¥
No puede manejar el contestador automático a través del funcionamiento remoto.
Acceso Remoto no se activó.
Active Acceso Remoto (ver p. 24)
¥
El contestador automático no graba ningún
mensaje o se cambió a “sólo anuncios”.
La memoria está llena.
Borre los mensajes antiguos.
Reproduzca los mensajes nuevos y bórrelos.
¥
¥
Níquel e hidruro metálico (NiMH):
El terminal inalámbrico se suministra con
las baterías AAA autorizadas.
Tiempos de servicio/carga del terminal
inalámbrico
Capacidad
550 mAh
Tiempo de espera Unas 180 horas (7,5 días)
Tiempo de
conversación
Aprox. 10 horas
Tiempo de carga
Aprox. 10 horas
Los tiempos de funcionamiento y carga
son válidos únicamente cuando se usa con
las baterías recomendadas.
Consumo de la estación base
En modo de espera: aprox. 1,5 vatios
Durante una llamada: aprox. 2 vatios
Especificaciones generales
DECT 6.0
se admite
Número de
canales
60 canales dúplex
Rango de frecuencia de radio
1920–1930 MHz
Método dúplex
Múltiplex por división de
tiempo, longitud de trama
10 ms
Trama de canal
1728 kHz
Tasa de bits
1152 kbit/s
Modulación
GFSK
Codificación de
lenguaje
32 kbit/s
Potencia de
transmisión
10 mW, potencia media
por canal
35
Verizon V500 / ES / A31008-M1931-R301-1-6019 / appendix.fm / 30.4.08
Apéndice
Alcance
hasta 984 pies (300 m) en
espacios abiertos y hasta
165 pies (50 m) en interiores
Fuente de alimentación de la estación base
110 V ~/60 Hz
Condiciones ambientales para el
funcionamiento
+41 °F a +113 °F
(5 °C a +45 °C);
20% a 75% de humedad
relativa
Modo de
marcación
DTMF (marcación por
tonos)/DP (marcación por
pulsos)
Información sobre la FCC/ACTA
Advertencia: las alteraciones o modificaciones a esta unidad que no hayan sido autorizados expresamente por Productos inalámbricos
de Siemens podría anular el permiso de la FCC
para el uso de este equipo. Esto incluye la
adición de cualquier antena exterior.
Este sistema telefónico cumple con la Sección
68 de las normas de la FCC y los requisitos
adoptados por la ACTA. En la parte inferior de la
base existe una etiqueta que, entre otra información, incluye un identificador de producto
con el formato US:AAAEQ##TXXXX. Usted debe
proporcionar esta información a su compañía
telefónica si así se lo solicita. El enchufe y el conector empleados para conectar este equipo al
cableado y la red telefónica de las instalaciones
han de cumplir las normas y requisitos pertinentes de la Sección 68 de la FCC adoptados
por la ACTA. Con este producto se incluyen un
cable de teléfono y un conector modular que
cumplen dichas normas y requisitos. Está diseñado para conectarse con un conector modular
compatible que también cumpla las normas y
requisitos. Consulte las instrucciones de instalación para obtener más detalles.
El REN es útil para determinar la cantidad de dispositivos que pueden ser conectados a la línea
telefónica. Un exceso de REN en una línea telefónica puede producir que los dispositivos no
suenen cuando entre una llamada. En la mayoría, pero no en todas las áreas, la suma de los
REN de todos los dispositivos conectados a una
línea no debería exceder de cinco (5.0) Para
estar seguro del número de dispositivos que
puede conectar a una línea, de acuerdo al REN,
póngase en contacto con su compañía de teléfonos local. En los productos aprobados
36
después del 23 de julio de 2001, el REN forma
parte del identificador de producto con el
formato US:AAAEQ##TXXXX. Los dígitos que
representan ## son los REN sin punto decimal
(p. ej., 03 es un REN de 0.3). En productos anteriores, el REN se muestra en la etiqueta por separado.
Si su equipo telefónico interfiere con la red telefónica, la compañía de teléfonos puede exigirle
que desconecte el teléfono hasta que se haya
solucionado el problema o puede desconectar
su línea temporalmente. Si es posible le notificarán este hecho por adelantado. Pero si no es
factible avisar primero, usted será notificado lo
más pronto posible. También se le informará de
su derecho a presentar una queja ante la FCC.
Su empresa telefónica puede efectuar cambios
en su sistema, equipos, operaciones o procedimientos, alguno de los cuales puede afectar el
funcionamiento del equipo telefónico del usuario. Si así ocurre, se le notificará anticipadamente para evitar interrupciones en su servicio telefónico. Si tiene problemas con este sistema
telefónico, desconéctelo de la línea hasta que el
problema haya sido corregido o hasta que esté
seguro de que el equipo funciona correctamente.
Si surgen problemas con el equipo, para
obtener información sobre reparaciones o la
garantía póngase en contacto con el Servicio de
Atención al Cliente Verizon, tel. 1-866 374
3864. Si el equipo interfiere con la red telefónica, la compañía de teléfonos puede exigirle que
desconecte el teléfono hasta que se haya solucionado el problema. Este equipo no está previsto para ser reparado por el cliente (usuario).
Este sistema telefónico no puede usarse con
servicios de pago suministrados por la empresa
telefónica. La conexión a líneas telefónicas
compartidas está sujeta a las tarifas del estado.
No se puede garantizar la privacidad de las conversaciones cuando se utilice este teléfono.
Si su hogar dispone de un sistema de alarma
con un cableado especial conectado a la línea
telefónica, asegúrese de que la instalación de
este equipo no desconecte el sistema de
alarma. Si tiene alguna duda sobre qué puede
desactivar el sistema de alarma, póngase en
contacto con la compañía telefónica o con un
instalador cualificado.
Este equipo telefónico ha sido debidamente
probado y cumple con los limites establecidos
para los dispositivos digitales de la Clase B, de
acuerdo con la sección 15 de las normas de la
FCC. El uso del sistema está sujeto a las condiciones siguientes: (1) Este dispositivo no debe
causar interferencias perjudiciales; y (2) este
Verizon V500 / ES / A31008-M1931-R301-1-6019 / appendix.fm / 30.4.08
Apéndice
dispositivo debe aceptar cualquier interferencia
recibida, incluyendo aquella que pueda causar
un funcionamiento no deseado. Estos límites
existen para proporcionar una protección razonable contra dichas interferencias en instalaciones residenciales. Algunos teléfonos inalámbricos operan a frecuencias que pueden causar
interferencias en aparatos de televisión y vídeo
cercanos, para limitar o prevenir estas interferencias, la base del sistema no debe colocarse
cerca o sobre una televisión o vídeo. En caso de
que se experimenten interferencias, el alejar la
base de estos aparatos generalmente reduce o
elimina dichas interferencias.
Sin embargo, no hay garantía de que no se producirán interferencias en alguna instalación en
particular. Si este sistema telefónico causa interferencias nocivas en la recepción de radio o
televisión cuando se encuentra en uso, el
usuario debe eliminar la interferencia intentando una o más de las siguientes medidas:
1. Cambie la orientación o la ubicación de la
antena receptora.
2. Aumente la distancia entre la base del
sistema y el receptor afectado.
3. Conecte la base del sistema en una toma de
corriente que esté en un circuito diferente al del
receptor.
4. Consulte al distribuidor o a un experto en
radio y televisión en busca de ayuda.
Aviso para la Marcación Directa de
Entrada (“DID”)
QUE PERMITE A ESTE EQUIPO SER MANEJADO
DE FORMA QUE NO PROPORCIONE UNA SUPERVISIÓN DE RESPUESTA ADECUADA COMO VIOLACIÓN DE LA SECCIÓN 68 DE LAS NORMAS DE
LA FCC.
Aviso a los usuarios con aparatos para
sordos: este sistema telefónico es compatible
con aparatos para sordos acoplados por inducción.
Apagones: en el caso de un apagón, su teléfono inalámbrico no funcionará. El teléfono inalámbrico precisa de electricidad para su funcionamiento. Debería tener un teléfono que no
necesita electricidad para usarlo durante los
cortes del suministro eléctrico.
Aviso:
La instalación de la unidad de base debería
dejar un margen de al menos 8 pulgadas entre
la base y las personas en cumplimiento de las
directrices de exposición a RF de la FCC.
La parte portátil (terminal inalámbrico) ha sido
debidamente probada para su uso en el cuerpo
y cumple las directrices de exposición a RF de la
FCC. Su utilización con un accesorio que contenga partes metálicas puede no garantizar el
cumplimiento de dichas directrices.
Aviso al servicio de la compañía telefónica:
Si precisa el servicio de su compañía telefónica,
proporcióneles estos datos:
- Código de interfaz de la instalación
(FIC): 02LS2
- Código de orden de servicio (SOC):9.0Y
- Conector del Código de orden de servicio universal (USOC) RJ11C, como se indica en la etiqueta de la parte inferior de la estación base.
Precauciones de seguridad
Antes de utilizar su teléfono, se deben tomar
precauciones importantes para reducir los
riesgos de incendio, electrocución y heridas a
terceros.
1. Lea y comprenda todas las instrucciones.
2. Siga todas las instrucciones y advertencias
contenidas en el producto.
3. Desconecte el producto de la toma de corriente y de la línea de teléfonos antes de limpiarlo. No utilice limpiadores líquidos o aerosoles. Use un paño húmedo para limpiarlo.
4. No utilice este producto cerca del agua, por
ejemplo, cerca de una bañera, lavamanos, lavavajillas ni lavadoras. Tampoco en sótanos
húmedos ni cerca de una piscina o alberca.
5. Coloque este producto en una superficie
sólida y estable. Si la unidad cae al piso puede
sufrir graves deterioros o puede herir a alguna
persona.
6. Las ranuras o aperturas en la cubierta y en la
parte posterior e inferior son para ventilación y
así evitar un calentamiento excesivo. Jamás se
deben bloquear dichas ranuras. Nunca se debe
poner el equipo cerca o sobre un radiador o calentador, ni tampoco en lugares donde no
exista ventilación adecuada.
7. Este producto sólo debe operarse con el
voltaje indicado en la etiqueta. Si no está
seguro del voltaje local, consulte a la compañía
eléctrica local.
8. No ponga objetos sobre el cordón eléctrico
de la unidad. Instale la unidad donde nadie
pueda pisarla o tropezar con el cordón.
37
Verizon V500 / ES / A31008-M1931-R301-1-6019 / appendix.fm / 30.4.08
Apéndice
9. No sobrecargue las tomas de corriente ni las
extensiones de cables ya que ello puede provocar incendios o choques eléctricos.
10. Nunca introduzca objetos en las ranuras del
equipo ya que pueden hacer contacto con terminales de alto voltaje o provocar cortocircuitos
y causar incendios o choques eléctricos. Nunca
derrame líquidos sobre el equipo.
11. Para reducir los riesgos de electrocución o
quemaduras, no desarme la unidad. Acuda al
servicio técnico autorizado más cercano
cuando se requiera algún tipo de reparación. El
abrir o sacar las cubiertas del equipo le puede
exponer a corrientes y voltajes extremadamente peligrosos, además de otros riesgos. También, si se rearma el equipo incorrectamente,
éste puede causar choques eléctricos al utilizarlo posteriormente.
12. Desconecte el cordón de las tomas de corriente y lleve el equipo al servicio técnico autorizado si se produce alguna de las siguientes situaciones:
a.) El cordón de la corriente está roto o dañado.
b.) Si se han derramado líquidos en el interior
del producto.
c.) Si el equipo ha estado expuesto a la lluvia o
al agua.
d.) Si el producto no funciona normalmente al
utilizarlo según las instrucciones de operación.
Ajuste sólo aquellos controles indicados en las
instrucciones de operación, ya que el ajuste inadecuado de otros puede causar desperfectos
que sólo podrán ser reparados por un técnico
cualificado.
e.) Si el producto se ha caído al suelo o tiene
daños en su superficie.
f.) Si el producto sufre una disminución significativa en su funcionamiento.
13. Evite usar un teléfono (que no sea inalámbrico) durante una tormenta eléctrica. Existe un
posible riesgo de choque eléctrico por un rayo.
Por tanto, sugerimos la utilización de un protector de sobretensión.
14. No utilice el teléfono para informar sobre
una fuga de gas estando en las cercanías de
ésta.
15. Puede que los números de emergencia/911
no se puedan marcar si el teclado está bloqueado.
38
PRECAUCIONES CON LA BATERÍA
Con el fin de reducir el riesgo de incendios,
heridas o choques eléctricos, y para desechar
las baterías en forma adecuada, sírvase leer
atentamente estas instrucciones:
CONTIENE UNA BATERÍA ALCALINA DE NÍQUELHIDRURO. SE DEBE RECICLAR O DESECHAR ADECUADAMENTE. NO SE DEBE ARROJAR EN VERTEDEROS MUNICIPALES.
1. Utilice sólo baterías diseñadas para este producto.
2. NO UTILICE BATERÍAS ALCALINAS DE NÍQUEL
CADMIO O LITIO O NO RECARGABLES, ni
combine baterías de diferentes tamaños o
marcas. NO UTILICE BATERÍAS NO RECARGABLES.
3. No exponga las baterías al fuego; las celdas
pueden explotar. Tampoco las exponga al agua.
Consulte las normas municipales sobre el
desecho de este tipo de baterías.
4. No abra ni perfore las baterías. El electrolito
que contienen es corrosivo y puede causar quemaduras en los ojos y en la piel. Éste también es
tóxico si se ingiere.
5. Se debe tener precaución al utilizar las baterías para no provocar cortocircuitos con los elementos conductores como anillos, brazaletes o
llaves. Tanto las baterías como estos elementos
pueden sobrecalentarse y causar quemaduras o
incendios.
6. Cargue las baterías contenidas en la caja, o
aquellas diseñadas para este equipo, de
acuerdo a las instrucciones y limitaciones especificadas en el manual del usuario No trate de
cargarlas por ningún medio o dispositivo que
no esté contemplado en el manual.
7. Limpie periódicamente los contactos de
carga del cargador y del auricular.
Verizon V500 / ES / A31008-M1931-R301-1-6019 / appendix.fm / 30.4.08
Apéndice
Atención al Cliente
Garantía del Centro de Atención al Cliente para Productos Inalámbricos.
Para obtener el servicio de la Garantía del Centro de Atención al Cliente,
información sobre el funcionamiento de productos o para resolver problemas, llame al:
Teléfono gratuito: 1-866-374-3864
De 9:00 a.m. a 5:00 p.m. De lunes a sábado
Información del sistema
Si llama al servicio de Atención al cliente,
es posible que le soliciten la información
de su sistema telefónico.
Durante la llamada, proceda como se
indica:
§Menú§ ¢ s ¢ Info. Sistema
Hrs. Operación
Seleccione la entrada y presione §OK§.
La cantidad de horas que ha estado funcionando su sistema.
§Atrás§
Presione la tecla de pantalla.
s Versión HS S/W
Seleccione la entrada y presione §OK§.
Aparece la versión del software del terminal inalámbrico. Use q para desplazarse a
través de toda la información.
§Atrás§
Presione la tecla de pantalla.
s Ver. Base S/W
Seleccione la entrada y presione §OK§.
Aparece la versión del software de la estación base. Use q para desplazarse a través
de toda la información.
§Atrás§
Presione la tecla de pantalla
tres veces para regresar al
modo normal del teléfono.
Garantía limitada del
usuario final
La marca Verizon y la marca comercial Verizon
se usan bajo licencia. Este producto está cubierto por un año de garantía limitada. Toda reparación, reemplazo o servicio de garantía y todas
las preguntas sobre este producto deben ser
dirigidas a: 1-866-374-3864.
Esta garantía limitada y no transferible se aplica
al comprador original/usuario final («usted») de
sistemas, terminales y accesorios (colectivamente denominados «Producto») suministrados por Siemens Home and Office Communication Devices LLC («Siemens»). Siemens le
garantiza a usted que en el momento de la
compra el producto está libre de defectos de
mano de obra y materiales y que el software
incluido con el Producto funcionará cumpliendo sustancialmente sus especificaciones programadas.
1. PERIODO DE GARANTÍA
El periodo de garantía del Producto es de un (1)
año a partir de la fecha original de la compra
realizada por usted. Debe proporcionar una
prueba de compra (p. ej. el resguardo de la venta o la factura) junto con cualquier Producto
devuelto durante el periodo de garantía. Las
baterías suministradas con los Productos están
garantizadas como libres de defectos sólo en el
momento de la compra.
2. REPARACIÓN EXCLUSIVA
Toda la responsabilidad de Siemens y la reparación exclusiva para usted en caso de que el Producto sea defectuoso en materiales o mano de
obra durante el periodo de garantía y se haya
devuelto será la reparación o sustitución, tal y
como se establece en la Sección 4 más abajo.
En la reparación o sustitución pueden usarse
componentes, piezas o materiales reacondicio-
39
Verizon V500 / ES / A31008-M1931-R301-1-6019 / appendix.fm / 30.4.08
Apéndice
nados. Los datos contenidos en la memoria del
Producto podrían perderse durante la reparación.
3. ESTA GARANTÍA LIMITADA NO CUBRE
LOS SIGUIENTES ASPECTOS Y SERÁ
NULA PARA:
– Daños cosméticos, daños físicos en la superficie del Producto, incluidas, sin limitarse a,
las roturas, rajaduras, muescas, rayado o
marcas de adhesivos en la pantalla LCD o en
la carcasa del Producto.
– Los Productos que hayan sido reparados,
revisados o modificados (incluida la la antena) por personas ajenas a Siemens o a un
servicio de reparaciones aprobado por Siemens o que hayan sido incorrectamente instalados.
– El coste de la instalación, la retirada o la
reinstalación.
– Daños debidos al funcionamiento incorrecto
de cualquier teléfono, dispositivo electrónico, hardware o programa de software, red,
Internet u ordenador, fallos o dificultades de
cualquier tipo, incluidos, pero sin limitarse
a, los fallos de servidor o transmisiones
informáticas incompletas, incorrectas, en
mal estado o retardadas.
– Equipos y componentes no fabricados,
suministrados o autorizados por Siemens.
– La modificación de los componentes del Producto, o el funcionamiento del Producto en
un entorno inadecuado o en una manera
para la que no estén destinados, incluidos,
pero sin limitarse a, fallos o defectos causados por el mal uso, abuso, accidentes, daños
físicos, manejo anormal, manipulación incorrecta, negligencia, alteraciones, instalación, extracción o reparaciones no autorizadas, incapacidad de seguir instrucciones,
problemas causados por la cobertura del
transportista, exposición al fuego, al agua o
un exceso de humedad o líquidos, inundaciones, o cambios extremos de temperatura,
actos de la naturaleza, actos de terrorismo,
derrames de comida o líquidos, virus u otros
defectos introducidos en los Productos, u
otros actos que no sean responsabilidad de
Siemens y que las especificaciones del Producto no prevean, incluido el daño causado
por una incorrecta manipulación o fusibles
fundidos.
– Los Productos cuyas etiquetas de garantía,
números de serie electrónicos y/o etiquetas
con el número de serie se hayan quitado,
alterado, hecho ilegibles o aplicado de forma fraudulenta a otros equipos.
40
– Problemas de recepción de señal (salvo si
están causados por defectos de material o
mano de obra en el Producto).
– Productos a los que se haga funcionar más
allá de sus capacidades máximas.
– Rendimiento de los Productos cuando se
usan en combinación con otros productos
o equipamientos no fabricados, suministrados o autorizados por Siemens.
– Consumibles (como baterías y fusibles).
– Pagos por mano de obra o reparación a
representantes o centros de servicio no
autorizados por Siemens a realizar el mantenimiento del Producto.
– Pérdida de datos.
– Pruebas y exámenes revelan que el defecto
o funcionamiento incorrecto aducido en el
Producto no existe.
Esta garantía no cubre la educación e instrucción del cliente, instalación o extracción, ajustes de configuración, problemas relacionados
con servicio(s) proporcionados por un transportista u otro proveedor de servicios, y/o problemas de recepción de señal. Siemens no se hará
responsable del software, firmware, información o datos de la memoria contenidos, almacenados o integrados en cualquier Producto
devuelto para su reparación, esté o no bajo
garantía.
Esta garantía sólo es válida en EE. UU.
EL USO CON ACCESORIOS NO SUMINISTRADOS POR SIEMENS O QUE NO HAYAN SIDO
AUTORIZADOS DE OTRA MANERA POR SIEMENS PUEDE INVALIDAR LA GARANTÍA.
4. PROCEDIMIENTO DE DEMANDA DE GARANTÍA
Todas las demandas de garantía deben notificarse a Siemens antes de que expire el periodo
de garantía. La obligación de Siemens de proporcionar asistencia para la garantía no se
extenderá más allá de la fecha de finalización
del periodo de garantía, aunque los productos
reparados o sustituidos durante el periodo de
garantía continuarán en garantía durante el
resto de este periodo de garantía o durante
treinta (30) días, lo que sea mayor.
Verizon V500 / ES / A31008-M1931-R301-1-6019 / appendix.fm / 30.4.08
Apéndice
Durante el periodo de garantía, Verizon estará
disponible para proporcionarle un servicio de
asistencia técnica de lunes a sábado de 9:00 h a
17:00 h, excluyendo fiestas nacionales. El servicio de asistencia se le proporcionará a usted a
través del número gratuito de servicio al cliente:
1-866-374-3864
5. LIMITACIÓN DE LA GARANTÍA
Siemens no garantiza ni declara que el software
de los Productos satisfará sus requisitos ni que
funcionará en combinación con otro hardware
o software proporcionado por terceros, que el
funcionamiento del software será ininterrumpido o libre de errores ni que todos los defectos
de los productos de software serán corregidos.
6. LIMITACIÓN DE REPARACIONES;
EXCLUSIÓN DE DAÑOS
CONSECUENCIALES O DE OTRO TIPO
Su única reparación para cualquier infracción
de esta garantía limitada está especificada más
arriba. Salvo en el caso de cualquier reintegro
elegido por Siemens, NO TIENE DERECHO A
NINGÚN TIPO DE DAÑO, INCLUIDOS, PERO
SIN LIMITARSE A, LOS DAÑOS CONSECUENCIALES, si el Producto no cumple la garantía
limitada y, en la medida en que la ley aplicable
lo permita, incluso si cualquier reparación no
cumpliera su fin esencial. Los términos abajo
indicados («Exclusión de daños incidentales,
consecuenciales y otros») también se incorporan a esta garantía limitada. Algunos estados
no permiten la exclusión o limitación de daños
incidentales o consecuenciales, por tanto, es
posible que las limitaciones anteriores no le
sean aplicables. Esta garantía limitada le proporciona derechos legales concretos específicos. Puede tener otros derechos que varían de
estado/jurisdicción a estado/jurisdicción.
7. DESCARGO DE RESPONSABILIDADES
DE GARANTÍAS
SIEMENS Y SUS PROVEEDORES PROPORCIONAN
EL PRODUCTO Y LOS SERVICIOS DE ASISTENCIA
(SI LOS HUBIERA) “TAL COMO SON” Y Y CON
TODOS SUS FALLOS. LA GARANTÍA LIMITADA EN
LUGAR DE CUALQUIER OTRA GARANTÍA EXPRESA (SI LA HUBIERA) CREADA POR CUALQUIER
EXTRACTO DE DOCUMENTACIÓN O EMBALAJE,
SALDO POR LA GARANTÍA LIMITADA Y EN LA
MÁXIMA EXTENSIÓN QUE PERMITAN LAS LEYES
APLICABLES EN LUGAR DE CUALQUIER GARANTÍA IMPLÍCITA O ESTABLECIDA POR LA LEY,
INCLUIDAS, PERO SIN LIMITARSE A, LAS GARANTÍAS IMPLÍCITAS DE COMERCIABILIDAD O IDEONEIDAD PARA UN FIN CONCRETO O LA EXACTITUD O TOTALIDAD O RESPUESTAS, DE
RESULTADOS, DE ESFUERZOS DE MANO DE
OBRA, DE AUSENCIA DE VIRUS Y DE AUSENCIA
DE NEGLIGENCIA, TODO ELLO RESPECTO AL
PRODUCTO, Y LA PROVISIÓN O FALLO PARA
PROVEER SERVICIOS DE ASISTENCIA. ASIMISMO, NO EXISTE GARANTÍA O CONDICIÓN DE
TÍTULO, DISFRUTE TRANQUILO, POSESIÓN
TRANQUILA O CORRESPONDENCIA CON LA
DESCRIPCIÓN O LA NO INFRACCIÓN RESPECTO
AL PRODUCTO. Algunos estados no permiten
limitaciones en la duración de garantías implícitas o la exclusión o limitación de daños incidentales o consecuenciales, por tanto, es posible
que las limitaciones anteriores no le sean aplicables a usted. Si su estado creara una garantía
o condición implícita y una ley federal o estatal
prohibiera el descargo de responsabilidades de
la misma, también dispone de un garantía o
condición implícita, PERO SÓLO DURANTE EL
PERIODO DE ESTA GARANTÍA LIMITADA (UN
AÑO). EN LO QUE SE REFIERE A CUALQUIER
DEFECTO DESCUBIERTO DESPUÉS DEL PERIODO
DE UN AÑO, NO EXISTE GARANTÍA O CONDICIÓN DE NINGÚN TIPO. Esta garantía limitada le
proporciona a usted derechos legales específicos, y usted puede disponer asimismo de otros
derechos que varían de estado a estado. En ningún caso la responsabilidad de Siemens excederá el coste de reparar o sustituir los Productos
defectuosos tal y como aquí se describen, y
dichas responsabilidades terminarán cuando
expire el periodo de garantía.
Cualquier añadido o actualización del Producto
o del software del Producto, incluido sin limitaciones cualquier arreglo o actualización del
software o solución de errores que se le proporcione tras la expiración del año de garantía limitada no están cubiertos por garantía o condición alguna, expresa, implícita o establecida
por la ley.
8. EXCLUSIÓN DE DAÑOS
INCIDENTALES, CONSECUENCIALES Y
OTROS
EN LA EXTENSIÓN MÁXIMA PERMITIDA POR LA
LEY, EN NINGÚN CASO SIEMENS, EL VENDEDOR
O SUS PROVEEDORES SERÁN RESPONSABLES DE
DAÑOS ESPECIALES, INCIDENTALES, INDIRECTOS O CONSECUENCIALES DE NINGÚN TIPO
(INCLUIDOS, PERO SIN LIMITARSE A, LOS
DAÑOS CAUSADOS POR PÉRDIDA DE BENEFICIOS O PÉRDIDA DE INFORMACIÓN, INTERRUP-
41
Verizon V500 / ES / A31008-M1931-R301-1-6019 / appendix.fm / 30.4.08
Apéndice
CIÓN DE NEGOCIO, DAÑOS PERSONALES, PÉRDIDA DE PRIVACIDAD, INCAPACIDAD DE
CUMPLIR CUALQUIER DEBER INCLUIDOS LOS DE
BUENA FE O DE ATENCIÓN RAZONABLE, NEGLIGENCIA, Y CUALQUIER OTRA PÉRDIDA PECUNIARIA) RESULTANTES O RELACIONADOS DE CUALQUIER MANERA CON EL USO O LA
INCAPACIDAD DE USAR EL PRODUCTO, LA PROVISIÓN DE O LA INCAPACIDAD DE PROPORCIONAR SERVICIOS DE ASISTENCIA ACOGIDA O EN
CONEXIÓN CON CUALQUIER PROVISIÓN DE
ESTA GARANTÍA LIMITADA, INCLUSO EN EL
CASO DE FALLO, AGRAVIO (INCLUIDA LA NEGLIGENCIA), ESTRICTA RESPONSABILIDAD, RUPTURA DE CONTRATO O RUPTURA DE GARANTÍA DE
SIEMENS O DEL VENDEDOR O DE CUALQUIER
PROVEEDOR, INCLUSO SI SIEMENS O EL VENDEDOR O CUALQUIER PROVEEDOR HA SIDO NOTIFICADO DE LA POSIBILIDAD DE TALES DAÑOS.
LA REPARACIÓN O SUSTITUCIÓN, TAL Y COMO
SE CONTEMPLAN EN LA GARANTÍA, SON SU
ÚNICA Y EXCLUSIVA REPARACIÓN PARA LA
INFRACCIÓN DE LA GARANTÍA LIMITADA.
9. LIMITACIÓN DE RESPONSABILIDAD Y
REPARACIONES
NO OBSTANTE DE CUALQUIER DAÑO EN EL QUE
USTED PUDIERA INCURRIR POR CUALQUIER
MOTIVO (INCLUIDOS SIN LIMITACIONES TODOS
LOS DAÑOS REFERENCIADOS MÁS ARRIBA Y
TODOS LOS DAÑOS DIRECTOS O GENERALES),
LA ENTERA RESPONSABILIDAD DE SIEMENS, EL
VENDEDOR Y CUALQUIERA DE SUS PROVEEDORES BAJO CUALQUIER PROVISIÓN DE ESTA
GARANTÍA LIMITADA Y SU REPARACIÓN EXCLUSIVA PARA TODO LO ANTERIOR (SALVO EN EL
CASO DE REPARACIONES DE ARREGLOS O SUSTITUCIONES ELEGIDAS POR SIEMENS O EL VENDEDOR O EL PROVEEDOR RESPECTO A CUALQUIER INFRACCIÓN DE LA GARANTÍA LIMITADA)
SE LIMITA COMO MUCHO A LA CANTIDAD
PAGADA POR USTED POR EL PRODUCTO O CINCO DÓLARES (5,00 $ ESTADOUNIDENSES). LAS
LIMITACIONES, EXCLUSIONES Y DESCARGOS DE
RESPONSABILIDAD ANTERIORES SE APLICARÁN
EL LA EXTENSIÓN MÁXIMA QUE LA LEY APLICABLE PERMITA, INCLUSO SI LA REPARACIÓN FRACASA EN SU FIN ESENCIAL.
42
10. LEY APLICABLE
Esta garantía limitada está gobernada por las
leyes de Texas, y queda excluida de la convención de las Naciones Unidas acerca de contratos
para la venta internacional de bienes.
Si desea obtener más información sobre el servicio de Verizon o bien asistencia técnica para
su teléfono Verizon, visite nuestro sitio web en
http://www.verizon.com, o bien llame al
1-866-374-3864.
Publicado por Siemens Cordless Products
Siemens es una marca comercial registrada de
Siemens Home and Office Communication
Devices GmbH & Co. KG.
Siemens Cordless Products es una división de
Siemens Home and Office Communication
Devices GmbH & Co. KG.
Las características del producto están sujetas a
cambios.
Siemens se reserva el derecho a realizar
cambios sin previo aviso en el diseño y/o los
componentes del equipo.
Referencia: A31008-M1931-R301-1-6019
© Copyright 2008 Verizon. Reservados todos
los derechos.
Verizon V500 / ES / A31008-M1931-R301-1-6019 / V500_kombi_SIX.fm / 30.4.08
Índice alfabético
Índice alfabético
Símbolos
"Externas" (lista de llamadas) . . . . . . . 18
"Suprimidas" (lista de llamadas) . . . . . 18
A
Aceptación de llamada . . . . . . . . . . . 23
Activación
bloqueo del teclado . . . . . . . . . . . . 13
contestador automático . . . . . . . . . 20
Activación,
contestador automático
(funcionamiento remoto) . . . . . 24
llamada de conferencia interna . . . . 28
respuesta automática . . . . . . . . . . . 30
terminal inalámbrico . . . . . . . . . . . 13
Ajustar
iluminación . . . . . . . . . . . . . . . . . . 30
la fecha . . . . . . . . . . . . . . . . . . . . . 10
la hora . . . . . . . . . . . . . . . . . . . . . . 10
Alcance. . . . . . . . . . . . . . . . . . . . . . . . 9
Anuncio (contestador automático) . . . 20
Anuncio (contestador
automático) . . . . . . . . . . . . . . . . 21
Atención al Cliente . . . . . . . . . . . . . . 39
B
Bandeja de entrada de la red . . . . . . . 25
Batería,
baterías recomendadas . . . . . . . . . 35
colocación . . . . . . . . . . . . . . . . . . . . 9
Baterías,
estado de carga . . . . . . . . . . . . . . . . 1
Bloqueo del teclado, . . . . . . . . . . . . . 13
Bloqueo,
activar/desactivar bloqueo de
teclado . . . . . . . . . . . . . . . . . . 13
Borrar registro del terminal
inalámbrico . . . . . . . . . . . . . . . . 26
Buscar un terminal inalámbrico . . . . . 26
C
Cambiar
modo de marcación . . . . . . . . . . . .
nombre de un terminal
inalámbrico . . . . . . . . . . . . . . .
PIN del sistema . . . . . . . . . . . . . . .
tiempo de corte de llamada . . . . . .
32
30
32
32
tono de timbre . . . . . . . . . . . . . . . .30
Caracteres especiales . . . . . . . . . . . . .15
Características técnicas . . . . . . . . . . . .35
Centralita telefónica,
configuración . . . . . . . . . . . . . . . . .32
configuración del modo de
marcación . . . . . . . . . . . . . . . .32
configuración del tiempo de corte
de llamada . . . . . . . . . . . . . . . .32
conmutar a marcación por
tonos . . . . . . . . . . . . . . . . . . . .32
Configuración
modo de marcación . . . . . . . . . . . .32
para conectar a
una centralita telefónica . . . . . .32
sistema . . . . . . . . . . . . . . . . . . . . . .32
tiempo de corte de llamada . . . . . . .32
Configuración de la línea . . . . . . . . . .11
Configuración del terminal
inalámbrico . . . . . . . . . . . . . . . . . 9
Configuración predeterminada . . . . . .33
Configuración,
configuración de la línea . . . . . . . . .11
contraste de la pantalla
(estación base) . . . . . . . . . . . . .31
contraste de la pantalla
(terminal inalámbrico) . . . . . . .30
estación base . . . . . . . . . . . . . . . . .31
idioma de la pantalla
(estación base) . . . . . . . . . . . . .31
marcación por tonos . . . . . . . . . . . .32
melodía del tono de timbre
(terminal inalámbrico) . . . . . . .30
respuesta automática . . . . . . . . . . .30
restaurar la configuración predeterminada . . . . . . . . . . . . . . . . . . . .33
sistema . . . . . . . . . . . . . . . . . . . . . .32
terminal inalámbrico . . . . . . . . . . . .30
tono del teclado
(terminal inalámbrico) . . . . . . .31
volumen de la bocina (terminal inalámbrico) . . . . . . . . . . . . . . . . . . . .30
volumen del tono de timbre
(estación base) . . . . . . . . . . . . .31
volumen del tono de timbre
(terminal inalámbrico) . . . . . . .30
Consumo eléctrico . . . . . . . . . . . . . . .35
Contenido del paquete . . . . . . . . . . . . 8
43
Verizon V500 / ES / A31008-M1931-R301-1-6019 / V500_kombi_SIX.fm / 30.4.08
Índice alfabético
Contestador automático . . . . . . . . . . 19
activación/desactivación . . . . . . . . . 20
cómo borrar mensajes . . . . . . . . . . 22
cómo reproducir los mensajes. . . . . 21
Contestador automático,
funcionamiento remoto . . . . . . . . . 24
grabar anuncios personales
/sólo anuncios . . . . . . . . . . 20, 24
Contestador automático, ver
bandeja de entrada de la red
Contraste de la pantalla,
estación base . . . . . . . . . . . . . . . . . 31
terminal inalámbrico . . . . . . . . . . . 30
Control remoto . . . . . . . . . . . . . . . . . 24
Conversación con manos libres . . . . . 13
Corregir entradas . . . . . . . . . . . . . . . 15
Cuidado del teléfono . . . . . . . . . . . . . 34
Cómo borrar
anuncios para el contestador
automático . . . . . . . . . . . . . . . 20
caracteres . . . . . . . . . . . . . . . . . . . 15
mensaje. . . . . . . . . . . . . . . . . . . . . 22
Cómo buscar en el directorio
telefónico . . . . . . . . . . . . . . . . . . 16
Cómo hacer llamadas
cómo responder una llamada . . . . . 12
externas . . . . . . . . . . . . . . . . . . . . 12
internas . . . . . . . . . . . . . . . . . . . . . 27
Cómo marcar
lista de llamadas . . . . . . . . . . . . . . 18
Cómo registrar los terminales inalámbricos . . . . . . . . . . . . . . . . . . . . . . . 26
E
D
F
Desactivación
bloqueo del teclado . . . . . . . . . . . .
contestador automático . . . . . . . . .
Desactivación,
llamada de conferencia . . . . . . . . .
respuesta automática . . . . . . . . . . .
terminal inalámbrico . . . . . . . . . . .
Desconocido . . . . . . . . . . . . . . . . . . .
Directorio telefónico . . . . . . . . . . . . .
Directorio telefónico,
administrar registros . . . . . . . . . . .
cómo abrir . . . . . . . . . . . . . . . . . . .
guardar registro . . . . . . . . . . . . . . .
DP (marcación por pulsos) . . . . . . . . .
DTMF . . . . . . . . . . . . . . . . . . . . . . . .
Duración de la llamada . . . . . . . . . . .
44
13
20
28
30
13
13
16
16
14
16
32
32
12
Ejemplo de registro de menú . . . . . . . 7
Enchufe para auricular . . . . . . . . . . . . 1
Equipo médico . . . . . . . . . . . . . . . . . . 6
Escribir entradas . . . . . . . . . . . . . . . . .15
Escucha simultánea durante la
grabación . . . . . . . . . . . . . . . . . .22
Escuchar una llamada . . . . . . . . . . . . .28
Espera durante una llamada
interna . . . . . . . . . . . . . . . . . . . .27
Estación base
Configuraciones relevantes para
una centralita telefónica . . . . . .32
Estación base,
alcance . . . . . . . . . . . . . . . . . . . . . . 9
conectar el dispositivo . . . . . . . . . . . 9
conexión y configuración . . . . . . . . 8
configuración . . . . . . . . . . . . . .31, 32
contraste de la pantalla . . . . . . . . . .31
cómo cambiar . . . . . . . . . . . . . . . . .26
idioma de la pantalla . . . . . . . . . . . .31
melodía del tono de timbre . . . . . . .32
PIN del sistema . . . . . . . . . . . . . . . .32
volumen del tono de timbre. . . . . . .31
Estado inactivo (pantalla) . . . . . . . . . .11
Estado inactivo, volver a . . . . . . . . . . .14
Externas,
conmutar entre dos llamadas . . . . . .29
dos llamadas simultáneas . . . . . . . .29
iniciar una segunda llamada
externa . . . . . . . . . . . . . . . . . .29
llamada de conferencia . . . . . . . . . .29
Finalizar la llamada . . . . . . . . . . . . . . .12
Finalizar, ver Desactivar
Fuente de alimentación . . . . . . . . . . . 6
Funcionamiento con auricular . . . . . . .13
Función de ahorro . . . . . . . . . . . . . . .23
H
Historial de llamadas . . . . . . . . . . . . .17
I
Icono
bloqueo del teclado . . . . . . . . . . . . .13
contestador automático . . . . . . . . .20
mensaje nuevo . . . . . . . . . . . . . . . .21
pantalla . . . . . . . . . . . . . . . . . . . . .14
tono de timbre . . . . . . . . . . . . . . . .31
Verizon V500 / ES / A31008-M1931-R301-1-6019 / V500_kombi_SIX.fm / 30.4.08
Índice alfabético
ID de llamantes . . . . . . . . . . . . . . . . . 13
Idioma de la pantalla,
estación base . . . . . . . . . . . . . . . . . 31
terminal inalámbrico . . . . . . . . . . . 30
Iluminación . . . . . . . . . . . . . . . . . . . . 30
Indicación del nivel de carga de
las baterías . . . . . . . . . . . . . . . . . . 1
Instalación de la estación base . . . . . . . 8
Interna,
llamada de conferencia . . . . . . . . . 28
llamada interna simultánea . . . . . . 27
Internas,
cómo hacer llamadas . . . . . . . . . . . 27
L
Lista de llamadas,
"Externas" . . . . . . . . . . . . . . . . . . .
"Suprimidas" . . . . . . . . . . . . . . . . .
cómo marcar . . . . . . . . . . . . . . . . .
estado del registro . . . . . . . . . . . . .
nombre del llamante . . . . . . . . . . .
número del llamante . . . . . . . . . . .
tipo de lista . . . . . . . . . . . . . . . . . .
ver entrada . . . . . . . . . . . . . . . . . .
Lista,
historial de llamadas . . . . . . . . . . .
llamadas perdidas . . . . . . . . . . . . .
Llamada
interna . . . . . . . . . . . . . . . . . . . . .
transferencia (conexión). . . . . . . . .
Llamada de conferencia . . . . . . . . . . .
externa . . . . . . . . . . . . . . . . . . . . .
Llamada en espera . . . . . . . . . . . . . .
llamada interna . . . . . . . . . . . . . . .
Llamada interna . . . . . . . . . . . . . . . .
llamada en espera . . . . . . . . . . . . .
Llamada,
cómo responder . . . . . . . . . . . . . . .
externa . . . . . . . . . . . . . . . . . . . . .
finalizar . . . . . . . . . . . . . . . . . . . . .
llamada de conferencia . . . . . . . . .
responder desde el contestador
automático . . . . . . . . . . . . . . .
Llamadas perdidas . . . . . . . . . . . . . . .
Llamante desconocido . . . . . . . . . . . .
Localización . . . . . . . . . . . . . . . . . . .
Localización, terminal inalámbrico . . .
Líquidos . . . . . . . . . . . . . . . . . . . . . .
18
18
18
18
18
18
18
18
17
18
27
27
28
29
27
27
27
27
12
12
12
28
22
18
13
26
26
34
M
Marcación por pulsos . . . . . . . . . . . . .32
Marcación por tonos . . . . . . . . . . . . . .32
Marcación rápida,
bandeja de entrada de la red . . . . . .25
contestador automático . . . . . . . . .24
Mejor estación base . . . . . . . . . . . . . .26
Mensajes . . . . . . . . . . . . . . . . . . . . . .19
icono de mensaje nuevo . . . . . . . . .21
Mensajes,
cómo borrar . . . . . . . . . . . . . . . . . .22
marcar como "nuevo" . . . . . . . . . . .22
reproducción . . . . . . . . . . . . . . . . .21
Menú,
guía del menú . . . . . . . . . . . . . . . . .14
registro de menú . . . . . . . . . . . . . . . 7
tecla . . . . . . . . . . . . . . . 14, 15, 16, 17
Micrófono . . . . . . . . . . . . . . . . . . . . . 1
silenciar/activar . . . . . . . . . . . . . . . . 1
Modificación de registros . . . . . . . . . .15
Modo de anuncio (contestador
automático) . . . . . . . . . . . . . . 19, 21
Modo de marcación . . . . . . . . . . . . . .32
Modo de marcación, . . . . . . . . . . . . . .32
N
Nombre del llamante
(lista de llamadas) . . . . . . . . . . . .18
Número del llamante
(lista de llamadas) . . . . . . . . . . . .18
Número,
agregar al directorio telefónico . . . .17
guardar en el directorio telefónico . .16
número que llama en pantalla
(CIP). . . . . . . . . . . . . . . . . . . . .13
P
Pantalla
en estado inactivo . . . . . . . . . . . . . .14
Pantalla,
iluminación. . . . . . . . . . . . . . . . . . .30
indicación del nivel de carga de
las baterías . . . . . . . . . . . . . . . . 1
teclas . . . . . . . . . . . . . . . . . . .1, 2, 14
terminal inalámbrico . . . . . . . . . . . . 1
PIN . . . . . . . . . . . . . . . . . . . . . . . . . .32
PIN del sistema . . . . . . . . . . . . . . . . . .32
Potencia de recepción . . . . . . . . . . . . . 9
Precauciones de seguridad . . . . . . . . . 6
Prefijos de área . . . . . . . . . . . . . . . . . .11
45
Verizon V500 / ES / A31008-M1931-R301-1-6019 / V500_kombi_SIX.fm / 30.4.08
Índice alfabético
Preguntas y respuestas . . . . . . . . . . . 34
Protección contra acceso . . . . . . . . . . 32
Protección del teléfono contra el
acceso . . . . . . . . . . . . . . . . . . . . 32
R
Registro,
escribir, modificar, corregir . . . . . . . 15
estado (lista de llamadas) . . . . . . . . 18
seleccionar (menú) . . . . . . . . . . . . . 7
seleccionar del directorio
telefónico . . . . . . . . . . . . . . . . 16
Rellamada manual de últimos
números . . . . . . . . . . . . . . . . . . . 17
Reproducción
anuncio (contestador
automático) . . . . . . . . . . . 20, 21
Resolución de problemas . . . . . . . . . . 34
Respuesta automática . . . . . . . . . 12, 30
S
Se muestra
número (CID/CNID) . . . . . . . . . . . . 13
Sonido, ver Tono de timbre
T
Tabla del conjunto de caracteres . . . . 15
Tecla 1 (marcación rápida) . . . . . . . . . 24
Tecla de asterisco . . . . . . . . . . . . . 1, 31
Tecla de borrar . . . . . . 3, 14, 15, 16, 17
Tecla de colgar . . . . . . . . . . 1, 3, 12, 29
Tecla de control . . . . . . . . . . . . . 1, 2, 13
Tecla de descolgar . . . . . . . . . . . . . 2, 12
Tecla de descolgar/tiempo de
corte . . . . . . . . . . . . . . . . . . . . . . 3
Tecla de encender/apagar . . . . . . . . 1, 3
Tecla de iniciar/detener con LED . . . . . . 3
Tecla de intercomunicación/
conferencia . . . . . . . . . . . . . . . . . 3
Tecla de localización . . . . . . . . . . . . . . 3
Tecla de numeral . . . . . . . . . . . . . . 1, 13
Tecla de rellamada. . . . . . . . . . . . . . . 17
Tecla de rellamada/pausa . . . . . . . . . . . 3
Tecla Silenciar . . . . . . . . . . . . . . . . . 1, 3
Teclas
línea 1 . . . . . . . . . . . . . . . . . . . . . . . 1
línea 1 con LED . . . . . . . . . . . . . . . . 3
línea 2 . . . . . . . . . . . . . . . . . . . . . . . 1
línea 2 con LED . . . . . . . . . . . . . . . . 3
marcación rápida . . . . . . . . . . . . . . 24
46
silenciar/activar micrófono . . . . . . . . 1
tecla de asterisco. . . . . . . . . . . . .1, 31
tecla de borrar . . . . . . . . 3, 14, 15, 17
tecla de colgar . . . . . . . . . 1, 3, 12, 29
tecla de control . . . . . . . . . . . .1, 2, 13
tecla de descolgar . . . . . . . . . . . .2, 12
tecla de descolgar/tiempo de
corte . . . . . . . . . . . . . . . . . . . . 3
tecla de encender/apagar . . . . . . .1, 3
tecla de iniciar/detener con LED . . . . 3
tecla de intercomunicación/
conferencia . . . . . . . . . . . . . . . 3
tecla de localización . . . . . . . . . . . . 3
tecla de menú . . . . . . . . 14, 15, 16, 17
Tecla de numeral . . . . . . . . . . . . .1, 13
tecla de rellamada de últimos
números . . . . . . . . . . . . . . . . .17
tecla de rellamada/pausa . . . . . . . . . 3
tecla silenciar . . . . . . . . . . . . . . . . . 3
teclas de pantalla . . . . . . . . . .1, 2, 14
Teclas de línea . . . . . . . . . . . . . . . . . . 1
Teclas de línea con LED . . . . . . . . . . . . 3
Teclas,
tecla de borrar . . . . . . . . . . . . . . . .16
Terminal inalámbrico,
activación/desactivación . . . . . . . . .13
borrar registro . . . . . . . . . . . . . . . . .26
cambiar a otra estación base . . . . . .26
cambiar nombre . . . . . . . . . . . . . . .30
cambiar para mejorar la
recepción . . . . . . . . . . . . . . . . .26
configuración . . . . . . . . . . . . . . .9, 30
contacto con líquidos . . . . . . . . . . .34
contraste de la pantalla . . . . . . . . . .30
cómo usar varios terminales inalámbricos . . . . . . . . . . . . . . . . . . . . . .26
desactivar el tono de timbre. . . . . . .31
enchufe para auricular . . . . . . . . . . . 1
estado inactivo . . . . . . . . . . . . . 11, 14
idioma de la pantalla . . . . . . . . . . . .30
iluminación. . . . . . . . . . . . . . . . . . .30
localización . . . . . . . . . . . . . . . . . . .26
melodía del tono de timbre . . . . . . .30
pantalla en estado inactivo . . . . . . . 1
potencia de recepción . . . . . . . . . . . 9
registro . . . . . . . . . . . . . . . . . . . . . .26
registro en otra estación
base . . . . . . . . . . . . . . . . . . . . .26
respuesta automática . . . . . . . . . . .30
tono del teclado . . . . . . . . . . . . . . .31
Verizon V500 / ES / A31008-M1931-R301-1-6019 / V500_kombi_SIX.fm / 30.4.08
Índice alfabético
transferir una llamada . . . . . . . . . .
volumen de la bocina . . . . . . . . . . .
volumen del tono de timbre . . . . . .
Tiempo de corte de llamada . . . . . . . .
Tiempo de funcionamiento del
terminal inalámbrico . . . . . . . . . .
Tiempos de carga del terminal
inalámbrico . . . . . . . . . . . . . . . .
Tipo de lista (lista de llamadas) . . . . .
Tono de timbre,
activación/desactivación . . . . . . . . .
configuración de la melodía
(estación base) . . . . . . . . . . . .
configuración de la melodía
(terminal inalámbrico) . . . . . . .
configuración del volumen
(estación base) . . . . . . . . . . . .
configuración del volumen
(terminal inalámbrico) . . . . . . .
cómo cambiar . . . . . . . . . . . . . . . .
Transferencia de llamada atendida . . .
Transferencia de llamada no
atendida . . . . . . . . . . . . . . . . . . .
Transferir una llamada . . . . . . . . . . . .
atendida . . . . . . . . . . . . . . . . . . . .
no atendida . . . . . . . . . . . . . . . . . .
27
30
30
32
35
35
18
31
32
30
31
30
30
27
27
27
27
27
U
Últimos números de rellamada. . . . . . 17
V
Ver
registro de la lista de llamadas . . . .
Volumen
tono de timbre . . . . . . . . . . . . . . . .
Volumen de la bocina, . . . . . . . . . . . .
terminal inalámbrico . . . . . . . . . . .
Volumen,
bocina del terminal inalámbrico . . .
tono de timbre del terminal
inalámbrico . . . . . . . . . . . . . . .
18
30
30
30
30
30
47