1
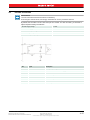
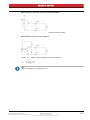
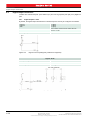
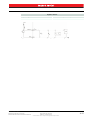
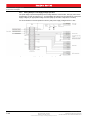
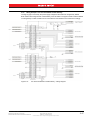
maxon motor control EPOS2 Positioning Controller Hardware Reference Edition October 2014 Positioning Controller Hardware Reference Document ID: rel4773 maxon motor ag Brünigstrasse 220 P.O.Box 263 CH-6072 Sachseln Phone +41 41 666 15 00 Fax +41 41 666 16 50 www.maxonmotor.com PLEASE READ THIS FIRST These instructions are intended for qualified technical personnel. Prior commencing with any activities … • you must carefully read and understand this manual and • you must follow the instructions given therein. We have tried to provide you with all information necessary to install and commission the equipment in a secure, safe and time-saving manner. Our main focus is … • to familiarize you with all relevant technical aspects, • to let you know the easiest way of doing, • to alert you of any possibly dangerous situation you might encounter or that you might cause if you do not follow the description, • to write as little and to say as much as possible and • not to bore you with things you already know. Likewise, we tried to skip repetitive information! Thus, you will find things mentioned just once. If, for example, an earlier mentioned action fits other occasions you then will be directed to that text passage with a respective reference. Follow any stated reference – observe respective information – then go back and continue with the task! PREREQUISITES FOR PERMISSION TO COMMENCE INSTALLATION The EPOS2 Module 36/2 is considered as partly completed machinery according to EU directive 2006/ 42/EC, Article 2, Clause (g) and therefore is intended to be incorporated into or assembled with other machinery or other partly completed machinery or equipment. You must not put the device into service, … • unless you have made completely sure that the other machinery – the surrounding system the device is intended to be incorporated to – fully complies with the requirements stated in EU directive 2006/ 42/EC! • unless the surrounding system fulfills all relevant health and safety aspects! • unless all respective interfaces have been established and fulfill the stated requirements! A-2 Document ID: rel4773 Edition: October 2014 © 2014 maxon motor. Subject to change without prior notice. maxon motor control EPOS2 Positioning Controller EPOS2 Module 36/2 Hardware Reference TABLE OF CONTENTS 1 About this Document 5 2 Introduction 9 2.1 2.2 Documentation Structure . . . . . . . . . . . . . . . . . . . . . . . . . . . . . . . . . . . . . . . . . 9 Safety Precautions. . . . . . . . . . . . . . . . . . . . . . . . . . . . . . . . . . . . . . . . . . . . . 10 3 Technical Data 3.1 3.2 3.3 3.4 3.5 3.6 4 11 Electrical Data . . . . . . . . . . . . . . . . . . . . . . . . . . . . . . . . . . . . . . . . . . . . . . . . Mechanical Data . . . . . . . . . . . . . . . . . . . . . . . . . . . . . . . . . . . . . . . . . . . . . . Dimensional Drawings . . . . . . . . . . . . . . . . . . . . . . . . . . . . . . . . . . . . . . . . . . Environmental Conditions . . . . . . . . . . . . . . . . . . . . . . . . . . . . . . . . . . . . . . . Order Details . . . . . . . . . . . . . . . . . . . . . . . . . . . . . . . . . . . . . . . . . . . . . . . . . Standards . . . . . . . . . . . . . . . . . . . . . . . . . . . . . . . . . . . . . . . . . . . . . . . . . . . 11 13 13 14 14 15 Connections 17 4.1 4.2 4.3 Pin Assignment . . . . . . . . . . . . . . . . . . . . . . . . . . . . . . . . . . . . . . . . . . . . . . . 17 Minimum external Wiring . . . . . . . . . . . . . . . . . . . . . . . . . . . . . . . . . . . . . . . . 19 Power Supply. . . . . . . . . . . . . . . . . . . . . . . . . . . . . . . . . . . . . . . . . . . . . . . . . 20 4.3.1 Determination of Power Supply . . . . . . . . . . . . . . . . . . . . . . . . . . . . . . . . . . . . . . . . . . . 20 4.3.2 Use of separate Logic Supply (optional) . . . . . . . . . . . . . . . . . . . . . . . . . . . . . . . . . . . . 21 4.3.3 Low Supply Voltage Operation (optional). . . . . . . . . . . . . . . . . . . . . . . . . . . . . . . . . . . . 21 4.4 Motor Connection . . . . . . . . . . . . . . . . . . . . . . . . . . . . . . . . . . . . . . . . . . . . . 23 4.4.1 maxon EC motor (brushless) . . . . . . . . . . . . . . . . . . . . . . . . . . . . . . . . . . . . . . . . . . . . . 23 4.4.2 maxon DC motor (brushed) . . . . . . . . . . . . . . . . . . . . . . . . . . . . . . . . . . . . . . . . . . . . . . 23 4.5 4.6 4.7 Hall Sensor Connection . . . . . . . . . . . . . . . . . . . . . . . . . . . . . . . . . . . . . . . . . 24 Encoder Connection . . . . . . . . . . . . . . . . . . . . . . . . . . . . . . . . . . . . . . . . . . . 25 Digital Input Connection. . . . . . . . . . . . . . . . . . . . . . . . . . . . . . . . . . . . . . . . . 26 4.7.1 Digital Inputs 1, 2, 3 and 4 . . . . . . . . . . . . . . . . . . . . . . . . . . . . . . . . . . . . . . . . . . . . . . . 26 4.7.2 Digital Inputs 7 and 8 . . . . . . . . . . . . . . . . . . . . . . . . . . . . . . . . . . . . . . . . . . . . . . . . . . . 28 4.8 Analog Input Connection . . . . . . . . . . . . . . . . . . . . . . . . . . . . . . . . . . . . . . . . 29 4.8.1 Analog Inputs 1 and 2 . . . . . . . . . . . . . . . . . . . . . . . . . . . . . . . . . . . . . . . . . . . . . . . . . . 29 4.9 Digital Output Connection . . . . . . . . . . . . . . . . . . . . . . . . . . . . . . . . . . . . . . . 30 4.9.1 Digital Outputs 1 and 2 . . . . . . . . . . . . . . . . . . . . . . . . . . . . . . . . . . . . . . . . . . . . . . . . . 30 4.9.2 Digital Output 5 . . . . . . . . . . . . . . . . . . . . . . . . . . . . . . . . . . . . . . . . . . . . . . . . . . . . . . . 32 4.10 4.11 4.12 4.13 RS232 Connection. . . . . . . . . . . . . . . . . . . . . . . . . . . . . . . . . . . . . . . . . . . . . SCI Interface Connection. . . . . . . . . . . . . . . . . . . . . . . . . . . . . . . . . . . . . . . . CAN Connection . . . . . . . . . . . . . . . . . . . . . . . . . . . . . . . . . . . . . . . . . . . . . . CAN Configuration. . . . . . . . . . . . . . . . . . . . . . . . . . . . . . . . . . . . . . . . . . . . . 34 34 35 36 4.13.1 CAN ID (Node Address). . . . . . . . . . . . . . . . . . . . . . . . . . . . . . . . . . . . . . . . . . . . . . . . . 36 4.13.2 CAN automatic Bit Rate Detection . . . . . . . . . . . . . . . . . . . . . . . . . . . . . . . . . . . . . . . . . 37 4.14 Status LEDs. . . . . . . . . . . . . . . . . . . . . . . . . . . . . . . . . . . . . . . . . . . . . . . . . . 38 maxon motor control EPOS2 Positioning Controller EPOS2 Module 36/2 Hardware Reference Document ID: rel4773 Edition: October 2014 © 2014 maxon motor. Subject to change without prior notice. A-3 5 Motherboard Design Guide 5.1 39 Requirements for external Components. . . . . . . . . . . . . . . . . . . . . . . . . . . . . 39 5.1.1 Card Edge Connector . . . . . . . . . . . . . . . . . . . . . . . . . . . . . . . . . . . . . . . . . . . . . . . . . . 39 5.1.2 Power Supply Voltage . . . . . . . . . . . . . . . . . . . . . . . . . . . . . . . . . . . . . . . . . . . . . . . . . . 39 5.1.3 Logic Supply Voltage . . . . . . . . . . . . . . . . . . . . . . . . . . . . . . . . . . . . . . . . . . . . . . . . . . . 40 5.1.4 Motor Phase . . . . . . . . . . . . . . . . . . . . . . . . . . . . . . . . . . . . . . . . . . . . . . . . . . . . . . . . . 41 5.1.5 Supplier Reference . . . . . . . . . . . . . . . . . . . . . . . . . . . . . . . . . . . . . . . . . . . . . . . . . . . . 41 5.1.6 USB . . . . . . . . . . . . . . . . . . . . . . . . . . . . . . . . . . . . . . . . . . . . . . . . . . . . . . . . . . . . . . . . 42 5.2 Design Rules . . . . . . . . . . . . . . . . . . . . . . . . . . . . . . . . . . . . . . . . . . . . . . . . . 43 5.2.1 Ground. . . . . . . . . . . . . . . . . . . . . . . . . . . . . . . . . . . . . . . . . . . . . . . . . . . . . . . . . . . . . . 43 5.2.2 Communication Interfaces . . . . . . . . . . . . . . . . . . . . . . . . . . . . . . . . . . . . . . . . . . . . . . . 43 5.2.3 I/Os . . . . . . . . . . . . . . . . . . . . . . . . . . . . . . . . . . . . . . . . . . . . . . . . . . . . . . . . . . . . . . . . 43 5.2.4 Layout . . . . . . . . . . . . . . . . . . . . . . . . . . . . . . . . . . . . . . . . . . . . . . . . . . . . . . . . . . . . . . 44 5.3 Schematic Examples . . . . . . . . . . . . . . . . . . . . . . . . . . . . . . . . . . . . . . . . . . . 44 5.3.1 Minimum External Wiring. . . . . . . . . . . . . . . . . . . . . . . . . . . . . . . . . . . . . . . . . . . . . . . . 44 5.3.2 Separate Logic Supply Voltage and CAN Communication . . . . . . . . . . . . . . . . . . . . . . 44 5.3.3 USB Interface . . . . . . . . . . . . . . . . . . . . . . . . . . . . . . . . . . . . . . . . . . . . . . . . . . . . . . . . 45 5.3.4 Wiring Example: Low Supply Voltage Operation . . . . . . . . . . . . . . . . . . . . . . . . . . . . . . 46 5.3.5 Wiring Example: Two Axes with RS232 to CAN Gateway. . . . . . . . . . . . . . . . . . . . . . . 47 A-4 Document ID: rel4773 Edition: October 2014 © 2014 maxon motor. Subject to change without prior notice. maxon motor control EPOS2 Positioning Controller EPOS2 Module 36/2 Hardware Reference 1 About this Document 1.1 Intended Purpose The purpose of the present document is to familiarize you with the described equipment and the tasks on safe and adequate installation and/or commissioning. Observing the described instructions in this document will help you … • to avoid dangerous situations, • to keep installation and/or commissioning time at a minimum and • to increase reliability and service life of the described equipment. Use for other and/or additional purposes is not permitted. maxon motor, the manufacturer of the equipment described, does not assume any liability for loss or damage that may arise from any other and/or additional use than the intended purpose. 1.2 Target Audience This document is meant for trained and skilled personnel working with the equipment described. It conveys information on how to understand and fulfill the respective work and duties. This document is a reference book. It does require particular knowledge and expertise specific to the equipment described. 1.3 How to use Take note of the following notations and codes which will be used throughout the document. Notation Explanation (n) referring to an item (such as order number, list item, etc.) denotes “see”, “see also”, “take note of” or “go to” Table 1-1 1.4 Notations used in this Document Symbols and Signs 1.4.1 Safety Alerts Take note of when and why the alerts will be used and what the consequences are if you should fail to observe them! Safety alerts are composed of… • a signal word, • a description of type and/or source of the danger, • the consequence if the alert is being ignored, and • explanations on how to avoid the hazard. Following types will be used: 1) DANGER Indicates an imminently hazardous situation. If not avoided, the situation will result in death or serious injury. 2) WARNING Indicates a potentially hazardous situation. If not avoided, the situation can result in death or serious injury. maxon motor control EPOS2 Positioning Controller EPOS2 Module 36/2 Hardware Reference Document ID: rel4773 Edition: October 2014 © 2014 maxon motor. Subject to change without prior notice. 1-5 About this Document 3) CAUTION Indicates a probable hazardous situation and is also used to alert against unsafe practices. If not avoided, the situation may result in minor or moderate injury. Example: DANGER High Voltage and/or Electrical Shock Touching live wires causes death or serious injuries! • Make sure that neither end of cable is connected to life power! • Make sure that power source cannot be engaged while work is in process! • Obey lock-out/tag-out procedures! • Make sure to securely lock any power engaging equipment against unintentional engagement and tag with your name! 1.4.2 Prohibited Actions and Mandatory Actions The signs define prohibitive actions. So, you must not! Examples: Do not touch! Do not operate! The signs point out actions to avoid a hazard. So, you must! Examples: Unplug! 1.4.3 Tag before work! Informatory Signs Requirement / Note / Remark Indicates an action you must perform prior continuing or refers to information on a particular item. Best Practice Gives advice on the easiest and best way to proceed. Material Damage Points out information particular to potential damage of equipment. Reference Refers to particular information provided by other parties. 1-6 Document ID: rel4773 Edition: October 2014 © 2014 maxon motor. Subject to change without prior notice. maxon motor control EPOS2 Positioning Controller EPOS2 Module 36/2 Hardware Reference 1.5 Trademarks and Brand Names For easier legibility, registered brand names are listed below and will not be further tagged with their respective trademark. It must be understood that the brands (the below list is not necessarily concluding) are protected by copyright and/or other intellectual property rights even if their legal trademarks are omitted in the later course of this document. The brand name(s) … … is/are a registered trademark(s) of … Adobe® Reader® © Adobe Systems Incorporated, USA-San Jose, CA OMNI-BLOK® SMD NANO2® © Littelfuse, USA-Chicago, IL Pentium® © Intel Corporation, USA-Santa Clara, CA Windows® © Microsoft Corporation, USA-Redmond, WA Table 1-2 1.6 Brand Names and Trademark Owners Copyright © 2014 maxon motor. All rights reserved. The present document – including all parts thereof – is protected by copyright. Any use (including reproduction, translation, microfilming and other means of electronic data processing) beyond the narrow restrictions of the copyright law without the prior approval of maxon motor ag, is not permitted and subject to persecution under the applicable law. maxon motor ag Brünigstrasse 220 P.O.Box 263 CH-6072 Sachseln Switzerland Phone +41 41 666 15 00 Fax +41 41 666 16 50 www.maxonmotor.com maxon motor control EPOS2 Positioning Controller EPOS2 Module 36/2 Hardware Reference Document ID: rel4773 Edition: October 2014 © 2014 maxon motor. Subject to change without prior notice. 1-7 About this Document ••page intentionally left blank•• 1-8 Document ID: rel4773 Edition: October 2014 © 2014 maxon motor. Subject to change without prior notice. maxon motor control EPOS2 Positioning Controller EPOS2 Module 36/2 Hardware Reference 2 Introduction The present document provides you with information on the EPOS2 Module 36/2 Positioning Controller’s hardware. It contains… • performance data and specifications, • information on connections and pin assignment and • wiring examples. maxon motor control’s EPOS2 Module 36/2 is a small-sized, full digital, smart motion controller. It is designated for the use as plug-in module in customer-specific motherboards for single axis or multi axes motion control systems. Due to its flexible and high efficient power stage, the EPOS2 Module 36/2 drives brushed DC motors with digital encoder as well as brushless EC motors with digital Hall sensors and encoder. The sinusoidal current commutation by space vector control offers the possibility to drive brushless EC motors with minimal torque ripple and low noise. The integrated position, velocity and current control functionality allows sophisticated positioning applications. The EPOS2 Module 36/2 is especially designed being commanded and controlled as a slave node in a CANopen network. In addition, the unit can be operated via any USB (external transceiver necessary) or RS232 interface. Find the latest edition of the present document, as well as additional documentation and software to the EPOS2 Module 36/2 Positioning Controller also on the Internet: www.maxonmotor.com 2.1 Documentation Structure The present document is part of a documentation set. Please find below an overview on the documentation hierarchy and the interrelationship of its individual parts: Figure 2-1 maxon motor control EPOS2 Positioning Controller EPOS2 Module 36/2 Hardware Reference Documentation Structure Document ID: rel4773 Edition: October 2014 © 2014 maxon motor. Subject to change without prior notice. 2-9 Introduction Safety Precautions 2.2 Safety Precautions Prior continuing … • make sure you have read and understood chapter “ PLEASE READ THIS FIRST” on page A-2, • do not engage with any work unless you possess the stated skills (chapter “1.2 Target Audience” on page 1-5), • refer to chapter “1.4 Symbols and Signs” on page 1-5 to understand the subsequently used indicators, • you must observe any regulation applicable in the country and/or at the site of implementation with regard to health and safety/accident prevention and/or environmental protection, • take note of the subsequently used indicators and follow them at all times. DANGER High Voltage and/or Electrical Shock Touching live wires causes death or serious injuries! • Consider any power cable as connected to life power, unless having proven the opposite! • Make sure that neither end of cable is connected to life power! • Make sure that power source cannot be engaged while work is in process! • Obey lock-out/tag-out procedures! • Make sure to securely lock any power engaging equipment against unintentional engagement and tag with your name! Requirements • Make sure that all associated devices and components are installed according to local regulations. • Be aware that, by principle, an electronic apparatus can not be considered fail-safe. Therefore, you must make sure that any machine/apparatus has been fitted with independent monitoring and safety equipment. If the machine/apparatus should break down, if it is operated incorrectly, if the control unit breaks down or if the cables break or get disconnected, etc., the complete drive system must return – and be kept – in a safe operating mode. • Be aware that you are not entitled to perform any repair on components supplied by maxon motor. Best Practice • For initial operation, make sure that the motor is free running. If not the case, mechanically disconnect the motor from the load. Maximal permitted Supply Voltage • Make sure that supply power is between 11…36 VDC. • Supply voltages above 40 VDC will destroy the unit. • Wrong polarity will destroy the unit. Electrostatic Sensitive Device (ESD) • Make sure to wear working cloth in compliance with ESD. • Handle device with extra care. 2-10 Document ID: rel4773 Edition: October 2014 © 2014 maxon motor. Subject to change without prior notice. maxon motor control EPOS2 Positioning Controller EPOS2 Module 36/2 Hardware Reference 3 Technical Data 3.1 Electrical Data Rating Nominal power supply voltage VCC 11…36 VDC Nominal logic supply voltage VC (optional) 11…36 VDC Absolute minimum supply voltage 10 VDC Absolute max. supply voltage 40 VDC Max. output voltage 0.9 • VCC Max. output current Imax (<1sec) 4A Continuous output current Icont 2A Switching frequency 50 kHz Max. efficiency 93% Sample rate PI – current controller 10 kHz Sample rate PI – speed controller 1 kHz Sample rate PID – positioning controller 1 kHz Max. speed @ sinusoidal commutation (motors with 1 pole pair) 25 000 rpm Max. speed @ block commutation (motors with 1 pole pair) 100 000 rpm Built-in motor choke per phase 10 μH / 2 A Table 3-3 Electrical Data – Rating Inputs Hall sensor signals Hall sensor 1, Hall sensor 2 and Hall sensor 3 for Hall effect sensor ICs (Schmitt trigger with open collector output) Encoder signals A, A\, B, B\, I, I\ (max. 5 MHz) internal line receiver EIA RS422 Standard Digital Input 1 (“General Purpose”) +3…+36 VDC (Ri = 12 kΩ) Digital Input 2 (“General Purpose”) +3…+36 VDC (Ri = 12 kΩ) Digital Input 3 (“General Purpose”) +3…+36 VDC (Ri = 12 kΩ) Digital Input 4 (“General Purpose”) +3…+36 VDC (Ri = 12 kΩ) Digital Input 7 (“High Speed Command”) internal line receiver EIA RS422 Standard Digital Input 8 (“High Speed Command”) internal line receiver EIA RS422 Standard Analog Input 1 resolution 11-bit 0…+5 V (Ri = 34 kΩ) Analog Input 2 resolution 11-bit 0…+5 V (Ri = 34 kΩ) CAN ID (CAN identification) ID 1…127 configurable by external wiring Table 3-4 Electrical Data – Inputs Outputs Digital Output 1 (“General Purpose”), open collector max. 36 VDC (IL <50 mA) Digital Output 2 (“General Purpose”), open collector max. 36 VDC (IL <50 mA) Digital Output 5 (“High Speed Command”), push-pull max. 3.3 VDC (IL <10 mA) Table 3-5 maxon motor control EPOS2 Positioning Controller EPOS2 Module 36/2 Hardware Reference Electrical Data – Outputs Document ID: rel4773 Edition: October 2014 © 2014 maxon motor. Subject to change without prior notice. 3-11 Technical Data Electrical Data Voltage Outputs Encoder supply voltage +5 VDC (IL <100 mA) Hall sensors supply voltage +5 VDC (IL <30 mA) Table 3-6 Electrical Data – Voltage Outputs Motor Connections maxon EC motor maxon DC motor Motor winding 1 + Motor Motor winding 2 - Motor Motor winding 3 Table 3-7 Electrical Data – Motor Connections Interfaces RS232 RxD; TxD USB 2.0 / USB 3.0 external transceiver necessary CAN CAN_H (high); CAN_L (low) Table 3-8 max. 115 200 bit/s max.1 Mbit/s Electrical Data – Interfaces Status Indicators Operation green LED Error red LED Table 3-9 Electrical Data – LEDs Connections On board: Suitable plug: Suitable retainer: Table 3-10 3-12 Card edge connector PCI Express (PCIe) Connector 2x32 Pin vertical or horizontal, 1 mm pitch Tyco 2-1775801-1 (vertical) / Tyco 1761465-2 (horizontal) FCI 10018783-11111TLF (vertical) Meritec 983172-064-2MMF (horizontal) FCI PCI express retainer, blue, 10042618-002LF Electrical Data – Connections Document ID: rel4773 Edition: October 2014 © 2014 maxon motor. Subject to change without prior notice. maxon motor control EPOS2 Positioning Controller EPOS2 Module 36/2 Hardware Reference 3.2 Mechanical Data Mechanical Data Weight approx. 10 g Dimensions (L x W x H) 54.5 x 28.2 x 9 mm Mounting pluggable card edge connector with optional PCB support brackets Table 3-11 3.3 Mechanical Data Dimensional Drawings VERTICAL CONNECTOR Figure 3-2 Dimensional Drawing (with vertical Connector) [mm] HORIZONTAL CONNECTOR Figure 3-3 Dimensional Drawing (with horizontal connector Meritec 983172-064-2MMF) [mm] RETAINER Figure 3-4 maxon motor control EPOS2 Positioning Controller EPOS2 Module 36/2 Hardware Reference Footprint of Retainer (Meritec 983172-064-2MMF connector) [mm] Document ID: rel4773 Edition: October 2014 © 2014 maxon motor. Subject to change without prior notice. 3-13 Technical Data Environmental Conditions 3.4 Environmental Conditions Environmental Condition Temperature Operation -10…+45°C Extended Range *1) +45…+75°C / Derating: -0.067 A/°C Storage -40…+85°C Humidity 20…80% (condensation not permitted) Remark: *1) Operation within the extended temperature range is permitted. However, a respective derating (declination of max. output current) as to the stated value will apply. Table 3-12 3.5 Environmental Conditions Order Details Order Details EPOS2 Module 36/2 Table 3-13 Order number 360665 Order Details Accessories EPOS2 Module Evaluation Board Order number 361435 EPOS2 Module Starter Kit (including EPOS2 Module 36/2, EPOS2 Module Evaluation Board and necessary cables) Order number 363407 Table 3-14 Accessories Note Accessories are not part of the delivery. You will need to order them separately. 3-14 Document ID: rel4773 Edition: October 2014 © 2014 maxon motor. Subject to change without prior notice. maxon motor control EPOS2 Positioning Controller EPOS2 Module 36/2 Hardware Reference 3.6 Standards The described device has been successfully tested for compliance with the below listed standards. In practical terms, only the complete system (the fully operational equipment comprising all individual components, such as motor, servo controller, power supply unit, EMC filter, cabling etc.) can undergo an EMC test to ensure interference-free operation. Important Notice The device’s compliance with the mentioned standards does not imply its compliance within the final, ready to operate setup. In order to achieve compliance of your operational system, you must perform EMC testing of the involved equipment as a whole. Electromagnetic Compatibility IEC/EN 61000-6-2 Immunity for industrial environments IEC/EN 61000-6-3 Emission standard for residential, commercial and lightindustrial environments IEC/EN 61000-6-3 IEC/EN 55022 (CISPR22) Radio disturbance characteristics / radio interference IEC/EN 61000-4-3 Radiated, radio-frequency, electromagnetic field immunity test >10 V/m IEC/EN 61000-4-4 Electrical fast transient/burst immunity test ±1 kV/±2 kV IEC/EN 61000-4-6 Immunity to conducted disturbances, induced by radiofrequency fields 10 Vrms IEC/EN 61000-4-8 Power frequency magnetic field 30 A/m Generic Standards Applied Standards Others Environmental Standards IEC/EN 60068-2-6 Environmental testing – Test Fc: Vibration (sinusoidal) MIL-STD-810F Random transport Safety Standards UL File Number E172472 or E92481; unassembled printed circuit board Reliability Table 3-15 maxon motor control EPOS2 Positioning Controller EPOS2 Module 36/2 Hardware Reference MIL-HDBK-217F Reliability prediction of electronic equipment Environment: Ground, benign Ambient temperature: 298 K (25°C) Component stress: In accordance with circuit diagram and nominal power Mean Time Between Failures (MTBF): 610'435 hours Standards Document ID: rel4773 Edition: October 2014 © 2014 maxon motor. Subject to change without prior notice. 3-15 Technical Data Standards ••page intentionally left blank•• 3-16 Document ID: rel4773 Edition: October 2014 © 2014 maxon motor. Subject to change without prior notice. maxon motor control EPOS2 Positioning Controller EPOS2 Module 36/2 Hardware Reference 4 Connections Figure 4-5 4.1 EPOS2 Module 36/2 – PCB with Connector Array Pin Assignment ARRAY A Pin Signal A1 Power_GND Description Ground of supply voltage A2 VCC A3 VCC A4 VCC A5 VC Logic supply voltage 11…36 VDC (optional) A6 Power_GND Ground of supply voltage A7 Hall sensor 1 Hall sensor 1 input A8 Hall sensor 2 Hall sensor 2 input A9 Hall sensor 3 Hall sensor 3 input +Vaux Auxiliary voltage output +5 VDC +VDDin Auxiliary supply voltage input +5 VDC (optional) A11 GND Ground of Hall sensor supply and Ground of encoder supply A12 Channel A Encoder channel A A13 Channel A\ Encoder channel A complement A14 Channel B Encoder channel B A15 Channel B\ Encoder channel B complement A16 Channel I Encoder index A10 Power supply voltage +0…+36 VDC A17 Channel I\ Encoder index complement A18 GND Ground of analog inputs A19 AnIN1 Analog Input 1 A20 AnIN2 Analog Input 2 A21 GND Ground of digital output A22 DigOUT5 Digital Output 5 A23 not connected A24 EPOS SCI RTS Serial communication interface handshake *1) A25 EPOS SCI RxD Serial communication interface receive *1) A26 EPOS SCI TxD Serial communication interface transmit *1) A27 EPOS RxD EPOS RS232 receive *2) A28 EPOS TxD EPOS RS232 transmit *2) A29 GND Ground of SCI and RS232 maxon motor control EPOS2 Positioning Controller EPOS2 Module 36/2 Hardware Reference Document ID: rel4773 Edition: October 2014 © 2014 maxon motor. Subject to change without prior notice. 4-17 Connections Pin Assignment Pin Signal Description A30 CAN low CAN low bus line A31 CAN high CAN high bus line A32 GND Ground of CAN bus Note *1) Voltage level “low” = 0V, “high” = 3.3V, connected directly to the DSP *2) EIA RS232 Standard Table 4-16 EPOS2 Module 36/2 – Pin Assignment Array A ARRAY B Pin 4-18 Signal Description B1 Power_GND B2 EC: Motor winding 1 DC: Motor + Ground of supply voltage B3 EC: Motor winding 1 DC: Motor + B4 EC: Motor winding 1 DC: Motor + B5 EC: Motor winding 2 DC: Motor - B6 EC: Motor winding 2 DC: Motor - B7 EC: Motor winding 2 DC: Motor - B8 EC: Motor winding 3 DC: not connected B9 EC: Motor winding 3 DC: not connected B10 EC: Motor winding 3 DC: not connected EC motor: Motor winding 1 DC motor: Motor + EC motor: Motor winding 2 DC motor: Motor - EC motor: Motor winding 3 DC motor: not connected B11 Power_GND Ground of supply voltage B12 GND Ground of digital input B13 DigIN1 Digital Input 1 B14 DigIN2 Digital Input 2 B15 DigIN3 Digital Input 3 B16 DigIN4 Digital Input 4 B17 GND Ground of digital input B18 DigIN7 Digital Input 7 “High Speed Command” B19 DigIN7\ Digital Input 7 “High Speed Command” complement B20 DigIN8 Digital Input 8 “High Speed Command” B21 DigIN8\ Digital Input 8 “High Speed Command” complement B22 DigOUT1 Digital Output 1 B23 DigOUT2 Digital Output 2 B24 GND Ground of CAN ID setting B25 CAN ID 1 CAN ID 1 (valence = 1) B26 CAN ID 2 CAN ID 2 (valence = 2) Document ID: rel4773 Edition: October 2014 © 2014 maxon motor. Subject to change without prior notice. maxon motor control EPOS2 Positioning Controller EPOS2 Module 36/2 Hardware Reference Pin Description B27 CAN ID 3 CAN ID 3 (valence = 4) B28 CAN ID 4 CAN ID 4 (valence = 8) B29 CAN ID 5 CAN ID 5 (valence = 16) B30 CAN ID 6 CAN ID 6 (valence = 32) B31 CAN ID 7 CAN ID 7 (valence = 64) B32 Auto bit rate Automatic bit rate detection of CAN bus Table 4-17 4.2 Signal EPOS2 Module 36/2 – Pin Assignment Array B Minimum external Wiring Figure 4-6 Minimum external Wiring maxon motor control EPOS2 Positioning Controller EPOS2 Module 36/2 Hardware Reference Document ID: rel4773 Edition: October 2014 © 2014 maxon motor. Subject to change without prior notice. 4-19 Connections Power Supply 4.3 Power Supply Best Practice Keep the motor mechanically disconnected during setup and adjustment phase. External Protection Supply voltages above 40 VDC will destroy the unit. To prevent damage to the EPOS2 Module 36/2, we recommend to install two upstream fuses – a transient voltage suppressor diode (TVS diode) and a capacitor in the power supply voltage line (for details chapter “5.1.2 Power Supply Voltage” on page 5-39). 4.3.1 Determination of Power Supply Basically, any power supply may be used, provided it meets below stated minimal requirements. Power Supply Requirements Output voltage VCC min. 11 VDC; VCC max. 36 VDC Absolute output voltage min. 0 V (VCC below 11 V is only possible with separate logic supply voltage!) / max. 40 VDC Output current Depending on load (continuous max. 2 A / acceleration, short-time max. 4 A <1 s) 1) Calculate required voltage under load using following scheme (the formula takes a max. PWM cycle of 90% and a max. voltage drop of -1 V at EPOS2 Module 36/2 into account): KNOWN VALUES: • Operating torque MB [mNm] • Operating speed nB [min-1] • Nominal motor voltage UN [Volt] • Motor no-load speed at UN, n0 [min-1] • Speed/torque gradient of the motor Δn/ΔM [min-1 mNm-1] SOUGHT VALUE: • Supply voltage VCC [Volt] SOLUTION: UN Δn 1 V CC = ------- ⋅ n B + --------- ⋅ M B ⋅ ------- + 1 [ V ] 0.9 nO ΔM 2) Choose power supply capable as to above calculation. Thereby consider: a) During braking of the load, the power supply must be capable of buffering the fed back energy, e.g. in a capacitor or shunt regulator (309687). b) When using an electronically stabilized power supply, observe that the overcurrent protection must not be activated in any operating state. Pin Signal Description A1/6 B1/11 Power_Gnd Ground of supply voltage A2/3/4 VCC Power supply voltage +11…+36 VDC Limited Current Rating per Pin Due to the limited current rating per pin (1.1 A), you must connect all pins! 4-20 Document ID: rel4773 Edition: October 2014 © 2014 maxon motor. Subject to change without prior notice. maxon motor control EPOS2 Positioning Controller EPOS2 Module 36/2 Hardware Reference 4.3.2 Use of separate Logic Supply (optional) By default, the logic must be powered by (connected to) the regular supply voltage. Optionally, you may wish to feed the logic supply voltage separately, permitting a safe and economical power backup feature. For connection chapter “4.2 Minimum external Wiring” on page 4-19). External Protection Supply voltages above 40 VDC will destroy the unit. To prevent damage to the EPOS2 Module 36/2, we recommend to install two upstream fuses – a transient voltage suppressor diode (TVS diode) and a capacitor in the power supply voltage line (for details chapter “5.1.2 Power Supply Voltage” on page 5-39). Basically, any power supply may be used, provided it meets below stated minimal requirements. Logic Power Supply Requirements Output voltage VC min. 11 VDC; VC max. 36 VDC Absolute output voltage min. 9 VDC; max. 40 VDC Min. output power PC min. 3 W Pin Signal Description A1/6 B1/11 Power_Gnd Ground of supply voltage A5 VC Logic supply voltage +11…+36 VDC 4.3.3 Low Supply Voltage Operation (optional) For low voltage applications, you may supply the power stage separately with voltages lower than +11V. APPLICATION EXAMPLE: Operation with a Li-Ion battery 3.6 V: • Power supply voltage direct via accumulator. • An external step-up converter produces 5 V for logic supply voltage. The low supply voltage operation for logic and power supply is possible, as long as the following conditions are met (for further details chapter “5.3.4 Wiring Example: Low Supply Voltage Operation” on page 5-46): • Supply the logic part via +VDDin (pin A10). The voltage range must be 4.75…5.25 V. • Supply the power part via VCC (pins A2, A3 and A4). The voltage range must be 0…40 V. • Deactivate undervoltage control using «EPOS Studio». Do so by opening the Object Dictionary and set the object with Index 0x2008 (Miscellaneous Configuration) to 32 (decimal format). Best Practice We strongly recommend to use separate voltage supplies for logic part and power part. • Using a common supply, it will be very difficult to maintain the logic voltage range condition (4.75…5.25 V). • Voltage drops during acceleration, as well as the fed back energy during breaking may cause significant voltage variations on the power supply voltage. maxon motor control EPOS2 Positioning Controller EPOS2 Module 36/2 Hardware Reference Document ID: rel4773 Edition: October 2014 © 2014 maxon motor. Subject to change without prior notice. 4-21 Connections Power Supply Following requirements must be met: Supply Voltage Requirements Output voltage VDD +5 VDC Absolute output voltage min. 4.75 VDC; max. 5.25 VDC Power Supply Requirements Output voltage VCC min. 0 VDC; max. 36 VDC Absolute output voltage min. 0 V / max. 40 VDC Pin Signal Description A1/6 B1/11 Power_Gnd Ground of supply voltage A2/3/4 VCC Power supply voltage 0…+36 VDC A10 +VDD +5 V voltage supply Limited Current Rating per Pin Due to the limited current rating per pin (1.1 A), you must connect all pins! 4-22 Document ID: rel4773 Edition: October 2014 © 2014 maxon motor. Subject to change without prior notice. maxon motor control EPOS2 Positioning Controller EPOS2 Module 36/2 Hardware Reference 4.4 Motor Connection Limited Current Rating per Pin Due to the limited current rating per pin (1.1 A), you must connect all pins! 4.4.1 maxon EC motor (brushless) Pin Signal Description B2/3/4 Motor winding 1 EC motor: Winding 1 B5/6/7 Motor winding 2 EC motor: Winding 2 B8/9/10 Motor winding 3 EC motor: Winding 3 4.4.2 maxon DC motor (brushed) Pin Signal Description B2/3/4 Motor (+M) DC motor: Motor + B5/6/7 Motor (-M) DC motor: Motor - maxon motor control EPOS2 Positioning Controller EPOS2 Module 36/2 Hardware Reference Document ID: rel4773 Edition: October 2014 © 2014 maxon motor. Subject to change without prior notice. 4-23 Connections Hall Sensor Connection 4.5 Hall Sensor Connection Hall sensors are required to detect the rotor position of maxon EC motors (brushless). Suitable Hall effect sensors IC use «Schmitt trigger» with open collector output. Hall sensor supply voltage +5 VDC Max. Hall sensor supply current 30 mA Input voltage 0…+24 VDC Logic 0 typical <0.8 VDC Logic 1 typical >2.4 VDC Internal pull-up resistor 2.7 kΩ (against +5 VDC) Figure 4-7 4-24 Hall Sensor Input Circuit Pin Signal Description A7 Hall sensor 1 Hall sensor 1 Input A8 Hall sensor 2 Hall sensor 2 Input A9 Hall sensor 3 Hall sensor 3 Input A10 +Vaux Auxiliary output voltage for Hall sensors and encoder +5 VDC A11 GND Ground of Hall sensor/encoder supply Document ID: rel4773 Edition: October 2014 © 2014 maxon motor. Subject to change without prior notice. maxon motor control EPOS2 Positioning Controller EPOS2 Module 36/2 Hardware Reference 4.6 Encoder Connection Best Practice The use of encoder with built-in line driver is mandatory. Even though 2-channel will do, we strongly recommend to use only 3-channel versions! By default, the controller is set for a 500 count per turn encoder. For other encoders, you will need to adjust respective settings via software. Encoder supply voltage +5 VDC Max. encoder supply current 100 mA Min. differential Input voltage ± 200 mV Line receiver (internal) EIA RS422 Standard Max. encoder input frequency 5 MHz Figure 4-8 Encoder Input Circuit Pin Signal Description A10 +Vaux Auxiliary output voltage for Hall sensors and encoder +5 VDC A11 GND Ground of Hall sensor/encoder supply A12 Channel A Channel A A13 Channel A\ Channel A complement A14 Channel B Channel B A15 Channel B\ Channel B complement A16 Channel I Index A17 Channel I\ Index complement maxon motor control EPOS2 Positioning Controller EPOS2 Module 36/2 Hardware Reference Document ID: rel4773 Edition: October 2014 © 2014 maxon motor. Subject to change without prior notice. 4-25 Connections Digital Input Connection 4.7 Digital Input Connection Contains four smart multi-purpose digital inputs configurable as “Positive Limit Switch”, “Negative Limit Switch”, “Home Switch” and “General Purpose”. Additionally offered are two “High Speed Command” inputs. 4.7.1 Digital Inputs 1, 2, 3 and 4 By default, the digital input is defined as “General Purpose” and may be configured via software. DigIN1 “General Purpose” DigIN2 “Home Switch” DigIN3 “Positive Limit Switch” DigIN4 “Negative Limit Switch” GND Pin [B13] Pin [B14] Pin [B15] Pin [B16] Pin [B12] Type of input single-ended Input voltage 0…36 VDC Max. input voltage ±36 VDC Logic 0 Uin <0.8 VDC Logic 1 Uin >2.0 VDC Input resistance typical 22 kΩ (<3.3 V) typical 18 kΩ (@ 5 V) typical 12 kΩ (@ 24 V) Input current at logic 1 typical 270 µA @ 5 VDC Switching delay <300 µs Figure 4-9 DigIN1 Circuit (analogously valid also for DigIN2…4) For wiring examples page 4-27. 4-26 Document ID: rel4773 Edition: October 2014 © 2014 maxon motor. Subject to change without prior notice. maxon motor control EPOS2 Positioning Controller EPOS2 Module 36/2 Hardware Reference WIRING EXAMPLE: “PROXIMITY SWITCH TYPE PNP 3-WIRE MODEL” Figure 4-10 DigIN2 – Wiring Example for Type PNP Proximity Switch WIRING EXAMPLE: “SLOTTED OPTICAL SENSOR” Figure 4-11 DigIN2 – Wiring Example for slotted optical Sensor R IN ⋅ ( V S – V IN ) R ext = --------------------------------------V IN Note Logic level threshold VIN assumed to be 5 V. maxon motor control EPOS2 Positioning Controller EPOS2 Module 36/2 Hardware Reference Document ID: rel4773 Edition: October 2014 © 2014 maxon motor. Subject to change without prior notice. 4-27 Connections Digital Input Connection 4.7.2 Digital Inputs 7 and 8 The “High Speed Command” differential inputs are set by default and may be configured via software. Differential DigIN7 “High Speed Command” DigIN8 “High Speed Command” Pins [B18] / [B19] Pins [B20] / [B21] Min. differential input voltage ±200 mV Line receiver (internal) EIA RS422 Standard Max. input frequency 5 MHz Figure 4-12 DigIN7 “Differential” Circuit (analogously valid also for DigIN8) Single-ended DigIN7 “High Speed Command” DigIN8 “High Speed Command” Pins [B18] Pins [B20] Input voltage 0…5 VDC Max. input voltage -7.5…+12.5 VDC Logic 0 <0.8 V Logic 1 >2.0 V Input resistance typical 20 kΩ (referenced to D_GND) Max. input frequency 2.5 MHz Note Do not connect DigIN’s complements! Figure 4-13 4-28 DigIN7 “Single-ended” Circuit (analogously valid also for DigIN8) Document ID: rel4773 Edition: October 2014 © 2014 maxon motor. Subject to change without prior notice. maxon motor control EPOS2 Positioning Controller EPOS2 Module 36/2 Hardware Reference 4.8 Analog Input Connection 4.8.1 Analog Inputs 1 and 2 By default, the analog inputs are defined as “General Purpose” and may be configured via software. AnIN1 “General Purpose” AnIN2 “General Purpose” GND Pin [A19] Pin [A20] Pin [A18] Input voltage 0…5 VDC Max. input voltage 0…10 VDC Input resistance typical 34 kΩ (referenced to GND) Resolution 2.49 mV Bandwidth 250 Hz Figure 4-14 maxon motor control EPOS2 Positioning Controller EPOS2 Module 36/2 Hardware Reference AnIN1 Circuit (analogously valid also for AnIN2) Document ID: rel4773 Edition: October 2014 © 2014 maxon motor. Subject to change without prior notice. 4-29 Connections Digital Output Connection 4.9 Digital Output Connection Contains two “General Purpose” open collector (5 V) and one “High speed” push-pull (3.3 V) digital outputs. 4.9.1 Digital Outputs 1 and 2 By default, the digital outputs are defined as “General Purpose” and may be configured via software. DigOUT1 DigOUT2 GND Pin [B22] Pin [B23] Pin [A21] Circuit Open collector (internal pull-up resistor 2k2 and diode to +5 VDC Switching delay <3 µs Figure 4-15 DigOUT1 Circuit (analogously valid also for DigOUT2) DigOUT “Sinks” Max. input voltage +36 VDC Max. load current 50 mA Max. voltage drop <1.0 V @ 50 mA Figure 4-16 4-30 DigOUT1 “Sinks” Circuit (analogously valid also for DigOUT2) Document ID: rel4773 Edition: October 2014 © 2014 maxon motor. Subject to change without prior notice. maxon motor control EPOS2 Positioning Controller EPOS2 Module 36/2 Hardware Reference DigOUT “Source” Output voltage Uout ≈5 V - 0.75 V - (Iload × 2200 Ω) Max. load current Iload ≤2 mA Figure 4-17 maxon motor control EPOS2 Positioning Controller EPOS2 Module 36/2 Hardware Reference DigOUT1 “Source” Circuit (analogously valid also for DigOUT2) Document ID: rel4773 Edition: October 2014 © 2014 maxon motor. Subject to change without prior notice. 4-31 Connections Digital Output Connection 4.9.2 Digital Output 5 The digital output is defined as “High Speed” and may be configured via software. DigOUT5 GND Pin [A22] Pin [A21] Circuit Push-pull stage Switching delay <10 ns Figure 4-18 DigOUT5 Circuit DigOUT “Sinks” Max. input voltage Uin ≤3.3 VDC Max. load current Imax ≤24 mA Max. voltage drop Udrop <0.55 V + (Imax x 100 Ω) Figure 4-19 4-32 DigOUT5 “Sinks” Circuit Document ID: rel4773 Edition: October 2014 © 2014 maxon motor. Subject to change without prior notice. maxon motor control EPOS2 Positioning Controller EPOS2 Module 36/2 Hardware Reference DigOUT “Source” Output voltage Uout ≈3.3 V - 0.75 V - (Iload × 100 Ω) Max. load current Iload ≤24 mA Figure 4-20 DigOUT5 “Source” Circuit maxon motor control EPOS2 Positioning Controller EPOS2 Module 36/2 Hardware Reference Document ID: rel4773 Edition: October 2014 © 2014 maxon motor. Subject to change without prior notice. 4-33 Connections RS232 Connection 4.10 RS232 Connection The EPOS2 Module 36/2 can be configured via RS232 communication port. The software «EPOS Studio» provides a graphical user interface to setup all features via the PC’s serial port. Max. input voltage ±30 V Output voltage typical ±9 V @ 3 kΩ to Ground Max. bit rate 115 200 bit/s Internal RS232 driver/receiver EIA RS232 Standard Note • Consider your PC's serial port maximal baud rate. • The standard baud rate setting (factory setting) is 115'200 bauds. CONNECTION OF POSITIONING CONTROLLER TO PC 4.11 EPOS2 Module 36/2 PC Interface (RS232), DIN41652 Pin [A27] “EPOS RxD” Pin 3 “PC TxD” Pin [A28] “EPOS TxD” Pin 2 “PC RxD” Pin [A29] “GND” Pin 5 “GND” SCI Interface Connection The serial communications interface (SCI) is a two-wire asynchronous serial port, commonly known as a UART. The SCI modules support digital communication between the CPU and other asynchronous peripherals that use the standard non-return-to-zero (NRZ) format. As a common application for EPOS2 Module 36/2’s SCI interface, it can be wired to an USB-to-UART converter to built an USB interface. For further details chapter “5.1.6 USB” on page 5-42. 4-34 Max. input voltage 3.3 VDC High-level input voltage >2.0 VDC Low-level input voltage <0.8 VDC High-level output voltage >2.4 VDC Low-level output voltage <0.4 VDC Bit rate 1 Mbit/s Data format NRZ (non-return-to-zero) Pin Signal Description A24 DSP_RTS2 Serial communication interface handshake A25 DSP_RxD2 Serial communication interface receive A26 DSP_TxD2 Serial communication interface transmit A29 GND Ground Document ID: rel4773 Edition: October 2014 © 2014 maxon motor. Subject to change without prior notice. maxon motor control EPOS2 Positioning Controller EPOS2 Module 36/2 Hardware Reference 4.12 CAN Connection The EPOS2 Module 36/2 is specially designed being commanded and controlled via a Controller Area Network (CAN), an highly efficient data bus, very common in all fields of automation and motion control. The EPOS2 Module 36/2 is preferably used as a slave node in the CANopen network. Standard ISO 11898-2:2003 Max. bit rate 1 Mbit/s Max. number of CAN nodes 127 Protocol CANopen DS-301 V4.02 Identifier setting by external wiring or software Pin Signal Description A30 CAN_L CAN low bus line A31 CAN_H CAN high bus line A32 GND Ground Note • Consider CAN Master’s maximal baud rate. • The standard baud rate setting (factory setting) is “Auto Bit Rate”. • Use 120 Ω termination resistor at both ends of the CAN bus. • For detailed CAN information separate document «EPOS2 Communication Guide». maxon motor control EPOS2 Positioning Controller EPOS2 Module 36/2 Hardware Reference Document ID: rel4773 Edition: October 2014 © 2014 maxon motor. Subject to change without prior notice. 4-35 Connections CAN Configuration 4.13 CAN Configuration 4.13.1 CAN ID (Node Address) The CAN ID is set with input lines CAN ID1…CAN ID7. Addresses (1…127) may be coded using binary code. Logic 1 typical <0.8 VDC Logic 0 typical >2.4 VDC Internal pull-up resistor 4.7 kΩ (against +3.3 VDC) Figure 4-21 CAN ID Input Circuit Pin Signal Description Binary Code Valence B24 GND B25 CANID1 Ground for CAN ID settings – – CAN ID 1 20 B26 1 CANID2 CAN ID 2 21 2 B27 CANID3 CAN ID 3 2 4 B28 CANID4 CAN ID 4 23 8 B29 CANID5 CAN ID 5 24 16 B30 CANID6 CAN ID 6 25 32 B31 CANID7 CAN ID 7 26 64 Table 4-18 2 CAN ID – Binary Code Values The set CAN ID (node address) can be observed by adding the valences of all inputs connected externally to GND. EXAMPLES: Use following table as a (non-concluding) guide: CAN ID/Switch 1 2 3 4 5 6 7 Valence 1 2 4 8 16 32 64 1 1* 0** 0 0 0 0 0 1 2 0 1 0 0 0 0 0 2 32 0 0 0 0 0 1 0 32 35 1 1 0 0 0 1 0 1 + 2 + 32 127 1 1 1 1 1 1 1 1 + 2 + 4 + 8 + 16 + 32 + 64 CAN ID Calculation Legend: * 1 = CAN ID input line externally connected to GND ** 0 = CAN ID input line open or externally connected to +3.3 VDC Table 4-19 4-36 CAN ID – Examples Document ID: rel4773 Edition: October 2014 © 2014 maxon motor. Subject to change without prior notice. maxon motor control EPOS2 Positioning Controller EPOS2 Module 36/2 Hardware Reference Note The Node ID set by software is valid, if CAN ID is set “0” (all CAN ID input lines open or externally connected to +3.3 VDC). 4.13.2 CAN automatic Bit Rate Detection By using this function, the CANopen interface can be put in a “listen only” mode. For further details separate document «EPOS2 Firmware Specification». The automatic bit rate detection is activated when the input line is connected externally to GND. Auto Bit Rate GND Pin [B32] Pin [B24] Logic 0 typical <0.8 VDC Logic 1 typical >2.4 VDC Internal pull-up resistor 4.7 kΩ (against +3.3 VDC) Figure 4-22 maxon motor control EPOS2 Positioning Controller EPOS2 Module 36/2 Hardware Reference CAN automatic Bit Rate Detection Circuit Document ID: rel4773 Edition: October 2014 © 2014 maxon motor. Subject to change without prior notice. 4-37 Connections Status LEDs 4.14 Status LEDs The LEDs display the current status of the EPOS2 Module 36/2, as well as possible errors: • Green LED shows the operating status • Red LED indicates errors For detailed information separate document «EPOS2 Firmware Specification». LED Red Green Status / Error OFF Slow Power stage is disabled. Device is in status… • “Switch ON Disabled” • “Ready to Switch ON” • “Switched ON” OFF ON Power stage is enabled. Device is in status… • “Operation Enable” • “Quick Stop Active” ON OFF FAULT state. Device is in status… • “Fault” ON ON Power stage is enabled. Device is in temporary status… • “Fault Reaction Active” ON Flash No valid firmware or firmware download in progress. Flash = Flashing (≈0.9 s OFF/≈0.1 s ON) Slow = Slow blinking (≈1 Hz) Table 4-20 4-38 LEDs – Interpretation of Condition Document ID: rel4773 Edition: October 2014 © 2014 maxon motor. Subject to change without prior notice. maxon motor control EPOS2 Positioning Controller EPOS2 Module 36/2 Hardware Reference 5 Motherboard Design Guide The «Motherboard Design Guide» provides helpful information on the implementation of the EPOS2 Module 36/2 into an electronics board. It contains external component requirements, routing instructions, pin assignment, mechanical dimensions and wiring examples. CAUTION Hazardous Incorrect Design can lead to serious injuries! • Do not further proceed if you are not familiar with electronic design! • Designing an electronic board requires specific skills and must only be performed by experienced electronic engineers! • This short guide must only be considered as a help and does not by itself lead to a working design! Get assistance: If you are not familiar with electronic design, you might wish to seek assistance. maxon motor ag’s specialists will be glad to offer you a customized motherboard design that suits your particular application. 5.1 Requirements for external Components For correct and save function of the EPOS2 Module 36/2, the following external components will be required. Function and key data of each component is noted and completed with examples. 5.1.1 Card Edge Connector The EPOS2 Module 36/2 is designed to plug into a card edge connector that is mounted on an application-specific PCB. This connector must be a 2x32 way vertical or horizontal type with at rated current per pin of at least 1 A. In case of high vibration in your application, the EPOS2 Module 36/2 must be locked with an additional PCB retainer (for details and references “Connections” on page 3-12. 5.1.2 Power Supply Voltage Due to limited current rating of 1.1 A per pin, all pins of the power supply voltage VCC must be connected. To protect the module from damage, two fuses – a transient voltage suppressor diode (TVS diode) and a capacitor in the power supply voltage line – are recommended. Figure 5-23 maxon motor control EPOS2 Positioning Controller EPOS2 Module 36/2 Hardware Reference Recommended Protection for Power Supply Document ID: rel4773 Edition: October 2014 © 2014 maxon motor. Subject to change without prior notice. 5-39 Motherboard Design Guide Requirements for external Components 5.1.2.1 Capacitor C1 An external capacitor is not mandatory for the function of the module, but – during braking of the load – the power supply must be capable to buffer the fed back energy. Hence, connect an electrolytic capacitor to the power supply voltage. The capacity needed depends on the following items: • Power supply voltage • Speed at the beginning of the braking • Total mass inertia • Deceleration rate • Number of modules For recommended types (supplying one EPOS2 Module 36/2) “Supplier Reference” on page 5-41. 5.1.2.2 Fuse FU1 Place a fuse at the power supply’s entry to protect against reverse polarity. Together with the TVS diode, the fuse breaks an occurring reverse current. The continuous current of the fuse depends on the number of modules supplied and how much current each module needs. For recommended types “Supplier Reference” on page 5-41. 5.1.2.3 Fuse FU2 For protection against short circuit of the motor winding connections, it is recommended to place additionally one fuse per module. The fuse must withstand 2 A continuously and 4 A during 5 seconds with a typical melt I2t smaller than 0.05 A2s. For recommended types “Supplier Reference” on page 5-41. 5.1.2.4 TVS Diode D1 To protect against overvoltage due to supply transients or the braking energy, connect a transient voltage suppressor diode to the power supply voltage. For recommended types “Supplier Reference” on page 5-41. 5.1.3 Logic Supply Voltage The EPOS2 Module 36/2 features a logic supply voltage input and a +Vaux output. The logic supply voltage input has a voltage range of 9…40 V and can be sourced separately or by the power supply voltage (chapter “4.2 Minimum external Wiring” on page 4-19). 5-40 • If the logic supply voltage is sourced, the +Vaux can be used as +5 VDC supply output for Hall sensors and encoder. • If the logic supply voltage is sourced separately, a transient voltage suppressor diode at the logic supply voltage input can be connected to protect the module against overvoltage. For references on the TVS diode “Supplier Reference” on page 5-41. Document ID: rel4773 Edition: October 2014 © 2014 maxon motor. Subject to change without prior notice. maxon motor control EPOS2 Positioning Controller EPOS2 Module 36/2 Hardware Reference 5.1.4 Motor Phase The EPOS2 Module 36/2 features a built-in choke of 10 μH per phase. For most motors and applications this will be sufficient. In case of high power supply voltage and for motors with very low inductance, the current ripple will become too high thus, requiring additional chokes on the motherboard. The minimum inductance of each choke can be calculated as to below formula. • If the result is negative, no additional chokes will be needed. • If the result is positive, additional chokes will be required. The chokes must have an electromagnetic shield, high saturation current, low losses and a rated current higher than the continuous motor current. For recommended types “Supplier Reference” on page 5-41. V cc ⋅ 3 1 L phase ≥ --- ⋅ ----------------------------------------------------- – L mot – 2 × L EPOS2Module 2 24 ⋅ f PWM ⋅ I 2 – I 2 N D Lphase [H] external inductance per phase VCC [V] Power supply voltage fPWM [Hz] PWM frequency = 50000 Hz IN [A] Nominal motor current (consult maxon catalog for applicable data) ID [A] Continuous motor current in your application Lmot [H] Terminal inductance phase to phases of the motor LEPOS2Module [H] EPOS2 Module 36/2’s built-in inductance per phase = 10-5 H 5.1.5 Supplier Reference Recommended Components Panasonic (EEUFC1H221) C=220 uF / UDC=50 V / IAC=1030 mA @ 100kHz, low impedance / T=-55…105°C Capacitor C1 Rubicon (50ZL220M10X16) C=220 uF / UDC=50 V / IAC=1370 mA @ 100kHz, low impedance / T=-55…105°C Fuse FU1 Littelfuse, 154 Series OMNI-BLOK fuse holder with SMD NANO2 fuse installed. – 3 A very fast-acting (154003) when employing 1 EPOS2 Module 36/2 – 5 A very fast-acting (154005) when employing 2 EPOS2 Module 36/2 – 10 A very fast-acting (154010) when employing 4 EPOS2 Module 36/2 Fuse FU2 Bussmann, 3216FF Series (3216FF-2A), fast-acting, 2 A Wickmann, SMD 0805 Series (FCD081200), quick-acting, 2 A TVS diode D1 Vishay (SMBJ43A) Diotec(P6KE51A) UR=43 V / UBR=47.8…52.8 V @ 1 m A / UC=69.4 V @ 8.6 A Motor choke Würth Elektronik, WE-PD-XXL (7447709101) LN=100 μH / RDC=100 mΩ / IDC=2.5 A / Isat = 3.1A, shielded Table 5-21 maxon motor control EPOS2 Positioning Controller EPOS2 Module 36/2 Hardware Reference Recommended Components Document ID: rel4773 Edition: October 2014 © 2014 maxon motor. Subject to change without prior notice. 5-41 Motherboard Design Guide Requirements for external Components 5.1.6 USB 5.1.6.1 General Requirements USB offers an easy way to configure and command the EPOS2 Module 36/2. The module itself does not possess an USB interface, but an USB to UART converter placed on the motherboard can be wired to the module’s SCI interface pins. It will be sufficient to place only one USB converter on the motherboard. The modules among themselves communicate via the CAN bus. For a schematic example of the USB to UART converter chapter “5.3.3 USB Interface” on page 5-45. 5.1.6.2 USB to UART Converter Configuration 1) Connect the USB cable to an USB port of a PC. 2) Install and start the «EPOS Studio» software. The provided USB driver supports only the USB to UART converter “FT232RQ” by FTDI. It must be configured with FTDI’s utility software «MProg» before communication between «EPOS Studio» and the EPOS2 Module 36/2 will be available. 3) Download and install «D2XX drivers» from www.ftdichip.com – category «Drivers» / category «D2XX» / column «Comments» / link «setup executable». 4) Download and install «MProg» from www.ftdichip.com – category «Resources» / category «Utilities» / heading «MProg - EEPROM Programming Utility». 5) Connect FT232RQ with an USB cable to your computer. The FT232RQ will be powered via USB. 6) Start the software utility «MProg» and click in menu “Tools” / “Read and Parse”. The default configuration will be read-out and displayed. 7) Change values as follows: Name Change from… …to USB VID/PID FTDI Default FTDI Supplied PID Product ID 6001 A8B0 Manufacturer FTDI maxon motor ag Description FT232R USB UART maxon motor EPOS2 Check box “Load D2XX driver” Table 5-22 ticked USB to UART Converter Configuration – Settings 8) Select menu “File” / “Save As…” and assign a name. 9) Select menu “Device” / “Program”. 10) The “Programmed Serial Number: …” will now be displayed in the text box at the bottom. Leave this number unchanged. 11) Close «MProg» utility and disconnect the USB cable. Now, the converter is configured and the communication between «EPOS Studio» and the EPOS2 Module 36/2 via USB is established. 5-42 Document ID: rel4773 Edition: October 2014 © 2014 maxon motor. Subject to change without prior notice. maxon motor control EPOS2 Positioning Controller EPOS2 Module 36/2 Hardware Reference 5.2 Design Rules Follow below rules to design your application-specific motherboard and to provide correct and save function of the EPOS2 Module 36/2. Before continuing, make sure to consult the following sections: • For Pin Description chapter “4.1 Pin Assignment” on page 4-17. • For Performance Data chapter “3 Technical Data” on page 3-11 and chapter “4.3.3 Low Supply Voltage Operation (optional)” on page 4-21. • For Dimensional Drawings chapter “3.3 Dimensional Drawings” on page 3-13. 5.2.1 Ground The ground pins (GND) are internally connected, but each ground pin is assigned to a functional block. It is common practice to place a ground plane on the motherboard and will be required to connect pins A1, A6, B1 and B11 with thick tracks to the power supply voltage ground.The ground pins of each functional block are as follows: Use Pin(s)… …to connect this Functional Block to Ground: A1/6 B1/11 Power supply voltage A11 Encoder A18 Analog inputs A21 B12/17 Digital inputs and outputs A29 USB and RS232 A32 CAN bus B24 CAN ID settings Table 5-23 Functional Blocks – Ground Connections If ground safety earth is available, connect the ground plane over some parallel capacitors to the ground safety earth. We recommend the use of capacitors with 47 nF and 100 V. 5.2.2 Communication Interfaces • For RS232 chapter “4.10 RS232 Connection” on page 4-34. • For CAN chapter “4.12 CAN Connection” on page 4-35. 5.2.3 I/Os • For Digital inputs chapter “4.7 Digital Input Connection” on page 4-26. • For Analog Inputs chapter “4.8 Analog Input Connection” on page 4-29. • For Digital Outputs chapter “4.9 Digital Output Connection” on page 4-30. maxon motor control EPOS2 Positioning Controller EPOS2 Module 36/2 Hardware Reference Document ID: rel4773 Edition: October 2014 © 2014 maxon motor. Subject to change without prior notice. 5-43 Motherboard Design Guide Schematic Examples 5.2.4 Layout Follow these rules: 5.3 • Connect pins A2, A3 and A4 (power supply voltage VCC) with a thick track to the fuse. • Connect pins A1, A6, B1 and B11 (Power_GND) with thick tracks to the ground of supply voltage. • Copper plating’s width and thickness of traces for power supply voltage and motor winding depend on the maximum current expected in the application. We recommend a minimum width of 50 mil at a thickness of 35 µm. • Route fast signal wire pairs (encoder, differential inputs, CAN, USB) close to the return wire in order to minimize the area of the loop enclosed by the corresponding current. Schematic Examples 5.3.1 Minimum External Wiring Logic supply is sourced by the power supply voltage. The EPOS2 Module 36/2 is configured by RS232. For details chapter “4.2 Minimum external Wiring” on page 4-19. 5.3.2 Separate Logic Supply Voltage and CAN Communication Power and logic supply voltage are sourced separately. The EPOS2 Module 36/2 is configured and commanded by CAN. Figure 5-24 5-44 Separate Logic Supply Voltage and CAN Communication – Wiring Diagram Document ID: rel4773 Edition: October 2014 © 2014 maxon motor. Subject to change without prior notice. maxon motor control EPOS2 Positioning Controller EPOS2 Module 36/2 Hardware Reference 5.3.3 USB Interface If an external USB to UART converter is connected to the EPOS SCI, the module can be configured and commanded by a PC through USB. Figure 5-25 maxon motor control EPOS2 Positioning Controller EPOS2 Module 36/2 Hardware Reference USB Interface – Wiring Diagram Document ID: rel4773 Edition: October 2014 © 2014 maxon motor. Subject to change without prior notice. 5-45 Motherboard Design Guide Schematic Examples 5.3.4 Wiring Example: Low Supply Voltage Operation The power stage is powered separately with a voltage between 0 and 36 VDC. The logic part must be supplied with +5 VDC connected to VDDin. As a possibility, this voltage can be produced out of the power supply voltage by an appropriate voltage converter (step-up-converter or step-down-converter). It is recommended to use this operation mode only with power supply voltages below 11 VDC. Figure 5-26 5-46 Low Supply Voltage Operation – Wiring Diagram Document ID: rel4773 Edition: October 2014 © 2014 maxon motor. Subject to change without prior notice. maxon motor control EPOS2 Positioning Controller EPOS2 Module 36/2 Hardware Reference 5.3.5 Wiring Example: Two Axes with RS232 to CAN Gateway The logic supply is sourced by the power supply voltage and the module is configured by RS232. Both modules are configured and commanded by a PC via RS232. The upper module is used as RS232 to CAN gateway. Further modules can be connected and commanded to the CAN bus accordingly. Figure 5-27 maxon motor control EPOS2 Positioning Controller EPOS2 Module 36/2 Hardware Reference Two Axes with RS232 to CAN Gateway – Wiring Diagram Document ID: rel4773 Edition: October 2014 © 2014 maxon motor. Subject to change without prior notice. 5-47 Motherboard Design Guide Schematic Examples ••page intentionally left blank•• 5-48 Document ID: rel4773 Edition: October 2014 © 2014 maxon motor. Subject to change without prior notice. maxon motor control EPOS2 Positioning Controller EPOS2 Module 36/2 Hardware Reference LIST OF FIGURES Figure 2-1 Documentation Structure . . . . . . . . . . . . . . . . . . . . . . . . . . . . . . . . . . . . . . . . . . . . . . . .9 Figure 3-2 Dimensional Drawing (with vertical Connector) [mm] . . . . . . . . . . . . . . . . . . . . . . . . . .13 Figure 3-3 Dimensional Drawing (with horizontal connector Meritec 983172-064-2MMF) [mm] . .13 Figure 3-4 Footprint of Retainer (Meritec 983172-064-2MMF connector) [mm] . . . . . . . . . . . . . .13 Figure 4-5 EPOS2 Module 36/2 – PCB with Connector Array . . . . . . . . . . . . . . . . . . . . . . . . . . . .17 Figure 4-6 Minimum external Wiring . . . . . . . . . . . . . . . . . . . . . . . . . . . . . . . . . . . . . . . . . . . . . . .19 Figure 4-7 Hall Sensor Input Circuit . . . . . . . . . . . . . . . . . . . . . . . . . . . . . . . . . . . . . . . . . . . . . . . .24 Figure 4-8 Encoder Input Circuit . . . . . . . . . . . . . . . . . . . . . . . . . . . . . . . . . . . . . . . . . . . . . . . . . .25 Figure 4-9 DigIN1 Circuit (analogously valid also for DigIN2…4) . . . . . . . . . . . . . . . . . . . . . . . . .26 Figure 4-10 DigIN2 – Wiring Example for Type PNP Proximity Switch . . . . . . . . . . . . . . . . . . . . . .27 Figure 4-11 DigIN2 – Wiring Example for slotted optical Sensor . . . . . . . . . . . . . . . . . . . . . . . . . . .27 Figure 4-12 DigIN7 “Differential” Circuit (analogously valid also for DigIN8) . . . . . . . . . . . . . . . . . .28 Figure 4-13 DigIN7 “Single-ended” Circuit (analogously valid also for DigIN8) . . . . . . . . . . . . . . . .28 Figure 4-14 AnIN1 Circuit (analogously valid also for AnIN2) . . . . . . . . . . . . . . . . . . . . . . . . . . . . .29 Figure 4-15 DigOUT1 Circuit (analogously valid also for DigOUT2) . . . . . . . . . . . . . . . . . . . . . . . .30 Figure 4-16 DigOUT1 “Sinks” Circuit (analogously valid also for DigOUT2) . . . . . . . . . . . . . . . . . .30 Figure 4-17 DigOUT1 “Source” Circuit (analogously valid also for DigOUT2) . . . . . . . . . . . . . . . . .31 Figure 4-18 DigOUT5 Circuit . . . . . . . . . . . . . . . . . . . . . . . . . . . . . . . . . . . . . . . . . . . . . . . . . . . . . .32 Figure 4-19 DigOUT5 “Sinks” Circuit . . . . . . . . . . . . . . . . . . . . . . . . . . . . . . . . . . . . . . . . . . . . . . . .32 Figure 4-20 DigOUT5 “Source” Circuit. . . . . . . . . . . . . . . . . . . . . . . . . . . . . . . . . . . . . . . . . . . . . . .33 Figure 4-21 CAN ID Input Circuit . . . . . . . . . . . . . . . . . . . . . . . . . . . . . . . . . . . . . . . . . . . . . . . . . . .36 Figure 4-22 CAN automatic Bit Rate Detection Circuit . . . . . . . . . . . . . . . . . . . . . . . . . . . . . . . . . .37 Figure 5-23 Recommended Protection for Power Supply . . . . . . . . . . . . . . . . . . . . . . . . . . . . . . . .39 Figure 5-24 Separate Logic Supply Voltage and CAN Communication – Wiring Diagram . . . . . . .44 Figure 5-25 USB Interface – Wiring Diagram. . . . . . . . . . . . . . . . . . . . . . . . . . . . . . . . . . . . . . . . . .45 Figure 5-26 Low Supply Voltage Operation – Wiring Diagram . . . . . . . . . . . . . . . . . . . . . . . . . . . .46 Figure 5-27 Two Axes with RS232 to CAN Gateway – Wiring Diagram . . . . . . . . . . . . . . . . . . . . .47 maxon motor control EPOS2 Positioning Controller EPOS2 Module 36/2 Hardware Reference Document ID: rel4773 Edition: October 2014 © 2014 maxon motor. Subject to change without prior notice. Z-49 LIST OF TABLES Z-50 Table 1-1 Notations used in this Document . . . . . . . . . . . . . . . . . . . . . . . . . . . . . . . . . . . . . . . . . . 5 Table 1-2 Brand Names and Trademark Owners. . . . . . . . . . . . . . . . . . . . . . . . . . . . . . . . . . . . . . 7 Table 3-3 Electrical Data – Rating . . . . . . . . . . . . . . . . . . . . . . . . . . . . . . . . . . . . . . . . . . . . . . . . 11 Table 3-4 Electrical Data – Inputs . . . . . . . . . . . . . . . . . . . . . . . . . . . . . . . . . . . . . . . . . . . . . . . . 11 Table 3-5 Electrical Data – Outputs . . . . . . . . . . . . . . . . . . . . . . . . . . . . . . . . . . . . . . . . . . . . . . . 11 Table 3-6 Electrical Data – Voltage Outputs . . . . . . . . . . . . . . . . . . . . . . . . . . . . . . . . . . . . . . . . 12 Table 3-7 Electrical Data – Motor Connections . . . . . . . . . . . . . . . . . . . . . . . . . . . . . . . . . . . . . . 12 Table 3-8 Electrical Data – Interfaces . . . . . . . . . . . . . . . . . . . . . . . . . . . . . . . . . . . . . . . . . . . . . 12 Table 3-9 Electrical Data – LEDs . . . . . . . . . . . . . . . . . . . . . . . . . . . . . . . . . . . . . . . . . . . . . . . . . 12 Table 3-10 Electrical Data – Connections . . . . . . . . . . . . . . . . . . . . . . . . . . . . . . . . . . . . . . . . . . . 12 Table 3-11 Mechanical Data. . . . . . . . . . . . . . . . . . . . . . . . . . . . . . . . . . . . . . . . . . . . . . . . . . . . . . 13 Table 3-12 Environmental Conditions . . . . . . . . . . . . . . . . . . . . . . . . . . . . . . . . . . . . . . . . . . . . . . 14 Table 3-13 Order Details . . . . . . . . . . . . . . . . . . . . . . . . . . . . . . . . . . . . . . . . . . . . . . . . . . . . . . . . 14 Table 3-14 Accessories . . . . . . . . . . . . . . . . . . . . . . . . . . . . . . . . . . . . . . . . . . . . . . . . . . . . . . . . . 14 Table 3-15 Standards . . . . . . . . . . . . . . . . . . . . . . . . . . . . . . . . . . . . . . . . . . . . . . . . . . . . . . . . . . . 15 Table 4-16 EPOS2 Module 36/2 – Pin Assignment Array A. . . . . . . . . . . . . . . . . . . . . . . . . . . . . . 18 Table 4-17 EPOS2 Module 36/2 – Pin Assignment Array B. . . . . . . . . . . . . . . . . . . . . . . . . . . . . . 19 Table 4-18 CAN ID – Binary Code Values . . . . . . . . . . . . . . . . . . . . . . . . . . . . . . . . . . . . . . . . . . . 36 Table 4-19 CAN ID – Examples . . . . . . . . . . . . . . . . . . . . . . . . . . . . . . . . . . . . . . . . . . . . . . . . . . . 36 Table 4-20 LEDs – Interpretation of Condition . . . . . . . . . . . . . . . . . . . . . . . . . . . . . . . . . . . . . . . . 38 Table 5-21 Recommended Components . . . . . . . . . . . . . . . . . . . . . . . . . . . . . . . . . . . . . . . . . . . . 41 Table 5-22 USB to UART Converter Configuration – Settings . . . . . . . . . . . . . . . . . . . . . . . . . . . . 42 Table 5-23 Functional Blocks – Ground Connections . . . . . . . . . . . . . . . . . . . . . . . . . . . . . . . . . . 43 Document ID: rel4773 Edition: October 2014 © 2014 maxon motor. Subject to change without prior notice. maxon motor control EPOS2 Positioning Controller EPOS2 Module 36/2 Hardware Reference INDEX A H additionally applicable regulations 10 alerts 5 analog inputs 29 how to calculate minimum inductance 41 calculate required supply voltage 20 configure CAN ID 36 get help in designing the motherboard 39 get MProg 42 interpret icons (and signs) used in the document 5 B backup power 21 bit rate detection, automatic 37 I C informatory signs 6 intended purpose 9 interface CAN 35 RS232 34 C1 40 calculation of required supply voltage 20 CAN example of communication 44 interface 35 RS232 to CAN gateway 47 CAN ID settings 36 choke 41 country-specific regulations 10 L LEDs 38 M D mandatory action signs 6 mechanical data 13 motherboard, requirements 39 motor choke 41 D1 40 digital inputs 26 digital outputs 30, 32 N E electrical data 11 environmental conditions, permitted 14 error display 38 ESD 10 example 2 axes with RS232 to CAN gateway 47 CAN communication 44 Low Supply Voltage Operation 46 separate Logic Supply Voltage 44 setting CAN IDs 36 USB interface 45 wiring proximity switches 27 F FU1 40 FU2 40 maxon motor control EPOS2 Positioning Controller EPOS2 Module 36/2 Hardware Reference Node Address, configuration 36 O operating status, display 38 P performance data 11 power backup 21 precautions 10 prohibitive signs 6 purpose of the device 9 of this document 5 R recommended components (suppliers) 41 regulations, additionally applicable 10 RS232 interface 34 to CAN gateway 47 rules for motherboard design 43 Document ID: rel4773 Edition: October 2014 © 2014 maxon motor. Subject to change without prior notice. Z-51 S safety alerts 5 safety first! 10 SCI interface 34 signs informative 6 mandatory 6 prohibitive 6 signs used 5 standards, fulfilled 15 status display 38 status LEDs 38 suppliers of recommended components 41 supply voltage, required 20 symbols used 5 T technical data 11 U UART 42 USB example for interface 45 to UART converter 42 Z-52 Document ID: rel4773 Edition: October 2014 © 2014 maxon motor. Subject to change without prior notice. maxon motor control EPOS2 Positioning Controller EPOS2 Module 36/2 Hardware Reference ••page intentionally left blank•• maxon motor control EPOS2 Positioning Controller EPOS2 Module 36/2 Hardware Reference Document ID: rel4773 Edition: October 2014 © 2014 maxon motor. Subject to change without prior notice. Z-53 © 2014 maxon motor. All rights reserved. The present document – including all parts thereof – is protected by copyright. Any use (including reproduction, translation, microfilming and other means of electronic data processing) beyond the narrow restrictions of the copyright law without the prior approval of maxon motor ag, is not permitted and subject to persecution under the applicable law. maxon motor ag Brünigstrasse 220 P.O.Box 263 CH-6072 Sachseln Switzerland Phone +41 41 666 15 00 Fax +41 41 666 16 50 www.maxonmotor.com Z-54 Document ID: rel4773 Edition: October 2014 © 2014 maxon motor. Subject to change without prior notice. maxon motor control EPOS2 Positioning Controller EPOS2 Module 36/2 Hardware Reference