1
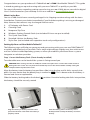
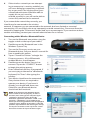
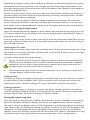
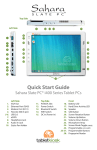
Top Side
*(BL
Left Side
CL
!
@
#
$
%
Right Side
BM
CMCNCO
CP
CP
^
BQ
BR
BS
BT
Z&
CQ
Quick Start Guide
eo a7400 Ultra-Mobile Tablet PC
Left Side
1. Carry Strap Attachment
2. Ethernet Port (RJ45)
3. Mini USB 2.0
4. Headphone Jack
5. Audio In Jack
6. Media Card Reader
7. Kensington Lock Port
Right Side
Front
12. Carry Strap Attachment
20. 2.0 MPixel Webcam
13. Full Size USB 2.0
21. SSD Activity LED
14. DC Power In
22. Battery 1 Status LED
15. SAS Button
23. Battery 2 Status LED
16. Auto Screen Rotation 24. Audio Speakers
Lock/Unlock Button 25. Microphone Array
17. Screen Brightness +
18. Screen Brightness –
Top Side
8. Power Switch
9. Bluetooth Switch
10. WiFi Switch
11. Modular Expansion
Port with Cover
Tablet PCs designed for business. Built to last.
BN
BO
BP
BU
Congratulations on your purchase of a TabletKiosk eo® a7400 Ultra-Mobile Tablet PC. This guide
is aimed at getting you up and running with your new Tablet PC as quickly as possible.
For more information regarding setting up and using your eo a7400, please consult the digital
User’s Guide located on your desktop or visit our website at www.tabletkiosk.com.
What’s in the Box
Your eo a7400 should come securely packaged in its shipping container along with the items
listed below. Contact your dealer immediately if you find that anything is missing or damaged.
Note, however, that contents may be changed without notice.
1.
2.
3.
4.
5.
6.
7.
AC Adapter with Power Cord
Cleaning Cloth
Neoprene Slip Case
Windows Getting Started Guide (not included if Linux was pre-installed)
This Quick Start Guide
Standard Lithium-Ion Battery Pack
Stylus Pen (not included with capacitive touch only configurations)
Setting Up Your eo Ultra-Mobile Tablet PC
The following steps will help you power up and get running with your new eo a7400 Tablet PC
as quickly and effortlessly as possible. These steps might change slightly over time with newer
revisions of the installed operating system, or when your tablet is purchased from a system
integrator or solutions provider.
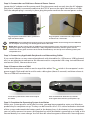
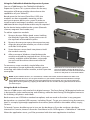
Step 1: Insert the Battery Pack (if not already installed)
Turn the tablet over so the back of the system is facing toward you.
CAUTION: When turning over the eo a7400, be careful not to place it on a surface that could scratch or
damage the LCD screen. You can place the included slip case on the surface before carefully setting the
computer down to protect the screen.
Align the battery into the battery bay and then slide it into the bay until it clicks securely into
place. You may notice that the battery bay is marked as
. This is because the first battery is
internal and not user replaceable.
Slide the battery-locking tab to the locked ( ) position. Once the locking tab clicks into position,
the battery should be securely seated.
Align the battery in the bay and slide it into
place. You will hear a click when the battery is
properly seated.
Slide the locking tab on the battery to the
locked position to keep the battery secured in
the bay.
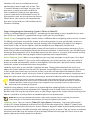
Step 2: Connect the eo a7400 to an External Power Source
Locate the AC adapter and the power cord. Plug the power cord securely into the AC adapter.
Plug the AC adapter’s connection cable into the “DC In” port on the right side of the eo a7400.
Once the adapter plug is securely in place, plug the power cord into an external power socket.
Plug the power cord into the DC In jack on the
right side of the tablet.
Plug the power cord into the AC adapter brick
and then into a wall outlet.
IMPORTANT: You should allow the battery pack(s) to charge fully before disconnecting the eo a7400 from
the AC adapter and running it on battery power for the first time.
NOTE: When you first connect the eo a7400 into an external power source, the battery charge indicator(s)
will begin to glow orange. When the battery is fully charged the indicator(s) will turn green. See the
section later in this guide and in the User’s Guide entitled Battery Care for tips on maximizing battery life
and performance.
Step 3: Connect Any Applicable Peripherals and Networking Cables
If you would like to use any external peripherals with the tablet (i.e. USB mouse, USB keyboard,
etc.), or are planning to connect to the Internet and/or a corporate LAN using a wired Ethernet
connection (RJ45), connect them now.
Step 4: Power on the eo a7400
Locate the three power switches on the top of the tablet. The switch is the computer’s main
power toggle. Slide and hold it until it emits a blue glow (about 5 seconds) and then release it.
The eo a7400 will now boot up.
Locate the system Power switch on the top of
the tablet.
Slide and hold it for about five (5) seconds
until it glows blue and the system powers up.
Step 5: Complete the Operating System Installation
When your system powers on for the first time, you may be prompted to enter your Windows
product key to complete set-up. The key can be found on the C.O.A. sticker located on the back
of the system underneath the battery pack in the battery bay. As the battery is hot swappable,
you can safely remove it to access the product key while the tablet is powered on as long as the
internal battery has some charge. You will then be asked to agree to Microsoft's licensing terms.
Windows will start its configuration and
optimization routine and may restart. This
is normal. Windows will then ask you a few
questions in order to localize and finish
your installation. Refer to your operating
system’s manual for information on any of
the questions you are unsure how to answer.
When done, your system will complete the
first time set-up and you will be taken to the
Windows desktop.
Step 6: Navigating the Operating System's GUI on a Tablet PC
Unlike a standard laptop or desktop PC, navigating the operating system’s graphical user interface (GUI) on a Tablet PC is performed using a stylus pen or your fingers.
Touch Screen: Navigating with a touch screen is different from navigating with a mouse. Instead
of sliding your fingers around the screen to move the pointer (as you would with a mouse or
track pad), simply tap on what you want to interact with. Remember, the pad of your finger is
lower than its tip, so aim for objects with the middle of your fingernail, not the end.
Sliding your finger while touching the screen will move the on-screen pointer around as if you
were using a mouse and holding down the left mouse button. In other words, you would be performing a drag operation. Also, remember that since the screen is sensitive to the touch, resting
your hand on it while working might make the pointer react unpredictably.
Active Digitizer (pen): When using a digitizer, you may only navigate using the pen. On a dual
mode eo a7400 Tablet PC, the screen will intelligently sense the tip of the stylus pen when it
draws near and automatically switch on the digitizer. Now the pen's tip doesn’t even need to
touch the screen to activate and move the pointer.
Hold the stylus pen as you would a standard ink pen. Simply place the tip of the stylus just
above the screen and move it around. The pointer should follow it as if you were using a mouse.
In this mode your hand may rest on the screen, since this will not affect the behavior of the
pointer. Like a touch screen, when you want to select or interact with an object, simply tap on it.
Keep the stylus tip on the screen while moving it around in order to perform a drag operation.
TIP: When trying to select or activate something on the screen with the stylus pen, pay attention to the
position of the pointer icon on the screen instead of the tip of the pen. By default, the pointer is diamond
shaped in Windows 7 when using a touch screen or digitizer unless you plug-in and use a mouse, then it
will switch to the standard arrow pointer.
Whether using either a touch screen or an active digitizer, tapping lightly on the screen will
perform a standard left mouse button click. Tapping twice in rapid succession will perform a
double-click. Pressing the tip of the stylus or your finger against the screen without moving it for
about a second or so will perform a standard right mouse button click.
NOTE: When pressing and holding to perform a right-click, keep your finger or stylus tip pressed to the
screen until you see a circle draw around where you are pressing before you release.
Inputting Data: You can use the Tablet PC Input Panel in Windows 7 to enter information
via the On-Screen Keyboard or Writing Pad. You’ll find the edge of the Tablet PC Input Panel
docked on the left-hand side of your screen. When in digitizer mode, hovering the pointer over
the panel will cause it to slide outward a bit making it easier to access. Tap on it once to activate
the panel and slide it to the center of your desktop. When finished, tap the “close” icon in the
upper right corner of the panel to re-dock it.
When using a touch screen, tap once on the input panel’s edge to slide it to the center of your
desktop. You can also enable the PC Input Panel Toolbar on the Windows Taskbar by pressing
and holding (right-clicking) on a blank space on the Taskbar and choosing "Toolbars Tablet
PC Input Panel" from the pop-up menu that appears.
For more information on using the input panels, see the digital User's Guide on your system's
desktop (you can also download it from www.tabletkiosk.com) or check out the Tablet PC
Tutorials in Windows.
Calibrating the Screen for Improved Accuracy
If you find that the position of the on-screen pointer
isn’t matching the touch of the stylus or your finger
properly, you should calibrate the screen.
Calibrating the Active Digitizer and Touch Screen
1. Go to the START menu and tap on "Control
Panel" in the right hand column to open the
Windows Control Panel.
2. Tap on the “Hardware and Sound” category and
If your eo a7400 has a dual mode screen, you
locate the "Tablet PC Settings" sub-category and will see this window asking you to choose an
then either tap on it or tap on the "Calibrate the input panel to calibrate.
screen for pen or touch input" link.
3. In the "Display" tab, tap on the “Calibrate...”
button. If a Window appears asking you which
type of screen you to want to calibrate ("Touch
Input" for the touch screen, or "Pen Input" for
the digitizer) choose the appropriate one to
continue to the calibration screen.
4. Follow the on-screen instructions to complete
the calibration. The routine for each screen is
very similar. Tap in the center of each cross
when it appears on the screen. When you have
tapped on the last cross, you will be prompted to save your calibration data. If you are
happy with how you tapped on each cross, save the data. If not, choose to cancel and then
rerun the calibration routine.
NOTE: If you find that after you calibrate for the first time the screen accuracy is no better or perhaps
worse, choose to calibrate again. After the first calibration for each screen, the routine steps down to
only using 4-target points for calibration. Sometimes, the 4-point calibration can produce better feeling
calibration data for some users.
If at any point you wish to reset your calibration data and return to the Windows default
calibration state, simply tap on the "Reset..." button and choose which screen to reset if asked.
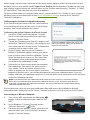
Connecting to a Wireless Network
1.
2.
3.
Turn on the WiFi transmitter by sliding the
toggle switch on the top of your tablet to the
left.
In the Windows 7 System Tray, tap on the
“Wireless Networks” (
) icon.
From the list that appears, tap to select the network to which you wish to connect and then
tap the “Connect” button.
4.
If the wireless network you are attempting to connect to is security-enabled, you
will see a dialog box requesting a network
key or password. The key/password (your
network administrator should be able to
supply this to you) must be
entered correctly or you will not be able to
successfully connect to the network.
If you entered the network key correctly, you
should now be connected to the wireless
network. If it appears you are connected to the network, but have limited or no actual
connectivity, it is most likely due to an improperly entered network key. Disconnect from the
network by tapping the “Disconnect” button and try to connect again. If you continue to have
trouble connecting, contact your network administrator for assistance.
Connecting with a Wireless Bluetooth Device
1.
Turn on the Bluetooth transmitter using the
toggle switch on the top of your tablet.
2. Double-tap on the Bluetooth icon in the
Windows System Tray.
3. Turn on the Discovery service on your
Bluetooth device. See your device's manual for
how to enable this option.
4.Tap on "Search for Devices" to begin the
Discovery process. A list of Bluetooth
enabled devices should appear.
5. Double-tap on the device you wish to
connect. Tap on the "CONNECT" button
to begin the pairing process.
6. Enter a Bluetooth passkey if prompted. If
you are trying to connect to a Bluetooth
keyboard, hit "Enter" after typing the
passkey.
7.Your device should now be connected.
If any device drivers are required to
operate your device, if you haven't
already, you should load them now.
Otherwise your Bluetooth device
should now be functional.
NOTE: If you find that your Bluetooth device
doesn't seem to connect properly, or doesn't
function, after starting up the computer again
sometime in the future: open up the "My
Bluetooth" application (located in "START All
Programs Bluetooth"), tap and hold on the
device you are having problems with to highlight it
and then tap on "Update". If that doesn't solve the
problem, tap and hold on the device again and tap
on "Unpair" to remove it. Then tap on the "Search
for Devices" button to re-pair the device again.
Using the TabletKiosk Modular Expansion System
Your eo a7400 features the TabletKiosk Modular
Expansion System. This systems allows for the easy
integration of feature modules that enhance the
capabilities of your Tablet PC.
Based upon the Universal Serial Bus (USB), the
modules are hot swappable, meaning you do
not have to power down your system in order to
install/remove/exchange a module, and require no
additional drivers beyond those that may be required
by the device being added to the system (Barcode
scanner, magnetic card reader, etc.).
To add an expansion module:
1.
Remove the two Philips head screws holding
the Modular Expansion System port cover on
the top/back of the tablet in place.
2. Remove the cover to expose the expansion port.
3. Align the plug of the module you wish to install
and slide it into place.
4. Screw the two screws back into place to hold
the module securely.
5. After a moment, Windows should detect the
module and load the required drivers, if they are
natively available within Windows, or prompt
you to install the drivers that came with the
module.
To remove or swap a module, simple follow the
same procedure, except replace the module you are
removing with either another module, or the Expansion
cover plate.
Remember to screw the module into place
to prevent it from coming off while in use.
Be sure to store the screws that attached the
cover in a safe place so as not to lose them.
NOTE: If your module contains, or is attached to, a media card reader, external hard drive or other such
removable media device, be sure to eject the device as you would a standard USB attached data storage
device before removing it in order to prevent possible data loss/corruption. You can eject the device by
going down to the System Tray, tapping on the USB Device icon and the selecting the device from the list
you wish to eject.
Using the Built-in Cameras
Your eo a7400 comes with two built-in digital cameras. The front facing 2.0 Megapixel webcam
is designed for video conferencing and chatting, while the back facing 5.0 Megapixel camera is
for shooting still photos and videos.
Both cameras are USB Video standard compliant, and are made to function in any program
designed to use standard USB cameras, including Skype®. To get you started using the cameras,
there is a simple, lightweight application that comes preinstalled on the tablet called, simply,
Camera.
To launch Camera, double tap on its icon on the desktop, or if you do not have a desktop
shortcut for Camera, choose it from the Start Menu in the "All Programs > TabletKiosk" submenu.
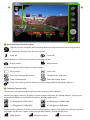
When the application starts, you'll be presented with the main application interface.
@
!
! Main Interface Controls (right)
Tap this icon to swap the active camera between the front and rear facing camera.
Enable/Disable the LED flash for the rear camera.
Flash on
Flash off
Switch between still Photo and Video recording modes.
Photo mode
Video mode
Cycle through the information screen overlays.
No Overlays
Icons only
Icons and Composition Grid
Composition Grid only.
Take a Photograph
Start Recording Video
Open the Settings panel where you can change different program options.
@ Overlay Controls (left)
These icons are activated by tapping on the Overlays menu button.
Photo Resolution selector. Displays current image resolution for taking photos. Tap to cycle
through the different available resolutions. (Photo mode only)
5.0 Megapixel (2592x1944)
2.0 Megapixel (1600x1200)
1.3 Megapixel (1280x1024)
0.3 Megapixel (640x480)
Photo Quality selector. Displays current image quality setting. The higher the picture quality
the larger the file size. Tap to cycle through the options. (Photo mode only)
High quality
Medium quality
Lower quality
Self Timer selector. Displays timer selection. Tap to cycle through the options. (Photo mode only)
Off
Two (2) second delay
Ten (10) second delay
Video Format (resolution) selector. Displays current video format. Tap to cycle the options.
480p (640x480)
240p (320x240)
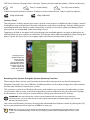
Settings Panel
The program's Settings panel gives access to the same controls available by the Overlay Controls
listed above, the save locations for both still photos and video recordings, and the ability to put
a predetermined time limit on video recordings in order to save drive space and battery life in
the event of an unattended video recording session.
Tapping on a field in the panel will cycle through the available options or open a dialog box to
choose where to save a photo or video file. The change takes effect immediately after exiting the
panel. Tap on the close icon in the upper right hand corner of the panel to close it.
Simply tap on an
option field in the
panel to make
a change. The
change takes effect
immediately. Tap on
the close icon in the
upper right hand
corner of the panel
to close it.
Restoring Your System Using the System Recovery Partition
There may be times where you’ll encounter errors that may prevent you from booting into
Windows normally. Your eo a7400 has a hidden partition on the data storage drive that contains
the files you’ll need to restore your system.
This recovery system uses Windows Recovery and enables you to restore the operating system
to a previous state in time, reinstall the operating system without losing your previous settings
or documents, or reinstall your system without saving your documents or settings.
IMPORTANT: You will need to have a mouse and/or keyboard with standard F1-F12 function keys
attached to your system in order to launch and navigate both the Advanced Boot Options menu and the
Windows Recovery System.
You enter into Windows Recovery through the Advanced Boot Options menu by hitting the [F8]
key on your keyboard when your eo a7400 first starts up.
NOTE: The easiest way to enter the Advanced Boot Menu is by repeatedly pressing the [F8] key as soon
as you see the TabletKiosk logo screen and not stopping until the Advanced Boot Options menu screen
appears.
1.
When the Advanced Boot Options menu
appears, select “Repair Your Computer” and
press [Enter] to launch Windows Recovery.
2.
When the recovery system starts, choose
your preferred keyboard language.
3.
In order to access the recovery options,
you will need to login using your current
Windows login.
NOTE: Your current account must have administrator
privileges in order to successfully login.
4.
After successfully logging
in, you will be taken to the
System Recovery Options
menu. Click on the last
option “Reinstall Windows”
to restore your system
using the files in the hidden
recovery partition.
5.
You will then be given one
last chance to cancel by
clicking the “No” button
when asked if are you
sure you want to reinstall
Windows. If you are sure,
click the “Yes” button and
the restore procedure will begin.
After you have finished restoring Windows, your system will reboot and Set-up will configure
Windows for first use. When you have returned to the Windows desktop, go to Windows Update
and install any Critical updates until your system is current. Finally, reinstall your applications
and any documents you backed up before you reinstalled.
Using the Batteries for the First Time
Before using your eo a7400 on battery power for the first time, it's best if the batteries are
fully charged.
On the front of the eo a7400 are two battery status
indicators just above the LCD display. These indicators
will track the charging status of the two Lithium-Ion
batteries. Battery #1 is internal, while battery #2 is
located on the back of the Tablet PC.
Partially discharged batteries will cause the indicators
to glow orange when attached to an external power
source. When each battery is fully charged, its
corresponding indicator will turn green. Be sure that
both indicators have turned green before attempting
to run the eo a7400 on battery power for the first time.
The battery indicators will turn orange
when charging and green when their
corresponding battery is fully charged.
Battery Usage
Running your system plugged in all the time, or conversely, until the batteries are totally drained
on a regular basis is not recommended as they can damage the battery’s ability to hold a charge.
In general, running the system until both battery indicators are blinking, typically this is when
the batteries are down to just below 10% charged, and then fully charging the batteries (full
discharge/charge cycle) will ensure the accuracy of the battery status gauges and prolong the
batteries' charge efficiency.
You do not need to plug in the system when only one of the battery indicators are blinking, as
the other battery may have plenty of charge remaining. Generally, waiting until they are both
blinking before charging is preferred.
When there is only one minute of battery charge remaining, the computer will suspend its
current state to the hard drive and power off (hibernate) to prevent data loss. To resume your
work, either swap in charged batteries or plug in the AC adapter and turn the system back on.
Cleaning and Caring for Your System
Never use household cleaning supplies or glass cleaner with ammonia to clean the case or the
LCD screen. Additionally, you shouldn't ever spray anything directly on the Tablet PC while it is
powered on and running.
A can of compressed air can be used to remove dust and other particulate matter from crevices,
vents and I/O ports. Compressed air is also good for cleaning dust from the non-slip surface of
the eo a7400's top case.
Cleaning the LCD screen
Gently wipe the surface using a clean, dry microfiber cloth. Do not use excessive pressure. Using
your breath in conjunction with the microfiber cloth, as you would to clean the lenses on a pair
of eye glasses, is very effective.
To remove really tough marks and smudges:
1.
Spray a small amount of LCD cleaner, water or a mixture of water and isopropyl alcohol
(70/30 mix) on a microfiber cloth. The cloth should be damp, not saturated or dripping.
CAUTION: Do not spray or apply any liquids directly onto the Tablet PC. Always apply the solution to your
microfiber cloth first, not directly on the parts you are cleaning.
2.
Gently wipe the display surface. Use only as much pressure as necessary to remove the
smudge. Wipe in small circular motions.
Cleaning Cloth
To clean your display, we recommend using the microfiber cloth that came with your system or
a similar double-sided microfiber cloth. They are extremely soft, non-abrasive, and are nonelectrostatic which is ideal for cleaning LCD screens and other computer components.
Cleaning Solutions
For tough, greasy marks or smudges, use water, high purity isopropyl alcohol, or a cleaning
solution specifically made for cleaning LCD monitors. Be sure not to use cleaners that contain
Acetone, Ethyl Alcohol, Ethyl Acid, Ammonia, or Methyl Chloride.
Storing the System Long-Term
If you don’t plan on using your eo a7400 for more than four months, TabletKiosk recommends
that you remove the Lithium-Ion battery and store it with approximately a 50-70% charge. If
you store a Lithium-Ion battery when it’s fully discharged, it could fall into a deeply discharged
state which renders it incapable of holding any charge. Conversely, if you store the battery fully
charged for an extended period of time, the battery may experience some loss of charging
capacity, meaning it will have a shorter life. Be sure to store your Tablet PC and batteries in a dry,
cool location to prevent damage due to extreme temperatures and/or condensation.
Tablet PCs designed for business. Built to last.
2832 Columbia Street, Torrance, CA 90503
310.782.1201 tel 310.782.1205 fax
www.tabletkiosk.com
©2014 Sand Dune Ventures, Inc. d/b/a TabletKiosk. All Rights Reserved. eo, the eo logo, and TabletKiosk are registered trademarks of Sand Dune
Ventures, Inc. in the United States and other countries. Windows, the Windows logo, and Windows 7 are registered trademarks or trademarks of
Microsoft Corporation in the United States and other countries.
rev 03.11.14