1
Save This Manual
for Future Reference
MODEL NO.
113.177990
VAC WITH CART
MODEL NO.
113.169240
/ CRRFTSMRN®
Serial
Number
Model and serial
numbers may be
found on the handle,
Youshould record both
model and ser_af
numbers in a safe
place for future use,
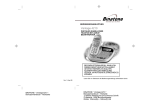
16 GALLON
COMMERCIAL
WET/DRY VAC
o assembUy
operating
repair parts
FOR YOUR
SAFETY
READ ALL
INSTRUCTIONS
CAREFULLY
Sold by SEARS,
Part No SP573!
ROEBUCK
AND CO., Chicago,
IL 60684
U_S.A,
Printed
in U S A
FULL ONE YEAR WARRANTY
ON CRAFTSMAN WET/DRY VACS
if within one year from the date of purchase, this Craftsman Wet/Dry Vac fails
due to a defect in material or workmanship, Sears will repair it, free of charge°
if this Craftsman Wet/Dry Vac is used for commercial or rental purposes,
this warranty coverage applies for only 90 days from date of purchase.
WARRANTY SERVICE IS AVAILABLE BY SIMPLY CONTACTING THE NEAREST SEARS SERVICE CENTER/DEPARTMENT THROUGHOUT THE UNITED
STATES_
This warranty applied only while this product is used in the United States.
This warranty gives you specific legal rights, and you may also have other
rights which vary from state to state.
SEARS, ROEBUCK AND CO., D817 WA,
Hoffman Estates, IL 60195
IMPORTANT SAFETY NSTFItUCTaONS
When using your Wet/Dry Vac, follow
basic safety precautions includingthe following.
To avoid health hazards from vapors
dusts, do not vacuum toxic materials..
the risk of fire, electric shock, or
injury:
Read and understand this owner's manual and atl labels on the Wet/Dry Vac
before operating, Use only as described
in this manual. To avoid personal in}ury or
damage to Wet/Dry Vac, use only Sears
Craftsman recommended accessories
Sparks inside the motor can ignite flam.
mabta vapors or dust To avoid firo or
explosion;
o Do not vacuum, or use this Wet/Dry
Vac near, flammable or combustible liquids, gases, or explosfve dusts Itke
'. gasoline or other fuels, lighter fluid,
cleaners, oil-based paints, natural gas,
" hydrogen, coal dust, magnesium dust,
grain _ust, or gun powder.
' Do not use WeVDry Vac as a sprayer
for any flammable or combustible liquid
To avoid electric shock,
rain Store indoors
WARNING
Do
not
,o reduoematerials
Do not vacuum any'thing that is burning
or smoking, such as cigarettes, matches,
or hot ashes
use
or
store
near
or
hazardous
do not expose
to
Do not allow to be used as a toy. Close
attention is necessary
when used by or
near chiEdren.
Do not use this Wet/Dry
Vac with a torn
filter or without the filter installed except
for vacuuming
liquids as described in the
operations
section
of this manual
Do not leave Wet/Dry Vac when plugged
in Unplug from outlet when not in use
and before servicing
Vac before unplugging
To avoid
injury
unplug power
cleaning filter.
Turn
off Wet!Dry
from accidental
cord
starting,
changing
or
Do not unptug by putting on cord
unplug, grasp the plug, net the cord
To
Do not use with
other
parts.
before
damaged
If your
Wet/Dry
cord,
plug or
Vac is not
working as it should, has missing parrs,
has been dropped,
damaged,
left outdoors, or dropped into water, return it to a
Sears Service Center
Do not putt or carry by cord, use cord as
handle, close a door on cord, or pull cord
around sharp edges or corners, Do not
run Wet/Dry Vac over cord, Keep cord
away from heated surfaces,
Do not handle plug or the Wet/Dry Vac
with wet hands,
Do not put any object into ventilation
openings, Do not vacuum with any ventila_ion openings blocked; keep free of
dust, tint, hair or anything that may
reduce air flow,,
Keep hair, loose clothing, fingers, and all
parts of body away from openings and
moving parts
To avoid falls, use extra care when cleaning on stairs
This Wet/Dry Vac is double-insulated,
eliminating the need for a separate
grounding system Use only identical
replacement parts, Read the instructions
for Servicing Double-Insulated Wet/Dry
Vacs before servicing
Extension cords in poor condition or that
are too small can pose fire and shock
hazards, When using an extension cord,
be sure it is }n good condition, Using any
extension cord will cause some toss of
power. To keep the loss to a minimum,
use the folowing table to choose the minimum wire size extension cord
Extension Cord Length
Wire Size
0_50 feet
No, 14
50q O0 feet
No, 12
Observe the following warnings that
appear on the motor housing of your Wet!
Dry Vac,,
DOUBLE INSULATED, GROUNDIING NOT REQUIRED,
WHEN
SERVICING
USE ONLY IDENTF
CAL REPLACEMENT PARTS,
WARNING:To a_id electricshock-do not
exposeto ra_*storeindoors.
WARNING: For your own safety, read and
understand owner's manual. Do not pick up
hot ashes, coals, toxic, _le
or olher
hazardous r_a_lso
Do not use around
explosive liquids or W_ors_
Safety Signa! Words
DANGER:
means if the safety tnforma _
lion is not followed someone wile be seriously injured or killed
WARNING:
means if the safety information is not foltowed someone
could be
seriously injured or killed.
CAUTION:
means if the safety information is not followed someone might
be
injured
SAVE THESE gNSTRUCTJONS
The operation of any utility vac can result
in foreign objects being blown into the
eyes, which can resutt in severe eye damage, Always wear safety goggles complyIng with ANSI Z87,t (shown on package)
before commencing operaion, Safety
Goggles are available at Sears retail
stores°
To avoid hearing damage, wear ear protectors when using the vac for extended
hours orwhen, using it in a noisy area
WEAR
YOUR
This Wet/Dry Vac is Intended for either
commercial or householduse,
iMPORTANT NOTE
Please Read Carefully
Static Shocks Are Common - In dry
areas or when the relative humidityof the
air is low. To reduce the frequency of
static shocks in your home the best remedy is to add moisture to the air with a
console humidifier.
Owner's Manual Contents
Item
Page
Warranty Information .............................. 2
Safety instructions ............................... 2
Introduction ............................................. 4
Unpacking and Checking
Carton Contents ....................................4
Assembly ...........................................
5
Operation ...................................................7
Maintenance .................................................
9
Repair Parts .........................................................
10
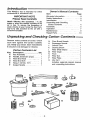
Unpacking and Checking Carton Contents=====
Remove entire contents of carton,,Check
each item against the Carton Contents
List, Notify your Sears Store immediately
if any parts are damaged or missing,
Carton
Key
A
B
C
D
E
F
Contents
List
Description .................................
Qty,
Vac Assembly ........................... 1
Handle, Extension (2 pc) ............ 1
Hose End Hard ....................................
1
Hose End Soft............................... 4
Hose,l-lf2Dia,
loft ................... 4
Carpet Nozzle .............................. t
B
E
o
G
H
J
K
L
M
N
O
P
Q
Floor Brush Nozzle ..........................
!
Squeegee Nozzle .........................1
Crevice Tool ............................
1
Dusting Brush .............................. t
Filter (Red Stripe) ..................... 1
Filter Cage ................................. 1
Float ..................................
t
Filter Nut ..................................
1
Filter Plate ..................................... 1
Vac Cart ........................................1
includes separate owners manual
and unpacking instructions
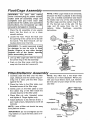
Float/Cage
Assembly
WARNING'.
For
your
own
never connect
plug to power
outlet until all assembly
complete
and you have
understood
instructions.
...........................................................
NOTE: if filter cage needs to be removed,
safety,
source
steps
read
because the float is placed in the wrong
way, use a slotted screwdriver
and insert
the blade near one of the tabs between
are
and
the filter cage and the center
the safety and operation
Do not operate vac with
any parts damaged
or missing°
l Place the lid assembfy of vac upside
down into the drum or on a clean
smooth surface
2 Locate
the float,
the opening
the words
Place
the float
ring of the
lid Pry the tab out of the slot,, Tilt the
cage and lift away from the lid To
replace,
follow
float/cage
assembly
instructions
over
in the center of the lid with
"Thts Side Towards
Lid" lay-
i
ing face down over the hoie
w_henWARNING:
To avoid
or damage
to vac
personal
be sure
injury I
to
keeP l
hands, fingers, or any other foreign I
objects
out of the center opening I
assembling
the float;
I
3 Line up f{iter cage tabs with the slots in
the center
4 Push
ring of the lid assembly.
on the filter
cage until the tabs
snap into the s_ots for a secure fit,
riD"'"
F,i l te,...=Tlector
I
Ass embl y
Carefvlfy slide the fi_ter over the fifter
cage, sliding it over the center ring cov-
NOTE: Your filter has a red stripe that
matches an in-store disptayer When you
ering the 3 sIots
against the lid
visit your loca] Sears store, just remember the color of your stripe for the correct
size filter
2 Place
until the filter
the hole in the filter plate
threaded
stops
over
screw of the filter cage
_;;_,----- Rite r Nut
3 Gently push on the filter plate to seat
the rubber ring of the filter inside the
circular channel of the filter plate,
4, Place
filter
and tighten
5 Attach
nut
onto
deflector
screw
to lid with two 8-32 x 1
pan head screws,
locknuts
NOTE:
threaded
it, Finger tighten only.
flatwashers
and 8-32
Lever of Iilter nut should be away
from plate as shown
IMPORTANT:
may deform
ter cage.
Do not overtighten as this
or crack the filter plate or illScrew
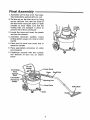
Final Assembly ...............................................................
I. Assemble cart to dust drum See sepa_
rate Instructions packed with vac cart
2. Put the t0p on the dust drum by lining
up the Vacuum Port with the drain in
the dust drum and push down on both
handles at once, Make sure that the
locking tabs are snappecl in place to
prevent the lidfrom coming off
PUSH
DOWN
3, Locate the hose and insert the plastic
end into the vacuum o
4_Assemble extension handles, insure
locking button snaps into hole on ether
handla_
5_Place end of hose over small end of
extension handle
_!
6, Place appropriate accessory on coltar
and of wands°
7, Familiarize yourself with the controls
and features of your vac as shown
below
Cord Wra p,_
Area
_,_
Hose
Small End
VaelJ,,
Port
/
Port
Dust Drum
Collar End
Operation .................
.............
.................................
.........
...........
....................
....................
WARNING
To avoid fire or explosion, do not operate this vac in areas with flammable gases
or flammable vapors such as lighter fluid, cleaners, oil-base paints, gasoline,
alcohol or explosive dust such as coal, magnesium, grain or gun powder in the
air. Do not vacuum explosive dust, flammable or combustible liquids or hot
ashes. Do not use this vac as a sprayer for any flammable or combustible liquid,
To avoid health hazards from vapors or dusts, do not vacuum toxic materials. To
avoid electrical shock do not expose to rain. Store vac indoors° Unplug power
cord before changing or cleaning filter or emptying the dust drum°
CAUTION: To reduce the risk of hearing damage wear ear protectors when
using the vac for extended hours or
when using it in a noisy area. The
operation of any utility vac can result
in foreign objects being blown into
the eyes, which can result in severe
eye damage,_Always wear safety goggles complying with ANS! Z87.1
(shown on Package)before
commencing operation_ Safety Goggles
are available at Sears retail stores°
Vacuuming
Dry Materials
1.The filter must be in correct position a_
all times to avoid leaks and possible
damage to vac
2_When using your vac to pick up very
fine dust, it will be necessary for you to
empty the drum and clean the filter at
more frequent intervals to maintain
peak vac performance
NOTE: A dry filter ts necessary to pick up
dry material. If you use your vac to pick
up dust when the filter is wet, the filter will
clog quickly and be very difficult to clean
3 if your fitter is wet but you need to use
the vac to pick up dry material, you can
quickly dry the filter by running the vac
without hose attached for about t0
minutes The clean air rushing through
the vac w_ll help dry the filter.
Vacuuming
Liquids
t When picking up small amounts of liq_
uid the fitter may be left in place.
2 When picking up large amounts of tlquld we recommend that the filter be
removed, if the filter is not removed, It
will become saturated and misting may
appear in the exhaust.
3 After using the vac to pick up liquids,
the filter must be dried to avoid possi*
ble mildsw and damage to the filter
4.When the liquid in the drum reaches a
predetermined leve!, the float mechanism wil! rise automatically to cut off
air-flow When this happens, turn off
the vac, unplug the power cord, and
empty the drum. "Youwilt know that the
float has risen because vac airflow
ceases and the motor noise will
become higher in pitch, due to
increased motor speed
IMPORTANT: To avoid damage to the
vac do not run motor w_thfloat In raised
position
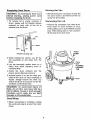
Emptyirtg Dust Drum
Moving the Vac
JWARNIN_G:To avoid injury from acci- I
Identai Stariing, unplug power cordJ
lbefore emptying the:drum.
1 Should
I, TO rem0ve lid to empty contents of
drum, simply pull the flexible latches
outward on each side of the lid to
releasefromthedrum
Removing
I
it become
necessary
to pick the
vac up to move tt, DO NOT pick the vac
up by the lid handles
the Lid
1 Remove lid assembly from dust drum
Push down on both handles at once,
while pulling out on both flexible locking
tabs With tocking tabs in "out" position,
lift lid away from dust drum
Lid
OUT t'.
PUSH
DOWN
Flexlbte Locking Tab
2 While holding the latches out, lift the
top assembly up and away from the
drum.
3 Lay top assembly upside down on a
clean area while emptying drum or
changing filter,
4 Dump the drum contents into the
proper waste disposal container
5 Another option is 'to use the drain provided in the drum for easy emptyingof
liquids. Simply inscrew the drain cap
and tilt the drum fn a manner so 1he liquid flowsout the drain hole.
IWARNING: To avoid back injury or 1
Jfalls, do not lift a vac hea W with liq-_
}uid or debris. Scoop or drain enough I
/contents out to make the vac lightl
!enough to lift comfortably,,
j
Cord Wrap
1,When vacuuming is complete, unplug
the cord and wrap it around the motor
cover.
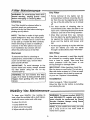
Dry Filter
IWAR"INQ:
Toavoid
injufromacoi-J 1 Some
removal of dry debris can be
accomplished
without removing the lifter from the vac by slapping your hand
Identa! starting, unplug power cord]
Ibefore changing or cleaning filter°
j
Cleaning
on top of the lid while the vac is turned
off
Your _ter should be cleaned often to
maintain peak vac performance,
Be sure to dry the filter before storing or
picking up dry debris
2 For best resuffs of cleaning
due to
accumulated dust, clean the filter in an
open area Cleaning SHOULD be done
outdoors and not in the living quarters.
3 After
NOTE: This filteris made of high quality
paper designed to stop very smatt particles of dust The filter can be used for wet
or dry pick up Handle the filter carefully
when removing to c_ean or fnstafling it.
Creases in the filter pleats may occur
from installation but creases wil! not
affect the performance of the filter.
filter
removal
from vac, remove
the dry debris by gently tapping the filter against the inside wall of your dust
drum and the debris will loosen and
fall.
4 For thorough cleaning of dry fitter with fine
dust (no debris) you may run water
through it as described under "Wet Filter'
Removal
Wet Filter
To removethe filter for cleaningor
replacement, removefilter nul from the
screw on the filter cage, remove filter
plate and lift off fiiler_
After filter is removed, a wet filter should
be cleaned by running water f,hrough it
from
a hose
or spigot. Take care
water
pressure
from the hose
strong enough to damage fitter
IMPORTANT: To avoid damage to the
blowsr wheel and motor, always reinstall
the filter before using the vac for dry
material pick-up
that
is not
IMPORTANT: After cleaning, check the
filter for tears or smalf holes. Do not use a
filter wifh holes or tears in it Even a small
hole can cause a lot of dust to come out
WARNING: Do not remove the filter]
cage. it is there to help prevent your|
fingers from getting into the blower|
heel.
j
of your vac
Replace
It immediately
Installation
Refer to page 5, "Filter Assembly".
Atlow the filter to dry before re-installing
and storing the vac
Wet/Dry Vac Maintenance
..................................................
...................................
To keep your We_JDr_ Vac looking its
best, clean the outstde with a cloth dampened with warm water and mild soap
SAFETY t
and RELIABILITY, repairs and adjust- I
ment should be performed by Sears I
Service Centers,
always
using Sears{
WARNING:
To assure
product
replscement parts.
J
NOTE: if yourcasters are no_sy,you may
put a drop of oil on the roller shaft to
make them quieter.
To clean the drum:
t Dump debris out.
2 Wash drum thoroughly
3,Wipe out with dry cloth
9
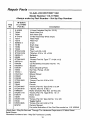
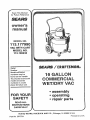
Repair Farts
16-GALLON
WET/DRY VAC
tVlodel Number 113.177990
Allways order by Part Number - Not by Key Number
J.
Key
No.
113_177990
16 Gallon
Part Nee
I
Description
1
2
9-16909
73240
t Hose (Includes Key No
Hard Hose End
3
73241
Soft Hose End
4
5
6
9-t7816
73317
73316
1"F{iter Assembly
Filter Pfate
Filter Nut
7
809544-3
Drum
8
9
10
73185
73362
73349
Drain Cap
Fitter Cage
Float
11
STD541406
'Nut, Lock No 8-32
12
t3
t4
STD551008
28229-01
25969
"W'asher, 3/t6 x 1/2 x 3/64
D_flector
Gasket
15
16
STD601005
25972-0!
*Screw, Pan Hd
Handle
17
!8
819066
810364-2
Lid Assembty
Gasket
2 & 3)
(Red stripe)
Type 'T'
(Includes
10-24 x 1/2
Key No
14)
19
819067
Motor Mounting
20
21
73352
15534-1
Nut Hex, Flange 1/4-20
Washer
Plate
22
818413-2
Blower Wheel
23
24
818961
819069
Spacer
Collector
25
26
27
STD510802
20866
73242
"Screw, Pan Hd
Gasket
Ferrule
28
29
STD610807
STD510810
*Screw, Pan Hd Type B No 8 x 3/4
*Screw, PanHd 8-32x 1
30
818802-8
Motor (includes
3!
32
33
STD611010
819074
73239
"Screw, Pan Hd Type B No
Motor Cover
Dome
34
35
36
STD611005
73t 80
STD510805
SP573t
*Screw, Pan Hd Type AB No, I0 x 5/8
Toggle Switch
*Screw, Pan Hd 8-32 x 7/16
Owners Manual
8-32 x 5/16
Key Nos 20 thru 23)
10 x 1
For parts illustration of Vac Cart See model no 113 169240
Stock Item - May Be Secured Through
Retail Stores
*Standard
Hardware
The Hardware
Item - May Be Purchased
10
Locally
Department
Of Most Sears
,
,
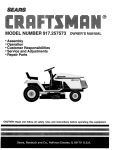
'16 GALLON WETtDRY VAC MODEL 113.177990
WARNING
SERVICING
OF DOUBLE-INSULATED
WET/DRY
VAC
In a double=insulated Wet/Dry Vac, two systems of insulation are provided instead
of grounding. No grounding means is provided on a double-insulated appliance,
nor should a means for grounding be added. Servicing a double-insulated Wet/Dry
Vac requires extreme care and knowledge of the system, and should b'e done only
by qualified service personnel. Replacement parts for a double-insulated Wet/Dry
Vac must be identical to the parts they replace° Your double-insulated Wet/Dry Vac
is marked with the words "DOUBLE INSULATED" and the symbol _(square
within a square) may also be marked on the appliances.
lul
32
31 "----.._
/
b
/
8
1t
Forthe repair or replacement parts you need
Gall 7'am - 7 pro, 7 days a week
t =8OO-366-PART
(1_80D-366-7278)
Forin-home majorbra.d repair service
Call 24 hours a day, 7 days a week
1-800-4-REPNR
(1-800-473-7247)
Forthe location of a
SearsRepair Service Center in yourarea
Cal! 24 hours a day, 7 days a week
1-800-488-1222
Forinformationon purchasioga Sears
MaintenanceAgreementor to inquire
aboutan existingAgreement
Call 9 am - 5 pro, _Jlonday-Saturd_y
t =800-827-5655
A me nca's Re_air
Spec_,.3fists
The model number will be found on the side of the handle.
When requesting service or ordering parts, always provide the
following information:
•
.
Product Type
Part Number
Sears, Roebuck
Part No SP5731
• Model Number
o Part Description
and Co. Hoffman
Estates,
Form No SP573I-2
tLo 60179 U.&Ao
Printed in U S A 5196