1
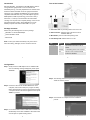
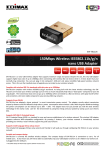
Connecting to Wireless Access Point
After installation is complete, wireless configuration utility will be
shown as an icon at the lower-right corner of the windows
desktop. Click on the icon using right mouse key and select
<Launch Config Utilities>.
Step 2. If the wireless access point uses encryption, users will
Step 2. have to input the correct WEP passphrase or WPA preStep 2. shared key. Ensure both the AP and PC is set with the
Step 2. same WEP passphrase/WPA pre-shared key.
Step 2. Otherwise the wireless connection will fail to establish.
Authentication type is selected automatically, please do not change it.
Step 1. Configuration utility will scan for available wireless
Step 1. access points automatically. Please select an access
Step 1. point to connect, and click on <Connect>. If the AP you
Step 1. wish to connect is not in the list, please press
Step 1. <Rescan> to renew the interface.
Step 3. If the wireless access point is successfully connected,
Step 2. users will see a blue icon displayed at the right of the
Step 2. SSID.
5
6
Specifications
Model
Standards
SP907NL
IEEE802.11b/ 802.11g / 802.11n
Interface
Frequency Band
USB 2.0/1.1
2.4000 ~ 2.4835GHz
Data Rate
• 11b: 1/2/5.5/11Mbps
• 11g: 6/9/12/24/36/48/54Mbps
• 11n (20MHz): MCS0-7 (up to 72Mbps)
• 11n (40MHz): MCS0-7 (up to 150Mbps)
Output Power
• 11n: 14dBm 1.5dBm
• 11g: 14dBm 1.5dBm
• 11b: 17dBm 1.5dBm
Security
• WEP 64/128-bit
• WPA & WPA2
• Cisco CCX Support
LED Indicators
Link/ Activity
Antenna
MIMO Technology
Internal Antennas
Humidity
10~95% (Non-Condensing)
Temperature
32~104 F (0 ~ 40 C)
Quick Installation Guide
Operating System
Windows 2000/XP/2003/Vista
FCC, CE
11n Wireless LAN USB Adapter
Emission
1T1R MIMO Technology
Model No.: SP907NL
P/N: 2300-0556
WEEE Directive & Product Disposal
At the end its serviceable life ,this product should not
be treated as household or general waste. It should be
handed over to the applicable collection point for the
recycling of electrical and electronic equipment, or
returned to the supplier for disposal.
7
Web: www.micronet.com.tw
Introduction
Tour of the Product
Micronet SP907NL, 11N Wireless LAN USB Adapter, delivers
next generation high speed at a more economical and
affordable price tag. It is easily implemented for medium-sized
business to allow immediate access to high speed wireless
experience. It is compliant with IEEE 802.11n and backward
compatible with IEEE 802.11b/g. The USB adapter supports
MIMO (Multi-In, Multi-Out) technology, which uses 1T1R (1
transceiver, 1 receiver) to enhance data rate and wireless
coverage. It is the part of the complete package of the new 11n
high speed wireless solution. Ideal installation is for both
desktop computer and notebook with USB 2.0/1.1 port.
1
3
2
4
Package Contents
Please verify the following items are in the package:
SP907NL 11n WLAN USB Adapter
Quick Installation Guide
1. Connector Cab: for protecting device when not in use.
2. USB Connector: insert this side of the device into an
1.
available USB slot.
3. WPS button: press to active WPS pairing mode.
Manual CD
4. Link/Activity LED: indicate device is in use.
Note: Contact your dealer immediately if any of the above
items are missing, damaged, or if the unit does not work.
LED
Status
Operation
Link/Activity
On
Successful connection to AP or
Router
Flashing
Transmitting data to AP or Router
Off
No link to AP or Router/ WLAN
function is disabled
1
2
Configuration
Step 1. Gently insert the USB adapter into an available USB
Step 1. slot. The following message will appear, please press
Step 1. <Cancel>.
Step 4. The following windows will appear, please press on
Step 5. 'Install' to start the process.
Step 2. Insert driver CD into the CD/DVD ROM drive of the
Step 1. computer, and execute 'Setup.exe' program in 'Utility'
Step 1. folder. Read through the License Agreement and select
Step 1. 'I accept the terms of the license agreement' then press
Step 1. <Next> to proceed.
Step 5. Click <Finish> to complete the driver installation
Step 5. process.
Step 3. It is recommended to select 'Install driver and Micronet
Step 1. WLAN Utility' for first-time installation. Otherwise select
Step 1. second option to update existing drivers.
3
4