1
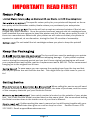
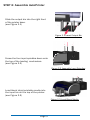
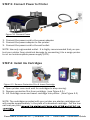
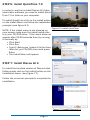
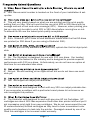
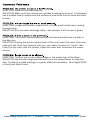
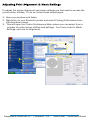
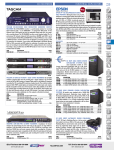
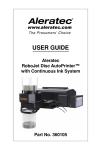
QUICKSTART GUIDE
StudioJet AutoPrinter
50 or 100 Disc AutoPrinter
Manual for Models:
StudioJet 50™
StudioJet 100™
Recordex® StudioJet 50™/StudioJet 100™ AutoPrinter - QuickStart Guide
IMPORTANT! READ FIRST!
The specific return policy for your printer will depend on the return policy of the Recordex retailer/dealer where you purchased your autoprinter.
Recordex will not accept any returned printers if the ink cartridges have been installed. Once the printer has been opened and ink cartridges have
been installed the user agrees to keep the printer and the 30-day return policy is void. If
there is a manufacturer defect with your printer we will make sure that your printer is
repaired or replaced, at our discretion, during the first 12-months of ownership.
Do not install the ink cartridges unless you plan to keep the printer!
The box and foam used to package your printer
for shipping is specially designed to prevent shipping damage. If your printer requires
service during the warranty period and you don’t have original packaging we will send
you a replacement set but the cost for a replacement set is $45.00. So we recommend
hanging on to the original box & foam.
To save space you can remove the packing tape from the top and bottom of your printer box and fold the box flat. This might free up a little room in your attic!
When calling for service we will need
to know the serial number of your StudioJet Printer, the date of purchase, and the name
of the company that sold you your StudioJet Printer.
Your serial number is located on the outside of your printer
box. You’ll also find the Model number listed on the same label. We recommend writing
the Serial number down in the inside cover of your User’s Manual.
If after reading the user’s manual you’re still having trouble with your
StudioJet Disc AutoPrinter then give us a call or drop us a line. Service Phone: 478237-5501 Email: [email protected]
Page 3
STEP 1: Unbox and Verify Contents
Verify the contents of your package against the image below.
Using a pair of scissors cut the plastic packing strip holding the disc tray in
place.
Remove plastic film from printer chassis. (NOTE: Once plastic film is removed
the printer can not be returned for a refund.)
Save the box and packaging material for return shipment should your printer
require service.
NOTE: StudioJet 50 Depicted. StudioJet 100™
will include a 100 capacity output bin and longer
input spindles.
Figure 1.1 Printer Contents
Recordex® StudioJet 50™/StudioJet 100™ AutoPrinter - QuickStart Guide
STEP 2: Assemble AutoPrinter
Slide the output bin into the right front
of the printer base.
(see Figure 2.1)
Figure 2.1 Insert Output Bin
Screw the four input spindles down onto
the top of the loading mechanism.
(see Figure 2.2)
Figure 2.2 Assemble Input Spindles
Load blank inkjet printable media into
the input bin on the top of the printer.
(see Figure 2.3)
Figure 2.3 Load Blank Media
Page 5
STEP 3: Connect Power to Printer
Figure 3.1 Connect Power
1. Connect the power cord to the power adapter.
2. Connect the power adapter to the printer.
3. Connect the power cord to the wall outlet.
NOTE: Use only a grounded outlet. It is highly recommended that you protect your printer from electrical damage by connecting it to a surge protector or an uninterruptible power supply (UPS).
STEP 4: Install Ink Cartridges
Figure 4.1 Remove Protective Film & Insert Cartridge
1. Open printer cover and wait for cartridges to stop moving.
2. Remove protective film from cartridge. (see Figure 4.1.)
3. Lift Cartridge cover and insert cartridge into printer. (See Figure 4.1)
NOTE: The cartridges provided with your printer are starter cartridges and
will provide approximately ½ the yield of a standard cartridge. For the lowest cost per print
Recordex® StudioJet 50™/StudioJet 100™ AutoPrinter - QuickStart Guide
STEP 5: Install XP Printer Driver
Insert the StudioJe™t Installation Disc into
your CD/DVD drive. After a few seconds an
installation menu will be displayed. For now
you can ignore the install menu.
Connect the StudioJet™ to your computer
with the supplied USB cable. After a few seconds the computer will report that it has
found new hardware. If this does not happen
check to make sure there is power to the
printer and that the printer is plugged into
your computer. Try reconnecting the USB cable.
After the computer reports that it has found
new hardware simply follow the Add New
Hardware Wizard to install the printer driver.
Refer to the screen shots to the right as you
proceed through the Add New Hardware wizard.
Page 7
STEP 5b: Install Vista Printer Driver
Insert the StudioJet™ Installation Disc into
your CD/DVD drive. After a few seconds an
installation menu will be displayed. For now
you can ignore the install menu.
Connect the StudioJet™ to your computer
with the supplied USB cable. After a few seconds the computer will report that it has
found new hardware. If this does not happen
check to make sure there is power to the
printer and that the printer is plugged into
your computer. Try reconnecting the Power
and USB cables.
After the computer reports that it has found
new hardware simply follow the Add New
Hardware Wizard to install the printer driver.
Refer to the screen shots to the left as you
proceed through the Add New Hardware wizard.
Recordex® StudioJet 50™/StudioJet 100™ AutoPrinter - QuickStart Guide
STEP 6: Install QuickTime 7.0
In order to use the included Discus LE 4 disc
label editor software you need to install QuickTime 7.0 or later on your computer.
To install QuickTime click on the install button
on the Install Menu and follow the installation
prompts. (see figure 6.1)
NOTE: If the install menu is not showing on
your screen make sure the install/setup disc
is in your CD/DVD drive. If the menu does not
appear after 20-30 seconds then try running
it manually by:
• Click Start
• Click Run
• Type E:\Setup.exe (where E is the drive
letter for you CD/DVD drive) and press
Enter.
• The Install Menu will appear.
Figure 6.1 Install QuickTime
STEP 7: Install Discus LE 4
To install the bundled version of Discus Label
Editor simply click on the Install button on the
Installation menu. (see figure 7.1)
Follow the on-screen prompts to complete the
installation.
Figure 7.1 Install Discus LE 4
Page 9
STEP 8: Using Discus For the First Time
The first time you use Discus you will need to unlock the software by entering
the software serial number/registration key. This number can be found on
the front of your installation disc. If you can’t find your install disc check your
DVD/CD drive since you likely just finished installing Discus!
The software is quite easy to use and after a few minutes of experimenting
you’ll be creating incredible labels. We recommend reading through the Discus User Manual (available on the help menu when using Discus) to familiarize yourself with the application. Note: the manual includes how to create
jewel case inserts. This function is not available with the version of Discus
bundled with your printer, however, the layout methods are the same for labels and inserts so it is still worth reading!
• Try using your own pictures. You’ll be amazed at the photo-quality printing
you can achieve with your StudioJet™ Disc AutoPrinter.
• Experiment with Discus. You’ll learn the fastest if you just sit down and
play with the software.
• Be sure to select the type of media that you are using on the Print tab (I.e.
Hub-Printable, or Standard).
• If your StudioJet™ isn’t set as your default printer, you’ll need to
remember to select it as your printer when you print from Discus,
otherwise you’re disc print job will be sent to one of the other printers
installed on your computer.
Phone: 415-669-7010 (10am to 7pm PST)
Fax:
415-669-7009
Email: [email protected]
Web: http://www.magicmouse.com/h_support.html
Recordex® StudioJet 50™/StudioJet 100™ AutoPrinter - QuickStart Guide
A: Your Discus serial number is located on the front of your installation & setup disc.
A: This will vary greatly based on what you are printing and the print quality
setting that you use. We’ve found that we can print 450 to 525 discs with an
average amount of text and color coverage (40%). However, when printing photos you may only be able to print 125 to 150 discs before running low on ink.
To extend ink life use the lowest print quality acceptable.
A: Sure. However, you’ll have to load additional media after the first 50 discs
are printed (or 100 discs if you are using a StudioJet 100).
A: You can print on any standard size (120 mm) optical disc that is inkjet printable.
A: No. The StudioJet is designed for use with 120 mm discs. Our loading
mechanism is the fastest in the industry and is designed to provide superior
performance with 120 mm discs. Unfortunately, we do not have an option at
this time for non-standard disc sizes.
A: Not yet. We are working on an Apple driver but we do not have one available yet.
A: Yes. We support all inkjet print surfaces.
A: The StudioJet was designed to work with any 120 mm inkjet printable disc.
If you encounter a problem with a particular brand please let us know so we
can investigate the problem.
A: The StudioJet was designed to work with genuine HP Ink Cartridges. HP
cartridges are about 40% less expensive than other disc printer inks and you’ll
get impressive print yield from new cartridges. We do not recommend the use
of remanufactured/refilled cartridges as they tend to have inconsistent color
quality and a tendency to leak into the printer. Damaged caused by use of refilled ink cartridges is not covered under warranty.
Page 11
SYMPTOM: Discs do not load properly.
SOLUTION: Make sure the surface your printer is resting on is level. If necessary
use a bubble level to make sure the surface is level both front to back and side
to side.
SYMPTOM: Images are streaky, washed out, or have small white lines running
through them.
SOLUTION: Run the clean cartridge utility. See chapter 4 of the user’s guide.
SYMPTOM: The printer has stopped and will not resume and there is a disc in
the disc tray.
SOLUTION: Unplug the printer (at the back of the unit) open the cover, and manually pull the drive tray forward until you can easily access the “stuck” disc.
Push the tray back into the printer, close the cover and reconnect the power
source.
SYMPTOM: There is ink on the outside edge or the inside hub of the discs.
SOLUTION: Use the disc alignment feature if you are using Discus to align the
disc. Or alter the mask settings, or center offset as necessary. See Pages XX-XX
of the Quick Start Guide.
Recordex® StudioJet 50™/StudioJet 100™ AutoPrinter - QuickStart Guide
This refers to how the printed image aligns with the outer
and inner edge of the disc. The disc is out of alignment if their is uneven
white space (I.e. Un-printed) on one or two edges of the disc edge. See
the illustration below.
Hub-Printable Disc
Print Alignment Problem
Standard Printable Disc
Print Alignment Problem
Image is shifted to the right leaving
a white space on the left of the disc.
The alignment needs adjusted to the left.
Image is shifted to the left and down leaving
a white space on the right and top of the disc.
The alignment needs adjusted to the right and up.
The mask settings control how close to the center hub
(the center hole of the disc) and the outer edge that the printer will print.
See the illustration below.
Hub-Printable Disc
Outer Mask Setting Problem
Standard Printable Disc
Inner Mask Setting Problem
Image is not printing all the way to the
outer edge of the printable area. The outer hub
mask settings need to be adjusted higher.
Image is not printing all the way to the inner
edge of the printable area. The inner hub mask
settings need to be adjusted lower.
Page 13
To adjust the printer alignment and mask settings you first need to access the
printer driver utilities. To do so, follow these simple steps.
1. Open your printers and faxes.
2. Right-click on your StudioJet printer and select Printing Preferences from
the drop-down menu.
3. This will open the Printer Preferences Menu where you can select from a
number of printer driver utilities and settings. You’ll see a tab for Mask
Settings, and one for Alignment.
Recordex® StudioJet 50™/StudioJet 100™ AutoPrinter - QuickStart Guide
First, make sure the enable masking
check box is checked.
If your image is not printing all the way
to the outer edge then increase the
Outer Diameter setting.
If you image is not printing all the way
to the inner edge then decrease the
Inner Diameter setting.
If you are using hub-printable media
then check the Printing on Hub check
box and set the outer and inner diameter for the Hub Area Settings.
If the printer is printing out of alignment you will need to change the
“offset”. This just shifts the printed
image up, down, left or right of center.
To shift an image down or right you
enter positive numbers, to shift an
image up or left you enter negative
numbers. The number you enter represents 1 millimeter or 1 tenth of a
millimeter depending on the option
selected (1). Usually you will only
need to make small adjustments and
the .1 millimeter option is preferred.
To adjust the offset simply enter a positive or negative (-) value into the X
and/or Y offset box and then click the offset button. This saves the changes
to the printer. Now you can print another disc and check to see if you need
to make further adjustments.
Sample Offset Entries
Negative x-value (I.e. -2)
Positive x-value (I.e. 3)
Negative y-value (I.e. -1)
Positive y-value (I.e. 4)
Result
Moves image left 2 units
Moves image right 3 units
Moves image up 1 unit
Moves image down 4 units
Page 15
Recordex warrants to the original purchaser only that the
CD/DVD autoprinter will be free from defects in material and workmanship under
normal use for a period of one (1) year from the date of original purchase. However,
Recordex does not warrant against failures related to poor quality media or the use
of refilled or refurbished inkjet cartridges. Recordex's warranty shall not apply: (i) to
any autoprinter subjected to accident, misuse, neglect, alteration, acts of God, improper handling, improper transport, improper storage, improper use or application,
improper installation, improper testing or unauthorized repair; or (ii) to cosmetic problems or defects that result from normal wear and tear under ordinary use, and do not
affect the performance or use of the product. If the autoprinter develops a covered
defect within the first year, Recordex will, at its option, either repair or replace the
autoprinter at no charge, provided that the autoprinter is returned during the warranty period.
One (1) year from the date of the original purchase.
You are responsible for shipping the printer to our
Printer Service Depot. Recordex will pay for return shipment of printers repaired under warranty. Return shipment will be by ground service to the 48 contiguous US
states. You are responsible for shipping to Alaska, Hawaii and any address outside
of the United States. If the printer is repaired out of warranty then you are responsible for shipping both ways.
To obtain warranty service please contact
Recordex's Customer Service Center at 1-478-237-5501 or contact your authorized
Recordex Dealer for assistance in filing a warranty claim. You will receive instructions
on how to properly return your product for authorized warranty repair. In order to receive warranty service you must be able to provide an original receipt for the purchase of your autoprinter.
THE ABOVE STATED WARRANTY IS EXCLUSIVE AND REPLACES ALL OTHER WARRANTIES EXPRESSED OR IMPLIED INCLUDING THOSE OF MERCHANTABILITY AND FITNESS FOR A PARTICULAR PURPOSE. RECORDEX WILL NOT BE HELD LIABLE FOR ANY
OTHER DAMAGES OR LOSS INCLUDING INCIDENTAL OR CONSEQUENTIAL DAMAGES
AND LOSS OF PROFITS OR REVENUES FROM WHATEVER CAUSE, INCLUDING BREACH
OF WARRANTY OR NEGLIGENCE.
PO Box 848 • 105 North Anderson Drive • Swainsboro • Georgia • 30401
www.recordexusa.com • [email protected] • 478-237-5501