1
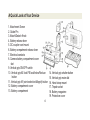
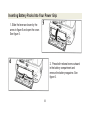
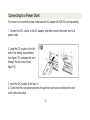
Deluxe Power Grip for Canon EOS 5D Mark II
INSTRUCTION MANUAL
VIV-PG-5DMII
Limited One Year Warranty
Vivitar warrants this quality product to be free of defects in material and workmanship for a
period of one year from the date of purchase. During the period, Vivitar will repair or replace the
product at no charge for parts or labor.
TIME PERIOD OF THIS WARRANTY
The time period of this warranty starts from the date of the original purchase and expires on the
first anniversary date of purchase.
WHAT IS NOT COVERED BY THIS WARRANTY
No express or implied warranty is made for any defects in this product which result from
accident, abuse, misuse, failure to operate the product in accordance with relevant instructions,
neglect, immersion in or exposure to chemicals or liquids, extremes of climate, fungus, excessive
wear and tear/cosmetic damage and defects resulting from other extraneous causes such as
unauthorised disassembly, repair or modification.
This warranty shall not extend to any incidental or consequential damages arising from the
purchase, use or inability to use this product even if Vivitar has been advised of such damages.
The laws of some countries and some States thereof do not allow the limitation of incidental or
consequential damages, so the above limitation or exclusion may apply to you.
-1-
WHAT TO DO WHEN SERVICE IS NEEDED
STEP 1. Package the product and relevant accessories carefully, using ample padding materials
and a sturdy mailing container to prevent damage in transit.
STEP 2. Include in package:
a) Evidence of date and place of original purchase (for example, a copy of your sales receipt).
b) Detailed description of your problem.
c) When possible, a sample evidencing the problem.
STEP 3. Return item (insured) to: Vivitar
Attn: Technical Support
195 Carter Drive
Edison NJ 08817
When service is complete, the product will be returned to you shipping prepaid. In the event the
product is deemed to be not faulty or the defect is a result in wear and tear, Vivitar may levy a
handling charge for the return ofthe product.
This warranty gives you specific legal rights. You may also have other rights which vary from
country and State to State thereof.
For more information visit our website www.vivitar.com
-2-
Introduction
Congratulations on your purchase of the VIV-PG-5DMII. The VIV-PG-5DMII is a battery
grip for Canon EOS 5D Mark II digital SLR cameras. It is capable of holding two LP-E6
battery packs or six AA sized batteries. It is also equipped with a vertical shutter button,
and main dial, which will enable shooting in the same way as a horizontal grip.
-3-
A Quick Look at Your Device
1. Attachment Screw
2. Guide Pin
3. Attach/Detach Knob
4. Battery release lever
5. DC coupler cord mount
6. Battery compartment release lever
7. Electrical contacts
8. Camera battery compartment cover
slot
9. Vertical grip ON/OFF switch
10. Vertical grip AE lock/FE lock/Index/Reduce
button
11. Vertical grip AF point selection/Magnify button
12. Battery compartment cover
13. Battery compartment
-4-
14. Vertical grip shutter button
15. Vertical grip main dial
16. Hand strap mount
17. Tripod socket
18. Battery magazine
19. Protective cover
Attaching Your Power Grip to Your Camera
1. Remove the battery that is in
your camera (See figure 1 to the
left.)
2. Detach the camera’s battery compartmencover. See figure 2.
-5-
Attaching Your Power Grip to Your Camera (continued)
3. Insert the detached
cover into its storage slot to
ensure that it will not be
lost. See figure 3.
-6-
4. Remove the protective cover, and
then insert the electrical contacts of
your power grip into the battery
compartment of your camera. See
figure 4.
5.Align the attachment screw with the
camera’s tripod socket, and then turn
the attach/detach knob to tighten the
power grip securely to your camera.
See figure 4.
Attaching Your Power Grip to Your Camera (continued)
NOTE: Be sure to attach the battery grip to your camera before loading the battery
magazine into the battery grip. Your camera may not display the correct amount of power
provided by your battery grip if you attach the battery grip with the battery magazine already
loaded.
Before removing your battery grip from your camera, make sure to turn the power switch on
your camera to the OFF position, and to also remove the battery magazine. Once the
battery grip is removed, attach the included protective cover over the electric contacts of
your battery grip.
-7-
Inserting Battery Packs Into Your Power Grip
1. Slide the lever as shown by the
arrow in figure 5 and open the cover.
See figure 5.
2. Press both release levers outward
in the battery compartment and
remove the battery magazine. See
figure 6.
-8-
Inserting Battery Packs Into Your Power Grip (continued)
3. Check the illustration on the
battery compartment cover, and then
insert the batteries all the way in.
See figure 7.
4. Close the battery compartment cover until it clicks into place.
-9-
Inserting Battery Packs Into Your Power Grip (continued)
NOTE: If only one battery will be used, it may be inserted in either the right or left sides. If
two batteries packs are inserted, power is supplied simultaneously by both battery packs.
Two battery packs at different charging levels can be used without any complications.
-10-
Inserting AA Batteries
1. Insert your AA batteries into the
battery magazine. Make sure the
batteries are inserted with the + and –
ends in the directions shown on the
battery magazine. See figure 8.
2. Turn over the battery magazine so
that the inserted batteries are facing
downward, and then insert the battery
magazine into the battery grip until the
release lever locks into place. See
figure 9.
3.Close the battery compartment cover until it clicks into place.
-11-
Inserting AA Batteries (continued)
NOTE: When AA sized batteries are being used, the continuous shooting speed will slow
down. Also, fewer images can be shot. Therefore, usage of AA batteries is recommended
only for emergencies. Use of AA batteries is also not recommended when connecting the
camera to a computer.
When using disposable AA batteries the camera may not function when using at temperatures below 20°C/68°F or for certain battery brands and in some storage conditions.
Only insert six new batteries that are of the same brand. Do not use old and new batteries
together.
-12-
Connecting to a Power Oulet
To connect to a household power outlet use the AC adapter kit ACK-E2 (sold separately).
1. Connect the DC coupler to the AC adapter, and then connect the power cord to a
power outlet.
2. Load the DC coupler to the left
side of the battery compartment,
(see figure 10), and pass the cord
through the cord mount (see
figure 10).
3. Insert the DC coupler all the way in.
4. Check that the cord passes properly through the cord mount and close the cover
until it clicks into place.
-13-
Connecting to a Power Outlet
NOTE: Do not connect or disconnect the power cord while the camera power switch in the
ON position. The DC coupler can also be used with the compact power adapter CA-PS400
and the DC coupler DR-400. Both are sold separately.
-14-
Using the Battery Grip
Turn the vertical grip ON/OFF switch to
the ON position (see figure 11) in order to
make the buttons and dials on your power
grip function in the same way as those on
your camera.
When shooting in the horizontal grip position, turn the vertical grip ON/OFF switch to the
OFF position so that you do not accidentally use the buttons or dials on the power grip.
CAUTION
Remove the power supply from your power grip when your camera will not be used for an
extended period of time.
Never attempt to disassemble or repair this device. Any malfunction or accident resulting
from such action is not covered by your warranty.
-15-
Battery Life
Temperature: +23°C/0°C, 73°F/32° (Number of shots aproximate)
MODEL
EOS 5D
Mark II
Power Supply
LP-E6 x 2
Shooting Method Possible Shots
Viewfinder Shooting
AA Alkaline Batteries Viewfinder Shooting
1700/1500
300/100
*Based on CIPA (Camera &Imaging Products Association) testing standards. No live view shooting. The number
of images that can be shot is reduced by use of the LCD monitor and using the AF frequently without shooting.
-16-
Specifications
Type:
Battery grip for the EOS 5D Mark II
Power Sources:
(1) Battery Pack LP-E6
(2) AA size batteries: Alkaline batteries
(3) AC adapter kit ACK-E2 (not included)
Power Switch:
Camera’s power switch
Dimensions:
149.1 (w) x 114.3 (H) x 76.3 (D) mm / 5.9(w) x 4.5(H) x 3(D) inches
Weight:
Approximately 315g/11.1 oz.
-17-