1
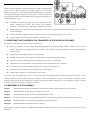
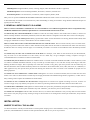
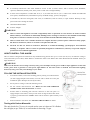
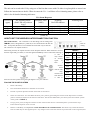
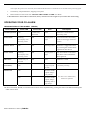
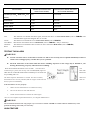
USER’S MANUAL
MODEL: VST-WC588IH
IMPORTANT! PLEASE READ CAREFULLY AND SAVE.
This user’s manual contains important information about your Alarm’s operation. If you are installing the Alarm for use by others, you
must leave this manual—or a copy of it—with the end user.
WIRELESS CARBON MONOXIDE ALARM
MAIN FEATURES
¾
¾
¾
¾
¾
¾
¾
¾
¾
¾
DC operated Wireless Interconnectable carbon monoxide alarm
Electrochemical CO sensor
Test / Hush Button
High and stable sensitivity
With quick fix mounting bracket for easy installation
Fitting and battery tamper-resist feature
LED operation indicator
Extra loud alarm sound over 85 dB at 1m
Low-battery and battery missing warning indicator
Auto reset after CO is clear
SPECIFICATION
¾
¾
¾
¾
¾
¾
¾
Detection Type:
Power Source:
Working frequency:
Emission distance:
Standby Current:
Alarm Current:
CO Alarm Level:
¾
¾
¾
¾
Alarm Sound Level
Operation Temperature:
Ambient Humidity:
Compact size:
Electrochemical CO sensor
9V(6F22) Battery
868MHz
>60m(open space)
25uA max
40mA max
50ppm (Between 60-90 min)
100ppm (Between 10-40 min)
300ppm (<3min.)
85 Decibels at 1 meter
4℃ to 40℃
15% to 90% Relative Humidity
110mm diameter
IMPORTANT SAFETY INFORMATION
1. WHAT IS CARBON MONOXIDE?
Carbon monoxide is a colorless, odorless and tasteless poison gas that can be fatal when inhaled. CO blinds to the hemoglobin in the
blood and inhibits its capacity to carry oxygen. CO kills hundreds of people each year and injures many more because it is difficult to
be detected with the human senses. In high concentrations, CO can kill in minutes.
2. SOURCES OF CARBON MONOXIDE
Inside your home, appliances used for heating and cooking are the most likely
sources of CO. Vehicles running in attached garages can also produce
dangerous levels of CO. CO can be produced when burning any fossil fuel,
such as gasoline, propane, natural gas, oil and wood. It can be produced by
any fuel-burning appliance that is malfunctioning, improperly installed, or not
ventilated correctly, such as:
z
Automobiles, furnaces, gas ranges/stoves, gas clothes dryers, water
heaters, portable fuel burning space heaters and generators,
fireplaces, wood-burning stoves and certain swimming pool heaters.
z
Blocked chimneys or flues, back drafts and changes in air pressure, corroded or disconnected vent pipes, loose or cracked
furnace exchangers.
z
Vehicles and other combustion engines running in an open or closed garage, attached or near a home.
z
Burning charcoal or fuel in grills and hibachis in an enclosed area.
3. CONDITIONS THAT CAN RESULT IN TRANSIENT CO SITUATION IN THE HOME:
The following conditions can result in transient CO situations:
z
Excessive spillage or reverse venting of fuel-burning appliances caused by outdoor ambient conditions, such as, wind
direction and/or velocity, including high gusts of wind, heavy air in the vent pipes (Cold/humid air with extended periods
between cycles).
z
Negative pressure resulting from the use of exhaust fans.
z
Simultaneous operation of several fuel-burning appliances competing for limited internal air.
z
Vent pipe connections vibrating loose from clothes dryers, furnaces, or water heaters.
z
Obstructions in, or unconventional, vent pipe designs which can amplify the above situations.
z
Extended operation of unvented fuel-burning devices (range, oven, fireplace, etc.).
z
Temperature inversions which can trap exhaust gases near the ground.
z
Vehicle idling in an open or closed garage, or near a home.
To be safe, know the possible sources of CO in your home. Keep fuel-burning appliances and their chimneys and vents in good
working condition. Learn the early symptoms of exposure, and if you suspect CO poisoning, move outside to fresh air and get
emergency help. Your first line of defense is an annual inspection and regular maintenance of your appliances. Contact a licensed
contractor or call your local utility company for assistance.
4. SYMPTOMS OF CO POISONING
35 ppm
The maximum allowable concentration for continuous exposure for healthy adults in any 8 hour period
200 ppm
Slight headaches, fatigue, dizziness, nausea after 2-3 hours
400 ppm
Frontal headaches within 1-2 hours, life threatening after 3 hours
800 ppm
Dizziness, nausea and convulsions within 45 minutes. Unconsciousness within 2 hours and death within 3 hours
1600 ppm
Headache, dizziness and nausea within 20 minutes. Death within 1 hour.
6400 ppm
Headache dizziness and nausea within 1-2 minutes
The following symptoms related to CARBON MONOXIDE POISONING and are to be discussed with ALL members of the
household:
Mild Exposure: Slight headache, nausea, vomiting, fatigue (often described as “flu-like” symptoms)
Medium Exposure: Severe throbbing headache, drowsiness, confusion, fast heart rate.
Extreme Exposure: Unconsciousness, convulsions, cardio respiratory failure, death.
Many cases of reported CARBON MONOXIDE POISONING indicate that while victims are aware they are not well. They become
so disoriented they are unable to save themselves by either the building or calling for assistance. Yong children and household pets are
typically the first affected.
5. GENERAL LIMITATIONS OF CO ALARMS
This CO Alarm is intended for residential use. It is not intended for use in industrial applications where Occupational Safety
and Health Administration (OSHA) requirements for Carbon Monoxide Alarms must be met.
CO alarms may not waken all individuals. If children or others do not readily waken to the sound of the CO alarm, or if there are
infants or family members with mobility limitations, make sure that someone is assigned to assist them in the event of an emergency.
CO Alarms cannot work without power. Battery operated units cannot work if the batteries are missing, disconnected or dead, if the
wrong type of batteries are used, or if the batteries are not installed correctly.
This CO Alarm will not sense carbon monoxide that does not reach the sensor. This CO Alarm will only sense CO at the sensor.
CO may be present in other areas. Doors or other obstructions may affect the rate at which CO reaches the CO Alarm. For this reason,
if bedroom doors are usually closed at night, we recommend you install a CO Alarm in each bedroom and in the hallway between
them.
CO Alarms may not sense CO on another level of the home. For example, a CO Alarm on the second level, near the bedrooms,
may not sense CO in the basement. For this reason, one CO Alarm may not give adequate warning. Complete coverage is
recommended. Place CO Alarms on each level of the home.
CO Alarms may not be heard. The alarm horn loudness meets or exceeds current EN standards of 85 dB at 1 meter. However, if the
CO Alarm is installed outside the bedroom, it may not wake up a sound sleeper or one who has recently used drugs or has been
drinking alcoholic beverages. This is especially true if the door is closed or only partly open. Even persons who are awake may not
hear the alarm horn if the sound is blocked by distance or closed doors. Noise from traffic, stereo, radio, television, air conditioner, or
other appliances may also prevent alert persons from hearing the alarm horn. This CO Alarm is not intended for people who are
hearing impaired.
CO Alarms are not a substitute for a smoke alarm. Although fire is a source of carbon monoxide, this CO Alarm does not sense
smoke or fire. This CO Alarm senses CO that may be escaping unnoticed from malfunctioning furnaces, appliances, or other sources.
Early warning of fire requires the installation of smoke alarms.
CO Alarms are not a substitute for life insurance. Though these CO Alarms warn against increasing CO levels, we does not
warrant or imply in any way that they will protect lives from CO poisoning. Homeowners and renters must still insure their lives.
CO Alarms have a limited life. Although the CO Alarm and all of its parts have passed many stringent tests and are designed to be as
reliable as possible, any of these parts could fail at any time. Therefore, you must test your CO Alarm weekly.
CO Alarms are not foolproof. Like all other electronic devices, CO Alarms have limitations. They can only detect CO that reaches
their sensors. They may not give early warning to rising CO levels if the CO is coming from a remote part of the home, away from the
CO Alarm.
INSTALLATION
WHERE TO INSTALL THIS ALARM
CO Alarm should be centrally located outside of each separate sleeping area in the immediate vicinity of the bedrooms. For added
protection, install additional CO Alarms in each separate bedroom, and on every level of your home.
If your bedroom hallway is longer than 40 feet (12 meters), install a CO Alarm at BOTH ends of the hallway.
In a Single-level Home:
z
Install at least one CO Alarm near or within each separate sleeping area.
z
For added protection, install an additional CO Alarm at least 20 feet (6 meters) away from the furnace or fuel burning heat
source.
In a Multi-level Home:
z
Install at least one CO Alarm near or within each separate sleeping area.
z
For added protection, install at least one CO Alarm on each level of the home.
z
For added protection, install an additional CO Alarm at least 20 feet (6 meters) away from the furnace or fuel burning heat
source.
In Mobile Homes:
z
Install CO Alarms on inside walls ONLY. Uninsulated outside walls and roofs of mobile homes often transfer heat and cold
from outdoors. The Alarm should be located at least 152 mm (6 inches) from all exterior walls and at least 305 mm (12
inches) from supply or return vents.
WHERE THIS ALARMS SHOULD NOT BE INSTALLED
Do NOT locate this CO Alarm:
z
In garages, kitchens, furnace rooms, or in any extremely dusty, dirty or greasy areas.
z
Within 5 feet (1.5 meters) of any cooking appliance.
z
In extremely humid areas. This alarm should be at least 10 feet (3 meters) from a bath or shower, sauna, humidifier,
vaporizer, dishwasher, laundry room, utility room or other source of high humidity.
z
In areas where temperature is colder than 40˚ F (4˚ C) or hotter than 100˚ F (38˚ C). These areas include unconditioned
crawl spaces, unfinished attics, uninsulated or poorly insulated ceilings, porches, and garages.
z
In turbulent air, like near ceiling fans, heat vents, air conditioners, fresh air returns, or open windows. Blowing air may
prevent CO from reaching the sensors.
z
Outside the Mobile Home.
z
In direct sunlight.
WARNING!
z
This CO Alarm is designed for use inside a single-family home or apartment. It is not meant to be used in common
lobbies, hallways, or basements of multi-family buildings unless working CO Alarms are also installed in each family
living unit. CO Alarms in common areas may not be heard from inside individual family living units.
z
This CO Alarm alone is not a suitable substitute for complete detection systems in places which house many people,
like hotels or dormitories, unless a CO Alarm is also placed in each unit.
z
DO NOT use this CO Alarm in warehouses, industrial or commercial buildings, special-purpose non-residential
buildings, or airplanes. This CO Alarm is specifically designed for residential use, and may not provide adequate
protection in non-residential applications.
HOW TO INSTALL THIS ALARM
This CO Alarm is designed to be mounted on any standard wiring junction box up to a 4-inch (10 cm) size, on either the ceiling or
wall (if allowed by local codes). Read “Where to Install This Alarm” and “Where This Alarm Should Not Be Installed” before you
begin installation.
WARNING!
Make sure the Alarm is not receiving excessively noisy power. Examples of noisy power could be major appliances on the same
circuit, power from a generator or solar power, light dimmer on the same circuit or mounted near fluorescent lighting.
Excessively noisy power may cause damage to your Alarm.
FOLLOW THE INSTALLATION STEPS
1.
From back of alarm, remove the mounting plate by turning it counterclockwise.
(To later engage tamper-resist feature, twist out and set aside one of the pins
molded into plate. Both pins are exactly the same.)
2.
Secure plate to ceiling or wall with mounting screws.
3.
Set the wireless interconnection. See “HOW TO SET THE WIRELESS
INTERCONNECTION FUNCTION” for details.
4.
Position alarm to mounting plate and turn clockwise to lock into place. To
engage tamper-resist feature, insert pin into notch on edge of alarm after alarm
is properly positioned in base. NOTE: Alarm will not mount to plate if battery is not
installed.
5.
Push test button to test alarm. See “TESTING THIS ALARM” for details.
Testing with Carbon Monoxide
The unit checks for CO every 4 seconds and as soon as it detects CO it flashes
the red light (as per Table A) to confirm that is detecting CO gas.
The unit can be tested with CO by using one of the kits that comes with CO either in a glass phial or aerosol can.
Follow the instructions on the kit. When it senses the CO,it will have a Pre-Alarming status, please refer to
table A for all detailed alarming indicators:
CO Alarm Response
CO Level
(ppm)
0 ppm
50 ppm
100 ppm
300 ppm
Pre-Alarming status:
(Red LED only without
beep)
Off
2 Flashes / 4 Seconds
3 Flashes / 4 Seconds
4 Flashes / 4 Seconds
Response Time
(MIN)
N/A
60-90
10-40
<3
(Table A)
Alarming
Red LED Indictor
Alarming Horn
Off
4 Flashes / 4 Seconds
4 Flashes / 4 Seconds
4 Flashes / 4 Seconds
Off
4 Beeps / 4 Seconds
4 Beeps / 4 Seconds
4 Beeps / 4 Seconds
HOW TO SET THE WIRELESS INTERCONNECTION FUNCTION
to
other 15
coding.
DIP switch function: The 1~4numeric is for ID coding, total 16 coding (refer
TABLE1). ID 0 (coding 0000) is a public ID, it can communicate with other all
IDs. Except ID0, the devices can communicate each other only in same ID
The 5 numeric is for repeater function.
When being slid ON, the repeater function works. Repeater function: When the device receives
emission signal and gives alarm, it will emit signal immediately to drive other units alarming. It
is also a
relay station
of wireless
signal
to
form
a
wireless
alarm
network with
relay
transmit. The
emit distance
is 30m in
house area.for the repeater setting the right diagram is for your reference.
TABLE1
1~4
ID
1~4
ID
0000
0
1000
8
0001
1
1001
9
0010
2
1010
10
0011
3
1011
11
0100
4
1100
12
0101
5
1101
13
0110
6
1110
14
0111
7
1111
15
FOLLOW THE ID SETUP STEPS
1.
Remove the battery.
2.
Press and hold the button for a minimum of 10 seconds.
3.
Find the 5-position dipswitch located on the back of each device.
4.
Select one of the units. You will define the ID of your system by positioning the switches of the dipswitch in a random
pattern. The ID will need to be the same for each alarm. This ID will differentiate your alarm system from similar systems
nearby.(refer to TABLE 1)
5.
Using a pen or pencil, change the switches in each of the wireless devices to match the pattern you selected in step 3.
Ensure that the sequence is not reversed.
6.
Insert a 9-volt battery to compartment. NOTE POLARITY OF CONNECTIONS. The alarms only read the ID that has
been set when they are first supplied power. Any changes to the switch after the unit is powered will not be recognized, and
will require the power to be removed, Press and hold the button for a minimum of 10 seconds before powering again.
7.
Close battery compartment door, snapping it into place.
8. Push test button to test alarm. See “TESTING THE SMOKE ALARM” for details.
CAUTION: Due to the loudness of the alarm, always stand at an arm’s length away from the unit when testing.
OPERATING YOUR CO ALARM
VARIOUS STATUS OF THIS ALARM (TABLE2)
Current Status
Alarm LED
Power LED
Horn
Description
Normal Operation
Off
1 Flash every
60seconds
Silent
The device is on the normal
self-testing status
Local Alarm
Flashing
accompany with
alarming sound
Off
4 beeps-pause- 4
beeps
carbon monoxide is detected by
the device and trigger the device
to alarm
Remote Alarm
Off
Off
Alarming sound
The device is triggered to alarm
by receiving the wireless alarm
signal from other device
Locate Alarm
Flashing
accompany with
alarming sound
Off
4 beeps-pause- 4
beeps
Only Local alarm can be in this
state, but it cannot transmit the
alarm signal out
Hush State
1 flash every 10
seconds
Off
Silent
The device is silent
Low Battery
Off
--
1 beep every 60
seconds
Low battery warning
Malfunction
Off
--
The horn sounds
3 quick “chirps”
every minute.
Off
--
The horn sounds
2 quick “chirps”
following with 1
long “chirp”.
The device is in malfunction,
need to be replaced
The device has TEST, HUSH, LOCATE functions which can be implemented by pressing the button with different holding time
under various status.
Button Definition as below: (TABLE3)
Current Status
Function (Press button and
release it in 2 seconds)
Function (Press button and hold it
for 3 seconds minimum)
Normal Operation、Hush State、Low
Battery
Test
Local Hush
Local Alarm
Locate
All Hush
Remote Alarm
Locate
All Hush
Locate Alarm
None
Local Hush
Malfunction
Function Definition as below:
Reset
None
This function can simulate the alarm signal, and lead the device to Local Alarm Status (refer to TABLE2). The
simulated alarm signal will disappear after 15 seconds.
Locate:
This function can lead the device to Locate Alarm Status (refer to TABLE2).
Local Hush: This function can lead the device to Hush Status (refer to TABLE2).(Only to the device)
All Hush:
This function can lead all the devices which are in the same ID to Hush Status (refer to TABLE2).
Reset:
Reset the device
Test:
TESTING THIS ALARM
WARNING!
z
Test the CO Alarm once a week. If the CO Alarm ever fails to test correctly, have it replaced immediately! If the CO
Alarm is not working properly, it cannot alert you to a problem.
z
DO NOT stand close to the Alarm when the horn is sounding. Exposure at close range may be harmful to your
hearing. When testing, step away when horn starts sounding.
Press the test button and release it in 2 seconds, The alarm horn
sound 4 beeps, a pause, then 4 beeps. The ALARM (RED) light will
other devices in same ID should sound a loud beep in 8 seconds. The
stop sounding after 15s.
will
flash. The
alarm will
The alarm sequence should last 15 seconds. If it does not alarm,
fresh batteries are correctly installed, and test it again. If the unit still
alarm, replace it immediately.
make sure
does not
If the alarm does not test properly:
1.
Make sure that fresh batteries are installed correctly.
2.
Be sure the Alarm is clean and dust-free.
3.
Install fresh 9V batteries* and test the Alarm again.
*For a list of acceptable replacement batteries, see “Regular Maintenance.”
WARNING!
The Test/Silence button is the only proper way to test the CO Alarm. NEVER use vehicle exhaust! Exhaust may cause
permanent damage and voids your warranty.
HUSH FEATURE
WARNING!
z
The Hush Feature is for your convenience only and will not correct a CO problem. Always check your home for a
potential problem after any alarm. Failure to do so can result in injury or death.
z
NEVER remove the batteries from your CO Alarm to silence the horn. Use the hush feature. Removing the batteries
removes your protection! See “If Your CO Alarm Sounds” for details on responding to an alarm.
The Hush Feature is intended to temporarily silence your CO Alarm’s alarm horn while you correct the problem—it will not correct a
CO problem. While the alarm is silenced it will continue to monitor the air for CO.
When CO reaches alarm levels the alarm will sound— repeating horn pattern: 4 beeps, a pause, 4 beeps, etc. Press and hold the
Test/Silence button until the horn is silent. The initial Silence cycle will last approximately 4 minutes.
NOTE: After initial 4-minute Silence cycle, the CO Alarm re-evaluates present CO levels and responds accordingly. If CO levels
remain potentially dangerous—or start rising higher—the horn will start sounding again.
For the wireless devices in the same ID, when the devices are in Local alarm or Remote alarm status (refer to TABLE2),
Triggering the Hush function will lead all the devices to be in Hush Status.。
LOCATE FEATURE
When the devices alarming for detecting carbon monoxide, users can find the initial point through the Locate Feature :
Find any one of the alarming device(Local Alarm or Remote Alarm), press the Test/Hush button and release it in 2 seconds. Then
the Locate Feature will be triggered. After triggering Locate Feature, all the alarming devices will be stop sound, except the initial
device which is detecting carbon monoxide signal keeps alarming until carbon monoxide signal goes off.
REGULAR MAINTENANCE
WARNING!
Use only the replacement batteries listed below. The unit may not operate properly with other batteries. Never use
rechargeable batteries since they may not provide a constant charge.
This unit has been designed to be as maintenance-free as possible, but there are a few simple things you must do to keep it working
properly:
z
Test it every week using the Test button.
z
Vacuum the CO Alarm cover once a month, using the soft brush attachment. Never use water, cleaners, or solvents, since
these may damage the unit. Test the CO Alarm again after vacuuming.
z
Replace the batteries when the CO Alarm “chirps” about every minute (the low battery warning).
The low battery warning should last for 30 days, but you should replace the battery immediately to continue your protection.
The unit requires one standard 9V battery. The following batteries are acceptable as replacements:
Golden Power #6F22; New Leader #6F22; Gold Peak #6F22; Eveready #522, #1222.; Golden Power G6F22; Golden Power
GL6F22A
IMPORTANT!
Actual battery service life depends on the Alarm and the environment in which it is installed. All the batteries specified above are
acceptable replacement batteries for this unit. Regardless of the manufacturer’s suggested battery life, you MUST replace the
battery immediately once the unit starts “chirping” (the “low battery warning”).
To replace the batteries:
1.
Use screwdriver to twist out the tamperproof tabs on both sides of the
alarm。
2.
Turn alarm counterclockwise to detach it from the mounting plate.
3.
Open the battery cover and remove the battery from the compartment.
4.
Press and hold Test/Hush bottom for 10s and then release it.
5.
Insert a new 9-volt battery to compartment. NOTE POLARITY OF
CONNECTIONS. Ensure the metal tab is fully depressed when the
battery has been fitted.
6.
Close the battery cover.
7.
Using Test button, test the alarm to verify 9V DC battery. See “TESTING THIS ALARM” for details
8.
Reattach the alarm to the mounting plate by turning alarm clockwise until it snaps into place. Insert the tamperproof tabs
back into the notch on edge of alarm after alarm is properly positioned in base
9.
Test the alarm using “Test” button. See “TESTING THIS ALARM” for details.
CO ALARM REPLACEMENT:
CO Alarms don’t last indefinitely. CO Alarms are sophisticated electronic devices with many parts. Although the alarm and its
component parts have undergone stringent tests, and are designed to be very reliable, it is possible that parts can fail. Therefore, you
should test your CO Alarm weekly. The CO Alarm must be replaced after 3 years operation or by the replacement date on the label of
unit on back side.
IF YOUR CO ALARM SOUNDS
WARNING!
Actuation of your CO Alarm indicates the presence of carbon monoxide (CO) which can kill you. In other words, when your
CO Alarm sounds, you must not ignore it!
IF THE ALARM SIGNAL SOUNDS:
z
Find any one of the alarming device, press the Test/Hush button and release it in 2 seconds. Triggering the Locate function
of the alarming devices.
z
Once the initial alarming device is located,distinguish the alarming device is CO alarm or Fire alarm from the different
alarming sound. The fire alarming sound is quick and intensive;The CO alarming sound is 4 beeps-pause-4 beeps。
z
Follow below guidance “IF THE ALARM SOUND CO SIGNAL” or “IF THE ALARM SOUND FIRE SIGNAL”.
IF THE ALARM SOUND CO SIGNAL:
z
Call your emergency services or fire department. Write down the number of your local emergency service here:
z
Immediately move to fresh air—outdoors or by an open door or window. Do a head count to check that all persons are
accounted for. Do not re-enter the premises, or move away from the open door or window until the emergency services
responder has arrived, the premises have been aired out, and your CO Alarm remains in its normal condition.
z
After following steps 1-3, if your CO Alarm reactivates within a 24 hour period, repeat steps 1-3 and call a qualified
appliance technician to investigate for sources of CO from fuel-burning equipment and appliances, and inspect for proper
operation of this equipment. If problems are identified during this inspection have the equipment serviced immediately.
Note any combustion equipment not inspected by the technician, and consult the manufacturers’ instructions, or contact the
manufacturers directly, for more information about CO safety and this equipment. Make sure that motor vehicles are not,
and have not, been operating in an attached garage or adjacent to the residence. Write down the number of a qualified
appliance technician here:
NOTE: A qualified appliance technician is defined as “a person, firm, corporation, or company that either in person or
through a representative, is engaged in and responsible for the installation, testing, servicing, or replacement of heating,
ventilation, air conditioning (HVAC) equipment, combustion appliances and equipment, and/or gas fireplaces or other
decorative combustion equipment.”
IF THE ALARM SOUND FIRE SIGNAL:
z
Don’t panic; stay calm. Follow your family escape plan.
z
Get out of the house as quickly as possible. Don’t stop to get dressed or collect anything.
z
Feel doors with the back of your hand before opening them. If a door is cool, open it slowly. Don’t open a hot door. Keep
doors and windows closed, unless you must escape through them.
z
Cover your nose and mouth with a cloth (preferably damp). Take short, shallow breaths.
z
Meet at your planned meeting place outside your home, and do a head count to make sure everybody got out safely.
z
Call the Fire Department as soon as possible from outside. Give your address, then your name.
z
Never go back inside a burning building for any reason.
WARNING!
Alarms have various limitations. See " IMPORTANT SAFETY INFORMATION " for details.
TROUBLE SHOOTING GUIDE
Problem
Possible cause
Solution
Not all of the
alarms/accessories produce
an alarm signal when one
device is tested.
Devices may not all be on the
same ID.
Locate the 5-position dipswitch on the back of
each unit and ensure that all of the corresponding
switches are set the same. If an ID needs to be
changed: Remove power,Press and hold the
button for a minimum of 10 seconds, change the
ID and reapply power.
Devices may not have power.
Check that battery is properly attached to
connector.
There may be too much
interference between units.
Move the other units to a new location and try
again. You should try to locate the wireless units
as closely to each other as possible.
Low-battery
Replace battery. See “ REGULAR
MAINTENANCE ” for details.
The horn sounds 1 short
“chirp” every minute.
CO Alarm sounds frequently
even though no high levels
of CO are revealed in an
investigation.
Unit is set to the same ID as a
system nearby.
Change the ID of your units by following the
instructions in HOW TO SET THE
WIRELESS INTERCONNECTION
FUNCTION. Make sure to turn power off to all
units before changing the switch positions.
Wireless Interference.
Move the other units to a new location.
The CO Alarm may be
improperly located.
Relocate your alarm. If frequent alarms continue,
have home rechecked for potential CO problems.
You may be experiencing an intermittent CO
problem. Refer to “WHERE TO INSTALL
THIS ALARM”.
The horn sounds 3 quick
“chirps” every minute.
Malfunction signal. CO Alarm
needs to be replaced.
CO Alarms under warranty should be returned to
manufacturer for replacement.
The horn sounds 2 quick
“chirps” following with 1
long “chirp”.
Malfunction signal. CO Alarm
needs to be replaced.
CO Alarms under warranty should be returned to
manufacturer for replacement.
For your records, please record:
Date Purchased:
Where Purchased:
Data Installed:
Replacement data is 5 years after installation:
NOTE: End of Life Signal — Once the unit reaches the end of its lifecycle, the MALFUNCTION SIGNAL will
sound once a minute to indicate the need to immediately replace the Alarm.
This apparatus is designed to protect individuals from the acute effects of carbon monoxide exposure. It will not
fully safeguard individuals with specific medical conditions. If in doubt consult a medical practitioner.
Manufacturer:
Xiamen Vs-Top Electronics Co., Ltd.
2nd floor, No-107 Xiaguang Road, Xinyang Industrial District, Haicang ,Xiamen, China.
Tel: 0086-592-6017700
E-mail: [email protected]
Fax: 0086-592-6017711
Website: www.orientalert.com