1
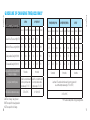
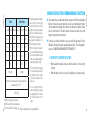
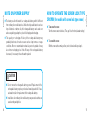
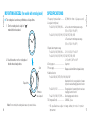
Cal. V110, V111, V114, V115, V116, V117, V145,
V147, V157, V158, V181, V182 & V187
INSTRUCTIONS
(P.
BEDIENUNGSANLEITUNG
(S. 18)
4)
INSTRUCTIONS
(P. 33)
ISTRUZIONI
(P. 47)
INSTRUCCIONES
(P. 62)
INSTRUÇÕES
(P. 76)
ИНСТРУКЦИИ
(P. 90)
(106
)
You are now the proud owner of a SEIKO Solar Cal. V110/V111/V114/V115/V116/V117/V145/V147/V157/
V158/V181/V182/V187. For the best results, please read the instructions in this booklet carefully before using
it. Please keep this manual handy for ready reference.
Wir gratulieren Ihnen zum Kauf der SEIKO Solar Kal. V110/V111/V114/V115/V116/V117/V145/V147/V157/
V158/V181/V182/V187. Lesen Sie diese Bedienungsanleitung vor der Verwendung aufmerksam durch,
um ihre optimale Nutzung zu gewährleisten. Heben Sie diese Bedienungsanleitung gut auf, um jederzeit
wieder nachlesen zu können.
Vous êtes maintenant l’heureux propriétaire d’une montre solaire SEIKO Cal. V110/V111/V114/V115/V116/
V117/V145/V147/V157/V158/V181/V182/V187. Pour en obtenir des performances optimales, veuillez lire
attentivement cette brochure avant d'utiliser la montre. Conservez ce manuel pour vous y référer en cas
de besoin.
Grazie di aver acquistato questo orologio SEIKO Solar Cal. V110/V111/V114/V115/V116/V117/V145/V147/V157/
V158/V181/V182/V187. Per poter utilizzare l’orologio al massimo delle sue prestazioni leggere attentamente
questo manuale di istruzioni prima di passare all’uso dell’orologio stesso, e conservarlo poi per qualsiasi
eventuale futura consultazione.
Usted es ahora un orgulloso propietario de un SEIKO Solar Cal. V110/V111/V114/V115/V116/V117/V145/V147/
V157/V158/V181/V182/V187. Para los mejores resultados, por favor, lea cuidadosamente las instrucciones
de este panfleto antes utilizar su Reloj SEIKO. Por favor, guarde este manual en un lugar conveniente para
su futura referencia.
Agora pode sentir-se orgulhoso de possuir um SEIKO Solar Cal. V110/V111/V114/V115/V116/V117/V145/V147/
V157/V158/V181/V182/V187.Para obter os melhores resultados, leia atentamente as instruções contidas
neste opúsculo antes de usá-lo. Conserve este manual para consultas futuras.
Теперь Вы являетесь обладателем часов Сейко Соляр (Seiko Solar) Калибра V110/V111/V114/
V115/V116/V117/V145/V147/V157/V158/V181/V182/V187. Перед использованием их, для достижения
лучших результатов, пожалуйста, внимательно ознакомьтесь с данной инструкцией и обязательно
сохраните ее.
歡迎購買精工V110/V111/V114/V115/V116/V145/V147/V157/V158/V181/V182/V187機型太陽能手錶
English
ENGLISH
FEATURES
CONTENTS
page
FEATURES....................................................................................................... 5
HOW TO CHARGE AND START THE WATCH............................................... 6
TIME/CALENDAR SETTING........................................................................... 8
GUIDELINE OF CHARGING TIME/ACCURACY............................................ 10
ENERGY DEPLETION FOREWARNING FUNCTION..................................... 13
NOTE ON POWER SUPPLY............................................................................ 14
HOW TO OPERATE THE SCREW LOCK TYPE CROWN............................... 15
ROTATING BEZEL........................................................................................... 16
SPECIFICATIONS............................................................................................ 17
n POWERED BY LIGHT ENERGY
n NO BATTERY CHANGE REQUIRED (Please refer to page 14 "NOTE ON POWER
SUPPLY")
n L ASTS FOR 2 TO 12 MONTHS AF TER FULL CHARGE ( DEPENDS ON THE
CALIBRE)
n ENERGY DEPLETION FOREWARNING FUNCTION (FOR CAL. V111, V117, V145,
V147, V157, V158, V181, V182, V187 ONLY)
n INSTANT-START FUNCTION (FOR CAL. V145, V147, V157, V158, V181, V182,
V187 ONLY)
n OVERCHARGING PREVENTION FUNCTION
l Calibre number of your watch
Please check the case back of your watch to find
its calibre number inscribed on it. As illustrated at
right, the calibre number of your watch is the 4-digit
number to the left of the hyphen mark.
V145-0A00
I For the care of your watch, see “TO PRESERVE THE QUALITY OF YOUR
WATCH” in the attached Worldwide Guarantee and Instruction Booklet.
English
CAL. V110, V111, V114, V115, V116, V117, V145,
V147, V157, V158, V181, V182 & V187
AQ
Calibre No.
English
1 E x p o s e t h e w a t c h t o s u n l i g h t o r s t r o n g
artificial light.
* When the watch has stopped operating, the second
hand will start moving at 2-second intervals.
▲
2 Keep the watch exposed to the light until the
second hand moves at 1-second intervals.
▲
3 W h e n t h e w a t c h i s c h a r g e d a f t e r i t h a s
completely stopped, set the date and time
before wearing the watch.
* See “GUIDELINE OF CHARGING TIME/ACCURACY” .
NOTES:
1 If your watch has a second hand, when the instant-start function is activated after
the watch is exposed to light, the second hand starts moving at 2-second intervals
immediately, but the energy stored in the rechargeable battery is not sufficient. If
the watch is turned away from the light, it may stop operating.
2 It is not necessary to charge the watch fully. It is important, however, to charge
the watch sufficiently, especially in case of initial charge.
English
HOW TO CHARGE AND START THE WATCH
● When you start the watch or when the energy in the rechargeable battery is
reduced to an extremely low level, charge it sufficiently by exposing the watch
to light.
● Instant-start function:
When the watch is exposed to sunlight or strong artificial light (of more than
1,000 lux), it will start operating immediately with the second hand moving at
2-second intervals.
CAUTION
Caution for charging
● When charging the watch, do not place it too close to a photoflash
light, spotlight, incandescent light or other light sources as the watch
temperature will become extremely high, causing damage to the parts
inside the watch.
● When exposing the watch to sunlight to charge it, do not leave it on the
dashboard of a car, etc. for a long time, as the watch temperature becomes
extremely high.
● While charging the watch, make sure the watch temperature does not
exceed 50 °C. (For Cal. V110, V145, V181 and V182)
● While charging the watch, make sure the watch temperature does not exceed
60 °C. (For Cal. V111, V114, V115, V116, V117, V147, V157, V158 and V187)
English
l Models with two/three hands
Hour hand
l Models with day and date
Second hand
1. Pull out the crown to the first click.
2. Turn the crown to set the desired time.
3. P u s h b a c k t h e c r o w n c o m p l e t e l y ( i n
accordance with a time signal for a threehand model.)
Minute hand
l Models with date
1. Pull out the crown to the first click and set
the previous date.
2. Pull ou t the c r ow n to the s e c ond c li c k
when the second hand is at the 12 o'clock
position.
3. Tur n t h e c r o w n u n t il t h e d e s ir e d d a t e
appears.
4. Turn the crown to set the hour and minute
hands to the desired time.
5. P u s h b a c k t h e c r o w n c o m p l e t e l y i n
accordance with a time signal.
Date
1. Pull out the crown to the first click and set
the previous day and date.
2. P u l l o u t t h e c r o w n t o t h e s e c o n d c l i c k
when the second hand is at the 12 o'clock
position.
3. Turn the crown until the desired day and
date appears.
4. Turn the crown to set the hour and minute
hands to the desired time.
5. P u s h b a c k t h e c r o w n c o m p l e t e l y i n
accordance with a time signal.
Day
Date
English
TIME/CALENDAR SETTING
NOTES:
1
Do not set the date between 9:00 p.m. and 1:00 a.m. Otherwise, it may not change properly.
* If it is necessary to set the date during that time period, first change the time to any time
outside it, set the date and then reset the correct time.
2 When setting the hour hand, check that AM/PM is correctly set.
* The watch is so designed that the date changes once in 24 hours. Turn the hands past the
12 o’clock marker to determine whether the watch is set for the A.M. or P.M. period. If the
date changes, the time is set for the A.M. period. If the date does not change, the time is
set for the P.M. period.
3 When setting the minute hand, first advance it 4 to 5 minutes ahead of the desired time and
then turn it back to the exact minute.
4 It is necessary to adjust the date at the end of February and 30-day months.
English
V110
V111/V117
V114/V115/V116
Environment/Lightsource (lux)
A (minutes ) B (hours) C (hours) A (minutes) B (hours) C (hours)
V187
A (minutes ) B (hours) C (hours) A (minutes) B (hours) C (hours) A (minutes) B (hours) C (hours)
General offices/ Fluorescent light (700)
50
16
140
180
60
-
180
60
-
110
25
-
95
8
100
30W20cm/ Fluorescent light (3000)
11
3.5
30
35
10
180
35
10
180
30
6
120
23
1.6
25
Cloudy weather/Sunlight (10000)
3
0.9
8
12
4
60
12
4
60
10
2
35
6
0.4
7
Fair weather/Sunlight (100000)
1
0.3
2
2
0.5
10
2
0.5
10
2
0.4
9
3
0.1
3
Expected life per charge from full
charge to stoppage
Loss/gain (monthly rate)
Operational temperature range
10
V147/V157/V158
English
GUIDELINE OF CHARGING TIME/ACCURACY
A: Time to charge 1 day of power B: Time required for steady operation
C: Time required for full charge
5 months
6 months
Less than 20 seconds when the watch Less than 15 seconds when the watch
is worn on your wrist at a normal
is worn on your wrist at a normal
temperature range (5 ºC to 35 ºC)
temperature range (5 ºC to 35 ºC)
-5 ºC to 50 ºC
-10 ºC to 60 ºC
12 months
10 months
2 months
Less than 15 seconds when the watch is worn on your wrist
at a normal temperature range (5 ºC to 35 ºC)
-10 ºC to 60 ºC
v The above table provides only a general guideline.
11
English
V145
V181/V182
A (minutes ) B (hours) C (hours) A (minutes) B (hours) C (hours)
50
11
175
75
6
82
10
2
40
18
1.3
20
3
0.5
10
5
0.3
5
1
0.1
3
2
0.1
2.1
6 months
2 months
Less than 20 seconds when the watch is worn on your wrist at a normal
temperature range (5 ºC to 35 ºC)
-5 ºC to 50 ºC
12
electricity by converting light
received on the dial to electrical
energy. It cannot properly operate
unless the remaining energy is
sufficient. Place or store the watch
in a location receiving light etc., to
sufficiently charge electricity.
• When the watch is stopped or
the second hand starts moving
at 2-second intervals (for models
with a second hand,) charge the
watch by exposing it to light.
• The time required for charging
the watch varies depending on
the calibres. Check the calibre
of your watch engraved on the
back cover.
● If your watch has a second hand, when the energy stored in the rechargeable
battery is reduced to an extremely low level, the second hand starts moving
at 2-second intervals instead of the normal 1-second intervals. (Some calibres
have no such function.) The watch remains accurate even while the second
hand is moving at 2-second intervals.
English
ENERGY DEPLETION FOREWARNING FUNCTION
u The watch operates while charging
● In that case, recharge the watch as soon as possible by exposing it to light.
Otherwise, the watch may stop operating in about 3 days. (For recharging the
watch, see “HOW TO CHARGE AND START THE WATCH”)
v TO PREVENT THE ENERGY DEPLETION
• When wearing the watch, make sure that the watch is not covered by
clothing.
• When the watch is not in use, leave it in a bright place as long as possible.
• It is recommended that the
watch be charged for as long as
the charging time "B" to assure
the stable movement of the
watch.
A: Time to charge 1 day of power B: Time required for steady operation
C: Time required for full charge v The above table provides only a general guideline.
13
English
● The battery used in this watch is a rechargeable battery, which is different
from ordinary silver oxide batteries. Unlike other disposable batteries such as
dry-cell batteries or button cells, this rechargeable battery can be used over
and over again by repeating the cycles of discharging and recharging.
● The capacit y or recharging ef f iciency of the rechargeable bat ter y may
gradually deteriorate for various reasons such as long-term use or usage
conditions. Worn or contaminated mechanical parts or degraded oils may
also shorten recharging cycles. If the efficiency of the rechargeable battery
decreases, it is necessary to have the watch repaired.
HOW TO OPERATE THE SCREW LOCK TYPE
CROWN (for models with screw lock type crown)
l To unscrew the crown:
Turn the crown counterclockwise. (Then, pull it out for time/calendar setting)
English
NOTE ON POWER SUPPLY
l To screw in the crown:
With the crown at the normal position, turn it clockwise while pressing it.
CAUTION
● Do not remove the rechargeable battery yourself. Replacement of the
rechargeable battery requires professional knowledge and skill. Please
ask a watch retailer for replacement of the rechargeable battery.
● Installation of an ordinary silver oxide battery can generate heat that can
cause bursting and ignition.
14
15
English
SPECIFICATIONS
l The rotating bezel can show up to 60 minutes of elapsed time.
1
2
3
4
5
6
1 Turn the rotating bezel to align its "
mark with the minute hand.
"
2 Read the number on the rotating bezel
that the minute hand points to.
Start
Elapsed time
30 minutes
have elapsed.
Note: For some models, the rotating bezel rotates only counterclockwise.
16
Frequency of crystal oscillator .............. 32,768 Hz (Hz = Hertz … Cycles per second)
Loss/gain (monthly rate)
For Cal. V110, V145, V181, V182....... ±20 seconds at normal temperature range
(5 °C to 35 °C/ 41 °F to 95 °F)
For Cal. V111, V114, V115, V116, V117, V147, V157, V158, V187
±15 seconds at normal temperature range
(5 °C to 35 °C/ 41 °F to 95 °F)
Operational temperature range
For Cal. V110, V145, V181, V182....... –5 °C to 50 °C/ 23 °F to 122 °F
For Cal. V111, V114, V115, V116, V117, V147, V157, V158, V187
–10 °C to 60 °C/ 14 °F to 140 °F
Driving system....................................... Step motor
Power supply.......................................... Manganese titanium-lithium rechargeable battery
Additional function
For Cal. V145, V147, V157, V158, V181, V182, V187
Instant-start function, energy depletion forewarning function and overcharging prevention function
For Cal. V111, V117............................ Energy depletion forewarning function and overcharging prevention function
For Cal. V110, V114, V115, V116.......... Overcharging prevention function
7 IC (Integrated Circuit) . .......................... C-MOS-IC, 1 piece
• The specifications are subject to change without prior notice for product
improvement.
English
ROTATING BEZEL (for models with rotating bezel)
17