1
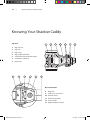
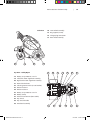
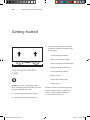
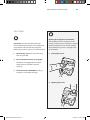
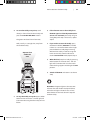
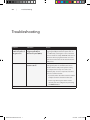
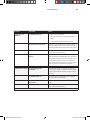
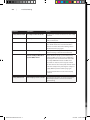
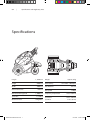
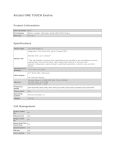
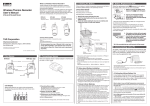
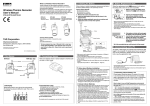
Shadow Caddy SC-1000
Owners Manual
SC-1000: Manual Version 1.4
N2695 User Manual 12.indd 1
27/11/08 12:26:14 PM
N2695 User Manual 12.indd 2
27/11/08 12:26:14 PM
Table of Contents
Read this first
ii
Section Four: Troubleshooting
Troubleshooting
Section One: Introduction and Safety
Information
4.1
Welcome to a better way to play golf
1.2
Section Five: Specifications, Warranty and
Regulatory Data
Overview of the Shadow Caddy
1.3
Safety and warnings
1.4
Specifications
5.1
Declaration of Conformity: AS 4268-2003
5.2
Product Model No: SC-1000
5.2
Limited Product Warranty Information
5.3
Contacts
5.5
Section Two: How to use your Shadow Caddy
Knowing Your Shadow Caddy
1.8
Getting Started
2.2
Unpacking the Shadow Caddy
2.2
Using the Caddy
2.6
Section Three: Maintaining your
Shadow Caddy
Maintaining Your Shadow Caddy
3.1
Battery Recharging
3.1
Cleaning the Shadow Caddy
3.4
Tyre Pressure
3.4
Transporting Your Caddy
3.5
N2695 User Manual 12.indd 1
27/11/08 12:26:14 PM
Read this first
The Shadow Caddy manual is an important
document and reference. Please keep it in a
safe place.
The specifications and descriptions in this
manual are accurate at the time of printing but,
because of our commitment to continuous
product improvement and development, we
reserve the right to make changes in appearance
and specification at any time without notice and
without incurring any obligation.
The Shadow Caddy Australian and international
patents pending (International PCT Patent
Application No: PCT/AU2007/000670,
Publication No: WO 2007/131299)
The Shadow Caddy system firmware and
software are protected by Australian and
international copyright.
“Just Play” and the Shadow Caddy logo
are registered trademarks of Your Shadow
Technologies Pty Ltd.
Throughout this manual you will find two
important symbols. The Warning symbol, and
the Caution/Reminder/Important symbol.
Please take note and adhere to these at all times.
Warning: This symbol is to warn you to be
especially careful to avoid personal injury.
Caution/Reminder/Important: This symbol
is used to either prevent you from damaging
your Shadow Caddy or to draw your attention to
important information.
N2695 User Manual 12.indd 2
27/11/08 12:26:14 PM
1
Section One
Introduction and
safety information
N2695 User Manual 12.indd 3
27/11/08 12:26:14 PM
1.2
|
Introduction and Safety Information
Welcome to a better way to play golf
Thank you for choosing Shadow Caddy
To ensure the enjoyable and trouble free
operation of your new Shadow Caddy, we urge
you to read this manual carefully and follow
its recommendations.
Although your warranty may cover defects in
material or workmanship, we would recommend
that you consider general insurance as you
would with other similar products, especially
those rented out to consumers on a regular
basis.
We wish to assure you of our continuing
interest in your golfing pleasure and complete
satisfaction in your Shadow Caddy.
For the latest information or should you require
any further assistance, please visit
www.shadowcaddy.com
or email us at [email protected]
N2695 User Manual 12.indd 2
27/11/08 12:26:14 PM
Introduction and Safety Information
|
1.3
Overview of the Shadow Caddy
The Shadow Caddy is an intelligent robot that
carries your golf clubs, following faithfully
behind you, allowing you to focus on your
game.
It achieves this by using its patented system
of following a signal emitted by a transmitter
carried by the golfer.
The Shadow Caddy has an integrated Object
Detection System so that when it detects a
person, animal or other object in its path the
system is designed to stop, providing power to
the motors and engaging the brakes to avoid a
collision. For extra protection and to minimize
the potential for harm in the event of a collision,
the Shadow Caddy apparatus is speed limited,
to minimize the kinetic energy of the device, to
a speed less than 8.0 (eight) kilometers per hour.
The Shadow Caddy is to be exclusively used for
the transportation of golf clubs weighing less
than 30 (thirty) kilograms. The Shadow Caddy is
not designed for the transportation of humans,
especially children, animals, heavy goods,
liquids (except for drinks in the drinks holder), or
dangerous goods of any kinds. Transportation
of such items on the Shadow Caddy is strictly
prohibited. The device is to be operated
outdoors away from flames or flammable liquids
or gases.
The Shadow Caddy follows a Radio Frequency
(RF) signal transmitted by the Radio
Transmission Unit (RTU). The Shadow Caddy is
susceptible to strong external interference. In
the presence of external interference the Caddy
may stop following. If this occurs please operate
the Shadow Caddy in a location away from the
source of interference.
The user must at all times operate the device
in a safe manner and adhere to all warnings
described in this manual.
N2695 User Manual 12.indd 3
27/11/08 12:26:14 PM
1.4
|
Introduction and Safety Information
Safety and warnings
1. Read the manual before operating the Shadow Caddy for
the first time
2. Adhere to all operating warnings outlined in this manual
whilst operating The Shadow Caddy system
3. Never operate The Shadow Caddy in an environment
or manner that may be unsafe
4. The Caddy should only be serviced by an authorised
individual
5. The Shadow Caddy is sold to you on the condition
that it must only be used in the country in which it
was purchased and must not under any circumstances
be exported to a third country without Your Shadow
Technologies’ written permission.
N2695 User Manual 12.indd 4
27/11/08 12:26:14 PM
Introduction and Safety Information
The Shadow Caddy has sophisticated safety
features such as a Object Detection System and
the ability to stop if it loses signal from the RTU
or if the RTU is tilted from the vertical (as would
be the case if the operator trips and falls).
5. In confined spaces and on metal bridges,
Although this and other safety features are built
into the unit, care must always be taken when
operating any robotic device and the Shadow
Caddy is no exception.
|
1.5
use the “Reverse” mode to manually steer
the Caddy to open ground.
6. Shadow Caddy is to be exclusively used to
transport golf clubs weighing less than 30
(thirty) kilograms.
7. Shadow Caddy must not be operated
by a user under the influence of alcohol,
medicines or non-prescribed drugs.
Please note the following warnings:
8. Shadow Caddy is not under any
1. The Shadow Caddy is to be operated on
a golf course.
2. The device is only to be operated by a
competent adult (minimum 18 years of age
unless accompanied by an adult).
circumstances be used to transport people,
children or any animal.
9. Shadow Caddy is never to be used to
transport dangerous or hazardous material.
10. Shadow Caddy is not to be operated in a
3. The adult operating the device should be
authorised to do so and in possession of an
RTU unit.
4. Maintain a clearance of at least 1 metre on
all sides at all times.
hazardous or explosive atmosphere.
11. Shadow Caddy is designed to be operated
only with its top cover closed and locked,
making its internal machinery inaccessible
to the general public.
12. Never attempt to move the Caddy with the
top cover open.
N2695 User Manual 12.indd 5
27/11/08 12:26:14 PM
1.6
|
Introduction and Safety Information
13. The Caddy functions by detecting a radio
frequency signal transmitted from the Radio
Transmission Unit (RTU). In the presence
of high levels of interference or jamming
the Caddy may stop or may not operate
correctly. If this occurs the Caddy will
disengage the follow me and stop. If the
interference continues, manually move the
Caddy away from ITS source by using the
REVERSE button and then re-engage the
follow me mode.
14. Never operate the Caddy with the RTU in
your hands or above waist height. Always
keep the transmitter at waist level centred on
your back.
15. Do not operate the Shadow Caddy if the
Object Detection System is faulty or if the
Object Detection sensors are obstructed,
dirty or badly scratched.
17. Do not switch on the RTU or attempt to
operate the Shadow Caddy if the Caddy and
the RTU are on opposite sides of infra red
transparent material or glass
18. Do not operate the Caddy near an edge or
surface that may cause it to tip, roll or cause
injury.
19. Keep all battery chargers dry and ventilated
at all times. Do not operate a charger if it or
the Caddy charger socket has been or can
be exposed to moisture or if the case of any
cable being damaged.
20. Only place the batteries provided with the
RTU into the recharging system. Batteries
provided by a third party may short circuit
or otherwise damage the recharge systems
and/or may explode.
21. The machinery is only to be serviced by
If the Object Detection System housing
is obstructed, dirty or if the clear
polycarbonate housing is clouded or has
a significant film of moisture, discontinue
use of the Caddy until the housing is clean
and transparent again. If the housing is
damaged call the Shadow Caddy service
department.
16. In the presence of highly reflective radio
frequency surfaces the Caddy may follow
the reflected signal rather than the signal
transmitted by the RTU. Avoid the operation
of the Caddy near highly reflective surfaces
such as metallic bridges.
N2695 User Manual 12.indd 6
Shadow Caddy authorised personnel. No
modifications to the electronics, safety or
propulsion systems are to be undertaken
without the express written permission of
Shadow Caddy Pty Ltd.
22. The Shadow Caddy is sold to you on the
condition that it must only be used in the
country that it was purchased and must
not under any circumstances be exported
to a third country without Your Shadow
Technologies’ written permission.
27/11/08 12:26:15 PM
2
Section Two
How to use your
Shadow Caddy
N2695 User Manual 12.indd 7
27/11/08 12:26:16 PM
1.8
|
How to Use Your Shadow Caddy
Knowing Your Shadow Caddy
Top View
1.
2.
3.
4.
5.
6.
7.
8
1
2
3
4
5
6
7
Bag well mat
Bag well
Bag Straps
Bag support (lowered)
Sand bucket containers & brackets
Follow Me™ antennae
Nose cone
9
10
11
12
13
Nose Cone Detail
8.
9.
10.
11.
12.
13.
N2695 User Manual 12.indd 8
Body lock
Follow me / stay switch
Reverse switch
Bulk head assembly
Drinks Holder
Object Detection sensors
27/11/08 12:26:16 PM
How to Use Your Shadow Caddy
Side View
14
15
16
Top View – Caddy Open
14.
15.
16.
17.
|
1.9
Front wheel assembly
Bag support (raised)
Charge plug connection
Rear wheel assembly
17
18
19
20
21
22
23
24
18. Battery array: Batteries 1 and 2
19.
20.
21.
22.
23.
24.
25.
26.
27.
28.
29.
30.
Left hand motor & gearbox assembly
Right hand motor & gearbox assembly
Manual brake levers
Isolating power switch (circuit breaker)
Electronics box 1
Electronics box 2
Battery array: Batteries 3 and 4
Battery clamp
USB stick connection (loose cable)
Key switch
Key switch bracket
Headstock assembly
25
N2695 User Manual 12.indd 9
26
27
28
29
30
27/11/08 12:26:16 PM
2.2
|
How to Use Your Shadow Caddy
Getting Started
3. The Shadow Caddy comes to you fully
assembled. In the box, you will find the
following parts.
Unpacking the Shadow
Caddy
Caution: Do not lift – the Shadow Caddy is
heavy. Attempting to lift the Caddy may cause
injury or damage to the Caddy
1. Cut the strapping and remove the lid
•
Shadow Caddy (assembled)
•
Radio Transmission Unit (RTU)
•
Main charger for the Shadow Caddy
•
Charging rack for RTU batteries
•
4 x AA batteries for the RTU
•
Owners manual
•
Keys for the Shadow Caddy
•
Body lock key
Should any of the parts be missing, please
contact Shadow Caddy on 1300 794 931,
email us at [email protected] or
visit www.shadowcaddy.com
2. Remove the plastic protection wrap
N2695 User Manual 12.indd 2
27/11/08 12:26:17 PM
How to Use Your Shadow Caddy
|
2.3
First steps
Important: The steps that follow describe
normal operating procedures. If you experience
any problems with the operating steps that
follow, please refer to Section 4 – Troubleshooting.
Opening & closing the circuit breaker:
Please note that whilst the lever must be
used to close the circuit, the button is used to
release or open the circuit. Failure to follow
this procedure may result in damage to the
circuit breaker.
1. Open the top cover case using the “body
1. Closing the circuit
lock key” provided.
2. Ensure the motor brakes are engaged.
The brakes are engaged by turning the
metal levers on the motors to point
vertically.
3. Close the CIRCUIT BREAKER by sliding
the lever as indicated to the right.
2. Opening the circuit
N2695 User Manual 12.indd 3
27/11/08 12:26:17 PM
2.4
|
How to Use Your Shadow Caddy
4. Close the top cover and lock it with the
“body lock key”.
Note: Once the Caddy has finished booting up,
the brakes will re-engage. Should you need to
release the brakes again:
5. Switch the Caddy on (switch is under the
bag support). The operating system on the
Caddy will begin to boot and the brakes will
disengage – you may now manually roll the
Caddy off the base plate.
Look out for the following sequence to
indicate that the Caddy is booting up
correctly:
i.
both LEDs (red and green) are solid
during boot up;
ii. a short sequence of beeps is heard to
indicate successful boot up; then
The RED LED remains on and only the GREEN
LED goes out when the system has correctly
booted up.
•
Switch the Caddy off and on again. The
brakes will be released for approximately 30
seconds during the bootup phase.
•
Alternatively, disable the brakes by
manually moving the metal levers at the
front of each motor away from the vertical
position.
Be sure to re-engage the brakes by returning
the levers to the vertical position when you
have finished moving it.
Warning: Remember to return the levers
to the vertical position to re-engage the
brakes before resuming normal operation:
Remember also not to move the Caddy with
the top cover open.
6. Insert two FULLY CHARGED AA batteries
into the RTU (Radio Transmission Unit) and
close the cover.
7. The Caddy may now be charged to prepare
it for normal operation
N2695 User Manual 12.indd 4
27/11/08 12:26:17 PM
How to Use Your Shadow Caddy
|
2.5
Important: The Caddy will arrive with some
charge, allowing you to move the Caddy and
ensure it is functional (before testing the
Caddy, please read ‘Using your Caddy’ – Page 2.6
overleaf ). However, it is not fully charged and
MUST be charged for 10 hours before it is ready
for normal operation.
N2695 User Manual 12.indd 5
27/11/08 12:26:17 PM
2.6
|
How to Use Your Shadow Caddy
Using the Caddy
Following these simple steps will ensure that
you find the Shadow Caddy simple, safe and
pleasurable to use.
3. Ensure that the red light on the nose
cone is illuminated (i.e. that the Caddy is
NOT in follow me mode).
1. Switch on the RTU by turning the knob
clockwise. A bright blue light on the RTU
will turn on and begin flashing at one
second intervals.
2. Clip the RTU to your trousers / belt/skirt
in the middle of your back at waist height.
Warning: Do not operate the Caddy whilst
holding the RTU. The RTU MUST be clipped
to your back before beginning operation
and at ALL TIMES whilst the caddy is in
follow me mode.
NEVER switch off the RTU whilst the Caddy
is in follow me mode. This may cause
the Caddy to lurch forward causing injury.
N2695 User Manual 12.indd 6
27/11/08 12:26:17 PM
How to Use Your Shadow Caddy
4. To start the Caddy at any time, stand
directly in front of the Shadow Caddy and
press the FOLLOW ME/wait button.
The green LED should now illuminate.
Walk, initially in a straight line, away from
the Shadow Caddy.
Operate from
within this
zone
|
2.7
6. If for whatever reason the Caddy loses
the RTU signal or if the Object Detection
sensors are activated, the Caddy will give
a long beep and stop. If this occurs, repeat
Step 4.
7. If you wish to reverse the Caddy, press
the button labelled “REVERSE ” and hold
it down. It is normal for there to be a slight
pause before the Caddy begins moving.
Walk with the Caddy in reverse using two
hands to manually steer the device. To
resume FOLLOW ME mode, repeat Step 4.
8. When finished, stop the Caddy by pressing
either button on the nose cone – the red
light will illuminate. Then turn the switch
under the bag support moulding to the OFF
position.
9. Switch off the RTU and return it to the Pro
Shop
Reminder: The green light on the nose cone
indicates that the Shadow Caddy will follow,
whilst the red light indicates that it will not.
Either button on the nose cone will stop the
Shadow Caddy
5. To stop the Caddy at any time, press either
button on the nose cone – the red light will
illuminate indicating that the Caddy will not
follow.
N2695 User Manual 12.indd 7
27/11/08 12:26:17 PM
2.8
|
How to Use Your Shadow Caddy
Warning: Never operate the caddy using the
RTU (radio transmitting unit) when in tight
areas, when inside or when storing the Caddy.
Potential interference from power cables, metal
structures such as roller doors, galvanised
sheds or walls, may cause the Caddy to behave
erratically causing damage or injury.
Instead, always use the REVERSE button to
manually manoeuvre the caddy.
Important: When storing the Caddies, ensure
that the RTU (radio transmitting unit) is stored
in a separate and safe place. In case of theft, this
prevents the Caddy from being used.
N2695 User Manual 12.indd 8
27/11/08 12:26:17 PM
3
Section Three
Maintaining your
Shadow Caddy
N2695 User Manual 12.indd 9
27/11/08 12:26:18 PM
3.1
|
Maintaining Your Shadow Caddy
Maintaining Your Shadow Caddy
Battery Recharging
Caddy Main Battery
1. Important: Main Caddy batteries require an
initial charge of 10 hours or more before use.
2. The main Caddy battery must be recharged
every night (minimum 8 hours) to maintain
optimal performance.
Main Battery Charging Procedure –
using the EPS 2407 charger
1. Always ensure that the Caddy and the
RTU are switched OFF before charging.
2. Ensure the switch under the bag support
is in the OFF position
3. Check that the charger is switched OFF
4. Insert the charger connector into the charge
socket located just before the left rear wheel
and rotate clockwise ensuring it is LOCKED
into position.
Warning: Only use the charger provided
as the use of any other charger may
overcharge the battery. This may result
in a fire, explosion and personally injury.
The use of any other charger will also void
the warranty on the battery and other
Caddy components.
Insert the charger here and turn
clockwise until your hear a “click”
N2695 User Manual 12.indd 1
27/11/08 12:26:18 PM
Maintaining Your Shadow Caddy
Important: If the charge plug is not LOCKED,
then the Shadow Caddy will NOT charge and
may stop running out on the course.
between rounds. The Caddy and the RTU
batteries MUST be charged EVERY NIGHT
to ensure the battery life is at its optimum,
the full charge will take 8 to 10 hours
5. Plug charger into wall socket and turn it on
|
3.2
– a red light will illuminate on the charger
switch.
6. The charging indicator light (to the right of
the switch) will turn red indicating that the
Caddy is charging.
7. The charger light will turn green when the
battery is fully charged. If the light is green
when charger is turned on, switch off and
on again. If still green, the battery is full and
does not need charging.
Recommended practice to optimise
battery life
The Shadow Caddy has been designed
complete up to two rounds per day. Range
has been tested at 40 holes in one day on a
moderate course, but results will vary according
to course length, turf and weather conditions
and of course, the actual distance travelled by
the golfer while playing a round.
Important: even if only 1 round has been
played, the Caddy battery MUST still be charged
overnight to maintain performance. If the
battery cannot be charged overnight, open the
circuit breaker to preserve the existing charge
(see page 2.7). Remember to close the circuit
again before charging as the battery will not
charge otherwise.
Battery Replacement
Rechargeable batteries have a finite number
of charge/discharge cycles and performance
will decrease over time. If you determine
that the batteries are no longer performing
satisfactorily they may need to be replaced.
Please contact your service representative
to facilitate the installation of new batteries.
In most cases, the caddy will comfortably
complete one full round and one 9 hole round
per day without recharging in between.
To complete two full rounds in one day, we
recommend charging for at least 90 minutes
N2695 User Manual 12.indd 2
27/11/08 12:26:18 PM
3.3
|
Maintaining Your Shadow Caddy
Changing RTU Batteries
Warning: Do not attempt to replace batteries
or alter the battery configuration yourself as
there is a risk of electrocution.
Accidental or deliberate shorting of batteries
will cause extreme heat to be generated that
may result in fire and or explosion that may
lead to injury or death.
Important: Attempting to change the
Shadow Caddy batteries or alter the battery
configuration may result in the voiding of your
warranty.
Radio Transmitter Unit (RTU) Battery
1. Always install fully charged AA batteries
before use.
The Radio Transmission Unit is supplied with
two (2) 1.2 volt rechargeable AA NiMH batteries.
Change batteries by removing the battery
cover plate and replacing the existing batteries,
ensuring that they are placed in the correct
orientation.
Warning: Place only batteries provided with
the RTU into the recharge system. Do not use
batteries from a third party with the recharge
system as they may be damaged, or damage the
RTU, short circuit or explode.
Under no circumstances should alkaline
or batteries not specifically designed to be
recharged be placed into the RTU charging rack
because they may explode and cause serious
injury or death.
2. The RTU batteries should be recharged
overnight at the end of each day’s use..
3. In order to recharge the RTU batteries,
remove the batteries from the case and
only place them into the “AA” recharge unit
supplied.
N2695 User Manual 12.indd 3
Caution: Keep the battery charger dry and
ventilated at all times. Do not operate the
charger if it has been or can be exposed to
moisture. Do not operate the charger if any
cable or the case is damaged.
27/11/08 12:26:18 PM
Maintaining Your Shadow Caddy
Cleaning the Shadow Caddy
Tyre Pressure
|
3.4
For optimal Caddy performance the tyres
supplied with your Caddy should be inflated to
the following values
The Shadow Caddy is designed to withstand
rain, but should not be hosed down with water.
Use a damp cloth to wipe the Shadow Caddy
down if it becomes dirty, ensure that the front
anti-collision sensors are clean. DO NOT USE
ANY ABRASIVE CHEMICALS , or SOLVENT
CLEANERS TO CLEAN THE SHADOW CADDY
bodywork.
Object Detection Sensors
Front Tyre 15 Psi / 104 kPa.
Rear Tyres 12 Psi / 86 kPa.
Replacement Tyres
If the tyres require replacing please replace
them with tubed tyres for optimal Caddy
performance. Please contact Shadow Caddy in
your area for replacement tyres.
These sensors are in the nose section of your
Caddy and their efficacy may be reduced when
dirt, dust and condensation forms on the
outside of the sensor housing.
Check the clear polycarbonate window regularly
for damage. Wipe clean any dirt or foreign
particles. If the Object Detection housing is
damaged discontinue use of the Caddy and call
the Shadow Caddy service department.
Clean the clear housing regularly and only with
a clean moist cloth DO not use SOLVENT or
AROMATIC LIQUID CLEANERS
N2695 User Manual 12.indd 4
27/11/08 12:26:18 PM
3.5
|
Maintaining Your Shadow Caddy
Transporting Your Caddy
Your The Shadow Caddy is an advanced robotic
system with sensitive electronic equipment and
sensors.
Before transporting your The Shadow Caddy
ensure that it is switched off. The switch under
the bag support must be at the off position and
the circuit breaker should be open (see page 2.7)
Open the top cover and confirm the brakes are
engaged. This is achieved by moving the levers
attached to the electric motors to the vertical
position.
During transportation make sure that the Caddy
is securely fastened and it does not experience
significant vibration.
Warning: As the Caddy’s weight exceeds 70 kg,
it should only be lifted by mechanical means.
Never attempt to move the Caddy with the top
cover open as it may swing shut causing injury.
N2695 User Manual 12.indd 5
27/11/08 12:26:18 PM
4
Section Four
Troubleshooting
N2695 User Manual 12.indd 6
27/11/08 12:26:18 PM
4.1
|
Troubleshooting
Troubleshooting
Problem
Check List
Action
Caddy regularly stops
at the same place on
the golf course
Is protruding vegetation
triggering the Object
Detection System (ODS)?
On some paths, protruding vegetation may be
triggering the Object Detection System. This can
be confirmed by checking the screen on the front
silver box inside the caddy. “INNER GB” indicates an
ODS alarm. Trim any vegetation which can come
within 50cm of the sides and 1m of the front of he
caddy’s nose.
Is there underground cable
at the location?
Some courses have “trouble spots” where
underground power or communication cables
interfere with the caddy’s radio system causing
the caddy to either “hiccup” or in some cases
completely stop. Since it is not practical to move
them, we recommend either:
1. If possible, find an alternative route for Shadow
Caddy users which avoids the trouble spot
2. Install a sign advising users of the need to
manually steer the caddy past the point using
the reverse button
N2695 User Manual 12.indd 1
27/11/08 12:26:18 PM
Troubleshooting
Problem
Check List
Action
Caddy does not
switch on
Is circuit breaker on?
1. Open top case of Caddy
|
4.2
2. Check Circuit Breaker is in the “ON” position, i.e.
closed.
3. If not, set the switch to the “ON” position
Caddy will not charge
N2695 User Manual 12.indd 2
Has battery been charged?
Connect charger, try to switch on again. If caddy
switches on with charger connected, batteries were
probably flat. Charge overnight before trying again.
Have any wires come loose?
Open caddy and visually check for any obviously
loose or disconnected wiring.
Is Main Electronics fuse
intact?
Open caddy and you will see a small sliver and
black box with the word “REDARC” on it. Follow the
purple wire coming from this box until you locate
a plastic fuse holder. Check the fuse within and
replace with another 5A fuse if it has blown. If fuses
blow repeatedly, contact Customer Support.
Is charger plugged in
correctly?
Check that the charger is inserted correctly and
locked into place with a clockwise turn. A red light
on the charger indicates that the charger is rapid
charging.
Is circuit breaker on?
Check the internal circuit breaker. The caddy will
not charge if the circuit breaker
Is port dirty, wet or
damaged?
Visually inspect port. Clean if dirty and allow to dry
if wet.
Have any wires come loose?
Open top case and visually check for any obviously
loose or disconnected wiring.
27/11/08 12:26:19 PM
4.3
|
Troubleshooting
Problem
Check List
Action
Caddy will not follow
Is caddy in follow-me mode
The green LED on front left must be lit before caddy
will follow.
Is caddy on?
The REVERSE light will be on and steady if the
caddy is switched on.
Is RTU on?
Before checking the RTU, make sure the caddy is
not in follow mode. Then check that the RTU is
switched on and the blue LED is flashing. Return
RTU to belt before trying again.
Are antennas damaged?
Visually check for damage to the two plastic
antenna housings in front of the sand buckets
Is there an Object Detection
System (ODS) alarm?
If both LEDs flash rapidly as you walk off, it may
indicate an ODS alarm. This can be confirmed by
checking the screen on the front silver box inside
the caddy. “INNER GB” indicates an ODS alarm.
Check that no obstacle (even tall grass) is within
1m of the front or sides of the plastic window at the
front of the caddy and try reversing the caddy to a
slightly different position before trying again.
Also check that window is clean and not heavily
scratched.
Caddy will not turn
N2695 User Manual 12.indd 3
Is front tyre pressure correct?
Check that tyre pressures are correct. In particular,
low front tyre pressure can increase resistance
against turning.
27/11/08 12:26:19 PM
5
Section Five
Specifications, Warranty
and Regulatory Data
N2695 User Manual 12.indd 4
27/11/08 12:26:19 PM
5.1
|
Specifications and Regulatory Data
Specifications
Length
1,165.0mm
Height
545.0mm
Main Battery
4 x 24 Volt – 20Amp/hr
Width
780.0mm
RTU Batteries
AA 1.2V
Ground Clearance
Minimum Turning Circle
Tyre Front
Maximum Load
N2695 User Manual 12.indd 1
76.0mm
1,400.0mm
13/5.00/6
30kg/66lbs
Weight
Max Speed
Approx: 75kg
8.0kph
Frequency of Operation
325 to 380 kHz
Tyre Front
15 Psi / 104 kPa
Tyre Rear
12 Psi / 86 kPa
27/11/08 12:26:19 PM
Specifications and Regulatory Data
|
5.2
Declaration of Conformity:
AS 4268-2003
Product Model No: SC-1000
Categorisation: Level 1 Device
Product Description:
According to Radio Communication Devices
(Compliance Labeling Notice 2003) a low-risk
device is defined as a device which if operated
in contravention of an applicable standard may
have a low interference impact on other devices
using the radio frequency spectrum.
Shadow Caddy Pty Ltd (A.C.N. 124 278 155)
product is a robotic Caddy known as “Shadow
Caddy”. The motorized Caddy follows a signal
transmitted by a transponder that is carried by
the golfer.
The transponder operates in the frequencies
240-285 and 325-380kHz at a transmit E.I.R.P. of
less than 500nW. The motorized vehicle follows
the transmitted signal by using a combination
of signal strength maximisation and signal
direction finding.
Statement of Level 1 Device Classification:
The Shadow Caddy is classified as a level 1
device for the following reasons:
1. It transmits at low powers, less than 500nW.
2. Is operated in open areas, such as on golf
courses areas at large distances from other
telecommunication devices and equipment.
3. Is a variant of a remote controlled model.
N2695 User Manual 12.indd 2
27/11/08 12:26:19 PM
5.3
|
Specifications and Regulatory Data
Limited Product Warranty Information
New product warranty
Transport
The warranty is given by Shadow Caddy Pty
Ltd. The warranty applies to the Shadow Caddy
identified by the serial number. The warranty is
given to the original purchaser of the Shadow
Caddy within the country of purchase during
the warranty period.
Shadow Caddy Pty Ltd will be liable for any
damage caused to goods in transit from
Shadow Caddy Pty Ltd to the customer. If any
damage has been caused while in transit to
the customer, Shadow Caddy will replace the
damaged parts at Shadow Caddy’s expense.
Warranty period
The coverage commences from the date of
delivery from Shadow Caddy Pty Ltd. The
coverage is for 1 year.
Repairs covered
This warranty covers the correction, during the
warranty period, of any Shadow Caddy defect
in materials and workmanship. This correction
may be carried out by supplying parts for the
purchaser to fit under instruction by Shadow
Caddy or, at Shadow Caddy’s discretion, by an
appointed representative.
N2695 User Manual 12.indd 3
27/11/08 12:26:19 PM
Specifications and Regulatory Data
Warranty exclusions
Misuse
Damage
This warranty DOES NOT cover damage caused by:
Your warranty does not extend to the following:
8. Misuse or abuse of the Shadow Caddy
1. Damage caused by accident, misuse,
9. Operation of the Shadow Caddy after the
neglect, fire, theft or moving objects striking
the buggy.
|
5.4
defect is known
10. Failure to carry out proper maintenance
2. Damage caused by industrial fallout,
services (refer to owner’s manual)
chemicals or sealants.
11. Alteration of the Shadow Caddy by anyone
3. Damage caused by atmospheric fallout or
flood, hail, salt etc
4. Damage caused to batteries by over
discharging due to excessive use, or
sulphation due to leaving in a discharged
state for prolonged periods
5. Damage caused by overheating due to
inadequate ventilation during charging
6. Indirect, incidental or consequential
who is not authorised by Shadow Caddy
Pty Ltd
12. Fitting of parts or accessories not
recommended by Shadow Caddy Pty Ltd
13. Any work carried out on the Shadow Caddy
by anyone else except by the purchaser or
an authorised person from Shadow Caddy
Pty Ltd
Fair wear and tear
damages
7. Batteries
Items such as the chassis, nose cone bulkhead,
main body and wheels which are subject to
wear and tear are not covered by the warranty
Insurance
We strongly recommend that the owner obtain
independent insurance.
N2695 User Manual 12.indd 4
27/11/08 12:26:19 PM
Contacts
Customer Support
1300 794 931 After Hours: Phil Crotty - 0414 356 044
Tracking by Your Shadow Technologies Pty Ltd
250 Hammond Road, Dandenong South
VIC 3175
Australia
www.yourshadow.com
Australia (Head office)
Shadow Caddy Pty Ltd.
250 Hammond Road,
Dandenong South. Vic 3175.
Phone: 1300 794 931
Fax: 1300 794 932
Email: [email protected]
www.shadowcaddy.com
© Your Shadow Technologies Pty Ltd: October 2008.
International Patents Pending
Agents
South Africa
Shadow Caddy South Africa
59 Bowling Avenue
Kramerville
Gauteng 2148
www.shadowcaddy.com
United Kingdom
Shadow Caddy (Europe) Ltd
Cardinal Point, Park Road,
Rickmansworth. Hertfordshire. WD3 1RE
Phone +44 (0) 1923 432 659
Mobile +44 (0) 7767 324 586
Email [email protected]
www.shadowcaddy.co.uk
N2695 User Manual 12.indd 5
27/11/08 12:26:19 PM