1
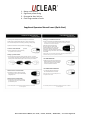
FIRMWARE RELEASE NOTES **Note** Software version 2.07 is not compatible with previous versions of 1.x and lower. All units require version 2.07 for interoperability. HBC200 Version 2.07 NOW WITH Open Intercom for all Brands, Enhanced Private Intercom and Multipoint Features Check out new features and/or enhancements below for just released UCLEAR firmware. As always, please let us know what you think or if you have requests for future updates. We greatly rely on customer feedback for our ongoing product development. We’d also like to extend a special thank you to all of our customers who contributed to this first release (you know who you are!). BRAND NEW This FREE upgrade includes the capability to support the following: Open Intercom with other vendor Bluetooth helmet communications products. Multipoint Bluetooth service supporting dual device connections. Enhanced Private Intercom feature for two voice channel intercom connections The following pages explain the process for using the above features IMPROVED FOR HBC200 Products Firmware 2.07 1. Multi-Point (MP) Supports linking up UCLEAR Communicator (HBC200) with one Smartphone and a 2nd Smartphone at the same time. This feature is supported for adding, for instance; HBC200 Communicator linking with a Smartphone and other Bluetooth devices (iPAD, iPod, GPS, etc.) See following figure. 1093 E. IRON EAGLE DRIVE, STE 115-B | EAGLE, ID 83616 | 208.639-0201 | www.uclear-digital.com 2. Open-Intercom This new feature allows an HBC communicator to link up with other brand of Bluetooth communication headsets. Example: SENA SMH10, CARDO GX9 Example: Other brand communicator + HBC200 + HBC200 + Other brand communicator as shown in figure 1. Figure 1. Supported Configurations Overview Open intercom works via a single Bluetooth connection. A single HBC200 unit only supports one connection to a different brand of communicator. However, because UCLEAR devices support multi-hop connection methods to our own UCLEAR devices you can support the connection method shown in figure 1. 1093 E. IRON EAGLE DRIVE, STE 115-B | EAGLE, ID 83616 | 208.639-0201 | www.uclear-digital.com You can also support the following: UCLEAR + Other + Other + UCLEAR UCLEAR + Other UCLEAR + UCLEAR + Other + Other The key is to use a configuration of units that links UCLEAR to one other brand at a time. Open Intercom Pairing Process 1. Setup the [other brand] Bluetooth headset in HFP pairing (pairing mode for basic phone link). Please refer to the related Manufacturer’s instruction manual. Make sure it is in a ready state by its blinking protocol. 2. Now power on our UCLEAR unit by holding the power button 10 seconds. The LED will blink in white/purple. Both units will attempt to connect. 3. Wait for a while, when UCLEAR LED blinks in blue twice at about 4 sec interval shows that pairing is successfully. 4. The intercom is ready for use now, it will connect and enable intercom for both units automatically. Once this is complete you can use. Once you power off but still wish to stay connected to the other brand unit follow below: 2.12 Generic Intercom Quick start 1. Power on [other brand] headset. 2. Power on UCLEAR device (You may need to wait for a while to allow both system to complete the Initialization process) 10-15 seconds 3. To start intercom, press the 'up' button on UCLEAR device for 2 sec. It will connect to the [other brand], and intercom is ready for use. 4. To disconnect intercom, press the 'down' button on UCLEAR for 2 sec. NOTE: You can only start/stop intercom from the UCLEAR device, not the [other brand]. Key things to consider: The UCLEAR device can connect to a maximum of one [other brand] of intercom. Once the [other brand] headset is paired to a UCLEAR device, it is permanently bonded. Therefore the connection cannot be re-organized after link-loss. Some other brands may require reset to restore their normal operations once complete with open intercom mode. Each time you initiate UCLEAR multi-hop pairing, the generic pairing info is automatically removed. So you must perform generic intercom pairing with [other brand] headset after the UCLEAR multi-hop pairing. UCLEAR multi-hop intercom has following advantages over the generic intercom: 1093 E. IRON EAGLE DRIVE, STE 115-B | EAGLE, ID 83616 | 208.639-0201 | www.uclear-digital.com 1. 2. 3. 4. Better audio quality Significant power saving Re-organize after link loss Chain large number of units Supplicant Operators Manual Insert (Quick Start) Advance Private Intercom Cross-Brand Intercom Quick Start Guide Quick Start Guide **Please ignore the default private intercom setup in the user manual** Setting up Cross-Brand Intercom This intercom contains two voice channels, one common channel and one private channel. By default, all the users are on common voice channel. You can enable the private voice channel by performing on-the-fly pairing. a) Power up & setup the [other brand] bluetooth headset in HFP pairing. *Note: HFP mode is the simple mode just like paring to a mobile phone. Refer to other brands owner manuals for instructions** b) Powered on your UClear HBC by pressing & holding the power button for 8-10 seconds.You will be notified by blinking PURPLE LED. The two units will sync and followed by blinking BLUE LED twice at 4 seconds interval at the indicator. At this stage, pairing is successful. Intercom should be auto enabled a) Make sure all intercom units are powered on & PAIRED UP. Common Channel Mode by default b) Connect all the intercom units by pressing 'vol up' button on one of the units. *After this pairing, it is recommended to power off both units before you start the intercom. Setting up Private Mode **Please take note that you will only need to pair this ONCE c) Set up private voice channel by pressing & holding the 'pwr' + ‘up’ button on any of the two units (B & C in this example) you wish to connect at the same time.The power indicator will blink purple in color once set up is successful. To Start Intercom d) Make sure you have turned on other brand headset and HBC unit that has been paired. Start off your intercom by press & hold the 'Volume UP' button for 2 seconds A B C D **Please take note that you will only need to pair this ONCE** To Disconnect Intercom Switch back to Common Mode d) Switchback to common channel by pressing the 'pwr' button once and you will be notified by a single beep tone. e) To disconnect intercom press & hold the 'Vol DOWN' button for 2 seconds *Start / disconnect can only be controlled by HBC unit, not applicable to other brands. Switch back to Private Mode e) Switch back to private channel by pressing the 'pwr' button once and you will be notified by a double beep tone. For more details, please visit and download the updated instructions from our website: www.uclear-digital.com For more details, please visit and download the updated instructions from our website: www.uclear-digital.com 1093 E. IRON EAGLE DRIVE, STE 115-B | EAGLE, ID 83616 | 208.639-0201 | www.uclear-digital.com 3. Advanced Private Intercom Set up Advanced Private Intercom ------------------------The intercom contains two voice channels, one common channel and one private channel. By default all the users are on common voice channel. You can enable the private voice channel by performing on-the-fly pairing. How to Enable Private Voice Channel 1) Assume you have unit’s A, B, C, D already paired. 2) Connect up all the intercom units by pressing 'vol up' button on any one of the units. By default all the intercom units are in common voice channel now. 3) On unit B, press 'pwr' + 'vol up' at the same time for 2 seconds (LED will blink purple). 4) On unit c, press 'pwr' + 'vol up' at the same time for 2 seconds (LED will blink purple). 5) Press any button on unit B or C, common group pairing will end. 6) Units B and C are enabled on a private channel now. The conversation between B and C cannot be heard by A and D. 7) Please shut down all the units and follow steps below to practice a fresh start up. Quick Start (example for same units configuration noted from above) 1) Power on all the intercom units. 2) Connect up all the intercom units by pressing 'vol up' button on one of the units. Initially all the intercom units are in common voice channel. 3) To toggle between common/private voice channel, press the 'pwr' button once. You'll hear a double beep tone indicating you are in private voice channel B, C. 4) To toggle the voice channel again, press the 'pwr' button once. You'll hear a single beep tone indicating you are in common voice channel A,B,C,D. 1093 E. IRON EAGLE DRIVE, STE 115-B | EAGLE, ID 83616 | 208.639-0201 | www.uclear-digital.com