1
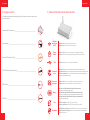
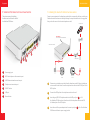
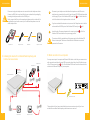
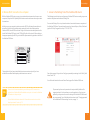
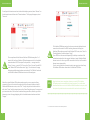
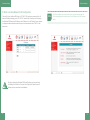
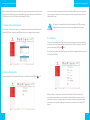
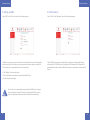
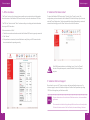
Welcome!
The equipment you have received is state-of-the-art and provides multiple
possibilities so you can make the most of the services you have chosen.
Discover how you can make the most of your Vodafone DSL Router functions
and make your communication even simpler!
User’s Manual
Vodafone Business Connect
Contents
Contents
Equipment........................................................................................................ p. 4-6
Setting up a local area network..........................................................p. 22-23
Initial installation.........................................................................................p. 7-10
Advanced settings....................................................................................p. 24-27
Basic settings.............................................................................................p. 11-14
Technical support..........................................................................................p. 28-29
Internet connection................................................................................p. 15-17
Safety information...................................................................................p. 30-33
1.Package contents
2.Vodafone DSL Router illuminated indicators
3.Vodafone DSL Router technical characteristics
1.Installing the device for Internet access service
2.Installing the device for combined fixed telephony and Internet access services
3.Wired connection to a computer
4.Wireless (Wi-Fi) connection to a computer
1.Access to the Settings Tool of the Vodafone DSL Router
2.Display of activated services
3.Settings back up and restoration
4.Changing the password for the Vodafone DSL Router settings
1.Connection via the Vodafone privately-owned network
2.Immediate connection via a mobile telephony network
1.Display of connected devices
2.Using a shared printer
3.File sharing
1.NAT configuration
2.Setting up a DMZ
3.UPnP activation
1.ADSL Line status
2.Vodafone DSL Router restart
3.Vodafone technical Support
1.For your safety
2.Declaration of conformity
Function settings......................................................................................p. 18-21
1.Wireless network configuration
2.Setting up a Wi-Fi network
3.Wired Local Area Network (LAN) configuration
2
3
Equipment
Equipment
1.Package contents
2.Vodafone DSL Router illuminated indicators
A complete package contains everything you will need to connect to the services
you have chosen:
Vodafone DSL Router device________________________________________
Wireless
connection
(Wi-Fi)
Power adapter_ _________________________________________________
Device
status
Indicator off: The Wi-Fi network is deactivated
Indicator on: The Wi-Fi network is functioning
Indicator off: There is no power supply to the Vodafone DSL Router.
Indicator on: There is normal power supply to the Vodafone DSL Router.
Ethernet/LAN cables (yellow)_______________________________________
USB
DSL/LINE telephone cables (grey)_ __________________________________
ADSL
PHON E
LINE
ADSL splitter_ __________________________________________________
DS
L/L
INE
Telephone
lines
Indicator off: The voice service is deactivated (for the respective telephone line).
Indicator blinking: There is an incoming telephone call (to the respective telephone line).
Indicator constantly on: The voice service is activated; you can place a telephone call
(from the respective telephone line).
New voice
message
Indicator off: There are no messages on the answering machine.
Indicator on: There are messages on the answering machine.
Battery
ADSL filter_ ____________________________________________________
DSL
Broadband
4
Indicator on: A device is connected to the USB port.
Indicator on and “Device Status” indicator off at the same time:
The product is operating on battery supply.
Indicator blinking and “Device Status” indicator off at the same time:
The product is operating on battery supply; the battery is almost discharged.
Indicator blinking and “Device Status” indicator on at the same time:
The battery needs replacing.
Indicator blinking: The ADSL line is synchronizing.
Indicator constantly on: The ADSL line has been synchronized.
Red indicator constantly on: A broadband connection has been established.
(Red/blue) indicator blinking: There is a connected and activated Vodafone
USB Modem in place.
5
Equipment
Initial installation
3.Vodafone DSL Router technical characteristics
1.Installing the device for Internet access service
The ports necessary for installing
the device are located on the back of
the Vodafone DSL Router.
Connect your equipment to the telephone socket which corresponds to the line on which your
Vodafone services have been activated by following the steps described below (it is suggested
that you should connect it to the main telephone socket):
Telephone set
Wi-Fi button:
Press to activate/deactivate Wi-Fi
Vodafone DSL Router
A
C
ADSL splitter
D
1
Power supply port
2
ADSL line telephone cable connection port
3
LAN/Ethernet network connection port
4
Telephone set connection port
5
ON/OFF button
6
USB port
7
Restart button
6
B
Power
socket
Telephone
socket
A
Disconnect your telephone set cable from the telephone socket (if there is a telephone
set connected to the socket). Insert the telephone set cable into the PHONE port of the
ADSL splitter.
B
Connect the ADSL splitter to the telephone socket on the wall.
C
Insert the grey DSL/LINE telephone cable into the DSL port (port 2 , p. 6) of
the Vodafone DSL Router. Insert the other end of the telephone cable into the DSL
(or Modem) port of the ADSL splitter.
D
Insert the end of the power adapter into the correct port (port 1 , p. 6) of the Vodafone
DSL Router and then to a power supply socket.
7
Initial installation
Initial installation
Disconnect any duplex telephone sets connected to other telephone sockets.
Connect an ADSL filter to each one (like the one contained in the package) by
inserting the telephone cable into the PHONE port.
Finally, connect the filters to the respective telephone sockets on the wall. It is
suggested that you should connect up to 2 additional telephone sets on the
same telephone line.
Telephone set
Telephone cable
ADSL filter
Telephone socket
A
Disconnect your telephone set cable from the telephone socket (if there is a
telephone set connected to the socket). Insert the grey DSL/LINE telephone cable
into the grey DSL port of the Vodafone DSL Router (port 2 , p. 6). Insert the other
end of the cable into the telephone socket on the wall.
B
If you have activated the relevant service, connect the 2 telephone sets to the first
and second black PHONE ports of the Vodafone DSL Router (port 4 , p. 6).
C
Insert the end of the power adapter into the correct port (port 1 , p. 6) of the
Vodafone DSL Router and then to a power supply socket.
The service will still be provided even if the power supply to the Vodafone DSL
Router is interrupted. The device is fitted with built-in batteries to ensure its
operation for 60 minutes.
3.Wired connection to a computer
2.Installing the device for combined fixed telephony and
Internet access services
Telephone set
Telephone set
You may connect up to 4 computers via Ethernet/LAN cables so that they can communicate
with one another and share the same ADSL connection. Insert the yellow LAN cable into one
of the 3 Ethernet ports (port 3 , p. 6) of the Vodafone DSL Router. Insert the other end of the
cable into the Ethernet/LAN port of your computer.
Wi-Fi button:
Press to activate/
deactivate Wi-Fi
Vodafone DSL Router
B
B
A
C
LAN/Ethernet cable
This applies both if you have activated the Internet access service only and if you have
activated the combined fixed telephony and Internet access services.
8
Power socket
Telephone socket
9
Initial installation
Basic settings
4.Wireless (Wi-Fi) connection to a computer
1. Access to the Settings Tool of the Vodafone DSL Router
With the Vodafone DSL Router you may set up a wireless Internet connection for one or more
computers, if they have Wi-Fi capability. Both a wireless and a wired connection may be used at
the same time.
The following steps will assist you configure your Vodafone DSL Router according to your own
needs via the dynamic and interactive Settings Tool.
Initially, turn on your computer’s wireless connection (Wi-Fi) by following the manufacturer’s
instructions. From the list of available wireless networks, choose the one designated as
Vodafone-XXXXX, where XXXXX are the last 5 digits of the device serial number printed on the
back of the Vodafone DSL Router, in the (S/N) field. Double click to select it. When a dialogue
box appears requesting the Wi-Fi Key, enter the WPA alphanumerical key printed on the back of
the Vodafone DSL Router.
To access the Settings Tool, set up a (wired or wireless) connection between a computer and
the Vodafone DSL Router. Open an Internet browser (e.g. Internet Explorer, Firefox, Safari) and
type the URL http://oxygen.lan (or http://192.168.1.254).
WPA
005527171525
001D1C143D24
fwbcmrpi
DESIGNED IN HELLAS
MADE IN CHINA
MAC
Input: 12VDC
Polarity:
S/N
or http://192.168.1.254
Password: user
1.5A
OxyGEN IAD - IKA14001.NUM
URL: http://oxygen.lan
Username: user
This applies both if you have activated the Internet access service only and if you have
activated the combined fixed telephony and Internet access services.
Enter a New password of your choice. Verify your password by reentering it in the “Verify” field
below. Select “ΟΚ”.
You will then be directed to the main Control Panel page of the Vodafone DSL Router.
Info
Connect to the Internet immediately, even before your ADSL connection is
activated via a Vodafone Mobile Broadband service plan. Just insert the Vodafone
USB modem to the special port.
You can find detailed instructions in the “Immediate connection via a mobile
telephony network” section (p. 15).
10
The password you have set is personal and is not provided by Vodafone. We
suggest you keep it for the next time you use the application. If you lose your
password, you may restore the custom settings of the Vodafone DSL Router and
set a new password. You will find detailed instructions in the “Changing password
for the Vodafone DSL Router settings” section, on page 14.
11
Basic settings
Basic settings
2.Display of activated services
3.Settings back up and restoration
To display the activated services and Vodafone DSL Router functions, select “Home” on the
horizontal menu on the Control Panel home page. A window will appear where you can check
the various functions of your device (e.g. DSL line status, Wi-Fi, connected computers, etc.).
All the configurations you have set on the Vodafone DSL Router can be backed up for future
use (e.g. following the device restoration to its initial custom settings).
To backup the settings, select “System” on the horizontal menu, select “Backup / Restore” on
the left side menu and then press “Backup”.
In the next dialogue box, select “Save”. Enter the desired save location on your computer (e.g.
in “My Documents”) and confirm it by pressing “ΟΚ”.
To restore the backed up settings without having to configure every function, visit the
“Backup / Restore” section.
In the “Restore” field select “Browse” to find the location where you have saved your
configuration file. Click on “Open” and then click on “Restore”.
12
13
Basic settings
4 Changing the password for the Vodafone DSL Router settings
To change the Current password which you set when you first visited the Settings Tool,
select “System” on the horizontal menu and then select “Change password” on the left side
menu. Enter the Current password and then enter the New password. Verify your password by
reentering it in the “Verify” field below. Select “Apply”.
Internet connection
The Vodafone DSL Router supports 2 different Internet connection modes depending on
the type of access you have chosen:
• ADSL: Access via the Vodafone privately-owned network
• Vodafone Mobile Broadband: Internet access via a mobile telephony network (3G/HSDPA)1.
1.Connection via the Vodafone privately-owned network
Where Internet access is provided via the Vodafone privately-owned network (LLU), you have
an ADSL connection and no additional settings are required on your part. No passwords are
required either.
The first time you connect your equipment, the Vodafone DSL Router may be
reset automatically to upgrade its Firmware. The process takes approximately 10
minutes and must be completed before you proceed with any other action.
2.Immediate connection via a mobile telephony network
With the Vodafone DSL Router you can connect to the Internet immediately, even before
your ADSL connection is activated. You must simply request the activation of your computer
(desktop or laptop) Vodafone Mobile Internet service and use the special Vodafone USB
modem to access the Internet via the Vodafone mobile telephony network (3G/HSDPA).
If you misplace/forget your initial password, but also if you wish to restore the
custom settings of your device, keep the “Reset” button on the back of the
Vodafone DSL Router ( 7 , p. 6) pressed for 10 seconds. By resetting, you will
lose all the settings you may have chosen. As soon as the reset is complete,
reconfigure the Vodafone DSL Router either by using the configurations you have
backed up (see detailed instructions in the “Settings back up and restoration”
section, p. 13) or configure each function separately.
To insert the special SIM card into the Vodafone USB modem, remove the cover and place
the SIM card in the special slot. Follow the relevant instructions included in the Vodafone USB
modem package.
Connect the USB modem to the Vodafone DSL Router by inserting it into the USB port on the
back of the device ( 6 , p. 6).
1
14
Requires the activation of the relevant Vodafone service. Ensure the service has been activated.
15
Internet connection
Internet connection
To configure the Internet connection via the mobile telephony network, select “Internet” on
the horizontal menu and then select “External modems”. On the page that appears, select
“New scan”.
The Vodafone USB Modem can also function as an automatic backup Internet
connection in the event of the ADSL line being disconnected. Keep your
Vodafone USB modem connected to the Vodafone DSL Router, select “Auto” as
“Backup Operation” method and press “Apply”.
If your ADSL line is disconnected temporarily, the backup connection will be
activated automatically via the computer (desktop or laptop) Vodafone Mobile
Internet service . As soon as your ADSL connection is back on, it will be used for
Internet access automatically.
If you do not wish the backup connection option, we suggest you do not keep
the Vodafone USB modem connected to the Vodafone DSL Router.
The scan performed to find the new Vodafone USB Modem may take 1 to 2
minutes. Wait until your Vodafone USB modem appears on the list of available
external modems. If a PIN is required for its operation, — orange icon in the
“Status” column — press the “Edit” icon on the “Action” column. Enter the PIN
in the “Modem PIN” field and then select “Apply”. You will return to the page
displaying available external modems automatically. Click “Refresh” and make
sure that the Vodafone USB Modem status icon has turned green.
Under the custom Vodafone USB modem operating mode, you can connect and hang
up manually. If you wish to activate the connection via the computer (desktop or laptop)
Vodafone Mobile Internet services, select “Dial”. To verify that you have Internet access as
well, select “Home” on the horizontal menu on the Control Panel home page. You may control
your connection status (VoX-vmb) on the window that appears. When, however, you wish to
disconnect, return to the page displaying the list of available external modems and select
“Hangup”.
Info
Enjoy fast Internet access anywhere, whenever you need it! The Vodafone
USB modem may be connected directly to any computer. You can thus have
broadband Internet access via the Vodafone Mobile Broadband service plan, with
the option of a portable wireless connection which can also be used outdoors.
* You must have the relevant service activated by Vodafone.
16
17
Function settings
Function settings
1.Wireless network configuration
2. Setting up a Wi-Fi network
To configure the wireless connection between the Vodafone DSL Router and your computer or
other wireless devices, select “Configuration” on the “Wireless” horizontal menu.
The custom wireless network encryption standard is WPA/WPA2; however, you may
change it to WEP, WPA or WPA2. You may also choose your own password and enter a new
alphanumerical code (ASCII characters) in the relevant field. The more alphanumerical
characters you use the more secure your Wi-Fi network will be against possible connections by
unknown devices.
The Vodafone DSL Router supports the Wi-Fi 802.11n standard (default setting) for high
performance wireless connection and is also compatible with the 802.11 b and 802.11 g
standards.
Unless changes are made to the Vodafone DSL Router custom settings, the optimum Wi-Fi will
be chosen automatically. You can, however, select another channel manually.
By selecting “Off” in the “Security” section, you will make the Wi-Fi network
open and accessible to other devices without the use of a password. This may
lead to the unwelcome and even harmful use of the Vodafone DSL Router and
the ADSL line by unknown persons.
If you wish, you may change the name of your Wi-Fi network by entering a new name in the
“Network name” field. By selecting “Off’ under “Broadcast SSID” on the “Configuration” menu,
you may hide your Wi-Fi network identity to achieve an even higher level of security.
The Vodafone DSL Router is capable of setting up a Wi-Fi network by using different encryption
standards (WEP, WPA or WPA2). When the Wi-Fi Key is requested, enter the WPA alphanumerical
key printed on the back of the Vodafone DSL Router.
WPA
18
005527171525
001D1C143D24
fwbcmrpi
DESIGNED IN HELLAS
MADE IN CHINA
MAC
Input: 12VDC
Polarity:
S/N
or http://192.168.1.254
Password: user
1.5A
OxyGEN IAD - IKA14001.NUM
URL: http://oxygen.lan
Username: user
19
Function settings
Function settings
3.Wired Local Area Network (LAN) configuration
The local IP of your Vodafone DSL Router is 192.168.1.254. Any devices connected to it will
have an IP address belonging to the “102.168.1 Χ” network form. Should you wish to change
the Vodafone DSL Router local IP address, select “Addresses” on the “Network” menu, whereas
to change the address allocation method in your local area network, select “DHCP” on the
same menu.
Info
To further configure the security levels of your local area network, see the
“Authorizing programs for Internet access” and “Definition of a DMZ” sections
below.
Should you change the Vodafone DSL Router IP address, your connection to
the Settings Tool will be lost. To return to the Settings Tool enter the new IP
address you have created on the web address.
20
21
Setting up a local area network
With the Vodafone DSL Router you are able to set up your own local area network and connect
any devices to it. Simply connect your compatible device (e.g. printer, external hard disk drive,
USB flash drive, etc.) to the USB port of the Vodafone DSL Router.
1.Display of connected devices
Setting up a local area network
As soon as your printer is properly connected to the Vodafone DSL Router, you may detect it
on your computer. Now you can use the same printer from any computer connected to the
Vodafone DSL Router.
This function is compatible with a number of printers with a USB connection
capability. Scanners and all-in-ones are not compatible with this function.
On the “Status” menu, under “Interfaces”, you may check any linked devices detected by the
Vodafone DSL Router: computers and USB devices (such as a storage medium or printer).
3.File sharing
Share your files wirelessly with all the computers connected to your local area network. Just
connect your external storage medium (e.g. hard disk drive, USB flash drive, etc.) to the USB
port of the Vodafone DSL Router ( 6 , p. 6).
In the “Devices” section on the Home Page, you can check the storage medium connected to
the Vodafone DSL Router.
2.Using a shared printer
Connect your printer to the Vodafone DSL Router via a USB cable to the USB port ( 6 , p. 6).
Make sure that your computer is connected to the Vodafone DSL Router. Identify the
connected storage medium on your computer. By double clicking the medium, you will
have wireless access to the entire content of the medium. Use the same method to make
simultaneous use of the files saved by all the computers connected to the Vodafone DSL
Router.
22
23
Advanced settings
Advanced settings
1.NAT configuration
To configure “Port Forwarding” rules on your Vodafone DSL Router:
The Vodafone DSL Router has a pre-activated “Firewall” to ensure maximum security.
Consequently, access is permitted only to outgoing connections. This function may affect
certain applications, such as communication tools (e.g. video conferencing, etc.) or server
applications (FTP, SMTP).
• Select “Port Forwarding” in the “Firewall” section on the horizontal menu.
The “Port Forwarding” option allows any data packets received via the specific TCP/IP port to
be transmitted to a specific device on the internal network.
If you wish to have Internet access to a server (web, e-mail, ftp, game server, etc.) on your
local area network via a specific port, you will have to set a forwarding rule which will direct
any TCP/UDP packets received via the port to the network device. If the server in question has
to forward a number of ports, you may set an equal number of different forwarding rules or a
range of successive ports under the same rule.
• Select “Add new” to create a new rule.
• Choose your preferred application from the dropdown menu.
• If you are unable to find your preferred application in the list, you may set it by choosing
“Custom” and entering the protocol type (TCP or UDP) and the port number used for
data packet forwarding.
• Set the IP address on your local area network and, optionally, the destination port if
you want it to be different from the one entered in the fields used to set the “Application”.
The request will be forwarded to this “Private address”.
• Select “OK” to save the settings.
• Repeat the process for any application you want to exclude from the “Firewall”.
For a example, if you want to have Internet access to a web server with the IP address
192.168.1.2 on your local area network, you will have to set a forwarding rule which will
redirect any TCP packets received by the Vodafone DSL Router via port 80 to the device with
the IP address 192.168.1.2.
24
25
Advanced settings
Advanced settings
2.Setting up a DMZ
3.UPnP activation
Select “DMZ” on the “Router” menu for the following settings.
Select “UPnP” on the “Advanced” menu for the following settings.
The DMZ zone allows you to expose a device to the Internet without any restriction regarding
which ports will be used. It allows you to open any ports that have not been set already (via
“Port Forwarding”) to a single device on the local area network:
The UPnP IGD option allows certain applications to set the port forwarding NAT settings
automatically. The UPnP AV option is used by other UPnP terminals for the shared use of
multimedia files stored on a disk or USB flash drive which is connected to the Vodafone DSL
Router.
• Click “Enabled” to activate this option
• Enter the IP address of the device to be included in the DMZ zone
• Confirm it by selecting “Apply”
Caution: The local computer defined as included in the DMZ zone is no longer
protected by the pre-activated “Firewall” of your Vodafone DSL Router, since
every incoming Internet connection will be forwarded to it automatically.
26
27
Technical support
Technical support
1.ADSL Line status
2.Vodafone DSL Router restart
The “Status” section on the horizontal menu enables you to monitor technical information
about the status of the Vodafone DSL Router functions, such as the interfaces or ADSL line.
To restart the Vodafone DSL Router, select “Restart” in the “System” section. The
configurations you have selected on the Vodafone DSL Router will be kept if you have not
selected “Erase Configuration”, which restores default settings. Alternatively, to reset and
restore default settings, press the “Reset” button on the back of the device.
The “DSL Line” function in the “Status” section enables you to display technical information
about your ADSL line status.
If the current status is “Idle”:
• Check the connections and make sure that the Vodafone DSL Router is properly connected.
• Click “Retrain”.
• If the problem is not resolved, contact Vodafone to verify that your ADSL connection has
been activated and is operating correctly.
If the DSL/Internet indicator is not blinking (see p. 5), use the “Restart”
function. If the problem persists, contact Vodafone Technical Support,
any time.
3.Vodafone Technical Support
We are here for you on a 24/7 basis to assist you with any problem that may occur. For
technical support, contact the Vodafone Corporate Customer Care Department by calling
1399 (free of charge from you Vodafone mobile).
Info
For more information on the activation of Vodafone services, visit www.vodafone.
gr/business
The screenshots included in this guide may differ from those on the end product.
To obtain the latest version of the User Guide, visit www.vodafone.gr/business
28
29
Safety information
1.For your safety
Read the following instructions carefully. Failure to comply with these instructions can be
dangerous and/or illegal. You are solely responsible for how your Vodafone DSL Router is used
and for the consequences of its use.
Do not activate the product in places where the use of wireless products is prohibited or where
it can cause interference or hazards.
Read the “Safety information” section
Do not use the device at refueling stations
The device may generate intense or flashing light
Do not rely on this device for emergency
communications
Maintain a distance of at least 20 cm from the
Vodafone DSL Router
Do not dispose of the device in fire
Small parts may cause chocking
Avoid contact with magnetic media
The device may generate intense noise
Avoid extreme temperatures
Keep the device away from pacemakers and other
individual medical devices
Avoid contact with liquids Keep the device dry
Deactivate the device when asked to do so
in hospitals and medical facilities
Do not try to disassemble the device
Deactivate the device in explosive environments
Safety information
Radio frequency exposure limits
To avoid the possibility of exceeding the radio frequency exposure limits, you, or anybody else who is around, must be
at least 20 cm away from the aerial linked to the Vodafone DSL Router.
Young children
Keep the Vodafone DSL Router and its components out of reach of children and do not allow children to play with the
router. They may be injured, cause injuries to others or damage the Vodafone DSL Router. The Vodafone DSL Router
includes small, pointed parts which can cause injuries or become detached and cause chocking.
Interference
The Vodafone DSL Router includes a transmitter and a receiver. When on, it receives and transmits radio frequency
energy. You must be careful when using the Vodafone DSL Router very near individual medical devices, such as
pacemakers and hearing aids. All wireless products are sensitive to interference which may affect their performance.
The Vodafone DSL Router is designed for operation at a distance of at least 20 cm from any individual. Failure to
comply with this instruction may lead to exposure to radio frequency energy in excess of the limits set forth in relevant
directives.
Pacemakers
Pacemaker manufacturers suggest that a pacemaker should be at least 15 cm away from a wireless device to avoid
possible interference between the device and the pacemaker.
Hearing aids
Hearing aids or other cochlear implant users may experience noise interference when using, or being close to, wireless
devices. The level of interference depends on the type of the aid and the distance from the source of interference.
You may reduce interference by moving further away from the source. Consult your hearing aid manufacturer for
alternative solutions.
Medical devices
To find out whether the Vodafone DSL Router could affect the operation of your medical device, consult your doctor
and the device manufacturer.
Hospitals
To prevent possible interference with sensitive medical equipment, deactivate your wireless device when requested to
do so in hospitals, clinics or health facilities.
Explosive environments
Where there is a possible explosive atmosphere, you must comply with all posted instructions and must, upon request,
deactivate the Vodafone DSL Router or any other wireless device. Areas with possible explosive environments are
refueling stations, spaces under boat decks, fuel or chemical transportation or storage facilities, as well as areas where
the air contains chemicals or particles (such as grains, dust or suspended metallic particles).
Explosion areas
To avoid causing interference with explosion operations, you must deactivate the Vodafone DSL Router when you
are in explosion areas or in areas where there are signs instructing you to deactivate “two-way wireless devices” or
“electronic devices”. Watch out for warnings, comply with restrictions and observe all the rules
Use only authorized accessories
This product is recyclable. Dispose of it appropriately
30
31
Safety information
Safety information
• DO NOT use this product near water, for example in a damp basement or close to a swimming pool.
• DO NOT expose the device to moisture, dust or corrosive liquids.
Appropriate disposal of the product
(Electric & electronic equipment waste)
• DO NOT place objects on the device.
• DO NOT install, use or maintain the device during a storm. There is slight risk of electrocution.
• Connect ONLY approved components to the device.
• DO NOT open the device or unit. If you open or remove the covers, you may be exposed to dangerously high
voltages or other hazards. ONLY specialized and knowledgeable technicians should service or disassemble the
device. Contact your supplier for more information.
• Make sure that you have inserted cables into the correct ports.
The signs affixed on the product or its accompanying manuals indicate that it should not be disposed of with
other domestic waste when its life cycle is over. To help prevent possible health or environmental hazards
(due to uncontrolled waste disposal), and assist the sustainable reuse of material resources, please, separate
it from other types of waste and recycle it. Domestic users should either contact the shop where they bought
the product or local services to find out where and how they can deliver the product for environmentally safe
disposal. Corporate users should contact their suppliers and check the terms and conditions laid down in
their purchasing contracts. This product should not be mixed with normal waste.
• Place the connection cables carefully to eliminate any possibility of somebody stepping or stumbling on them.
• Make sure that you have disconnected all cables from the device before you take it for servicing or disassemble it.
• Use ONLY an appropriate power adapter or cable for your device.
• Connect the power adapter or cable to an appropriate power supply line (e.g. 110V AC in Northern America or
230V AC in Europe).
• DO NOT let anything come into contact with the power adapter or cable and DO NOT place the product in a place
where somebody could step or stumble on it.
• DO NOT use the device if the power adapter or cable is damaged. There is a risk of electrocution.
• If the power adapter or cable is damaged, disconnect it from the power socket.
• DO NOT try to repair the power adapter or cable. Contact your nearest supplier and buy a new one.
• DO NOT use the device outdoors and make sure that all connections are located indoors. There is slight risk of
electrocution.
2.Declaration of conformity
Vodafone-Panafon Hellenic Telecommunications Company hereby states that this Vodafone DSL Router complies with
the essential requirements and other relevant provisions of Directive 1999/5/EU.
It also complies with the standards established by the following:
EN300328V1.6.1 (2004-07), ΕΝ301 489-01 V1.4.1 (2002-08), ΕΝ301 489-17 V1.2.1 (2002-08), Safety ΕΝ 609501:2001. In accordance with the provisions of Directives 89/336/EEC, 92/31/EEC, 93/68/EEC, 99/5/EEC and LVD
73/23/EEC. FCC approved
Declaration of Interference in accordance with the requirements of the Federal Communications Commission (FCC)
This device complies with Part 15 of the FCC Rules. Operation is subject to the following two conditions:
• This device may not cause harmful interference.
• This device must withstand any interference received, including interference that could cause undesired operations.
• DO NOT block the device ventilation openings. Insufficient air flow may damage the device.
• Use only a telecommunications cable no. 26 AWG (American Wire Gauge) or a cable of a higher cross section.
• Aerial warning! This device complies with the ETSI and FCC certification requirements when used with the
accompanying aerial(s). Use only the accompanying aerial(s).
• If you mount the device on the wall, make sure not to cause any damage to power, gas or water lines.
• DO NOT expose the battery to excessive heat or a naked flame.
• DO NOT immerse the battery in water.
• DO NOT subject the battery to strong blows or let it come in contact with water droplets.
• DO NOT disassemble or modify the battery for any reason whatsoever.
• DO NOT keep the battery discharged.
• Charge the battery at temperatures ranging between 0°C and +45°C.
• DO NOT store the battery with less than 50% of its original capacity or at a temperature other than specified.
32
CE: RE980106H01
SAR: RM980106H01
This equipment has been tested and found to comply with the limits for a Class B digital device, pursuant to Section
15 of the FCC regulations. These limits are designed to provide reasonable protection from harmful interference in
residential installations. This equipment generates, uses and can radiate radio frequency energy and, if not installed
and used in accordance with the instructions, may cause harmful interference to radio communications. However,
there is no guarantee that interference will not occur in a particular installation. If this equipment does cause harmful
interference to radio or television reception, which can be determined by turning the equipment off and on, the user is
encouraged to try to correct the interference by one or more of the following measures:
1. Reorient or relocate the receiving antenna.
2. Increase the distance between the equipment and receiver.
3. Connect the equipment into an outlet on a circuit other than that to which the receiver is connected.
4. Consult the retailer or an experienced radio/TV technician for assistance.
Radiation exposure statement in accordance with FCC requirements
• This transmitter must not be located or operate in conjunction with any other antenna or transmitter.
• The IEEE 802.11 b or 802.11 g function of this product in the USA is restricted by the firmware to channels 1 to 11.
• Compliance to FCC requirements on exposure to radiofrequencies, demands that there must be a minimum 20 cm
distance between the device antenna and any persons near it.
33
1-3 Tzavella St., 152 31 Chalandri
Tel.: 210 67 02 000, 210 67 03 000 Fax: 210 67 03 200
CUSTOMER CARE DEPARTMENT
1399 (free of charge from Vodafone mobiles),
80011 127127 (free of charge from landlines)