1
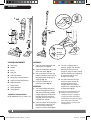
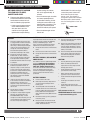
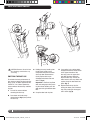
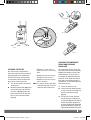
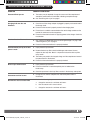
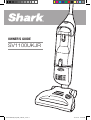
OWNER’S GUIDE
SV1100UKJR
SV1100UKJR_40_ENG_120124_1.indd 1
12-01-24 10:05 AM
WARNINGS
IMPORTANT SAFETY INSTRUCTIONS
For Household Use Only
WHEN USING YOUR SHARK® CORDLESS VACUUM,
BASIC SAFETY PRECAUTIONS SHOULD ALWAYS BE
FOLLOWED, INCLUDING THE FOLLOWING:
8DO NOT use charging adapter with an extension cord.
Plug adapter directly and only in a standard
(220-240V~, 50/60Hz) electrical outlet.
READ ALL INSTRUCTIONS BEFORE USING YOUR SHARK®
CORDLESS VACUUM.
9DO NOT run the vacuum over the charging adapter cord.
IMPORTANT: This appliance can be
11DO NOT attempt to use this charging adapter with any
other product nor attempt to charge this product with
another charging adapter.
used by children aged from 8 years and above and
persons with reduced physical or mental capabilities
or lack of experience and knowledge if they have
been given supervision or instruction concerning the
use of the appliance in a safe way and understand
the hazards involved. Children should be supervised
to ensure that they do not play with the applaince.
Cleaning and user maintenance shall not be made by
children without supervision.
IMPORTANT: Instructions for proper disposal of
this product, pursuant to the European Union’s
directive on electrical waste.
Please do not dispose of any electrical equipment as
ordinary waste. Help to conserve natural resources and
protect the environment: when you have finished using this
product, please dispose of it at your local waste collection
or recycling centre in the area reserved for electrical
equipment. Contact your local authority to find the nearest
waste collection centre. To remind you to dispose of this
product responsibly and separately from ordinary waste, it
is marked with the symbol of a crossed-out rubbish bin.
GENERAL ELECTRICAL SAFETY:
WARNING: TO REDUCE THE RISK OF
ELECTRIC SHOCK OR INJURY DO NOT USE OUTDOORS
OR ON WET SURFACES.
10Keep charging adapter cord away from heated surfaces.
12Only use charging adapter provided with the vacuum. It
is marked “For SV1100UK models only”.
13Always turn the vacuum off before connecting or
disconnecting the motorised floor brush.
GENERAL USE:
14 Use only on dry, indoor surfaces.
15Store the cordless vacuum indoors. Put the cordless
vacuum away after use to prevent accidents.
16Use only as described in this manual. DO NOT use for
any purpose other than described in this user’s guide.
17Use only cleaning attachments supplied with this unit.
18 Keep your work area well lit.
19Keep the vacuum moving over the carpet surface at all
times to avoid damaging the carpet fibres.
20 DO NOT put any objects into openings.
21DO NOT use with any opening blocked; keep free of
dust, lint, hair and anything that may reduce airflow.
22DO NOT use the vacuum cleaner without dust cup and
filter in place.
23DO NOT vacuum up any liquids.
24DO NOT pick up anything that is burning or smoking
such as cigarettes, matches or hot ashes.
2 DO NOT use or charge the unit on wet surfaces.
25DO NOT use to pick up flammable or combustible liquids
such as gasoline or use vacuum in areas where their
fumes may be present.
3DO NOT immerse vacuum cleaner, charging base or
charging adapter in water or other liquids.
26DO NOT pick up toxic solutions such as chlorine bleach,
ammonia or drain cleaner.
4DO NOT handle vacuum, charging base or charging
adapter with wet hands.
27DO NOT use in an enclosed space where vapors are
present from paint, paint thinner, moth-proofing
substances, flammable dust or other explosive or toxic
materials.
1 DO NOT use or charge the unit outdoors.
5DO NOT use charging adapter if power cord has been
damaged.
6DO NOT abuse the charging adapter cord.
NEVER carry the charging adapter or charging base by
the cord.
7DO NOT unplug the charging adapter by pulling on cord;
to unplug, grasp the plug, not the cord.
2
28DO NOT run the vacuum over large-sized objects.
29DO NOT pick up hard or sharp objects such as glass,
nails, screws or coins that could damage the vacuum
cleaner.
www.sharkclean.co.uk
SV1100UKJR_40_ENG_120124_1.indd 2
12-01-24 10:05 AM
CONTENTS
30DO NOT place vacuum on unstable surfaces such as
chairs or tables.
31 Use extra care when cleaning on stairs.
32 DO NOT allow the vacuum to be used as a toy.
33Close attention is necessary when used by or near
children.
34DO NOT use cordless vacuum cleaner, charging base
or charging adapter if it has been dropped, damaged,
left outdoors or submerged in water. To avoid the risk
of electric shock, do not disassemble or attempt to
repair the appliance on your own. If the supply cord is
damaged, it must be replaced by a qualified electrician
in order to avoid a hazard. Incorrect re-assembly or
repair can cause a risk of electrical shock or injury to
persons when the appliance is used.
Assembly4
Using your Cordless Vacuum
5
Maximizing the Life of your Battery
5
Care and Maintenance
6
Troubleshooting Guide
9
35Keep hair, face, loose clothing, fingers and all body parts
away from openings and moving parts.
36This product is powered by Ni-Mh batteries, which must
be recycled when the replaceable battery or leaking
battery or battery pack is at the end of its life. The battery
must be removed from the appliance before it is recycled.
The appliance must be disconnected from the supply
when removing the battery. Do not incinerate batteries
or expose to high temperatures, as they may explode.
Please ensure you deliver the battery for recycling to the
battery collection system in your country.
37Leaks from battery cells can occur under extreme
conditions. If the liquid gets on the skin, wash
immediately with soap and water. If the liquid gets into
the eyes, flush them immediately with clean water for a
minimum of 10 minutes and seek medical attention.
Thank you
for purchasing
the Shark®
Cordless Vac
38The battery must be removed from the appliance before
the appliance is discarded.
39 Batteries are to be recycled or disposed of safely.
DUST CUP/FILTER:
40 Before turning on the vacuum:
• Make sure that the dust cup and filter are securely in
place after routine maintenance.
• Make sure that all components and filters are
thoroughly dry after routine cleaning.
• Only use filters and accessories provided by the
manufacturer. [Failure to do so will void the warranty.]
SAVE THESE
INSTRUCTIONS
This manual covers model number:
SV1100UKJR 40
www.sharkclean.co.uk
SV1100UKJR_40_ENG_120124_1.indd 3
3
12-01-24 10:05 AM
ASSEMBLY
B
C
A
b
fig. 2
E
c
F
d
D
G
J
H
a
Charging
I
K
fig. 1
VACUUM COMPONENTS
ASSEMBLY
A Main Body
1Insert the vacuum body into the
motorised brush. (fig. 1a)
B Handle
C Screw
D Dust Cup
E Dust Cup Release
F Upper Dust Cup Door Release
G Lower Dust Cup Door Release
H Motorised Brush
I Power Button
J Charging Adapter
K Charging Base
TECHNICAL SPECIFICATIONS:
Ni-Mh 3000mAh 14.4 V (1.2VDC x 12)
2Insert the handle pole into the top
of the main body. (fig. 1b)
3Use a screwdriver to secure the
handle assembly in place with the
bolt (taped to the handle during
shipping). (fig. 1c)
4Ensure that the dust cup is
securely in place. (fig. 1d)
CHARGING
1The charge adapter plug will fit
into the charging base only one
way. Insert the charging adapter
plug by aligning the arrow on the
plug with the arrow next to the
charging jack on the back of the
charging base. (fig. 2)
2Place the vacuum on the charging
base to charge. Charge the unit
for 6 hours before using the
vacuum for the first time. (fig. 3)
4
Charge
Complete
fig. 4
fig. 3
3This unit is equipped with a
precision charger that monitors
the batteries to ensure a full
charge for every use and to extend
the life of the batteries. Depending
on usage, the time for a full
charge is 3 to 6 hours.
4One half of the blue LED light
around the power button will
illuminate while the unit is
charging. When the charge is
complete, the complete oval will
be illuminated. (fig. 4)
If the charging light does not
illuminate, ensure that the
charging adapter is plugged
in properly to the wall outlet
and to the back of the charging
base. Also ensure that the
unit is properly seated in the
charging base.
www.sharkclean.co.uk
SV1100UKJR_40_ENG_120124_1.indd 4
12-01-24 10:05 AM
USING YOUR SHARK ® CORDLESS VACUUM
USE YOUR CORDLESS VACUUM
TO CLEAN BARE FLOORS,
CARPETS AND RUGS.
1Place your foot lightly on the top
of the motorised brush and tilt the
handle back to release the unit
from the locked upright position.
• Lightly press the power button
on the motorised floor brush
with your foot to turn the
vacuum on to a high speed
optImised for carpet cleaning.
MAXIMIZING THE LIFE OF YOUR
BATTERY
1To enhance battery life, this vacuum
is equipped with an advanced feature
that will shut off the vacuum when
the battery is almost fully discharged.
If the vacuum shuts off while in use,
charge the unit until the complete
oval around the power button is
illuminated, indicating a full charge.
2Charge the vacuum for 6 hours
before initial use. After initial use,
each recharge will take 3 to 6 hours.
A complete oval around the power
button will illuminate when the charge
is complete.
3The precision charger monitors the
batteries so you don’t have to. A
complete charge can take as little as
3 hours, but may take up to 6 hours
because the charger monitors battery
properties to extend battery life.
Leaving the unit in the charger past
the complete charge time will NOT
harm the batteries.
4If the vacuum has never been used
or has not been used for an extended
period of time, it will take 3 to 5
complete charge and run down cycles
to realize the full operational time of
the vacuum.
5Do not store or charge in areas of high
temperature or humidity.
6Use only the charge adapter supplied
with this unit, marked with “For
SV1100UK Models Only”. If other
chargers are used, the battery can fail
causing damage to the battery, to the
vacuum, or to personal property.
On this setting, the vacuum
will run for approximately 15
minutes.
• Press the button again to switch
to a lower speed optImised
for bare floor cleaning. On this
setting the vacuum will run for
approximately 22 minutes. The
LED lights around the power
button will indicate your speed.
IMPORTANT: The indicator light
around the power button will
flash if the brush roll stops
due to a jam. This feature is
designed to protect the Lifetime
Belt that powers the brushroll.
See “Restarting After a Jam” on
page 8.
BARE FLOOR
• Press the button again to turn
the unit off.
CARPET
BATTERY RECONDITIONING
BATTERY REPLACEMENT
If you experience shorter run time over the
life of the vacuum, perform the following
battery reconditioning steps. These
steps can also be performed as monthly
maintenance for maximum battery life.
1Push the connector terminals together
until they click into place.
1Charge the vacuum for a minimum of 6
hours.
2Run the vacuum until it turns itself off.
3Charge the vacuum for a minimum of 6
hours.
BATTERY REMOVAL, REPLACEMENT
AND DISPOSAL
2Replace the new battery pack into the
battery compartment, taking care to
tuck the wiring completely in so that
the wiring does not interfere with the
battery access door.
3Place the battery door onto the bottom
of the nozzle, slide it back into place
and move the sliding tab next to the
door to the lock position.
CAUTION:
The cordless vacuum is powered by Ni-Mh
batteries, which must be recycled or
disposed of properly in accordance
with state, federal and local laws. If
uncertain as to how to remove the battery
pack, we suggest that you take your
vacuum to a reputable small appliance
service technician to have this service
performed.
•
Use only with battery pack supplied.
•
ever use ordinary batteries for
N
replacement as these may leak and
damage your vacuum
•
o not attempt to remove the battery
D
pack from the unit to charge.
•
ever throw the battery pack or the
N
appliance into a fire or incinerate it.
BATTERY REMOVAL
•
o not remove or damage the battery
D
casing.
•
o not place the batteries on metal
D
surfaces.
•
o not touch metal parts of the
D
batteries together as the batteries will
overheat.
1 Ensure that the unit is Off.
2Never open the battery compartment
except to replace or dispose of the
battery pack.
3The battery door is on the bottom of
the floor nozzle. Turn the unit over and
push the sliding tab located next to the
battery door to the unlock position.
Slide and lift the battery door off of the
nozzle.
Call customer service at
FREEPHONE 0800 781 7831 to order
a replacement battery pack.
4Remove the battery pack by pulling on
the battery strap.
5Grasp the white connector terminals
and push down on the lever with your
thumb. Pull to disconnect.
www.sharkclean.co.uk
SV1100UKJR_40_ENG_120124_1.indd 5
5
12-01-24 10:05 AM
CARE AND MAINTENANCE
fig. 6
fig. 8
fig. 5
fig. 7
CAUTION: Remove the unit from
the charging stand before any
servicing.
EMPTYING THE DUST CUP
To maintain the best performance of
your vacuum, empty the dust cup after
every use or as debris approaches the
“MAX FILL” line. Never operate the
vacuum without the dust cup and filter
in place.
1Turn off the vacuum before
removing the dust cup.
3Holding the carry handle, place
the dust cup inside a trash
receptacle and press the lower
dust cup door release button.
Gently tap the dust cup to
dislodge and release dust and
debris. (fig. 6)
Important: If the Dust Cup Door
does not swing open after pressing the release button, push the
door open using the bottom door
tabs.
4Snap the door back in place.
5
If you notice hair or other debris
wrapped around the metal screen
in the upper chamber of the
dust cup, press the upper dust
cup door release to open the
top of the dust cup. Lift out the
metal screen, clear any debris and
replace. Snap the door back into
place. (fig. 7)
6Replace the dust cup by first
seating the lower part of the dust
cup, then pushing in the top part
until it clicks. (fig. 8)
2Press down on the dust cup
release button (fig. 5) and pull out
the dust cup.
6
www.sharkclean.co.uk
SV1100UKJR_40_ENG_120124_1.indd 6
12-01-24 10:05 AM
fig. 10
fig. 11
fig. 9
fig. 12
CLEANING THE MOTORISED
BRUSH AND CLEARING
BLOCKAGES
CLEANING THE FILTER
Your vacuum has a high efficiency
dust cup to maintain strong suction by
preventing debris from collecting on
the filter. To maintain strong suction,
it is important to clean the foam filter
every month, under normal use.
1 T urn off the vacuum and remove
the dust cup.
2Remove the foam filter (fig. 9) and
rinse under water until the water
runs clear. (fig. 10) Squeeze the
excess water out of the filter and
let it air dry for 24 hours before
replacing.
• DO NOT use a hair dryer or
other forced hot air to dry the
filter.
• DO NOT operate the vacuum
without the filter in place.
• DO NOT operate the vacuum
with a wet filter.
NOTE: It is normal for your foam filter
to discolor over time; it will not
affect the filter performance.
An accumulation of hair, string, and
other debris may sometimes become
lodged in the flexible air hose of the
motorised brush, in the air inlet of
the dustcup or wrapped around the
brush roll. These areas must be free
from debris for maximum cleaning
performance. To clear blockages and
clean the brush roll:
1 Ensure the vacuum is off.
2Press the release button located
on the rear of the main body and
remove the motorised brush.
(fig. 11)
3To clear the air hose, flip back
the connector to straighten the
air passage (fig. 12) and carefully
remove any debris lodged in the
air hose. DO NOT USE SCISSORS
OR OTHER SHARP OBJECTS AS
THESE MAY DAMAGE THE HOSE.
www.sharkclean.co.uk
SV1100UKJR_40_ENG_120124_1.indd 7
7
12-01-24 10:05 AM
CARE AND MAINTENANCE - cont.
fig. 13
fig. 15
fig. 14
fig. 17b
fig. 16
fig. 17a
4Inspect the rotating brush for
a build-up of debris. Remove
anything wound around the
brush by carefully cutting it
with scissors. The brush roll is
equipped with a raised cutting
guide to make inserting scissors
easier. Avoid damaging or cutting
the bristles. (fig. 13)
5Use a flashlight to inspect inside
the air duct at the bottom of the
main body and remove any debris
or blockages that may be there.
Reattach the motorised brush,
ensuring it clicks into place.
6Remove the dust cup and use the
flashlight to check the air path
on the spine of the vacuum and
remove any debris or blockages.
Then replace the dust cup.
fig. 18
BRUSH BAR REMOVAL
BRUSH BAR INSERTION
1For easier cleaning, the brush roll
can be removed from the nozzle.
Using a coin, turn the dial next to
the brush roll access door to the
unlock position. (fig. 14) Remove
the brush roll access door.
(fig. 15)
1To reinsert the brush roll, first slip
the black belt onto the white gear
(fig. 17a), then align the white
square on the opposite side of
the brush roll into the square slot.
(fig. 17b)
2Slip the black belt off of the white
gear and lift out the brush roll.
(fig. 16)
2Align the white square on the belt
side and position into its slot.
(fig. 18)
3Replace the door, inserting the
wheel side first. Use a coin to
move the dial to the lock position.
RESTARTING AFTER A JAM
If the indicator light around the power
button flashes, the brush bar has
jammed and will cease to operate.
1Turn the unit off and allow it to
cool down for 10 seconds.
2Ensure that nothing is blocking
the motorised brush or wrapped
around the brush bar.
3Turn the power on and the unit
should operate normally.
8
www.sharkclean.co.uk
SV1100UKJR_40_ENG_120124_1.indd 8
12-01-24 10:05 AM
TROUBLESHOOTING GUIDE & REPLACEMENT PARTS
PROBLEM
SUGGESTED SOLUTION
Vacuum will not operate
1The battery may be depleted. Charge the vacuum until the complete oval
around the power button is illuminated, indicating a complete charge.
2 See “Restarting after a jam” on page 8.
Charging indicator does not
illuminate
1Check to see if the charge adapter is plugged in properly to the outlet and to
the charge stand.
2Ensure that the vacuum is properly seated in the charging base.
3Ensure there is no debris accumulated on the metal charge contacts on the
back of the nozzle and on the charge base.
4Ensure that the electrical outlet is supplying power to the charger. Check the
fuse/breaker.
Motorised brush will not work
1See “Cleaning the Motorised Brush and Clearing Blockages” on page 7 and
“Restarting after a jam” on page 8.
2 Ensure that the motorised brush is properly attached.
Vacuum will not pick up or suction
power is weak
1 Empty the dust cup container.
2Remove the dust cup filter, check for blockages and remove. Clean or
replace the dust cup filter. Note: It is important to clean the dust cup filter
every month.
3 The battery may need to be charged, charge until the complete oval around the power button is illuminated.
4 Ensure that the motorised brush is properly attached.
Dust escapes from vacuum
1 Empty the dust cup container.
2Ensure that the filter is inserted completely into its holder below
the dust cup.
3Check for punctures in dust cup filter or cracks in the dust cup and replace.
Vacuum turns off on its own
Run time has decreased over time
1Charge the unit until the complete oval around the power button is
illuminated.
1Perform the following steps:
a
Charge the vacuum for a minimum of 6 hours.
b
Run the vacuum until it turns itself off.
c
Charge the vacuum for a minimum of 6 hours.
www.sharkclean.co.uk
SV1100UKJR_40_ENG_120124_1.indd 9
9
12-01-24 10:05 AM
Notes
10
www.sharkclean.co.uk
SV1100UKJR_40_ENG_120124_1.indd 10
12-01-24 10:05 AM
Notes
www.sharkclean.co.uk
SV1100UKJR_40_ENG_120124_1.indd 11
11
12-01-24 10:05 AM
Distributed by JML
JML, Unit 1 Eastside
Port of Tyne
South Shields
NE33 5SP
[email protected]
Freephone 0800 781 7831
www.sharkclean.co.uk
Registered address: JML House, NW5 3EG
Technical Details
Model number: SV1100UKJR
PRINTED IN CHINA
SV1100UKJR.E.120124.1
Illustrations may differ from actual product.
SV1100UKJR_40_ENG_120124_1.indd 12
12-01-24 10:05 AM