1
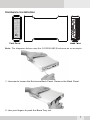
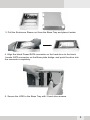
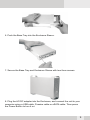
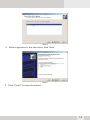
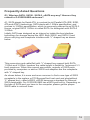
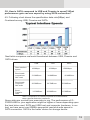
IEEE 1394A and 1394B FireWire/Hi-Speed USB2.0/eSATA
3.5” Serial ATA Hard Drive Enclosure
G-S350SUAB2
User's Manual
CONTENTS
INTRODUCING 1394A and 1394B FIREWIRE/
USB2.0/eSATA HI-SPEED ENCLOSURE
About this Guide
System Requirements
Package Contents
Safety Precautions
3
3
3
4
4
HARDWARE BASICS
6
HARDWARE INSTALLATION
7
Software Installation for MAC
10
SATA Connection for MacOS X 10.2 and above
Firewire and USB Connection for Mac 9.2 and OS X
Software Installation for PC
SATAConnection for Windows 2000/XP/vista/Windows 7
Firewire and USB Connection for Windows 2000/XP/Vista/
Windows 7
10
11
12
12
12
HARD DRIVE PARTITION and FORMAT
PROCEDURES in PC WINDOWS 2000/XP/Vista/Windows 7
13
Frequently Asked Questions
16
2
Introducing IEEE 1394A and 1394B FireWire/Hi-Speed USB2.0/eSATA
3.5" Hard Drive Enclosure - G-S350SUAB2
Thank you for choosing the G-S350SUAB2 aluminum IEEE 1394A and 1394B
FireWire/ Hi-Speed USB2.0/eSATA 3.5" Hard Drive Enclosure. This Aluminum
enclosure supports 3.5” SATA Hard drive up to 3TB. It is simple to install
and comes with all the parts you need to create an external hard drive.
Based on IEEE 1394A and 1394B FireWire/SATA II, SATA I, USB2.0 and USB1.1
specifications the transfer rates are up to:
SATA II - 3.0Gb/s
SATA I - 1.5Gb/s
1394A - 400Mb/s
1394B - 800Mb/s
USB2.0 - 480Mb/s
USB1.1 - 12Mb/s
G-S350SUAB2 can support the speed specification listed above, however its
transfer rates are possible to be lower, and will vary depending upon the
Operating System, type of SATA, 1394A,1394B and USB host controller, SATA
Hard Drive and computer hardware.
About This Guide
Before you begin using the G-S350SUAB2, be sure to read this manual in its
entirety.
This guide contains:
! Introducing IEEE1394A and 1394B FireWire/Hi-Speed USB2.0/eSATA
! 3.5" Hard Drive Enclosure
! Hardware Installation
! Software Installation
! Hard Drive Partition and Format in PC Windows 2000/XP/Vista/Windows7
! FAQ
System Requirements
!
!
!
!
MacOS 9.2 and MacOS X 10.1 to 10.7 for USB and Firewire connection
MacOS X 10. to 10.7 for SATA connection
Windows 2000, Windows XP ,Windows VISTA and Windows7
Any desktop or Notebook computer with an available SATA, FireWire or
USB port
3
Package Contents
The G-S350SUAB2-Aluminum IEEE 1394A and IEEE 1394B FireWire/
Hi-Speed USB2.0 /eSATA 3.5" Hard Drive Enclosure package includes the following
software and documentation:
! G-S350SUAB2 enclosure
! 6 pin-6 pin1394A FireWire Cable
! 9 pin-9 pin1394B FireWire Cable
! USB2.0 cable
! Software CD containing the drivers and manual
! AC/DC Adapter
! eSATA cable(optional)
Safety Precautions
ON INSTALLATION
1. To reduce the risk of fire or electric shock, do not expose this
product to rain, water or moisture.
2. Do not place any containers with liquids (drinking glass, flower
vase, etc.) or containers with small metal parts (paper clips, etc.)
on top of the unit.
3. According to standard industry practice, surge protection is
recommended for all telecommunications devices. Surge suppressors
and/or line conditioning should be used on the input power supply.
ON OPERATION
! Do not move the chassis during operation. Doing so may cause a
malfunction.
! Protect the unit from shocks and vibrations.
! Do not use the subsystem in areas exposed to oily smoke or
steam,such as a kitchen or close to a humidifier.
! Do not use the subsystem in locations exposed to rain or splashes of
water, such as outdoors, in a bathroom, or close to a window.
! Do not use the subsystem on an unstable or slanted surface without
proper support.
! Do not expose the unit to direct sunlight or hot air where the
temperature could exceed 45ºC, or very cold locations where the
temperature is below 0ºC.
! Keep the power cord away from hot appliances.
! Do not touch the power cord with wet hands.
4
ON TRANSPORTATION
Save the packing materials as you may need to repack and transport the
unit at a later date.
Always remove the disc before moving the unit.
ON POWER SOURCES
When you are not using the unit for a long time, disconnect the power
cord from the unit.
To unplug the AC power adapter from the wall outlet, grasp the adapter
itself. Do not pull the cord.
Warning
If any of the following conditions occur, immediately disconnect the
power cord from the wall outlet and contact your dealer or an authorized
service station. Continuing to use the computer involves the risk of fire
and electric shock.
!
!
!
!
Smoke or unusual smell is coming from the subsystem.
Water has entered the unit, or the unit has become wet.
A foreign object has entered the unit.
The unit has been dropped or the front panel or frame has been
damaged.
! The power cable is damaged, causing wire breakage or exposed
leads.
5
Hardware Basic
Precaution:
Please make sure your hand is dry and remove static from your body by
touching metal parts of your computer chassis.
1 — Back Panel
2 — 2 -6mm Screws
3 — Enclosure Sleeve
4 — Base Tray bridge
5 — 6 -5mm Screws
6 — 8 -4mm Screws
7 — Front Panel
8 — Base Tray
9 — Power on/off button
6
Hardware Installation
Note: The diagrams below uses the G-S350UAB2 Enclosure as an example.
1. Unscrew to loosen the Enclosure Back Panel. Remove the Back Panel.
2. Use your fingers to push the Base Tray out.
7
3. Pull the Enclosure Sleeve out from the Base Tray and place it aside.
4. Align the black Power/SATA connector on the hard drive to the black
female SATA connector on the Base plate bridge, and push the drive into
the connector completely.
5. Secure the HDD to the Base Tray with 2 hard drive screws.
8
6. Push the Base Tray into the Enclosure Sleeve.
7. Secure the Base Tray and Enclosure Sleeve with two 6mm screws.
Front Sleeve
8. Plug the AC/DC adapter into the Enclosure, and connect the unit to your
computer using a USB cable ,Firewire cable or eSATA cable. Then press
the Power Button to turn it on.
9
Software Installation for Mac
SATA Connection for MacOS X 10.2 and above
At the time when this manual is written, none of Mac computers has built-in
external SATA port accessible to connect G-S350SUAB2 enclosure. In order
to take advantage of high performance via SATA connection, current
solution is to add a third-party Mac compatible SATA II or SATA I to PCI or
ExpressCard host controller adapter with external SATA port (with “L”
shaped key type) or eSATA port. When external SATA port is available,
please follow steps below to use G-S350SUAB2 enclosure:
1. When computer is powered off, attach G-S350SUAB2 to the SATA port
of the computer.
2. Power on G-S350SUAB2 first, then turn on the computer.
3. After Mac OS boots up, it will recognize it automatically, ask you to
initialize the new drive if it was not initialized yet, and mount the
drive on desktop.
Above described connection and power sequence is referred to as Hot
Boot. There are total five power sequence modes by which an external
hard drive can possibly be used with a computer system. They are defined
as follows:
Hot Boot -Computer is off, enclosure is on and is attached to computer.
Boot up system.
Cold Boot - Computer is off, enclosure is off and is attached to computer.
Boot up system completely, then turn on the enclosure.
Hot Plug - System is up and running, enclosure is turned on then attached
to computer.
Cold Plug - System is up and running, enclosure is off then attached to
computer. Enclosure is turned on.
Power Cycle - System is up and running, enclosure is on and mounted on
the computer. Then, power off the enclosure, wait for several seconds and
turn the enclosure back on.
10
It is important to note that different SATA host adapters handle the power
sequence in different way. Some support all five power sequence modes,
the other can only support Hot Boot. G-S350SUAB2 supports all five power
sequence modes. To find out what your SATA host adapter is capable of,
please contact the manufacturer of SATA host adapter, or simply try all
power sequence mode yourself.
Before disconnecting the SATA drive cable from the computer, we
recommend you to shut down the computer first, because current system
driver and SATA host specification do not make SATA hard drive 100%
removable like USB or Firewire hard drive.
FireWire and USB Connection for MacOS 9.2 and MacOS X
When the Enclosure is connected to the computer, MacOS X will
recognize it automatically, initialize it (if the drive is not initialized) and
mount the drive to desktop. All five power sequence modes are supported
in Firewire or USB connection.
Note: MacOS X provides a Disk Utility to create multiple volumes, which
is located in Utilities folder inside Applications folder.
11
Software Installation for PC
SATA Connection for Windows 2000/XP/Vista/Windows 7
Some PC computers nowadays are equipped with external SATA ports for
peripheral connectivity, or provide a SATA cable and bracket to route
internal SATA port on motherboard to external port. Otherwise, to take
advantage of high performance SATA connection, you need to add a thirdparty SATA II or SATA I host controller adapter with external SATA port the
“L” shaped key type). When external SATA port is available, please follow
steps below to use G-S350SUAB2 enclosure:
1. When computer is powered off, attach G-S350SUAB2 to
the SATA port of the computer.
2. Power on G-S350SUAB2 first, then turn on the computer.
3. After Windows boots up, it will load, the driver and recognize the
Enclosure automatically. If you don't see a new(SATA) drive in My
Computer, probably the SATA drive needs to be partitioned and
formatted first.
Above described connection and power sequence is referred to as Hot
Boot. There are total five power sequence modes, Hot Boot, Cold Boot,
Hot Plug, Cold Plug, and Power Cycle, by which an external hard drive can
possibly be used with a computer system. Please refer to the section
“SATA Connection for MacOS X 10.2 and above” for definition.
It is important to note that different SATA host adapters handle the power
sequence in different way. Some support all five power sequence modes,
the other can only support Hot Boot. G-S350SUAB2 supports all five
power sequence modes. To find out what your SATA host adapter is
capable of, please contact the manufacturer of SATA host adapter, or
simply try all power sequence mode yourself.
Firewire and USB Connection For Windows 2000/XP/Vista/Windows 7
When the enclosure is connected to the computer and power on, the
system will start installing for the proper driver. Please follow the onscreen instruction to complete the driver installation.
If you do not see the new drive letter added in My Computer after the driver
finishes loading, the reason could be the hard disk such as a brand new
one has no partition and format yet. In this case, please follow the
procedures in next section to partition and format it before using.
12
HARD DRIVE PARTITION and FORMAT PROCEDURES in
PC WINDOWS 2000/XP/Vista/Windows 7
If you can see a new entry under Disk drives of Device Manager, you are
ready to partition and format the drive.
1. Open Control panel, “Administrative Tools” and “Computer
management”.
Step 2
2. Click on “Disk Management”.
Step 3
3. “Write Signature and Upgrade Disk Wizard” windows will show up and
click “Next”.
13
Step 4
4. Write a signature to the new drive, click “Next”.
Step 5
5. Click “Finish” to close the wizard.
14
Step 6
6. Select the new “Unallocated” disk, and then right click to choose
“Create partition”.
Step 7
7. Follow the onscreen instruction to partition and fully format the drive.
*note: If it assigns a new hard drive letter but format dose not run automatically,
please exit “Computer Management”, and find the new drive letter in My
computer to format it completely.
15
Frequently Asked Questions
Q1, What are SATA, SATA I, SATA II, eSATA any way? How are they
related to G-S350SUAB2 enclosure?
A1: SATA stands for Serial ATA, in contrast to old Parallel ATA (IDE, EIDE,
ATA and ATAPI) technology. SATA starts with 1.5Gb/s specification, and
evolves to 3.0Gb/s specification, which is commonly referred to as SATA II.
Hence, original SATA 1.5Gb/s is called SATA I to distinguish with SATA II
3.0Gb/s.
Initially SATA was designed as an internal or inside-the-box interface
technology for storage device like HDD. Both SATA I and SATA II hard
drives use plug and receptacle interface with “L” shaped key as shown
below.
This connectors and cable(flat) with “L” shaped key support both SATA
1.5Gb/s and 3.0Gb/s, however the cable length is limited to 1m(around 3.3
feet) maximum. When this manual was written, majority of SATA ports
provided by computers or add-on SATA host adapters are the receptacle
with “L” shaped key.
As shown below, it is more and more common to find a new type of SATA
receptacle in the system or PCI/ExpressCard host card and plug(without
“L” shaped key), called eSATA. eSATA becomes a standard for external
SATA peripherals. Our G-S350SUAB2 has eSATA port built in. Depending on
the type of SATA port you have in the computer, please get the proper
SATA cable to connect them.
16
Q2. How should I disconnect G-S350SUAB2 safely from the computer?
After I disconnect the SATA enclosure, why does the drive icon still
stay on the desktop of MacOS X?
A2: For Firewire or USB connection in Windows PC, please click “Safely
remove mass storage device - Drive letter” line inside Safely Remove
Hardware icon on the System Tray; In Mac computer, please trash the
external drive icon. Then disconnect G-S350SUAB2 from the system.
In SATA connection, depending on the SATA host controller(and
sometimes OS) you use, some controllers support hot plug and unplug
function, some don't. You have to find out its capability. To prevent data
corruption, the safest way to disconnect SATA cable or power off GS350SUAB2 is to shut down computer first.
SATA drive (or SATA connection) is not treated essentially as removable
device to the most of systems if not all. That is why there is no eject icon
associated to SATA drive in Finder of Mac OS X, and System Tray in
Windows has no Remove Hardware option for SATA drive. Therefore,
when the SATA drive is connected, some system still keeps SATA drive
icon, you just won't be able to use the drive until you connect it back.
17
Q3. How is SATA compared to USB and Firewire in speed? What
performance gain can one expect by using SATA connection?
A3: Following chart shows the specification data rate(MBps) and
Overhead among USB, Firewire and SATA.
Next table compares real world benchmark between USB, Firewire and
SATA drives:
USB
1394
Seria
Raw Interface
speed
480Mbps
Benchmark
comparison
64K read
31.6MB/sec
34.8MB/sec
26.5MB/sec
26.7MB/sec
56.2MB/sec
36.2MB/sec
111.3MB/sec
Benchmark
comparison
400Mbps
1500Mbps
42.4MB/sec
64K write
Burst
Transfer
Rate
33.5MB/sec
Table: Comparison of interface speeds and data transfer
rates external disk drive interfaces
Above data are quoted from www.sata-io.org. The performance of GS350SUAB2 in your application might be higher or lower depending upon
the hard drive used, SATA and USB host and computer hardware. In our
test, we have seen over 60MB/s sequential read and write speed in
SATA connection. SATA is the better choice for storage device.
18