1
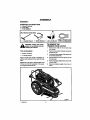
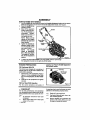
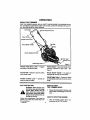
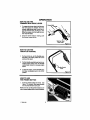
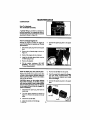
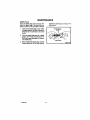
/
5.5 Horsepower
HIGHWHEEL WEEDTRIMMER
MODEL NO.
536.773600
i
H
Caution:
H
Read and follow all Safety Rules
and Operating Instructions before
first use of this product.
SEARS,
F--000210M
ROEBUCK
AND CO., Hoffman
Estates,
IL 60179
U.S.A.llm
TABLE OF CONTENTS
WARRANTY STATEMENT ......
SAFETY RULES ...............
INTERNATIONAL SYMBOLS ....
ASSEMBLY ...................
OPERATION
..................
MAINTENANCE
...............
SERVICE AND ADJUSTMENT
..
2
3
5
6
8
12
15
TROUBLE SHOOTING CHART ..
19
SLOPE GUIDE ................
21
REPAIR PARTS ...............
22
ENGINE REPAIR PARTS .......
28
SPANISH (ESPAI_IOL) ..........
34
PARTS ORDERING/SERVICE
..
BACK COVER
WARRANTY STATEMENT
LIMITED TWO-YEAR
WARRANTY
ON CRAFTSMAN
WEEDTRIMMER
For twoyears fromthe dateof pumhase,whenthisCraftsrnanWeedtflmmeris maintained,
lubficatab,andtuned up accordingto the opera_ng and maintenanceinstruc_ons in the
owner'smanual,Sears will repair,free of charge,any defect in materialor workmanship.
If this CraftsmanWsedtrimmeris usedfor commercialor rentalpurposes,this warrantyappliesfor ooly90 daysfromthe dateof pumhase.
This warrantydoes not coverthe following:
•
Expendableitemswhichbecomeworn duringnormaluse, suchas sparkplugs,etc.
•
Repairnecessarybecauseof operatorabuse or negligence,includingbent crankshafts
andthe failureto maintainthe equipmentaccordingto the instructionscontainedin the
owner'smanual.
WARRANTY SERVICE IS AVAILABLE BY RETURNING THE CRAFTSMAN WEEDTRIMMER TO THE NEAREST SEARS SERVICE CENTER/DEPARTMENT IN THE
UNITED STATES.THIS WARRANTY APPMES ONLYWHILE THIS PRODUCT IS IN USE
IN THE UNITED STATES.
Thiswarrantygivesyouspecificlegalrights,andyoumay also haveotherrightswhich may
varyfrom stateto state.
Seam, Roebuckand Co., D817WA, HoffmanEstates.IL 60179
IMPORTANT: This unit is equipped with an internal combustion engine and must not be
used on or near any unimproved forest-covered, brush-covered or grass-covered land
unless the engine's exhaust system is equipped with a spark srrester masting
applicable local or state laws (if any). If e spark nrrester is used, it must be maintained in
effective working order by the operator.
In the State of California the above Is required by law (Section 4442 of the California
Public Resources Code). Other states may have similar laws. Federal laws apply on federal lands. See an Authorized Service Center for s spark arrester for the muffler.
F-O00210M
2
SAFETY
Safe Operation
A
I.
RULES
Practices for Trimmer.
WARNING: Look for this symbol to point out important safety precautions.
It means: "AttenItonl Become Alertl Your Safety Is Involved."
General Operation
Only use accessories approved by the
manufacturer.
1. Read, understand,and follow all instruc- 15. Operate only in daylightor good artificial
tionson the machineand in the manual(s).
light.
Be thoroughlyfamiliar withthe controlsand 16. Do notoperatethe trimmerwhileunderthe
the properuse of the trimmerbeforestartinfluenceof alcohol,drugsor othermedicaing.
tionwhich can cause drowsinessor affect
2. Familiarize yourselfwith all of the safety
yourabilityto operatethis machine safely.
and operating decals on this equipment 17. Never operate trimmer in wet grass. Aland on any of itsattachmentsor accessoways be sure of yourfooting;keep a firm
ries.
holdon the handle and walk; neverrun.
3. Do eot puthandsor fastnearor undsrrotat- 18. Beforeeach use, inspectthe throtUeconing parts.
trol lever and cable. Make sure that the
4. Only allowresponsibleindividuals,
who are
cableis free andthat the leveris notdamfamiliarwiththe instructions,
to operatethe
aged. Alsocheckthe cablelinkagerunning
trimmer.
to the carburetor for kinks, louse fittings,
5. Inspectthe area wherethe trimmeris to be
and obstructions. Vedfy that the control
used. Yourequipmentcan propelsmallobbail isworkingproperly.
jcotsat highspeed causingpersonal injury 19. Stopthe rotatingtrimmerhead when crossor property damage. Stay away from
ing graveldrives,walks,or roads. Wait for
breakable objects, such as house winthe cuttinglinesto stop rotating.
dows, auto glass, greenhouses,etc.
20, Watch for trafficwhen operatingnear, or
6. Keep the area of operationclearof all perwhencrossingroads.
cons,particularlysmall children,and pets. 21. Stop the engine (motor) whenever you
7. Wear appropriateclothingsuchas a longleave the equlpmant,before cleaning resleevedsNrtor jacket. AIcowear longtroupairingor inspectingthe unit, be sure the
sereor slacks. Do notwear shorts.
trimmer head and all movingparts have
8. Do notwear louseclothingwhich couldget
stopped. Let the engine cool,disconnect
caughtin this equipment.
the sparkplugwire and moveit awayfrom
9. Always wear safety goggles or safety
the sparkplug.
glasseswith side shieldswhen operating 22. If the equipment shouldstarttovibrateabtrimmerto protect your eyes from foreign
normally,stopthe engine (motor),disconobjectswhichcan be thrown from the unit.
nect the sparkplugwire and preventit from
10. Always wear work glovesand sturdyfonttouchingthe sparkplug. Checkimmediatewear. Leather work shoes or short boots
ly for the cause. Vibration is generally a
workwell for most people. These will prowaming oftrouble.
tect the operator'sankles and shins from
23. After strikinga foreignobject,stopthe ensmall sticks, splinters,and other debds,
gine (motor). Remove the wire from the
andimprovetraction.
spark plug. Inspectthe trimmerfor dam11. It is advisable to wear protectiveheadgear
age. If damaged,repairbefore sta_ng and
to preventthe possibilityof beingstruck by
operatingthe trimmer.
smallflyingparticles,or being sf_K:kby low 24. Neverleave the trimmerunattendedwhen
hangingbranches,twigs, or other objects
the engine is running. Remove the wire
whichmay be unnoticedbythe operator.
fromthe sparkplug.
12. Do notoperatethe trimmerwithoutproper 25. Regularlyinspectthe trimmer. Make sure
guards or other safety protectivedevices
partsare notbent, damaged or louse.
in place.
13. Use this equipment for its intendedpurII. Slope Operation
pose only.
14. See manufacturer's instructionsfor proper Slopes are a major factor related to slip and fall
operationand installationof accessories. accidents which can result in severe injury. All
F_00210M
SAFETY RULES
slopes require extra canttoe. If you feel uneasy
on a slope, do not trim it.
c,
Never refuel the machine indoors.
d. Never store the machineor fuel container inside where there is an open
flame, suchas a water heater.
Dotrim ecmss _ face of slopes; never up and
down. Do not tdm excessively steep slopes
(maximum 15 degrees) or areas where the
ground is very rough. See the "Guide" in the
back of this manual to check a slope. Exemise
extreme caution when changing direction on
slopes.
2. Never run an engine Indeom or inside a
closedarea.
3. Never make adjustmentsor repairs with
the engine(motor)running.Disconnectthe
spark plug wire, and keep the wire away
Do remove objects such as rocks, tree limbs,
fromthe plugto preventaccidentalstarting
etc.
(remove the ignifionkayif equippedwithan
Do watch for holes, ruts, or bumps. Tall grass
electdcstart).Alwayswear eye protection
can hide obstacles.
when you makeadjustmentsor repairs.
Do nottdm near drop-otis, ditches, or embank4. Check the trimmer head and engine
mounting bolts at frequent intervals for
mants. The operator could lose footing or balance.
propertightness.
5. Keep all nuts and bolts tight and keep
Do not tdm excessively steep slopes.
equipment in good condition. Check
Do not trim on wet grass. Reduced footing
mountinghardwareon tdrnmerheadevery
could cause slipping.
time you change trimmerline and pdor to
each use.
III. Children
6. Never tamper with safety devices. Check
theirproperoperation regularly.
Tragicaccidentscan occurif the operatorisnot
7. When servicingor repairingthe trimmer,do
alert to the pmcance of children.Childrenam
nottip the machineover or up unlessspeoftenattractedto the tdmmerand the trimming
cificallyinstructedto do so in thisManual.
activity.Neverassumethat childrenwill remain
Serviceandrepairprocedurescan be done
where you lastcaw them.
with the _mmar in an updght position.
1. Koupchildrenout ofthe tdmmingaree and
Some procedureswill be easier if the maunder the watchfulcam of a responsible
chine is liftedon a raisedplatformor workadult.
ingsurface.
2. Be alert and turntrimmeroffif children en8.
To
reducefire hazard,keeptrimmerfreeof
ter the area.
grass, leaves, or other debris build-up.
3. Beforeand while movingbackwards,look
Clean up oilor fuelspillage.Allowtrimmer
behindand downfor smallchildren.
to coolbefore storing.
4. Never allow children to operate the trim- 9. Stop and inspect the equipment if you
mer.
strikean object. Repair,if necessary,be5. Use extra cam when approachingblind
tore restarting.
comers, shrubs,trees,or otherobjectsthat 10. Alwaysdisconnectsparkplugwire before
may obscurevision.
cleaning,repairing,or adjusting.
11. Do out change theenginegovernorsetting
IV. Service
or over-speed the engine.
12. Clean and replace safety and instruction
1. Use extra care in handlinggasolineand
decalsas necessary.
other fuels. They are flammable and va13. To guardagainst engineover-heating,aiporsare explosive.
ways have engine debris filter mounted
a. Use onlyan approvedcontainer.
and clean.
b. Never removegascap or add fuelwith 14. Inspecttrimmerbeforestorage.
the engine running. Allow engine to
15. Use onlyodginstequipmentor authorized
cool beforerefueling.Do not smoke.
replacementparts.
F_X)0210M
4
SAFETY RULES
INTERNATIONAL
SYMBOLS
IMPORTANT: Many of the following symbols are located on your unit or on literature supplied with the product. Before you operate the unit, learn and understand the purpose for
each symbol.
ControlAndOperatingSymbols
Slow
Fast
Fuel
Oil
SafetyWarningSymbols
WARNING
WARNING
Thrown Objects.
Keep Bystanders Away.
Rotating Parts. Stop Engine.
Disconnect Spark Wire Before
Making Adjustments.
WARNING
Q
IMPORTANT
Read Owner's Manual
Before Operating
This Machine.
WARNING
Wear Eye Protection
@
WARNING
Never Operate Up Or
Down Slopes. Operate
Across Slopes.
t
F_O210M
5
STOP
ASSEMBLY
ASSEMBLY
CONTENTS
OF PARTS
1 -Owner_ Manual
1 - ParLs Bag
1 - FuelS_bil_er
1- T-Handle Wrench
A
BAG
1 - Safety Glasses 1 - 20 oz. Bottle Oil
2 Sets - Trimmer Llnea
(0.155 inch diameter)
TO REMOVE THE
TRIMMER
FROM CARTON
1, Remove the bottle of oil and parts bag
fromcarton,
glasses or eye
shields
while
asWARNING:
Always
wear
safety
sembting the trimmer.
TOOLS REQUIRED
2.
Remove the packingmaterial posilJoned
aroundthe unit,
3. Cut downall fourcomersof the cationand
lay the side panels fiat.
4. Pull the trimmerout of the cartonand off
the basepad,
5. Remove packingmatedalfromaroundthe
tdmmerhead.
1 - Knifeto cut carton,
1 - T-Handle Wrench,
Figure1 shows the trimmer completelyassembledand positionedin the carto_ forshipment.
References to the right or left hand side of the
trimmer are from the viewpoint of the operator's position behind the unit,
6, Remove protectiveplasticfrom frontof
frame.
Figure1
F-000210M
6
ASSEMBLY
HOW TO RAISE THE HANDLE
f.
2.
Hold the handle with one hand and loosen both handle adjustment knobs unUlthe ratchet
teeth are disengaged. Do not remove the handle adjustment knobs. See Figure 2.
Raise the handle to the
operating position.
3.
Stand in the operator's
position behind the trimmer. Put the handle in a
Handle
comfortable
position.
Make sure both sides of
the handle are level.
NOTE: Make sure the
cables ere not caught
between the upper and
lower handle.
4.
Tighten the handle adjustment knobs. Make
sure the handle pivots
are locked in place.
NOTE:
The handle
height is adjustable.
See "How To Adjust
The Height Of The Handle" in the Adjustment
section.
5.
To attach the recoil start handle to the rope guide, twist the rope through
the rope guide mounted on the right side of the handle.
ENGINE PREPARATION
Fill Crankcase With OII
gasoline,see =How To Fill With Gasoline"in
the Operationsection.
The trimmerwas shippedwith a container of
SAE30 motor oil.Thisoilmustbe added tothe
enginebeforeoperating.
1. Remove the oil fillcap/dipstickshown in
Figure3. Fill the crankcase to the FULL
line on oil fillcap/dipsUck.
DO NOT OVERFILL.
2. Installthe oil fill cap/dipstickand tighten
securely.
Fill Fuel Tank With Gasoline
Figure
For the correct procedure and grade of
_" CHECKLIST
For the best performance and satisfaction
from this quality product, please review the following checklist before you operate the trimmer:
All assembly instructions have been
completed.
Check carton. Make sure no loose parts
remain in the carton.
F-OO0210M
7
As you learn how to use the tdmmer, pay extra
attention to the following important items:
v'P"
Engine oil is at correct level.
v'P"
Fuel tank is filled with fresh, clean, regular unleaded gasoline.
P"P_
Become familiar and understand the
function of all controls. Before your start
the engine, operate all controls.
_"
OPERATION
KNOW YOUR TRIMMER
READ THE OWNER'S
MANUAL AND ALL SAFETY RULES BEFORE YOU OPERATE the tdm-
mer. To famiUadze yourself with the location of the controls,compare the illustrations with your trimmer. Save this manual for future reference.
Control Bail
Tdmmer Head Ddve Lever
Upper Handle
Throltle Control Lever
Recoil StarterHandle
Fuel Cap
Handle Adjustment Knob
Shield Edge Guard
Figure4
Trimmer Head Drive Lever - Engages
the rotationof the tdmmerhead,
Palmer Button - Injectsfueldirectlyintothe
carburetor manifold for faster starts. See
Figure7.
Control Bell - Release to stopthe rotation
of the trimmerhead.
Recoil Starter Handle - The engine is
equippedwith an easy pullrecoilstarter.
Throttle Control Lever - Controls the
speed or stopsthe engine.
Shield Edge Guard - Protectsthe shield
byautomaticallycuttingthe line tothe correct
leng_.
EYE PROTECTION
WARNING:
HOW TO STOP
THE TRIMMER HEAD
Debris thrown from
the trimmer can result In foreign
A
1.
open position and disengage the thmmer
head.
eyes, which can cause severe
objects being thrown Into the
eye damage. Always wear safety
glasses or eye shields when operetlng the trimmer.
Always wear safety glasses. If you wear eye
glasses, put a Wide Vision Safety Mask over
your eye glasses.
F-000210M
Release the control bail. It will return to its
HOW TO STOP THE ENGINE
1.
8
Move the throttle
control
lever com-
pletely back to the STOP position.
OPERATION
HOW TO USE THE
TRIMMER HEAD DRIVE LEVER
1. To engagethe tdrnmerhead,holdthecontrol bail against the handle. Move the
trimmer head drive lever forwardto engage the trimmerhead. Sea Figure5. The
fasterthe engineruns,the fasterthe tdmmer headwill rotate,
2. Once the tdmmerhead is rotating,push
the tdmmerforwardto tdm.
HOW TO USE THE
THROTTLE CONTROL
1. Duringnormal use, set the throttle control lever in the FAST positionto run the
engineat full speed.
2.
3.
Pullthethrottle control lever backto decrease engine speed. Push the throttle
control lever forwardto increaseengine
speed.
ThrottleControl
Lever
To stop the engine, pull the throttle control lever completely back to the STOP
position.
Figure6
HOW TO USE
THE PRIMER BUTTON
1. Push the primer button five times. See
Figure7 for location.Wait approximately
two secondsbetween eachpush.
NOTE: DO not use the primer button to restart a warm engine after a short shutdown.
F-OOO210M
9
OPERATION
BEFORE STARTING THE ENGINE
Oil Recommendation
Only use highqualitydetergentoil rated with
API serviceclassificationSG, Selectthe oil's
SAE viscositygrade according to your expected operatingtemperature:
Colder _,-_
m.--,
<<
...........
I
Dmm_
32°F
How To Fill With Gasoline
NOTICE:
ENGINES WHICH ARE CERTIFIED TO COMPLY WITH CALIFORNIA AND
US EPA EMISSION REGULATIONS
FOR
ULGE ENGINES: Are certified to operate on
regular unleaded gasoline. Include the following emission control system(s): EM, TWC (if
so equipped).
Include any user adjustable
features-therefore no other adjustments are
needed.
Warmer
->>
I
I
WARNING: Never fig the gas tank
hot.
the engine
to cool
whlleAllow
the engine
Is running
or
before adding gasoline. Immedlatsty wipe off any spilled gasoline before you start the engine.
NOTE:
Although
multi-vlscastty
oils
(5W30, lOW30, etc.) Improve starting In
cold weather, these multi-viscosity
oils
will result in Increased oil consumption
when used above 32°F. To avoid possible
engine damage from running low on oil,
frequently check your engine oil level.
WARNING:
Gasoline
Is flammable. Use caution when handling or storing gasoline. Keep
away from an open flame or an
electrical spark. Do not smoke
while filling the fuel tank. Store
gasoline In a clean, approved
container In a cool well ventilated
place; never In the house.
Check The Engine Oil
Before each use, check the engine oil as
follows:
1. Put the trimmeron a level surface.
2. Remove the oil fill cap/dipstickshownin
Figure8.
3. Make surethe oilreachesthe FULL mark
on the oiltillcap/dipstick.
4. If necessary,add oil untilthe FULL mark
on the oilfill cap/dipstick is reached. DO
NOT OVERFILL. See "Oi!Recommendation"for the grade andtype of oilto use.
Fillthe fuel tank witha fresh,clean, unleaded
regular,unleaded premium, or reformulated
automotive gasoline only. DO NOT use
leaded gasoline. Be sure that the gasoline
containeris clean and free from dustor other
foreign particles.Never use gasolinethat is
stalefrom long periodsof storage, Reinstall
fuelcap.
CAUTION: Alcohol blended fuels (called
gasohol or using methanol) can attract
moisture which leads to separation and
formation of acids during storage. Acidic
gas can damage the fuel system of an englna while In storage. To avoid engine
problems, empty the fuel system before
storage of 30 days or longer. Drain the fuel
tank. Start the engine and let It run until the
fuel lines end carburetor are empty. Never
use engine or carburetor cleaner products
In the fuel tank or permanent damage may
occur. See "Storage Instructions" for additional Information.
F-000210M
10
OPERATION
HOW TO START THE ENGINE
NOTE: DO NOT BE ALARMED,your engine
will smoke the first time it is started. It is
burning off the protectivecoatingthat Is on
the internal engine parts.
mer unattended whil the engine
is
running. Wait
the the
trimmer
WARNING:
Never for
leave
trimIthee to step rotation.
_lb
t.
Before each use, remove debris from the
debris screen shown in Figure 8. Debris
can cause the engine to overheat. Wipe
the debris screen with a cloth or paper
towel.
2.
Move the throttlecontndlever forwardto
the START or FAST position.
NOTE: If engine fails to start after three
pulls, push the primer button two times and
again pull the recoil starter handle.
WARNING:
Never
run the en-
gine Indoors or in a poorty verdilatad area. Engine exhaust contalns
carbon
menexide,
an
odorless and deadly gas. Keep
hands, feet, hair and loose
clothing away from the trimmer
and any moving parts on the angins. Avoid the muffler and surrounding areas. Temperatures
may exceed 150o1:.
3, To starta coldengine,pushthe primerbuttonfive times. Wait twosecondsbetween
each push ofthe primerbutton.
NOTE: Do not use the primer to start •
warm engine.
4.
Firmlyholdthe recoil starter handle with
yourrighthand. See Figure9.
5.
Pull back sharply on the recoil starter
handle. DO NOT allowthe starterropeto
snap back.Let the starter ropeslowlyrewind as youholdthe recoilstarterhandle.
Recoil Starter Handle
Figure9
TRIMMER TIPS
d_llb
gravel or rocks, can be thrown
WARNING:
Debris
as sticks,
with
sufficient
forcesuch
to cause
personal Injury or property damage.
Set the throitte controlin the FAST position. If the weeds er grass are tall and
thick, operate the tdmmer at a slower
walkingspeed.
Frequentlydean the undersideofthe trimmerto removeany grassbuild up. See the
Maintenancesectionfordetails.
For best results and longer lasUng line,
use the ends of the line to do the cutting.
This is easily done by moving slowly
through very thick or heavy weeds.
•
If the trimmer li.es become ton short, it will
F-O(_210M
11
take longerto completethe job.If the trimmer linesare wom to lass than half their
originallength,change to a new trimmer
line. "See How To Change The Trimmer
Line"in the ServiceAnd Adjustmentsection.
Do not trim on excessively steep slopes. If
a slope is difficult to stand on, do not trim.
Do not trim on slopes when the ground is
slippery or wet. Trim across the face of a
slope, not up and down.
Tdmmer headcontacttoconcrete,asphalt
and harder services may create premature wear to the height guide (See
Figure16).
MAINTENANCE
CUSTOMER
RESPONSIBILITIES
SERVICERECORDS
Fill in dates as you
complete regular service,
Before Every Every
Each
5
2s
use
Hours Hours
Every
lOO
Hours
As
Noted
Check trimmerLines
1
Engine/MachineCleaning
2
SERVICE
DATES
Check Spark Plug
ServiceAir Filter
3
LubdcateWheel Beadngs
Note I - When old lineis halfthe originallength,replacewith new line.
Note 2 - Clean dailyif usedin extremelydustyor dirtyconditions.
Note 3 - Change mere often if usedin extremelydustyor dirtyconditions.
PRODUCT SPECIFICATIONS
GENERAL RECOMMENDATIONS
TrimmerLineDiameter 0.155inch
Trimmer Line Length
21,5 inches
Horse Power
5.5
Displacement
11.5 cu. in.
Gasoline Capacity
1,5 quarts
Oil Capacity
20 oz.
Spark Plug
Champion
RJ-19LM
Spark Plug Gap
0.030 inch
F-000210M
The warrantyon this trimmerdoes not cover
items that have been subjected to opera_)r
abuseor negligence.To receivefullvaluefrom
the warranty,the operatormust maintainthe
trimmeras instructedin this manual.
Some adjustments must be made periodically
to properly maintain your trimmer.
12
All adjustments in the Service and Adjustmentssec_onofthis manualmustbechecked
at leastonce eachseason.
MAINTENANCE
LUBRICATION
How To Lubricate
The Jackshaft Assembly
A grease fitting is provided to lubricate the
jeckshafl assembly, Use e grease gun with automotive type grease to lubricate the jaskshaft
assembly as shown in Figure 10.
How To Change Engine OII
Change the engine oil when the engine is
warm. Forthe properoil capacity,see "Product
Specifications".
1.
Disconnectsparkplugwire fromthe spark
plug.
2.
Remove the oil drain plug as shownin
Figure11.
3,
Drain all the engine oil into a fiat pan.
4.
Install the oll drain plug. Make sure the
oil drain plug is tight.
5.
Remove the dipstick.
6.
Fill the engine crankcase. DO NOT
OVERFILL. For properoil capacity,see
=ProductSpecifications".
7. Connectthe sparkplugwiretothespark
plug.
HOW TO REPLACE THE AIR FILTER
5.
Put the new air filter into the cover.
Replacethe airfilteroncea yearor more often
in dustyor dirtyco_rlJcos.DO NOT attemptto
clean or oilthe air filter.Remove and installa
new air filteras follows:
6.
Pushthe cover firmlyagainst the flange.
Turn the cover counterclockwiseuntil
tight. Be sure the retainers are locked
around the flange.
CAUTION: Never run the engine without
the air filter Installed. An air filter clogged
with dust can result In loss of engine power
and can cause excessive wear or damage
to the engine. If the air filter Is clogged, replace Immediately.
7.
Connect the sparkplug wire to the spark
plug.
1.
Disconnectthe spark plug wire from the
sparkplug.
2.
Turn the cover clockwise as shown in
Figure 12, Remove the cover and the air
filter.
3.
Air Filter
Discard the old air filter.
4. Clean the cover and the flange.
F_210M
13
MAINTENANCE
SPARK
PLUG
Check the spark plug every 25 hours. Replace the spark plug if the electrodes are
pitted or burned or if the porcelain is cracked,
1.
Make sure the spark plug is clean. Clean
the spark plug by carefully scraping the
electrodes (do not sand blast or use a wire
brush).
2.
Check the spark plug gap with a feeler
gauge. See "Product Specifications" for
the correct spark plug gap and replacement spark plug.
3.
Beforeinstallingthe spark plug, coatthe
threads lightlywith oil for easy removal.
F_)00210M
Tighten the spark plug to e torque of 15
foof-pounds.
Feeler Gauge
0.030"
Spark Plug
F_um 1
14
SERVICE
SERVICE
AND ADJUSTMENT
AND ADJUSTMENT
Make sure that
ell moving
partsclean
have or
stopped.
wire
the
WARNING:
Before
you inspect,
service Disconnect
the trimmer,the
stop
thefrom
engine.
spark plug.
_lb
HOW TO
REPLACE THE TRIMMER
LINE
Forthe best performance,use a heavy
gauge (0.155" diameter)trimmer line. Cut
the lengthof the trimmer line to 21.5 inches.
Use the lengthguide,locatedon the shield,
to makesure the trimmer line is the correct
length. See Figure14. Do notallowthe
lengthofthe linesto vary morethan one
inch.Thisis importantto make sure the trimmer head is balancedanddoes not vibrate.
Trimmer Une
Shield
IMPORTANT:To extend the life of the trimmer line, keep the trimmer line moist. If not
kept moist, the nylon trimmer line will become dry end brittle. Keep extra trimmer
line in a can of water. The line will then stay
flexible and easy to change. A flexible line
will also lest much longer.
HOW TO CHANGE TRIMMER
LINES
When the trimmerline becomes wornto half the odgir_allength,replacethe trimmerlineas
follows:
Line
Retainer
Trimmer
Line
1. Stop the engine. Wait for
all movingpartsto stop.
2. Remove worn trlmmor
line from line retainer.
3.
First thread the ends of
the new trimmer line
through the outside
loops.
F-O00210M
Retainer
4.
Naxt, ta_etheendsofthe
line, cross over the line
retainer, and thread the
ends through the center
hole.
15
5.
Then, check to make
sum that the ends of the
line are even.
SERVICE
AND ADJUSTMENT
HOW TO ADJUST
THE HEIGHT OF THE HANDLE
Use the knobs, on each side of the handle, to
adjust the height of the handle.
1.
Hold the handle with one hand and loosen
both knobs untilthe ratchet teeth are disengaged. Do not remove the knobs. See
Figure 15.
2.
Move the handle up or down to the desired position, then align the ratchet
teeth. Makesure both sidesofthe handle
are level.
3.
_ghtentheknobs.
HOW TO SET THE HEIGHT OF CUT
CAUTION:
Before you
sst
the
Height Of
Walt
moving
stop.
heightforofallcut:
stop parts
the to
engine.
Allow the engine to cool and disconnect the spark plug wire.
Set Screw
Trimmer
Head
The height of cut can be set from 1-1/2 inches
to 3 inches. Recommended cutting height for
the average yard is 2".
1.
Use the T--wrench, found in the parts hag,
to loosen the set screw shown in
Figure 16.
2.
Set the trimmer
height.
3.
_ghten
heed at the desired
Height Guide
T-Wrench
the set screw.
Figure 16
F-0(X)210M
16
SERVICE
AND ADJUSTMENT
HOW TO
REPLACE THE DRIVE BELT
To replace the ddve belt, the trimmer head
and shield must be removed as follows.
A
1.
the drive belt, disconnect the wire
WARNING: Before you remove
from the spark plug.
Remove the two fasteners
that hold the
rear of the shield to the trimmer housing
(See Figure 17).
2.
Remove the four fasteners that hold the
front of the shield and trimmer head to
the trimmer housing.
3.
Remove the
bracket.
%P pulley from the
idler
4.
Raise the front of the trimmer housing
and remove the drive belt. On some models, it is necessary to loosen the mounting belt for the drive pulley to remove the
drive belt (see Figure 18). Do not bend the
belt guides,
NOTE: Make sure you replace the drive
belt only with a replacement belt from
the factory.
5.
To assemble the drive belt, reverse the
above steps. Make sure all fasteners are
tight. Make sure the mounting belt for the
drive pulley is light.
6.
Check the routing of the drive bell Make
sure the drive belt is inside of all belt
gulden shown in Rgure 18.
IMPORTANT: Test the drive system. Start
the engine and move the throttle control to
the FAST position. Engage and disengage
the trimmer head several times. When disengaged, make sure the trimmer head completely stops when rseUng on the ground. If
the trimmer head continues to rotate, take
the trimmer to the nearest Sears Service
Center.
F-000210M
17
SERVICE
AND ADJUSTMENT
STORAGE
WARNING:
To prevent enginedamage whenthe tdmmer
is in storagefor 30 daysor more,followthe
stepsbelow:
Do not remove gaso-
a fire, or while you smoke. Gasoline while inside a building, near
line fumes can cause an explosion or a fire.
Let the engine run until it is out of gasoline.
When the tdmmer is put in storage for thirty
days or more, follow the steps below to
make sure the trimmer is in good condition
the following season.
Drain the oil from the warm engine. Fitl the
engine crankcase with new oil.
Remove the sparkplugfrom the cylinder.
Pour one ounce of oil into the cylinder.
Slowlypullthe recoilstarterhandlesothat
the oilwillprotectthecylinder.Installa new
sparkplugin the cylinder.
Trimmer
Completelyclean the tdmmer.
Put the trimmerin a buildingthat hasgood
ventilation.
Clean dirt and debds from the cylinder
cooling fins and the engine housing.
NOTE: A yearly checkup or tune-up at a
Sears authorized earvlce center will make
If youdo net wantto removegasoline,add
a fuel stabilizer,such as Craftsmanfuel
stabilizerNo. 33500, to anygasolineleftin
the tank. Craftsman fuel stalibizer will
minimizethe formation of gum deposits
and acids. Ifthe tank isalmostempty,mix
Craftsmanfuel stabilizerwith freshgasoline in a separate containerand add the
mixtureto the tank. Alwaysfollowthe instructionson the stabilizercontainer.Run
the engineat leastten minutes after stabilizeris addedto allowthe mixtureto reach
the carburetor.
sure that the trimmer will provide maximum performance for the next season.
Engine
IMPORTANT: It is important to prevent gum
deposits from forming In fuel system parts
such as the carburetor, fuel filter, fuel hose,
and tank during storage. Also, using alcohol-blended fuels (called gasohol, ethanol
or methanol) can attract moisture which
leads to separation and formation of acids
during storage. Acidic gas can damage the
fuel system of an engine while In storage.
F-OC_210M
18
TROUBLE
SHOOTING
CHART
TROUBLE
CAUSE
CORRECTION
Engine does not start
Sparkplugwire
disconnected.
Connectsparkplugwire.
Enginenotprimed.
Primeengine.
Defas_ve or incorrectly
gappedsparkplug.
Inspector replacespark
plug.
Fueltank empty.
Add fuel.
Dirtycarburetoror fuelline.
Clean carburetoror fuel line.
Dirtyair filter.
Replaceair tilter.
Carburetoroutof adjustment. Forcarburetor adjustment,
take the unitto a Sears
Service Center.
Engine rune poorly.
F_XX)210M
Engineflooded.
Wait severalminutesbefore
starting.
ThrottlecontrolleverIn
incorrectposition.
i Movethrottle leverto FAST
Stale gasoline.
Drain old gasoline and add
fresh gasoline.
Defectivethrottlecontrol
lever or wire.
Inspect lever and wire,
Replace if damaged or
defective.
Bad sparkplug.
Replacesparkplug.
Dirtyair filter.
Replace air tilter.
Carburetoroutof adjustment.
Adjustcarburetor.Takethe
unitto a Sears Service
Center.
Stale gasoline.
Drain old gasoline. Add fresh
gasoline.
Engine cooling system
clogged.
Clean enginescreenand
coolingtins.
19
or START position.
TROUBLE
Engine overheats.
SHOOTING
CHART
Enginecoolingsystem
clogged,
Clean debdsscreen and
engine coolingfins.
Carburetoroutof adjustment, Adjustcarburetor.Take the
unitto a Sears Service
Center.
Engine will not step
running.
Poor trimming
3edorrrisnea.
Trimmer vibrates.
Trimmer head does not
retain gne
F-000210M
Oil level is low.
Addoil.
Defective throffie control
lever or wire.
Inspectand replace
damaged parts.
Throttle net adjusted
properly.
Move throttle to the full OFF
_osition.
Tdmmerline lengthis too
short.
Correctline lengthis 21.5
inches. When lessthan 1/2
this length,replacethe line.
Enginenotset at FAST
speed.
Move enginethrottle leverto
FAST position,
Set screwfor tdmmerhead
is loose.
Tightenset screwwith
T-handle wrench.
Tdmmerline lengthsare
substantiallydifferent,
Adjusttrimmerline to
approximatelyequal lengths.
Loosenuts or bolts.
Check all boltsand nuts,
includingengine bolts.
Brokentdmmerhead.
Replacebrokenpart.
Tdmmerline notpropedy
attached.
Follow instnJctions on decal
;or In the Service sec_on of
the owner's manual.
Broken line retainer.
Replacetrimmerhead
assembly.
Tdmmerline notcorrect size.
Use Craftsman0.155 inch
diametertrimmerline.
20
SLOPE GUIDE
SIGHT AND HOLD THIS GUIDE LEVEL WITH A VERTICAL
TREE, A CORNER OF A STRUCTURE, A POWER LINE
POLE, OR A FENCE.
Operate a trimmer across the face
of slopes, never up or down slopes.
Use this guide and do not trim on e slope greater than 15 degrees.
A 10 degree slope is a hill that increases in height at approximately 1.7 feet in 10 feet..
A 15 degree slope is a hill that increases in height at approximately 2.5 feet In 10 feet..
Use extreme care at all times and avoid sudden turns or maneuvers. Follow other instructions in this
,_
manual for safety in trimming on slopes. Operate a trimmer across the face of slopes, never up or down
slopes. Use extra care when operating on or near slopes and obstructions.