1
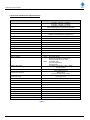
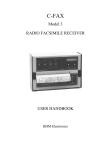
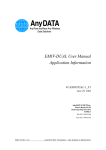
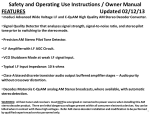
User’s Manual
PA516 Series
AM RF Power Amplifier
Base Line 1.70
Document Number: INS41834-2
PA516 Series User’s Manual
Company Overview
RFI has been serving the needs of the wireless communications market for over 30 years. First founded as a
manufacturer of antenna systems, RFI has grown to be a key player in the development, manufacturing and
distribution of wireless technology and energy products. Through our extensive network of resellers, systems
integrators and retail outlets, RFI is a key supplier to both industry and Government.
Our research and manufacturing facilities have talented people, sophisticated test equipment, state of the art
software with class leading manufacturing systems and techniques. Additionally, we have in place a quality
management program which is certified to ISO9001, environmental management system certification to ISO14001
and occupational health and safety standard AS4801 giving you complete confidence in everything we do.
RFI’s products are truly innovative and as a result we are active around the globe taking our Australian designed and
manufactured products to key markets in Asia Pacific, the Americas and EMEA regions via offices ‘in-region’ in
addition to exporting directly to in excess of 50 countries.
One of RFI’s key principals is to remain totally customer focused as we recognise our future depends on the success
of our customers. We know that to be chosen as your supplier we must add value to your business and to achieve
this we will work hard to deliver the best product when and where you need it and back this up with the very best
technical support available.
Asia Pacific | EMEA | Americas
2
PA516 Series User’s Manual
Document Number INS41832-2
Copyright ã 2014 RF Industries Pty Ltd
First Printing: 14th February 2007
Version Number
Version Date
1.1
14th February 2007
1.2
09th March 2007
1.3
24th April 2007
1.4
23rd April 2008
1.5
19th January 2009
1.6
16th May 2009
1.7
25th July 2013
_____________________________________________________________________________
Disclaimer
Product part numbering in photographs and drawings is accurate at the time of printing. Part number labels on RFI
products supersede part numbers given within this manual. Information is subject to change without notice.
Asia Pacific | EMEA | Americas
3
PA516 Series User’s Manual
TABLE OF CONTENTS
1. GENERAL DESCRIPTION .............................................................................................................. 7
2. ELECTRICAL AND MECHANICAL SPECIFICATIONS........................................................... 8
3. ORDERING INFORMATION .......................................................................................................... 9
4. UNPACKING.................................................................................................................................... 10
5. FIRMWARE LICENSE AGREEMENT ........................................................................................ 11
6. INSTALLATION .............................................................................................................................. 12
7. SETUP AND OPERATION ............................................................................................................. 13
DEFAULT ....................................................................................................................................................14
DOWNLOAD ..............................................................................................................................................14
HELP ............................................................................................................................................................15
RESET REVPWR .......................................................................................................................................15
SET BAUD ...................................................................................................................................................15
SET GAIN ....................................................................................................................................................15
SET LEVEL .................................................................................................................................................16
SET LVLDELAY ........................................................................................................................................16
SET NAME ..................................................................................................................................................16
SET SHUTDOWN RETRY ........................................................................................................................17
SET VSWR ..................................................................................................................................................17
SHOW ID .....................................................................................................................................................17
SHOW SHUTDOWN RETRY ...................................................................................................................17
SHOW SYSTEM .........................................................................................................................................18
SHOW VERSION .......................................................................................................................................18
START .........................................................................................................................................................18
8. CONNECTORS AND CONNECTOR LAYOUT .......................................................................... 19
9. MAINTENANCE, INSPECTION AND REPAIR ADVICE......................................................... 21
10. BACKGROUND MATERIAL AND OTHER RESOURCES .................................................... 22
11. USER NOTES: ................................................................................................................................ 23
Asia Pacific | EMEA | Americas
4
PA516 Series User’s Manual
Notice
The information contained in this document is subject to change without notice.
RF Industries Pty. Ltd. makes no warranty of any kind with regard to this material, including but not limited
to, the implied warranties of merchantability and fitness for a particular purpose. RF Industries Pty Ltd shall
not be liable for errors contained herein or for incidental or consequential damages in connection with the
furnishing, performance or use of the material.
All information contained in this manual has been reviewed. However RF Industries Pty Ltd accepts no
liability for any omissions, errors or construed information.
Ó 2007-2014, RF Industries Pty Ltd. All rights reserved. Reproduction, adaptation or translation without prior
written permission is prohibited except as allowed under copyright laws.
For further information or help with this product contact your nearest RFI sales office or through the
following;
Region
USA
EMEA
ASIA PACIFIC
Sales email
Tech Support
Telephone Intl
Telephone local
Fax Intl
Web
[email protected]
[email protected]
+1 (330) 486 0706
330 486 0706
+ 1 (330) 486 0705
rfiamericas.com
[email protected]
[email protected]
+44 1869 255 772
01869 255 772
rfiemea.com
[email protected]
[email protected]
+61 7 3621 9400
1300 000 RFI
+61 2 9630 0844
rfi.com.au
Asia Pacific | EMEA | Americas
5
PA516 Series User’s Manual
PA516 Series
AM RF Power Amplifier
Front View
Rear View
Asia Pacific | EMEA | Americas
6
PA516 Series User’s Manual
1. General Description
The PA516 Series are full-featured, high performance RF Power Amplifiers for the AM frequency band.
Two models are available. The PA516A covers operation across 531KHz-1250KHz, and the PA516B covers
531KHz-1750KHz. The PA516A may be used where IM products of lower frequencies in the range need to be
suppressed above 1250KHz, or the PA516B may be used where such suppression is unnecessary, or where full
band operation is required from a single unit.
These units offer high linearity amplifier performance that is suited for multi-carrier operation, and are packaged in a
compact 19inch rack mount, 2RU enclosure.
Figure 1 – PA516 Block Diagram
Various operating parameters are monitored and out-of-tolerance status alarm outputs are provided for use if desired.
Alarm conditions provided include;
Minor Alarms:
Excessive VSWR.
Cooling fan speed out of limits.
Internal voltage rail out of limits.
Major Alarms:
Output power level more than 6 dB different from configured reference level.
Internal temperature is above 85˚C.
PA has been shut down due to excessive reverse power.
Front Panel LED indicators display the units’ power, enabled state, VSWR and alarm status.
units are available for operation from 240VAC +/-10% power systems.
These PA516 series
Supporting documents including this User Manual, a Product Brief, an Application Note, and Service Bulletins are
available from RFI.
Asia Pacific | EMEA | Americas
7
PA516 Series User’s Manual
2. Electrical and Mechanical Specifications
Model Number
PA516A / PA516B
PA516A 531KHz – 1250KHz
PA516B 531KHz – 1750KHz
6 carriers at +30dBm per carrier
(other carriers/powers combinations possible)
50-62dB in 1dB steps
Frequency Band
Power Output
Gain
Gain Flatness
Intermodulation Distortion & Harmonics
Output ALC Range
+/-0.5dB over the prorated part of the AM frequency band
< -35dBc
(subject to carriers/powers combinations)
40dB minimum
RF Connector (Input)
N (F)
RF Connector (Output)
N (F)
RF Input Impedance
50 ohms
RF Output Impedance
50 ohms
Power Connector
Fused IEC Inlet (fused 5A)
Power Supply
Alarm Functions
240VAC +/-10% @ 800VA maximum
Minor:
Major:
Alarm Output Type
Alarm Connector
Control Port Functions
Control Port Logic
Control Port Connector
Excessive VSWR
Cooling fan speed out of tolerance
Internal voltage rail out of limits
RF Output level
Internal Temperature
PA Shut Down
Dry Relay Contact (N.C. / N.O. / CMN)
60VDC 100mA
DB9 (Male)
Mute Interlock Control
Mute Control
Reverse Power Reset Control
Control Inputs source ~12VDC @ 1mA
Active logic “low”
DB9 (Male)
Communications
RS232
Communications Connector
DB9 (Female)
Ambeint Temperature Range
0 deg C. to +50 deg C.
Cooling
Forced Air
Mounting
19in Rack Mount, 2 RU x 321mm deep
Case Size
443mm x 88mm x 321mm approx.
Finish
ROHS Compliant
Weight
~7.5kg (~16.5lbs)
Table 1
Asia Pacific | EMEA | Americas
8
PA516 Series User’s Manual
3. Ordering Information
Ordering Information
RFI Part Number
Description
PA516A
AM RF Power Amplifier
531KHz – 1250KHz
240VAC
19in Rack Mount, 2RU
PA516B
AM RF Power Amplifier
531KHz – 1750KHz
240VAC
19in Rack Mount, 2RU
Table 2
Asia Pacific | EMEA | Americas
9
PA516 Series User’s Manual
4. Unpacking
The PA516 unit is packed in heavy-duty cardboard packaging.
Packed with the units will be the Factory Test Sheet (FTS). The User’s Manual is available for download from the
RFI website.
It is recommended to retain the Factory Test Sheet for future reference.
Although the packaging has been designed to provide suitable product protection during shipping, it is important to
report any visible damage to the carrier immediately.
It is the customers’ responsibility in the event of product damage, to lodge a damage claim with the carrier within a
short period of time after receipt of the package. The time window for lodging the claim should be ascertained from
the specific carrier as this may vary between carriers (typically 1 to 5 days).
Please dispose of all packaging material responsibly.
Asia Pacific | EMEA | Americas
10
PA516 Series User’s Manual
5. Firmware License Agreement
This statement must be read in its entirety prior to the loading or use of the Firmware provided by RFI.
Introduction.
By loading any product related Firmware you agree without reserve with all the conditions as detailed in this RFI
Firmware License Agreement.
The term “Firmware” for the sake of this statement includes all software or firmware upgrades, either as a new
installation, revision, patches or upgrades. Any reference to software, for the purposes of this license agreement, will
therefore be included in the term Firmware.
RFI refers to the Australian registered company RF Industries Pty Ltd.
The copyright of all Firmware relating to this product remains the property in whole of RFI and is therefore protected
by the respective international copyright or trademark laws.
You agree that by using and or downloading any of the RFI product specific Firmware, that you have fully understood
and agree to comply and be bound by the all of the conditional requirements as detailed in this Firmware License
Agreement and accept the disclaimer thereof.
RFI reserves the right to update and change, from time to time, any attribute, function, feature and in the main any
content of the Firmware and any documentation attributed and referenced to the Firmware underwritten by this
Firmware License Agreement without notice to existing users.
The use of this Firmware is non-exclusive and non-sub licensable, nor does it give the user the right to re-sell, lease,
loan, distribute, or transfer the Firmware nor the rights thereof.
This Firmware License Agreement grants or implies no right, title, or interest in any intellectual property owned or
licensed by RFI.
Support and Firmware Updates.
RFI may elect to provide you with customer support and/or Firmware upgrades, enhancements, or modifications for
the RFI Firmware at its sole discretion, and may terminate such support at any time without notice to the user. RFI
may change, suspend, or discontinue any aspect of the Firmware at any time, including the availability of any
Firmware feature, database, or content.
From time to time RFI may provide notice through the RFI web site of any available updates or Firmware revision
downloads.
Fees.
RFI reserves the right to charge fees for upgrades or revisions of the applicable Firmware download.
Disclaimer.
Use of any Firmware enabling operation of the product or providing support for the product is at the user’s discretion
and risk. RFI will not be held responsible or liable for any damage or loss that results from the downloading and or
use of the Firmware or incompatibilities or other problems experienced as a result of any combination of operating
system(s), firmware, or software the user may use.
RFI will not be held responsible or liable for any inaccuracies, completeness or inadequacy regarding the Firmware
as the basis of the provision of the Firmware is on a “fit-for-purpose, best effort” approach.
RFI will not be liable to the user for claims and liabilities of any kind arising out of or in any way related to the use of
the Firmware by the user or any third party.
The failure of RFI to exercise or enforce any right or provision of this Firmware License Agreement shall not
constitute a waiver of such right or provision.
Asia Pacific | EMEA | Americas
11
PA516 Series User’s Manual
6. Installation
The PA516 is designed to be installed into standard 19inch rack mount frames or cabinet spaces and is intended for
indoor use only.
Power connection to the unit must be made via the rear IEC connector with the required power capacity. The
equipment must only be used with a properly earthed mains supply.
Cooling air for the unit is drawn in from the front of the unit and is expelled at the rear. Adequate provisions must be
made to ensure that the air flow is not impeded at either the front or rear of the unit. Under no circumstances should
the unit be allowed to become wet.
Ensure that the power source is disconnected before removal of any covers.
Installation Summary
Lightning protection, grounding, and the appropriate torqueing of connectors and the sealing of terminations are all
important facets of any system installation. Careful attention should be given in these areas.
The type of coaxial feeder cables that may be used with the PA516 may vary, but generally their type will be
determined by their length (and resulting insertion loss) and associated jumper/tail requirements.
Always follow engineering best practices for equipment installation.
Asia Pacific | EMEA | Americas
12
PA516 Series User’s Manual
7. Setup and Operation
Terms and Conventions
Operator commands are displayed in upper case on the terminal screen, regardless of case setting on keyboard.
This manual uses the following notational conventions:
{ }
{A...F}
{high | low}
[ ]
<>
_
Text enclosed in curly brackets denotes variable operator input.
Means any one of A, B, C, D, E or F is required.
Means either "high" or "low" is required.
Text enclosed in square brackets denotes the input is optional.
Text enclosed in these symbols denotes a single command key.
Denotes a space.
Unless specified otherwise, all commands are executed by pressing the Enter key, <ENTER>.
Status LEDs
There are four LEDs on the Power Amplifier front panel which provide a summary of the system status as follows:
Power
Active
VSWR
Alarm
Green Green Yellow Red -
ON when the system is powered.
ON when the PA is enabled.
ON when a Reverse Power or VSWR fault is present.
ON when any alarm is active.
When the system firmware is being updated (refer to the DOWNLOAD command) the Power LED will be flashing.
The alarm status will also be active during a firmware update.
Initial Setup
Connect a VT100 compatible terminal via a straight through 9 pin serial cable to the 9 pin female connector located in the
rear of the unit.
Connect power to the unit.
Check that the power LED’s on the front of the unit is illuminated green. Also note that the front and rear fans should be
operating.
Confirm basic system functionality by issuing a SHOW SYSTEM command. Note that no channel module information
will be display until they have been configured. At this stage it would be advisable to have the Software Interface
Operating Instructions available for reference.
Set the module configuration for each of the 16 channel modules using the SET CHANNEL x command. Frequency,
antenna selection, high or low band grouping, relative output level and muting on/off is to be set for each channel.
Following the setting of each channel the active system configuration can be observed using the SHOW SYSTEM
command. In addition to the configured information additional information includes VCO status, RF level present at the
antenna input, and RF output level for both tubes.
The unit should now be operational.
Asia Pacific | EMEA | Americas
13
PA516 Series User’s Manual
Terminal Commands
The following commands are available when a terminal is connected to the system serial port.
DEFAULT
Purpose:
Returns all settings to factory defaults.
Syntax:
default
Example:
Type:
Response:
Are you sure? (YES/NO) >
Type:
Response:
DEFAULT
YES
(must type “yes” in full)
All configuration data set to DEFAULTS
>
Comments:
After this command, the settings will be as follows:
Gain = 50dB
Level Alarm Delay = 5 Sec
VSWR Alarm level = 1.50:1
Reference output power level = Not configured.
DOWNLOAD
Purpose:
Initiates the download of updated firmware.
Syntax:
download
Example:
Type:
Response:
This will overwrite the current firmware!
DOWNLOAD
Are you sure? (YES/NO) >
Type:
Response:
YES
Ready to receive a new application.
- Activate the TRANSFER/SEND FILE (Binary) menu items,
- Select the relevant .BIN application file,
- If presented with the option, select XMODEM protocol,
- Press OK and/or SEND.
To cancel a download:
- Send one or more CTRL-D characters, OR
- Hang up the modem, OR
- Unplug the local terminal.
If possible, the previous application will then be restarted.
At this point, activate your terminal software’s File Transfer protocol. For example for Hyperterminal, invoke
Transfer/Send File, then enter (or Browse) the filename (for example PA516A_V1_1.BIN), set the Protocol
to Xmodem (NOT 1K Xmodem), then press the Send button.
When the transfer is complete, the new firmware will automatically start.
Comments:
If the download of application code is interrupted or fails midway, the system will normally restart
immediately with the previously active application. If it doesn’t restart immediately, press CTRL-D
one or more times, alternatively, wait for about 3 minutes, and the system will automatically abandon
the download.
Asia Pacific | EMEA | Americas
14
PA516 Series User’s Manual
HELP
Purpose:
Displays a brief summary of the available commands.
Syntax:
help
The system responds by displaying help screens.
RESET REVPWR
Purpose:
Resets the Reverse Power shutdown.
Syntax:
reset revpwr
Example:
Type:
Response:
>
RESET
REVPWR
SET BAUD
Purpose:
Sets the serial interface baud rate.
Syntax:
set baud {1200 | 2400 | 4800 | 9600 | 19200}
Example:
Type:
Response:
The new serial baud rate will be activated now.
SET
BAUD
19200
Press any key to continue
Comment
After a key is pressed, the new data rate will be active, so the terminal data rate should be
changed either immediately prior to pressing the key, or immediately after.
The default data rate out of the factory is 9600 baud.
WARNING:
If the baud rate is changed from the factory default, you may want to record this on the repeater
enclosure for other maintenance staff.
SET GAIN
Purpose:
Used to set the amplifier gain.
Syntax:
set gain {50…62}
Example:
Type:
Response:
> Gain = 56dB
SET
GAIN
56
Asia Pacific | EMEA | Americas
15
PA516 Series User’s Manual
SET LEVEL
Purpose:
Used to set the reference output power level.
Syntax:
set level
Example:
Type:
Response:
Current output power = 41.3dBm.
SET
LEVEL
This level will become the nominal level for alarm purposes.
Are you sure? (YES/NO) >
Type:
Comment
YES
If the output power level deviates by more than +/-6dB from the level set with this command, a
Major alarm condition will be activated.
If the reference output power level has not yet been configured, no output power level alarms will
be generated.
SET LVLDELAY
Purpose:
Sets the delay period before a level alarm is raised.
Syntax:
set lvldelay {1..99}
Example:
Type:
Response:
Delay to Level Alarm = 15 Sec
Comment
The output power level needs to be more than 6dB above or below the Reference level for this period
of time before an alarm is signalled.
SET
LVLDELAY
15
SET NAME
Purpose:
Used to designate the name of the site.
Syntax:
set name {name}
Example:
Type:
Response:
>
Comment
The name can be up to 16 characters long. Any of the visible characters from a PC keyboard may
be used, except for a space. When other commands such as SHOW ID and SHOW STATUS are
used, they will include the site name.
SET
NAME
SITE-1234A
Asia Pacific | EMEA | Americas
16
PA516 Series User’s Manual
SET SHUTDOWN RETRY
Purpose:
Sets the delay before retrying the Reverse Power shutdown cycle.
Syntax:
set shutdown retry <minutes>
Example: Type:
SET
Response:
> Shutdown retry delay = 10 Min.
Comment
When an excessive Reverse Power level is detected (currently >35 dBm) the PA is shut down.
The reverse power level is then re-checked 3 times at 10 Second intervals. If the fault condition
persists this retry cycle is repeated once more after the delay specified with this command. If this
fails to clear the fault condition the PA is permanently shut down until either the power is cycled, or
an external Reverse Power Reset signal is applied.
SHUTDOWN
RETRY
10
The Minimum value is 0, which disables the feature, and the maximum value is 60 Min.
SET VSWR
Purpose:
Sets the VSWR alarm level.
Syntax:
set vswr <1.00...20.00>
Example:
Type:
Response:
> VSWR alarm level
Comment
When a VSWR level above this configured value is detected, the VSWR alarm is activated.
SET
VSWR
2.5
= 2.50:1
There is a hysteresis of 0.1 on this alarm. For example if the alarm activates on a VSWR of 1.90:1,
it will remain active until the VSWR drops below 1.80:1.
SHOW ID
Purpose:
Displays the Name, ID, Firmware Version and Serial number.
Syntax:
show id
Example:
Type:
Response:
SITE-1234A, PA516A, V1.6, Serial No.05080001
SHOW
ID
>
SHOW SHUTDOWN RETRY
Purpose:
Displays the delay before retrying the reverse power (VSWR) shutdown cycle.
Syntax:
show shutdown retry
Example:
Type:
Response:
> Shutdown retry delay = 10 Min
Comment
See the command SHUTDOWN RETRY for more details.
SHOW
SHUTDOWN
RETRY
Asia Pacific | EMEA | Americas
17
PA516 Series User’s Manual
SHOW SYSTEM
Purpose:
Displays the system status.
Syntax:
show system
Example:
Type:
Response:
SITE-1234A, PA516A, V1.0,
Gain
56
SHOW
SYSTEM
Serial No.05080001
NomLvl Level Mute PA
41.3
40.5
NO
ON
VSWR Temp Power
OK
OK
OK
Minor-Alm
OK
Major-Alm
OK
Level alarm delay = 15 Sec
VSWR alarm level = 2.50:1
SHOW VERSION
Purpose:
This command displays the firmware version.
Syntax:
show version
Example:
Type:
Response:
Version
SHOW_VERSION
= 1.6
>
START
Purpose:
Resets the screen to scrolling mode and re-displays the banner.
Syntax:
start
Example:
Type:
Response:
(C) Copyright 2006-2012, RF Industries – PA516A, V1.6
START
>
Asia Pacific | EMEA | Americas
18
PA516 Series User’s Manual
8. Connectors and Connector Layout
Figure 2 – PA516 Connectors
Serial Port
Purpose:
The rear panel serial connector allows a local terminal to configure and report all aspects of the
operation of the Power Amplifier.
Serial Format:
The serial communications format is 8 data bits, no parity, 1 stop bit. Handshaking should be disabled.
If the option is available, the terminal software should be configured to send a “Backspace, Space,
Backspace” sequence when the Backspace key is pressed.
Data Rate:
The data rate is preset in the factory to 9600 bits per second, it can be changed by software command
to another rate (See the SET BAUD command)
Connections:
The terminal connection is a DCE type via a female 9 pin 'D' screw-lock socket located on the rear
panel of the Power Amplifier. A standard straight through serial cable can be used to connect the serial
port to a PC serial port. The connections are:
Pin
1
2
3
4
5
6
7
8
9
Name
RxD
TxD
DTR
Gnd
DSR
Function
Not Used
Serial data output from the Power Amplifier
Serial data input to the Power Amplifier
Input
Ground
Output
Not Used
Not Used
Not Used
Asia Pacific | EMEA | Americas
19
PA516 Series User’s Manual
Alarm Connector
The Power Amplifier provides two changeover alarm contacts via a Male DB9 connector on the rear panel.
Connections are as follows:
Pin
Name / Function
1
2
3
4
5
6
7
8
9
Minor alarm - Common.
Minor alarm – Closed on alarm.
Not used.
Major alarm – Closed on alarm.
Major alarm - Common.
Minor alarm – Open on alarm.
Not used.
Not used.
Major alarm – Open on alarm.
The alarm relay contacts are rated at 60VDC, 100mA.
Minor Alarms: Excessive VSWR.
Cooling fan speed out of limits.
Internal voltage rail out of limits.
Major Alarms: Output power level more than 6 dB different from configured reference level.
Internal temperature is above 85˚C.
PA has been shut down due to excessive reverse power.
Control Port
Purpose:
The rear panel Control connector provides a local terminal to configure and report all aspects of the
operation of the Power Amplifier.
The three external control signals are connected via a male DB9 connector on the rear panel.
When a control input is connected to the system ground, the respective signal is activated:
Pin
Name / Function
1
2
3
4
5
6
7
8
9
Mute Interlock control.
System ground.
Mute control.
System ground.
Reverse Power Reset control.
System ground.
Not used.
Not used.
Not used.
The control inputs source approximately 12VDC at about 1mA.
The three external control signals provide the following functionality;
Mute Interlock Control
-
Not currently implemented. Available for future applications.
Mute Control
-
Disables the PA516 RF Output for control and/or maintenance purposes.
(Note: This also reduces PA516 power consumption to a nominal standby value)
Reverse Power Reset Control
-
Facilitates external reset of a VSWR alarm state (i.e. VSWR Shutdown) if present.
Asia Pacific | EMEA | Americas
20
PA516 Series User’s Manual
9. Maintenance, Inspection and Repair Advice
No special maintenance program is required for the PA516.
It is recommended that the fans and fan filters be checked regularly and cleaned to ensure efficient and unobstructed
air flow is achieved. Testing and inspection of the PA516 may be included in a Periodic Maintenance Inspection
(PMI) program if desired.
Firmware upgrades may periodically be made available and may be uploaded for the PA516 via the Command Line
Interface (CLI) if desired.
Checking that the RF connectors on all coaxial cables are correctly torqued (as per manufacturers’
recommendations) is considered good practice.
All other connectors (power, alarm, control, etc) must be firmly located and pushed into their corresponding mating
sockets, with fastening screws tightened securely.
The PA516 is not considered field repairable. Should it be considered that any unit may be faulty through diagnosis,
they should be replaced - or returned to RFI for repair.
Asia Pacific | EMEA | Americas
21
PA516 Series User’s Manual
10. Background Material and other resources
For Product Briefs, User Manuals, Firmware Upgrade files or additional information on the RFI range of PA516 products
please contact your nearest RFI Sales Office or visit: http://www.rfiwireless.com.au
Asia Pacific | EMEA | Americas
22
PA516 Series User’s Manual
11. User Notes:
Asia Pacific | EMEA | Americas
23
PA516 Series User’s Manual
11. Maintenance
No special maintenance program is required for the APM or frequency banded Couplers.
Firmware upgrades may periodically be made available and will require uploading into the APM.
Physically checking that the 7/16DIN (M) RF connectors on the feeder cables from the combiner and to the antenna are correctly
torqued (as per manufacturers recommendations) onto the corresponding Coupler termination connectors is considered good
practice. All N Male termination connectors on the RF coaxial connectors on both the APM and Coupler/s must also be tightened.
The 2-pin Phoenix DC connector socket must be firmly located and pushed into the corresponding power plug on the APM.
Neither the APM nor the Coupler/s are considered field repairable and should it be considered that either unit may be faulty
through diagnosis, they will have to be returned to RFI.
Notes:
Asia Pacific | EMEA | Americas
24