1
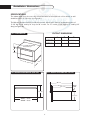
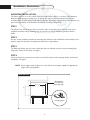
THE PROFESSIONAL
WARMING DRAWER
Installation Guide
Models:
■ WD-27SS
■ WD-27BK
■ WD-27WT
■ WD-27GN
■ WD-27BL
■ WD-27PL
■ WD-30SS
■ WD-30BK
■ WD-30WT
■ WD-30GN
■ WD-30BL
■ WD-30PL
A Message To Our Customers
Thank you for selecting this DCS Warming Drawer. Because of its unique features, we have developed this
Installation Guide. It contains valuable information on how to properly install your new Warming Drawer for
years of safe and enjoyable use.
For your convenience, product questions can be answered by a DCS Customer Service
Representative by phone: 1-888-281-5698, or Fax: 714-372-7004,
or by mail:
DCS
Attention: Customer Service
5800 Skylab Road
Huntington Beach, CA 92647
WARNING
The warming drawer is not intended to be used in conjunction with water. DO NOT fill the drawer or warming
cavity with water. Doing so could create a shock hazard resulting in a possible injury.
WARNING
TO REDUCE THE RISK OF INJURY TO PERSONS IN THE EVENT OF A RANGE TOP GREASE FIRE, OBSERVE
THE FOLLOWING: SMOTHER FLAMES with a close-fitting lid, cookie sheet, or metal tray, then turn off the
burner. BE CAREFUL TO PREVENT BURNS. If the flames do not go out immediately EVACUATE AND CALL
THE FIRE DEPARTMENT. NEVER PICK UP A FLAMING PAN - You may be burned. DO NOT USE WATER,
including wet dishcloths or towels - a violent steam explosion will result. Use an extinguisher ONLY if:
1.You know you have a Class ABC extinguisher, and you already know how to operate it.
2.The fire is small and contained in the area where it started.
3.The fire department is being called.
4.You can fight the fire with your back to an exit.
PLEASE RETAIN THIS MANUAL
FOR FUTURE REFERENCE.
1
Table Of Contents
SAFETY PRACTICES & PRECAUTIONS ...........................................................................3-4
INSTALLATION INSTRUCTIONS ..........................................................................................5-7
Specifications ....................................................................................................................................5
Mounting Installation...................................................................................................................6-7
WIRING DIAGRAM ..............................................................................................................................8
SERVICE........................................................................................................................................................9
WARRANTY ............................................................................................................................................10
2
Safety Practices & Precautions
READ AND UNDERSTAND THESE PRECAUTIONS
• Read this Installation Guide thoroughly before installation. This will help to reduce the risk of fire,
electric shock, or injury to persons.
• Remove all packaging materials from your appliance.
• Install according to instructions. See page 5-9 to insure proper installation and servicing.
• Be sure to have a qualified service technician install and ground this appliance.
• Plug into rated outlet: 120 Volts AC, 5 amp minimum circuit requirement.
PREHEATING INSTRUCTIONS
The Warming Drawer is designed to keep foods at a safe temperature (above 1400) when used
according to the operating instructions. The drawer must be pre-heated for at least 1/2 hour on the
highest setting. If the warming drawer isn’t pre-heated, the internal temperature of the food being
warmed could fall below the minimum safe level and bacteria could develop. Always preheat the
drawer according to the instructions described in the warming drawer Use and Care Guide.
• Children should not be left alone or unattended in an area where appliances are in use. They should
never be allowed to turn knobs, push buttons, sit or stand on any part of an appliance.
• Children in walkers, or children crawling can be attracted to the round door handle and may grab
and open the warming drawer. This can result in injury from the door being pulled open on a child,
or severe burns if it is in use and hot.
CAUTION: Do not store items of interest to children in, above or around any appliance. Children
could be seriously injured if they should climb onto the appliance to reach these items.
Be certain to use only dry pot holders: Moist or damp pot holders on hot surfaces may cause burns
from steam. Do not use a towel or other bulky cloth in place of pot holders.
• Never store anything in the warming drawer. Flammable materials can catch fire, plastic items may
melt or ignite and other types of items could be ruined.
• Do not hang articles from any part of the appliance or place anything against the drawer. Some
fabrics are quite flammable and could catch on fire.
• For safety reasons and to avoid damage to the appliance, never sit, stand, or lean on the warming
drawer door.
• For personal safety, wear proper apparel. Loose fitting garments or hanging sleeves should never be
worn while using this appliance. Some synthetic fabrics are highly flammable and should not be worn
while using this appliance.
• Do not use aluminum foil to line any part of the warming drawer. Using a foil liner could result in a
fire hazard, or the obstruction of the flow of heat and ventilation air. Foil is an excellent heat
insulator and heat will be trapped underneath it. This trapped heat can upset the performance of the
warming drawer parts.
WARNING: This appliance is designed for warming food. Based on safety considerations, never use
the warming drawer to warm or heat a room.
3
Safety Practices & Precautions
• As with any cooking or heating appliance, never leave the warming drawer unattended when warming
food, this could be a fire hazard.
• Only certain types of glass, heat proof glass-ceramic, ceramic, earthenware or glazes are suitable for
use in this warming drawer. Utensils that are not thermally heat safe may break with sudden
temperature changes.
• Never heat unopened containers, a build up of pressure may cause the container to burst.
• 120 volt AC, 5 amp minimum circuit required.
• Grease is flammable, avoid letting grease deposits collect in the warming drawer, clean up spillage.
• DO NOT use water on grease fires. Turn OFF the warming drawer, then smother the fire with
baking soda or use a dry chemical or foam-type fire extinguisher.
• When opening the drawer while warming liquids, the drawer must be opened slowly to avoid spillage.
• Use care when opening a hot warming drawer; to avoid severe burns, open slowly, allow the hot air
or steam to escape before reaching in to remove or replace any foods.
• Do not repair or replace any part of this appliance unless it is specifically recommended in this
manual. All other servicing should be referred to a qualified Service Technician. Service Technicians
must disconnect the power supply before servicing this appliance.
• When using the warming drawer: DO NOT TOUCH THE INTERIOR SURFACES or the exterior
area immediately surrounding the door until it has had sufficient time to cool to avoid burn injuries.
• Clean the warming drawer with caution. Avoid steam burns; do not use a wet sponge or cloth to
clean the appliance while it is hot. Some cleaners produce noxious fumes if applied to a hot surface.
Follow directions provided by the cleaner manufacturer.
• Be sure all the controls are turned off and the appliance is cool before using any type of aerosol
cleaner on or around the appliance. The chemical that produces the spraying action could, in the
presence of heat, ignite or cause metal parts to corrode.
• Do not touch the heating element or interior surfaces of the warming drawer, even if they appear
dark in color. They may still be hot enough to cause burn injury, allow sufficient time to cool.
• Do not allow flammable materials which may ignite to come in contact with the hot heating element
or the interior surface of the warming drawer until the unit has had a sufficient time to cool.
WARMING DRAWER FEATURES
Stainless
Steel
Tray
Moist/
Crisp
Knob
Power Thermostat
Indicator Control
Lens
Knob
Power
Indicator
Stainless
Steel
Drawer
4
Installation Instructions
SPECIFICATIONS
The cabinet depth from the outer edge of the face frame to the inside back of the cabinet or wall
should be at least 23 7/8 inches (see figure 01).
The Warming Drawer should be installed into a base cabinet with minimum outside dimensions of
13 1/4” high by 30” wide by 24” deep for 30” models. For 27” models 13 1/4” high by 27” wide by 24”
deep (see figure 02).
CUTOUT DIMENSIONS
FIG.01 CUTOUT DIMENSIONS
A
B
C
WD-27
11 3/4”
25 3/8”
23 7/8” (min.)
WD-30
11 3/4”
28 3/8”
23 7/8” (min.)
1 1/2" Min. To Bottom
of Countertop
A
B
C
FIG.03 WARMING DRAWER DIMENSIONS (SIDE VIEW)
FIG.02 WARMING DRAWER DIMENSIONS (FRONT VIEW)
28 7/16"
25 1/4"
23 11/16"
POWER
CORD
13 1/4"
11 11/16"
WD27" - 26 5/8"
WD30" - 29 5/8"
5
Installation Instructions
MOUNTING INSTALLATION
The lower rear corners of the cabinet need to provide proper support to the back of the Warming
Drawer and the anti-tip mounting clips. A 120 volt AC outlet should be located no further than
36 inches from the back center of the Warming Drawer. Illustrations suggest one possible bottom support, but the consumer is not limited to this idea for mounting configuration.
STEP 1
The bottom rear section of the cabinet should be made of solid plywood or 2x4 and needs to be
installed to hold the anti-tip mounting clips and support the weight of Warming Drawer, which is
90 lbs.
STEP 2
Use the screws provided to attach the mounting clips which must be installed for anti-tip safety to the
bottom support at the back. See placement dimensions in figure below.
STEP 3
The Warming Drawer has slots on the back side where it will slide onto the anti-tip mounting clips.
Plug power cord into AC outlet. See page 7.
STEP 4
Screw the front face screw into the center hole of the front face of the warming drawer to finish the
installation. See page 7.
NOTE: Bottom support made of plywood or other solid wood construction capable of supporting the
weight of the warming drawer.
FIG.04 STEPS 1 & 2
21
Slide drawer
on to Anti-Tip
mounting clips
5/16"
mounting clips
6
Installation Instructions
FIG.05 STEP 3
Center line
to Center line
for mounting clips
WD30 - 24 1/4"
WD27 - 21 1/4"
FIG.06 STEP 4
7
8
STRAIN RELIEF
NEU
L1
1
1
GND
THERMOSTAT
TEMP. SWITCH
2
AUX. SWITCH
2
4
3
1
LIGHT
2
WARMING ELEMENT
500 WATTS, 120 VAC.
Wiring Diagram
Service
HOW TO OBTAIN SERVICE:
Before you call for service:
1) Is the circuit breaker tripped or the fuse blown?
2) Is there a power outage in the area?
For warranty service, contact DCS Customer Service at (888) 281-5698.
Before you call, please have the following information ready:
• Model Number
• Serial Number
• Date of installation
• A brief description of the problem
Your satisfaction is of the utmost importance to us. If a problem cannot be resolved to your
satisfaction, please write or fax us at:
Write:
DCS
Attention: Customer Service
5800 Skylab Road
Huntington Beach, CA 92647
Fax us at: (714) 372-7004
9
Warranty
LENGTH OF WARRANTY
One (1) Year Full parts and Labor Covers the entire product
DCS WILL PAY FOR
All repair labor and parts found to be defective due to materials or workmanship for one full year “IN HOME”
warranty during the first year of ownership. This does not apply if the unit was subjected to other than normal
household use. Service must be provided by Authorized Factory Agent during normal working hours. No
charges will be made for repair or replacement at the location of initial installation or factory for parts returned
pre-paid, through the dealer and claimed within the warranty period, and found by DCS to be defective.
Replacement will be F.O.B. DCS, and DCS will not be liable for any transportation costs, labor costs, or export
duties. This warranty shall not apply, nor can we assume responsibility for damage that might result from failure
to follow manufactures instructions or local codes, where the appliance has been tampered with or altered in
anyway or which, in our judgement, has been subjected to misuse, negligence, or accident. Implied warranty shall
not extend beyond the duration of this written warranty. This warranty is in lieu of all warranties expressed or
implied and all other obligations or liability in connection with the sale of this appliance.
DCS WILL NOT PAY FOR
•
•
•
•
•
•
•
•
•
•
•
Installation or start-up.
Shipping damage.
Service by an unauthorized agency.
Damage or repairs due to service by an unauthorized agency or the use of unauthorized parts.
Service during other than normal working hours.
Improper installation, such as improper hook-up, etc.
Service visits to teach you how to use the appliance; correct the installation; reset circuit breakers or
replace home fuses.
Cleaning of filters and outer panels.
Repairs due to other than normal household use.
Damage caused from accident, abuse, alteration, misuse, incorrect installation or installation not in
accordance with local codes.
Units installed in non-residential application such as day care centers, bed and breakfast centers,
churches, nursing homes, restaurants, hotels, schools, etc.
This warranty applies to appliances used in residential applications; it does not cover their use in
commercial situations. This warranty is for products purchased and retained in the 50 states of the
U.S.A., the District of Columbia and Canada. This warranty applies even if you should move during the
warranty period. Should the appliance be sold by the original purchaser during the warranty period,
the new owner continues to be protected until the expiration date of the original purchaser’s warranty
period. This warranty gives you specific legal rights. You may also have other rights which vary from
state to state.
10