1
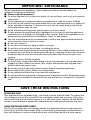
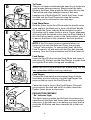
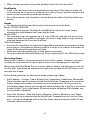
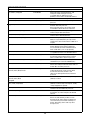
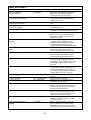
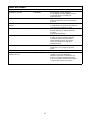
®
PowerPro
TM
Full-Size
Food Processors
?
QUESTIONS? Please call us TOLL FREE!
IN U.S.A. 1-800-231-9786
IN CANADA 1-800-465-6070
Model FP1000 Series Food Processors
SAVE THIS USE & CARE BOOK
IMPORTANT SAFEGUARDS
When using electrical appliances, basic safety precautions should always be
followed, including the following:
■ Please read all instructions.
■ To protect against risk of electrical shock, do not put base, cord, or plug in water or
other liquid.
■ Close supervision is necessary when any appliance is used by or near children.
■ Turn unit off and unplug from outlet when not in use, before putting on or taking off
parts, and before cleaning. To disconnect, turn unit off, grasp plug, and pull from
wall outlet. Never yank on cord.
■ Avoid contacting moving parts. Keep fingers out of food chute.
■ Do not operate any appliance with a damaged cord or plug or after the appliance
malfunctions or is dropped or damaged in any manner. Return the appliance to an
authorized service facility for examination, repair, or adjustment.
■ The use of attachments not recommended or sold by the appliance manufacturer
may cause fire, electric shock, or injury.
■ Do not use outdoors.
■ Do not let cord hang over edge of table or counter.
■ Do not let cord contact hot surface, including the stove.
■ Keep hands and utensils away from moving blades or discs while processing food
to prevent the possibility of severe personal injury or damage to the food processor.
A spatula may be used, but it must be used only when the food processor is not
running.
■ Blades are sharp. Handle carefully.
■ To avoid injury, never place knife blade or disc on base without first putting bowl
properly in place. Make sure motor, disc, and/or knife blade have stopped completely before removing cover.
■ Be certain cover is securely locked in place before operating appliance.
■ Never feed food by hand. Always use food pusher.
■ Do not attempt to defeat the cover interlock mechanism.
■ Do not operate this appliance in the presence of explosive and/or flammable fumes.
■ his appliance is intended for household use only and not for commercial or industrial
use.
SAVE THESE INSTRUCTIONS
POLARIZED PLUG
This appliance has a polarized plug—one blade is wider than the other. To reduce the
risk of electric shock, this plug will fit into a polarized outlet only one way. If the plug
does not fit fully into the outlet, reverse it. If it still does not fit, contact a qualified electrician. Do not attempt to defeat this safety feature by modifying the plug in any way.
AVOID PREPARING SOME FOODS
The Food Processor may not beat egg whites to a desirable volume. It may not satisfactorily slice solidly frozen meat; slice or shred hard-cooked eggs, marshmallows, or
very soft cheeses; or process foods which are so hard that the tip of a knife cannot
FOOD PUSHER
FRENCH FRY DISC
FOOD FINGERS
(In Food Chute)
(Selected models
only)
COVER
THIN SLICE/FINE
SHRED REVERSIBLE
DISC
THICK SLICE/COARSE SHRED
REVERSIBLE DISC
DISC STEM
KNIFE BLADE
BOWL HANDLE
BOWL
CORD STORAGE
CENTER POST
(AT BACK OF BASE)
PUSH BUTTON CONTROLS
“ON”
INDICATOR LIGHT
3
be easily inserted. It also will not grind grain, coffee
beans, or spices with a high oil content. Do not chop Ice
it will damage the Bowl and dull the Knife Blade.
A
B1
TO ASSEMBLE FOOD PROCESSOR
IMPORTANT: Be sure the Food Processor is off and
unplugged before removing or inserting parts.
Food Processor Bowl
To attach Bowl to Base, hold Bowl with Front facing you
(A). Set Bowl into Round Well and rotate until its Locking
Tabs drop down into the Base. Twist the Bowl
counterclockwise as far as it will go. Be sure both Locking Tabs drop into place. Use markings on the Push Button Control Panel as a guide.
Reversible Slice/Shred Disc
NOTE: The Reversible Disc will slice or shred depending
upon which side is facing upward.
B2
Position the Bowl on the Base and place the Disc Stem
on the Center Post (B1). Grasp the Disc by the Center Hub
with the desired side (slice or shred) facing upward.
Rotate the Disc until it slides down into place.
IMPORTANT: For your protection, this unit has a system
that locks the Cover and Bowl onto the Base for safe
usage. Do not attempt to operate the unit without the
Cover and Bowl locked correctly in place. An attempt to
do so will turn on the Indicator Light but the unit will not
operate. If this happens check to ensure the cover is
completely on.
French Fry Disc (MODEL FP1011 ONLY)
C
The French Fry Disc is also used with the Disc Stem. This
Disc must be mounted with the cutting blades facing
upward, and is installed the same way as the Slice/Shred
Disc (C).
Knife Blade
Position the Bowl on the Base. Grasp the Blade by its
Center Hub and slip the Blade down over the Center Post
of the Bowl. (D).
4
D
E
To Puree:
The pre-cut feature eliminates the need to cut foods into
small pieces before pureeing. Simply install the knife
Blade in the Bowl, then grasp the thick slice disc by the
Centre Hub and align hexagon shape of Hub over
hexagon top of Knife Blade (E). Install the Cover. Insert
the food into the Food Chute and using the pusher,
pureeing can be achieved in one easy step.
Food Chute/Cover
Hold the Cover by the Food Chute with the handle cover
at an angle to the Bowl just in front of the Bowl Handle
(F). Lower the Cover over the Bowl and twist counterclockwise until it snaps firmly in place. Proper alignment
will result with the handle cover over the Bowl Handle. If
the Lid does not easily rotate to the Lock position, check
to ensure the Bowl is fully rotated to the Lock position.
NOTE: If the Processor does not operate when it is
turned on, be sure the Bowl and Cover are properly
“locked“ into position. To remove the Cover, shut the
Food Processor off and wait until the Disc has stopped
rotating. Turn the Cover clockwise and lift the Cover off.
F
Food Pusher
Insert the Food Pusher into the Food Chute and lower it
into place (G). Always use the Food Pusher to guide food
through the Disc when slicing and shredding.
NOTE: The Food Pusher doubles as a measuring cup and
has convenient millilitre and cup markings.
Food Fingers
To keep the food steady and minimize tilting of singlefood items (such as carrots), clip the Food Fingers into
place on the top rim of the Food Chute (H).
G
Center the food in front of the Food Fingers. They will
press against the food and hold it in place. Insert the
Pusher, press down, and process.
PUSH BUTTON CONTROLS
“On” Indicator Light
This light comes on when the On Switch has been activated even if the Bowl and Cover have not been locked
into place. If the Indicator is on before you close the Lid,
press the Off Button and then rotate the lid to the Lock
position.
5
Pulse Button
• Press and hold the Pulse Button must be pressed and
held in place for the unit to operate. When you
release it, the unit will stop. (I)
• Use the Pulse Button for short processing tasks,
such as chopping raw beef cubes or vegetables. This
allows you to control processing time as well as
results.
H
On Button (Models FP1000 and FP1000-04)
• When the On button is pressed, the unit will run until
the Off Button is pressed.
• Use the On position for longer processing tasks, such
as making peanut butter, smooth spreads, dips, etc.
I
On
Pulse
Light
J
Off
High
Speed
Low
Speed
2-Speed Buttons (Model FP1011)
Instead of an ON Button, Model FP1011 has two (2)
Speed Control Buttons. (J)
• When the “II” button is pressed, the unit will run at
High Speed until the OFF or “I” button is pressed.
• When the “I” button is pressed, the unit will run at
LOW SPEED until the OFF or “II” button is pressed.
• For most applications requiring longer processing,
use HIGH SPEED (II).Use LOW SPEED (I) for higher
volumes of liquid (3 to 4 cups/750 to 1000 ml).
CARE AND CLEANING
Other than the cleaning mentioned in this manual, no other
servicing or maintenance of this appliance is required.
Repairs, if necessary, must be performed by a Black &
Decker Authorized Service Center.
Pulse
General Care
• Do not attempt to sharpen the cutting edges of the
Knife Blade or the Reversible Disc. They are permanently sharpened at the factory and will be ruined by
attempted sharpening.
• To store the unit, push the cord into the storage compartment at the back of the unit.
Cleaning
• Before cleaning, be sure the unit is off and unplugged. from outlet.
• Whenever possible, rinse parts immediately after processing to make cleanup easier.
• Wipe the base with a damp cloth and dry thoroughly. Stubborn spots can be
removed by rubbing with a damp cloth and a mild, non-abrasive cleaner. Do not
immerse the Base in liquid.
• All removable parts can be washed by hand or in a dishwasher.
6
K
L
–If washing by hand, use in hot, sudsy water, rinse,
and dry thoroughly. If necessary, use a nylon bristle
brush to thoroughly clean the Bowl and Food
Chute/Cover; this type of brush will also help to prevent cutting yourself on the Knife Blade and
Reversible Discs.
–If washing in a dishwasher, the Knife Blade and
Discs should be placed on the upper rack – not in or
near the utensil basket where your hand could be
cut when removing utensils.
• Do not use rough scouring pads or abrasive
cleansers.
• Do not fill the Bowl with boiling water. Do not place
any of the parts in boiling water.
• Do not let the Knife Blade or Discs soak in water for
any length of time.
FOOD PROCESSING TECHNIQUES
Empty the bowl when food reaches the lower rim of the
Cover. Remove the Disc or Blade before removing food
from the bowl.
M
Food Size
• When chopping, quarter foods or cut them into 1” (25
mm) pieces. Large pieces chop unevenly, with some
particles coarse and others overprocessed. When
slicing or shredding foods which are too large for the
Food Chute, decrease the size by first pre-cutting
them by hand to fit (K).
• When slicing and shredding, cut long foods to fit the
Food Chute [approximately
3 1/2” (90 mm)] for best results.
• When processing long, narrow foods, pack the Food
Chute so food will stand upright. Slices will then be
round and even (L).
• For long shreds or slices, arrange 2 1/2” (65 mm) food pieces horizontally in the Food
Chute. These are attractive in salads, Oriental dishes, and vegetable dips (M).
Food Quantity
• Medium-sized loads chop more evenly than large ones. If your recipe calls for 4
medium onions, for instance, chop them 2 at a time; so they will be evenly chopped
without being over-processed.
Food Temperature
• Fruits, vegetables, and medium-hard cheeses should be processed at refrigerator
temperature.
• Parmesan and Romano cheese should be processed at room temperature. See
“Processing Cheese” for techniques.
9
• When slicing raw meat, it should be partially frozen (firm, but not solid).
Food Quality
• Fresh, crisp, and firm fruits and vegetables process best. This does not mean you
cannot use up an old carrot or a limp piece of celery, but you should not expect the
same results you would get with fresh produce.
• For uniform texture, use a spatula to scrape down the sides of the Bowl when necessary.
Liquids
• Hot liquids (not boiling) and hot foods can be processed in the Bowl.
Model FP1000, FP1000-04
• For best results process less than 3 cups (800 ml) of liquids at a time. Larger
amounts may leak between the Cover and the Bowl.
Model FP1011
• For best results you can process up to 4 cups (1000 ml) of liquids at a time on low
speed; less than 3 cups (800 ml) of liquids at a time on high speed. Larger amounts
may leak between the Cover and the Bowl.
Other Techniques
• Process dry ingredients first and moist ingredients later when making several different recipes or using several different foods in a recipe. This reduces the number of
times the Bowl must be washed and dried.
• Wash and remove inedible parts of food before processing.
• Chop raw meat with the Knife Blade only. Chop a maximum of 1 Cup (240 ml) at a time.
Processing Cheese
Many kinds of cheese can be processed in this Food Processor. However, some precautions must be observed for good results and to avoid damaging your machine.
When using the Slice/Shred Disc to process cheese, always use light pressure on the
Food Pusher. Light pressure means just enough force to keep the Food Pusher in contact with the cheese.
Follow these guidelines for best results when processing cheese.
• Soft Cheeses – Cottage, Cream, Ricotta, Brie, Camembert, Liederkranz, Mozzarella.
These cheeses may be processed with the Knife Blade. Temperature is not critical.
Cream cheese will process more easily at room temperature. Of this group, only
mozzarella cheese may be processed with the shredding side of the Disc, but it must
be well chilled. Put it in the freezer 20 minutes before shredding. Soft cheeses cannot be sliced or shredded.
• Semi-Soft Cheeses – Blue, Bel Paese, Meunster, Fontina, Monterey Jack. These
cheeses may be processed with the Knife Blade. Temperature is not critical. However, if using the shredding side of the Disc, these cheeses must be chilled. These
cheeses cannot be sliced.
10
• Semi-Hard Cheeses – Cheddar, Colby, Longhorn, American, Swiss, Gruyere,
Emmenthaler, Jarlsberg, Edam, Gouda, Provolone. Temperature is not critical if
using the Knife Blade. These cheeses may be shredded or sliced, but they must be
well chilled. Use only light pressure on the Pusher.
• Hard Cheeses – Parmesan, Romano, Pecarino, Sapsage. These cheeses have a
lower moisture content. If these cheeses are so hard as not to be able to pierce
easily with a thin knife, do not attempt to process in Food Processor. Hard cheeses
may be processed as soon as purchased and then stored in freezer until needed.
These cheeses should be processed with the Knife Blade only, as results are better
chopped than shredded.
• To Chop or Grate Cheese to any texture from coarse to fine, first cut into 1” (25 mm)
cubes. Place in Bowl and pulse or process continuously until desired texture is
reached. Process up to 2 cups (480 ml) of cheese cubes at a time.
Making Baby Food
The Food Processor makes preparing food for a baby an easy task. The baby may eat
what the rest of the family is eating rather than preparing a different meal.
With the Food Processor, it is possible to puree raw and cooked foods with a bit of
sauce or juice to enhance flavour and aid processing. Fresh fruits and cooked meats
can be pureed; vegetables can be stewed briefly and pureed. The texture of the food
can be controlled by pulsing more or less to suit the needs and age of the child. Fresh
baby food can be available for every feeding with a minimum of preservatives and
additives.
11
12
DAILY USE CHART
Food/Result
Attachment
Special Instructions
Apples, Chopped
Knife Blade
Apples, Sliced
Disc, Slicing Side
Avocado, Sliced
Disc, Slicing Side
Peel (if desired), quarter and core. Cut each
1/4 in half crosswise. Add up to 1 cup
(240 ml) at a time.
Stack quarters horizontally. Use firm
pressure.
Pit, quarter, and core. Arrange quarters
(back to back) in Chute, alternating thick
and thin ends. Use firm pressure.
Baby Food
Knife Blade
Bananas, Mashed
Use ripe fruit. Peel and cut into 1” (25mm) pieces.
Process up to 3 bananas at a time.
Disc, Slicing Side
Peel and cut in half. Place cut side against
Disc. Use light pressure.
Knife Blade
Break bread into pieces. Process until
crumbed to desired fineness.
Knife Blade
Use up to 4 slices in quarters. Process
until crumbed to desired fineness.
Knife Blade
Core and cut into 1” (25 mm) pieces. Add up
to 2 cups (480 ml) at a time. Pulse to
desired fineness.
Disc, Slicing Side
Cut into pieces to fit Chute. Use light
pressure. Empty Bowl as cabbage reaches
lower rim of Bowl Cover.
Disc, Shredding Side
Cut into pieces to fit Chute. Use light
pressure. Empty Bowl as cabbage reaches
lower rim of Bowl Cover.
Knife Blade
Peel and cut into 1” (25 mm) lengths. Add up
to 2 cups (480 ml) at a time. Pulse to
desired fineness.
Disc, Shredding Side
Position in Chute and shred.
Disc, Slicing Side
Cut to fit Chute - 3 1/2” (90 mm). Pack
Chute, alternating thick and thin ends.
Disc, Slicing Side
Remove strings and cut each stalk
crosswise in thirds. Place upright in
Chute. For best results, slice more than
1 stalk at a time. Use firm pressure.
Knife Blade or Disc
See “Processing Cheese” (pg. 12) for
techniques.
Knife Blade
Use room-temperature chocolate. Cut
squares into quarters. Add up to 2
quartered squares or up to 1 cup (240 ml)
chips to Bowl. Process 15 to 30 seconds.
Knife Blade
Remove brown husk and cut coconut meat
into 1” (25 mm) pieces. Add up to a cup
(240 ml). Process to desired fineness.
Disc, Shredding Side
Remove brown husk and cut coconut meat
to fit Chute. Pack Chute. Use firm pressure.
Knife Blade
Break up into bowl. Process until crumbed
to desired fineness.
Knife Blade
Add up to 2 cups (480 ml) and pulse to
desired fineness.
Knife Blade
Add 2 cups (480 ml) to Bowl and process
until thickened (check after 20 seconds).
If desired, sweeten with 2 to 3 tablespoons
(30 to 45 ml) confectioners sugar.
Bananas, Sliced
Bread (Dry)
Finely Crumbed
Bread (Fresh)
Coarsely Crumbed
Cabbage, Chopped
Cabbage, Coarsely Shredded
Cabbage, Finely Shredded
Carrots, Chopped
Carrots, Shredded
Carrots, Sliced
Celery Sliced
Cheese
Chocolate, Grated
Coconut (Fresh), Grated
Coconut (Fresh), Shredded
Cookies, Crackers, Crumbed
Cranberries, Chopped
Cream (Whipping or Heavy),
Thickened
See “Making Baby Food” (pg. 12) for
techniques.
Knife Blade
13
DAILY USE CHART
Food/Result
Attachment
Special Instructions
Cucumbers, Chopped
Knife Blade
Cucumbers, Shredded
Cucumbers, Sliced
Disc, Shredding Side
Disc, Slicing Side
Eggplant, Sliced
Disc, Slicing Side
Eggs (Hard Cooked), Chopped
Knife Blade
Fish (Boned, Raw), Chopped
Knife Blade
Fruit (Candied, Dried), Chopped
Knife Blade
Garlic, Minced
Knife Blade
Horseradish, Grated
Knife Blade
Lemons, Sliced
Disc, Slicing Side
Lettuce, Sliced (into Strips)
Disc, Slicing Side
Limes, Sliced
Disc, Slicing Side
Meat (Boneless, Uncooked
Chicken, Pork, Beef) Sliced
Disc Slicing Side
Meat (Boneless, Uncooked
Chicken, Pork, Beef)
Chopped
Meat (Boneless, Cooked Ham,
Pork, Lamb, Veal, Beef)
Knife Blade
Peel (if desired), halve lengthwise, and
scoop out seeds (if tough). Cut into
1” (25 mm) pieces. Add up to 2 cups
(480 ml) at a time. Pulse to desired fineness.
Cut to fit Chute (if necessary).
Cut to fit Chute (if necessary). Use light
pressure.
Peel (if desired) and quartered or cut to
fit Chute. Use firm pressure.
For frying after slicing, salt and let stand
in colander to drain off excess moisture.
Peel, dry and halve. Add up to 6 eggs at
a time. Chop to desired fineness.
Cut into cubes. Add up to 1 cup (240 ml) at
a time. Pulse to desired fineness.
Pit and add up to 1 cup (240 ml) at a time.
Add 1/2-cup (120 ml) flour per cup of fruit.
(Subtract this flour from amount called for in
recipe).
With Processor running, drop clove down
Chute. Quickly cover Chute and process
3 to 5 seconds. (Use this method to mince
other small items, such as gingerroot.)
Peel; cut into 1” (25 mm) cubes. Add up to
1 cup (240 ml). Process to desired fineness.
Choose lemons to fit Chute (if possible).
Cut off one end and place lemon in Chute
with cut end on Disc. Use firm pressure.
Cut wedges to fit Chute. (Never try to
shred lettuce; it is too soft and delicate.)
Choose limes to fit Chute (if possible). Cut
off one end and place lime in Chute with cut
end on Disc. Use firm pressure.
Position meat on cookie sheet and freeze
until partially frozen, (firm, but not solid).
Cut meat to fit Chute. (If meat is too
solid, it can damage Processor.) Use firm
pressure.
Cut into 1” (25 mm) cubes. Add up to 1 cup
(240 ml) at a time.
Melon, Sliced
Disc, Slicing Side
Mushrooms, Chopped
Knife Blade
Mushrooms, Sliced
Disc, Slicing Side
Knife Blade
14
Cut into 1” (25 mm) cubes. Add up to 1 cup
(240 ml) at a time. Chop coarsely for salads,
finely Chopped for spreads.
Halve, remove seeds, cut to fit Chute, and
remove rind. Use moderate pressure.
Wash (keep stems on). Add 5 or 6
mushrooms at a time and pulse to desired
texture.
Cut a thin slice off 1 side of 2 mushrooms.
Place cut sides directly on Disc in area
beneath Chute. Place Cover on Bowl and
stack remaining mushrooms sideways in
Chute, alternating stems and caps. Use
firm pressure.
DAILY USE CHART
Food/Result
Attachment
Special Instructions
Nuts (Hard, Almonds,
Peanuts), Ground
Knife Blade
Nuts (Hard, Almonds
Peanuts), Very Finely Ground
Knife Blade
Nuts (Soft, Walnuts, Pecans,
Brazil), Coarsely Chopped
Nuts (Soft, Walnuts, Pecans,
Brazil), Finely Chopped
Olives, Chopped
Disc, Slicing Side
Olives, Sliced
Disc, Slicing Side
Onions, Green (Scallions),
Chopped
Knife Blade
Onions, Green (Scallions),
Sliced
Disc, Slicing Side
Onions, White, Chopped
Knife Blade
Onions, White, Sliced
Disc, Slicing Side
Oranges, Sliced
Disc, Slicing Side
Parsley, Chopped
Knife Blade
Parsnips, Shredded
Parsnips, Sliced
Disc, Shredding Side
Disc, Slicing Side
Peaches, Sliced
Disc, Slicing Disc
Pears, Sliced
Disc, Sliding Side
Pepperoni, Sliced
Disc, Slicing Side
Peppers (Sweet, Red, Green),
Chopped
Knife Blade
Add up to 1 cup (240 ml) at a time to dry
Bowl and pulse to desired fineness.
(For best results, process frozen).
Add 1/4-cup (60 ml) flour for 1 cup (240 ml)
nuts. (Subtract this flour from amount
called for in recipe.)
Fill Chute with nuts. Use moderate pressure.
Add up to 1 cup (240 ml) at a time. Pulse
to desired fineness.
Add up to 1 cup (240 ml) pitted or
stuffed olives and pulse to desired fineness.
Arrange pitted or stuffed olives (open end
down) on Disc in area beneath Chute.
Place Cover on Bowl and slice using
moderate pressure.
Remove roots, trim tops, and cut into
1” (25 mm) pieces. Add up to 2 cups
(480 ml) at a time and pulse to desired
fineness. (Chopped pieces may be
slightly longer than hand-chopped results.)
Remove roots and soft parts of tops. Cut
onions into 3” (75 mm) equal parts.
Place upright in Chute and pack tightly.
Peel and quarter. (Cut large onions into
eighths). Add up to 4 medium onions at
a time and pulse to desired fineness.
Peel and slice off ends. (Use whole, small
onions for rings.) Position on Disc (For
large onions, cut in half from root to stem
and wedge upright in Chute.) Use firm
pressure.
Cut a slice off one end of orange. (If orange
is too large to fit Chute, halve lengthwise
cutting straight down through stem.) Insert orange through bottom of Chute with
sliced end down. Use firm pressure.
Wash and dry thoroughly. Chop to desired
fineness.
Position in Chute and shred.
Halve crosswise and place upright in
Chute with cut side on Disc.
Peel, halve, and pit firm, ripe peaches.
Position 2 halves in Chute and slice using firm pressure (Sprinkle with lemon
juice to prevent browning.)
Quarter and core firm, ripe pears. Arrange
quarters in Chute (back to back), alternating thick and thin ends. (Sprinkle with
lemon juice to prevent browning.)
Cut into 3” (75 mm) lengths. Remove
inedible casing. Slice 1 piece at a time
using firm pressure.
Quarter and remove tops, seeds, and
pith. Cut quarters crosswise in thirds.
Add up to 1 pepper at a time and pulse
to desired fineness. (Do not over-process).
Knife Blade
Knife Blade
15
DAILY USE CHART
Food/Result
Attachment
Special Instructions
Peppers (Sweet, Red, Green),
Sliced
Disc, Slicing Side
Pickles, Chopped
Knife Blade
Pickles, Sliced
Disc, Slicing Side
Pineapple (Fresh), Sliced
Disc, Slicing Side
Potatoes, Chopped
Knife Blade
Potatoes, Shredded
Disc, Shredding Side
Potatoes, Sliced
Disc, Slicing Side
Pumpkin, Mashed
Knife Blade
Radishes, Sliced
Disc, Slicing Side
Rhubarb, Sliced
Disc, Slicing Side
Rutabagas, Sliced
Disc, Slicing Side
Salami (Hard Sausage), Sliced
Disc, Slicing Side
Squash (Butternut), Mashed
Knife Blade
Squash, (Summer, Zucchini)
Shredded
Disc, Shredding Side
Squash (Summer, Zucchini),
Sliced
Disc, Slicing Side
Strawberries, Chopped
Knife Blade
Remove top from pepper. (If pepper is
small enough to fit Chute, remove seeds
and pith from top and leave pepper
whole.) Halve larger peppers and remove
insides. Fit pepper into bottom of Chute
by gently squeezing pepper by the sides.
Slice using moderate pressure.
Peel (if desired), halve lengthwise, and scoop
out seeds (if tough). Cut into 1” (25 mm)
pieces. Add up to 2 cups (480 ml)
at a time. Pulse to desired fineness.
Cut ends from pickles and place pickles
upright in Chute. Slice using moderate
pressure.
Remove top and cut into wedges to fit
Chute. Trim off rind, eyes, and core.
Stand wedges upright in Chute. Use firm
pressure.
Peel (if desired), quarter and cut each
quarter in half crosswise. (If very large,
cut quarters into thirds.) Add up to 1 cup
(240 ml) pieces to Bowl. Pulse to desired
fineness.
Cut to fit Chute. After processing, place
shreds in cold water to prevent darkening. Drain before cooking. Dry well for
frying.
Peel (if desired). Use small potatoes for
whole slices or cut larger potatoes to fit
Chute.
Peel, cut into 1” (25 mm) pieces, and simmer
in salted water until tender. Drain well. Process up to 3 cups (720 ml) at a time.
Remove roots and tops. Use moderate
pressure.
Cut each stalk crosswise in thirds. Place
upright in Chute. For best results, slice
more than 1 stalk at a time. Use firm
pressure.
Peel (if desired). Use small rutabagas for
whole slices or cut larger rutabagas to fit
Chute.
Cut into 3” (75 mm) lengths. Cut larger
Salami to fit chute; smaller ones fit whole.
Remove inedible casing. Slice 1 piece at a
time using firm pressure.
Peel, cut into 1” (25 mm) pieces, and simmer
in salted water until tender. Drain well. Process up to 3 cups (720 ml) at a time.
Slice off ends. Cut to fit horizontally in
Chute. Salt shreds, toss, and drain at
least 10 minutes in colander. Squeeze out
excess moisture. (Shredded squash
cooks quickly in butter or oil.)
Peel (if desired). Use small squash for
whole slices or cut larger squash to fit
Chute.
Hull and halve, if large. Add up to 2 cups
(480 ml) at a time to Bowl. Pulse to desired
fineness.
16
DAILY USE CHART
Food/Result
Attachment
Special Instructions
Strawberries, Pureed
Knife Blade
Strawberries, Sliced
Disc, Slicing Side
Sweet Potatoes (Yams),
Mashed
Knife Blade
Tomatoes, Chopped
Knife Blade
Tomatoes, Sliced
Disc, Slicing Side
Turnips, Sliced
Disc, Slicing Slide
Water Chestnuts Sliced
Vegetables (Various), Julienne
or Matchstick Cut
Disc, Slicing Side
Disc, Slicing Side
Hull and halve, if large. Add up to
2 cups (480 ml) at a time to Bowl. Process
10 seconds.(Use in fruit topping or
gelatin desserts.)
Hull. Arrange berries on their sides in
Chute for lengthwise slices. Use very light
pressure.
Peel, cut into 1” (25 mm) pieces, and simmer
in salted water until tender. Drain well. Process up to 3 cups (720 ml) at a time.
Quarter and remove peel and seeds (if
desired). Add up to 2 medium tomatoes
at a time.
Pulse to desired fineness.
Select tomatoes small enough to fit Chute
or halve, if necessary. Peel (if desired)
and remove stem end. Insert tomato
through bottom of Chute. For meatier
slices, turn tomato on its side. Use
medium pressure.
Peel (if desired). Use small turnips for
whole slices or cut larger turnips to fit
Chute.
Fill Chute. Use moderate pressure.
Slice vegetables (such as potato, cucumber, or zucchini). Hold Cover
sideways with Pusher inserted part way
to form a cup at the bottom of the Chute.
Pack slices tightly in Chute with cut edges
at right angles to Cover. Slice again.
17
RECIPES
Onion Soup au Gratin
5 medium onions
2 tablespoons (30 ml) butter or margarine
1 teaspoon (5 ml) sugar
1 tablespoon (15 ml) all-purpose flour
3 cups (720 ml) water
4 oz. (114 gms) Swiss or Gruyere cheese
cut to fit Chute
4 slices French bread - 1 inch thick
(25 mm) toasted
2 cans (10 1/2 oz. / 300 gms each) condensed beef broth
Position Disc in Bowl, slicing side up. Cut onions to fit Food Chute and slice. In 4 quart saucepan
(4 L), melt butter or margarine. Add onions, sprinkle with sugar. Sauté, covered, over low heat 15
minutes, stirring occasionally. (Onions should not brown).
Stir in flour. Then add beef broth and water, stirring constantly, until mixture starts to boil. (Adjust
heat as necessary) Simmer, uncovered for 20 minutes.
Position Disc in Bowl, shredding side up. Shred cheese. Divide soup into 4 oven-proof bowls.
Top each with a slice of bread and shredded cheese.
Bake in 400ºF (200ºC) preheated oven or heat in microwave oven until cheese melts and soup is
hot.
MAKES: 4 (1-1/2 cups/360 ml) servings
Fresh Mushroom Soup
2 tablespoons (30 ml) butter or margarine
1 medium onion, quartered
1/2 tablespoon (226 gms) mushrooms
2 tablespoons (30 ml) all-purpose flour
2 cups (480 ml) chicken broth
2 cups (480 ml) milk
In 4 quart (4 L) saucepan, melt butter or margarine. Position Knife Blade in Bowl; add onion. process to finely chop. Sauté in saucepan.
Position Disc in Bowl, slicing side up. Slice mushrooms. Add to skillet and sauté until soft. Stir in
flour. Then add broth, stirring constantly, until mixture thickens.
Add milk, heat gently until soup is hot (but not boiling). Season with salt and pepper, if desired.
Makes: 6 (3/4 cup/180 ml) servings
Chunky Tomato Salsa
1/4 cup (60 ml) parsley
1 clove garlic, peeled
1 green pepper, cut into 1” (25 mm) pieces
1 red pepper, cut into 1” (25 mm) pieces
1 medium onion, quartered
8 medium tomatoes, peeled and quartered
1 can (6 oz/170 gms) tomato paste
1/4 cup (60 ml) red vinegar
1 - 2 teaspoons (5 - 10 ml) cumin
Position Knife Blade in Bowl. Add parsley. With processor running, drop garlic through Food
Chute. Process to finely chop. Transfer to 4 quart (4 L) saucepan.
Reposition Knife Blade; add onion. Process to coarsely chop. Transfer to saucepan. Repeat with
peppers and tomatoes, chopping peppers, one at a time, and tomatoes, 2 at a time. Add remaining ingredients - stir to mix. Bring to a boil. Simmer, uncovered, for about 2 hours, or until thick.
Store in refrigerator for 2 weeks or freeze.
Makes: About 5 cups (1.2 L)
Overnight Cabbage Slaw
18
1/2 medium cabbage, cut in wedges
1 small sweet or red onion, halved
1/2 medium green pepper
2 carrots, peeled
2/3 cup (160 ml) vinegar
1/3 cup (80 ml) vegetable oil
1/4 cup (60 ml) sugar
1 teaspoon (5 ml) salt
1/4 teaspoon (1 ml) pepper
Position Disc in Bowl, slicing side up. Slice cabbage, onion and pepper. When vegetables reach
top of bowl, transfer to extra-large bowl and slice remaining quantity.
Position Disc in Bowl, shredding side up. Shred carrots. Add to cabbage mixture. Position Knife
Blade in Bowl. Add vinegar, oil, sugar, salt and pepper. Process until well mixed, about 10 seconds. Pour over vegetables; stir to combine. cover; refrigerate at least 8 hours before serving. At
serving time, stir thoroughly, then drain.
Note: May be made a day or two
in advance.
Makes: 6 - 1 cup (240 ml) servings
Quick Cheese Pizza
Crust:
2 packages (1/4 oz./ 7 gms each)
active dry yeast
2 teaspoons (10 ml) sugar
1 cup (240 ml) lukewarm water
(110-115ºF/44-46ºC)
3 cups (720 ml) all-purpose flour
1 teaspoon (5 ml) salt
2 tablespoons (30 ml) vegetable oil
Topping:
1 jar (14 oz./400 gms) pizza sauce
1 package (16 oz./454 gms)
mozzarella cheese
(chilled in freezer 20 minutes
before using), cut to fit Chute
Stir yeast and sugar into water and let stand 5 minutes. Position Knife Blade in Bowl. Add flour
and salt. Turn processor on and pour yeast mixture through Food Chute. Add oil and process
until dough forms a ball. If dough sticks to side of bowl, add more flour, 1 tablespoon (15 ml) at a
time. Process about 60 seconds. Let dough rest 10 minutes. Divide dough evenly into 2 balls.
Stretch or roll each ball to fit a lightly oiled 14 “ (36 cm) pizza pan. Top with pizza sauce.
Position Disc in Bowl, shredding side up. Shred cheese using light pressure on Food Pusher.
Spread cheese evenly over pizza sauce and add other toppings if desired. Bake in pre-heated
400ºF (205ºC) oven for 20 to 25 minutes.
Makes: 2 - 14 inch (36 cm) pizzas
Whole Wheat Bread
2 cups (480 ml) all-purpose flour
1 package (1/4 oz./7 gms) active dry yeast
19
1 cup (240 ml) whole wheat flour
2 tablespoons (30 ml) brown sugar
2 tablespoons (30 ml) soft butter
or margarine
1-1/2 teaspoon (7 ml) salt
1/4 cup (60 ml) lukewarm water
(110-115ºF/44-46ºC)
2/3 to 1 cup (160-240 ml) lukewarm water
(110-115ºF/44-46ºC)
Position Knife Blade in Bowl. Add flour, sugar, butter or margarine and salt. Process until blended, about 5 seconds. In a small bowl, add yeast to 1/4 cup (60 ml) water. Stir and allow to dissolve, about 10 minutes. With processor running, add yeast mixture through Food Chute, then add
only enough water, in a slow stream, to make dough form a ball.
Stop processor (add only enough water to form a soft dough). Turn dough out and with floured
hands, toss or fold dough over 9 - 10 times. Shape into a ball. Place dough in greased bowl and
rotate to grease surface. Cover and let rise in warm place until dough doubles in size, about 1-1/2
hours. With floured hands, punch down and toss until no longer sticky. Form into smooth ball.
Cover with bowl and let rest 15 minutes. Shape into loaf. Place in well greased 9 x 5 inch (23 x 13
cm) pan. Cover and let rise until dough doubles in size, about 1 hour. Bake in preheated
375ºF(190ºC) oven for 35-40 minutes. Remove from pan immediately, cool before slicing.
Makes 1-9”x5” (23x13 cm) loaf
Pasta Bonanza Toss
3 medium carrots, peeled
1 medium onion, quartered
4 oz. (114 gms) broccoli, cut in 2”
(50 mm) pieces
1 medium zucchini
6 medium mushrooms
8 oz. (226 gms) favorite pasta
4 oz. (114 gms) sliced deli ham
1/4 cup (60 ml) milk
3 tablespoons (45 ml) Parmesan cheese
Position disc in Bowl, slicing side up. Slice carrots and onion. In 4 quart saucepan (4 L), steam
carrots until just done (about 7 minutes). Add broccoli to carrots after 3 minutes.
Reposition disc, slicing side up. Slice zucchini and mushrooms. Add to carrot mixture for last 2
minutes of steaming.
Transfer steamed vegetables to large mixing bowl (reserve water in saucepan). In same
saucepan, add additional water and cook pasta as directed on package. Reposition Disc in Bowl,
slicing side up. roll up ham slices and slice for a coarse, chopped result. Add to steamed vegetables along with remaining ingredients; stir to blend.
When pasta is just done, drain and return to pot. Add vegetable mixture. Over low heat, toss vegetables with pasta until well mixed and thoroughly heated. Season to taste.
Makes: 4 (2 cups/480 ml) servings.
Peanut Butter Chip Cookies
1 cup (240 ml) roasted salted peanuts
1 cup (240 ml) packed brown sugar
1/3 cup (80 ml) butter or margarine,
softened, cut into 6 pieces
1 cup (240 ml) all-purpose flour
1/2 cup (120 ml) semi-sweet
chocolate morsels
1/2 teaspoon (2 ml) baking soda
20
1 egg
1 teaspoon (5 ml) vanilla
Position Knife Blade in Bowl. Process peanuts until a butter forms (about 2 minutes). Add sugar
and butter, process until smooth (15 seconds). Scrape down bowl as necessary. Add egg and
vanilla, process 5 seconds.
Add flour, chocolate morsels and baking soda. Pulse just until flour is blended into mixture (about
5 times).
Shape dough into balls using 1 tablespoon (15 ml) dough for each. Place on ungreased cookie
sheets, about 2” (50 mm) apart. Flatten each cookie with fork in a crisscross pattern to 1/4” (6
mm) thick. Bake in preheated 350ºF (175ºC) oven for 12 minutes, or until cookies are firm to the
touch. Cool on wire racks.
Makes: about 2-1/2 dozen cookies.
Note: Cookie dough may be stored in refrigerator 1 week or in freezer up to 6 months.
Aloha Carrot Cake
3 medium carrots, peeled
1 cup (240 ml) sugar
1/2 cup (120 ml) vegetable oil
2 eggs
1 teaspoon (5 ml) baking powder
1 teaspoon (5 ml) baking soda
1 teaspoon (5 ml) cinnamon
1 teaspoon (5 ml) salt
1/4 teaspoon (1 ml) mace
1-1/2 cups (360 ml) all-purpose flour
1 can (8 oz./227 gms) crushed pineapple,
undrained
Preheat oven to 375ºF (190ºC). Position Knife Blade in Bowl with disc above it, shredding side up.
Shred carrots. Add sugar, oil, eggs, baking powder, soda, cinnamon, salt and mace. Process to
mix, 30 seconds. Add flour. Process to combine 15 seconds. Add pineapple. Pulse until just
mixed, about 2 to 3 seconds. Turn into a greased and floured 9” (23 cm) square baking pan. Bake
until cake springs back when lightly touched in center, 30 to 35 minutes. Cool and remove from
pan. Frost with Cream Cheese frosting (see below). Refrigerate any unused portion.
Makes: 1 (9”/23 cm sq.) cake
Cream Cheese Frosting
1 package (3 oz./85 gms) cream cheese,
chilled, cut in 4 pieces
2 tablespoons (30 ml) soft butter
or margarine
2-3 teaspoons (10-15 ml) lemon juice
1-1/2 cups (360 ml) confectioners sugar
1/4 teaspoon (1 ml) mace
Position Knife Blade in Bowl. Drop cream cheese through food chute, one piece at a time, with
processor running. Turn off. Add butter and lemon juice. Process to mix ingredients, 3 to 4 seconds. Add sugar and mace and process until smooth, 15 to 20 seconds.
Makes: 1 cup (240 ml)
Apple Crisp
6 medium cooking apples, peeled,
cored, quartered
2 tablespoons (30 ml) lemon juice
1 cup (240 ml) quick oats, uncooked
1 teaspoon (5 ml) cinnamon
1/2 cup (120 ml) all-purpose flour
1/2 cup (120 ml) butter or
margarine, chilled, cut in 6 pieces
3/4 cup (180 ml) packed brown sugar
21
Preheat oven to 375ºF (190ºC). Position Disc in bowl with slicing side up and slice apples. As
slices reach top of bowl, empty into ungreased 9” (23 cm) square baking pan. Sprinkle lemon
juice over apples. Position Knife Blade in Bowl; add remaining ingredients. Process until
crumbly, about 10 seconds. Crumble evenly over apples. Bake until apples are tender, 40 to 45
minutes. Serve warm or cold, plain, or with ice cream, or sweetened whipped cream.
Makes: 6 (3/4 cup/180 ml) servings
Note: Substitute 5 to 6 cups (1.2 to 1.4 L) fruits in season such as peaches or rhubarb. With
rhubarb, add 1/2 cup (120 ml) sugar to fruit.
Pecan Crescents
3/4 cup (180 ml) pecans
1-1/2 cups (360 ml) all-purpose flour
3/4 cup (180 ml) butter or margarine,
softened, cut into 10 pieces
1/3 cup confectioners sugar
1/2 teaspoon vanilla
Position Knife Blade in Bowl. Add pecans; pulse until coarsely chopped. Add butter, flour, confectioners sugar and vanilla; pulse just until flour is blended into mixture (about 8 pulses).
Roll 1 tablespoon (15 ml) at a time with palms of hands, into a 3” (75 mm) long roll. Place 1” (25
mm) apart on ungreased cookie sheet and curve into a crescent. Bake in preheated 375ºF (190ºC)
oven for 12 minutes or until set, but not browned. Dust lightly with confectioners sugar before
serving.
Makes: 2-1/2 dozen cookies
One Crust Standard Pie Crust
1 cup (240 ml) all-purpose flour
1 tablespoon (15 ml) butter or margarine, frozen
1/2 teaspoon (2 ml) salt
3 tablespoons (45 ml) cold water
1/4 cup (60 ml) vegetable shortening,
room temperature, divided in 3 pieces.
Position Knife Blade in Bowl. Add flour, salt, vegetable shortening and butter or margarine. Process until particles resemble coarse crumbs, about 15 seconds. Add water all at once through
Food Chute with processor running. Process until dough forms a ball, or no more than 15-20 seconds. Stop processor; remove Knife Blade. Shape into ball with hands, if necessary. Roll out for
pie, or as directed in recipe. If crust is to be baked before filling, prick generously with fork.
Bake in preheated 450ºF (230ºC) oven for 9-12 minutes.
Makes: 1 (9”/23 cm) pie crust
Two Crust Standard Pie Crust
2 cup (480 ml) all-purpose flour
1 tablespoon (15 ml) butter or margarine, frozen
1 teaspoon (5 ml) salt
1/3 tablespoons (80 ml) cold water
1/2 cup (120 ml) vegetable shortening,
room temperature, divided in 6 pieces.
Follow the directions for the One Crust Standard Pie Crust (above), but divide dough in half and
shape into 2 balls.
Makes: 2 (9”/23 cm) pie crusts or 1 double crust pie.
22
NOTES
23
SERVICE OR REPAIR
Service if necessary, must be performed by a Black & Decker Inc., Household Appliance
Company-Owned or Authorized Service Center.
The Service Center nearest you can be found in the yellow pages of your phone book under
“Electric Appliances – Small – Repairing”, or call the tool-free number on the cover of this
book for the location of the Service Center nearest you.
If mailing or shipping your Food Processor, pack it carefully in a sturdy carton with enough
packing material to prevent damage. Include a note describing the problem to our Service
Center and be sure to give your return address. We also suggest that you insure the package for your protection.
Consumer replaceable parts and accessories are available at Black & Decker Inc., Household Appliance Company-Owned or Authorized Service Centers.
TWO-YEAR WARRANTY
Black & Decker Inc. warrants this product against any defects that are due to faulty material or workmanship for a two year period after the original date of consumer purchase or
receipt as a gift. This warranty does not include damage to the product resulting from accident or misuse.
If the product should become defective within the warranty period, we will repair it or elect
to replace it free of charge. We will return your product, transportation charges prepaid,
provided it is delivered prepaid to any Black & Decker Inc., Household Appliance CompanyOwned or Authorized Service Center.
This warranty gives you specific legal rights, and you may also have other rights which vary
from state to state or province.
The provisions of this warranty are in addition to and not a modification of or subtraction
from the statutory warranties and other rights and remedies contained in any applicable
legislation and to the extent that any such provisions purport to disclaim, exclude or limit
any such statutory warranties or other rights or remedies, such provisions shall be deemed
to be amended to the extent necessary to comply herewith.
Answers to any questions regarding warranty, repair, or service locations may be obtained
by writing or by phoning:
In the U.S.A.
Consumer Assistance & Information
Black & Decker (U.S.) Inc.
626 Hanover Pike
Hamstead, MD.
21074-0618
In Canada
Consumer Assistance & Information
Black & Decker Canada Inc.
100 Central Avenue
Brockville, Ontario
K6V 5W6
Toll Free Phone Number
1-800-231-9786
Monday - Friday
8:15 a.m. to 5:00 p.m.
Eastern Time
Toll Free Phone Number
1-800-465-6070
Monday - Friday
8:00 a.m. to 4:30 p.m.
Eastern Time
Form No. 263902-01
Publication No. 168633-24-RVO2
Printed in People’s Republic of China
Copyright © Black & Decker Inc. 1993 - 1995
POUSSOIR
ENTONNOIR
H
GUIDES POUR LES ALIMENTS
BOL
I
COUVERCLE-ENTONNOIR
COUVERCLE
J
DISQUES RÉVERSIBLES
POIGNÉE DU
COUVERCLE
K
COUTEAU
L
COLONNE DE
LA COMMANDE
M
MOYEU
N
DISQUE RÉVERSIBLE
O
BOL
P
POUSSOIR
Q
TÉMOIN DE FONCTIONNEMENT
ENTONNOIR
R
AXE D’ENTRAÎNEMENT
GUIDES POUR
LES ALIMENTS
S
ENTONNOIR
T
INTERMITTENT
U
MARCHE
V
POIGNÉE DU BOL
ESPACE DE RANGEMENT DU CORDON
SOCLE
COMMANDE À
BOUTON-POUSSOIR
MARCHE/ARRÊT/MARCHE
INTERMITTENTE
BOL
TIGE DE SOUTIEN
DES DISQUES
GRIFFES
MARCHE
INTERMITTENTE
ARRÊT
FROMAGE
ENTONNOIR
ENTONNOIR
DISQUE ÉMINCEUR
DISQUE
DÉCHIQUETEUR
LÉGUMES
LÉGUMES
ENTONNOIR
COUTEAU
DEVANT
DU BOL
CREUX ROND
ERGOTS
POSITION DE
VERROUILLAGE
A
B
C
D
E
F
G