1
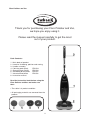
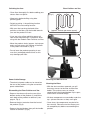
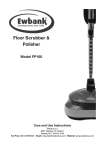
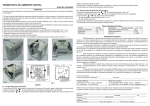
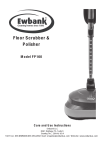
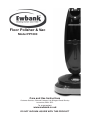
Floor Polisher & Vac
Model FP1000
Care and Use Instructions
Customer Services, Ewbank Products Ltd, Billington Road, Burnley
Lancashire, BB11 5ED.
Tel: 01282 835841
www.ewbank.co.uk
DO NOT VACUUM LIQUIDS WITH THIS PRODUCT
Floor Polisher and Vac
Thank you for purchasing your Floor Polisher and Vac,
we hope you enjoy using it.
Please read the manual carefully to get the most
out of your product.
Pack Contents:
1 - Main body of product
2 - Head for scrubbing, polisher and waxing
3 - Handle assembly
4 - Polishing pads (blue)
EB0129
5 - Scouring pads (white)
EB0130
6 - Scrubbing brush plates
EB0131
7 - Velcro backed plates
EB0132
8 - Instruction manual
Read the instruction book before using the
Floor Polisher and Vac and make sure
that…
• The cable is in perfect condition.
• All packaging materials are removed from the
product.
2
Floor Polisher and Vac
Safety Instructions - CAUTION
• Do not operate with a damaged power cable,
keep feet and all parts of body away from the
rotating pads.
Use power cable clip on handle to keep
power cable clear of rotating pads.
• Make sure that the vacuum function of the
product is never used on wet surfaces.
• Do not allow machine to run unattended at
any time.
• Do not pull or carry by power cable, or use
power cable as a handle, close door on power
cable or pull power cable around sharp edges
or corners. Keep power cable away from
heated surfaces.
• Close supervision is necessary when this
machine is used near children. Do not allow it
to be used as a toy.
• The machine is designed for household use
only, do not expose to rain.
• Unplug cleaner when not in use. Turn all
controls off before unplugging from electrical
outlet.
• Whilst in use never turn the machine over,
keep machine level during use.
• Do not unplug by pulling on power cable.
Always grasp the plug, not the power cable.
Never handle plug or appliance with wet
hands.
• Use extra care when cleaning on stairs or
step-ladders.
• To provide continued protection against the
risk of electric shock, connect properly to an
earthed socket.
• Store in a dry place. Do not expose machine
to freezing temperatures.
• Use only genuine manufacturerʼs parts.
• This appliance is not intended for use by
persons (including children) with reduced
physical, sensory or mental capabilities, or
lack of experience and knowledge, unless
they have been given supervision or
instruction concerning use of the appliance by
a person responsible for their safety.
• It is recommended that a RCD (residual
current device) rated at 30mA is fitted into the
mains supply socket for added protection
against electric shock.
• Do not immerse power cable, plug or
machine in water or any other liquid.
• Unplug after use and before cleaning.
• Do not operate machine in bare feet or when
wearing open toe shoes or sandals.
• The Ewbank Floor Polisher and Vac is
intended for Domestic use and not
Commercial use.
• Check pads for embedded grit or hard
material before using on floors or scratching
may occur.
3
(Fig.3)
Floor Polisher and Vac
Assembling the Appliance
• Insert the handle into the aperture at the top
of the body until the metal securing knob is
located (Fig.3).
• Polisher base can be removed from the
appliance, press release clip (A) and pull
straight out (Fig.2).
Changing the pads and plates on your
product
• Make sure appliance is not plugged in before
fitting pads.
(Fig.4)
• Note the orientation of the drive hubs (Fig.4).
• Place the required velcro plate or brush plate
over the hub and rotate until the shape lines
up.
• Press the plate down to clip into place (Fig.6).
• Always use two plates of the same type, i.e.
not 1 brush and 1 pad (Fig.7).
(Fig.5)
• Simply pull the plates off to remove and
change.
Adjust the height of the handle to suit your
height (Fig.1)
(Fig.1)
(Fig.6)
(Fig.2)
(Fig.7)
4
Using your floor polisher and Vac on
various floor types
Floor Polisher and Vac
DO NOT USE ON CARPET
Take care not to slip over when polishing floors,
they can become very slippy in the process.
Only use dedicated floor products, other
inappropriate polishes and waxes may leave
the floor dangerously slippy.
In addition to your floor polisher you may need
a mop and bucket to clean and polish your
hard floor.
Cleaning hard floors with heavy soiling
• Use the brush heads with the vacuum
function (switch to position II), to pick up the
dry dust and loosen dried on dirt.
• Take care not to scratch the floor if hard dirt
gets stuck to the brush heads.
Switch to position II
Spreading floor treatments
• Always read and follow manufactures
instructions for floor treatment products.
• Apply the treatment directly to the floor unless
instructions indicate otherwise.
• Use clean brush heads (switch position I), to
spread the treatment evenly over the floor
area and allow to dry.
Switch to position I
Polishing wax on hard floors
(Fig.1)
• Once the wax polish has dried on the floor
use the blue buffing pads to polish.
• Switch to position I, Keep the polishing head
moving, donʼt stop in one place for a long time
or it will spoil the finish.
• Move at a speed of about 1min.per 1m2 and
follow the diagram for an even finish (Fig.1).
(approx. 1minute per metre square)
• A glossy finish is not always possible; this
depends on the wax or polish used and the
type of floor. Sometimes several coats of wax
polish will help to get a glossy finish.
Removing old polish
• Read and follow carefully the instructions for
your chosen floor polish remover.
• Use the white pads to scrub old polish from
the floor.
5
(Fig.1)
Floor Polisher and Vac
Scrubbing /Cleaning the floor
• Ensure that the scrubbing brushes are
attached to the product (see page 4).
• To turn the product on, select setting II
(scrubbing and vacuuming).
• With your foot securing the head of the
polisher on the floor, pull the handle towards
you and the product will start (Fig.1).
• Move the product slowly across the surface of
the floor to loosen and collect any debris.
• Collect large debris towards the centre of the
base unit to prevent it from being spread
across the floor.
• If, during this process the dust container
becomes full of debris, please empty it as
described below.
• Once this is complete, please turn the
product off, before returning it to its upright
position.
Emptying the dust container
• To remove the dust container, depress the
button at the top of the unit, and gently pull it
towards you and then upwards (Fig.2).
(Fig.2)
• Hold with opening lid upwards.
• Slide lock across to open lid (Fig.3).
• Remove blue part (Fig.3-3).
• Empty debris into a bin.
(Fig.3)
6
Polishing the floor
Floor Polisher and Vac
• Clean floor thoroughly first before adding your
chosen floor wax polish.
(Fig.1)
• Allow to dry before buffing using blue
polishing pads.
• Switch to setting 1, the polishing function
WITHOUT the vacuuming function.
• With your foot securing the head of the
polisher on the floor, pull the handle towards
you and the product will start.
(approx. 1minute per metre square)
(Fig.2)
• If you are using a floor polishing wax or oil,
refer to the manufacturersʼ instructions when
using with the Ewbank Floor Polisher and Vac.
• Move the product slowly (approx. 1minute per
metre square) across the surface of the floor
in the pattern illustrated in (Fig.1).
• Do not leave the product operating in one
area for a prolonged period of time as this
may damage your floor.
(Fig.3)
Power Cable Storage
Cleaning and Maintenance
Dismantling the Floor Polisher and Vac
• With the dust container removed, you will
have easy access to the filter and the filter
holder. The cyclone cone can also be
removed once the hinged bottom flap is open,
and the dust container empty.
• The electrical power cable can be stored on
the rear of the product using the convenient
power cable hooks.
Cleaning the filters
• Depress the release clip on the rear of the
bottom section of the product (1) and lift the
main body of the product to remove it (see
page 4, Fig.1).
• All these components are washable under the
tap – please take care as they are fragile.
• Remove the dust container from the front of
the product (Fig.2).
• Depress the steel button, then pull the handle
section to remove it (Fig.3).
7
• Once clean, the components may be left to
dry naturally. Please ensure that these parts
are completely dry before reassembling the
product.
Floor Polisher and Vac
• Smeary marks are made on floor when
polishing.
- Has the polish/wax been allowed to dry.
- Does old polish/wax need to be removed?
Cleaning the floor pads
• All pads and floor attachments are washable.
• The Scrubbing brushes (EB0131), and
the polishing pads (EB0129 and EB0130) can
be washed under the tap with warm soapy
water.
• No gloss sheen is being produced.
- Floor wax level may need to be increased, try
another coat. Allow to dry and re-polish.
- However some types of floor do not produce
gloss finish.
• The vacuum and polishing units are not
suitable for washing in water, they mush be
wiped with a damp cloth.
• Scratches are made on the floor.
- Check for grit or dirt stuck to the pads or
wheels.
- Clean/replace pads or clean wheels.
Technical Data
220-240V~50Hz
Rotational speed Approx. 2500 rpm.
Vacuum 18 Kpa
• Floor is too slippy.
- Check the polish/wax is designed to be used
on floors. Floor wax should produce a glossy
but grippy finish.
Trouble Shooting
• Loss of vacuum suction?
- Check dust container is emptied.
- Check dust filter is emptied.
INFORMATION ON THE DISPOSAL OF WASTE ELECTRICAL
EQUIPMENT KNOWN AS WEEE
Your attention is brought to new directives applicable to the disposal of this electrical
equipment,where in accordance with the legislation this product must not be disposed of
in your normal household waste. Instead it is your responsibility to dispose of this type of
waste by handing it over to special designated collection points for recovery and recycling.
This product is marked with a ‘Wheelie bin’ symbol with a cross on it to remind you of this
action. The objective of this directive is to help conserve resources and ensure that it is
recycled in a manner that protects human health and the environment. For more information
about where you can drop off your waste please contact your local authority, take back
facilities are free of charge.
Your Guarantee
This product is covered by a 12 month guarantee.
This does not cover normal wear and tear or abuse.
For guarantee purposes, please retain your original receipt as proof of purchase.
This guarantee does not affect your statutory rights.
For spares, service and further information please contact;
Customer Services, Ewbank Products Ltd, Billington Road, Burnley, Lancashire, BB11 5ED
Tel: 01282 835841
www.ewbank.co.uk
Made in China
EB0110 27/10/10
8