1
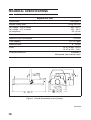
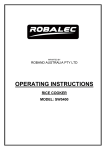
Magnum Pro 2000
user’s guide
CONTENTS
INTRODUCTION . . . . . . . . . . . . . . . . . . . . . . . . . . . . . . . . . . . . . . . . . . . . . . . . .
9
INSTALLING THE MAGNUM PRO 2000 . . . . . . . . . . . . . . . . . . . . . . . . . . . . . . . .
4
OPERATING VIA THE REMOTE CONTROL UNIT . . . . . . . . . . . . . . . . . . . . . . . . .
5
OPERATING VIA A 0-10 VOLT SOURCE . . . . . . . . . . . . . . . . . . . . . . . . . . . . . . .
6
SLAVE OPERATION . . . . . . . . . . . . . . . . . . . . . . . . . . . . . . . . . . . . . . . . . . . . . . .
7
IMPORTANT NOTES ON OPERATION . . . . . . . . . . . . . . . . . . . . . . . . . . . . . . . . .
7
TROUBLE SHOOTING . . . . . . . . . . . . . . . . . . . . . . . . . . . . . . . . . . . . . . . . . . . . .
7
REPLACING THE FUSE . . . . . . . . . . . . . . . . . . . . . . . . . . . . . . . . . . . . . . . . . . . .
8
RESETTING THE THERMO-SWITCH . . . . . . . . . . . . . . . . . . . . . . . . . . . . . . . . . .
8
TECHNICAL SPECIFICATIONS . . . . . . . . . . . . . . . . . . . . . . . . . . . . . . . . . . . . . .
10
INTRODUCTION
The Magnum Pro 2000 is a high performance micro-controller based smoke machine, which
features:
Specially designed heating element for long life and reliability.
High pressure pump.
Variable smoke output.
Remote control unit with auto-timer and memory function.
0-10 V control input.
Slave output allows an infinite number of Magnum Pro 2000 smoke machines to be
controlled via one remote control unit.
All control connections via standard XLR/XLR balanced microphone cables.
9.5 litres (2.5 gallons) internal tank.
Electronic and mechanical overheating protection with manual reset.
Mounting bracket and carrying handles.
Uses non-toxic Martin fog-fluid.
To ensure maximum benefit and safe operation of your Magnum Pro 2000, please read this
users guide before operating the machine.
3
INSTALLING THE MAGNUM PRO 2000
Your Magnum Pro 2000 package comes complete with the following items:
Magnum Pro 2000 smoke machine with remote control unit.
5 metre (16.5 ft) XLR/XLR cable for remote control unit.
Adaptor-cap (for fluid tank) with fluid filter.
Users guide.
IMPORTANT!
Before attempting any of the following ensure that the machine is
disconnected from any mains power.
Fitting the mains plug:
The Magnum Pro 2000 is delivered from the factory without a plug on the mains lead. You
will have to fit a suitable plug (one that fits your local wall outlet) before you can connect the
machine to the mains. The double isolated mains lead on the Magnum Pro 2000 contains
three wires. The brown wire should be connected to the LIVE pin, the blue wire to the
NEUTRAL pin, and the Yellow/Green wire to the EARTH pin (ground).
Fitting the fluid tank:
Place the fluid tank in the body of the Magnum Pro 2000 as shown in figure 1 on page 10,
and replace the screw cap by the tube adaptor-cap (with the fluid filter) ensuring that the
fluid filter reaches the bottom of the tank. Finally, locate the fluid tube that is mounted to the
fluid inlet on the machine and then connect the opposite end of this tube to the fluid outlet
of the tank (the adaptor cap).
IMPORTANT!
Use Martin fog fluid only. This fluid is manufactured specially for Martin smoke
machines. Using another fluid may clog the heating element or cause the machine
to spit hot liquid from the nozzle. Martin fog fluid is delivered in tanks exactly
fitting in the Magnum Pro 2000 smoke machine.
Placing:
The Magnum Pro 2000 may be placed on a flat surface or hanged up by means of its
mounting bracket. The bracket allows you to turn and/or tilt the machine to a desired
position.
WARNING!
Due to the extremely hot temperature of the smoke vapour, DO NOT install the
Magnum Pro 2000 closer than 1 metre (3.5 feet) from public contact.
4
Fitting/connecting the remote control unit:
You will find the remote control unit plugged into the back of the machine and secured by
two finger screws. This unit can be removed from the machine and mounted in a rack
system or placed on a table. Please follow this procedure to remove the unit:
Unscrew the two finger screws and draw out the remote control unit by pulling the finger
screws. Where the remote control unit was mounted, you will now see a XLR-male
connector which will now be known as the control input.
Use the 5 metre XLR/XLR cable that came with the machine to connect any of the two
remote control unit XLR outputs to the control input on the Magnum Pro 2000. Any
standard balanced microphone cable can be used for this extension.
Please note that it is not important to which of the XLR control outputs you connect the
machine but do never connect two machines directly to one remote control unit.
OPERATING VIA THE REMOTE CONTROL UNIT
Having ensured that your Magnum Pro 2000 is properly installed, you may now connect it
to the mains. This will automatically turn the machine on to stand-by.
Switching on:
To enable the heater circuit, simply turn the remote control potentiometer clock wise until
it clicks and the red POWER LED turns on. Located on the back of the Magnum Pro 2000
are three LED’s which indicate the following:
POWER (red LED): The same as the Power LED on the remote control unit. The POWER
LED will always be on when the heater circuit is enabled.
HEAT (red LED): This LED indicates that the machine is heating. Switching on a ’cold’
machine will instantly start heating and it will normally take 8 to 10 minutes until it stops
heating again. At the end of the heating period the heat LED will start flashing fast and then
slowly until it turns off, thus indicating that the heating element has reached maximum
temperature and the heating process is terminated.
READY (green LED). This LED indicates that the machine is ready for operation. When the
READY LED is off, it will NOT be possible to produce smoke, since the temperature of the
heating element will not be high enough.
Please note that the HEAT LED and READY LED can be on simultaneously, meaning that
smoke production is possible even though the machine is heating.
Manual operation:
As soon as the green READY LED turns on you may start producing smoke, simply by
pressing the smoke button on the remote control unit. The level of the smoke emission can
be adjusted via the smoke output potentiometer. The fluid pump will stop instantly when
you release the smoke button, however, the smoke emission will continue for another few
seconds, due to fluid already pumped into the heating element.
5
Using the auto-timer:
This feature allows the machine to produce smoke automatically for a programmable period
of time called the duration and then continuously repeat this smoke duration by a
programmable cycle. Both duration, cycle and smoke level are stored in the Magnum Pro
2000 memory, not in the remote control unit. Follow the listed example below to get familiar
with this feature:
Adjust the smoke output potentiometer to medium smoke emission.
Press the smoke button for approximately 3 seconds.
Wait 7 seconds and then press the timer store button to store the sequence.
Assuming that the READY LED is on, the Magnum Pro 2000 will now produce smoke at
medium level for 3 seconds, wait 7 seconds and then produce smoke for another 3 seconds
etc. In this example, the duration is 3 seconds and the cycle 10 seconds (duration + pause
= 3 + 7 = 10). The maximum cycle length programmable is approximately 1 hour at a
resolution of approximately 1/10 of a second.
As mentioned above, the auto-timer sequence is stored in the memory and will not be
cleared when disconnecting the machine from mains power. Switched on the machine will
automatically start executing the sequence as soon the READY LED turns on. Adjusting the
smoke output potentiometer will not affect the performance of the auto-timer. You can still
produce smoke manually by pressing the smoke button on the remote control unit and in
case this level is higher than the memory level, it will override the memory level.
To terminate the auto-timer sequence, press the timer store button for 5 seconds. This will
clear the memory.
OPERATING VIA A 0-10 VOLT SOURCE
Basically, operation via a 0-10 Volt signal is similar to operation via the remote control unit,
since the voltage level in this case determines the function. You will need to unplug the
remote control unit and connect your analog source to the XLR control input on the back of
the machine. Before connecting you must ensure that GND (ground) on your analog source
will connect to pin 1 on the XLR control input and that the +0-10V output on your analog
source will connect to pin 3 on the XLR control input.
Voltage applied to
control input
(approximately)
Function
0 - 1.0 V
No function - machine stand by.
1.0 - 2.5 V
Enabling the heater circuit - same as ’power on’.
2.5 - 9.5 V
Smoke emission. Output increases with control voltage.
9.5 - 10.0 V
Timer store.
6
SLAVE OPERATION
Whether you choose to operate your Magnum Pro 2000 via the remote control unit or via
a 0-10 Volt source you will have the possibility of adding on an infinite number of slave
machines that will all perform the same as the master machine by using the XLR slave
output located on the back of the machine. The first slave machine should have its control
input connected to the slave output on the master machine. Similarly, the second slave
machine should have its control input connected to the slave output on the first slave
machine, etc.
IMPORTANT NOTES ON OPERATION
To ensure long life and safe operation of your Magnum Pro 2000, please read these
important notes:
Keep the machine and the remote control unit away from damp rooms and do not use
it in wet conditions.
Do not activate the pump without fluid in the tank, as this may harm the pump system.
Always use clean fluid to avoid clogging of the heating element and destruction of the
pump system.
Use Martin fog-fluid only. This fluid is non toxic, water based and specially designed for
use in Martin smoke machines.
TROUBLE SHOOTING
If you have trouble in operating your Magnum Pro 2000, check this table for help:
No light in the POWER LED located on rear
plate of the machine.
Check the mains plug. Check the
fuse (please see the section named
"Replacing the Fuse").
No light in the POWER LED located on the
remote control unit when potentiometer is
turned on.
Is the remote control unit properly
connected? Check XLR/XLR cable.
When pressing the smoke button the pump is
activated, but no smoke is produced.
Check that the fluid filter reaches
the fluid in the bottom of the tank.
Check that the fluid tube is
connected to the inlet on the
machine.
7
The machine indicates heating but the READY
LED never comes on.
Reset the thermo-switch inside the
machine. Please see the section
named "Resetting the ThermoSwitch". If the problem persists then
consult your Martin dealer.
In any other case you should contact qualified service personnel.
REPLACING THE FUSE
It may occur that the fuse inside the Magnum Pro 2000 blows. If that should happen you will
have to replace this fuse. Use a 10 A slow-blow fuse if the machine is a 230 V model. If the
machine is a 115 V model then use a 15 A slow-blow. Please follow this procedure in order
to access and replace the fuse.
IMPORTANT!
Before attempting any of the following ensure that the machine is
disconnected from any mains power.
1
2
3
4
5
6
Remove the fluid tank from the machine.
Remove the Philips screws that secure top-cover located at the rear end of the machine.
Slide the cover forwards until the circuit board (PCB) becomes accessible.
Locate on the left hand-side of the PCB the fuse named "F1".
Replace the fuse with a new one (T 10 A at 230 V / T 15 A at 115 V).
Re-assemble the fixture before connecting to the mains.
RESETTING THE THERMO-SWITCH
For reasons of safety, the Magnum Pro 2000 has been fitted with an over-heat switch
(thermo-switch). In case that the electronic circuit inside the Magnum Pro 2000 fails, thus
causing the heating element to reach a temperature that is above normal operation level,
the thermo-switch will ensure that power to the heating element is interrupted, subsequently
avoiding no further damage to occur. Even though the electronic circuit should resume
normal operation (e.g. after having switched off the machine and then switched it back on
again) the thermo-switch will remain interrupted until a manual reset of the switch is
performed. This reset is performed by pressing the plastic button on top of the switch. To
access and reset the thermo-switch please follow this procedure carefully:
8
IMPORTANT!
Before attempting any of the following ensure that the machine is
disconnected from any mains power and cooled down.
1 Remove the fluid tank from the machine.
2 Remove the two Philips screws that secure the top-cover over the heating element.
3 Slide the cover backwards until the thermo-switch becomes accessible. The thermoswitch is located on the mid, left hand side of the heating element with two wires
attached.
4 Press the plastic button on the thermo-switch, thereby resetting this switch.
5 Re-assemble the fixture before connecting to the mains.
NOTE
If the thermo-switch should interrupt repeatedly, then contact your Martin dealer
for service.
9
TECHNICAL SPECIFICATIONS
Magnum Pro 2000
Dimensions:
See figure 1
Weight (empty tank):
13 Kg (28.5 lb)
AC-voltage - 230 V model:
AC-voltage - 115 V model:
AC-frequency:
200 - 260 V
100 - 130 V
50 / 60 Hz
Power consumption:
1700 W
Maximum fluid consumption:
0.2 l/min
Tank capacity:
9.5 l (2.5 gall)
Warm-up time:
8 - 10 min
Fuse:
Overheat protection:
10 AT at 200 - 260 V
15 AT at 100 - 130 V
Electronic /
Mechanical (with manual reset)
Figure 1: Overall dimensions in mm (inches).
PS-950307
10