1
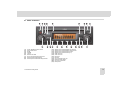
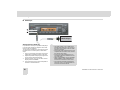
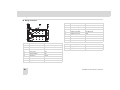
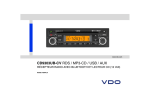
www.vdo.com CD9303UB-CV RDS / MP3-CD / USB / AUX TUNER WITH BLUETOOTH AND CD PLAYBACK (12 Volt) OWNER´S MANUAL 3. 왘 Before operating the unit, please read this manual thoroughly and retain it for future reference. 2 1. PANEL CONTROLS ................................................................................................................... Page 03 2. GENERAL ................................................................................................................................... Page 04 3. ANTI-THEFT SECURITY PIN CODE INPUT.............................................................................. Page 06 4. RADIO......................................................................................................................................... Page 07 5. CD PLAYER................................................................................................................................ Page 08 6. USB PLAYER ............................................................................................................................. Page 11 7. AUX PLAYER ............................................................................................................................. Page 12 8. BLUETOOTH .............................................................................................................................. Page 13 9. WIRING CONNECTION ............................................................................................................. Page 16 10. HANDLING COMPACT DISCS ................................................................................................ Page 17 11. LCD DISPLAY FOR CD PLAYER ERROR............................................................................... Page 17 12. PRODUCT AND WARRANTY SERVICE ................................................................................. Page 18 13. MP3/WMA INFORMATION AND NOTICE................................................................................ Page 18 14. SPECIFICATIONS .................................................................................................................... Page 19 CD9303UB-CV RDS / MP3-CD / USB / AUX PANEL CONTROLS 쮿 (1) (2) (3) (4) (5) (6) (7) (8) (9) PANEL CONTROLS Power ON/OFF/Volume control Setup/Tune button Mode AM/FM TA/AF Deterent Pin LED Down tuning/Track down & review Station preset button/Display Station preset button/Scan Play selector © Continental Trading GmbH (10) (11) (12) (13) (14) (15) (16) (17) (18) (19) (20) (21) Station preset button/Repeat Play selector Station preset button/Random Play selector Station preset button/Directory down Station preset button/Directory up USB connector AUX connector Disc eject Disc slot Up tuning/Track up & cue Off-hook (send) button On-hook (end) button Microphone 3 GENERAL 쮿 GENERAL Power On/Off (1) [VOL]-button Setup button (2) [TUNE]-button Treble control (2) [TUNE]-button Press [VOL]-knob (1) to turn the Set On or Off. This button can adjust the sound effect and other things. Each time you press [TUNE]-button (2), LCD displays as follows : To adjust the treble tone level, first select the treble mode by pressing [TUNE]-button (2) until “TREBLE” appears on the display panel. Within 5 seconds of selecting the treble mode, turn [TUNE]button (2) right or left to adjust the treble level as desired. The treble level will be shown on the display panel from a minimum of “TREB -10” to a maximum of “TREB +10”. Volume control (1) [VOL]-button Turn [VOL]-knob (1) right to increase the volume level and left to decrease the volume level. After 5 seconds the display will return to the previous display mode. Start-up volume level set up (1) [VOL]button Start-up volume is the volume level the set will play at when next turned on. To adjust the start-up volume, press and hold [VOL]-knob (1) longer than 2 seconds. The current volume level is displayed as a flashing number on the display panel. Turn [VOL]-knob (1) right or left to increase or decrease the volume, then press [VOL]-knob (1) again to set that volume level as the start-up volume level. 4 BASS TREBLE BAL L=R FAD F=R LOUD OFF REG OFF LOCAL OFF EQ OFF BEEP 2ND On each setting, the level can be controlled by turning [TUNE]-button (2). The display will automatically return to the previous display mode 5 seconds after the last adjustment is made. Bass control (2) [TUNE]-button To adjust the bass tone level, first select the bass mode by pressing [TUNE]-button (2) until “BASS” appears on the display panel. Within 5 seconds of selecting the BASS mode, turn [TUNE]-button (2) right or left to adjust the bass level as desired. The bass level will be shown on the display panel from a minimum of “BASS -10” to a maximum of “BASS +10”. Balance control (2) [TUNE]-button To adjust the left-right speaker balance, first select the Balance mode by pressing [TUNE]-button (2) until the “BAL” indication appears on the display panel. Within 5 seconds of choosing the Balance mode, turn [TUNE]-button (2) right/left to adjust the balance as desired. The balance position will be shown by the bars on the display panel from “BAL 10L” (full left) to “BAL 10R” (full right). CD9303UB-CV RDS / MP3-CD / USB / AUX GENERAL Fader control (2) [TUNE]-button Beep control (2) [TUNE]-button To adjust the front-rear speaker balance, first select the Fader mode by pressing [TUNE]-button (2) until the “FADER” indication appears on the display panel. Within 5 seconds of choosing the Fader mode, turn [TUNE]-button (2) right/left to adjust the front-rear speaker level as desired. The fader position will be shown by the bars on the display panel from “FAD 10F” (full front) to “FAD 10R”(full rear). To adjust the Beep mode, first select the Beep mode by pressing [TUNE]-button (2) until “BEEP 2ND” appears on the display panel. If [TUNE]-button (2) is turned, it will be toggled with BEEP 2ND ➟➠ BEEP OFF. Select “BEEP 2ND”, when you wish to hear the ”BEEP” sound whenever any Radio Pre-set memory. Loud control (2) [TUNE]-button EQ control (2) [TUNE]-button You can select an equalizer curve for 4 music types (CLASSIC, POP, ROCK, JAZZ). To adjust the EQ mode, first select the EQ mode by pressing [TUNE]-button (2) until “EQ OFF” appears on the display panel. Within 5 seconds of choosing the EQ mode, turn [TUNE]-button (2) right to adjust EQ sound as desired. Each time you turn [TUNE]-button (2), LCD displays as follows: When listening to music at low volume levels, this feature will boost the bass and treble response. This action will compensate for the reduction in bass and treble performance experienced at low volume. To select the loudness feature, press button ? until “LOUD ON” or “LOUD OFF” is displayed, then turn [TUNE]-button (2) left or right to activate or deactivate loudness. Local distance control (LO/DX) (2) [TUNE]-button LO/DX will select only local strong stations in station search mode. In “non” LOC mode (DX), your radio will search for both local strong and distant weaker stations. To adjust the LO/DX mode, first select the LO/DX adjust mode by pressing [TUNE]-button (2) until “LOCAL OFF” appears on the display panel. If [TUNE]-button (2) is turned, it will be toggled with LOCAL OFF ➟➠ LOCAL ON. Mode button (3) Each time this button is pressed, Function is changed. Each time this button is pressed, LCD displays as follows: RADIO CD USB AUX REG control (2) [TUNE]-button EQ OFF CLASSIC POP ROCK JAZZ Note: When the EQ mode is activated, the BASS and TREBLE modes are not displayed. © Continental Trading GmbH To adjust the Regional ON/OFF at AF function, first select the Reg adjust mode by pressing [TUNE]button (2) until “REG OFF” appears on the display panel. If [TUNE]-button (2) is turned, it will be toggled with REG ON ➟➠ REG OFF. Deterent PIN LED (6) 앫 This LED blinks every 1 second when the ignition is turned off. 앫 This LED will turn ON when phone-in/phoneout. It will turn OFF when end of tel call. 5 Anti Theft Security PIN Code Input 쮿 Anti Theft Security PIN Code Input Anti Theft Security PIN Code Input To activate the security pin code, please follow these steps. 1. Turn on your stereo. 2. If the stereo screen indicates “1 CODE”, this is a message that you need enter your anti-theft security pin code. 3. Your MP3 CD Player has the fixed security pin code “1111” when it is at first supplied to you. 4. Enter the fixed security (“1111”) to turn on power of MP3 CD Player. a. Press Station preset button number [1] (8), one (1x) time. b. Press Station preset button number [2] (9), one (1x) time. c. Press Station preset button number [3] (10), one (1x) time. d. Press Station preset button number [4] (11), one (1x) time. e. Finally press SETUP button (2) to confirm it. Your Stereo is now readied for full operation. 5. Important : If you have entered the incorrect anti-theft pin code or used an incorrect procedure at your first attempt, your stereo screen will exhibit the following message “2 CODE”. This means you need enter the pin code a second time taking care to follow these instructions and enter the correct pin code. 6. If the stereo screen show the message “3 CODE”, this means you failed to follow the correct instructions or that you entered the incorrect pin code. 6 7. If you fail to succeed to enter the correct pin code at the third attempt, your stereo will turn off. You will need to wait at least one hour before attempting to re-enter the correct anti-theft security pin code number using the above procedures correctly. Your MP3 CD Player stereo has the antitheft security pin code entered. The only time your stereo will identify the message “1 CODE” in the screen is if your stereo or car has lost battery power. If your car battery is in good order, your stereo will accept your anti-theft security pin code number using the above procedure. 4. Input your new security code into 4digit as fol- 5. 6. Change Anti Theft Security PIN Code To change the security code, please follow these steps. 1. Power on your stereo (MP3 CD Player) and “AM/FM” Button are press hold more than 5 seconds. 2. Repeat how to enter the fixed security code (“1111”) from 6 page, phase 4. (Next time, Repeat how to enter the last user code.) 3. Display “1 New____” on LCD. 7. 8. lowing steps. If you want to enter new code to 5624. a. Press Station preset button number [1] (8), five (5x) times. b. Press Station preset button number [2] (9), six (6x) times. c. Press Station preset button number [3] (10), two (2x) times. d. Press Station preset button number [4] (11), four (4x) times. e. Press SETUP button (2) to confirm it. Display “2 New____” on LCD after entering new code successfully. Input the same one as to confirm it again. a. Press Station preset button number [1] (8), five (5x) times. b. Press Station preset button number [2] (9), six (6x) times. c. Press Station preset button number [3] (10), two (2x) times. d. Press Station preset button number [4] (11), four (4x) times. e. Press SETUP button (2) to confirm it. Display “CODE OK” on LCD if your new code is correct. Finally your new code is changed to “5624”. Press “POWER” [VOL]-knob (1) to turn power on. CD9303UB-CV RDS / MP3-CD / USB / AUX Radio 쮿 Radio Manual tuning (2) [TUNE]-button To manually tune to a radio station, turn encoder [TUNE]-button (2) left or right to increase or decrease the radio frequency. Up/Down seek [↑] (7), [↓] (18) To automatically select a radio station, press the SEEK UP button (18) or SEEK DOWN button (7) once. The tuner will search for the next radio station. [AM/FM]-button (4) Each time you press button (4), LCD displays as follows : FM1 FM2 FM3 AM1 AM2 [TA/AF]-button (5) If you wish to hear traffic news, press button (5) once. The display shows “TPSEEK”and “TA” icon on LCD panel and search the traffic station. When TA RDS signal is available from the current station, TP icon is turned on. If the TA function is activated, CD(USB) mode is also interrupted for traffic news. Every time pressand hold button (5) longer than 2 seconds, the “AF”icon is display On and Off. When “AF”on (“AF”icon will appear on the display panel.), the unit automatically switches to the frequency with the best reception and displays the station which transmit an AF signal. © Continental Trading GmbH In areas with very poor reception, there may be long paused while the radio attempts to find a better frequency. In this case, you can deactivate the AF function. [1] - [6] Station preset button (8) ~ (13) Whilst in radio mode, pressing buttons (8) to (13) for less than 2 seconds will recall the radio station that memory. To store desired stations into any of the 6 pre-set memories, in either the AM or FM bands, use the following procedure: a. Select the desired station. b. Press and hold any of the pre-set buttons for longer than 2 seconds. The pre-set number will appear on the display panel indicating that the station is now set into that pre-set memory position. • AM The range for most AM stations is greater than for FM, especially at night. The longer range can cause station frequencies to interfere with each other. For better radio reception, most AM radio stations will boostthe power levels during the day, and then reduce these levels during the night. Static can also occur when things like storms and power lines interfere with radio reception. When this happens, try reducing the treble on your radio. • FM Stereo FM stereo will give the best sound, but FM signals will reach only about 10 to 40 miles (16 to 65 km). Tall buildings or hills can interferewith FM signals, causing the sound to fade in and out. Note: • Radio reception You may experience frequency interference and static during normal radio reception if items such as mobile phone chargers, vehicle convenience accessories, and external electronic devices are plugged intothe accessory power outlet. lf there is interference or static, unplug the item from theaccessory power outlet. 7 CD Player 쮿 CD Player MP3 directory/File searching (2) [TUNE]-button Track selection & cue/Revies button [↑] (7), [↓] (18) During CD/USB player function, each time the (18) button is pressed, track number goes up. Each time the (7) button is pressed, track number goes down. [TUNE]-button (2) is used to select a particular directory and file on a MP3 disc. Press and hold [TUNE]-button (2) for more than 2 seconds. Then, To select desired Directory, press Directory UP button (13) or Directory DOWN button (12). When the desired directory is displayed, Press UP Tunning button (18) or DOWN Tunning button (7) to display the tracks within that directory. Press button (7) when the desired file is displayed to begin playback. Cue/Review functions (7), (18) CD: Track select function (7), (18) High-speed audible search cue and review of any track on a CD-DA (audio) disccan be made using button (7), (18). Press and hold the cue button (18) to advance rapidly in the forward direction and the review button (7) to advance rapidly in reverse direction. 8 Note: In case of playing MP3 disc, you can search the file using cue and review.Play Cue and Review within a located file (song) and play sounds automatically at the first selection of a file If you want to search the file in the located directory, Press UP Tunning button (18) or DOWN Tunning button (7) consecutively. Press the [TUNE]button (2) when you find the wanted file. The unit will then play the selected file. For instance, the file search changes in Dir01 as follows. File01 File02 File03 File04 MP3 directory/file configuration ROOT ROOT Dir01 Dir02 Dir03 Dir04 Dir05 Dir06 Dir07 Directory01 File01File02 File03 File04 Dir02 Dir03 Dir04 USB: File05 File06 Dir05 File07 File08 Dir06 File09 File10 Dir07 ROOT Dir01 Dir02 Dir05 Dir03 Dir06 Dir04 Dir07 CD9303UB-CV RDS / MP3-CD / USB / AUX CD Player Directory down [D-] (12) During MP3 playback, selection of the previous directory (if available on the MP3 disc) is possible by pressing button (12) briefly. Directory up [D+] (13) During MP3 playback, selection of the next directory (if available on the MP3 CD) is possible by pressing button (13) briefly. •Note If the MP3 disc does not contain directo- ries, the set plays MP3 tracks at 10-file intervals whenever button (13), (12) is pressed. • If the Disc does not contain any MP3 and WMA file, this function does not operate. • If the directory does not contain any MP3 files, the directory will not be shown. Track scan [SCN] (9) During disc play, press button (9) to play the first 10 seconds of each track on the disc. “SCN” will appear on the display panel. When the desired track is reached, press button (9) again to cancel the function. The set will then play the selected track. Track scan mode can be cancelled by activating random play, repeatplay, track up/down or directory up/down button. © Continental Trading GmbH Note: When playing a MP3 disc, when button (9) is pressed and held for longer than 2 seconds, “SCN” will blink on the display panel and all files in the selected directory will be introduced until the scan mode is cancelled by pressing button (9) again or by activating the random play, repeat play, track up/ down or directory up/down button. Repeat Play selector [RPT] (10) During disc play, press button (10) to play the selected track repeatedly. “RPT” will appear on the display panel. Play of the track will continue to repeat until the button is pressed again and the “RPT” disappears from the display panel. Repeat play mode will also be cancelled by activating random play or scan playbutton. Random Play selector [RDM] (11) During disc play, press button (11) to play tracks on the disc in a random or shuffled order. “RDM” will appear on the display panel. The track select function (11) will also select tracks in the random mode instead of the normal sequence. The random play mode can be cancelled by activating scan play or repeat playbutton. Note: In case of MP3 playback, when the random button is pressed and held longer than 2 seconds, “RDM” will blink on the display panel and play all files in the current directory randomly until the directory random mode is cancelled by pressing button (11) again or by activating scan play or repeat play button. “RDM” will disappear from the display. Note : In case of playing MP3 disc, when button (10) is pressed and held longer than 2 seconds, “RPT” will blink on the display panel and play all files in the selected directory. The playback will be repeated until the directory repeat mode is cancelled by pressing the repeat button again, or by activating random play or scan play button. “RPT” will then disappear from the display. 9 CD Player ID3 v2 [DISP] (8) Disc eject [ Button (8) is used to change the display information. While playing a MP3 file, you can change the file information shown on the display. Each time button (8) is pressed, the display changes to show the information shown below: By pressing DISC EJECT button (16) , the disc will be ejected and the set will return to the previous mode. If the disc is not removed from the disc loading slot after ejecting, the disc will re-load to avoid damage to the disc. Playback of the disc can then resume by pressing button (3). Track number/elapsed time (normal mode) Directory name / file name Album name / performer / title 10 ] (16) Note: In case of Eject Error, press the Eject button for more than 5 seconds.The CD will force-eject. Note: • Load the disc at a straight angle into the slot. • This set is designed to play standard 5”(12cm) compact discs ONLY. • Do not attempt to use 3”(8cm), either with or without an adapter, ordiscs fitted with an outer edge trim or frame, as damage to the playerand/or disc can occur. Damage to these discs and/or set will not becovered by the product warranty. Disc slot (17) With the printed label surface facing up, gently insert the discinto the slot until the soft loading mechanism engages. The display panel will show “READING” and then disc playback will commence. Note: If the MP3 disc does not have any ID3 information, the display will display “NO ID3” on display panel. CD9303UB-CV RDS / MP3-CD / USB / AUX USB Player 쮿 USB Player INFORMATION AND NOTICE: •ItUSB can be played by those conditions. ➥ USB Playback (14) USB function (14) To change Radio or CDP/MP3 mode, press “MODE” button (3) momentarily or unplug gently the USB player or USB memory from the USB connector (14). USB mode will automatically change to previous mode. To play USB driver or USB device, press “MODE” button (3) momentarily or insert gently the USB driver or USB device. It will automatically play MP3 file in the USB device and the LCD display will show “USB PLAY”. If there is no files in USB device, it will be converted back to the previous mode after display “NO FILE”. All of the USB file playback function is same as MP3 DISC function. Please refer to page 11 - 14 on how to use possible function for USB file playback. © Continental Trading GmbH - FAT, FAT12, FAT16 and FAT32 in the FILE SYSTEM. - V1.1, V2.2 and V2.3 in the TAG(ID3) Version. • It can be displayed only 32 characters. • MULTI-CARD READER can not be supported. • It can not be played high speed but be played full speed. • It can not play files that DRM is applied. Please refer to page 18. ➥ Note: This function will be operated by the USB cable of which we provide. But USB driver or USB device is not provided. 11 AUX Player 쮿 AUX Player Media Player AUX Connector (AUX) (15) It is possible to connect your portable media player to the car audio system for playback of the audio tracks via the car speakers. To get the best results when connecting the portable media to the car audio system, follow these steps: 1. Use a 3.5 mm stereo plug cable to connect the media player headphone socket to the radio. 2. Adjust the portable media player to approximately 3/4 volume and start playback. 3. Press the button (3) on the car radio until the display shows AUX MODE. 4. The volume and tone can now be adjusted on the radio to the desired level. 12 •Note: The audio quality of your media player • • • • and the audio tracks on it may not be of the same sound quality as the car audio system's CD player. If the sound of the media player is too low compared with the radio or CD, increase the volume of the player. If the sound of the media player is too loud and/or distorted, decrease the volume of the player. When in AUX MODE, only the VOLUME, BASS, TREBLE, EQ, and MODE functions of the car audio set can be used. For technical information regarding the AUX input, refer to the specification section at the end of this manual. CD9303UB-CV RDS / MP3-CD / USB / AUX Bluetooth 쮿 Bluetooth Pairing your Head Unit and Bluetooth Phone Using a Bluetooth wireless connection 1. Your Head Unit supports Bluetooth wireless This Head Unit supports Handsfree profile, Headset profile, A2DP (Audio Advanced Distribution profile) and AVRCP (Audio Video Remote Control profile). 2. technology. You can set up a wireless link with Bluetooth cellular phone. Please always try pairing the cellular phone with Head Unit after a few minutes of the cellular phone was switched on to ensure the best pairing result. Bluetooth indicators shown on the display 앫 Bluetooth indicator ( ) : •Note Since this Head Unit is on standby to con- nect with your cellular phone via Bluetooth wireless technology, using this Head Unit without running the engine can result battery drainage. • This Head Unit’s phone call reception is on standby when ignition switch is set to ACC or ON. • The line-of-sight distance between this Head Unit and your cellular phone must be 10 meters or less for sending and receiving voice and data via Bluetooth wireless technology. However the transmission distance may become shorter than the estimated distance depending on the environment in use. • Digital Noise & Echo suppression system provides the best sound clarity with little or no distortion (Echo & side tone will happen depending on Cellular Phone or service network). 앫 앫 The Bluetooth logo above is displayed when a Bluetooth device is connected, and not displayed, when no Bluetooth device is connected. If the Bluetooth mobile phone is connected but the connection is not of satisfactory quality, the Bluetooth logo is not displayed. Battery strength indicator ( ) This is an indication of your mobile phone battery condition. If your mobile phone is not unable to transmit battery condition level, the indicator is not displayed. Signal level indicator ( ) This is an indication of the mobile phone network signal strength in your current location. If your mobile phone is not able to transmit signal level, the indicator is not displayed. Pairing in Handsfree mode 1. Press and hold button (19) for 4 seconds until 2. 3. 4. 5. Cellular Phone Pairing mode 1. Browse your Cellular Phone menu and find the connectivity or Bluetooth connection section. 2. Select “search for” a new Handsfree device 3. 4. 5. 6. 7. 8. © Continental Trading GmbH you hear beep sound 1 time, then “PAIR MODE”,” PAIRING” and ”KEY 0000” will alternately appear on the display. For the next procedure, go to “Cellular Phone Pairing Mode”. If it is pairing status with Head Unit and Cellular Phone , It will be blinked “Bluetooth Icon” on the display. If you want to exit pairing mode, press button (20) briefly while pairing, then it disappears “PAIR END” on the display. “Bluetooth Icon” and “PAIR OK” appears on the display when pairing is successful. function and allow the phone to find the mobile. “mobile” should appear on your Cellular Phone screen. Press connect menu among the Handsfree option on your cellular phone. The Cellular Phone should prompt for a pin code. Insert the pin code : “0000” The Cellular Phone should confirm that it has established a new paired connection. The pairing is now completed. It appears “Bluetooth Icon” and “PAIR OK” on the display. If the pairing failed, It appears “FAIL” on the display for 3 seconds. 13 Bluetooth Note : • Each cellular phone type has distinct phone menu so you may need to refer to your manufacture's instruction for the correct procedure on how to connect a new Bluetooth device. • Please retry to the pairing instructions, if “mobile” does not appear on the cellular phone screen. • Please select authorized, if there is authorized menu in the menu of Bluetooth connection in your cellular phone. • Once the Bluetooth pairing is completed between your cellular phone and this Head Unit, the both Units will be automatically recognized on its pairing and connection when you turn on the key in your car even though this Head Unit is turned off. • This Head Unit can store up to 8 phones pairings. If the memory is full, the first stored paired phone will be deleted. • The connecting priority will be given to the last connected Cellular Phone. • If you want to change the connecting priority, try to connect this Head Unit from the Cellular Phone. Bluetooth connection and disconnection 1. To disconnect Bluetooth Link: 2. Press button (19) for 2 seconds, it appears “DIS CONN” on the display. And then it disappears “Bluetooth Icon” on the display. To connect Bluetooth Link: Press button (19) briefly, it blinks “Bluetooth Icon” on the display while Bluetooth is being connected. If the connection is completed, it appears “Bluetooth Icon” and “CONNECTED” on the display. : •Note When your Cellular Phone battery is at low charge, the Bluetooth connection may occasionally be lost. To maintain good connectivity ensure that your Phone battery is adequately charged. • In case of failure of Bluetooth pairing: - Delete item in paired list on your phone. - Reset both phone by power off/on and this Head Unit by ACC off/on. • Connecting priority of Handsfree profile is higher than headset profile. • The Headset mode does not support Caller ID, Reject call and Call Transfer. Using the Head Unit as a Handsfree Device 1. When the Head Unit is ringing, then it appears 2. 3. “INCOMING” on the display, and then the phone number “************” on the display. To accept call Press button (19), it appears “HANDSFREE” on the display. To reject or end call Press button (20), It appears “CALL END” on the display. Audio transfer between the Head Unit and phone The audio transfer function is for switching the call from the Head Unit to the Cellular Phone for private conversation. 1. Press button (19) briefly during conversation, it appears “PRIVATE” on the display. 2. To switch back to the Head Unit, press button (19) briefly during private conversation, then it appears “HANDSFREE” on the display. 14 Note: If “Reject call” is not activated in your phone, then your Cellular Phone does not support “Reject call” function. Note: This function will be a cause of disconnection of Bluetooth link in some Nokia phones, but you do not worry just press button (19) during private conversation, then switch back to the Head Unit automatically. CD9303UB-CV RDS / MP3-CD / USB / AUX Bluetooth Last number dialing Press button (19) briefly, it appears “OUTGOING” on the display. And then make last call. To make a call by cellular phone 1. The Head Units activated automatically when you make a call by Cellular Phone. 2. When you make a call processing by Cellular Phone. It shows “OUTGOING” on the display. 3. When you receive a call, the phone number “************” appears on the display. Using the Head Unit as Bluetooth music The Head Unit supports A2DP (Audio Advanced Distribution Profile) and AVRCP (Audio Video Remote Control Profile), and both profiles are available to listen music at the Head Unit via cellular phone which is supporting the two profiles above. 1. To play music, press and hold button (3) for 2 seconds, then appears “BT AUDIO” on the display. 2. To pause music from cellular phone while playing music, press and hold button (3) for 2 seconds. 3. To track up, press button (18) briefly and to track down, press button (7) briefly. It will be displayed “BT NEXT” or “BT BACK”. 4. To stop music, Press button (3) briefly. © Continental Trading GmbH Note : • Some kinds of phone can not play music by the Head Unit, and then you search the menu on your cellular phone as below: i.e : Menu ➠ File manager ➠ Music ➠ Option ➠ Play via Bluetooth • This function maybe different depends on cellular phone. Please follow the cellular phone menu. Some kinds of phone need to pair once more for Bluetooth MP3 connection. • This function will be cause to disconnect A2DP (Audio Advanced Distribution Profile), ACRCP (Audio Video Remote Control Profile) depends on cellular phone. • Information about songs (e.g. the elapsed playing time, song titles, song index, etc.) cannot be displayed on this Head Unit. During phone-in and phone-out, RED LED on the set front will be turned ON. It will turn OFF when call end. 15 Wiring connection 쮿 Wiring connection Pin No. Function Wire color A1 N. C. - A2 N. C. - A3 Tel Mute Low Pink A4 Ignition +12V Red A5 Antenna Remote Blue A6 Illumination + Orange A7 Battery +12V Yellow A8 Negative Ground Black 16 Pin No. Function Wire color B1 Speaker Rear Right + Violet B2 Speaker Rear Right - Violet Black Line B3 Speaker Front Right + Gray B4 Speaker Front Right - Gray Black Line B5 Speaker Front Left + White B6 Speaker Front Left - White Black Line B7 Speaker Rear Left + Green B8 Speaker Rear Left - Green Black Line C2 Tel Mute High Pink Black Line C8 Steering Remote + White Black Line C11 Steering Remote - Blue Black Line CD9303UB-CV RDS / MP3-CD / USB / AUX Handling Compact Discs 쮿 Handling Compact Discs Dirt, dust, scratches, and disc warpage can cause skipping in the play back and deterioration of sound quality. Please observe these guidelines to take care of your compact discs : 앫 Fingerprints, dust and dirt should be carefully wiped off over the disc's playing surface (shiny side) with a soft cloth. Wipe in a straight motion from the inside to the outside of the disc. 앫 Never use chemicals such as record sprays, household cleaners or thinner to clean compact discs. Such chemicals can irreparably damage the disc's surface. 앫 Discs should be kept in their storage cases when not in use. 앫 Do not expose discs to direct sunlight, high temperatures or high humidity for extended periods. 앫 Do not stick paper, tape, or labels on the disc surfaces nor write on them with any type of marker. Discs with non-standard shapes (e.g.: heart, square, star) cannot be played on this unit. Attemp- ting to do so may damage the unit. Do not use such discs. Before playing, clean the discs with a commercially available cleaning cloth. Wipe each disc from the center out. Do not use solvents such as benzine, thinner, commercially available cleaners, or antistatic spray intended for analog discs. Some CD-Rs/CD-RWs (depending on the equipment used for its recording or the condition of the disc) may not play on this unit. MP3 CD-Rs/CD-RWs (depending on the recording method of the disc) may have some difference on 쮿 LCD Display for CD Player Error If a problem occurs while operating the unit, the following error codes may be displayed on the LCD. LCD Symbol Error Description ERROR 1 Load Loading is not available. ERROR 2 Mechanism Mechanism problem. ERROR 3 Fault Mechanism fault. ERROR 4 Servo Servo error. ERROR 5 CD Disc Disc error. ERROR 6 CD Data Disc data error. © Continental Trading GmbH 17 Product and Warranty Service 쮿 Product and Warranty Service MP3/WMA CD Player supports for MP3/WMA CD of Joliet and ISO9660 File Format. If your MP3/WMA CD Player is faulty, please take your vehicle to your nearest dealer for diagnostic inspection of your MP3/WMA CD Player. In case of proven defects, your dealer will implement a change over product service to replace your faulty MP3/WMA CD Player. This product warranty does not cover damage to your MP3/WMA CD Player (with CD, MP3/WMA and TUNER) if it has been subjected to misuse or abuse. A fee to extend warranty service to any unit that has been misused or abused will be applied prior to any service work carried out. This warranty does not cover any call for warranty service or change over product service if it is recognized that your complaint is caused by misuse, faulty CD Discs or imperfect CD-R and CD-RW discs. 쮿 MP3/WMA informatoion and notice MP3 is an abbreviation of Motion Picture Experts Group (or MPEG) Audio Layer 3*. MP3 is simply a file format with a data compression ratio of 1:10 128 Kbps. That means, by using MP3 format, one CD-R or CD-RW can contain 10 times as much data volume as a regular CD can. 18 Bit rate is the average number of bits that one second of audio data will consume. The unit is used Kbps(1000 bits/second). To get a better audio quality, choose a higher bit rate. The most popular bit rate for encoding is 128 Kbps. The elapsed time on the display and actual time are somewhat different, when written MP3 file into VBR (Variable Bit Rate). This unit is incorporated with MP3 decoder. You can playback MP3 files (tracks) recorded on CD-R, CD-RW, and CD-ROM. WMA is the abbreviation of Windows Media Audio, an audio file format developed by Microsoft Corporation. If you play a file with DRM (Digital Rights Management) for WMA/MP3 remaining ON, no audio is output. To disable DRM (Digital Rights Management) for WMA/MP3 : 앫 When using Windows Media Player 7, click on TOOLS ➠ OPTIONS ➠ CD AUDIO; there, uncheck the ENABLE PERSONAL RIGHTS MANAGEMENT check box, then construct files. 앫 When using Windows Media Player for Windows XP 8, click on TOOLS ➠ OPTIONS ➠ COPY MUSIC tab, then under COPY SETTINGS, uncheck the check box for PROTECT CONTENT. Thereafter, reconstruct files. Personally constructed WMA files are used at your own responsibility. Precautions when creating MP3/WMA disc. Usable sampling rates and bit rates: 앫 MP3: Sampling rate 44.1KHz, Bit rate: 32 Kbps-320 Kbps / VBR 앫 WMA: Bit rate 48 kbps-192kbps Logical format (File system) 앫 When writing MP3 file on a CD-R disc or CDRW disc, please select “ISO9660 level 1/2/3 or JOLIET” as the writing software format. Normal play may not be possible if the disc is recorded on another format. ID3 v2(ID3 TAG) is compatible. Extra information data such as album title, performer name, song title, recording year, music genre and a brief comment can be stored in a MP3 file. This unit can show ID3v2 tags (album name, performer name and song title) on the display. This player occasionally may not be compatible with musician property rights protection CD because its own special reflection rate manufactured by the CD maker may cause this player to make an error in reading. CD9303UB-CV RDS / MP3-CD / USB / AUX Specifications 쮿 Specifications Dimension (W ×H ×D) Operation Voltage Fuse spec: Output Power Output Impedance Tuning Range Sensitivity FM Stereo Separation Frequency Response CD S/N Ratio CD Channel Separation AUX Input Sensitivity Bluetooth Output Power Profile © Continental Trading GmbH 188mm ×58mm ×177mm 12 volts DC, negative ground 10 A 160 watts maximum (40 watts ×4 channels) compatible with 4 ~ 8 ohm speakers AM : 522~ 1,620 KHz( 9KHz step ) FM : 87.5 ~ 108.0MHz ( 50 KHz step ) AM : 30dBuFM : 9dBu 30 dBCD 20 ~ 20,000 Hz 70dB 50 dB 2V ( VOLUME STEP 20 ) 400 and 800 mV @ 10 K Ohm Version 2.0 + 4dBm Max Advanced Audio Distribution Profile Audio/Video Remote Control Profile Hands-Free Profile Headset Profile 19 Continental Trading GmbH Sodener Str. 9 65824 Schwalbach Germany Support & Download → www.vdo.com © 04.2011 Continental Trading GmbH