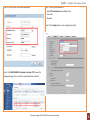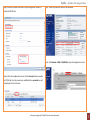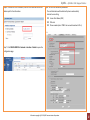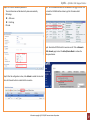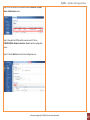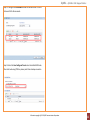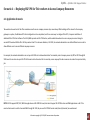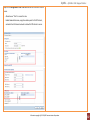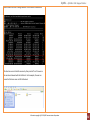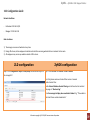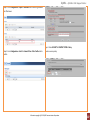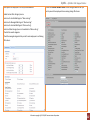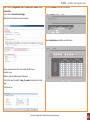
1
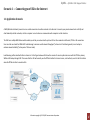
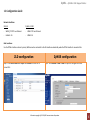
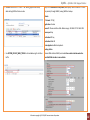
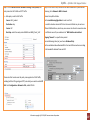
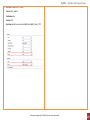
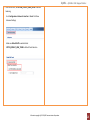
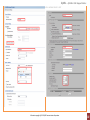
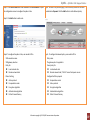
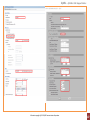
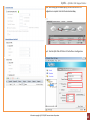
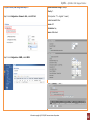
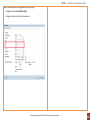
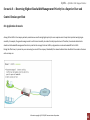
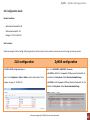
ZyWALL USG ZLD 2.21 Support Notes Revision 1.00 August, 2010 Written by CSO ZyXEL – ZyWALL USG Support Notes Table of Contents Scenario 1 — Connecting your USG to the Internet ................................................................................................................................................................................... 4 1.1 Application Scenario ....................................................................................................................................................................................................................... 4 1.2 Configuration Guide ....................................................................................................................................................................................................................... 5 Scenario 2 — WAN Load Balancing and Customized Usage of WAN Connection for Specific Traffic .................................................................................................... 12 2.1 WAN Load Balancing..................................................................................................................................................................................................................... 12 2.1.1 Load Balancing Algorithm ......................................................................................................................................................................................................... 12 2.2 Customized Usage of WAN Connection for Specific Traffic Type............................................................................................................................................... 14 2.3 Application Scenario ..................................................................................................................................................................................................................... 15 2.4 Configuration Guide ..................................................................................................................................................................................................................... 16 Scenario 3 — How to configure NAT if you have Internet-facing public servers .................................................................................................................................... 22 3.1 Application Scenario ..................................................................................................................................................................................................................... 22 3.2 Configuration Guide ..................................................................................................................................................................................................................... 23 Scenario 4 — Secure site-to-site connections using IPSec VPN ............................................................................................................................................................... 27 4.1 Application Scenario ..................................................................................................................................................................................................................... 27 4.2 Configuration Guide ..................................................................................................................................................................................................................... 28 Scenario 5 — Secure client-to-site connections using IPSec VPN ............................................................................................................................................................ 35 5.1 Application Scenario ..................................................................................................................................................................................................................... 35 5.2 Configuration Guide ..................................................................................................................................................................................................................... 36 Scenario 6 — Deploying SSL VPN for Tele-workers to Access Company Resources ............................................................................................................................... 45 6.1 Application Scenario ..................................................................................................................................................................................................................... 45 6.2 Configuration Guide ..................................................................................................................................................................................................................... 46 Scenario 7 — Reserving Highest Bandwidth Management Priority for VoIP Traffic ............................................................................................................................... 55 7.1 Application Scenario ..................................................................................................................................................................................................................... 55 7.2 Configuration Guide ..................................................................................................................................................................................................................... 56 Step4. Create a bandwidth management rule and configure .......................................................................................................................................................... 60 All contents copyright (c) 2010 ZyXEL Communications Corporation. 2 ZyXEL – ZyWALL USG Support Notes Scenario 8 — Reserving Highest Bandwidth Management Priority for a Superior User and Control Session per Host ...................................................................... 61 8.1 Application Scenario ..................................................................................................................................................................................................................... 61 8.2 Configuration Guide ..................................................................................................................................................................................................................... 62 Scenario 9 — Using ZyWALL to Control Popular P2P Applications .......................................................................................................................................................... 71 9.1 Application Scenario ..................................................................................................................................................................................................................... 71 9.2 Configuration Guide ..................................................................................................................................................................................................................... 72 Scenario 10 — Deploying Content Filtering to Manage Employee Browsing Behavior ......................................................................................................................... 77 10.1 Introduction to ZSB (ZyXEL Safe Browsing) ............................................................................................................................................................................... 78 10.2 Application Scenario ................................................................................................................................................................................................................... 78 10.3 Configuration Guide ................................................................................................................................................................................................................... 79 Scenario 11 — Quick Setup for Allowing WLAN Users to Access LAN Services ...................................................................................................................................... 86 11.1 Application Scenario ................................................................................................................................................................................................................... 86 11.2 Configuration Guide ................................................................................................................................................................................................................... 87 All contents copyright (c) 2010 ZyXEL Communications Corporation. 3 ZyXEL – ZyWALL USG Support Notes Scenario 1 — Connecting your USG to the Internet 1.1 Application Scenario A WAN (Wide Area Network) connection is an outside connection to another network or the Internet. It connects your private network such as LAN (Local Area Network) and other networks, so that a computer in one location can communicate with computers in other locations. The USG has a multiple WAN feature which enables you to link your network with up to two ISPs or other networks via Ethernet, PPPoE or 3G connections. User can either use trunks for WAN traffic load balancing to increase overall network throughput (“active-active” load sharing mode) or as a backup to enhance network reliability (“active-passive” failover mode). Load balancing will be described further in Scenario 2. In the figure below we first show the scenario for non-stop Internet access with the PPPoE as primary WAN and 3G backup through USB. This means that the USG will normally use the PPPoE interface for Internet access, and it will only resort to the 3G interface when the PPPoE interface’s connection fails. All contents copyright (c) 2010 ZyXEL Communications Corporation. 4 ZyXEL – ZyWALL USG Support Notes 1.2 Configuration Guide Network Conditions: USG-50: ZyWALL-5 UTM: - WAN1_PPP: PPP over Ethernet - WAN1: PPP over Ethernet - Cellular1: 3G - WAN2: 3G Goal to achieve: Use the PPPoE interface as device’s primary WAN connection and switch to the 3G interface automatically when the PPPoE interface’s connection fails. ZLD configuration Step 1. Click CONFIGURATION > Object > ISP Account to create an ISP ZyNOS configuration Step 1. Click Network > WAN > WAN1 to open the configuration screen. account first. All contents copyright (c) 2010 ZyXEL Communications Corporation. 5 ZyXEL – ZyWALL USG Support Notes Step 2. Fill in the PPPoE user name and password. Step 2. Fill in the PPPoE parameters: - Select PPP over Ethernet encapsulation mode - User name - Password Step 3. Click the Apply button to save and apply the setting. Step 3. Click CONFIGURATION > Network > Interface > PPP to open the configuration page. User can click the system default rule and edit it. All contents copyright (c) 2010 ZyXEL Communications Corporation. 6 ZyXEL – ZyWALL USG Support Notes Step 4. Enable the interface and select the pre-configured ISP account to Step 4. Check the connection status on the dashboard. activate the PPPoE rule. Step 5. Click Network > WAN > 3G (WAN2) to open the configuration screen. Step 5. When the configuration is done, click the Connect button to enable the PPPoE link. Once the connection is established, the connected icon will be displayed in front of the rule. All contents copyright (c) 2010 ZyXEL Communications Corporation. 7 ZyXEL – ZyWALL USG Support Notes Step 6. To check the PPPoE IP address, click the PPPoE rule and check the IP Step 6. Fill in the 3G connection parameters: address part for the information. - The card information will be detected by device automatically - Internet Access setting Access Point Name (APN) PIN code Phone number (enter *99# if not sure what number to fill in) Step 7. Click CONFIGURATION > Network > Interface > Cellular to open the configuration page. All contents copyright (c) 2010 ZyXEL Communications Corporation. 8 ZyXEL – ZyWALL USG Support Notes Step 8. Fill in the 3G connection parameters: Step 7. Go to the dashboard and click the Dial button to trigger the rule. User - The card information will be detected by device automatically can check the 3G WAN interface status to get the 3G modem detail - ISP Settings information. - APN name Dial String PIN code Step 8. Now the both PPPoE and 3G connection are UP. Click on Network > WAN > General page to select the Active/Passive Mode to achieve the backup mechanism. Step 9. After the configuration is done, click Activate to enable the rule. And then click Connect button to enable the 3G connection. All contents copyright (c) 2010 ZyXEL Communications Corporation. 9 ZyXEL – ZyWALL USG Support Notes Step 10. User can check the 3G connection status on MONITOR > System Status > Cellular Status screen. Step 11. Now both the PPPoE and 3G connection are UP. Click on CONFIGURATION > Network > Interface > Trunk to open the configuration screen. Step 12. Click the Add button to add a User Configuration rule. All contents copyright (c) 2010 ZyXEL Communications Corporation. 10 ZyXEL – ZyWALL USG Support Notes Step 13. Configure the trunk name and add the two interfaces: PPPoE for Active and 3G for Passive mode. Step 14. Select the User Configured Trunk rule as the default WAN trunk. Then it will work using PPPoE as primary and 3G as a backup connection. All contents copyright (c) 2010 ZyXEL Communications Corporation. 11 ZyXEL – ZyWALL USG Support Notes Scenario 2 — WAN Load Balancing and Customized Usage of WAN Connection for Specific Traffic 2.1 WAN Load Balancing As an enterprise network gateway, the USG ZyWALL often has more than one WAN connection to share the company network traffic load. Without WAN load balancing, a single WAN connection may get too congested, causing the Internet traffic to become slow or even get lost. USG ZyWALL provides network administrators with flexible ways of implementing WAN load balancing according to their demands. The outbound traffic is shared among multiple internet connections. Therefore, Internet traffic can get passed through the USG ZyWALL smoothly, improving your service quality and ensuring the Internet connections get effectively utilized. 2.1.1 Load Balancing Algorithm WRR — Weighted Round Robin We can assign different weights to different internet connections according to their bandwidth. The outbound traffic sessions will be sent out among the multiple WAN connections in turn; sessions will be assigned to different connections according to their proportional weights. Take the following for example: WAN1 bandwidth: 1 Mbps. WAN2 bandwidth: 512 Kbps. Since WAN1 has a bandwidth about twice that of WAN2, we can assign the weights to WAN1 and WAN2 as follows: WAN1 Weight: 2 WAN2 Weight: 1 The outbound traffic sessions will be assigned to WAN1 and WAN2 according to their proportional weights. E.g., when there’s total outbound traffic of 900K, 600K will be sent out over WAN1 and 300K will be sent out over WAN2. All contents copyright (c) 2010 ZyXEL Communications Corporation. 12 ZyXEL – ZyWALL USG Support Notes LLF — Least Load First When choosing LLF as the load balancing algorithm, the USG will calculate each WAN interface’s current outbound traffic utilization against the interface’s available bandwidth. Then it will use each interface’s traffic utilization ratio as the index to decide via which WAN interface it will send the next new session. The interface with the least outbound traffic utilization ratio will be used to send the next new session. Take the following for example: Interface Available Current measured Utilization Bandwidth Traffic Ratio WAN1 1M 600K 0.6 WAN1_ppp 512K 256K 0.5 WAN2 2M 1.6M 0.8 The next outbound new session will be sent over WAN1_ppp. All contents copyright (c) 2010 ZyXEL Communications Corporation. 13 ZyXEL – ZyWALL USG Support Notes Spill-over When choosing the Spill-over load balancing algorithm, the USG will send outbound traffic to the first interface member in the WAN trunk until its maximum allowable bandwidth is reached. Then the USG will send the excess outbound traffic to the second interface member in the WAN trunk. This algorithm is used when the first WAN connection is free or has a lower billing rate than the second WAN connection. The company can use this load balancing algorithm to reduce Internet fees while avoiding congestion on the first WAN connection. See the example below: WAN1 (free connection) bandwidth: 1M WAN2 (billing connection) bandwidth: 800K Total outbound traffic is 1.5M. The traffic distribution among the two connections: WAN1: 1M WAN2: 0.5M 2.2 Customized Usage of WAN Connection for Specific Traffic Type In some cases, the network administrator may prefer to send out some specific type of traffic over a specific WAN connection. For example, the ISP for WAN1 connection is also the company’s ITSP (VoIP provider). Therefore, network administrator can set the gateway to send VoIP traffic out over WAN1. Both ZyNOS ZyWALL and USG ZyWALL can achieve this application by Policy Route. All contents copyright (c) 2010 ZyXEL Communications Corporation. 14 ZyXEL – ZyWALL USG Support Notes 2.3 Application Scenario The company has two WAN connections for sharing outbound internet traffic. WAN1 uses static IP, and WAN2 uses a PPPoE connection. Since WAN1 ISP is also the company’s VoIP provider, the network administrator wants VoIP traffic primarily sent out over WAN1. In case WAN1 is down, the VoIP traffic can still go out over WAN2 PPPoE connection. Network administrator also wants HTTP traffic sent over WAN2 PPPoE connection primarily. In case WAN2 PPPoE is down, LAN users can still surf internet over WAN1. For all other types of traffic, administrator needs the two WAN connec tions to share the outbound traffic load, performing load balancing. All contents copyright (c) 2010 ZyXEL Communications Corporation. 15 ZyXEL – ZyWALL USG Support Notes 2.4 Configuration Guide Network Conditions: - LAN subnet: 192.168.1.0/24 - WAN1 IP: 200.0.0.1 - WAN2 PPPoE IP: Dynamic - WAN1 download bandwidth: 2M - WAN2 download bandwidth: 2M Goals to achieve: 1) VoIP traffic goes out primarily through WAN1. In case WAN1 is down, it will go out via WAN2 PPPoE connection. 2) HTTP traffic goes out primarily through WAN2 PPPoE connection. In case WAN2 PPPoE is down, it will go out via WAN1. 3) All other traffic goes out via WAN trunk performing Load Balancing with Least Load Balancing algorithm. ZLD configuration ZyNOS configuration Step 1. Configure a PPPoE account on WAN2 interface. Step 1. Go to Advanced > Policy Route, add policy route to route VoIP traffic out a. Go to CONFIGURATION > Object > ISP Account, add a PPPoE account: primarily from WAN1, and WAN2 as backup. Criteria: Application: SIP Source: Choose LAN interface. Address range: 192.168.1.0~192.168.1.255 Destination: Any. Action Applies to: Matched packets. Routing Action: All contents copyright (c) 2010 ZyXEL Communications Corporation. 16 ZyXEL – ZyWALL USG Support Notes b. Go to CONFIGURATION > Network > Interface > PPP, add a new PPP interface which is based on WAN 2(ge3) interface: Choose WAN interface WAN1, and enable Use another interface when the specified WAN interface is not available. Step 2. Go to CONFIGURATION > Network > Interface > Trunk. Add WAN Trunks. a. Add WAN trunk for VoIP traffic — Set WAN1 as Active mode, while setting WAN2_ppp as Passive mode. Please enable SIP ALG to let this policy route apply to all VoIP traffic including both SIP signaling and RTP (voice data). Go to Advanced > ALG, enable SIP ALG. All contents copyright (c) 2010 ZyXEL Communications Corporation. 17 ZyXEL – ZyWALL USG Support Notes b. Add WAN trunk for HTTP traffic — Set WAN2_ppp as Active mode, while setting WAN1 as Passive mode. Step 2. Go to Advanced > Policy Route, add a policy route to route HTTP traffic out primarily through WAN2, leaving WAN1 as backup. Criteria: IP Protocol: TCP (6) Application: Custom Source IP: Choose interface LAN. Address range: 192.168.1.0~192.168.1.255 Source port: Any Destination IP: Any Destination Port: 80 Action Applies to: Matched packets. Routing Action: c. Use SYSTEM_DEFAULT_WAN_TRUNK to do load balancing for all other traffic. Choose WAN interface WAN2, and enable Use another interface when the specified WAN interface is not available. All contents copyright (c) 2010 ZyXEL Communications Corporation. 18 ZyXEL – ZyWALL USG Support Notes Step 3. Go to CONFIGURATION > Network > Routing > Policy Route, add Step 3. For all other traffic, we use the two WAN connections to perform load policy routes for VoIP traffic and HTTP traffic. balancing. Go to Network > WAN > General. a. Add a policy route for VoIP traffic: Choose Active/Active Mode. Source: LAN1_subnet Set the Load Balancing Algorithm to Least Load First. Destination: Any To avoid the situation where traffic from the same LAN host may be sent over Service: SIP different WAN interfaces, which may cause servers to refuse the connection due Next Hop: select the newly created WAN trunk WAN_Trunk_VoIP to a different source IP, we enable and set “WAN Interface to Local Host Mapping Timeout” to a specific time period. For Load Balancing Index (es), we choose Outbound Only. Set the available outbound bandwidth for the two WAN connections according to the bandwidth obtained from each ISP. Please note that to make sure this policy route applies to all VoIP traffic, including both the SIP signaling and RTP (voice data), we need to enable SIP ALG. Go to Configuration > Network > ALG, enable SIP ALG. All contents copyright (c) 2010 ZyXEL Communications Corporation. 19 ZyXEL – ZyWALL USG Support Notes b. Add a policy route for HTTP traffic: Source: LAN1_subnet Destination: Any Service: HTTP Next Hop: Select the newly created WAN trunk WAN_Trunk_HTTP. All contents copyright (c) 2010 ZyXEL Communications Corporation. 20 ZyXEL – ZyWALL USG Support Notes c. For all other traffic, use SYSTEM_DEFAULT_WAN_TRUNK to do load balancing. Go to Configuration > Network > Interface > Trunk. Click Show Advanced Settings. Make sure Default SNAT is enabled. Select SYSTEM_DEFAULT_WAN_TRUNK in Default Trunk Selection. All contents copyright (c) 2010 ZyXEL Communications Corporation. 21 ZyXEL – ZyWALL USG Support Notes Scenario 3 — How to configure NAT if you have Internet-facing public servers 3.1 Application Scenario It is a common practice to place company servers behind the USG’s protection; while at the same time letting WAN side clients/servers access the intranet servers. To give an example, the company may have an internal FTP server, which needs to be accessible from the Internet as well. To fulfill this requirement, user can configure a NAT mapping rule to forward the traffic from Internet side to intranet side. This feature can not only ensure service availability but also helps avoid exposing the server’s real IP address to be attacked. All contents copyright (c) 2010 ZyXEL Communications Corporation. 22 ZyXEL – ZyWALL USG Support Notes 3.2 Configuration Guide Network Conditions: USG-50: ZyWALL-5 UTM: - WAN IP: 59.124.163.152 - WAN IP: 10.59.1.50 - FTP server IP:192.168.50.33 - FTP server IP: 192.168.5.33 Goal to achieve: User Tom can access the internal FTP server by accessing the Internet-facing WAN IP address. ZLD configuration ZyNOS configuration Step 1. Click CONFIGURATION > Network > NAT to open the configuration Step 1. Click ADVANCED > NAT > Port Forwarding to open the configuration screen. screen. All contents copyright (c) 2010 ZyXEL Communications Corporation. 23 ZyXEL – ZyWALL USG Support Notes Step 2. Click the Add button to create a mapping rule. Step 2. Configure the mapping rule. User needs to select the WAN interface for the incoming access, choosing the WAN IP for users to access. Step 3. In this page user needs to configure: - Rule’s name Step 3. Then configure the incoming ports, translation ports and the internal - Select Virtual Server type to let USG-50 do packet forwarding FTP server IP address. - Fill in the Original IP (WAN IP) address - Fill in the Mapped IP (Internal FTP server IP) address In this case, when the user accesses the WAN IP address with the port 20/21, - Select the service to be mapped (FTP); the ports will be selected the ZyWALL-5 UTM will forward the request to the FTP server, 192.168.5.33, automatically with the port 20/21. Thus, user can access the internal FTP server without problem. Step 4. The port forwarding rule enables delivery of the access request from WAN to the internal network, but the user still needs to configure access privileges by adjusting the firewall rule. By default all WAN to LAN access is dropped. All contents copyright (c) 2010 ZyXEL Communications Corporation. 24 ZyXEL – ZyWALL USG Support Notes Step 4. Click CONFIGURATION > Network > Firewall to open the firewall Step 5. Click Rule Summary to customize the setup. The default is to drop all configuration screen. packets. Here assume the user already assigned the WAN interface to WAN zone and LAN interface to LAN1 zone. Step 6. Configure the firewall rule to enable the FTP service to pass from WAN1 to LAN. - Source IP address is not specific - Destination IP address is the FTP server’s address - Select FTP service (with port 20/21) to be enabled - Select the Permit action for matched packets Step 5. Click the Add button to create a firewall rule to enable the FTP service to pass from WAN to LAN1. After this configuration, user can access the FTP server from WAN side. Step 6. User can create an address object for the internal FTP server for further configuration usage. Click Create new Object for this function. All contents copyright (c) 2010 ZyXEL Communications Corporation. 25 ZyXEL – ZyWALL USG Support Notes Step 7. Configure the rule to: - Allow access from WAN to LAN1 - Source IP address is not specific - Destination IP address is the FTP server’s address - Select FTP service (with port 20/21) to be enabled - Select the allow action for matched packets After this configuration, user can access the FTP server from WAN side. All contents copyright (c) 2010 ZyXEL Communications Corporation. 26 ZyXEL – ZyWALL USG Support Notes Scenario 4 — Secure site-to-site connections using IPSec VPN 4.1 Application Scenario A virtual private network (VPN) provides secure communications between sites without the expense of leased site-to-site lines. A secure VPN is a combination of tunneling, encryption, authentication, access control and auditing. It is used to transport traffic over the Internet or a ny insecure network that uses TCP/IP for communication. Internet Protocol Security (IPSec) offers standards-based VPN solutions that enable flexible scenarios for secure data communications across a public network like the Internet. An IPSec VPN tunnel is usually established in two phases. Each phase establishes a security association (SA), a contract indicating what security parameters the ZyWALL and the remote IPSec router will use. The first phase establishes an Internet Key Exchange (IKE) SA between the ZyWALL and a remote IPSec router. The second phase uses the IKE SA to securely establish an IPSec SA through which the ZyWALL and remote IPSec router can send data between computers on the local network and remote network. The USG can provide secure site-to-site access between remote locations and corporate resources through the Internet. Using IPSec VPN, companies can secure connections to branch offices, partners and headquarters as the illustration below. All contents copyright (c) 2010 ZyXEL Communications Corporation. 27 ZyXEL – ZyWALL USG Support Notes 4.2 Configuration Guide Network Conditions: USG-50: ZyWALL-5 UTM: - WAN IP: 59.124.163.152 - WAN IP: 10.59.1.50 - Local subnet: 192.168.50.0/24 - Local subnet: 192.168.5.0/24 IPSec VPN Conditions: Phase 1: Phase 2: - Authentication: 1234567890 - Encapsulation Mode: Tunnel - Local/Peer ID type: IP 0.0.0.0 - Active Protocol: ESP - Negotiation: Main mode - Encryption Algorithm: DES - Encryption Algorithm: 3DES - Authentication Algorithm: SHA1 - Authentication Algorithm: MD5 - Perfect Forward Secrecy: None - Key Group: DH1 Goal to achieve: Build up the IPSec VPN tunnel between USG-50 and ZyWALL-5 UTM with the above configuration. All contents copyright (c) 2010 ZyXEL Communications Corporation. 28 ZyXEL – ZyWALL USG Support Notes ZLD configuration ZyNOS configuration Step 1. Click CONFIGURATION > VPN > IPSec VPN > VPN Gateway to open Step 1. Click SECURITY > VPN > VPN RULES (IKE) to open the configuration the configuration screen. screen. Step 2. Click the Add button to add a VPN gateway rule. Step 2. Click the Add button to add a gateway policy. Step 3. To configure the VPN gateway rule, user needs to fill in: - VPN gateway name - Gateway address; both local (My Address) and peer (Peer GW Address) - Authentication setting - Step 3. To configure the gateway policy, user needs to fill in: Pre-Shared Key - Policy name ID Type setting (Local and Peer side) - Gateway information; both local (My ZyWALL) and peer (Remote GW) - Authentication setting Phase-1 setting Negotiation mode Pre-Shared Key Encryption algorithm ID Type setting (Local and Peer side) Authentication algorithm Key Group - Configure the IKE proposal Negotiation mode Encryption algorithm Authentication algorithm Key Group All contents copyright (c) 2010 ZyXEL Communications Corporation. 29 ZyXEL – ZyWALL USG Support Notes All contents copyright (c) 2010 ZyXEL Communications Corporation. 30 ZyXEL – ZyWALL USG Support Notes Step 4. Click CONFIGURATION > VPN > IPSec VPN > VPN Connection to open Step 4. Go back to the previous page to see the newly created IKE rule. Click the configuration screen to configure the phase-2 rule. the Add button to add a Network policy. Step 5. Click the Add button to add a rule. Step 5. To configure the network policy, user needs to fill in: - Policy name Step 6. To configure the phase-2 rule, user needs to fill in: - The gateway rule it is applied to - VPN connection name - Tunnel policy for - VPN gateway selection Local network side - Policy for Remote network side - Local network side Remote network side Phase-2 settings - Configure the IPSec proposal Encapsulation mode Active protocol Active protocol Encryption algorithm Encapsulation mode Authentication algorithm Encryption algorithm Perfect Forward Secrecy Authentication algorithm Perfect Forward Secrecy All contents copyright (c) 2010 ZyXEL Communications Corporation. 31 ZyXEL – ZyWALL USG Support Notes All contents copyright (c) 2010 ZyXEL Communications Corporation. 32 ZyXEL – ZyWALL USG Support Notes Step 6. After saving the network policy, user can see the IPSec VPN configuration is complete. Click the Connect button to enable the VPN tunnel. Step 7. After the VPN tunnel is established, user can find the SA information on SECURITY > VPN > SA Monitor. All contents copyright (c) 2010 ZyXEL Communications Corporation. 33 ZyXEL – ZyWALL USG Support Notes Step 7. After setting the rule, user can select the rule and click the Connect button to establish the VPN link. Once the tunnel is established, a connected icon will be displayedin front of the rule. Step 8. When the VPN tunnel is established, user can find the SA information on MONITOR > VPN MONITOR > IPSec. All contents copyright (c) 2010 ZyXEL Communications Corporation. 34 ZyXEL – ZyWALL USG Support Notes Scenario 5 — Secure client-to-site connections using IPSec VPN 5.1 Application Scenario The ZyWALL USG Series can provide secure access between remote locations and corporate resources through the Internet for organizations of any size. Using IPSec VPN, companies can secure connections to branch offices, partners and headquarters. Road warriors and telecommuters can use SSL or L2TP VPN to safely access the company network without having to install VPN software. ZyWALL USG Series provides a flexible and easy way to enable mobile employees, vendors and partners to confidentially access your network resource for better efficiency. All contents copyright (c) 2010 ZyXEL Communications Corporation. 35 ZyXEL – ZyWALL USG Support Notes 5.2 Configuration Guide Network Conditions: USG-50: ZyWALL-5 UTM: - WAN IP: 10.59.1.39 - WAN IP: 10.59.1.50 - Local subnet: 192.168.50.0/24 - Local subnet: 192.168.5.0/24 IPSec VPN Conditions: Phase 1: Phase 2: - Authentication: 1234567890 - Encapsulation Mode: Tunnel - Local/Peer ID type: IP 0.0.0.0 - Active Protocol: ESP - Negotiation: Main mode - Encryption Algorithm: DES - Encryption Algorithm: 3DES - Authentication Algorithm: SHA1 - Authentication Algorithm: MD5 - Perfect Forward Secrecy: None - Key Group: DH1 Goal to achieve: Build up an IPSec VPN tunnel for mobile user’s dynamic access to USG-50 or ZyWALL-5 UTM with the above configuration. All contents copyright (c) 2010 ZyXEL Communications Corporation. 36 ZyXEL – ZyWALL USG Support Notes ZLD configuration ZyNOS configuration Step 1. Click CONFIGURATION > VPN > IPSec VPN > VPN Gateway to open Step 1. Click SECURITY > VPN > VPN RULES (IKE) to open the configuration the configuration screen. screen. Step 2. Click the Add button to add a VPN gateway rule. Step 2. Click the Add button to add a gateway policy. Step 3. To configure the VPN gateway rule, user needs to fill in: - VPN gateway name - Gateway address; both local (My Address) and peer (Dynamic Address) - Authentication setting - Step 3. To configure the gateway policy, user needs to fill in: Pre-Shared Key - Policy name ID Type setting (Local and Peer side) - Gateway information; both local (My ZyWALL) and peer (“0.0.0.0” for Phase-1 setting dynamic access) Negotiation mode Encryption algorithm Pre-Shared Key Authentication algorithm ID Type setting (Local and Peer side) Key Group - - Authentication setting Configure the IKE proposal Negotiation mode Encryption algorithm Authentication algorithm Key Group All contents copyright (c) 2010 ZyXEL Communications Corporation. 37 ZyXEL – ZyWALL USG Support Notes All contents copyright (c) 2010 ZyXEL Communications Corporation. 38 ZyXEL – ZyWALL USG Support Notes Step 4. Click CONFIGURATION > VPN > IPSec VPN > VPN Connection to open Step 4. Go back to the previous page, to see the newly created IKE rule with the configuration screen to configure the phase-2 rule. the destination Dynamic. Click the Add button to add a Network policy. Step 5. Click Add button to add a rule. Step 6. To configure the phase-2 rule, user needs to fill in: Step 5. To configure the network policy, user needs to fill in: - VPN connection name - Policy name - VPN gateway selection - The gateway rule it is applied to - Policy for - Tunnel policy for - Local network side Local network side Remote network side Remote network side; “0.0.0.0” means for dynamic access Phase-2 setting - Configure the IPSec proposal Active protocol Encapsulation mode Encapsulation mode Active protocol Encryption algorithm Encryption algorithm Authentication algorithm Authentication algorithm Perfect Forward Secrecy Perfect Forward Secrecy All contents copyright (c) 2010 ZyXEL Communications Corporation. 39 ZyXEL – ZyWALL USG Support Notes All contents copyright (c) 2010 ZyXEL Communications Corporation. 40 ZyXEL – ZyWALL USG Support Notes Step 6. After setting up the network policy, user can see the IPSec VPN configuration is complete. Note that the destination is Any. Step 7. Start the ZyXEL IPSec VPN Client. Fill in the Phase-1 configuration. All contents copyright (c) 2010 ZyXEL Communications Corporation. 41 ZyXEL – ZyWALL USG Support Notes Step 7. Start the ZyXEL IPSec VPN Client. Fill in the Phase-1 configuration. Step 8. Configure the phase-2 parameters. Note that the USG series does not support the “Config Mode” in phase-1 advanced setting, thus users must avoid selecting it when performing configuration. All contents copyright (c) 2010 ZyXEL Communications Corporation. 42 ZyXEL – ZyWALL USG Support Notes Step 8. Configure the phase-2 parameters. Step 9. Because it is a dynamic rule, user MUST enable it from the VPN client. Click Open Tunnel to enable it. The icon will change to green if established successfully. All contents copyright (c) 2010 ZyXEL Communications Corporation. 43 ZyXEL – ZyWALL USG Support Notes Step 9. Because it is a dynamic rule, user MUST enable it from the VPN client. Click Open Tunnel to enable it. The icon will change to green if established successfully. Step 10. When the VPN tunnel is established, user can find the SA information on MONITOR > VPN MONITOR > IPSec. All contents copyright (c) 2010 ZyXEL Communications Corporation. 44 ZyXEL – ZyWALL USG Support Notes Scenario 6 — Deploying SSL VPN for Tele-workers to Access Company Resources 6.1 Application Scenario Tele-workers who work out of the office sometimes need to access company resources by a secured way. While building an IPSec tunnel to the company gateway is an option, the Windows VPN client configuration is too complicated, and for an easier way to configure IPSec VPN, it requires installation of additional IPSec VPN client software. The USG ZyWALL provides an SSL VPN function, which enables teleworkers to access company resources through a secured VPN tunnel with little effort. All they need on their PC is a browser. Besides, in SSL VPN, the network administrator can define different access rules to allow different users to access different company resources. For example, the network administrator can set up an SSL VPN rule to allow administrator Tom remotely control company servers by RDP or VNC through SSL VPN tunnel. He can also set up an SSL VPN Full tunnel rule to allow sales Chris to remotely access company file-share resources to conduct his important daily job. NOTE: USG 50 supports RDP, VNC, WEB link application and SSL VPN full tunnel, but doesn’t support SSL VPN file-share and OWA applications so far. If the remote clients want to use file-share and OWA through SSL VPN, they can use SSL VPN full tunnel mode (Security Extender) as a workaround. All contents copyright (c) 2010 ZyXEL Communications Corporation. 45 ZyXEL – ZyWALL USG Support Notes 6.2 Configuration Guide Network Conditions: - WAN IP: 172.25.27.62 - LAN subnet: 192.168.1.0/24 - VNC server IP: 192.168.1.5 Goals to achieve: 1) Tom in tele-admin group can VNC to the internal server 192.168.1.5 by SSL VPN application. 2) Chris in sales group can access company fileshare resources in the LAN subnet through SSL VPN full tunnel. All contents copyright (c) 2010 ZyXEL Communications Corporation. 46 ZyXEL – ZyWALL USG Support Notes ZLD configuration Step 1. Create two local user accounts for Tom and Chris on USG50. ZyNOS configuration ZyNOS ZyWALL does not support SSL VPN. Go to Configuration > Object > User/Group, add two local user accounts for Tom and Chris: All contents copyright (c) 2010 ZyXEL Communications Corporation. 47 ZyXEL – ZyWALL USG Support Notes Step 2. Go to Configuration > Object > Address. Add an IP address pool for the SSL VPN full tunnel mode access (Security Extender). Step3. Go to Configuration > Object > SSL Application. Create an SSL application object for the VNC server. All contents copyright (c) 2010 ZyXEL Communications Corporation. 48 ZyXEL – ZyWALL USG Support Notes Step4. Go to Configuration > VPN > SSL VPN. Add an SSL VPN rule for Tom to access. - Allow the user “Tom” to access this rule. - Add the VNC application to SSL Application. All contents copyright (c) 2010 ZyXEL Communications Corporation. 49 ZyXEL – ZyWALL USG Support Notes Step5. Go to Configuration > VPN > SSL VPN. Add an SSL VPN rule for Chris to access. - Allow the user “Chris” to access this rule. - Enable Network Extension, assign the address pool for SSL VPN clients, and select the USG internal network to allow SSL VPN clients to access. All contents copyright (c) 2010 ZyXEL Communications Corporation. 50 ZyXEL – ZyWALL USG Support Notes Check the created policies as below: Scenario Verification a. Log in with user “Tom”: Open the USG login page. Make sure Java is installed and enabled in your browser. Use user “Tom” to log into SSL VPN. NOTE: To use the SSL VPN RDP application, user must use IE. All contents copyright (c) 2010 ZyXEL Communications Corporation. 51 ZyXEL – ZyWALL USG Support Notes SSL VPN is established. You can see the VNC server on the VPN portal. User can just click on the VNC application and access the VNC server. Input the correct password for VNC login, and click OK, the VNC connection will be established. All contents copyright (c) 2010 ZyXEL Communications Corporation. 52 ZyXEL – ZyWALL USG Support Notes b. Log in with user “Chris”: Open the USG login page. Make sure Java is installed and enabled in your browser. Use user “Chris” to log into SSL VPN. Full tunnel SSL VPN (Security Extender) will be established. All contents copyright (c) 2010 ZyXEL Communications Corporation. 53 ZyXEL – ZyWALL USG Support Notes You can check the client’s routing table after the full tunnel is established. The client can access the LAN resources by their private IP’s as if he were in the same local network with the LAN hosts. In this example, the user can access the file share server in USG LAN subnet. All contents copyright (c) 2010 ZyXEL Communications Corporation. 54 ZyXEL – ZyWALL USG Support Notes Scenario 7 — Reserving Highest Bandwidth Management Priority for VoIP Traffic 7.1 Application Scenario In an enterprise network, there are various types of traffic. But the company Internet connection bandwidth is limited to a specific value. All this traffic will contend to use the limited bandwidth, which may result in some important traffic, for example, VoIP traffic getting slow or even starved. Therefore, intelligent bandwidth management for improved productivity becomes a matter of high concern for network administrators. ZyXEL ZyWALL provides Bandwidth Management (BWM) function to effectively manage bandwidth according to different flexible criteria. VoIP traffic is quite sensitive to delay and jitter. Therefore, in an enterprise company, VoIP traffic should usually be awarded the highest priority over all other types of traffic. All contents copyright (c) 2010 ZyXEL Communications Corporation. 55 ZyXEL – ZyWALL USG Support Notes 7.2 Configuration Guide Network Conditions: - WAN download bandwidth: 2M - WAN upload bandwidth: 1M Goal to achieve: Make sure VoIP traffic has the highest priority over all other traffic. ZLD configuration << ZyWALL USG50 configuration steps >> ZyNOS configuration Step 1. Go to Advanced > ALG, enable SIP ALG. (If you want to use BWM to manage VoIP traffic, SIP ALG must be Step 1. Go to Configuration > Network > ALG, enable SIP ALG. enabled.) All contents copyright (c) 2010 ZyXEL Communications Corporation. 56 ZyXEL – ZyWALL USG Support Notes Step 2. Go to Configuration > App Patrol > General, enable Application Patrol, Step 2. Go to Advanced > BW Management > Summary. enable BWM and enable Highest Bandwidth Priority for SIP Traffic. Enable WAN1 interface. Since ISP upload speed is 1 Mbps, set WAN1 speed to 1000 kbps. Enabling Highest Bandwidth Priority for SIP Traffic forces the device to give SIP Choose Priority-Based Scheduler. traffic the highest bandwidth priority. When this option is enabled the system Enable LAN interface. Since ISP download speed is 2 Mbps, set LAN speed ignores the bandwidth management settings of all application patrol rules for SIP to 2000 kbps. traffic and does not record SIP traffic bandwidth usage statistics. Step3. Go to Advanced > BW Management > Class Setup. Add Sub-Class under interface WAN1 to manage upload traffic. NOTE: You need to register IDP/App Patrol license to use App Patrol. All contents copyright (c) 2010 ZyXEL Communications Corporation. 57 ZyXEL – ZyWALL USG Support Notes << ZyWALL USG20/20W configuration steps >> Upload bandwidth budget: 300kbps. Priority: 7. Step 1. Go to Configuration > Network > ALG, enable SIP ALG. (Priority order: 7~1 — Highest ~ Lowest) Enable Bandwidth Filter. Service: SIP Destination: Any Source: LAN subnet Step 2. Go to Configuration > BWM, enable BWM. All contents copyright (c) 2010 ZyXEL Communications Corporation. 58 ZyXEL – ZyWALL USG Support Notes Step3. Create a bandwidth management rule and configure - Destination port 5060 for SIP application - Configure the rule as from LAN1 to WAN - Select the UDP protocol - Allocate 300kbps for both inbound/outbound bandwidths. Add Sub-Class under interface LAN to manage download traffic. To guarantee voice quality, the bandwidth for VoIP traffic with should be at least 300Kbps in both download and upload directions. Download bandwidth budget: 300kbps. Priority: 7. (Priority order: 7~1 — Highest ~ Lowest) Enable Bandwidth Filter. Service: SIP Destination: LAN subnet Source: Any All contents copyright (c) 2010 ZyXEL Communications Corporation. 59 ZyXEL – ZyWALL USG Support Notes Step4. Create a bandwidth management rule and configure - Configure the rule as from WAN to LAN1 - Configure the rest identically to the above rule All contents copyright (c) 2010 ZyXEL Communications Corporation. 60 ZyXEL – ZyWALL USG Support Notes Scenario 8 — Reserving Highest Bandwidth Management Priority for a Superior User and Control Session per Host 8.1 Application Scenario Among all the traffic in the company network, sometimes we need to assign higher priority to some superior users to keep their important work going on smoothly. For example, the general manager needs to surf Internet smoothly to conduct his daily important work. Therefore, the network administrator should use the bandwidth management function to prioritize the manager’s Internet traffic, and guarantee a minimum bandwidth for his traffic. During the office hours, to prevent any user consuming too much of the company’s bandwidth, the network administrator should limit the number of sessions each user may use. All contents copyright (c) 2010 ZyXEL Communications Corporation. 61 ZyXEL – ZyWALL USG Support Notes 8.2 Configuration Guide Network Conditions: - WAN download bandwidth: 2M - WAN upload bandwidth: 1M - Manager’s PC IP: 192.168.1.50 Goal to achieve: Guarantee manager’s internet surfing traffic going smoothly. Limit each user’s session numbers to prevent any user from using up too many sessions. ZLD configuration << ZyWALL USG50 configuration steps >> ZyNOS configuration Step 1. Go to ADVANCED > BW MGMT > Summary. Enable BWM on WAN1. Set the speed to 1000kbps (upload bandwidth). Set Step 1. Go to Configuration > Object > Address, add an address object for the the scheduler to Priority-Based. Enable Maximize Bandwidth Usage. manager. manager_IP: 192.168.1.50 Enable BWM on LAN. Set speed to 2000kbps (download bandwidth). Set the scheduler to Priority-Based. Enable Maximize Bandwidth Usage. All contents copyright (c) 2010 ZyXEL Communications Corporation. 62 ZyXEL – ZyWALL USG Support Notes Step 2. Go to Configuration > Object > Schedule. Add one recurring schedule Step 2. Go to ADVANCED > BW MGMT > Class Setup. Choose WAN1 to object. configure upload bandwidth management. Add a Sub-Class. Bandwidth Budget: Allocate 100kbps for the manager’s http upload traffic. Priority: Assign the highest priority 7. Enable Borrow bandwidth from parent class. Enable Bandwidth Filter Input Start Time and Stop Time, and choose the weekdays. Service: choose Custom Destination Address: Any Destination Port: 80(HTTP) Source Address: manager’s IP 192.168.1.50 Source Port: Any Protocol ID: 6(TCP) All contents copyright (c) 2010 ZyXEL Communications Corporation. 63 ZyXEL – ZyWALL USG Support Notes Step3. Go to Configuration > App Patrol > General. Enable Application Patrol, Step3. Go to ADVANCED > BW MGMT > Class Setup. Choose LAN to and enable BWM. configure download bandwidth management. Add a Sub-Class. Bandwidth Budget: Allocate 300kbps for the manager’s http download traffic. Priority: Assign the highest priority 7. Enable Borrow bandwidth from parent class. Enable Bandwidth Filter Service: choose Custom Destination Address: manager’s IP 192.168.1.50 Step4. Configuration > App Patrol > Common. Edit the application “http”. Destination Port: Any Source Address: Any Source Port: 80(HTTP) Protocol ID: 6(TCP) All contents copyright (c) 2010 ZyXEL Communications Corporation. 64 ZyXEL – ZyWALL USG Support Notes Add a policy to manage the manager’s http traffic bandwidth. Limit each user’s number of sessions Direction: from LAN to Any. To prevent any user from consuming too many sessions, we can limit each Source: manager_IP user’s sessions to a specific number. Go to ADVANCED > NAT > NAT Destination: any Overview. Set Max. Concurrent Sessions Per Host to 1000. Administrator can Bandwidth Management: To guarantee the manager can surf internet adjust this value according to his real network environment. smoothly, we can assign a bandwidth of 300kbps for inbound traffic (download), and assign a bandwidth of 100kbps for outbound traffic (upload). For the definition of Inbound and Outbound, please refer to the App Patrol BWM Direction NOTE below. Set priority as the highest —1. Enable Maximize Bandwidth Usage. All contents copyright (c) 2010 ZyXEL Communications Corporation. 65 ZyXEL – ZyWALL USG Support Notes App Patrol BWM Direction NOTE To use App Patrol to manage bandwidth correctly, users must understand the direction Inbound and Outbound. The direction Inbound and Outbound are determined with the traffic session initiation direction as reference. Inbound: From session responder to session initiator Outbound: From session initiator to session responder. All contents copyright (c) 2010 ZyXEL Communications Corporation. 66 ZyXEL – ZyWALL USG Support Notes Limit each user’s session number To prevent any user from using up too many sessions, we can limit each user’s sessions to a specific number. Go to Configuration > Firewall > Session Limit. Enable Session Limit, and set Default Session per Host to 1000. Administrator can adjust this value according to his real network environment. All contents copyright (c) 2010 ZyXEL Communications Corporation. 67 ZyXEL – ZyWALL USG Support Notes << ZyWALL USG20/20W configuration steps >> Step 1. Go to Configuration > Object > Address, Add an address object for the manager. manager_IP: 192.168.1.50 Step 2. Go to Configuration > Object > Schedule. Add one recurring schedule object. All contents copyright (c) 2010 ZyXEL Communications Corporation. 68 ZyXEL – ZyWALL USG Support Notes Input Start Time and Stop Time, and choose the weekdays. Step3. Go to Configuration > BWM. Add a policy to manage the manager’s http traffic bandwidth. All contents copyright (c) 2010 ZyXEL Communications Corporation. 69 ZyXEL – ZyWALL USG Support Notes Destination Port: 80 Schedule: the recurring schedule object configured in step2. Direction: from LAN1 to WAN. Source: manager_IP Destination: any Protocol: TCP Bandwidth Management: To guarantee the manager can surf internet smoothly, we can assign a bandwidth of 300kbps for inbound traffic (download), and assign a bandwidth of 100kbps for outbound traffic (upload). Set priority as the highest 1. Enable Maximize Bandwidth Usage. All contents copyright (c) 2010 ZyXEL Communications Corporation. 70 ZyXEL – ZyWALL USG Support Notes Scenario 9 — Using ZyWALL to Control Popular P2P Applications 9.1 Application Scenario Peer to Peer applications, with their massive numbers of concurrent sessions and fast traffic transmission speed, can consume much of a company’s limited bandwidth. This will slow down other normal productive traffic speed and affect productivity, lowering company productivity profit. USG ZyWALL’s Application Patrol function can examine passing traffic in real time, detect traffic service type, and take corresponding actions according to the configuration in App Patrol. For example, to improve network productivity efficiency, network administrator can set App Patrol to block P2P traffic in office hours, and limit its speed with bandwidth management out of office hours. All contents copyright (c) 2010 ZyXEL Communications Corporation. 71 ZyXEL – ZyWALL USG Support Notes 9.2 Configuration Guide Network Conditions: - LAN subnet: 192.168.1.0/24 Goals to achieve: 1) Block P2P traffic during office hours (8:30~17:30) 2) Allow P2P traffic out of office hours but limit its bandwidth to 100kbps. ZLD configuration Step 1. Go to Configuration > Object > Schedule, add a Recurring schedule ZyNOS configuration Step 1. IDP Common Setting. object for the office hours. a. In IDP->General, check the Enable Intrusion Detection and Prevention check box to enable IDP function. b. In Active option, check all the traffic to LAN, DMZ and WAN check boxes to have the IM/P2P traffic between LAN zone users and the remote users under control. c. Click the Apply button to save the above settings. All contents copyright (c) 2010 ZyXEL Communications Corporation. 72 ZyXEL – ZyWALL USG Support Notes Step 2. Go to Configuration > App Patrol > General. First of all, please make sure you have activated your IDP/App Patrol license. Enable Application Patrol, and enable BWM. Step 2. Control Thunder application. a. In IDP->Signature, click on Switch to query view to search for the specified signatures and set them up optionally. All contents copyright (c) 2010 ZyXEL Communications Corporation. 73 ZyXEL – ZyWALL USG Support Notes Step3. Switch to Configuration > App Patrol > Peer to Peer. Edit the P2P services you need to control. In this example, we will edit the thunder b. Use the “Thunder” keyword to search for and list any signatures related to “thunder”. application. All contents copyright (c) 2010 ZyXEL Communications Corporation. 74 ZyXEL – ZyWALL USG Support Notes Edit the default policy. Limit its bandwidth to 100kbps for both inbound and outbound traffic. Assign the lowest priority —7 for it. c. IT staff can log all Thunder traffic by checking the Log check box and blocking the Thunder packets by selecting Drop Packet in the Action field. Also remember to check the Active check box to activate the signatures. All contents copyright (c) 2010 ZyXEL Communications Corporation. 75 ZyXEL – ZyWALL USG Support Notes Add a policy to block thunder traffic during office hours. Step 3. IDP signature update. To keep the ZyWALL IDP engine performing at its Schedule: Choose the object office_hour best, make sure the IDP signatures are kept updated (The update procedure Session direction: from Any to Any can be done manually or automatically.) Access: Reject We can enable Log to check which user tries to violate the rule. Check the created policies. Make sure their order lists as below: NOTE: You need to register an IDP license to use the IDP function. All contents copyright (c) 2010 ZyXEL Communications Corporation. 76 ZyXEL – ZyWALL USG Support Notes Scenario 10 — Deploying Content Filtering to Manage Employee Browsing Behavior During their daily productive work for the company, working crew needs to surf the Internet to search for information to conduct their jobs. Browsing websites that are irrelevant to work is a waste of human resources as well as a waste of company network resources. There’re also some unsafe websites which may contain phishing or malicious programs. These unsafe websites should also be avoided. So the network administrator needs to make policies to prevent these undesirable types of browsing. ZyXEL Content Filtering service, including its Safe Browsing service, is tailored to help network administrator to handle these requirements. All contents copyright (c) 2010 ZyXEL Communications Corporation. 77 ZyXEL – ZyWALL USG Support Notes 10.1 Introduction to ZSB (ZyXEL Safe Browsing) ZSB stands for ZyXEL Safe Browsing. As suggested by its name, this function enhances web browsing safety. With the Internet becoming more and more popular, an increasing number of threats are injected into web pages. Some web pages may be phishing web sites where the visitors may be enticed to release their confidential information, other web pages may contain malware intended to infect the visitor’s PC with viruses or even to corrupt the visitor’s PC. Additionally, some web pages may contain spyware sources. ZSB has been added to ZyWALL to help protect users from such unsafe web sites. 10.2 Application Scenario During office hours, the employees should dedicate their time to their jobs and be restricted from browsing websites irrelevant to their work. But the manager should be able to access all websites without restriction at all times with the exception of unsafe websites. At other times outside of office hours, the restrictions for employees can be removed. The employees may access all websites except for unsafe websites. All contents copyright (c) 2010 ZyXEL Communications Corporation. 78 ZyXEL – ZyWALL USG Support Notes 10.3 Configuration Guide Network Conditions: - LAN subnet: 192.168.1.0/24 - Manager IP: 192.168.1.50 Goals to achieve: 1) The manager can access all websites at any time. 2) During office hours, other employees should be restricted from accessing websites that are irrelevant to their work. 3) All employees may access any websites outside of office hours. ZLD configuration Step 1. Go to Configuration> Object > User/Group. Add an address object for ZyNOS configuration Step 1. Go to SECURITY > CONTENT FILTER > General. the manager’s IP. First of all, please make sure Content Filter service is licensed. Enable Content Filter. Enable External Database Content Filtering and set the action for matched web pages to “Block and Log”. Enter the message to display when a website is blocked. E.g. “This website is restricted. Please contact administrator.” All contents copyright (c) 2010 ZyXEL Communications Corporation. 79 ZyXEL – ZyWALL USG Support Notes Step 2. Go to Configuration > Object > Schedule. Add a Recurring schedule for office hours. Step 2. Go to SECURITY > CONTENT FILTER > Policy. Step 3. Go to Configuration > Anti-X > Content Filter > Filter Profile. Add a Insert an access policy. profile. All contents copyright (c) 2010 ZyXEL Communications Corporation. 80 ZyXEL – ZyWALL USG Support Notes Add a profile which allows users to serf all websites. Add a policy to meet the requirement that during office hours, employees should be prevented from accessing some websites, and that the manager Enable Content Filter Category Service. (192.168.1.50) is not restricted. Set action for Unsafe Web Pages to “Warn and Log”. Address Setup: Add two address ranges to Configured Address. Set action for Managed Web Pages to “Pass”. 192.168.1.0~192.168.1.49 Set action for Unrated Web Pages to “Warn and Log”. 192.168.1.51~192.168.1.254 Set action When Category Server is Unavailable to “Warn and Log”. Check all the unsafe categories, and leave all the managed categories as unchecked. Click the External icon to edit the external categories. All contents copyright (c) 2010 ZyXEL Communications Corporation. 81 ZyXEL – ZyWALL USG Support Notes Add a profile for employees to surf only allowed websites. Activate the External Database Service. Select managed websites that you want to prevent the employees from accessing during office hours. Enable Content Filter Category Service. Set action for Unsafe Web Pages to “Warn and Log”. Set action for Managed Web Pages to “Block and Log”. Set action for Unrated Web Pages to “Warn and Log”. Set action When Category Server is Unavailable to “Warn and Log”. Check all the unsafe categories. Check the managed categories that you don’t want employees to surf during office hours. All contents copyright (c) 2010 ZyXEL Communications Corporation. 82 ZyXEL – ZyWALL USG Support Notes Step 4. Switch to Configuration > Anti-X > Content Filter > General. Enable Click on the Schedule icon to edit the schedule. Content Filter. You can edit the Denied Access Message. Make sure the Content Filter service is licensed. Choose Customization, and define your office hours. Add an access policy for all the crew outside of office hours. Schedule: none. Address: select the address object LAN subnet. Filter Profile: select the profile “allow_all_websites” created in the Profile page. User/Group: Any All contents copyright (c) 2010 ZyXEL Communications Corporation. 83 ZyXEL – ZyWALL USG Support Notes Add an access policy for the employees during office hours. Schedule: select the “office_hour” object Address: select the LAN subnet address object. Filter Profile: select the “for_employee” profile created in the Profile page. User/Group: Any Add an access policy for the manager. Schedule: none (all the time) Address: manager’s IP address Filter Profile: select the profile “allow_all_websites” created in Profile page. All contents copyright (c) 2010 ZyXEL Communications Corporation. 84 ZyXEL – ZyWALL USG Support Notes Check the created policies. Make sure their order lists as below: All contents copyright (c) 2010 ZyXEL Communications Corporation. 85 ZyXEL – ZyWALL USG Support Notes Scenario 11 — Quick Setup for Allowing WLAN Users to Access LAN Services 11.1 Application Scenario To provide rich and helpful tour information to customers, most hotels have a tour guide server to present the message. However, due to the security protection design, WLAN users cannot access the server on LAN side by default. To enable this, the system a dministrator needs to configure the firewall policy to allow access from WLAN to LAN and also from LAN to WLAN. To streamline the configuration process, the administrator can simply relocate the WLAN users and the server on LAN side into the same security group to give them identical properties. The steps below will show you how to realize this. All contents copyright (c) 2010 ZyXEL Communications Corporation. 86 ZyXEL – ZyWALL USG Support Notes 11.2 Configuration Guide Goal to achieve: A quick setup to allow users connected by WLAN access the service in the LAN zone. ZLD configuration ZyNOS configuration Step 1. Click CONFIGURATION > Network > Interface > WLAN to open the Step 1. Click WIRELESS > Wi-Fi > Wireless Card to open the configuration configuration screen. screen. All contents copyright (c) 2010 ZyXEL Communications Corporation. 87 ZyXEL – ZyWALL USG Support Notes Step 2. You can add a new rule by clicking the Add button or edit the Step 2. Configure the WLAN bridge to the LAN zone. This will give the WLAN pre-configured rule by clicking the Edit button. users the same security properties with the LAN server. Step 3. Configure this SSID to belong to the LAN zone. With both the WLAN users and the LAN server belonging to the same security zone, the WLAN users will be able to access the LAN service even without modifying the firewall policy. All contents copyright (c) 2010 ZyXEL Communications Corporation. 88