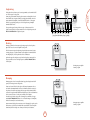
1
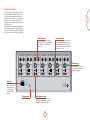
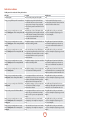
English P777 Handbook Multichannel power amplifier Français consignes de sécurité Attention! Assurez-vous qu’il est possible de débranchez l’appareil aisément avec la fiche d’alimentation électrique à l’arrière de l’appareil. ATTENTION : afin de réduire les risques de choc électrique, n’ouvrez pas le boîtier de l’appareil. Les pièces internes ne sont pas réparables par l’utilisateur. Pour tout problème matériel, contactez des techniciens qualifiés. ATTENTION : afin de réduire les risques de choc électrique et d’incendie, veillez à ne pas exposer cet appareil à la pluie ou à l’humidité. Le triangle dans lequel figure le symbole d’un éclair alerte l’utilisateur de la présence, dans le boîtier de l’appareil, d’une tension dangereuse, non isolée et suffisamment importante pour représenter un risque de choc électrique. Le triangle dans lequel figure un point d’exclamation alerte l’utilisateur de la présence d’instructions de fonctionnement et de maintenance (réparation) importantes dans la documentation accompagnant le produit. ATTENTION : au Canada et aux États-Unis, afin de prévenir tout choc électrique, aligner la plus grosse broche de la prise à la fente la plus large de la fiche et insérez entièrement la prise dans la fiche. La construction CLASSE I doit être connectée à une prise ayant uneconnection à terre protectrice. Ne pas nuire à la bonne marche de sécurité de la che polarisée ou lache terre. La che polarisée a deux broches, l’une plus épaisse quel’autre. La che terre a deux broches et la troisième est reliée à la terre. La broche la plus épaisse ou la broche reliée à la terre servent toutesdeux à garantir votre sécurité. Si la che ne va pas dans la prise, veuillez vous adresser à un électricien an de remplacer la prise. Bon nombre des consignes ci-dessous sont de simples précautions de bon sens. Nous vous recommandons toutefois de les lire pour votre propre sécurité et pour celle de l’appareil. Instructions de sécurité importantes Cet appareil a été conçu et fabriqué conformément aux normes de qualité et de sécurité les plus strictes. Vous devez cependant observer les précautions qui suivent lors de son installation et de son utilisation. 1. Suivez toutes les instructions Il est impératif de lire les consignes de sécurité et d’utilisation avant de mettre cet appareil en marche. Conservez ce manuel pour vous y référer par la suite et respectez scrupuleusement les avertissements figurant dans ce manuel ou sur l’appareil lui-même. Utilisez uniquement une étagère assez stable et solide pour supporter le poids de cet équipement. 5. Ventilation 14. Service Une bonne mise à la terre de l’appareil est essentielle à tout moment. N’essayez jamais d’effectuer d’autres opérations que celles mentionnées dans ce manuel. Toute autre intervention doit être effectuée par un personnel qualifié. Évitez de placer l’appareil sur un lit, un canapé, un tapis ou une surface similaire instable ou dans une bibliothèque ou un meuble fermé. Ceci risquerait de nuire à la ventilation du système. 10. Alimentation secteur Laissez un espace de 5 cm au minimum autour de l’appareil pour garantir une aération suffisante. Le principal moyen d’isoler l’appareil du secteur est d’utiliser l’interrupteur situé à l’arrière de l’appareil. Cet appareil doit être installé de façon à pouvoir être débranché si nécessaire. 6. Exposition à la chaleur 2. Eau et humidité Ne placez pas l’appareil à proximité d’une flamme nue ou de tout dispositif produisant de la chaleur : radiateur, poêle ou autre. L’installation d’un appareil électrique à proximité d’une source d’eau présente de sérieux risques. Il ne faut donc pas installer l’appareil près d’une baignoire, d’un lavabo, d’un évier, dans un sous-sol humide, près d’une piscine, etc. L’appareil est conçu pour fonctionner dans des climats modérés. Déconnectez cet équipement pendant un orage pour éviter tous dommages possibles d’un impacte de la foudre ou de surtension. 7. Conditions climatiques 3. Chute d’objets ou infiltration de liquides 8. Nettoyage Veillez à ne pas laisser tomber d’objets ni couler de liquides à travers les ouvertures de l’appareil et ne placez pas sur l’appareil d’objet contenant du liquide, tel qu’un vase par exemple. Mettez l’appareil hors-tension avant de le nettoyer. 4. Placement de l’équipement L’emploi d’aérosols ou de produits de nettoyage pour meubles est déconseillé, car le passage d’un chiffon humide risquerait de laisser des traces blanches et indélébiles. L’amplificateur pèse 37.2kg, faites donc extrêmement attention quand vous le manipulez. Nous vous recommandons de le soulever à deux personnes. 9. Mise à la terre Pour l’entretien du boîtier, utilisez uniquement un chiffon doux, humide et non pelucheux. N’utilisez pas de solvant chimique. Branchez l’appareil uniquement sur une alimentation secteur du type mentionné dans le manuel d’utilisation ou indiqué sur l’appareil lui-même. 11. Protection des câbles d’alimentation secteur Veillez à ce que les câbles d’alimentation ne se trouvent pas dans un lieu de passage ou bloqués par d’autres objets. Cette règle s’applique plus particulièrement aux prises et câbles d’alimentation et à leurs points de sortie de l’appareil. 12. Périodes de non-utilisation Si l’appareil possède une fonction de mise en veille, un courant faible continuera de circuler lorsqu’il sera réglé sur ce mode. Débrancher le cordon secteur de la prise murale si l’appareil doit rester inutilisé pendant une période prolongée. 13. Odeur suspecte Arrêtez et débranchez immédiatement l’appareil en cas d’émission de fumée ou d’odeur anormale. Contactez immédiatement votre revendeur. 2 F-2 15. Entretien par des techniciens qualifiés L’appareil doit être entretenu par du personnel qualifié lorsque : A. la prise ou le câble d’alimentation a été endommagé, B. des objets sont tombés ou du liquide a coulé dans l’appareil, C. l’appareil a été exposé à la pluie, D. l’appareil présente des dysfonctionnements, E. l’appareil est tombé ou le boîtier a été endommagé. Respect des consignes de sécurité Cet appareil a été conçu pour répondre à la norme internationale de sécurité électrique EN60065. Cet appareil est conforme à la Section 15 des règles de la FCC. Son fonctionnement est soumis aux deux conditions suivantes : (1) ce produit ne risque pas de causer d’interférences nuisibles et (2) ce produit doit accepter toutes les interférences reçues, y compris celles qui risquent d’entraîner un fonctionnement indésirable. CAUTION: To reduce the risk of electric shock, do not remove cover (or back). No user serviceable parts inside. Refer servicing to qualified service personnel. WARNING: To reduce the risk of fire or electric shock, do not expose this apparatus to rain or moisture. The lightning flash with an arrowhead symbol within an equilateral triangle, is intended to alert the user to the presence of uninsulated ‘dangerous voltage’ within the product’s enclosure that may be of sufficient magnitude to constitute a risk of electric shock to persons. The exclamation point within an equilateral triangle is intended to alert the user to the presence of important operating and maintenance (servicing) instructions in the literature accompanying the product. CAUTION: In Canada and the USA, to prevent electric shock, match the wide blade of the plug to the wide slot in the socket and insert the plug fully into the socket. Warning Mains plug/appliance coupler is used to disconnect device and it shall remain readily operable. CLASS I construction shall be connected to a MAINS socket outlet with a protective earthing connection. Do not defeat the safety purpose of the polarized or grounding-type plug. A polarized plug has two blades with one wider than the other. A grounding type plug has two blades and a third grounding prong. e wide blade or the third prong are provided for your safety. If the provided plug does not fit into your outlet, consult an electrician for replacement of the obsolete outlet. Many of these items are common sense precautions but, for your own safety and to ensure that you do not damage the unit, you must read them. Important safety instructions This product is designed and manufactured to meet strict quality and safety standards. However, you should be aware of the following installation and operation precautions. 1. Follow all instructions You should read all the safety and operating instructions before operating this equipment. Retain this handbook for future reference and adhere to all warnings in the handbook or on the equipment. 5. Ventilation 10. Power sources 15. Damage requiring service Do not place the equipment on a bed, sofa, rug or similar soft surface, or in an enclosed bookcase or cabinet, since ventilation may be impeded. Only connect the equipment to a power supply of the type described in the operating instructions or as marked on the equipment. Keep a minimum of 5cm (2 inches) clear around the apparatus to allow sufficient passage of air. The primary method of isolating the equipment from the mains supply is to remove the mains plug. The equipment must be installed in a manner that makes disconnection possible. The equipment should be serviced by qualified service personnel when: A. the power-supply cord or the plug has been damaged, or B. objects have fallen, or liquid has spilled into the equipment, or C. the equipment has been exposed to rain, or D. the equipment does not appear to operate normally or exhibits a marked change in performance, or E. the equipment has been dropped or the enclosure damaged. 6. Heat Locate the equipment away from naked flames or heatproducing appliances such as radiators, stoves or other appliances that produce heat. 2. Water and moisture 7. Climate The presence of electricity near water can be dangerous. Do not use the equipment near water – for example next to a bathtub, washbowl, kitchen sink, in a wet basement or near a swimming pool, etc. The equipment has been designed for use in moderate climates and in domestic situations. Unplug this equipment during lightning storms to prevent possible damage from a strike or mains surge. 3. Object or liquid entry 8. Cleaning Take care that objects do not fall and liquids are not spilled into the enclosure through any openings. Liquidfilled objects such as vases should not be placed on the equipment. Unplug the unit from the mains supply before cleaning. 4. Lifting and placing the equipment This amplifier weighs 37.2kg, so take extreme care when lifting or moving this unit. We recommend that two people are available to lift this unit. Only use a rack or shelf that is stable and strong enough to support the weight of this equipment. 11. Power-cord protection Power supply cords should be routed so that they are not likely to be walked on or pinched by items placed upon or against them. Pay particular attention to the point where they exit from the equipment. 12. Non-use periods If the equipment is not being used for an extended period, we recommend that you unplug the power cord of the equipment from the outlet, to save power. The case should normally only require a wipe with a soft, lint-free cloth. Do not use chemical solvents for cleaning. We do not advise the use of furniture cleaning sprays or polishes as they can cause permanent white marks. 9. Grounding 13. Abnormal smell If an abnormal smell or smoke is detected from the equipment, turn the power off immediately and unplug the equipment from the wall outlet. Contact your dealer and do not reconnect the equipment. 14. Servicing Ensure that the unit is grounded (‘earthed’) properly at all times You should not attempt to service the equipment. Contact your dealer to arrange servicing. 3 E-2 Safety compliance This equipment has been designed to meet the IEC/EN 60065 international electrical safety standard. This device complies with Part 15 of the FCC Rules. Operation is subject to the following two conditions: (1) This device may not cause harmful interference, and (2) this device must accept any interference received, including interference that may cause undesired operation. English safety guidelines safety guidelines........................................E-2 Important safety instructions........................... E-2 Safety compliance................................................. E-2 welcome.......................................................E-3 installation..................................................E-4 Overview................................................................... E-4 Placing the unit ..................................................... E-4 Room acoustics....................................................... E-4 12V Trigger input................................................... E-4 Power.......................................................................... E-4 Connecting to a pre-amplifier.......................... E-4 Interconnect cables.............................................. E-5 speakers.......................................................E-6 Speaker placement............................................... E-6 Speaker wiring options........................................ E-6 Single wiring............................................................ E-7 Bi-wiring.................................................................... E-7 Bi-amping................................................................. E-7 Thank you and congratulations for purchasing your Arcam FMJ P777 Multichannel power amplifier. Arcam has been producing specialist audio products of remarkable quality for over three decades and the P777 is the latest in a long line of award winning HiFi equipment. The design of the FMJ range draws upon all of Arcam’s experience as one of the UK’s most respected audio companies and is built to give you years of trouble-free listening enjoyment. This handbook has been designed to give you all the information you need to install, connect and use the Arcam P777. It may be that the P777 has been installed and set up as part of your Hi-Fi or home cinema installation by a qualified Arcam dealer. In this case, you may wish to skip the sections of this handbook dealing with installation and setting up the unit. Use the Contents list to guide you to the section of interest. We hope that your multichannel power amplifier will give you years of trouble-free operation. In the unlikely event of any fault, or if you simply require further information about Arcam products, our network of dealers will be happy to help you. Further information can also be found on the Arcam website at www.arcam.co.uk. The FMJ development team operation.....................................................E-8 Front panel control................................................ E-8 Operating procedure............................................ E-8 trouble-shooting.......................................E-9 Fault status indicators........................................E-10 specifications........................................... E-11 product guarantee................................. E-12 E-3 welcome English Contents Overview installation Placing the unit < Place the P777 on a level, firm surface, avoiding direct sunlight and sources of heat or damp. < The P777 is a powerful amplifier and a source of considerable heat output when driven hard. Take this into consideration when placing the unit. < Do not place the unit in an enclosed space such as a bookcase or closed cabinet unless there is very good provision for ventilation. < Do not place any other component or item on top of the P777 as this may obstruct airflow around the unit, causing the P777 to run hot. < Do not place your record deck on top of this unit. Record decks are very sensitive to the noise generated by mains power supplies which will be heard as a background ‘hum’ if the record deck is too close. The P777 Multichannel Power Amplifier is built to Arcam’s traditional high quality design and manufacturing standards. It is an extremely highperformance multichannel power amplifier obviously well suited to multichannel home cinema amplification, although it also provides superb quality stereo performance with two-channel sources. The P777 is an ideal partner for the FMJ AV888 Pre-amp Processor. Each power amplifier module is identical, and is electrically isolated from the other modules by optoisolated circuitry which ensures that each amplifier module has its own isolated supply. This allows the amplifier to give excellent channel separation and very low distortion. The P777 also has input and output phono sockets for the signal being fed to each channel, to allow the signal to be passed on to additional power amplifiers to drive loudspeakers in other rooms or to bi-amplify any of the speakers. If the P777 is being used to drive a five-channel surround sound system, then the spare two modules (SBL and SBR) can be used in conjunction with the main (L and R) modules to bi-amplify suitable front left and right speakers. Room acoustics The shape of your room and how it’s furnished will affect the sound you hear. For instance, too many bare surfaces can cause reflections that may add harshness to the sound. Adding carpeting and drapes can help. If you have a choice of rooms, avoid ones that are perfectly square or have one dimension exactly twice another. These rooms can aggravate resonances that colour the sound. The customised installation of the P777 to a listening room is an important process which requires care at every stage. For this reason, the installation information is very comprehensive and should be followed carefully. This manual has been written with the assumption that the installer is familiar with the installation of high-end audio/video systems. 12V Trigger input If your pre-amp provides a 12V Trigger output, it can be connected to the 12V TRIGGER IN socket using a mono 3.5mm jack. This enables the P777 to be turned on remotely from the pre-amp. tip: 12V trigger signal sleeve: ground Power The P777 is supplied with a moulded mains plug already fitted to the lead. Up to 3kW is drawn at maximum levels, so a heavy duty IEC mains cable is supplied. Check that the plug supplied fits your supply – if your mains supply voltage or mains plug is different, or you need a new mains lead, please contact your Arcam dealer. Push the IEC plug end of the power cable into the socket on the back of the P777, making sure that it is pushed in firmly. Plug the other end of the cable into your mains socket and, if necessary, switch the socket on. Connecting to a pre-amplifier Two different connection types are provided for receiving signals from your pre-amplifier: phono sockets and XLR connectors. The connection type to use depends on the set-up that you have. < If the cables to be used to connect your preamplifier to the P777 are less than 3m long, we recommend connecting your pre-amplifier to the Audio In phono (RCA) sockets of your P777. To use the phono connections, make sure that all the channel input switches are not depressed. < If the cables to be used to connect your preamplifier to the P777 are 3m or longer and your pre-amplifier has balanced XLR outputs, we recommend using these instead of the phono (RCA) connections. Performance will also be improved in electrically-noisy environments by using these connections. To use the XLR connections, make sure that the Input select switches are depressed for each channel. Female XLR Male XLR Pin Note that the trigger input is only active when the central power button on the front panel is depressed. In normal use there is no need to make any connections to this input. E-4 Function 1 Chassis ground (cable shield) 2 ‘Hot’ (normal polarity) 3 ‘Cold’ (inverted polarity) Interconnect cables English We recommend the use of high-quality screened cables that are designed for the particular application. Other cables will have different impedance characteristics that will degrade the performance of your system (for example, do not use cabling intended for video use to carry audio signals). All cables should be kept as short as is practically possible. It is good practice when connecting your equipment to make sure that the mains power-supply cabling is kept as far away as possible from your audio cables. Failure to do so may result in unwanted noise in the audio signals. Check the mains supply voltage matches the values printed on the back panel before connecting the mains cable here. Depress this switch to take the audio source from the Balanced XLR input connector for each channel; if the switch is not depressed, the audio source is taken from the Audio In RCA (phono) connector. Power inlet Input select switch The P777 is equipped with seven pairs of speaker terminals. See page 7 for information on the different ways of connecting loudspeakers. Speaker terminals 12V Trigger input Audio input and output See page 4 for details. Audio In from a pre-amplifier for each of seven channels. Audio out may be used to bi-amplify a set of speakers (see page 7). E-5 XLR audio input Balanced XLR connectors for each of seven channels, from an XLRequipped pre-amplifier. speakers Speaker placement Speaker wiring options The P777 allows connection of up to seven loudspeakers. All speakers, with the exception of the subwoofer, should be arranged around your normal viewing/listening position (see diagram). The subwoofer can be placed almost anywhere and we recommend experimenting with it in various positions to obtain the best result. The closer you place a speaker to intersecting room surfaces (corners, wall and ceiling, wall and floor), the stronger the bass output. This can help bass-shy speakers, but it can also add too much bass. Again, just moving a speaker a few inches can often make a big difference in sound. The surround left (SL) and right (SR) speakers reproduce the ambient sound and effects present in a multichannel home cinema system. Single wiring is the conventional wiring method of running a single cable per channel between the amplifier and the speaker; this is the easiest technique. The surround back left (SBL) and surround back right (SBR) speakers are used to add extra depth, a more spacious ambience and sound localisation. Bi-wiring Bi-wiring is running two separate cables between the amplifier and each speaker, with one cable carrying the low-frequency information, the other the higherfrequency signals. Bi-wiring can improve the sound of your system because the separation of high- and low-frequency signal currents into different speaker cables avoids distortions caused by the different currents interacting with oneanother within a single cable, as occurs in single-wired systems. A subwoofer (SW) will greatly improve the bass performance from your system. This is useful for reproducing special cinema effects, especially where a dedicated LFE (Low-Frequency Effects) channel is available, as with Dolby Digital or DTS Digital Surround encoded discs. Position your front left (L) and right (R) speakers to achieve a good stereo image for normal musical reproduction. If they are placed too close together there will be a lack of spaciousness. Alternatively if they are placed too far apart the stereo image will appear to have a hole in the middle and will be presented in two halves. The centre speaker (C) allows for a more realistic reproduction of dialogue and centre sounds as well as wider and better imaging for stereo effects and background sounds for home cinema use. Do not compromise on the quality of your centre speaker as it carries all the dialogue for a home cinema system. Single wiring The P777 is designed to allow easy bi-wiring, but you will need to connect to loudspeakers that provide separate terminals for the two cables. Each speaker must have two pairs of terminals; one pair labelled HF or ‘High Frequency’, the other pair labelled LF or ‘Low Frequency’. Bi-amping Bi-amping is the separation of the amplification of low- and high-frequency signals over two amplifiers. Bi-amping requires the use of two amplifiers per channel. E-6 Notes on making speaker connections < Do not make any connections to any amplifier while it is switched on. We recommend that your amplifier is completely disconnected from the mains supply before starting. < Before switching your amplifier on for the first time after connecting to speakers, please check all connections thoroughly. Ensure that bare wires or cables are not touching each other or the amplifier’s chassis (which could cause short circuits), and that you have connected positive (+) to positive and negative (–) to negative. Be sure to check the wiring for both the amplifier and the speaker. < After making connections: switch the amplifier on, with the pre-amplifier volume set to a low setting. Select a source signal, then gradually increase the volume to the required listening level. < If you are unsure as to how your system should be connected, or need advice on bi-wiring or bi-amping, please contact your Arcam dealer who will be happy to help you. ...etc... If your speakers support bi-wiring, then there is a strip of conductive metal on the speakers connecting the low-frequency terminals to those for the higher-frequencies; this must not be removed in a single-wired system. Connect the positive terminal of the right speaker connection on the amplifier (coloured red and labelled +R) to the positive terminal of your right speaker. Similarly, connect the negative terminal of the amplifier (coloured black and labelled with R–) to the negative terminal of your speaker. Repeat the process for the left speaker, using the amplifier terminals labelled +L and L–. Single wiring speaker connections Outputs from multichannel pre-amp (e.g AV888) Bi-wiring is performed in the same way as single wiring except that, for each speaker, a pair of cables are used to connect the amplifier to each speaker. Bi-wiring Follow the instructions given for single wiring; then perform the same actions, this time connecting the upper set of speaker terminals on your amplifier to the terminals labelled HF or ‘High Frequency’ for each speaker. Please refer to the illustration. Speakers that support bi-wiring have a strip of metal on the speakers connecting the lowfrequency terminals to those for the higher-frequencies; this must be removed in a bi-wired system. Bi-wiring using one amplifier channel per speaker Bi-amping requires the use of two amplifier channels per speaker. Using this method will prevent you from using seven surround speakers. Bi-amping Note that the strip of metal on the speakers connecting the lower terminals to the upper terminals must be removeD. Failure to do so will result in damage to both amplifiers, which will not normally be covered under warranty. Connect two channels of the P777 with a phono cable between the AUDIO OUT socket on one channel to the AUDIO IN channel of another. One channel should then be connected to the speakers as described for single wiring, with the exception that this channel should be connected to the speaker terminals labelled HF or ‘High Frequency’. The second channel must then be connected to the LF or ‘Low Frequency’ terminals, as in the diagram. Arcam recommends that the phono connections are use for bi-amping. If you prefer to use the XLR connectors, use a Y-lead with one female XLR to two male XLRs, so that two amplifier channels may be fed from a single source. Contact your dealer if you need assistance. E-7 Bi-amping using two amplifier channels per speaker English If each speaker has more than one pair of connecting terminals, use the terminals labelled LF or ‘Low Frequency’ for each speaker. Single wiring operation Front panel control Operating procedure The front panel has a single control: a centrally located power on/off button. Once the relevant connections have been made, the P777 can be switched on using the central button on the front panel. POWER Switching on Switches the unit on and off. Note that the modules are turned on individually to stagger the surge created when a powerful amplifier is switched on (i.e., it provides a ‘soft start’). This reduces the surge current drawn from the domestic power supply. It is recommended that you switch on your pre-amplifier or controller before powering up the power amplifier. Normal powering up is indicated by the following sequence of front panel LED indicators: 1. On pressing the power switch, all LEDs turn red. 2. After a short delay (about half-a-second), the centre LED turns amber. 3. The LEDs continue turning amber from the centre to the edges in pairs, at about one second intervals. 4. The centre LED turns green and a relay ‘click’ is heard. 5. The LEDs continue turning green from the centre to the edges in pairs, along with relay ‘clicks’, at about one second intervals. Status LEDs A separate LED indicates the status of each of the seven channels of the P777. The LEDs cycle through red, orange, then green to indicate the status from powered-up (initialised), stabilised and active respectively. All LEDs are off in standby mode. E-8 In the unlikely event that the LEDs do not follow this sequence when the unit is powered up, or they behave abnormally at any time during use, then refer to the ‘Fault status indicators’ table on page 10 to discover why the amplifier is in protection mode. Switching off To shut down, switch the power amplifier off first, followed by the pre-amplifier or controller. This eliminates the chance of any ‘thumps’ or power spikes being fed through to the power amplifier and potentially causing damage to the system. English troubleshooting No Lights on the Unit Sound only comes from some of the speakers Check that: < the power cord is plugged into the P777 and the mains socket outlet it is plugged into is switched on. < the plug fuse has not failed, or a circuit-breaker earlier in the power supply path has not opened. < the power button is pressed in. Check that: < the correct input has been selected on the preamplifier. < you have assigned the digital input to the correct input source. < the volume is turned up to a reasonable level and ‘MUTE’ is not displayed on the front panel display on the pre-amplifier. < your power amplifier(s) are turned on and working correctly. Check that: < all speakers in the system are connected to the P777. < you have configured your pre-amp to include all the speakers in your system. < you have an appropriate surround sound source selected and playing through the pre-amp. < for digital sources, check the player is outputting multichannel data. With some DVD players you are able to select in what format multi-format encoded discs are outputted, and whether multichannel data is down-mixed to PCM (stereo). < the disc you are playing is a multichannel recording and that the processor is outputting multichannel audio. < your speaker balance is correct. < all amplifiers are turned on and all channels are working correctly. < all units are turned on. If the audio is ‘daisychained’ from the P777, make sure that the unit being fed is turned on. Sound is poor and badly distorted Hum on an amplifier output Red LED present Refer to the ‘Fault status indicators’ table (overleaf) if you have an unusual sequence of LEDs. No sound is produced Check that: < all cables are making a good connection. If necessary withdraw the cable from the connector and plug it back in again. (Turn the power off before doing this.) < if the hum originates from a ground loop caused by an aerial, satellite dish or cable supply, you should contact your aerial contractor. Check that: < all cables are making a good connection. If necessary withdraw the cable from the connector and plug it back in again. (Turn the power off before doing this.) < you have selected the correct size of speakers to suit your system in the setup menu of the processor or pre-amp. E-9 < the signal (interconnect) leads are not wrapped around a mains lead. < try switching the ground lift on the back panel of the processor (if available). There is radio/television reception interference The P777 has been designed to a very high standards of electromagnetic compatibility. Check that: < the aerial/dish cable is routed as far as possible from your amplifier and its cabling. < the cabling used from the aerial/dish is of high quality and screened. < repositioning the receiving aerial/dish as far as possible from your amplifier and its cabling may bring an improvement. < if the problem persists, contact your aerial contractor. < you are using high quality screened audio cable between your equipment and that no cables are broken or damaged. Fault status indicators The LED patterns below indicate the following fault conditions: LED status Description Amplifier action All LEDs are green This is the normal operating state of the amplifier. None During power up all LEDs stay red for an extended time The amplifier is waiting for the DC offset fault lines to clear. A DC offset fault can occur if an excessive DC voltage is present at the output of the pre-amp feeding the P777. Normal operation resumes if the lines clear in 20 seconds. To verify excessive DC offset voltage, remove the interconnect leads (with the P777 switched off) and turn on the P777. The fault should have cleared. During power up or normal operation, one or more LEDs are flashing green, with the remaining LEDs solid red The DC fault cannot be cleared. The channels with the flashing green LEDs represent the amplifier modules that have a DC offset fault. Alternatively, a DC offset fault has reoccurred on the same channel within 12 seconds of a previous DC offset fault clearance. The amplifier shuts down. The power switch must be cycled to reset the amplifier (cycling the trigger does NOT reset the amplifier). During power up or normal operation, one or more LEDs are flashing green, with the remaining LEDs NOT solid red The amplifier is attempting to clear a DC offset fault on a channel with the flashing green LED. The amplifier mutes the channel with the fault and its paired channel. The amplifier stays in this state for up to two seconds or until the fault clears (whichever is sooner). During power up or normal operation, one or more LEDs are flashing red, with the remaining LEDs solid red A short circuit fault cannot be cleared. The flashing red The amplifier shuts down. The power switch must be LEDs represent the amplifier modules with a short circuit cycled to reset the amplifier (cycling the trigger resets the fault. Alternatively, a short circuit fault has reoccurred on amplifier). the same channel within 12 seconds of a previous short circuit fault clearance. During power up or normal operation, one or more LEDs are flashing red, with the remaining LEDs NOT solid red The amplifier is attempting to clear a short circuit fault on The amplifier mutes the channel with the fault and its a channel with the flashing red LED. paired channel. The amplifier stays in this state for up to half-a-second or until the fault clears (whichever is sooner). During power up or normal operation, one or more LEDs are flashing amber The amplifier is attempting to clear an over temperature fault on a channel with the flashing amber LED. During power up or normal operation, one LED is flashing amber, with the remaining LEDs solid red An over temperature fault has reoccurred on the same The amplifier shuts down. The power switch must be channel within 12 seconds of a previous over temperature cycled to reset the amplifier (cycling the trigger resets the fault clearance. The flashing amber LEDs represent the amplifier). amplifier modules with an over temperature fault. During power up or normal operation, all the LEDs are flashing amber The amplifier is attempting to clear an over temperature fault on more than one channel, or the power transformers have overheated. During normal operation, all the LEDs are solid red An over temperature fault has reoccurred on one or more The amplifier shuts down. The power switch must be channels, or the power transformers have overheated cycled to reset the amplifier (cycling the trigger resets the within 12 seconds of a previous over temperature fault amplifier). clearance. During power up or normal operation, one or more LEDs are flashing amber, with the remaining LEDs flashing green A DC offset fault occurred on one or more channels while attempting to clear a multiple over temperature fault. The amplifier shuts down. The power switch must be cycled to reset the amplifier (cycling the trigger does NOT reset the amplifier). During power up or normal operation, one or more LEDs are flashing amber, with the remaining LEDs flashing red A short circuit fault occurred on one or more channels while attempting to clear a multiple over temperature fault. The amplifier shuts down. The power switch must be cycled to reset the amplifier (cycling the trigger resets the amplifier). The amplifier mutes the channel with the fault and its paired channel and the fan is set to maximum speed. The amplifier stays in this state until the channel has cooled. The amplifier mutes all channels and the fan is set to maximum speed. The amplifier stays in this state until all channels have cooled, or the transformer has cooled. E-10 English specifications All measurements are with 230V/50Hz mains power Maximum continuous output power Continual improvement policy All channels driven, 20Hz–20kHz, 8Ω 160W per channel; 1.05kW total All channels driven, 20Hz–20kHz, 4Ω 270W per channel; 1.62kW total Arcam has a policy of continual improvement for its products. This means that designs and specifications are subject to change without notice. One or two channels driven at 1kHz, 8Ω 170W per channel Radio interference One or two channels driven at 1kHz, 4Ω 290W per channel The P777 is an audio device which has been designed to very high standards of electromagnetic compatibility. Total harmonic distortion At any level up to rated power, into 4Ω or 8Ω Typically <0.004% at 1kHz Frequency response Less than –0.3dB (10Hz—20kHz) –3dB at 100kHz Residual hum and noise Ref. full power –108dB, 20Hz–20kHz, unweighted Voltage gain x 37 (31.5dB), Arcam standard Input impedance 470pF in parallel with 22kΩ General Power requirements 115V or 230VAC, 50/60Hz, 1200W maximum via heavy duty IEC C20 mains inlet (requires IEC C19 plug). A soft start system eliminates large inrush currents at switch on. Physical Dimensions: W430 x D450 x H180mm Weight: 37.2kg net; 40kg packed E&OE NOTE: All specification values are typical unless otherwise stated E-11 The unit can radiate RF (radio frequency) energy. In some cases this can cause interference with FM and AM radio reception. If this is the case, keep the P777 and its connecting cables as far from the tuner and its aerials as possible. Connecting the P777 and the tuner to different mains sockets can also help to reduce interference. EC Countries – These products have been designed to comply with directive 89/336/EEC. USA – These products comply with FCC requirements. Worldwide Guarantee product guarantee This entitles you to have the unit repaired free of charge, during the first two years after purchase, at any authorised Arcam distributor provided that it was originally purchased from an authorised Arcam dealer or distributor. The manufacturer can take no responsibility for defects arising from accident, misuse, abuse, wear and tear, neglect or through unauthorized adjustment and/or repair, neither can they accept responsibility for damage or loss occurring during transit to or from the person claiming under the guarantee. The warranty covers: Parts and labour costs for two years from the purchase date. After two years you must pay for both parts and labour costs. The warranty does not cover transportation costs at any time. Claims under guarantee This equipment should be packed in the original packing and returned to the dealer from whom it was purchased, or failing this, directly to the Arcam distributor in the country of residence. It should be sent carriage prepaid by a reputable carrier – not by post. No responsibility can be accepted for the unit whilst in transit to the dealer or distributor and customers are therefore advised to insure the unit against loss or damage whilst in transit. For further details contact Arcam at: Arcam Customer Support Department, Pembroke Avenue, Waterbeach, CAMBRIDGE, CB25 9QR, England or via www.arcam.co.uk. Problems? If your Arcam dealer is unable to answer any query regarding this or any other Arcam product please contact Arcam Customer Support at the above address and we will do our best to help you. On-line registration You can register your product on-line at www.arcam.co.uk. Correct disposal of this product This marking indicates that this product should not be disposed with other household waste throughout the EU. To prevent possible harm to the environment or human health from uncontrolled waste disposal and to conserve material resources, this product should be recycled responsibly. To dispose of your product, please use your local return and collection systems or contact the retailer where the product was purchased. E-12 E-13 English SH213E Issue 2 A&R Cambridge Ltd, Pembroke Avenue, Waterbeach, CAMBRIDGE CB25 9QR, England