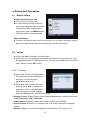
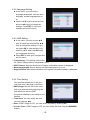
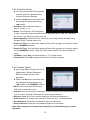
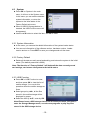
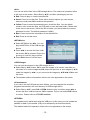
1
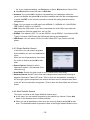
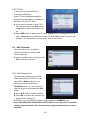
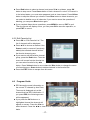
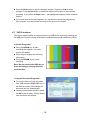
SatKing DVBS-100HD Instruction Manual SAFETY Safety Precaution The IRD is complied with international safety standards. Please read these simple guidelines carefully before using this device. Power Supply 90–250V AC 50/60Hz. Do Not Dismantle Do not attempt to dismantle the IRD. Opening the cabinet may cause malfunction or electric shock. Avoid Overloading Do not overload a wall outlet, extension cord or adapter as this may result in fire electric shock. Avoid Extreme Humidity Do not install the IRD in an extreme humid place. The STB shall not be exposed to dripping or splashing and that no objects filled with liquids, Such as vase, shall be placed on the apparatus. WARNING: To prevent fire or shock hazard, do not expose this appliance to rain or moisture. NOTE: If not used for long, please remember to pull out the power cable or turn off the power. -1- CLEANING Disconnect the STB from the wall outlet before cleaning. Use dry cloth to Dust the STB. Avoid Object and Liquid Entry Do not insert any kinds of small objects, such as a coin, into the IRD as it may result in short circuit. Ventilation Openings and Installation The IRD ’S ventilation openings prevent itself from overheating. Do not block them as it may cause malfunction. Put the IRD on a firm and flat surface. Avoid extreme heat and direct sunlight. Power supply Do not defeat the safety purpose or the polarized or grounding-type plug. If the provided plug does not fit into your outlet consult an electrician for replacement of the obsolete outlet. Protect the power cord from being walked on or pinched particularly at Plugs, convenience receptacles, and the point where they exit from the apparatus. Location Place the STB indoor in order not to expose to lightening, rain or sunlight. Unplug this STB during lighting storms or when unused for long periods of time. Maintenance Use spare parts and accessories only from the original manufacturer. Service Refer all servicing to qualified service personnel. Servicing is required when the STB has been damaged in any way, such as power-supply cord or plug is damaged, liquid has been soiled or objects have fallen into the STB, the STB has been exposed to rain or moisture, does not operate normally, or has been dropped. -2- CONTENTS HOW TO USE THIS MANUAL This manual provides complete instructions for installing and using this receiver. SAFETY INSTRUCTIONS 1.Before You Begin 1.1 Features ......................................................................................................... 4 1.2 Accessories .................................................................................................... 4 2.Controls and Functions 2.1 Front Panel..................................................................................................... 5 2.2 Remote Control Unit ...................................................................................... 6 2.3 Rear Panel (The actual production will have difference.) .............................. 7 3.Connections 3.1 Connecting to TV ........................................................................................... 8 3.2 Connecting to Dish ......................................................................................... 8 4.Setting and Operations 4.1 Before Setting ................................................................................................ 9 4.2 Setting ............................................................................................................ 9 4.3 System ......................................................................................................... 12 4.4 Setup ............................................................................................................ 14 4.5 Edit Channels ............................................................................................... 16 4.6 Program Guide ............................................................................................. 17 4.7 PVR Functions ............................................................................................. 18 4.8 TV menu at the normal mode ...................................................................... 20 Appendix A1 Trouble Shooting .......................................................................................... 21 A2 Specifications ................................................................................................ 22 A3 Glossary of Terms ......................................................................................... 24 Please Note: The Remote Control Unit and STB may be changed without notice in advance. So this manual may be different in some ways. In this case, please refer to the product. -3- 1. Before You Begin 1.1 Features 1.1.1 Common Part z Easy Graphic MENU Interface z Supports DiSEqC 1.0/1.2,13/18V, 22Khz Tone z RCA Connector z Multi-language Function (Menu, Audio) z Last Channel Memory z OSD: Transparency &Blending, 256 Palette Colors z Front Panel Buttons &IR Remote Controller User Interface z Editing Functions (TV or Radio Channel, Channel Name, Favorite Name, Satellite Name) z EPG for On Screen Channel Information z Channels Memory for Multi-satellite z Operation Modes (Digital TV, Digital Radio, Favorite) z PLL RF Modulator UHF 21-69 with PAL G/I/K and NTSC-M 1.1.2 Digital Part z Receives QPSK Satellite Broadcasting RF Signal and Decodes the Digitally Encoded Signal z Digital Tuner with Loop-through out z SCPC/MCPC Receivable from C/KU-band Satellite z MPEG-2 Main Profile at Main Level z 4000 Channels Memory 1.2 Accessories z USER ’S MANUAL z REMOTE CONTROL UNIT z RCA VIDEO/AUDIO CONNECTOR z BATTERIES Warning: Please don’t recharge, disassemble, electric, and mix with used or other battery types. -4- 2. Controls and Functions 2.1 Front Panel z Display (4-digits 7-segments / 2LED) The 4-digits displays channel information. The green LED lights up when the channel is locked in. z CH▲/CH▼ Move the cursor up/down in Menu state. Change the current program to the previous/next program in No-Menu state. z VOL◄/ VOL► Moves the cursor left/right in Menu state. Change the volume in No-Menu state z MENU Press to display the Main Menu. z OK Press this button after your selection or correction. z STANDBY Switch between Operation and Standby modes. -5- 2.2 Remote Control Unit All features of the set-top box can be controlled with the remote controller. z : Press to switch between Operation and Standby modes. z MUTE : Press to temporarily cut off the sound. z NUMBER BUTTONS (0~9): Press to input Channel, Password, PID code and etc. z TV/RADIO: Press to select the TV/RADIO mode. z RECALL: Press to return to the previous channel. z PAGE +/ PAGE - : Page up/down in the channel list. z FAV: Press to display Favorite Channel Mode. z EPG: Press to display the Electronic Program Guide. z SAT: Press to display the satellite list menu. z i : Display the information of the current program. z VOL◄/ VOL►: Adjust volume or move cursor in the menu. z CH▲/CH▼: Change Channel or move cursor in the menu. z OK: Press to select the item in the menu, or list the TV or Radio channels. z EXIT: Press to return to the previous menu or escape from the current mode. z MENU: Press to display the Main Menu. z AUDIO: Press to select different audio mode. z 9PIC: Press to display mosaic screen of programs. z LANG: Press to display the Audio Select Menu. z PAUSE: Pause the video output of receiver. z TEXT: Graphic information function. z TV/SAT: Press to switch between TV or AV mode. z ZOOM: Zoom on a part of the picture during normal viewing mode. z PVR LIST: Press to enter Recorded list. z ◄◄: Fast reverse. Play the recording at increased speed. By pressing the button multiple times you select from eight different speeds. z ►►: Fast forward (refer to ◄◄) z ►: Starts playback at the beginning of the current record session or returns to normal playback speed from fast reverse/forward or pause. z ●: Start recording. z ∣ / ∣: Skip to the previous or next program. z ∣∣: Pauses the playback. z ■: Stops the playback. -6- 2.3 Rear Panel (The actual production will have difference.) z RS232 Serial Port For firmware update, serial communication port (RS-232). z LNB IN Connect the digital signal from your LNB of your satellite dish to this connector. z LNB OUT Give you the possibility to connect an extra receiver (analogue or digital). z USB Provide for the mobile storage. z YPbPr Connect component video to HD Monitors (YPbPr Type). z VIDEO (Yellow RCA) This connector has a constant video signal for additional VCR-connections. z AUDIO Right/ Left (Red /White RCA) These connectors give you the possibility to connect the audio signal to an external amplifier, or the audio input of your TV. z SPDIF OUT (Optical) Connect to an External Audio Amplifier with S/PDIF Optical Digital Audio. z HDMI Connector Connect High-Definition Multimedia output to HD Monitors (HDMI Type). z LAN Connect to internet. z POWER Turn the receiver’s power on or off. Your receiver requires a current of 90~250V AC (Auto-selectable), 50/60Hz.Make sure to check the power specification before connecting your receiver to the wall outlet. -7- 3. Connections 3.1 Connecting to TV z Connect the satellite signal from the LNB to the LNB IN connector. z Connect the RCA connector at the back of the receiver to the RCA-in connector on your TV set. 3.2 Connecting to Dish z Connecting a fixed satellite dish to your receiver Make your choice of which satellite you want to receive your signals from, and have your dealer aim your dish at the requested satellite. Connect a coax cable to your LNB and the other end directly to the LNB IN connector of your receiver. z Connecting multiple fixed dishes to your receiver using a DiSEqC 1.0 switch If you want to watch programs from more than satellites (For in instance from Astra and from Hot Bird) it is advisable to use fixed dishes and a DiSEqC 1.0 switch. Connect the OUT connector of the DiSEqC 1.0 switch to the LNB IN connector at the back of your receiver. z Connecting a dish on a motorized positioner to your receiver Another possibility to watch programs from multiple satellites is by mounting a dish to a motorized DiSEqC 1.2 positioner. Connect the LNB with a coax cable to the LNB IN connector of the positioner, and connect the OUT connector of the positioner to the LNB IN connector at the back of your receiver. -8- 4. Setting and Operations 4.1 Before Setting Starting up for the First Time z Turn on your TV and receiver. z If it is the first time using a receiver, you should set parameters for system configuration. After displaying the login screen, press the MENU button. The aside screen will be appeared. Menu Information z The menu consists of main-menu and sub-menu, as you see in the above screen. Main-menu has 4 items and each main-item has its sub-menu items. 4.2 Setting z If you press OK on Setting in the main Menu. z In this menu you can set some parameters of the receiver by your purpose, such as Language setting, TV Setting and so on. You can press ▲/▼ keys to select the items, and then press OK to enter. 4.2.1 TV Setting z If you enter into the TV Setting Menu, the aside screen will be displayed. In this menu you can set some parameters output to TV. z Press ▲/▼ keys to select the items, and then press ◄/► to change the parameters. Or you can press OK to view the items’ list, select by ▲/▼. And press OK while you completed choosing. Display Format: Display Format can be changed depending on the television used. (1080_720p(50)p / 1920_1080p(50)i ) Video Output: Select the video output format. (CVBS/ S-VHS/ RGB) Screen Format: Select the TV screen format. (Pan scan/ Letter box/ Combined/ Ignore) Display Format: You can switch display format between 4:3 TV and 16:9 TV. -9- 4.2.2 Language Setting z In this menu, you can set the language parameters, such as menu language, subtitle language and so on. z Use the ▲/▼ keys to select the item and the ◄/► keys to change the settings. Press EXIT to save your changes and exit the menu. 4.2.3 OSD Setting z In this menu, you can use the ▲/▼ keys to select the item and the ◄/► keys to change the settings. Or you can press OK to view the items’ list, select by ▲/▼. And press OK while you completed choosing. z Press EXIT to save your changes and exit the menu. Transparency: This setting controls the On Screen Display (Menu) transparency level. OSD Timeout: Sets the duration the Program Information banner is displayed. Radio background: Sets to display the radio background on or not. Page Up/Down Tab: Sets the duration the Program Information banner is displayed. 4.2.4 Time Setting This submenu allows you to set your local time zone, date and current time. GMT Usage: Set this ON for the local time to be determined by adjusting the time difference with the GMT (Greenwich Meantime) according to your location. Time Zone: You can modify the time zone by pressing ◄/►. Date: If GMT Usage is OFF, you can modify the date by pressing OK. Current Time: If GMT Usage is OFF, you can modify the time using the NUMERIC buttons. - 10 - 4.2.5 Schedule Setting z You can program the STB to perform a certain event at a specified time using the Schedule Settings. z Use the ▲/▼button to select the item, and change the parameters using ◄/► button. Schedule: Select the timer that you want to modify. (1- 4) Event: Tune Channel / PVR will switch to tune / record the channel specified at the requested time. Power On / Stand By will turn on / turn off the unit at the time set. Event Reception: Select the timer frequency. (once/ daily/ Every Sunday/ Every Monday/ Every Tuesday and so on) Switch-on Time: You can set the switch-on time of the program you intend to switch; use the NUMERIC buttons. Switch-off Time: You can set the switch-off time of the program you intend to switch; use the NUMERIC buttons. (Only the PVR function needs to be set the switch-off time.) TV/Radio: Press ◄/► to switch between in TV or Radio mode. Channel No: Press OK to display a Channel list; Select a channel. 4.2.6 Parental Control z If you press OK in Parental Control of Setting Menu (Default Password: 0000), the aside screen will be appeared. z Use the ▲/▼button to select the item, and change the parameters using ◄/► button or the NUMERIC buttons. Menu: Set Lock to require entering a PIN code to access the menu. Channel: Set Lock to require entering a PIN code to access the channels menu. Set Lock to require entering a PIN code to access a locked channel. Receiver Lock: Set Lock to require entering a PIN code at powering on. Old Password: To change your password, first enter your current password. New Password: Enter the new password that you want to set. Verify Password: Enter the new password again for confirmation. Note: Please keep your new password properly, to avoid affecting your normal operation. - 11 - 4.3 System z Press OK on System in the main menu, it will turn to the System menu. In this menu you can see the detailed system information, or return the system to the initial status in the Factory Default sub-menu. z When a USB2.0 Storage device is inserted, the USB Function menu will be appeared. z Use the ▲/▼ button to select the item, and OK to enter. 4.3.1 System Information z In the menu, you can see the detaild information of the system loader status. z You can see information of the software version, hardware version, Loader version and so on. Press EXIT to save your changes and exit the menu. 4.3.2 Factory Default z Delete all the data currently saved and setting, and returns the system to the initial status.(The default password is 0000.) Note: The function of “Factory Default” will delete all the data currently saved and settings, and returns the system to the initial status. 4.3.3 USB Function z Press OK in USB Function to enter, and then press OK to view the list of mobile storage. You can do this operation about the mobile storage as flows. z Select groups by ◄/►, all the files stored in the mobile storage will be displayed in groups. z Select the item by ▲/▼, enter by OK. Note:Please insert a USB storage device into the USB port while you want to enter the Storage Manager menu, record some programs or play any files stored in the USB storage device. - 12 - <ALL> You can see all the files in the USB storage device. The method of operation refers to the clue on the screen. Select files by ▲/▼, and then operating by the clue. z Red: Press to play or view the selected file. z Green: Press to sort the files. There will be several options you can choose, select one and press OK to achieve the operation. z Yellow: Press to enter the advanced menu to edit the files. You can delete, rename, lock/ unlock the files, set PVR path or even add new folder. Please refer to the clue on the screen. (When the file is locked, you should enter the correct password to enter. The default password is 0000.) z Blue: Press to show the information of the selected file. z Exit: Press to exit the menu. <MP3/Music> z Select MP3/Music by ◄/►. You can play the MP3 files in the USB storage device. z Press ◄/► to choose the item under the screen, OK to operate. Skip to the previous or next file, play or pause. z Press Exit button to exit the menu. <JPEG/Image> You can look the photoes in the USB storage device. z Select files by ▲/▼ button, OK to view the images in full screen. And then you can zoom in or out the images by OK, skip to the previous or next images by ▲/▼, rotate the images by ◄/►, or you can move the images by ▲/▼/◄/►. Exit to exit the menu. z The detailed method of operation refers to the clue appeared on the screen. <Video/stream> If you havn’t set the PVR path as some folders, you can playback the recorded programs that stored in the root directory of USB storage device. z Select files by ▲/▼, press OK or PVR► button to play. And then press ◄/► to choose the item under the screen, OK to operate. Or you can press PVR buttons to control. Please refer to 4.7 PVR Functions. <STB/SW> An upgrade can be performed using the USB port. In this menu you can update the software or data if you needed. (Only to be advised by service technicians) The detailed method of operation refers to the clue appeared on the screen. - 13 - Note:The detailed method of operation refers to the clue appear on the screen. That only MP3 audio files, JPEG or BMP images and recordings made on the USB device can be viewed, any other format is not supported. (Might not be compatible with all devices. ) Files must contain alphanumeric characters only. The following characters “[ 4.4 ] ﹨”etc are not permitted. Setup z If you press OK in Setup Menu, the aside screen will be appeared. In this menu you can see the satellite list, setup the satellite parameters in Antenna Setup, search programs by Single Satellite Search, Multi Satellite Search. z Use the ▲/▼ keys to select the item and OK to enter. Press EXIT to save your changes and exit the menu. 4.4.1 Satellite list With this menu, you can designate the satellite to search channels in the menu of Single Satellite Search or Multi Satellite Search. There are up to 100 satellites available. z Use the ▲/▼ keys to select satellite and OK to confirm selecting. Red key to select all satellites, Green key to cancel select all. z Press EXIT to save your changes and exit the menu. 4.4.2 Antenna Setup If you have selected satellites in the satellite list menu, you can set up the parameter of satellite in this menu. z Use the ▲/▼ button to select the item, and set up the parameter with the ◄/► button, the NUMERIC buttons or OK button, which will show the item’s - 14 - list. If you completed setting, use Red button to Save, Blue button to Save & Exit. z Use Red button to enter the menu of Edit Sat. Antenna: If you press OK in Antenna, the satellites’ list is displayed. Move the cursor to a satellite and press OK to select the satellite and have the list disappeared, or press the EXIT on the remote controller to cancel the setting and have the list disappeared. Type: You can select one LNB type from NORMAL C, NORMAL Ku, UNIVERSAL, ONE CABLE, HIGH Ku or LOW Ku. 22K: Setup the 22K switch. If you have connected to a dual LNB or two antennas connected to a 22K tone switch box, set it to ON. DiSEqC: The default is OFF. To use the DiSEqC, set up DiSEqC. If you had set LNB Type to Universal, LNB Power and 22K switch options are disregarded. LNB Power: You can select 13/18V for LNB. Select OFF if you want to off LNB power. 4.4.3 Single Satellite Search In this menu you can search programs by the satellite you set in the satellite list menu. When you set all parameters, then move the cursor to Search press OK to start scan. Search Option: Decide for which channels to search. (All channels/ Free channels only) Scan Mode: Decide for which mode to use. (Preset Scan/ Auto Scan) Network Search: Set NIT ON to find more transponders (frequencies) through a Network Information Table (NIT) scan. That is, when the broadcaster is sending a NIT through a given transponder, the receiver will also scan for transponders listed in the NIT and not otherwise recognized. (That is when the Scan Mode set to Preset Scan.) 4.4.4 Multi Satellite Search This menu is similar as the Single Satellite Search menu. z In this menu you can search programs by the satellite you choose. Press ◄/► button in the Antenna item to choose satellite. z When you set all parameters, then move the cursor to Search press OK to start scan. The detailed method of operation refers to the Single Satellite Search menu. - 15 - 4.4.5 TP list In this menu you can edit the TP Frequency information. Show TP of the designated satellite. Signal power and quality is checked on the base of current TP value. z If you want to change to other TP in the Frequency item use ◄/► button or OK button, which will show the TP list. z Press RED button to add a new TP value, Green button to change the current value, Yellow button to delete the current TP value, Blue button to scan by the settings. You can operate correctly by the clew on the screen. 4.5 Edit Channels This menu allows you to edit the channels stored in the STB or add favorite channels. z Use the ▲/▼ button to select the item, OK to enter the sub-menu. 4.5.1 Edit Channel List This submenu allows you to edit the channels stored in the STB. You can select TV or Radio channels in an alternative way by pressing the TV/RADIO button. You can choose a channel list group by pressing the SAT button. z Press ▲/▼ button to select channel. z Press OK to rename the channel; the keypad will be displayed. z Similarly, you can edit the PID data using the Info and NUMERIC keys. Note: The VIDEO PID, AUDIO PID and PCR PID are very important for optimal satellite signal reception. We recommend you get professional advice where available. - 16 - z Press Red buttom to select a channel, and press ▼/▲ to up/down, press OK button to stop move. Press Green button to lock a channel or unlock. If Channel is in the locked status, you must enter password code to view channel. Press Yellow button to skip the channel you choose. Press Blue button to delete channels, you can select to delelte one or all channels. If you want to cancel the operation of deleting, you can press Blue button again. z If you complete these above operations, press MENU to save or EXIT to quit. Then the screen will display a clue, you can press OK to save the operation, or press EXIT to cancel. 4.5.2 Edit Favorite List z Press OK on ‘Edit Favorite List’. The list of channels will be displayed. z Press ▲/▼ to choose a channel. Use Green to add (or remove if previously added) the selected channel to/from the favorite channel group. z If you want to edit the favorite channel group, press the Red button. Then the cursor will moved into the favorite list, you can select favorite list by ◄/► button. Press Yellow button to move channels, Blue button to change the name of a favorite group, Green button to delete channels in the favorite lists. z Press the EXIT button to escape from this menu. 4.6 Program Guide z EPG shows the event information on the current TP channel by time Zone. The event is displayed only at the channel that has EPG information. If you press EPG, the following screen will be appeared. z If you press the OK button on a highlighted channel the channel will appear on screen. Press the ▼/▲ to select channel. Press the ◄/► to view EPG of a particular channel on a daily basis. - 17 - z Press the Red button to alter the program window. Press the ▼/▲ to select program. Press Yellow button to show the detailed information of the selected programs. If you press the Blue button,the highlighted program will be saved for reserve. z If you have reserved some programs, you can book to record the programs by your purpose. You can operate correctly by the clew on the screen. 4.7 PVR Functions This device has the ability to record content to a USB device by simply inserting into the USB port. Devices include USB sticks and powered external harddrives (Fat32). < Record Programs > z Press the REC● key to start recording the program, the aside screen will appear. z Press i key to display the recording information. z Press the REC■ key to cease recording. Note: Do not remove the USB device when recording or playing back the recorded files. < Play the Recorded Programs > z To view the files you have recorded onto USB press the PVR LIST key on the Remote control. Recordings will be stored into the Video/stream. z Choose Video/stream and then press the OK button to enter. All files stored onto the device will appear. - 18 - z In the menu of Video/stream, select files by ▲/▼, press OK or PVR► button to play. And then press ◄/► to choose the item under the screen, OK to operate. Or you can press PVR buttons to control. <PVR Remote Control Buttons> ◄◄: Fast reverse. Play the recording at increased speed. By pressing the button multiple times you select from eight different speeds. ►►: Fast forward (refer to ◄◄). ►: Starts playback at the beginning of the current record session or returns to normal playback speed from fast reverse/forward or pause. ●: Start recording. ∣§: Skip to the previous program. ¨∣: Skip to the next program. ∣∣: Pause the playback. ■ : Stop the playback. Note:The detailed method of operation refers to the clue appear on the screen. That only recordings made on the USB device can be viewed. (Might not be compatible with all devices. ) - 19 - 4.8 TV menu at the normal mode z At normal mode(no menu state), various menus are displayed on the screen with remote control action. You can change the current status and mode with various buttons including the ▲/▼, SAT, i, and EPG button. The follow screen shows the banner displayed when you press the i button. 4.8.1 TV/Radio List in Simple mode z If you press OK on the remote controller at No menu state, the channel list is displayed.You can preview the channel and move the channel fast with the▲/▼ button. z Press the Red button to sort the list by A-Z, Geen button to see the channels by different TP, Yellow button to see all or only free channels. 4.8.2 Favorite List in simple mode z If you press FAV on the remote controller at No menu state, it will enter the favorite typs list menu, choose one press OK to enter. You can preview the channel and move the channel fast with the ▲/▼ button. - 20 - A1 Trouble Shooting There may be various reasons for the abnormal operation of the receiver. Check the receiver according to the procedures shown below. SYMPTOM CAUSE REMEDY The LED doesn ’t The power cord is not Check that the power cord is light up plugged in. plugged into the wall outlet. No picture Wrong connection of the Connect the Audio/Video output of or sound Audio/Video output of the receiver to TV correctly. the receiver to TV. No picture Audio muting. Press the MUTE button. TV power off. Turn TV on. The receiver can ’t Check the antenna cable, replace receive the signal. the cable, or connect the cable to the receiver tightly. Incorrect values of some Set the values of tuner some tuner tuner parameters. parameters. Parameters correctly in installation menu. Wrong direction of the Check the signal strength with a dish. spectrum analyzer and adjust you dish correctly. The remote The batteries of the Check whether the batteries are controller does remote controller are not inserted correctly in you remote not working inserted or exhausted controller. Check the batteries, and if exhausted replace the batteries of the remote controller. - 21 - A2 Specifications 1 Tuner &Channel <Digital Part> Type .......................…….....1×F-type,IEC169-24 Female Frequency Range ...............950MHz to 2150MHz Input Impedance .................75 ohm unbalanced Signal Level ...............…......-25 to 65 dBm LNB Power ................…......13.5/18.5Vd ±5%, 0.5Amax, Overload protected 22kHz Tone .................…....Frequency: 22k Hz ±2kHz Amplitude: 0.6V ±0.2V DiSEqC Control ..................Version 1.2 Compatible Demodulation .....................QPSK Input Symbol Rate ..............2~45Ms/s FEC Decoder ......................Convolution Code Rate 1/2,2/3,3/4,5/6 and 7/8 with .....................…………..........constraint Length K=7 2 System &Memory Main Processor ....................NXP PNX8735 Flash Memory ............….......64M bytes SDRAM .................……........128M bytes Channel Memory ..................Digital Channel: 4000 Multi-satellite ............…........Up to 100 Multi-language Menu .....…...English, Arabic, French, Turkish, Russian Front .....................…….........4-Digital 7-Segment Display Remote Controller ................IR Remote Control 3 MPEG Transport Stream &A/V Decoding <Digital Part> MPEG4 AVC/H264………….MP@L30;8Mbps support MPEG-2………………………MP@ML;15Mbps support Profile Level .............…........support up to Level 30 of Main Profile Input Rate ...............……......Max 60Mbit/s Aspect Ratio ...........…..........4:3,16:9 Frame Rate ............…..........50Hz for PAL, 60Hz for NTSC Video Resolution ..................1080i(HD), 576P(SD) Audio Decoding ....................MPEG/MusiCam Layer I &II Audio Mode .............….........Signal channel/Dual channel Joint Stereo/Stereo Frequency Response ...........20Hz~20kHz, <+/-2dB .....................…………...........60Hz~18kHz <+/-0.5dB Sampling Rate ...........….......32,44.1,48(kHz) - 22 - 4 A/V &Data In/Out TV/VCR Scart Output ..…....RGB, CVBS, L, R Output with Volume Control (optional) RCA Output ...........…...…... CVBS, L, R Output (Yellow, White, Red Jack) ............................………..…..with Volume Control 5 Power Supply Input Voltage ...............…..….AC 90~250V, 50/60Hz Power Consumption .....….....Max. 20W Protection ...............…….…...Separate Internal Fuse ...........................…………......The Input shall have the lighting protection 6 Physical Specification Size (W×H×D)..........……....280mm×200mm×40 mm ...........................…………......Excluding the foot. Foot height is 4 mm Weight .................……...…....about1.5kg 7 Environment Condition Operating Temperature .........0~40 °C Storage Temperature ............-30 °C~80 °C Operating Humidity Range ....10~85%RH, Non-condensing Storage Humidity Range ........5~90%RH, Non-condensing - 23 - A3 Glossary of Terms C band 3.7~4.2 GHz Frequency. DiSEqC Digital Satellite Equipment Control. Ku band 11~18GHz Frequency. LNB (Low-Noise Block Converter) The LNB is an electronic unit mounted on the satellite dish. It receives the signals reflected by the dish and converts them to signals that can be used by Satellite receiver. PID Package Identifier. PIN Code Personal Identification Number. A four-digit code that is used for locking/unlocking, e.g. with the parental control feature. Polarization Polarization allows several programs to be fitted into the same frequency band. The signals from a satellite are transmitted eight with linear(vertical or horizontal) polarization or circular (right or left) polarization. - 24 -