1
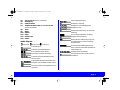
MCS2000 1-C UG GB (for US) Page 1 Monday, December 8, 1997 3:07 PM
MCS 2000 Model I User Guide
page
General Information . . . . . . . . . . . . . . . . . . . . . . . . . 2
Functions of the Buttons . . . . . . . . . . . . . . . . . . . . . . 2
Audio Signals . . . . . . . . . . . . . . . . . . . . . . . . . . . . . . 3
General operation . . . . . . . . . . . . . . . . . . . . . . . . . . . 4
Radio ON/OFF and Volume Control . . . . . . . . . . 4
Function Selection . . . . . . . . . . . . . . . . . . . . . . . . . . 4
Function Button Selection . . . . . . . . . . . . . . . . . . 4
Menu Selection . . . . . . . . . . . . . . . . . . . . . . . . . . 4
Exiting Functions . . . . . . . . . . . . . . . . . . . . . . . . . 5
Adjust Display Intensity . . . . . . . . . . . . . . . . . . . . 5
Tones On/off . . . . . . . . . . . . . . . . . . . . . . . . . . . . 5
Zone and Mode Selection . . . . . . . . . . . . . . . . . . 5
Outgoing Calls . . . . . . . . . . . . . . . . . . . . . . . . . . . . . 6
Scanning . . . . . . . . . . . . . . . . . . . . . . . . . . . . . . . 6
Turning Scanning On/Off . . . . . . . . . . . . . . . . . . . 6
Viewing a Scan List . . . . . . . . . . . . . . . . . . . . . . . 7
Changing Scan Lists . . . . . . . . . . . . . . . . . . . . . . 7
Telephone Interconnect . . . . . . . . . . . . . . . . . . . . . . 7
Receiving a Telephone Call . . . . . . . . . . . . . . . . . 7
Sending a Telephone Call . . . . . . . . . . . . . . . . . . 8
Keypad Selection (List/Buffered Dialing) . . . . . . . 8
Private Call . . . . . . . . . . . . . . . . . . . . . . . . . . . . . . . . 9
Receiving a Private Call . . . . . . . . . . . . . . . . . . . . 9
Sending a Private Call (trunking only) . . . . . . . . . 9
Enhanced Private Call . . . . . . . . . . . . . . . . . . . . 10
Caller ID . . . . . . . . . . . . . . . . . . . . . . . . . . . . . . . . . . 10
Mode Preset Buttons . . . . . . . . . . . . . . . . . . . . . . . 10
Mode Recall . . . . . . . . . . . . . . . . . . . . . . . . . . . . . . 10
Automatic Power-Off . . . . . . . . . . . . . . . . . . . . . . . 10
SmartZone/AMSS Functions . . . . . . . . . . . . . . . . . 11
Site Search & Site Lock . . . . . . . . . . . . . . . . . . . 11
Emergency Operation . . . . . . . . . . . . . . . . . . . . 11
External Alarm . . . . . . . . . . . . . . . . . . . . . . . . . . 12
MCS 2000 Model I
Handset Operation . . . . . . . . . . . . . . . . . . . . . . . . . 12
Car Radio Mute . . . . . . . . . . . . . . . . . . . . . . . . . . . 12
Failsoft . . . . . . . . . . . . . . . . . . . . . . . . . . . . . . . . . . 12
Conventional Operation . . . . . . . . . . . . . . . . . . . . . 13
Repeater/Direct . . . . . . . . . . . . . . . . . . . . . . . . . 13
Monitor . . . . . . . . . . . . . . . . . . . . . . . . . . . . . . . 13
User-Selectable Private Line (PL) . . . . . . . . . . . 13
Stat Alert (MDC - 1200/Star Signalling) Features . 13
PTT ID and Emergency . . . . . . . . . . . . . . . . . . . 13
Selective Calls . . . . . . . . . . . . . . . . . . . . . . . . . . . . 13
Receiving a Selective Call . . . . . . . . . . . . . . . . . 13
Sending a Selective Call . . . . . . . . . . . . . . . . . . 14
Telephone Interconnect . . . . . . . . . . . . . . . . . . 14
Status/Message . . . . . . . . . . . . . . . . . . . . . . . . 14
MDC Repeater Access (RAC) . . . . . . . . . . . . . . 14
Trunking Functions . . . . . . . . . . . . . . . . . . . . . . . . 15
Sending a Call Alert Page . . . . . . . . . . . . . . . . . 15
Receiving a Call Alert . . . . . . . . . . . . . . . . . . . . 15
Reprogram Request . . . . . . . . . . . . . . . . . . . . . 15
One Touch Button Functions . . . . . . . . . . . . . . 15
Out of Range . . . . . . . . . . . . . . . . . . . . . . . . . . . 15
Secure Operation . . . . . . . . . . . . . . . . . . . . . . . . . . 16
Secure Keyload and Erase . . . . . . . . . . . . . . . . 16
Data Operation . . . . . . . . . . . . . . . . . . . . . . . . . . . . 17
Radio Care . . . . . . . . . . . . . . . . . . . . . . . . . . . . . . . 17
Safety Information . . . . . . . . . . . . . . . . . . . . . . . . . 17
Important Electromagnetic Emission Information 18
Control Station Operation . . . . . . . . . . . . . . . . . 18
Caution: VEHICLES EQUIPPED WITH AIR BAGS . 19
Accessories . . . . . . . . . . . . . . . . . . . . . . . . . . . . . . 19
Menu Overview . . . . . . . . . . . . . . . . . . . . . . . . . . . 20
Computer Software Copyrights . . . . . . . . . . . . . . . 20
Warning: When installing or removing the mobile
radio from the vehicle, the radio must be switched off
or damage to the radio may occur.
68P81083C48-B
page 1
MCS2000 1-C UG GB (for US) Page 2 Monday, December 8, 1997 3:07 PM
page 2
68P81083C48-B
MCS 2000 Model I
General Information
Functions of the Buttons
With the MCS 2000 Model I you have chosen an
excellent mobile radio. The Motorola warranty for
quality guarantees the high standard of Motorola
products. Your MCS 2000 Model I radio has left our
factory only after extensive tests.
Numbers in brackets refer to the illustrations on the
fold out page.
Depending on the keypad ordered with your radio,
refer to either “E” or “I” for the description of the buttons:
(A)
Radio ON/OFF and Volume control
(B)
Three-color indicator
Green, flashing: incoming call or Call Alert Page
Red, continuous: radio transmits in clear and
secure
Orange, continuous: system/channel busy or
incoming clear call (secure operation).
Orange, flashing: incoming secure call (secure
operation).
(C)
Display with symbols and one line of 8 characters.
(D)
Mode selector
(F)
Transmit key (PTT)
Push to talk, release to listen.
(G)
Microphone connector
(1)
Zone select
(2)
Monitor, press button to listen for activity (conventional operation) or
Search (AMSS/SmartZone operation)
(3)
HOME
This user guide describes the way a standard
radio works. Since standard operation may be
changed by programming - both concerning
the Functions which the radio includes and the
Buttons used to activate them - the way your
radio operates may differ from what is
described here.
The radio display prompts may be programmed
into the radio in one of a number of different
languages. English is the default language and
is used to describe the displays in this user
guide.
For further information, contact the person in
charge of your radio system or your local service representative.
MCS2000 1-C UG GB (for US) Page 3 Monday, December 8, 1997 3:07 PM
(4)
(5)
(6)
(7)
(8)
(9)
(10)
(11)
(12)
(13)
Secure on/off (secure operation)
Emergency
External alarm
Telephone interconnect or Secure on/off
(secure operation)
Scan
Menu
Option
Page
Private call
Select
Audio Signals
High tone
Ringing tone
Low tone
Phone initiate/Receive
Emergency activate
Emergency acknowledgement
Emergency exit
Failsoft (repeated every 10 seconds
trunking)
Out of range (repeated, trunking)
Keypad entry accepted
Radio self-test failed/ Key entry not
accepted/Time out timer warning/
System reject
Call alert acknowledgement
Function/Channel/Hardware error,
tone continues until valid operation or
radio turned off.
Busy (repeated four times)
Keyfail (secure operation)
Automatic call back (trunking)
PTT pressed in clear mode (secure
operation)
Call alert sent
Call alert received (repeated every
five seconds)
Call initiated (Enhanced Private Call)
Selective call received (Private Call II)
Incoming private call (repeated for 20
seconds)
MCS 2000 Model I
68P81083C48-B
page 3
MCS2000 1-C UG GB (for US) Page 4 Monday, December 8, 1997 3:07 PM
page 4
68P81083C48-B
MCS 2000 Model I
General operation
Function Selection
Radio ON/OFF and Volume Control
Turn the radio on by pressing the on/off button (A).
The radio then carries out a self-test.
Adjust the volume to a comfortable listening level by
turning the on/off button (A).
Functions programmed into the radio can be selected
in two different ways:
1
Directly via a pre-programmed, dedicated button, or
2
Indirectly via the radio MENU.
Note: If equipped, your radio may be programmed with ignition sense enabled. Depending on programming, if the ignition is turned off,
the radio will:
• turn off
• inhibit transmit capability, or
• inhibit the use of the PTT button.
Contact your system operator for further information.
Turn the radio off by pressing the on/off button (A)
again.
Note: If the radio sounds the error tone and displays an error message, please contact the person in charge of your radio system or your local
service representative.
Function Button Selection
For direct access to a feature, depress the desired
function button. A triangle in the display points to the
function button used. If the function requires additional input, use the mode selector (D) to display your
choices, and press the select button (13).
Note: Function buttons are usually active.
Pressing a function button will exit the current
feature and start the selected feature.
Menu Selection
Features may be accessed indirectly through the radio
menu. The menu is selected by pressing the menu
button (9). Selections are made by using the mode
selector (D) to the desired function. Press the select
button (13). The radio will leave menu mode and enter
the selected feature, or enter a sub-menu. If additional
MCS2000 1-C UG GB (for US) Page 5 Monday, December 8, 1997 3:07 PM
input is required, use the selector (D) to select the
desired function. Press the select button (13).
A list of potential menu functions is found in the back
of this user guide (page 20).
Exiting Functions
If your radio is programmed with a HOME button (3),
press it to exit any function/menu.
If no HOME button is programmed, press the function
button once to exit the function. If the function is
accessed via the menus, press the menu button (9)
twice to exit.
Adjust Display Intensity
Select the menu INTNSITY as described above. Press
the select button (13). The display intensity may then
be adjusted to one of four levels: high, medium, low or
very low, using the selector (D).
Tones On/off
The tones heard every time a key is pressed may be
turned off or on through the menus.
Select the menu TONES as described above. Press
the select button (13). The display then shows the
present state e.g.
MCS 2000 Model I
TONE ON
Use the mode selector (D) to toggle between “TONE
OFF” and “TONE ON”. Press the select button (13)
when the desired state is in the display.
Zone and Mode Selection
A mode is a channel or talkgroup and all its related
features. A zone is a grouping of modes that can be
selected by pressing the zone button (1). Use the
mode selector (D) to display the desired zone e.g.
SECURITY
The zone name flashes until you press the select button (13) to choose it. Then use the mode selector (D)
until the desired talkgroup/channel is displayed, e.g.
GROUP 1
68P81083C48-B
page 5
MCS2000 1-C UG GB (for US) Page 6 Monday, December 8, 1997 3:07 PM
MCS 2000 Model I
Outgoing Calls
When you have selected zone and mode, you are
ready to transmit.
Lift the microphone out of its holder and press the
transmit key PTT (F) while talking, release it while listening. Speak in a normal tone of voice, keeping a distance of 5 -10 cm (2-4”) from the microphone. While
transmitting the red indicator (B) will light.
Conventional only:
If the orange indicator is lit, the channel is busy. Wait
for the indicator to turn off before transmitting.
Trunking only:
If the busy tone sounds, release the PTT (F) and wait
for the automatic call back tone. When this tone is
heard, press the PTT (F) within 3 seconds to transmit
the call again.
If your radio is equipped with a time out timer, a warning tone will sound a few seconds before the call is
terminated.
Scanning
Scan allows the user to monitor more than one channel or talkgroup (including the selected channel or
talkgroup) at a time for activity.
page 6
68P81083C48-B
Channels within a scan list may be assigned priority
levels as follows:
Priority 1: Most important
Priority 2: Second most important
Non-Priority: Normal scan list member without
priority
In scan the radio will listen to the channel/talkgroup
with the highest priority. If a channel/talkgroup with a
higher priority becomes active while the radio is listening to a lower priority member, the radio will switch to
the higher priority channel/talkgroup.
Note: If the user is involved in a conversation, he
will not be interrupted by any normal priority calls.
Turning Scanning On/Off
The scanning feature may be turned on via the Scan
button (8) or via a menu as previously described.
For as long as “SCAN ON” is selected, the scan icon
( ) will be on in the display and the radio will scan for
activity in the channels/talkgroups that are defined in
the scan lists of the present mode.
Note: If a mode is pre-programmed with autoscanning, the radio scans automatically when-
MCS2000 1-C UG GB (for US) Page 7 Monday, December 8, 1997 3:07 PM
ever this mode is selected and scan cannot be
turned off.
Viewing a Scan List
Select the menu VIEW LST as previously described,
then use the mode selector (D) to display the menu
SCAN. Press select (13).
The dot in the scan icon
flashes if the mode is
priority 1, lights continuously
if the mode is priority 2 or the icon
lights continuously to indicate a
normal priority mode. The programming icon
will
be on while the list is viewed.
Use the mode selector (D) to view the next member.
When all members have been viewed the function
should be exited.
Changing Scan Lists
If a scan list is user programmable, it may be changed
by the user (members added or deleted).
Select the menu PGM LIST as previously described,
then use the mode selector (D) until SCAN is displayed and press the select button (13) or
Press and hold the scan button (8) until the key press
and
accepted tone is heard. The programming icon
the triangle in the display flash.
MCS 2000 Model I
Use the mode selector (D) to select the desired mode.
Press the select button (13) if the scan icon
is not
in the display, to include the mode as a normal priority
member.
Press the button again to make the mode priority 2
(the scan icon
lights continuously).
Press the button a third time to make it a priority 1
mode (the dot in the scan icon
flashes).
Pressing the button again makes the mode non-member (mode not included in the list).
Telephone Interconnect
Telephone interconnect is used when the radio is
required to operate in a radio system connected to a
public or private telephone system.
Receiving a Telephone Call
When your radio receives a telephone call, a telephone ringing tone sounds and the display alternates
between
PHONE
and the home display. The green indicator (B) and the
call received icon flash.
68P81083C48-B
page 7
MCS2000 1-C UG GB (for US) Page 8 Monday, December 8, 1997 3:07 PM
page 8
68P81083C48-B
MCS 2000 Model I
Press the phone button (7) to answer the call.
Exit the function when the conversation is over.
Sending a Telephone Call
List Selection
Press the menu button (9) and use the mode selector (D)
until PHONE is displayed. Press the select button (13)
and use the mode selector (D) until the desired name or
number is displayed. Press the select button (13) or the
PTT (F). The radio then transmits the number.
Note: If your radio has been so programmed, you
can press the phone button for quick access to
the telephone interconnect function. Using the
mode selector (D), you can scroll between last
dialled call and phone number lists.
Keypad Selection (List/Buffered Dialing)
(with optional keypad microphone)
Press the phone button (7) or select the menu PHONE
as previously described, then enter the desired number directly from the keypad. If you are placing a call
to a local extension number requiring a pause before
it, press ✱
# .
If an incorrect phone number is entered, the digits
may be erased using the mode selector (D) down.
Continue using the mode selector (D) down to erase
the entire number.
When the number is complete, press the select button
(13) or the PTT (F) to transmit the call.
PLS WAIT
will be in the display, while the system is setting up the
call.
Trunking only:
If the PHONE system is busy, the display will show
PHN BUSY
and your call will be placed when the system is available, unless you exit the function.
If phone access is unavailable to your radio, the display shows
NO PHONE
MCS2000 1-C UG GB (for US) Page 9 Monday, December 8, 1997 3:07 PM
Private Call
Receiving a Private Call
When your radio receives a private call, the incoming
private call tone sounds and the display alternates
between
CALL RCV
and the home display. The green indicator (B) and the
call received icon flash.
Press the call button (12) or select the menu PVT
CALL to view the ID of the calling party.
If the PTT (F) is pressed within 20 seconds, the call is
answered and a private conversation can go ahead.
Note: If the call button (12) is not pressed, the
call will be initiated as a talkgroup call.
Exit the function when the conversation is over.
Sending a Private Call (trunking only)
Private calls can be selected either from a list or
directly via the keypad (with optional keypad microphone).
MCS 2000 Model I
Note: If your radio has been so programmed, you
can press the call button for quick access to the
Private Call function. Using the mode selector (D),
you can scroll between last received ID, Private
Call lists and your own radio ID.
Press the call button (12) or select PVT CALL through
the menus.
The display shows the last ID transmitted or received.
List Selection:
Transmit to the displayed ID by pressing the PTT (F) or
choose another ID from the list by using the mode
selector (D).
To view the radio's own ID, use the mode selector (D)
until the display shows:
MY ID:
alternating with the radio's ID, e.g.:
741317
68P81083C48-B
page 9
MCS2000 1-C UG GB (for US) Page 10 Monday, December 8, 1997 3:07 PM
page 10
68P81083C48-B
MCS 2000 Model I
Keypad Selection:
(with optional keypad microphone)
Press the call button (12) or select PVT CALL through the
menus and enter the desired ID directly from the keypad.
Until the ID is completed the last digit may be erased
by pressing down the mode selector (D). Continue
pressing the mode selector (D) down to erase the
entire ID. Then enter the correct ID.
When the ID has been selected in one of the two ways
described above, the private call may be transmitted
to the displayed ID by pressing the PTT (F).
Enhanced Private Call
If an Enhanced Private Call is not answered within 20
seconds the display changes into
NO ANSWR
Press the PTT (F) to leave your ID with the called radio
so that you will be called back later. The call alert sent
tone will sound.
Caller ID
The radio will momentarily display the ID or alias name
of the radio that initiated a call. If an emergency call is
received in trunked operation, the radio will alternate
the display between the talkgroup, the emergency
received display and the ID (or alias name) of the radio
that initiated the emergency call.
Mode Preset Buttons
Mode preset buttons will allow quick access to commonly used modes. Press and hold a mode preset
button until a good-key tone is heard to program the
button for the currently selected mode. A short press
of a mode preset button will cause the radio to immediately change to the mode programmed for that button.
Mode Recall
The radio will always remember the last mode
selected. Pressing mode recall will cause the radio to
switch to the previously selected mode.
Note: The “last” mode must be selected for a minimum of 5 seconds to be retained as the “last” mode.
Automatic Power-Off
“Automatic power off” will power off your radio when
no user actions occur during a pre-programmed
length of time. A user action is defined as the press of
a button, turn of a knob or the use of any radio accessory (e.g. footswitch).
MCS2000 1-C UG GB (for US) Page 11 Monday, December 8, 1997 3:07 PM
2 minutes prior to automatic power-off, the radio will
generate a continuous low tone and
PWR OFF
will flash on the display. Any user action will immediately cause the radio to cease the automatic poweroff tones and display and return the radio to normal
operation.
SmartZone/AMSS Functions
Press and hold the site search button (2) to force the
radio to scan for a new site.
If the optional “wide-area roaming” function is programmed the radio will automatically switch sites as it
moves through your coverage area.
Automatic site switching may be disabled by activating the site lock function.
Please contact the person in charge of your radio system for further information.
Site Search & Site Lock
Emergency Operation
If emergency is enabled on your system the function is
invoked by pressing the emergency button (5).
Emergency is exited by pressing the emergency button for approximately 2 seconds.
Press the site search/monitor button (2) to show the
current site and signal strength.
Additionally a bar display is used to reflect the signal
strength level for the current site ranging from 0 to 3
bars:
Trunking only:
Your radio may be programmed to indicate that an
emergency call has been received from another member of your talkgroup. The display will then alternate
between
In SmartZone and AMSS (Automatic Multiple Site
Select) operation the two functions mentioned below
may be programmed into your radio:
EMER RCV
3 bars indicate a very strong signal and no bar indicates a very weak signal.
MCS 2000 Model I
and mode name of the calling party.
If “emergency with voice to follow” is enabled, the
68P81083C48-B
page 11
MCS2000 1-C UG GB (for US) Page 12 Monday, December 8, 1997 3:07 PM
page 12
68P81083C48-B
MCS 2000 Model I
radio will automatically transmit an emergency alarm.
It transmits audio through the visor microphone for a
pre-defined period of time after pressing the emergency button. Please contact the person in charge of
your radio system for further information.
Note: Automatic transmit via the visor microphone
is possible only with the emergency feature.
External Alarm
Depending on the accessories ordered and installed
with your radio the external alarm function activates
the vehicle horn or lights if you do not respond to a
call (Page, Trunking Private Call, or Trunking Phone
Call) before a pre-programmed time.
Press button (6) or select H/L via the menu to turn the
external alarm on. “H/L ON” alternates on the display
to indicate the feature is active. Turn the alarm off by
pressing button (6) again or via the menu.
handset speaker and the radio speaker will be muted
for privacy.
When the handset is placed in the HUB, or when
HAND OFF is selected from the menu, audio will be
heard through the radio speaker.
Car Radio Mute
If the car radio mute feature is programmed into your
MCS 2000 Model I, your standard car radio will
momentarily mute when your MCS 2000 Model I
mobile radio is transmitting or receiving. Please contact the person in charge of your radio system for further information.
Failsoft
The failsoft feature ensures that a conversation is not
interrupted if the trunked system fails. In this mode
communication will be maintained on an open channel. The failsoft tone will sound every 10 seconds and
the display will alternate between
Handset Operation
To select Handset operation, select HANDSET from
the menu and select HAND ON. When HAND ON is
selected and the handset is removed from the Hang
up box (HUB) audio will be heard only through the
FAILSOFT
and the current active display.
MCS2000 1-C UG GB (for US) Page 13 Monday, December 8, 1997 3:07 PM
Conventional Operation
Before transmitting, always make sure that the
selected mode is free (Orange LED not on).
Repeater/Direct
Select the menu RPTR/DIR as previously described
or press a preprogrammed button. The current mode
(direct or repeater) will be displayed. Use the mode
selector (D) to toggle the mode. Press the select button (13) to select the displayed mode of operation.
Monitor
Press the monitor button to toggle monitor on or off.
Press and hold the monitor button to enter squelch
configuration. Using the mode selector (D), the
squelch level of the radio may be fine-tuned. Press the
select key when the desired level is attained.
User-Selectable Private Line (PL)
User Selectable Private Line (PL) allows the radio user
to select a PL code from a pre-programmed list of
codes. Press the Multiple Privale Line (MPL) button (if
programmed) to view the current PL or press and hold
the MPL button to enter MPL configuration. Use the
mode selector to change the PL code and press the
select key when the desired PL is displayed.
MCS 2000 Model I
Stat Alert (MDC - 1200/Star Signalling)
Features
PTT ID and Emergency
Each radio can be programmed to send a unique digital identification code at the beginning of each transmission, at the end, or both. When the PTT-ID is
programmed to come before voice transmission, you
will hear a tone until the ID transmission is complete.
This ID may be combined with an emergency alarm
that is activated by an emergency button on the radio.
The dispatcher can quickly identify the radio user in
an emergency situation.
Emergency Operation
Emergency is operated as previously described.
Selective Calls
Receiving a Selective Call
The radio will display
CALL RCV
for two seconds upon receiving a Selective Call. You
can enter Selective Call to view the ID of the calling
radio and to respond with a Selective Call (see below).
68P81083C48-B
page 13
MCS2000 1-C UG GB (for US) Page 14 Monday, December 8, 1997 3:07 PM
page 14
68P81083C48-B
MCS 2000 Model I
Sending a Selective Call
Press the call button (12) or select the menu CALL as
previously described. Enter the ID via the keypad or
use the mode selector (D) to scroll to the ID you wish
to call. Press the PTT (F) to transmit the selective call
to this ID. If automatic Selective Call is disabled, the
radio exits Selective Call after the transmission. If
automatic Selective Call is enabled, the radio will
remain in Selective Call until you exit.
Call Alert
See trunking section for more details.
Telephone Interconnect
To make a call through the telephone system in the
conventional mode your radio must send access and
hangup codes to the system. The access code can be
transmitted in either of two ways, depending on how
your radio is programmed.
Immediate: The radio automatically sends a prestored access code as soon as the telephone
interconnect button (7) is pressed.
Delayed: Press the Select button (13) or the PTT (F) and
the radio sends the pre-stored access code.
After the access code is sent, you should get a dial
tone. (If no dial tone sounds, exit the function to hang
up.) Now press the Select button (13) or the PTT (F).
The radio then transmits the number.
The call is then handled as described under “Sending
a Telephone Call” above.
Status/Message
Select the menu STATUS or MESSAGE as previously
described. The last acknowledged status or the first
message will be displayed. Use the mode selector (D)
to scroll through the lists of possible statuses or messages. When the display shows the desired status or
message, press the select key (13) to transmit the status or message. Four beeps will sound to indicate that
the status or message has been received. The radio
will automatically exit the status/message feature. If
the status or message is not received, the radio will
display
NO ACK
and generate a continuous tone. Press the select (13)
key to transmit the status or message again or exit the
function.
MDC Repeater Access (RAC)
MDC repeater access will select a repeater for transmission. Consult your system administrator for more
information.
MCS2000 1-C UG GB (for US) Page 15 Monday, December 8, 1997 3:07 PM
Trunking Functions
Sending a Call Alert Page
Select the menu PAGE as previously described, then
use the mode selector (D) to display the desired ID.
Press the PTT (F) the select button (13) to send the
Call Alert Page.
The call alert page acknowledgement tone is heard if
the called radio receives the call alert page. If the page
is not received the display will show
NO ACK
Exit the function to return to the home display.
Reprogram Request
If dynamic regrouping is programmed into your radio,
the reprogram request function may be selected
through a menu. A reprogram request will send a message to the console operator requesting that the operator assigns the radio to a new talkgroup. See your
system administrator for further details.
One Touch Button Functions
If this optional feature is programmed in your radio, a
button may be dedicated to sending a pre-programmed status, message, call alert or dialing a preprogrammed phone number. See your system administrator for further details.
Receiving a Call Alert
When a call alert is received, the call alert received
tone is heard, the green LED and the
icon flash
in the display until the Call Alert is acknowledged by
pressing the PTT (F) or pressing and releasing the
monitor button (2).
Out of Range
If this optional function is programmed into your radio,
it will indicate when you have left your radio coverage
area. The display will alternate between
Status/Message
Operated as previously described under Conventional Functions.
and the current mode and the out of range tone will
sound.
MCS 2000 Model I
NO SYS
68P81083C48-B
page 15
MCS2000 1-C UG GB (for US) Page 16 Monday, December 8, 1997 3:07 PM
MCS 2000 Model I
Secure Operation
Note: This section applies only if secure operation is programmed into your radio. This section lists features where differences occur when
operating in secure. For other feature operation
see General Operation above.
Outgoing Calls: When the selected mode is not preprogrammed as either secure-only or clear-only,
secure transmit is turned on/off by pressing the
secure button (4), except for trunking telephone interconnect and private call which are always controlled
by the button. A beep immediately after the PTT is
pressed indicates a clear (non-secure) transmission.
Note: If the secure button is pressed during a
transmission, the transmission is aborted, and
an alert tone will sound until the PTT is
released. The operation change will be effective
with the next PTT press.
Incoming Calls: When a secure call is received the
orange LED (conventional only) and the secure icon
will flash.
page 16
68P81083C48-B
Conventional Functions: In monitor, only calls from
radios with the same encryption key will be heard.
Calls with a different key will be heard as noise.
Trunking Functions: When secure transmit is controlled by the secure button (4), during a talk group or
private call you can only change from clear to secure
operation. During a telephone interconnect or failsoft call you can change from clear to secure operation, or from secure to clear. During an emergency
call NO change is possible.
Secure Keyload and Erase
An encryption key must be loaded from a Key Variable Loader (KVL) that corresponds to the encryption
type of the radio.
Disconnect the microphone cable from the controlhead and attach the keyloader cable. The display
shows “KEYLDNG” (KEYLOADING), and normal
transmit and receive is disabled. Refer to the KVL
instruction manual for loading procedure.
MCS2000 1-C UG GB (for US) Page 17 Monday, December 8, 1997 3:07 PM
Note: For some earlier radio models, enter the
keyloading mode by pressing and holding the
secure button (4) until the display changes
showing the secure menu's first item. Scroll to
the “KEYLOAD” choice, and press the select
button. To exit, press the home button.
When the key has been loaded successfully, the radio
will sound one long beep.
To erase a key, press and hold the secure button (4)
until the display changes showing the secure menu's
first item “ERASE KY”, and press the select button.
When key erase is complete, the display will show
“ERASED”.
Note: If battery power is removed from the
radio for more than 3 days, the radio may lose
its encryption key.
Data Operation
If your radio is programmed for data operation, you
may send and / or receive data messages from a data
terminal. While sending or receiving data, the radio
will display
MCS 2000 Model I
DATA XFR
Any button press will cause the radio to interrupt the
data transfer and return the radio to normal operation.
Please contact the person in charge of your radio system for further information.
Radio Care
•
•
Avoid any physical abuse of the radio.
The radio exterior should be cleaned with a
cloth dampened with clean water, a mild liquid
soap solution or isopropyl alcohol.
CAUTION
The use of chemicals such as detergents,
alcohol (except isopropyl), aerosol sprays,
and petroleum products may be harmful and
damage the radio housing.
Safety Information
Every radio, when transmitting, radiates energy into
the atmosphere which may, under certain conditions,
cause the generation of a spark.
All users of vehicles fitted with radios should be aware
of the following warnings:
68P81083C48-B
page 17
MCS2000 1-C UG GB (for US) Page 18 Monday, December 8, 1997 3:07 PM
MCS 2000 Model I
Do not operate radio near
inflammable liquids or in the vicinity of
explosive devices
During normal use, the radio will subject you to radio
energy substantially below the level where any kind of
harm is reported.
To ensure personal safety, please observe the following simple rules:
•
DO NOT transmit when the antenna is very
close to, or touching, exposed parts of the
body, especially the face and eyes.
•
DO NOT hold the transmit (PTT) key in when
not actually desiring to transmit.
•
DO NOT allow children to play with any radio
equipment containing a transmitter.
•
DO NOT operate radio while driving. It should
also be noticed that the use of a hand held
microphone while driving could constitute an
offence under the Road Traffic Regulation.
Important Electromagnetic Emission Information
In August, 1996, The Federal Communications Commission (FCC) adopted an updated safety standard
for human exposure to radio frequency electromagnetic energy emitted by FCC regulated equipment.
Motorola subscribes to this same updated safety
standard for the use of its products.
page 18
68P81083C48-B
In keeping with sound installation practice and to
maximize radiation efficiency, a one-quarter (1/4)
wave length antenna should be installed at the center
of the vehicle roof. If it is necessary to mount the
antenna on the vehicle's trunk lid, an appropriate 3dB
gain antenna should be used. This installation procedure will assure that vehicle occupants will be
exposed to radio frequency energy levels lower than
the limits specified in the standard adopted by the
FCC in General Docket 79144.
To assure that radio frequency (RF) energy exposure
to bystanders external to a vehicle is lower than that
recommended by FCC adopted standard, transmit
with any mobile radio only when bystanders are at
least two (2) feet away from a properly installed externally mounted antenna for radios with less than 50
watts of output power, or three (3) feet away for radios
with 50 watts or greater power.
Control Station Operation
In the event of Control Station operation, to assure
operators and bystanders are exposed to radio frequency (RF) energy levels lower than the limits specified in the FCC adopted standard, the antenna should
be installed outside of any building, but in no instance
shall the antenna be within two feet (less than 50
watts power output) or within three feet (50 watts or
MCS2000 1-C UG GB (for US) Page 19 Monday, December 8, 1997 3:07 PM
higher power output) of station operators or bystanders.
When planning the installation of communication
equipment in a vehicle with one or more air bags:
Caution: VEHICLES EQUIPPED WITH AIR
BAGS
•
•
•
An air bag inflates with great force. DO NOT
place objects, including communication equipment, in the area over the air bag or in the air
bag deployment area. If the communication
equipment is improperly installed and the air
bag inflates, this could cause serious injury.
Installation of vehicle communication equipment should be performed by a professional
installer/technician qualified in the requirements
for such installations. An air bag’s size, shape
and deployment area can vary by vehicle make,
model and front compartment configuration
(e.g., bench seat vs. bucket seats).
Contact the vehicle manufacturer’s corporate
headquarters, if necessary, for specific air bag
information for the vehicle make, model and
front compartment configuration involved in
your communication equipment installation.
MCS 2000 Model I
Accessories
Please contact you local Motorola representative for
further information about the accessories listed
below:
Microphone Options:
•
Palm Microphones
•
Keypad Microphones
•
Noise Cancelling Microphones
•
Visor Microphone
•
Desk Microphones
•
Telephone Style Handsets
Mounting Accessories:
•
Tilt Mount Bracket
•
Key Lock
•
Direct Trunnion Mount
•
Base Tray with Loudspeaker
•
Remote Mount Option
A Variety of External Loudspeakers (low/high power)
A Variety of Cable kits
Desk (Control Station) Accessories:
•
Power Supplies
•
External Emergency Foot-switch
Antennas
68P81083C48-B
page 19
MCS2000 1-C UG GB (for US) Page 20 Monday, December 8, 1997 3:07 PM
MCS 2000 Model I
Menu Overview
Zone:
Select a Zone (same as button - 1)
Channel: Select a channel (Same as mode selector D)
Scan:
Scan ON or OFF (Same as button - 8)
Tones: Keypad entry tones ON or OFF
Display intensity:
Adjust display backlight
View:
View a Scan, Telephone, Private Call, or Call
Alert List
Program lists:
Program a Scan, Telephone, Private Call, or
Call Alert List
Horn/Lights:
Turn External Alarm (Horn/Lights) ON or
OFF (Same as button - 6)
High/Low power:
Set the radio to High or Low Power level(s)
Transmit inhibit:
Turn the transmitter ON or OFF
Private Call:
Select Private Call feature. (Same as button
- 12)
Page:
Select the Call Alert Feature. (Same as button - 11)
Phone: Select a Phone feature. (Same as button - 7)
Status: Select and send a pre-programmed status
from a list
page 20
68P81083C48-B
Message:Select and send a pre-programmed message from a list
Handset:Select handset mode of operation
Trunking
Reprogram Request:
Request Dynamic Regrouping program
change
Wide-Area Trunking
Site Lock/Unlock:
Disables or enables automatic site switching
Conventional Only
Repeater or Direct:
Enables repeater access or talkaround
capability.
Computer Software Copyrights
The products described in this manual may include copyrighted computer programmes
stored in semiconductor memories or other media. Laws in the United States and other
countries preserve for Motorola/Europe and Motorola Inc. certain exclusive rights for
copyrighted computer programmes, including the right to copy or reproduce in any form
the copyrighted computer programme. Accordingly, any copyrighted computer programmes contained in the products described in this manual may not be copied or reproduced in any manner without the express written permission of the holders of the rights.
Furthermore, the purchase of these products shall not be deemed to grant either directly
or by implication, estoppel, or otherwise, any licence under the copyrights, patents, or
patent applications of the holders of the rights, except for the normal non-exclusive royalty
free licence to use that arises by operation of law in the sale of the product.