1
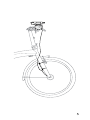
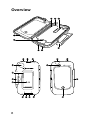
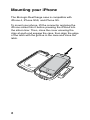
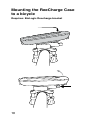
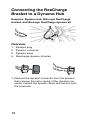
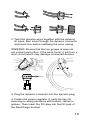
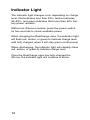
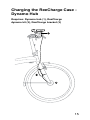
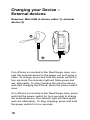
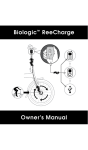
BioLogic ™ ReeCharge ™ Case for iPhone
Owner’s Manual
CAUTION
Please read the safety instructions for all products
and accessories before using them with the
ReeCharge case.
Carrying the ReeCharge case
The ReeCharge case contains delicate components so
do not bend, drop, or crush it.
Using connectors
Never force a connector into a port. Make sure that the
connector matches the port and it is correctly oriented
to the port.
Keep the ReeCharge case within acceptable
temperatures
Extreme temperatures might affect battery life. Keep
the ReeCharge case between -20°C and 45°C and
avoid exposing to fire and high heat.
Charging the ReeCharge case
Standard 6V/ 2.4W or 6V/ 3.0W dynamo hubs can be
connected to the ReeCharge case.
Connect the ReeCharge case to the bicycle dynamo
hub using only the compatible ReeCharge dynamo kit
with integrated power regulator. Do not connect the
ReeCharge case directly to a dynamo hub.
When charging the ReeCharge case with alternative
power sources, use only 5V DC output charging
devices rated at less than 1A.
The ReeCharge case and its adaptor may become
warm during normal use. Always allow adequate
ventilation around the ReeCharge case.
2
Avoid submerging in water
Do not submerge the ReeCharge case in water.
The ReeCharge case is weatherproof, but not water
resistant.
Do not attempt to dry the ReeCharge case device with
an external heat source such as a hair dryer, radiator,
or oven.
Charge safely while cycling
Do not attempt to operate the buttons or connectors of
the ReeCharge case while cycling.
When using a light and simultaneously charging the
ReeCharge case from the same dynamo hub, the
power from the dynamo hub is split between the two
devices, which may lower brightness of the light and
possibly compromise safety at night.
Choking hazard
The ReeCharge case contains small parts, which may
present a choking hazard to small children.
Keep the ReeCharge case and its accessories away
from small children.
Dispose of Safely
The built-in lithium-ion battery can be recycled.
Please dispose of the battery at the nearest recycling
location in your area.
Do not use flash
When taking photographs with the iPhone, the flash
should be switched off to maintain picture quality.
3
LIMITED PRODUCT WARRANTY INFORMATION:
This product comes with a ONE (1) YEAR Limited
Warranty from the date of the retail purchase by the
original end-user. If a material or workmanship defect
arises and a valid claim is received within the Warranty
Period, the case will be replaced. BioLogic cannot
be held liable for damages to personal property due
to misuse or improper care and maintenance. This
product’s warranty does not, under any circumstance,
cover the replacement or cost of any electronic or
personal property inside or outside of the case.
BioLogic BikeBrain™ App
4
5
Overview
6
1. Mounting shoe
2. Latch
3. Contacts
4. iPhone Power button
5. Headphone cover
6. Lens cover
7. Home button
8. Charging Button
9. Indicator light
10. Input socket (micro USB)
11. Output socket (mini USB)
12. Silicon liner
13. Spring
14. Connector (30-pin)
15. Clip
7
Mounting your iPhone
The BioLogic ReeCharge case is compatible with
iPhone 4, iPhone 3GS, and iPhone 3G.
To mount your phone, lift the connector and plug the
iPhone socket into it before pressing the iPhone into
the silicon liner. Then, close the cover ensuring the
clips at each end engage the case, then align the edge
of the latch with the groove in the case and close the
latch.
8
9
Mounting the ReeCharge Case
to a bicycle
Requires: BioLogic Reecharge bracket
10
Overview
1.
2.
3.
4.
Lip
Release tab
Contacts
DC-jack
Follow the instructions on the ReeCharge bracket
packaging to fix the ReeCharge bracket firmly.
To mount your phone, ensure the mounting shoe of the
ReeCharge case has engaged the lip of bracket, then
press the ReeCharge case toward the bracket.
To remove, hold the ReeCharge case while pressing
the release tab until the case is released, then remove
the ReeCharge case.
11
Connecting the ReeCharge
Bracket to a Dynamo Hub
Requires: Dyamno hub, BioLogic ReeCharge
bracket, and BioLogic ReeCharge dynamo kit
Overview
1.
2.
3.
4.
Dynamo plug
Dynamo connector
Dynamo wires
Reecharge dynamo kit wires
1. Remove the dynamo connector from the dynamo
then remove the outer casing of the dynamo connector. Detach the dynamo wires and remove from
the connector.
12
2. Twist the dynamo wires together with the dynamo
kit wires, then insert through the dynamo connector
and bend over before reaffixing the outer casing.
WARNING: Ensure that the two groups of wires do
not contact each other. If the wires touch, it will form a
short-circuit which may damage connected devices.
3. Plug the dynamo connector into the dynamo plug.
4. Fasten the power regulator (1) with zip ties (2)
ensuring no wiring interferes with brakes, cables or
spokes. Then insert the DC-plug into the DC-jack of
the ReeCharge bracket.
13
Indicator Light
The indicator light changes color depending on charge
level. Red indicates less than 30%, amber indicates
30~50%, and green indicates that more than 50% battery power remains.
Without an iPhone mounted, press the power switch
for two seconds to check available power.
When charging the ReeCharge case, the indicator light
will flash red, amber, or green to indicate charge level
until fully charged, when it will stay green continuously.
When discharging, the indicator light will steadily shine
red, amber, or green to indicate charge level.
Once the ReeCharge case has fully charged the
iPhone, the indicator light will continue to shine.
14
Charging the ReeCharge Case Dynamo Hub
Requires: Dynamo hub (1), ReeCharge
dynamo kit (2), ReeCharge bracket (3)
15
Charging the ReeCharge Case –
USB Port
Requires: Computer (1a) or wall-mounted charger
(1b) with USB port, and USB to micro USB cable (2)
16
Charging your Device – iPhone
Before charging, the iPhone must be fully inserted,
then press the power switch once to start charging.
The indicator light will steadily shine while charging.
Press the power switch again to stop charging.
Charging and Synchronizing
Connect the micro-USB cable to your computer and
the ReeCharge case. Press the power switch once to
charge your iPhone while synchronizing.
Select one Device to Charge
When the ReeCharge case is connected to a power
source with an iPhone inside, only the iPhone or ReeCharge case can be charged.
17
Charging your Device –
External devices
Requires: Mini-USB to device cable (1), external
device (2)
If an iPhone is mounted in the ReeCharge case, connect the external device to the power out port using a
cable. To charge, press and hold the power switch for
four seconds, the indicator light will flash green and
red, alternately. To stop charging the external device
and start charging the iPhone, press the power switch
once.
If no iPhone is mounted in the ReeCharge case, press
and hold the power switch for four seconds to charge
the external device, the indicator light will flash green
and red, alternately. To stop charging, press and hold
the power switch for four seconds.
18
Technical Specifications
Length: 142.3 mm
Width: 81.4 mm
Depth: 30.0 mm
Weight: 165.8g
Battery: 1400mAh Lithium Ion
Output power: 5 V | 500 mA
Input current: 5 V | <1000 mA
Type of power inputs:
• Bicycle dynamo hub (input voltage and current varies with different cycling speed and battery loading
conditions)
• PC / laptop USB 2.0 outlet
• Conventional 100~240V AC adaptor
NOTE: For safety reasons, charge-in voltage
and current are limited.
Universal power output:
USB 2.0 output at 5 V adaptive 500 mA
depending on devices
Mobile device recharge time via USB is about
1-2 hours depending on device
19
© 2011 Mobility Holdings, Ltd.
ReeCharge, ReeCharge case, ReeCharge
bracket, BikeBrain and BioLogic are all
tradenames or registered trademarks of Mobility
Holdings, Ltd.
Mobility Holdings, Ltd.
+886-2-2999-5623
P.O. Box 3-116 Sanchong 241
New Taipei City
Taiwan
20