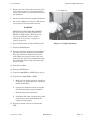
1
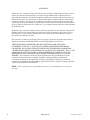
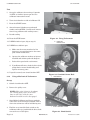
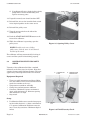
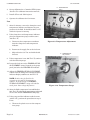
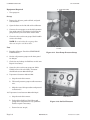
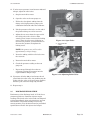
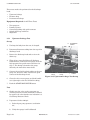
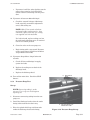
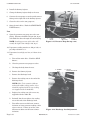
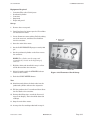
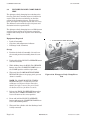
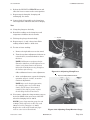
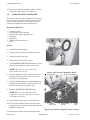
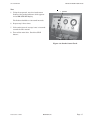
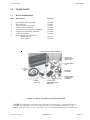
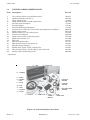
®
INSTRUCTION 77-9045
AUDIT PROCEDURES FOR
INJECTOR CALIBRATOR CD3
USING CD3 AUDIT KIT
Part Number 67-7707
Installation/Operation/Maintenance
Rev. 1 - February, 1994
Bacharach, Inc.
Headquarters: 621 Hunt Valley Circle, New Kensington, PA 15068
Ph: 724-334-5000 • Fax: 724-334-5001 • Toll Free: 800-736-4666 • Website: www.bacharach-inc.com • E-mail: [email protected]
Printed in U.S.A.
® Registered Trademark
WARRANTY
Bacharach, Inc. warrants to Buyer that at the time of delivery this Product will be free from
defects in material and manufacture and will conform substantially to Bacharach Inc.’s
applicable specifications. Bacharach’s liability and Buyer’s remedy under this warranty are
limited to the repair or replacement, at Bacharach’s option, of this Product or parts thereof
returned to Seller at the factory of manufacture and shown to Bacharach Inc.’s reasonable
satisfaction to have been defective; provided that written notice of the defect shall have been
given by Buyer to Bacharach Inc. within one (1) year after the date of delivery of this Product
by Bacharach, Inc.
Bacharach, Inc. warrants to Buyer that it will convey good title to this Product. Bacharach’s
liability and Buyer’s remedy under this warranty of title are limited to the removal of any
title defects or, at the election of Bacharach, to the replacement of this Product or parts
thereof that are defective in title.
The warranty set forth in paragraph 1 does not apply to parts the Operating Instructions
designate as having a limited shelf-life or as being expended in normal use.
THE FOREGOING WARRANTIES ARE EXCLUSIVE AND ARE GIVEN AND
ACCEPTED IN LIEU OF (i) ANY AND ALL OTHER WARRANTIES, EXPRESSED OR IMPLIED, INCLUDING WITHOUT LIMITATION THE IMPLIED WARRANTIESOF MERCHANTABILITY AND FITNESS FOR A PARTICULAR PURPOSE: AND (ii) ANY
OBLIGATION, LIABILITY, RIGHT, CLAIM OR REMEDY IN CONTRACT OR TORT,
WHETHER OR NOT ARISING FROM BACHARACH’S NEGLIGENCE, ACTUAL OR
IMPLIED. The remedies of the Buyer shall be limited to those provided herein to the
exclusion of any and all other remedies including, without limitation incidental or
consequential damages. No agreement varying or extending the foregoing warranties,
remedies or this limitation will be binding upon Bacharach, Inc. unless in writing, signed by
a duly authorized officer of Bacharach.
NOTE: Fuses and gaskets are expendable items and are excluded from the terms of this
warranty.
A
Bacharach, Inc.
Instruction 67-9319
CONTENTS
Warranty
Contents ............................................................................................................................................ i
Important Notes .................................................................................................................................... ii
l.0
1.1
1.2
1.3
1.4
Introduction ................................................................................................................................. 1-1
Tools and Equipment Required for Complete Audit .................................................................. 1-2
Installing Batteries ..................................................................................................................... 1-3
Preparation for Audit .................................................................................................................. 1-3
Pre-Audit Checklist ..................................................................................................................... 1-5
2.0
2.1
2.2
2.3
2.4
2.5
2.6
2.7
2.8
2.9
2.10
Cummins Injectors ...................................................................................................................... 2-1
Calibrator RPM Test ................................................................................................................... 2-1
Calibration Fluid Viscosity Check .............................................................................................. 2-4
Calibration Fluid Temperature Test .......................................................................................... 2-5
Gear Pump Pressure Check ........................................................................................................ 2-7
Discharge Head Check ................................................................................................................ 2-9
Flowmeter Check ........................................................................................................................ 2-14
Body to Seat Clamp Force Test .................................................................................................. 2-16
Plunger to Body Clamp Force Test ............................................................................................. 2-18
Injector Supply Pressure ............................................................................................................ 2-20
Stroke Count Check .................................................................................................................... 2-22
3.0
3.1
3.2
3.3
3.4
3.5
3.6
3.7
Detroit Diesel Engine (DD) Injectors ......................................................................................... 3-1
Calibrator RPM Test ................................................................................................................... 3-1
Calibration Fluid Viscosity Check .............................................................................................. 3-4
Calibration Fluid Temperature Test .......................................................................................... 3-4
Flowmeter Check ........................................................................................................................ 3-4
Plunger to Body Clamp Force Test ............................................................................................. 3-4
DD Master Injector Flow Test .................................................................................................... 3-5
Stroke Count Check .................................................................................................................... 3-6
4.0
Post Audit Checklist ................................................................................................................... 4-1
5.0
5.1
5.2
Spare Parts .................................................................................................................................. 5-1
Major Assemblies ........................................................................................................................ 5-1
Individual Replacement Parts .................................................................................................... 5-2
Instruction 67-9319
Bacharach, Inc.
i
IMPORTANT NOTES
RELIEF VALVE
l.
CROSS FITTING
Before auditing your CD3 calibrator, determine
whether or not your calibrator has a relief valve
to adjust the injector supply pump pressure. CD3
calibrators manufactured after November 1984
incorporate this valve. See photograph at right.
The relief valve fits on the end of a length of
plastic tubing leading from a brass cross fitting at
the injector supply pump. The relief valve is
normally inserted into the calibration fluid
reservoir through 8 hole in the top of the reservoir.
If necessary, install the relief valve be£ore
starting the audit. A Relief Valve Kit, consisting
of all the necessary parts and installation instructions, is available for customer installation. The
kit can be ordered from Bacharach using part
number 77-0452.
HOLE IN TOP
OF RESERVIOR
LOWER REAR
Figure 1. Relief Valve
2. The list of tools and equipment required to
perform an audit is in Section 1.1. Make certain
you have them before starting the audit.
ii
Bacharach, Inc.
Instruction 67-9319
CD3 AUDIT KIT
1.0
INTRODUCTION
INTRODUCTION
The Bacharach Injector Calibrator Model CD3
calibrates and tests mechanical unit injectors
manufactured by Diesel Technology Corporation
(used in Detroit Diesel engines (DD)) and by
Cummins Engine Company. The CD3 has been
adjusted, set, and tested at the factory to ensure
accurate test results. It is a precision machine and
must be handled accordingly.
To maintain the calibrator at its peak performance,
Bacharach provides an Audit Kit for checking most
critical components and systems.
•
Clamp force and temperature indicator*
•
Temperature transducer assembly*
•
Load cell assembly*
•
Rail pressure gauge adjusting tool
•
Graduated cylinder
•
Tubing with quick connects
•
Splash shield cup
•
Hose
The Audit Kit consists of the following items:
•
Dead weight tester
•
Test gauge set
•
Viscor cup with its associated instructions and
chart
•
Dummy injector assembly
--------------*The clamp force and temperature indicator is
calibrated with its load cell and temperature
transducer. (They are calibrated, the serial numbers recorded, and become a matched set at the
factory.) If the load cell or transducer are replaced,
the clamp force and temperature indicator must be
recalibrated.
GRADUATED
CYLINDER
GAUGE TOOL
DEAD WEIGHT
TESTER
VISCOR
CUP
TUBING
SPLASH
SHIELD CUP
HOSE
TEST
GAUGE
LOAD CELL
DUMMY
INJECTOR
INDICATOR
TEMPERATURE
TRANSDUCER
Figure 1-1. Audit Kit
Instructions 77-9045
Bacharach, Inc.
Page 1-1
INTRODUCTION
CD3 AUDIT KIT
The test and measurements that can be performed
with the Audit Kit are:
•
Calibration fluid viscosity
•
Calibration fluid temperature
•
Injector supply gear pump pressure
•
Injector supply inlet pressure
•
Body-to-seat clamping force
•
Plunger-to-body clamping force
•
Discharge head performance
•
Flowmeter performance
Additional tests needed for a complete audit are:
•
Speed check of the calibrator camshaft
•
Stroke count check
•
Plow test using DD master injectors (for DD
injectors only)
Each of these tests and checks influence the performance of the CD3. Therefore, each procedure must
be followed and all requirements met as stated.
These audit procedures may be performed for
Cummins injectors only or for DD injectors only, or
for both. To ensure good results, the procedures
must be performed in the order listed.
1.1
TOOLS AND EQUIPMENT NEEDED
FOR COMPLETE AUDIT
In addition to the Audit Kit (67-7707), tools and
equipment needed for a complete audit are:
•
One set of open end wrenches 3/8 in. to 1-1/8 in.
•
Screwdriver, 9/32 in. tip width, stub 3-1/2 in.
•
Screwdriver, 6 in. blade, 5/16 in. tip
•
Screwdriver, 3 in. blade, 3/16 in. tip
•
A1len key wrench set 5/64 through 1/4 in.
•
Stop watch - 0.1 second readability
Page 1-2
Bacharach, Inc.
Instructions 77-9045
CD3 AUDIT KIT
INTRODUCTION
•
Digital tachometer (hand held). Photo-electric
unit preferred, mechanical (contact type)
acceptable (readability: ±1 digit)
•
Cummins injector, flow code 178A
•
Master injector kit, Kent Moore part no.
J-26298 (53,71,149)
•
Master injector, Kent Moore part no.
J-29898 (8.2L)
•
Two fresh 9 volt alkaline batteries Duracell
M1604, Eveready 522 or others meeting NEDA1604A specifications). Operating life of the
batteries is approximately 6 continuous hours.
•
Container - minimum 2 quart, maximum 8
quart, with minimum 3 in. diameter opening
and minimum 6 in. high
1.2
INSTALLING BATTERIES
1. Make certain that the clamp force and temperature indicator is turned off.
2. Remove the battery cover.
3. Connect two 9 Volt batteries to the terminal
clip.
4. Insert the batteries into the holder.
5. Close the cover.
BATTERY HOLDER
CAUTION
Leaks from batteries can damage the
indicator. Remove dead batteries promptly.
Also remove batteries if the indicator will
not be used for a long time.
If the display indicates “LO BAT,” the
display values may be inaccurate.
1.3
PREPARATION FOR AUDIT
1. Clean the work area. Contaminants will interfere with the audit.
2. Make sure all air lines are intact and contain
no water or particulate matter.
Instructions 77-9045
Bacharach, Inc.
COVER
CLIP
Figure 1-2. Battery Holder
Page 1-3
INTRODUCTION
CD3 AUDIT KIT
3. Replace fluid and filters in the calibration fluid
system.
NOTE: Save approximately 2 quarts of
calibration fluid from the same batch as
fluid in step 3. Store in a clean container to
use when checking viscosity (Section 2.2).
4. Make sure all calibration fluid lines are intact
and clean.
5. Replace any worn components such as belts,
pulleys, and couplings.
6. Check and fill, if necessary, the lube oil in the
air-driven hydraulic pump.
7. Make sure the water, air and electrical utilities
meet specifications listed in the Injector Calibrator CD3 Installation/Operation/Maintenance
Instruction (67-9319).
8. Operate the calibrator with an injector in place
for 30 minutes before beginning the audit. This
will circulate new fluid and remove any contaminants that may be in the lines.
9. Use the following checklist to complete the
preparation for the audit.
Page 1-4
Bacharach, Inc.
Instructions 77-9045
CD3 AUDIT KIT
1.4
INTRODUCTION
PRE-AUDIT CHECKLIST
All responses to the following checklist should be
“YES”.
Pre-audit Checklist
YES
NO
Calibration Fluid Reservoir Cleaned
_____
_____
New Calibration Fluid Filters*
_____
_____
New Calibration Fluid in Reservoir*
_____
_____
Calibration Fluid Reservoir Full*
_____
_____
New “O” Ring in Fuel Arm*
_____
_____
Intensifier Reservoir Full*
_____
_____
Cam Box Oil Changed*
_____
_____
Cam Box Oil Level Normal*
_____
_____
No Leaks in Calibration Fluid Systems
_____
_____
Foreign Objects Removed From Work Area
_____
_____
Air Supply Connected*
_____
_____
Water Supply Connected*
_____
_____
Flowmeter Transducer Reservoir Filled*
_____
_____
Electrical Supply Correct for the Calibrator being
Audited (check the Nameplate)*
_____
_____
Fresh Batteries Installed in clamp force and temperature indicator
_____
_____
*These procedures are in the instruction manual
for the CD3 Calibrator (part 67-9319).
Instructions 77-9045
Bacharach, Inc.
Page 1-5
INTRODUCTION
CD3 AUDIT KIT
NOTES
Page 1-6
Bacharach, Inc.
Instructions 77-9045
CD3 AUDIT KIT
2.0
CUMMINS INJECTORS
CUMMINS INJECTORS
This section describes procedures designed to
adjust the CD3 for accurate testing of Cummins
injectors. These procedures must be performed in
the sequence listed here. After doing the viscosity
check (Section 2.2), complete the rest of the procedures while the fluid and the machine are warm.
While performing these procedures, be certain all
fluid connections for each test are intact.
2.1
CALIBRATOR RPM TEST
This test ensures that the injectors are driven at
the correct speed. Because the main motor is
synchronous, the speed of the camshaft depends
only on incoming power frequency and pulley ratio.
As long as the frequency is held to 60 Hz (or 50 Hz,
depending on the motor used), the speed will fall
within the prescribed range. If an injector is driven
at a speed lower than prescribed, its flow output
will increase because the absolute time for filling
the injector is increased. If the injector is driven at
a higher speed, its output will decrease.
Equipment Required
•
•
Hand held digital tachometer, optical preferred
Screwdriver (small stubby)
2.1.1
Using a Photo-Electric Tachometer
Set-up
1. Switch circuit breaker OFF.
2. Open the pulley cover.
NOTE: Older units use a sliding pulley
cover, which should be opened ½ inch.
3. Attach a small piece of reflective tape (usually
supplied with the tachometer) to the front
flywheel face so that it can be seen through the
perforated window.
NOTE: The white painted strip on the
flywheel can be used instead of the tape.
The painted strip can be viewed through
the perforated window.
4. Close pulley cover.
Instructions 77-9045
Bacharach, Inc.
Page 2-1
CUMMINS INJECTORS
CD3 AUDIT KIT
Test
5. Set up the calibrator for running a Cummins
3/8 PTD (or similar) injector per the CD3
calibrator instruction manual.
6. Turn circuit breaker on side of calibrator ON.
7. Press the START button.
8. Aim tachometer lightbeam at perforated
window and read RPM. (Consult tach. instructions if any problems with reading occurs.)
9. Record reading.
10. Press the STOP button.
Figure 2-1. Using Tachometer
ËCAMSHAFT
æCENTER HOLE
11. If RPM is 1050 ±1 rpm, skip to step 13.
12. If RPM is not 1050 ±1 rpm:
a. Make sure the motor matches the line
frequency (see specifications on the nameplate inside left side door).
b. Operate the calibrator without an injector
installed and without push rod adapters.
c.
Recheck the speed with a tachometer.
d. If problems still exist, check the drive shaft,
pump shaft or motor shaft binding and
replace necessary parts.
13. If speed is normal, turn circuit breaker OFF.
Figure 2-2. Camshaft Center Hole
2.1.2
Using a Mechanical Tachometer
ÌLIMIT SWITCH
Set-up
1. Switch circuit breaker OFF.
2. Remove the pulley cover.
NOTE: Older units (shown in the photos)
use a sliding pulley cover (newer units
have no side rails), slide the cover
backward until the track is disengaged.
3. Stand behind calibrator and locate camshaft
center hole on the end of the camshaft. This is
where the tachometer will be held during test.
4. Find the cover interlock limit switch on the
calibrator table top, just behind the drive shaft
next to the cover latch plate.
Page 2-2
Bacharach, Inc.
ÍRIGHT TERMINAL SCREW
Figure 2-3. Limit Switch
Instructions 77-9045
CD3 AUDIT KIT
CUMMINS INJECTORS
5. Remove wire in center terminal of the switch
and reconnect it to right terminal screw of
switch (as viewed from rear of the calibrator).
ÑTACHOMETER
Test
6. Set up calibrator for running a Cummins 3/8
PTD (or similar) injector per the CD3 calibrator
instruction manual.
WARNING
HAZARDOUS ROTATING EQUIPMENT.
Do not reach over the pulley to operate the
START or STOP buttons. Walk around to
the front of calibrator. Be careful not to
entangle loose clothing (such as sleeves and
neckties) in rotating equipment.
Figure 2-4. Using Mechanical Tachometer
7. Turn the circuit breaker on the side of the
calibrator ON.
8. Press the START button.
9. Press end of the tachometer shaft against back
end of the camshaft and read RPM. Keep the
tachometer aligned with the camshaft. Make
sure that the center of the camshaft is oil-free.
Oil on the camshaft will cause the tachometer
shaft to slip. Inaccurate readings will result.
10. Record reading.
WARNING
HAZARDOUS ROTATING MACHINERY.
Do not reach over the camshaft to turn off
the calibrator.
11. Go to front of calibrator and press STOP
button.
12. If RPM is 1050 ±1 rpm, skip to step 14.
13. If RPM is not 1050 ±l rpm:
a. Make sure the motor matches the line
frequency (see specifications on the nameplate inside left side door).
b. Operate the calibrator without an injector
installed and without push rod adapters.
c.
Recheck the speed with a tachometer.
Instructions 77-9045
Bacharach, Inc.
Page 2-3
CUMMINS INJECTORS
CD3 AUDIT KIT
d. If problems still exist, check the drive shaft,
pump shaft or motor shaft binding and
replace necessary parts.
ÛOPEN ½ INCH
14. If speed is normal, turn circuit breaker OFF.
15. Reinstall the wire on the interlock limit switch
in its original position at the center screw.
16. Reinstall the pulley cover.
17. Turn the power switch on the side of the
calibrator to ON.
18. Push the START MAIN DRIVE button on the
front of the calibrator.
19. While the calibrator is operating, open the
pulley cover.
Figure 2-5. Opening Pulley Cover
NOTE: For older units use a sliding
pulley cover, slide the cover ½ inch toward
the back of the stand.
The calibrator will stop automatically if wiring is
correct and the system is functioning properly.
2.2
CALIBRATION FLUID VISCOSITY
CHECK
Viscosity of the calibration fluid has a marked
influence on the flow test of an injector. Note that
viscosity changes with fluid temperature. This test
applies only to fluid specified in the CD3 manual.
ÉCALIBRATION
æFLUID
ÊTEMPERATURE
æTRANSDUCER
Equipment Required
•
•
•
•
•
Viscor cup with instructions and chart (Make
sure the number on the chart and instructions
match the number on the cup.)
Temperature transducer assembly
Clamp force and temperature indicator
Container - Minimum 2 quart, maximum 8
quart, with minimum 3 in. diameter opening
and maximum 6 in. high
Stop watch
Setup
1. If calibration fluid was not saved when preparing for audit (Section 1.3), drain a minimum of
1-½ quarts of calibration fluid from reservoir
into a clean, dry container - Minimum depth 5
inches.
Page 2-4
Bacharach, Inc.
ÊVISC0R
æCUP
ÌINDICATOR
Figure 2-6. Fluid Viscosity Check
Instructions 77-9045
CD3 AUDIT KIT
CUMMINS INJECTORS
2. Immerse the Viscor cup and temperature
transducer in the fluid in the container.
3. Allow a minimum of one hour for the temperature of the fluid, cup, and transducer to stabilize at room temperature.
4. Connect the temperature sensor cable to the
clamp force and temperature indicator.
Test
5. Follow the instructions supplied with the Viscor
cup.
6. Return contents of the container to the fuel
reservoir, clean the equipment and return the
items to the Audit Kit case.
7. Leave the temperature sensor connected to the
clamp force and temperature indicator. Turn off
the indicator.
2.3
CALIBRATION FLUID
TEMPERATURE TEST
Maintaining the correct calibration fluid temperature at the injector inlet is important because the
fluid temperature has a marked influence on
delivery.
ËTEMPERATURE TRANSDUCER
Figure 2-7. Temperature Transducer
Equipment Required
•
•
•
Clamp force and temperature indicator
Temperature transducer assembly
Cummins, Flow Code 178A injector
ËTEMPERATURE
æTRANSDUCER
ÍCUMMINS
æ178A INJECTOR
Set-up
1. Turn the circuit breaker on the side of the
calibrator to ON.
2. Allow time for calibration fluid to reach the set
temperature.
NOTE: Allow the HEATER ON indicator
(located on front panel just below the
CALIBRATION FLUID TEMPERATURE
gauge) to cycle ON and OFF several times
before proceeding.
ÏINDICATOR
3. Connect the temperature transducer in line
with the fuel arm supply line hose.
Instructions 77-9045
Figure 2-8. Transducer Installation
Bacharach, Inc.
Page 2-5
CUMMINS INJECTORS
CD3 AUDIT KIT
ÐTEMPERATURE
æ104° F
4. Set up calibrator for a Cummins PTD injector.
(See the CD3 calibrator instruction manual.)
5. Install a Flow code 178A injector.
6. Operate the calibrator for 15 minutes.
Test
7. After 15 minutes, turn on the clamp force and
temperature indicator and observe the temperature of the fluid. It should be 104°F ± 1°F,
while the injector is running.
8. If the clamp force and temperature indicator
plus the temperature gauge read the same
(104°F ± 1°F):
a. Disconnect the temperature transducer
from the clamp force and temperature
indicator.
ÒTEMPERATURE
æADJUSTMENT
Figure 2-9. Temperature Adjustment
b. Reconnect the supply line to the fuel arm.
c.
Skip to Section 2.4. You are finished with
this test.
ÕTEMPERATURE
æADJ. GAUGE
9. If the temperature is not 104°F ± 1°F, continue
with the following steps.
10. Loosen the lock nut on the TEMPERATURE
ADJUSTMENT control, located on the gauge
panel just below the HEATER ON indicator.
11. Adjust the TEMPERATURE ADJUSTMENT
control until the clamp force and temperature
indicator display stabilizes at 104°F ± 1°F.
NOTE: It takes time for fluid in the
reservoir to mix and the temperature to
stabilize. A small change in TEMPERATURE ADJUSTMENT setting will stabilize
much faster than a large adjustment.
Figure 2-10. Temperature Gauge
12. After the fluid temperature has stabilized at
104 °F ± 1°F, recheck the temperature indicated
on the CAL FLUID TEMPERATURE gauge.
13. If the gauge and the indicator read the same
(within 1°F), perform the procedures in step 8.
If not:
a. Unscrew the plastic cover on the temperature gauge.
Page 2-6
Bacharach, Inc.
Instructions 77-9045
CD3 AUDIT KIT
CUMMINS INJECTORS
b. Hold the pointer with your fingers and
adjust the pointer screw to read the same
as the clamp force and temperature indicator.
c.
Replace the gauge cover.
NOTE: When set properly, temperature
indicator and temperature gauge will
read the same (within ± 1°F).
14. If the temperature varies more than ± 1°F:
a. Check the calibration fluid level. It should
be at FULL on the dipstick.
b. Check the water flow at the water outlet. It
should flow freely when the amber light on
the front panel is not lit.
c.
Check the heater elements in the calibrator
fluid reservoir.
15. If the calibrator fluid temperature still cannot
be maintained within ± 1°F, the following
components on the CD3 may be defective:
a. Temperature controller.
b. Temperature adjustment control.
c.
Temperature sensor in fuel reservoir.
d. Dial thermometer and/or its bulb.
16. Repair or replace these components if necessary, then repeat the calibration fluid temperature test.
17. After completing the temperature test:
a. Remove the temperature transducer.
b. Reconnect the supply line to the fuel arm.
2.4
GEAR PUMP PRESSURE CHECK
Gear pump pressure must be maintained at 400 to
410 psi to keep the supply system well pressurized,
to reduce pulsations and to provide a steady fluid
supply to the injector.
Make sure the relief valve for adjusting the injector
supply pump pressure is installed before proceeding with this check. For details, see the Important
Notes section in the front of this manual.
Instructions 77-9045
Bacharach, Inc.
Page 2-7
CUMMINS INJECTORS
CD3 AUDIT KIT
Equipment Required
•
ËHIGH PRESSURE
æLINE
Test gauge set
Set-up
1. Remove the injector, push rod link, and push
rod extension.
2. Open the door on the left side of the calibrator.
3. Connect the test gauge set to the high pressure
line quick connect. The fitting is located at the
pump driven by the main drive motor shaft.
4. Close the valve on the test gauge (black handle
across valve body).
NOTE: Be certain that the test gauge hose
does not interfere with drive belts.
ÌVALVE
æCLOSED
Test
5. Run the calibrator. (Push the START MAIN
DRIVE button.)
Figure 2-11. Gear Pump Pressure Setup
6. Set the rail pressure gauge on the front panel
for 100 psi.
7. Check for any leakage in fluid lines or fuel arm.
Repair if necessary.
8. Open the valve on the test gauge set (black
handle in line with valve body). Pressure
should be between 400 and 410 psi.
9. If pressure is between 400 and 410:
a. Stop the main drive motor.
b. Wait until pressure gauge needle returns to
zero.
c.
Skip the rest of this procedure and proceed
to Section 2.5.
10. If pressure is not between 400 and 410 psi:
ÎSET RAIL PRESSURE
æFOR 100 PSI
a. Stop the main drive motor.
b. Recheck the fluid level, fluid lines and
pump drive components for any problems.
Refill or repair if necessary.
c.
Figure 2-12. Set Rail Pressure
Rerun the test (step 8).
Page 2-8
Bacharach, Inc.
Instructions 77-9045
CD3 AUDIT KIT
CUMMINS INJECTORS
11. If, after rerun, pressure is not between 400 and
410 psi, adjust the relief valve:
ÐOPEN VALVE
a. Stop the main drive motor.
b. Open the valve on the test gauge set.
c.
Follow the clear plastic tubing from the
fitting at the high pressure pump to the
calibration fluid tank under the calibrator.
d. Lift the pressure relief valve (on the end of
the plastic tubing) out of the reservoir.
e.
Adjust the set screw from the open end of
the relief valve with a 5/32 in. Allen
wrench. First, loosen or remove the locking
screw. Then, turn the screw clockwise to
increase the pressure, counterclockwise to
decrease the pressure. Retighten the
locking screw.
Figure 2-13. Open Valve
ÓADJUST RELIEF
æVALVE
NOTE: One quarter turn will result in
approximately a 25 psi change.
f.
Insert the tubing with the relief valve into
the reservoir.
g. Restart the main drive motor.
h. Check the pressure reading on the test
gauge set.
i.
Repeat steps d through h as often as
necessary to bring the pressure into the
required 400 to 410 psi range.
Figure 2-14. Adjusting Relief Valve
12. If pressure is below 400 psi and cannot be adjusted with the relief valve, the problem may be
either with the valve or the gear pump. Replace
defective part and rerun steps 11g and 11h.
13. Repeat step 9.
2.5
DISCHARGE HEAD CHECK
Performance of the discharge head (67-7642) has a
pronounced effect on Cummins injector output
readings. The check valve in the head was designed
to close immediately after each injection to prevent
fuel backflow and permit buildup of correct upstream pressure. Any deviation from the prescribed
specification will alter the injector fuel output.
Instructions 77-9045
Bacharach, Inc.
Page 2-9
CUMMINS INJECTORS
CD3 AUDIT KIT
Three tests need to be performed on the discharge
head:
•
•
•
Upstream leakage
Pressure drop
Downstream leakage
Equipment Required (for All Three Tests)
•
•
•
•
•
Test gauge set
Dummy injector
Connecting tubing with quick connects
Splash shield cup with hose
Stopwatch
2.5.1
Upstream Leakage Test
Set-up
ÊFLOWMETER
æTUBING
1. Unclamp the body from the seat, if clamped.
2. Disconnect flowmeter tubing from the top of the
discharge head.
3. Remove the discharge head and set it on the
drain tray.
4. Wipe off any excess fluid from all discharge
head surfaces. Connect the test gauge set to the
high pressure line quick connect (Section 2.4,
step 3). The fitting is located at the pump
driven by the main drive motor shaft.
5. Connect the end of the plastic tubing to the test
gauge set. Insert the other end into the quick
connect of the discharge head.
ÎCLOSE
æVALVE
ËDISCHARGE
æHEAD
ÍTUBING
æ
Figure 2-15. Upstream Leakage Test Set-up
6. Close the valve on test gauge set (black handle
at a right angle to the flow of fluid in tubing).
7. Push the START MAIN DRIVE button.
Test
8. Slowly open the valve on the test gauge set
until the pressure reaches maximum. It should
be equal to the value found or set in Section 2.4,
Gear Pump Pressure Check.
9. If pressure is below 400 psi:
a. Recheck gear pump pressure (see Section
2.4).
b. Verify that gauge is still calibrated.
Page 2-10
Bacharach, Inc.
Instructions 77-9045
CD3 AUDIT KIT
c.
CUMMINS INJECTORS
If pressure is still low after checking out the
gauge, there must be a leak. Find and
correct it before continuing with the procedure.
10. If pressure is between 400 and 410 psi:
a. Check for external leakage of discharge
head, especially around the adjustment
screw, and sealing nut.
NOTE: Older Units contain a locknut
and metal-rubber sealing washer, these
should be replaced with the new sealing
nut supplied with the Audit Kit.
If a leak is found, replace sealing nut, but
do not disturb adjusting screw. If external
leak is not evident proceed.
b. Close the valve on the test gauge set.
c.
Begin timing with a stop watch. Pressure
on the gauge fixture should not fall below
350 psi before 60 seconds.
11. If pressure drops below 350 psi before 60
seconds:
a. Check all lines and fittings in supply
system for leaks.
b. Replace the sealing nut on back of the
discharge head.
c.
Replace the discharge bead.
ÊDISCHARGE
æHEAD
12. Turn off the main drive. (Push the STOP
button.)
2.5.2
Pressure Drop Test
Set-up
NOTE: Connecting tubing is under
pressure. Use a rag as a shield against
squirting oil.
1. Disconnect connecting tubing from the test
gauge set.
2. Install the discharge head so that the outlet
fitting is directed into the drain tray.
ËSPLASH SHIELD CUP
æAND SHORT TUBE
3. Place the splash shield cup and short tube
under the discharge head outlet fitting.
Instructions 77-9045
Figure 2-16. Pressure Drop Set-up
Bacharach, Inc.
Page 2-11
CUMMINS INJECTORS
CD3 AUDIT KIT
4. Install the dummy injector.
5. Clamp the dummy injector body to the seat.
6. Connect the test gauge set to the quick connect
fitting on the right side of the dummy injector.
7. Close the valve on the test gauge set.
8. Start the main drive. (Push the START MAIN
DRIVE button.)
Test
9. Open the pressure test gauge set valve completely. Pressure should be 150 psi +20, -0 psi
with fluid flow down through the outlet fitting.
NOTE: Cracking pressure of the valve will
usually be higher than 150 psi +20, -0 psi.
ÏCLOSE
æVALVE
ÌDUMMY
æIINJECTOR
ÎQUICK
æCONNECT
Figure 2-17. Pressure Drop Set-up (cont.)
10. If pressure reading remains at 150 psi +20, -0
psi, skip to Section 2.5.3.
11. If pressure is too high, too low, or if there is no
flow:
a. Turn off the main drive. (Push the STOP
button.)
b. Close the pressure test gauge set valve.
c.
Unclamp the body from the seat.
ÓSEALING
æNUT
d. Remove the dummy injector.
e.
Remove the discharge head.
f.
Remove the sealing nut on the end of the
discharge head.
ÓADJUST
æDISCHARGE HEAD
NOTE: Older Units contain a locknut
and metal-rubber sealing washer, these
should be replaced with the new sealing
nut supplied with the Audit Kit.
g. Replace the sealing nut with a new one,
supplied with the Audit Kit.
h. Reinstall, but do not tighten, the sealing
nut on the end of the discharge head.
i.
Turn Allen screw one-half turn counterclockwise to lower pressure reading (clockwise to raise it). If there is no flow, turn
Allen screw about one full turn counterclockwise.
Page 2-12
Figure 2-18. Discharge head Adjustment
Bacharach, Inc.
Instructions 77-9045
CD3 AUDIT KIT
j.
CUMMINS INJECTORS
Tighten the sealing nut while preventing
the Allen screw from moving.
12. Reinstall the discharge head and dummy
injector.
13. Reclamp the injector body to the seat.
14. Start the main drive (push the START MAIN
DRIVE button).
15. Recheck pressure drop as in step 9.
16. If pressure is not within limits, repeat Steps 11
through 15 (except for replacing the sealing nut
on the discharge head).
17. Stop the main drive (push the STOP button).
18. After making pressure drop adjustments,
repeat the “Upstream Leakage Test", Section
2.5.1.
2.5.3
Downstream Leakage Test
Set-up
The set up for the “Downstream Leakage Test" is
the same as described in Section 2.5.2, "Pressure
Drop Test Set-up”.
Test
1. SLOWLY open the test gauge set valve until
the gauge pointer begins to move.
2. Continue to open the valve very slowly. The
pressure will increase until the check valve
pops open, then will abruptly drop.
3. Note the highest pressure achieved (the “cracking" pressure).
4. Close the valve.
5. Slowly open the test gauge set valve until the
pressure is just below the highest pressure
(within about 5 psi) achieved in step 2, above
(that is, before the valve pops open).
6. Close the valve and immediately start stopwatch. The pressure will slowly drop and
remain at a lower level.
7. Stop the main drive.
Instructions 77-9045
Bacharach, Inc.
Page 2-13
CUMMINS INJECTORS
CD3 AUDIT KIT
8. Record the time for the pressure to drop from
its highest reading to 150 psi.
9. If the pressure does not drop below 150 psi in
more than 30 seconds, skip to step 11.
10. If the pressure drops below 150 psi in less than
30 seconds:
a. Check for leaks at sealing surface between
dummy injector cone and discharge head.
b. If leaks are not evident, replace discharge
head.
11. Disconnect the connecting tubing from the
dummy injector.
12. Disconnect the test gauge set.
13. Drain the connecting tubing.
14. Replace the cover on the test gauge set.
15. Unclamp the dummy injector.
16. Remove the discharge head.
17. Remove the splash shield cup.
18. Reinstall the discharge head in normal position.
19. Reinstall flowmeter hose on the discharge head.
20. Return the dummy injector and the splash
shield cup to the Audit Kit carrying case.
2.6
FLOWMETER CHECK
This test is not intended to check accuracy of the
flowmeter but only checks that the meter is operational and in good working order. Accuracy is built
into the flowmeter and more sophisticated equipment and techniques are required for such a test.
Two people are required for this test, one to fill the
graduate and operate the stop watch and the other
to record readings from the flowmeter display on
the console.
Page 2-14
Bacharach, Inc.
Instructions 77-9045
CD3 AUDIT KIT
CUMMINS INJECTORS
Equipment Required
•
•
•
•
•
Cummins Flow code 178A injector
Graduated cylinder
Container
Stopwatch
Paper and pencil
Set-up
1. Remove lower rear panel.
2. Install and run the injector per the CD3 calibrator instruction manual.
3. Locate flowmeter return tubing. Pull the tubing
out of the reservoir, and direct the fluid flow
into the container.
ÐSELECT 50
æSTROKES
4. Start the main drive motor.
5. Set the RAIL PRESSURE gauge to exactly 100
psi.
6. Set the graduated cylinder on the floor next to
the container.
NOTE: The cylinder must be empty and
reasonably dry (inside) at the beginning of
each test.
7. Hold the drain tube installed in step 3 so flow
will be directed into the container.
8. Select 50 strokes with the STROKES selector
switch on the console.
Í100 PSI RAIL
æPRESSURE
Figure 2-19. Flowmeter Check Set-up
9. Push the START METER button.
Test
10. Simultaneously direct the drain tube into the
graduated cylinder and start the stopwatch.
11. Fill the graduate for 57 seconds and then direct
the flow back to the container.
12. During this filling time, record the flow readings on the display. There should be about 20
readings.
13. Stop the main drive motor.
14. Average the flow readings obtained in step 11.
Instructions 77-9045
Bacharach, Inc.
Page 2-15
CUMMINS INJECTORS
CD3 AUDIT KIT
15. Read and record the contents of the graduate
while it is sitting on a level surface. Be sure to
read the bottom of the meniscus.
16. Repeat the test three times, cleaning the
graduate for each test.
Although the graduate scale is in ml or cm³ (cc) and
the flowmeter display indicates mm/stroke, the
numbers should be within ±5.
×READ BOTTOM
OF MENISCUS
For examples if the average display reading is
150.3 mm/stroke, the graduate reading should be
between 145.3 and 155.3 ml.
The results should be consistent. If these results
cannot be obtained, see the troubleshooting section
of the CD3 manual.
17. Remove all test equipment and return it to the
Audit Kit case.
Figure 2-20. Reading Graduate
18. Insert drain tube into reservoir (removed in
step 3).
2.7
BODY TO SEAT CLAMP FORCE TEST
Proper body to seat clamping assures good sealing
of the Cummins injector to the discharge head. This
sealing is required because high pressure is developed between the Cummins injector and the discharge head. Low clamping force may cause leakage which in turn will affect fuel output readings.
Equipment Required
ËLOAD CELL
•
•
•
Load cell assembly
Clamp force and temperature indicator
Discharge head, (Cummins)
ÊDISCHARGE
HEAD
ÎBODY TO SEAT
CLAMP MONITOR
Set-up
1. Place the flywheel in top dead center position
(the white area will show through the window).
2. Place the discharge head in position.
3. Place the load cell assembly in position.
4. Connect the load cell assembly cable to the
clamp force and temperature indicator.
5. Push and hold the HOLD TO OPERATE
button.
ÌLOAD CELL CABLE
ÌINDICATOR
Figure 2-21. Body to seat Clamp Force Test
Page 2-16
Bacharach, Inc.
Instructions 77-9045
CD3 AUDIT KIT
CUMMINS INJECTORS
6. While holding the HOLD TO OPERATE button,
push the BODY TO SEAT CLAMP button on
the right hand side operator’s control panel.
NOTE: The BODY TO SEAT clamp
monitor located on gauge panel will appear
green when the body to seat clamp is
engaged.
7. Release both buttons.
8. To unclamp the load cell, press the yellow
button on the left hand side of the operator’s
control panel.
Test
9. Turn on the clamp force and temperature
indicator.
10. Clamp the body to the seat.
11. Record the reading on the clamp force and
temperature indicator.
12. Unclamp the body from the seat.
13. Repeat steps 10, 11 and 12 three times. Each
reading should be a minimum of 167 pounds
force.
14. If readings are too low:
a. Check the gauge reading on the air regulator located in back of calibrator. It should be
set for 60 to 65 psi.
b. Make sure there are no air leaks in the
lines supplying air to clamping cylinders or
solenoids.
c.
Examine all affected parts and replace
damaged or worn components.
15. Unclamp the load cell assembly.
16. Turn off the clamp force and temperature
indicator.
Instructions 77-9045
Bacharach, Inc.
Page 2-17
CUMMINS INJECTORS
2.8
CD3 AUDIT KIT
PLUNGER TO BODY CLAMP FORCE
TEST
The plunger to body clamping force simulates the
force by which the Cummins injector is held in the
engine. This force has an influence on the flow
output of the Cummins injector. The lower the
force, the higher the injector output and vice versa.
The influence varies with the type of injector and
deviation from the required force.
The plunger to body clamping force on GM injectors
ensures proper seating of the injector against its
support and sealing of the injector in the discharge
head.
Equipment Required
ÌCLAMP MONITOR TIMING INDICATOR
•
•
•
Load cell assembly
Clip force and temperature indicator
Discharge head (Cummins)
Set-up
1. Position the load cell assembly (left end) over
the treated push rod extending from the cambox.
2. Push and hold the HOLD TO OPERATE button
with the left hand.
3. While holding down the HOLD TO OPERATE
button, move the CLAMP/UNCLAMP lever to
the CLAMP position with the right hand.
4. Wait until the CLAMP MONITOR/TIMING
INDICATOR light on the gauge panel goes out
(about 3 seconds).
ÉPUSH ROD (HIDDEN)
ÒINDICATOR
Figure 2-22. Plunger to Body Clamp Force
Test
NOTE: The CLAMP MONITOR/TIMING
INDICATOR light is installed on all CD3
calibrators manufactured after November
1984. If the light is not on your panel, hold
the button and lever for about 3 seconds.
5. Release the HOLD TO OPERATE button first
and then the CLAMP/UNCLAMP lever. The
lever will return to the center position.
6. Press and hold the HOLD TO OPERATE
button and move the CLAMP/UNCLAMP lever
to the UNCLAMP position.
7. Wait until the cylinder with the discharge head
is fully retracted.
Page 2-18
Bacharach, Inc.
Instructions 77-9045
CD3 AUDIT KIT
CUMMINS INJECTORS
8. Release the HOLD TO OPERATE button and
allow the lever to return to the center position.
9. Repeat steps 2 through 8 (clamping and
unclamping) five times.
10. Connect load cell assembly to the clamp force
and temperature indicator and turn on display.
Test
11. Clamp the plunger to the body.
12. Record the reading on the clamp force and
temperature indicator after 2 seconds.
×ADJUST
æCLAMP FORCE
13. Unclamp the plunger from the body.
14. Repeat steps 1, 2, and 3 three times. Each
reading must be 380 lb. ± 10 lb. force.
15. To raise or lower reading:
a. Remove the right side cover on the stand.
b. Turn the regulator adjustment clockwise to
raise the force, counterclockwise to lower
the force.
NOTE: Calibrators manufactured after
November 1984 have a knob adjustment as
shown in the photo. Loosen the locknut
behind the knob before turning. Retighten
the locknut after turning.
Figure 2-23. Adjusting Clamp Force
Older calibrators have a screw adjustment.
ØADJUST CLAMP MONITOR GAUGE
c.
After each adjustment, repeat the clamping
operation (steps 1, 2, and 3) to see the
results of adjustment.
NOTE: After each clamping operation,
the clamping force may tend to drop
slowly. A 5 lb. drop in 30 seconds is
normal. If the drop is greater, replace
the discharge head seal and retest.
16. If necessary, adjust the clamp monitor gauge to
be in the middle of the green area of the dial
when the clamping force is 380 lb.
NOTE: If your clamp monitor gauge has a 0
to 160 psi dial, adjust the needle so it reads
100 psi when the clamp force is 380 lb.
Support the needle with thumb and finger
near its center so it will not break.
Instructions 77-9045
Figure 2-24. Adjusting Clamp Monitor Gauge
Bacharach, Inc.
Page 2-19
CUMMINS INJECTORS
CD3 AUDIT KIT
17. Remove the load cell assembly and turn off the
clamp force and temperature indicator.
2.9
INJECTOR SUPPLY PRESSURE
The injector inlet pressure of 100 psi (for Cummins
injectors) has the greatest effect on injector output
flow of all test parameters. The higher the inlet
pressure, the higher the injector fuel output.
Equipment Required
•
•
•
•
•
•
•
Dummy injector
Dead weight tester assembly
Rail pressure gauge adjusting tool
Graduate
Stopwatch
Tubing with quick connect
Hose
Set-up
1. Install the dummy injector.
2. Connect plastic tubing to the dummy injector.
3. Clamp the body to the seat.
4. Clamp the fuel arm on the injector.
5. Turn PRESSURE REGULATOR knob on gauge
panel counterclockwise until it turns freely.
ÍPRESSURE REGULATOR KNOB
NOTE: Lock nut may require loosening
before knob can be turned.
Figure 2-25. Pressure Regulator Knob
6. Connect tubing with quick connect from dead
weight tester to the quick connect on the left
side of the dummy injector.
ÓTRIM WEIGHT
ÎLEFT QUICK CONNECT
7. Connect flexible tubing to the barbed fitting at
the bottom of the dummy injector and direct it
down the drain hole in the drain pan.
8. Push the START MAIN DRIVE button.
NOTE: Make sure the calibration fluid
temperature shown on the gauge is at 104 °F
±1°F before proceeding.
9. Set the dead weight tester on the drain tray.
10. Level the dead weight tester with the sockethead capscrews in the base while observing the
bubble level indicator.
ÒBUBBLE
INDICATOR
ÑDEAD WEIGHT
TESTOR
ÑDRAIN
Ï
HOSE
Figure 2-26. Injector Supply Pressure Set-up
11. Remove trim weight from dead weight tester.
Page 2-20
Bacharach, Inc.
Instructions 77-9045
CD3 AUDIT KIT
CUMMINS INJECTORS
12. Purge air from the line and tester by momentarily depressing the bleeder valve pin (quick
connect) located 90° from the fluid inlet.
Test
NOTE: During the test, keep the weight (top
portion of the dead weight tester) spinning
to reduce friction and increase accuracy. Be
certain no leakage occurs around the fuel
arm connection to the dummy injector.
13. Slowly turn PRESSURE REGULATOR knob
clockwise until the dead weight begins to rise.
14. Place the trim weight on dead weight tester.
The weight should slowly fall.
15. Adjust the pressure regulator until both conditions (steps 13 and 14) are obtained at one
setting of the regulator.
16. Remove trim weight. The weight should rise.
17. Repeat steps 13 and 14 to check setting.
18. Tighten the lock nut on the regulator while
holding the PRESSURE REGULATOR knob
from turning.
After final adjustments, the console-mounted
pressure gauge should read exactly 100 psi.
19. If the gauge does not read 100 psi, adjust the
gauge needle as required to read 100 psi:
ÜDRAIN TUBE
a. Remove the glass over the gauge by loosening the thumbscrew on the bezel and
pulling the bezel away from the gauge.
b. Insert the rail pressure gauge adjusting tool
in the hole on the needle and turn as
required to set the needle at 100 psi.
c.
Remove the tool and replace the bezel.
20. Set 250 ml graduated cylinder on drain tray.
21. With the stopwatch in one hand and the drain
tube from the bottom of the dummy injector in
the other, fill the graduate for 20 seconds.
22. Read the volume of fluid from the scale on the
graduate. Be sure to read the bottom of the
meniscus. Volume should be between 176 and
179 cc(ml).
Instructions 77-9045
Bacharach, Inc.
ÜSTOPWATCH
Figure 2-27. Filling Graduate
Page 2-21
CUMMINS INJECTORS
CD3 AUDIT KIT
23. Repeat steps 21 and 22 two more times and
take the average of the three readings. It must
be between 176 and 179 cc(ml).
24. If volume is below 176 cc(ml), check for obstruction in the orifice located in the dummy injector
or for a leak in the supply system.
25. Stop the calibrator (with the STOP button.)
2.10
STROKE COUNT CHECK
The following test is a verification that each update
occurs after the prescribed number of strokes 50 or
100). It is based on the fact that the speed is at its
nominal 1050 RPM.
ÍMM3/STROKE
æDISPLAY
Equipment Required
•
Stopwatch
Set-up
1. Remove the injector, push rod, and associated
accessories.
2. Set the STROKES selector to 50.
3. Push the START MAIN DRIVE button.
4. Push the START METER button.
Test
Figure 2-28. Stroke Count Check
5. Using the stopwatch, note the time between
flashes of the indicator light which appears in
the MM³/STROKE display.
The flashes should be between 2.8 and 2.9
second intervals. A ± 0.05 second difference
resulting from stopwatch and human error is
permissible.
6. Repeat step 5 three times.
7. If the stroke interval average is not between 2.8
and 2.9 seconds consult the CD3 manual.
8. Turn off the main drive. (Push the STOP
button.)
9. Return all Audit Kit equipment to its case.
Page 2-22
Bacharach, Inc.
Instructions 77-9045
CD3 AUDIT KIT
3.0
DETROIT DIESEL INJECTORS
DETROIT DIESEL (DD)
ENGINE INJECTORS
All the procedures described in this section are
necessary to ensure accurate testing of Diesel
Technology Corp. injectors used in Detroit Diesel
engines (commonly refered to as DD injectors).
3.1
CALIBRATOR RPM TEST
This test ensures that the injectors are driven at
the correct speed. Because the main motor is
synchronous, the speed of the camshaft depends
only on the incoming power frequency and the belt
rating. As long as the frequency is held to 60 Hz (or
50 Hz, depending on the motor used), the speed will
fall within the prescribed range. If an injector is
driven at a lower than prescribed speed, its flow
output will increase because the absolute time for
filling is increased.
Equipment Required
•
•
Hand held digital tachometer, optical preferred
Screwdriver (small stubby)
3.1.1
Using a Photo-Electric Tachometer
Set-up
1. Switch circuit breaker OFF.
2. Open the pulley cover.
NOTE: Older units use a sliding pulley
cover, which should be opened ½ inch.
3. Attach a small piece of reflective tape (usually
supplied with the tachometer) to the front
flywheel face so that it can be seen through the
perforated window.
NOTE: The white painted strip on the
flywheel can be used instead of the tape.
The painted strip can be viewed through
the perforated window.
4. Close pulley cover.
5. Turn circuit breaker on side of calibrator ON.
6. Press the START button.
Instructions 77-9045
Bacharach, Inc.
Page 3-1
DETROIT DIESEL INJECTORS
CD3 AUDIT KIT
Test
7. Aim tachometer lightbeam at the perforated
window and read RPM. (Consult the tachometer instructions if any problems with the
reading occurs.)
8. Record reading.
9. Press the STOP button.
10. If RPM is 2000 ±5 rpm, skip to step 12.
11. If RPM is not 2000 ±5 rpm:
a. Make sure the motor matches the line
frequency (see specifications on the nameplate inside left side door).
ËCAMSHAFT
æCENTER HOLE
b. Operate the calibrator without an injector
installed and without push rod adapters.
c.
Recheck the speed with a tachometer.
d. If problems still exist, check the drive shaft,
pump shaft or motor shaft binding and
replace necessary parts.
12. If speed is normal, turn the circuit breaker
OFF.
3.1.2
Using a Mechanical Tachometer
Set-up
ÛOPEN ½ INCH
1. Switch circuit breaker OFF.
Figure 3-1. Camshaft Center Hole
ÌLIMIT SWITCH
2. Remove the pulley cover.
NOTE: Older units (shown in the photos)
using a sliding pulley cover (newer units
have no side rails), slide the cover
backward until the track is disengaged.
3. Standing behind the machine, locate the
camshaft center hole on end of camshaft.
When performing tests, the end of the tachometer will be pressed against the end of the shaft
at this point. The tachometer must be held in
line with shaft center for accurate reading.
4. Locate the cover interlock limit switch on the
calibrator table top just behind the drive shaft
next to the cover latch plate.
ÍRIGHT TERMINAL SCREW
Figure 3-2. Limit Switch
Page 3-2
Bacharach, Inc.
Instructions 77-9045
CD3 AUDIT KIT
DETROIT DIESEL INJECTORS
5. Remove the wire on the center terminal of the
switch and reconnect it to the right terminal
screw of the switch (as viewed from the rear of
the calibrator).
ÒTACHOMETER
6. Set the main drive belt for testing DD injectors.
7. Set up the calibrator for running a DD injector
test as per the CD3 instruction manual.
WARNING
HAZARDOUS ROTATING EQUIPMENT.
Do not reach over the pulley to operate the
START or STOP buttons. Walk around to
the front of calibrator. Beware of loose
clothing as it may become entangled in
rotating equipment.
8. Turn circuit breaker on side of calibrator ON.
Figure 3-3. Using Tachometer
9. Press the START button.
10. Press the end of the tachometer shaft against
the back end of the camshaft and read RPM.
Keep the tachometer aligned with the camshaft. Make sure that the center of the camshaft is oil-free. Oil on the camshaft will cause
the tachometer shaft to slip. Inaccurate readings will result.
11. Record the reading.
12. Press the STOP button.
13. If speed is 2000 RPM ± 5 RPM, skip to step 15.
14. If speed is not 2000 RPM ± 5 RPM:
a. Make sure the pulley and motor match line
frequency (see specifications on nameplate
inside left side door).
b. Operate the calibrator without an injector
installed and without push rod adapter.
c.
Recheck speed with tachometer.
d. If problems still exist, check for drive shaft,
pump shaft or motor shaft binding and
replace necessary parts.
15. If speed is normal, turn the circuit breaker
OFF.
Instructions 77-9045
Bacharach, Inc.
Page 3-3
DETROIT DIESEL INJECTORS
CD3 AUDIT KIT
16. Reinstall the wire on the interlock limit switch
in its original position, at the center screw.
ÜOPEN ½ INCH
17. Replace the pulley cover.
18. Turn the power switch on the site of the calibrator to ON.
19. Push the START MAIN DRIVE button on the
front of the calibrator.
20. While the calibrator is operating, open the
pulley cover.
NOTE: For older units use a sliding
pulley cover, slide the cover 1/2 inch
toward the back of the stand.
The calibrator will stop automatically if wiring is
correct and system is functioning properly.
3.2
Figure 3-4. Opening Pully Cover
CALIBRATION FLUID VISCOSITY
CHECK
Skip this test if you have already done it for Cummins injectors. Otherwise, follow the procedure
listed in Section 2.2.
3.3
CALIBRATION FLUID
TEMPERATURE TEST
Skip this test if you have already done it for Cummins injectors. Otherwise follow the procedure in
Section 2.3.
3.4
FLOWMETER CHECK
Skip this test if you have already done it for Cummins injectors. Otherwise follow the procedure in
Section 2.6 (using a 92 series injector), except:
•
•
•
3.5
Select 100 strokes (step 8).
Fill the graduate for 30 seconds and then direct
the flow back to the container (step 11).
There will be about 10 readings (step 12).
PLUNGER TO BODY CLAMP FORCE
TEST
While the plunger to body clamp force test is not
critical for DD injector flow tests, it should be
checked to ensure correct seating of injectors and
sealing in the discharge head.
Page 3-4
Bacharach, Inc.
Instructions 77-9045
CD3 AUDIT KIT
DETROIT DIESEL INJECTORS
Skip this test if you have already done it for Cummins injectors, otherwise follow the procedure in
Section 2.8.
3.6
DD MASTER INJECTOR FLOW TEST
Equipment Required
•
•
Master injectors, Kent Moore part J26298 for
53, 71, and 149 injectors
Master injector, Kent Moore part J29898 for
8.2L injector
Set-up
1. Set up the calibrator to run DD injectors
following the procedures given in the CD3
Instruction Manual.
Figure 3-5. DD Master Injectors
Test
2. Run each master injector repeatedly until
readings stabilize.
3. After readings stabilize, record at least five
consecutive readings per injector.
IMPORTANT NOTE:
It was recognized that testing unit injectors (manufactured by Diesel Technology Corporation for
Detroit Diesel Corporation (DDC) engines) the
results can be different from those obtained on other
makes and models of calibrators.
In particular, it has been determined that Master
Injectors marketed by Kent Moore all read higher on
Bacharach CD3 Calibrator by the amount shown
below. Therefore, when checking Master Injectors,
fuel output as read on the digital readout of the CD3
Calibrator will be higher than the stamped values
by the amounts shown:
Injector Type
53
71
92
8.2L
149
Instructions 77-9045
Difference In Reading (mm³/str)
2.0
2.5
4.6
2.3
3.9
Bacharach, Inc.
Page 3-5
DETROIT DIESEL INJECTORS
CD3 AUDIT KIT
The recheck limits (as given by DDC) of Master
Injectors on any calibrator are ±2% of stamped
value. As an example, for the type 71 Master
Injector:
Stamped
Value
72.0
+
Add
2.5 =
Correct
Value
74.5
Tolerance (2%)
73.0 - 76.0
Therefore, for a type 71 Master injector stamped as
72.0, correct delivery value (fuel output) should be
73.0-76.0 mm³/str on a Bacharach CD3 Calibrator.
From the above it follows that when calibrating
and/or checking injectors in service it is necessary
to add the above numbers to the limits given by the
manufacturer. For example:
Injector N75 (part No. 522877) has limits for the
KM Calibrator of 75 - 80 mm³/str. On the CD3 it is
necessary to add 2.5. Therefore, the new limits are
77.5 - 82.5 mm³/str.
4. Compare the average obtained with the value
stamped on the master injectors. The readings
must be within ± 2% of the number stamped.
3.7
STROKE COUNT CHECK
The following test is a verification that each update
occurs after the prescribed number of (50 or 100)
strokes. It is based on the fact that the speed is at
its nominal 2000 RPM.
Skip this test if you have already done it for Cummins injectors.
Equipment Required
•
Stopwatch
Set-up
1. Remove the injector, push rod, and associated
accessories.
2. Set the STROKES selector to 100.
3. Push the START MAIN DRIVE button.
4. Push the START METER button.
Page 3-6
Bacharach, Inc.
Instructions 77-9045
CD3 AUDIT KIT
DETROIT DIESEL INJECTORS
Test
ÍDISPLAY
5. Using the stopwatch, note the time between
flashes of the strokes indicator which appears
in the MM³/STROKE display.
The flashes should be at 3.0-second intervals.
6. Repeat step 5 three times.
7. If the stroke interval average is not 3.0 seconds
consult the CD3 manual.
8. Turn off the main drive. (Push the STOP
button.)
ÊSTROKES SET TO 100
Figure 3-6. Stroke Count Check
Instructions 77-9045
Bacharach, Inc.
Page 3-7
DETROIT DIESEL INJECTORS
CD3 AUDIT KIT
NOTES
Page 3-8
Bacharach, Inc.
Instructions 77-9045
CD3 AUDIT KIT
4.0
POST AUDIT CHECKLIST
POST AUDIT CHECKLIST
Checklist for completed audit
YES
NO
Calibration fluid viscosity is per chart supplied
with the Viscor cup.
_____
_____
Calibration fluid temperature is 104°F + 1°F.
_____
_____
Gear pump pressure is between 400 and 410 psi.
_____
_____
Body to seat clamp force is more than 167 lbs.
_____
_____
Plunger to body clamp force is 380 lb ± 10 lbs.
_____
_____
Injector supply pressure is exactly 100 psi.
_____
_____
Flow from dummy injector orifice is between 528
and 537 cc/min.
_____
_____
Discharge head upstream pressure is above 300 psi
for 60 seconds minimum.
_____
_____
Discharge head pressure drop is 150 psi +20, -0 psi.
_____
_____
Discharge head downstream pressure is above 150
psi for 30 seconds minimum.
_____
_____
Camshaft speed for Cummins is 1050 rpm ± 1 rpm.
_____
_____
Camshaft speed for GM is 2000 rpm ± 5 rpm.
_____
_____
Strokes occur at between 2.8 and 2.9 second intervals (STROKES set at 50 and speed set at 1050
RPM).
_____
_____
Return all calibration tools and equipment to the
Audit Kit box or to their proper positions on the
calibrator doors.
CAUTION
Leaks from batteries can damage the
indicator. Remove batteries from the
indicator, especially if the indicator will be
stored for more than a few days.
Instructions 77-9045
Bacharach, Inc.
Page 4-1
POST AUDIT CHECKLIST
CD3 AUDIT KIT
NOTES
Page 4-2
Bacharach, Inc.
Instructions 77-9045
CD3 AUDIT KIT
PARTS LISTS
5.0
SPARE PARTS
5.1
MAJOR ASSEMBLIES
Item
Description
Part no.
1
2
3
4
5
6
7
8
Dead weight tester assembly
Test gauge set
Viscor cup with instructions
Dummy injector assembly
Clamp force and temperature indicator
Temperature transducer assembly
Load cell assembly
Splash Shield Cup (consists of):
Plastic Closure
Poly. Tubing
77-0466
77-0467
77-0391
77-0468
77-0423*
77-0469*
77-0470*
05-3166
03-6019
ÉDEAD WEIGHT TESTER ASSEMBLY
ËVISCOR CUP
INSTRUCTIONS
AND CHART
ÐSPLASH SHIELD
CUP
ÊTEST
GAUGE
SET
ÏLOAD CELL
ASSEMBLY
ÎTEMPERATURE
TRANSDUCER
ASSEMBLY
ÌDUMMY
INJECTOR
ÍCLAMP FORCE
AND TEMPERATURE
INDICATOR
Figure 5-1. Major Assemblies of the CD3 Audit Kit
* NOTE: The Clamp force and temperature indicator is calibrated for an individual load cell
assembly and temperature transducer assembly. The three items become a matched set. If a
problem with any of these items is suspected, return the indicator to Bacharach for calibration.
Instructions 77-9045
Bacharach, Inc.
Page 5-1
PARTS LISTS
CD3 AUDIT KIT
5.2
INDIVIDUAL REPLACEMENT PARTS
Item
Description
Part no.
1
2
3
4*
5
6
7
8
9
10
11
12
13
14
15
16
17
18
19*
20*
Case, without inserts (tap and bottom plate)
Graduated cylinder, 250 ml (cc)
Gauge adjusting tool
Quick connect socket on dead weight tester
Load cell push rod adapter
Load cell adapter
Load cell discharge head adapter
Connectors, str. shell 7-pin (on load cell and temperature transducer)
Quick connect insert
Flexible tubing, 1/4" OD (order by foot)
Connector for indicator
Quick connect socket on dummy injector
Quick connect socket, 1/4"
Ball valve
Shut-off coupling socket
High pressure hose for test gauge set
Pressure gauge, 0-600 psi
Flexible hose, Tygon, 1/4"ID (order by foot)
Nut with brass sleeve (1/4"OD tubing) (part of item 10)
Sealing washer for discharge head
24-0117
06-5492
77-0461
103-5396
77-0384
77-0383
77-0385
204-1681
103-5391
03-2912
204-1680
67-6660
03-5400
03-4275
03-5351
72-0414
77-0395
03-6063
03-2962
900-6091
* Not Shown
ÉCASE
ËGAUGE TOOL
ÊCYLINDER
ÒTUBING
ÚFLEXIBLE
HOSE
ÍPUSH ROD
ADAPTER
ÙGAUGE
ÎLOAD CELL
ADAPTER
ØHOSE
ÖVALVE
ÏDISCHARGE HEAD
ADAPTER
×COUPLING
ÕSOCKET
ÔSOCKETS
ÓCONNECTOR ÑQUICK
Ð7-PIN
CONNECT
CONNECTORS
INSERTS
Figure 5-2. Individual Replacement Parts
Page 5-2
Bacharach, Inc.
Instructions 77-9045