1
BuzzXplore
TM
User's Manual
Manual Part Number – BTBX-500-B
Copyright
The manual and the software described in this manual are copyrighted. All rights are
reserved. No part of the manual or the described software may be copied, reproduced,
translated or reduced to any electronic medium or machine readable format without
prior written approval of Buzz Tools®, Inc.
Software copyright Ó 2001-2002 by Buzz Tools®, Inc.
Documentation and online help copyright Ó 2001-2002 by Buzz Tools®, Inc.
All U.S. and international Rights Reserved rights reserved.
Trademarks
Buzz Tools is a registered trademark of Buzz Tools®, Inc.
BuzzEdit is a registered trademark of Buzz Tools®, Inc.
BuzzXplore is a trademark of Buzz Tools®, Inc.
Microsoft, Windows® are registered trademark of Microsoft Corp.
Other products and company names mentioned herein may be the trademarks of their
respective owners.
Welcome
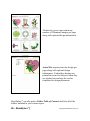
The Buzz Tools® programs were created by a hobby
embroiderer who got tired of doing the same routines
over and over again. My search for quick and accurate
design conversions and printable embroidery design
catalogs led to the development of the first Buzz
Tools® program, Buzz Tools® Plus.
BuzzXplore™ was developed from this original
program, and while it still contains many of the
features we have been proud to originate,
BuzzXplore™ has grown into a complete design
management tool. It is a MUST HAVE for any design
collector. We have expanded our design formats with
BuzzXplore™ and are excited to offer solutions for cross-stitch hobbyists.
Buzz Tools, Inc. has also developed an embroidery stitch editor, BuzzEdit®,
that provides embroidery users with a powerful editing program for analyzing
and modifying their stitch-based designs. It supports the newest and largest
multiple-position hoops available and includes the patented Stitches-in-Time®
display and provides powerful multi-hoop layout capabilities.
It has been exciting developing solutions for the sewing community and I hope
you enjoy the newest addition, BuzzXplore™!
Happy stitching!
Lisa A. Laufer
and the folks at Buzz Tools®, Inc.
Contents
WELCOME .................................................................................................. 5
ABOUT THIS GUIDE................................................................................ 11
USING THIS GUIDE .................................................................................... 11
Part One: Getting Started ..................................................................... 11
Part Two: BuzzXplore™ User’s Guide................................................... 11
Appendixes............................................................................................ 12
License Agreement ................................................................................ 12
Getting Started
INTRODUCTION TO BUZZXPLORE™ .................................................. 15
ABOUT BUZZXPLORE™ .............................................................................. 15
DESIGN SAMPLES ...................................................................................... 16
Designs Used in Examples .................................................................... 16
Professional Embroidery Samples......................................................... 16
PREREQUISITES .......................................................................................... 17
NOTATIONAL CONVENTIONS ...................................................................... 17
ABOUT BUZZ TOOLSÒ PRODUCTS............................................................... 17
IN A HURRY?............................................................................................. 18
INSTALLATION ....................................................................................... 19
SYSTEM REQUIREMENTS ............................................................................ 19
LAUNCH THE INSTALLATION CD BROWSER ................................................ 19
INSTALL BUZZXPLORE™ ............................................................................ 20
SET YOUR DISPLAY TO HIGH COLOR .......................................................... 22
INSTALL BUZZEDIT® LITE .......................................................................... 23
INSTALL PROFESSIONAL EMBROIDERY SAMPLES........................................ 25
REMOVE BUZZXPLORE™ OR BUZZEDIT® LITE ........................................... 26
®
Copyright © 2002 Buzz Tools , Inc.
|
Contents - 7
User's Guide
1 | HOW TO … ........................................................................................... 29
EXPLORE YOUR DESIGNS ........................................................................... 30
CHOOSE THE FILE TYPES TO DISPLAY ........................................................ 31
SWITCH BETWEEN XPLORER AND CATALOG MODES................................... 32
CHANGE VIEW OPTIONS ............................................................................ 33
CREATE A FOLDER ..................................................................................... 34
SELECT FILES AND FOLDERS ...................................................................... 34
COPY FILES AND FOLDERS ......................................................................... 35
MOVE FILES AND FOLDERS ........................................................................ 36
RENAME FILES AND FOLDERS .................................................................... 37
CONVERT DESIGNS .................................................................................... 38
CREATE DESIGN NOTES ............................................................................. 41
EXTRACT ZIP’D FILES ............................................................................... 43
ORGANIZE DESIGNS STORED ON HARD OR ZIP DRIVES .............................. 45
ORGANIZE DESIGNS STORED ON DISKETTES ............................................... 47
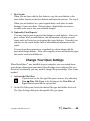
CHANGE YOUR OPEN SETTINGS ................................................................. 49
2 | BUZZXPLORE™ BASICS .................................................................... 51
TWO BROWSE MODES................................................................................ 51
Xplorer Mode........................................................................................ 51
Catalog Mode ....................................................................................... 52
Switching Modes................................................................................... 52
CHANGING THE VIEW ................................................................................ 53
Setting Thumbnail Size.......................................................................... 53
OTHER SETTINGS THAT AFFECT FILE DISPLAY ........................................... 54
File Filter ............................................................................................. 54
Sorting Files ......................................................................................... 54
THUMBNAIL OPTIONS FOR SEWING FILES ................................................... 55
Realistic 3-D Threads ........................................................................... 55
Sewing Thumbnail Information ............................................................. 56
Hoops and Borders ............................................................................... 57
Fabric Color......................................................................................... 57
ZIP ARCHIVES ........................................................................................... 57
What are ZIP Archive Files?................................................................. 57
8 – BuzzXplore™ |
®
Copyright © 2002 Buzz Tools , Inc.
ZIP Extraction Tool .............................................................................. 58
Create New ZIP Archives...................................................................... 59
PRINTED REPORTS ..................................................................................... 59
3 | ORGANIZING YOUR DESIGNS ........................................................ 61
WHERE WILL YOU STORE YOUR DESIGNS?................................................... 61
Storing Designs on Your Hard Drive..................................................... 61
Storing Designs on Diskettes................................................................. 62
Storing Designs on Zip Disks or Other Removable Media ..................... 62
Storing Designs on Writable Compact Discs ......................................... 63
CLASSIFYING DESIGNS............................................................................... 64
On Hard Drives .................................................................................... 64
Diskettes ............................................................................................... 65
4 | DESIGN NOTES & FINDING FILES.................................................. 67
FINDING FILES ........................................................................................... 67
Locate a File or Folder......................................................................... 67
Design Notes......................................................................................... 68
Windows® Find ..................................................................................... 69
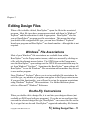
5 | EDITING DESIGN FILES.................................................................... 71
WINDOWS® FILE ASSOCIATIONS ................................................................ 71
ON-THE-FLY CONVERSIONS ....................................................................... 71
On-the-Fly Embroidery Conversions..................................................... 72
On-the-Fly Cross-Stitch Conversions .................................................... 73
On-the-Fly Settings ............................................................................... 74
6 | CONVERTING FORMATS.................................................................. 75
WHY CONVERT?........................................................................................ 75
BUZZXPLORE™ CONVERSIONS ................................................................... 76
Conversion Tools .................................................................................. 76
How Your Files are Processed .............................................................. 77
EMBROIDERY CONVERSIONS ...................................................................... 78
Colors During Conversions .................................................................. 78
File Splitting ......................................................................................... 79
Design Rotation and Resizing ............................................................... 80
Advanced Conversion Options .............................................................. 81
®
Copyright © 2002 Buzz Tools , Inc.
|
Contents - 9
CROSS-STITCH CONVERSIONS .................................................................... 82
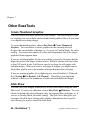
7 | OTHER BUZZTOOLS.......................................................................... 84
Create Thumbnail Graphics.................................................................. 84
Slide Show ............................................................................................ 84
WINDOWS® EXPLORER® TOOLS ................................................................. 85
Layout & Editing Users ........................................................................ 85
PC-Designer Users ............................................................................... 85
Professional Sew Ware Users ............................................................... 85
Appendices
A | BUZZXPLORE™ WORKSPACE ........................................................ 89
PRINCIPLE PARTS....................................................................................... 89
TOOLBAR .................................................................................................. 90
STATUS BAR.............................................................................................. 92
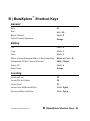
B | BUZZXPLORE™ SHORTCUT KEYS................................................. 93
General................................................................................................. 93
Editing.................................................................................................. 93
Locating................................................................................................ 93
Sorting Contents Pane .......................................................................... 94
Viewing................................................................................................. 94
Tools..................................................................................................... 94
C | EDITIONS & SUPPORTED FILE FORMATS .................................. 95
D | GETTING HELP .................................................................................. 97
TECHNICAL SUPPORT ................................................................................. 97
PROGRAM ENHANCEMENTS ....................................................................... 98
JOIN THE BUZZXPLORE™ EMAIL NEWSLETTER ........................................... 98
INDEX........................................................................................................101
LICENSE AGREEMENT.........................................................................106
10 – BuzzXplore™ |
®
Copyright © 2002 Buzz Tools , Inc.
About This Guide
BuzzXplore™ is a complete software package for managing your design
collection, whether it is embroidery, cross-stitch or both. BuzzXplore™ is a
Windows® based program and has many of the same familiar features as other
Windows® applications.
Using This Guide
This guide is divided into chapters that apply to the various features of
BuzzXplore™.
Part One: Getting Started
·
Introduction to BuzzXplore™ – provides an overview of BuzzXplore™
and basic product capabilities.
·
Installation – provides system requirements, installation and removal
instructions for BuzzXplore™, BuzzEdit® Lite, and the design samples.
Also provided is information on how to set your computer graphics display
to high color.
Part Two: BuzzXplore™ User’s Guide
·
Chapter 1 | How to … – provides instructions for many common
BuzzXplore™ tasks.
·
Chapter 2 | BuzzXplore™ Basics – provides basic information about
BuzzXplore, the different views, and how to change your BuzzXplore™
display. Also included is basic information about ZIP archive files and
printed reports.
·
Chapter 3 | Organizing Your Designs – discusses design organization
options and describes the steps necessary for organizing designs stored on
fixed or removable disks.
®
Copyright © 2002 Buzz Tools , Inc.
| About This Guide – 11
·
Chapter 4 | Design Notes & Finding Designs – describes how to use
BuzzXplore™ to locate specific designs and how the use of design note
files can assist in the locating of designs.
·
Chapter 5 | Editing Design Files – describes how to launch your
embroidery software and the settings that control how your designs are
converted on-the-fly, if required.
·
Chapter 6 | Converting Formats – describes how to convert your
designs. Includes specific information about embroidery design and
cross-stitch design conversions.
·
Chapter 7 | Other BuzzTools – describes a few other tools that are
included in BuzzXplore™.
Appendixes
·
A | BuzzXplore Workspace
·
B | BuzzXplore™ Shortcut Keys – lists shortcut keys available in
BuzzXplore.
·
C | BuzzXplore™ Editions and Supported File Formats – describes the
different editions of BuzzXplore™ that are available and where to find a list
of currently supported file formats
·
D | Getting Help – describes how to obtain technical support and
enhancements on Buzz Tools products.
License Agreement
·
Describes the agreement between you and Buzz Tools, Inc.
12 – BuzzXplore™ |
®
Copyright © 2002 Buzz Tools , Inc.
Getting Started
14 – BuzzXplore™ |
®
Copyright © 2002 Buzz Tools , Inc.
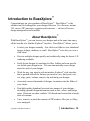
Introduction to BuzzXplore™
Congratulations on your purchase of BuzzXplore™. BuzzXplore™ is the
ultimate tool for looking after your design collection. It's a browser, instant
3-D viewer, ZIP processor, organizer and converter — the best all-in-one
design management tool available.
About BuzzXplore™
With BuzzXplore™, you can browse your designs and at the same time enjoy
all the benefits of a familiar Explorer® interface. BuzzXplore™ allows you to:
·
Look at your designs instantly. Just click on a folder to view thumbnail
images in large, medium, or small. BuzzXplore™ even lets you view a
slide show!
·
Preview multiple designs quickly and realistically using the fastest 3-D
rendering available.
·
Easily locate designs by searching for files, folders and even specific
text within your design notes. You can automatically create design
notes for each of your designs.
·
Work the way you want to with an intuitive Explorer® style interface
that is packed with all the features you need to view, find, print, sort,
cut, copy, paste, rename, convert, zip and unzip your designs.
·
Accurately convert thousands of designs, in minutes into the folder of
your choice.
·
Print high quality thumbnail or actual size images of your designs –
including optional design information such as size, colors, and design
notes. Printouts can show realistic 3-D threads and can include a handy
table of contents.
·
View, convert, or print the contents of ZIP archives files just as if they
were unzipped.
Copyright © 2002 Buzz Tools®, Inc.
| Introduction – 15
·
Open a design into your favorite application simply by double-clicking
on its image or icon. Designs are converted on-the-fly, if needed.
·
And finally organize your design collection and have time to SEW!
Design Samples
Designs Used in Examples
Some of the designs shown throughout the manual have been included with
BuzzXplore™. If you installed BuzzXplore™ into the default folder, you will
find the design samples in the following folder:
C:\Program Files\Buzz Tools\BuzzXplore\Samples
Other free designs are available for download from the Buzz Tools® web site:
www.buzztools.com
Professional Embroidery Samples
Several professional embroidery companies have included samples of their
embroidery designs for you to try. These embroidery design samples are
included only with the BuzzXplore™ Embroidery Edition.
The participating embroidery companies want you to experience first-hand the
quality of their designs without any additional expense or inconvenience.
Instructions for installing the Professional Embroidery Samples are on page 25.
You may purchase additional designs and collections from these companies.
Company information and ordering information is in the BuzzXplore™
Embroidery Edition Installation CD browser.
16 – BuzzXplore™ |
®
Copyright © 2002 Buzz Tools , Inc.
Prerequisites
Before beginning to use BuzzXplore™, you should have a working knowledge
of the MicrosoftÒ Windows® operating system and its conventions. You
should know how to use a mouse, standard menus and commands. You should
also know how to copy, open, save, print and close files. If you need to brush
up on these techniques, please see your MicrosoftÒ Windows® documentation
or a beginning Windows® book. There are many basic Windows® guides that
can be found at most bookstores.
Notational Conventions
Throughout this manual, we use the following conventions:
Menu and submenus are displayed together in the order that you will need to
select them. Menu and submenu items are separated by a ð character. For
example, "File ð Open" refers to the Open option of the File menu.
Dialog box titles are italicized and begin with uppercase letters. For example,
Report Wizard dialog box.
About Buzz ToolsÒ Products
Additional information about Buzz ToolsÒ products is available from the
following sources:
·
Your local Buzz ToolsÒ reseller
·
The Buzz ToolsÒ web site: www.buzztools.com
Information about Buzz Tools technical support is in Appendix D | Getting
Help beginning on page 97.
Copyright © 2002 Buzz Tools®, Inc.
| Introduction – 17
In a Hurry?
We know that you are anxious to get started using BuzzXplore™. If you are
already familiar with Windows® Explorer, you may find that you feel right at
home using BuzzXplore™. If not, here are some important areas of the manual
that can quickly assist you in using the program.
·
Installation Instructions – page19.
·
Chapter 1 | How to… – page 29 gives detailed instructions for many
common BuzzXplore™ tasks.
·
Chapter 2 | BuzzXplore™ Basics – page 51 provides an overview of the
program.
18 – BuzzXplore™ |
®
Copyright © 2002 Buzz Tools , Inc.
Installation
System Requirements
You can install BuzzXplore™ on any computer that satisfies the following
requirements:
·
Windows® 95, 98, ME, NT, 2000 or XP operating system installed
·
5 MB available space on your hard drive
·
256 colors minimum, 16-bit color or better recommended.
RECOMMENDED: Although BuzzXplore™ can run with a screen color setting of
256 colors, you will have better realistic 3-D thread simulations at color settings of
High Color (16 bits) or better. Directions for changing your color settings are
included on page 22 of this chapter.
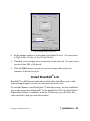
Launch the Installation CD Browser
1
From the Window® desktop close all open programs.
2
Place the BuzzXplore™ installation CD in the CD-ROM Drive. Wait a
moment for the CD to settle down in the drive.
3
From the Windows® Start menu, select Settings ð Control Panel.
4
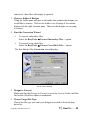
From the Control Panel, double-click the
Add/Remove Programs icon. The Add/Remove
Program Properties dialog box opens.
®
Copyright © 2002 Buzz Tools , Inc.
| Installation – 19
™
Use to install BuzzXplore onto your computer.
5
Click Install.
6
Microsoft Windows® locates the setup.exe installation program on the
installation CD and the Run Installation Program dialog box opens.
7
Click Finish to start the BuzzXplore™ Installation process. The
BuzzXplore™ Installation CD Browser opens.
Install BuzzXplore™
i Important Note: The original BuzzXploreÔ installation CD is required to
install or update your BuzzXploreÔ program. Do not lose your CD or you will not be
able to re-install BuzzXploreÔ or apply any of the free updates available from our
website: www.buzztools.com. In addition, after changes to your computer hardware,
BuzzXplore™ may prompt you to reinsert your installation CD.
20 – BuzzXplore™ |
®
Copyright © 2002 Buzz Tools , Inc.
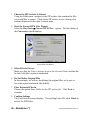
™
The BuzzXplore installation CD browser.
1
From the Installation CD browser, choose the option Install BuzzXplore™.
2
The Software License Agreement dialog box opens. This dialog box
displays the License Agreement between you and Buzz Tools, Inc. You
must accept the License Agreement before you can install BuzzXplore™.
If you do not accept the terms of the License Agreement, you should
promptly return BuzzXplore™ for a refund. For your convenience, the
license agreement is also included in this manual starting on page106.
3
Click the Yes button to accept. The User Information dialog box opens.
Use to type in your name, company and serial number.
®
Copyright © 2002 Buzz Tools , Inc.
| Installation – 21
4
When asked, type in your name, company name and serial number. The
serial number is located on the CD sleeve. Click the Next button to
continue.
5
The Choose Destination Location dialog box opens. On it, you are asked
where to install the software. The default program folder is C:\Program
Files\Buzz Tools\BuzzXplore. This default setting is the recommended
one. If this is not the location you want to use, you may use the Browse
button to locate another folder, or you may type the folder name in the text
bar on the dialog box. If the folder you chose does not exist, you are
prompted and, if you wish, the folder is created for you.
6
Setup will add program icons to the program folder Buzz Tools. This is the
recommended location for the BuzzXplore™ program icons. Click Next.
7
Follow the directions on the remaining BuzzXplore™ installation dialogs to
install BuzzXplore™ onto your computer. The last thing the installation
program does is to run BuzzXplore™ and check the installation CD for a
valid license key. If you ever reinstall BuzzXplore™ or install an update
from our website, you will again be required to insert the installation CD.
At the end of installation, the Buzz Tools® program group displays, and a
BuzzXplore™ icon is visible on your computer desktop. Be sure to check the
BuzzXplore Readme file for any late-breaking news.
Set Your Display to High Color
1
Using your alternate mouse button, click on your computer desktop away
from any program icons. Usually, the alternate mouse button is the right
mouse button.
2
From the Popup menu, choose Properties. The Display Properties dialog
box opens.
3
Along the inside top of the dialog box are tabs that look like file folder
tabs. Click the Settings tab.
22 – BuzzXplore™ |
®
Copyright © 2002 Buzz Tools , Inc.
Use to change display to high color
4
In the settings window is a drop down list labeled Colors. Set your colors
to High Color (16 bits) or True Color (24-bit).
5
If needed, you can adjust your screen area on the same tab. Set your screen
area to at least 800 x 600 pixels.
6
Click the OK button to accept your screen settings and restart your
computer if directed to do so.
Install BuzzEdit® Lite
BuzzEdit® is a full-featured embroidery stitch editor that allows you to edit
your existing designs to create your own personal work of art.
As an added bonus to our BuzzXplore™ Embroidery users, we have included a
free cut-down version of BuzzEdit® on the installation CD of the BuzzXplore™
Embroidery Edition. In addition, from the CD browser you will find a few
video tutorials to help you with this product.
®
Copyright © 2002 Buzz Tools , Inc.
| Installation – 23
To install BuzzEdit® Lite:
1
From Installation CD browser, choose the option Install BuzzEdit® Lite.
2
The Software License Agreement dialog box opens. This dialog box
displays the License Agreement between you and Buzz Tools, Inc. You
must accept the License Agreement before you can install BuzzEdit®. If
you do not accept the terms of the License Agreement, you should not
install this free program. For your convenience, the license agreement is
also included in this manual starting on page 105.
3
Click the Yes button to accept. The User Information dialog box opens.
Use to type in your name, company and serial number.
4
When asked, type in your name, company name and serial number. The
serial number is located on the CD sleeve. Click the Next button to
continue.
5
The Select Components dialog box opens. On it, you are asked what
components you want to install. The sample designs are optional and may
be installed later or not at all.
You can also change the installation folder. The default program folder is
C:\Program Files\Buzz Tools\BuzzEdit. This default setting is the
recommended one. If this is not the location you want to use, you may use
the Browse button to locate another folder, or you may type the folder
24 – BuzzXplore™ |
®
Copyright © 2002 Buzz Tools , Inc.
name in the text bar on the dialog box. If the folder you chose does not
exist, you are prompted and, if you wish, the folder is created for you.
6
Setup will add program icons to the program folder Buzz Tools. This is the
recommended location for the BuzzEdit® program icons. Click Next.
7
Follow the directions on the remaining BuzzEdit® installation dialogs to
install BuzzEdit® onto your computer.
8
At the end of installation, the Buzz Tools® program group displays, and a
BuzzEdit® icon is visible on your computer desktop. Be sure to check the
BuzzEdit Readme file for any late-breaking news.
Install Professional
Embroidery Samples
Several professional embroidery companies have included samples of their
embroidery designs for you to try. These embroidery designs are copyrighted
by their respective companies. Embroidery design samples are only included
with the BuzzXplore™ Embroidery Edition.
To install the embroidery design samples:
1
From Installation CD browser, choose the option Professional Embroidery
Samples.
2
The Installation browser will display a list of the participating embroidery
companies. Click on one of the companies to navigate to its installation
screen.
3
Click on the desired file type and follow the onscreen directions.
Remember: If you like these designs you can purchase additional varieties from the
participating embroidery company. Ordering information is included on the
Installation CD Browser.
®
Copyright © 2002 Buzz Tools , Inc.
| Installation – 25
Remove BuzzXplore™
or BuzzEdit® Lite
1
From the Windows® Start menu, select Settings ð Control Panel.
2
From the Control Panel, double-click the Add/Remove Programs icon.
The Add/Remove Programs Properties dialog box opens.
3
Using the scroll bar, locate the program name (BuzzXplore Embroidery
Edition, BuzzXplore Cross-Stitch Edition, or BuzzEdit Lite) and click on it
to select it.
4
Click Add/Remove….
5
On the Confirm File Deletion dialog box, click Yes.
26 – BuzzXplore™ |
®
Copyright © 2002 Buzz Tools , Inc.
User’s Guide
28 – BuzzXplore™ |
®
Copyright © 2002 Buzz Tools , Inc.
Chapter 1
How to …
Using the information in this chapter as a guide, you can try out the basic
features of BuzzXplore™. Once you become familiar with these basic
instructions, you can become more adventuresome and try different options.
Explore Your Designs.................................................................................30
Choose the File Types to Display................................................................31
Switch Between Xplorer and Catalog Modes ..............................................32
Change View Options.................................................................................33
Create a Folder ...........................................................................................34
Select Files and Folders ..............................................................................34
Copy Files and Folders ...............................................................................35
Move Files and Folders ..............................................................................36
Rename Files and Folders...........................................................................37
Convert Designs .........................................................................................38
Create Design Notes ...................................................................................41
Extract Zip'd Files ......................................................................................43
Organize Designs Stored on Hard Drives or ZIP Drives..............................45
Organize Designs Stored on Diskettes ........................................................47
Change Your File Open Settings.................................................................49
®
Copyright © 2002 Buzz Tools , Inc.
1|
How To… – 29
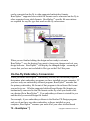
Explore Your Designs
1
Start BuzzXploreÔ .
Start BuzzXplore™ by double clicking the BuzzXplore™
icon located on your computer desktop. Alternatively, you
can use the program menu from the Windows® Start button
and navigate to Programs ð BuzzTools ð BuzzXplore.
2
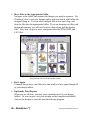
Xplorer Mode.
The first time you start BuzzXplore™, your files are shown in a familiar
Windows® Explorer® style interface. The Contents pane on the right
displays the contents of the current folder. The Folder pane on the lower
left lists the folders and drives on your computer. The upper left pane is
the File Filter pane where you can limit the number of files displayed by
filtering your files by file type. Don’t worry about File Filter pane now;
we will discuss it in the next section.
BuzzXplore Layout
3
Explore Drives and Folders.
Using the Folder pane, click on the drives and folders you want to explore.
30 – BuzzXplore™ |
®
Copyright © 2002 Buzz Tools , Inc.
4
Expand Folder Listings.
Click on a + to expand a listing and
display the folders and ZIP archive files it
contains.
5
Collapse Folder Listings.
Click on a – to collapse a listing and to
hide the folders and ZIP archive files it contains.
6
Display Folder Contents.
Click on any folder to see a listing of its
contents displayed in the right Contents pane.
7
Browse Files.
You can use the PgUp and PgDn keys to page up or down through the files
in the Contents pane.
NOTE: ZIP archives are a special type of file that store other files in a compressed
format. BuzzXplore™ displays ZIP archives as folders in the Folder pane of
BuzzXplore™. To view the contents of a ZIP archive file, click on it just as you
would a folder. Its contents are displayed in the right Contents pane. For more
information about ZIP archive files, see page 57.
Choose the File Types to Display
The first time you start BuzzXplore™, all file types are displayed and the File
Filter pane is displayed on the left above the Folder pane. You can limit the
number of files displayed by filtering your files by file category or by file type.
1
Start BuzzXploreÔ and Activate File Type Filtering.
When the File Filter pane is displayed,
file type filtering is in effect. If you do
not see the file type filter pane, activate it by
choosing View ð Filter File Types or by
clicking on the View Files of Type button
located on the top tool bar.
®
Copyright © 2002 Buzz Tools , Inc.
1|
How To… – 31
The File Filter pane allows you to choose any of the file types listed. It is
displayed as a selection tree so that you can choose all of a specific
category such as Embroidery Files or you can choose a specific file type
such as PCS – Pfaff.
2
Expand a File Type Category.
Click on the + in front of a file category to expand it and to
display the file types it contains.
3
Collapse a File Type Category.
Click on a – to collapse a file category and to hide the file types
it contains.
4
Choose Several File Types.
Click on the red selection boxes to the left of the file type or file
category. Notice that the right Contents pane is updated to display the
selected file types.
For a complete list of supported file types, please see your online help.
Switch Between Xplorer and Catalog Modes
Xplorer mode gives you quick access to any folder on your computer and you
will probably use it for most operations. However, there may be times when
you want to display together the contents of multiple folders without the
constraints of folder boundaries. Catalog mode provides this functionality.
You might find Catalog mode useful for reports, conversions or even sorting
across folders. For those familiar with Buzz Tools Plus, this is similar to the
classic interface. To switch between Xplorer and Catalog modes:
1
Start BuzzXploreÔ .
The first time you start BuzzXploreÔ it is in Xplorer mode. After that,
BuzzXplore™ remembers what mode you were last using so that the next
time BuzzXplore™ is started it begins in the same
32 – BuzzXplore™ |
®
Copyright © 2002 Buzz Tools , Inc.
2
folder and mode of last use.
3
Switch to Catalog Mode.
Choose View ð Catalog Mode or click
the Use Catalog Mode button located on
the top tool bar. Notice that the folder tree now
includes red selection boxes. This allows you to
select any combination of noncontiguous folders
and the results are displayed together, without
folder breaks, in the Contents pane.
4
Expand a Branch of the Folder Tree.
Click on the + in front of a folder name to
expand that portion of the tree.
5
Choose Folders.
Click on several of the red selection boxes to select the subfolders and
the files they contain. Notice that the Contents pane is updated with the
selected files and folders.
6
Switch to Xplorer Mode.
Choose View ð Xplorer Mode from the menu bar or again click
the Use Catalog Mode button to toggle modes. Notice that the
red selection boxes are hidden and that the Contents pane now displays
only the files in the current folder.
7
Switch Back to Catalog Mode.
Choose View ð Catalog Mode or click the Use Catalog Mode button to
toggle modes one last time. Notice that your catalog contains the same
folders that were selected in step 4 of this exercise.
Change View Options
1
Start BuzzXploreÔ .
For this exercise, you can be in either Xplorer or Catalog mode.
2
The View Button.
Notice the View button located on the right of the BuzzXploreÔ
®
Copyright © 2002 Buzz Tools , Inc.
1|
How To… – 33
toolbar. This button can be used to switch views.
3
Switch Views.
Click on the small arrow next to the View button to drop down a list of
your view options and try out the different view options. You can also
switch views by using the View menu. Notice how the various views affect
how your files are display. When you are finished, choose Large
Thumbnail option and proceed to Step 4.
4
Set Sewing Information.
Choose Sewing ð Summary Information and try out the various
information options.
Create a Folder
1
Switch to Xplorer Mode.
You can only create folders in Xplorer mode. So, if you are not already in
Xplorer mode, choose View ð Xplorer Mode.
2
Navigate to the Desired Location.
Navigate to the drive and/or folder where you want the new folder created.
Click on the folder name to select it. The new folder will become a
subfolder of the selected folder.
3
Create New Folder.
Choose File ð New Folder
4
Name the New Folder.
Type a name for the folder and
click OK.
Select Files and Folders
You must select files and folders before you can move or copy them into other
folders. In addition, you may also want to select files before you use one of
the BuzzXploreÔ tools or before you create a report. You can use several
techniques to select files and folders. The best technique will depend on
34 – BuzzXplore™ |
®
Copyright © 2002 Buzz Tools , Inc.
which files and/or folders you need to select. The following table outlines the
methods that can be used in BuzzXploreÔ.
To Select…
Use this Procedure…
A single file
or folder
·
Click on the item you wish to select.
Multiple files
or folders
·
Hold down the Ctrl key and click the desired items.
A group of
consecutive files
or folders
·
Click on the first item in the consecutive list.
·
Hold down the Shift key and click on the last item in
the list.
Any combination
of files and
folders
·
Use any of the above methods in combination. For
example, you can select a group of consecutive files
by using the Shift + click method and then use Ctrl +
click to select another file to add to the group.
All of the files
and folders in the
Contents pane.
·
Choose Edit ð Select All or use the keyboard
shortcut Ctrl + A.
Copy Files and Folders
Copying creates an exact duplicate of a file or a folder. The copy can be
placed in a new folder or drive. There are several methods that can be used for
copying files and folders.
Method
Procedure
Copy and Paste
1
Select the items to be copied.
2
Choose Edit ð Copy or click the Copy button.
If you are in Catalog mode and you want to copy a
folder, click on it with your alternate mouse button
and choose Copy from the popup menu.
®
Copyright © 2002 Buzz Tools , Inc.
1|
How To… – 35
Drag and Drop
3
In the Folder pane, find the folder where you would
like to place a copy of the items and click on it with
your alternate mouse button. Choose Paste from the
popup menu.
1
Select the items to be copied.
2
Hold down the primary mouse button and drag the
items so that the mouse cursor is over the folder where
you want to place a copy. Don't let go of the mouse
button yet.
3
Press and hold the Ctrl key and
notice that a + appears by the
drag cursor indicating that you
are creating a copy of the items.
Release the mouse button and
then release the Ctrl key.
4
Choose Copy Here from the Popup menu.
NOTE: The primary mouse button is the mouse button you have set up to perform
normal selection and dragging. You generally click this button using your index
finger. If you are right handed, this is usually set to the left mouse button. If you are
left handed, this is usually set to the right mouse button.
Move Files and Folders
When you move a file or folder, the original item is deleted from its original
location and it is placed in a new location. There are several methods that can
be used for moving files and folders.
36 – BuzzXplore™ |
®
Copyright © 2002 Buzz Tools , Inc.
Method
Procedure
Cut and Paste
1
Select the items to be moved.
2
Choose Edit ð Cut or click the Cut button.
If you are in Catalog mode and you want to cut a
folder, click on it with your alternate mouse button
and choose Cut from the popup menu.
3
Drag and Drop
1
2
The Cut command sends the selected items to the
Windows® Clipboard, and marks them for removal.
They are removed only during a subsequent paste
command.
In the Folder pane, find the folder where you would
like to place the items and click on it with your
alternate mouse button. Choose Paste from the popup
menu.
Select the items to be moved.
Drag the items to their new location
Rename Files and Folders
There may be times when you want to change the name of a file or folder.
This can be accomplished in several ways.
METHOD ONE
Not Available in
Thumbnail View
®
1
Click once on the file or folder you wish to rename.
Pause 2 seconds, then click again on the same file or
folder. You know when it is ready to rename when
you see a square around the highlighted name and the
cursor is blinking at the end of the name.
2
Type the new name and the old name is erased as soon
as you begin to type.
Copyright © 2002 Buzz Tools , Inc.
1|
How To… – 37
OR
2
Select any portion of the name you wish to change and
then re-type it.
Note: Be sure to type in the same extension when you
enter the new name or the file may become unusable.
METHOD TWO
1
Use your alternate mouse button and click on the file
name or folder you wish to rename. Choose Rename
from the Popup menu. A square appears around the
highlighted name and the cursor blinks at the end of
the name.
2
Type the new name and the old name is erased as soon
as you begin to type.
OR
2
Select any portion of the name you wish to change and
then retype it.
Note: Be sure to type in the same extension when you
enter the new name or the file may become unusable.
Convert Designs
1
Start BuzzXplore™ and Activate Xplorer Mode.
If you are not already in Xplorer mode, activate it by choosing
View ð Xplorer Mode.
2
Choose File Types to Show.
Before you begin, filter your files as desired
using the instructions on page 31. You may
convert from multiple file types at the same time.
Don't worry if BuzzXplore™ includes designs of
the target file type or file types that cannot be
38 – BuzzXplore™ |
®
Copyright © 2002 Buzz Tools , Inc.
converted - these files will simply be ignored.
3
Choose a Folder of Designs.
Using the Folder pane, navigate to the folder that contains the designs you
would like to convert. Click on the folder to see a listing of its contents
displayed in the right Contents pane. These are the designs we are going
to convert.
4
Start the Conversion Wizard.
·
To convert embroidery files:
Select the BuzzTools ð Convert Embroidery Files… option.
·
To convert cross-stitch files:
Select the BuzzTools ð Convert Cross-Stitch Files… option.
The first dialog of the Conversion wizard displays.
Use to Convert Designs.
5
Designs to Convert.
Make sure that the Designs to Convert is set to the Current Folder and that
the Include Subfolders option is unchecked.
6
Choose Target File Type.
Choose the file type you want your designs converted to from the drop
down list.
®
Copyright © 2002 Buzz Tools , Inc.
1|
How To… – 39
7
Do Not Delete Original Files
In this example, we will not be deleting the original files, so be sure to
leave this option unchecked (the default).
8
Place Converted Designs In.
Choose the option Same Folder as the Original Design File.
9
Click Next to continue.
A. Cross-Stitch Conversions Only
If you are converting cross-stitch files, you will not see the next two
conversion screens as they relate to embroidery specific conversion
options and you should skip forward in these instructions to step 11.
B. Embroidery Conversions Only
The second conversion screen allows specify the target file type version
and allows you to change how your designs are split.
Embroidery Conversion Options
Change the file version if required by your embroidery software and leave
the split design settings at their default values. Click Next to continue.
10 Conversion Hoop Settings.
The Conversion Hoops dialog displays. By default, designs are rotated
during the conversion if needed to fit in the hoop size but designs will not
40 – BuzzXplore™ |
®
Copyright © 2002 Buzz Tools , Inc.
be shrunk or converted if too big to fit in the hoop. Leave these settings
alone and click Next to continue.
11 Confirm Conversion Settings.
The last conversion screen displays. BuzzXplore™ displays the number of
files that will be converted along with the options specified. Click Finish
to convert your files and to display your updated catalog.
NOTE: In this example, we used Xplorer mode but you can also convert your designs
from Catalog mode. This is useful if you have several noncontiguous folders of
designs to convert.
Create Design Notes
The Create Design Notes wizard creates individual note files for the currently
selected design files or for all the design files in the current folder or catalog.
It can also be used to create one design note file that contains information
about multiple designs. Once a note file is created, you may edit it to add
information specific to the design. To create your design notes:
1
Start BuzzXplore™ and Activate Xplorer Mode.
If you are not already in Xplorer mode, activate it by choosing
View ð Xplorer Mode.
2
Select a Folder
Using the Folder pane, navigate to the folder that contains the designs you
would like to create notes for. Click on the folder to see a listing of its
contents displayed in the right Contents pane
3
Start Create Notes Wizard.
Once you have made your selection, choose the
BuzzTools ð Create Design Notes… option.
4
Choose which Designs to "Create Notes For".
On the first wizard screen, select which designs to create notes for.
®
Copyright © 2002 Buzz Tools , Inc.
1|
How To… – 41
Create Design Notes Wizard
5
Skip Files with Pre-Existing Note Files.
Have BuzzXplore™ skip files that already have design notes.
6
Choose Separate Files.
In this example, we will make a separate note file for each design. Choose
the option, Separate Files for Each Design File.
Click Next to continue.
7
Include a Detailed Summary of the Design.
Choose the contents option Detailed Summary. The note files created will
42 – BuzzXplore™ |
®
Copyright © 2002 Buzz Tools , Inc.
include colors and stitching order along with the file name, design size, the
number of stitches, the number of colors and any embedded comments.
8
Add a Comment If Desired.
Use the comment field to add additional information if desired and click
Next to continue.
9
Confirm Settings.
The Confirmation screen displays. If everything looks OK, click Finish to
create your design notes.
10 Edit New Design Notes If Desired.
You may edit any of the design notes by double-clicking its thumbnail or
icon. BuzzXplore™ will automatically open the design note in notepad (or
other editor if you have changed your Windows® Explorer® associations).
Extract ZIP’d Files
If you always use BuzzXplore™ to launch your embroidery software and to
open your designs, you do not need to extract your designs from their ZIP
archives. If you want to be able to open them directly from your embroidery
software, you will probably need to extract your designs from their ZIPs.
An easy way to extract ZIP'd files is to select the files in BuzzXplore™ and to
copy them to a folder of your choice. Alternatively, BuzzXplore™ also
includes a tool for the batch extraction or unzipping of ZIP'd files. It is
discussed here.
1
Start BuzzXplore™ and Activate Xplorer Mode.
If you are not already in Xplorer mode, activate it by Choosing View ð
Xplorer Mode.
2
Turn Off File Type Filters.
You will probably want to extract all of the files contained within
the selected ZIP archives. Therefore, you will want to turn off
any file filters that would limit which file types are extracted. If the File
Filter pane is displayed and active, you should turn it off by choosing View
ð Filter File Types or by clicking on the View Files of Type button
located on the top tool bar.
®
Copyright © 2002 Buzz Tools , Inc.
1|
How To… – 43
3
Choose the ZIP Archive to Extract.
Using the Folder pane, navigate to the ZIP archive that contains the files
you would like to extract. Click on the ZIP archive to see a listing of its
contents displayed in the right Contents pane.
4
Start the Extract ZIP'd Files Wizard.
Select the BuzzTools ð Extract ZIP’d Files… option. The first dialog of
the Conversion wizard displays.
Extract ZIP'd Files Wizard
5
Select Files to Process.
Make sure that the Files to Extract is set to the Current Folder and that the
Include Subfolders option is unchecked.
6
Do Not Delete Original Files
In this example, we will not be deleting the original files, so be sure to
leave this option unchecked (the default).
7
Place Extracted Files In.
Choose the option Same Folder as the ZIP archive file. Click Next to
continue.
8
Confirm Settings.
The Confirmation screen displays. If everything looks OK, click Finish to
extract the ZIP'd files.
44 – BuzzXplore™ |
®
Copyright © 2002 Buzz Tools , Inc.
Organize Designs Stored
on Hard or ZIP Drives
Additional information can be found in the chapter on Organizing Your
Designs starting on page 61.
1
Create Folder Structure.
You can only create folders in Xplorer mode. So, if
you are not already in Xplorer mode, choose View ð
Xplorer Mode.
If you haven't already done so, create a main design
folder on your hard drive or ZIP drive. This could be
called My Designs or something similar. Under this
folder, add subfolders for main subjects of designs.
You can set up these up automatically using the
Buzztools ðCreate Category Folders.
If you decide to set them up yourself, you should set up main subjects like
Alphabets, Animals, Cartoon, Children, Floral, etc… Beneath your main
subjects, add folders to refine the categories even more. For example,
under the main Animals folder you might have a subfolder for Dogs, Cats,
Horses, etc…
2
Turn Off File Type Filtering.
You will probably want to reorganize all of the files contained in
your folders so you don't miss any design notes, design graphics
or other companion files. Therefore, turn off any file filters that would
limit which file types are displayed. If the File Filter pane is displayed and
active, you turn it off by choosing View ð Filter File Types or by clicking
on the View Files of Type button.
3
Sort by Name.
When organizing designs, it is best if files are sorted by name so that
companion files are adjacent to one another in the Contents pane. Choose
View ð Sort Files by ð Name or use the keyboard shortcut Shift + N.
®
Copyright © 2002 Buzz Tools , Inc.
1|
How To… – 45
4
Move Files to the Appropriate Folder.
Navigate to the folder that contains the designs you need to organize. Use
Thumbnail view to see your designs and to help you decide what folder the
designs belong in. You can select multiple files at one time, drag, and
drop the files into the appropriate folder. If you are keeping text files with
design information, you will need to move these along with the design
files. Also, don’t forget to move companion files like PEM, BMP, and
LAY files.
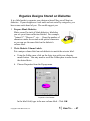
Drag and Drop Files into the Appropriate Folders
5
Do it Again.
Continue this process, one folder at a time until you have gone through all
of your design folders.
6
Optionally Print Reports.
When you are all done, you may want a printed report of your design
folders. Or you can just view your designs on the computer and double
click on the designs to start the associated design program.
46 – BuzzXplore™ |
®
Copyright © 2002 Buzz Tools , Inc.
Organize Designs Stored on Diskettes
It is a little harder to organize your designs when all they are all kept on
diskettes. If your designs are a real mess and not sorted by categories, you
have some work ahead of you. We would suggest you:
1
Prepare Blank Diskettes.
Make yourself a stack of blank diskettes, labeled as
you see your future collection labeled. For example,
"Animal 1", "Flowers 1", etc.… Keep the number of
characters under eleven and avoid special characters
so you can use the same label on the diskette's
volume label.
2
Write Diskette Volume Labels.
Put a unique volume label on each diskette to match the exterior label.
a. Using the Folder pane, click on the drive icon with your alternate
mouse button. You may need to scroll the Folder pane in order locate
the desired drive.
b. Choose Properties from the Popup menu.
Properties of the Diskette
In the label field, type in the new volume label. Click OK.
®
Copyright © 2002 Buzz Tools , Inc.
1|
How To… – 47
3
Create a Temporary Folder.
Create a temporary folder on your computers hard drive. You might call
the folder something like Design Work Space.
4
Turn Off File Type Filters.
You will probably want to reorganize all of the files on the
diskettes. Therefore, you will want to turn off any file filters that
would limit which file types are displayed and selected. If the File Filter
pane is displayed and active, you should turn it off by choosing View ð
Filter File Types or by clicking on the View Files of Type button.
5
Sort by Name.
When you are organizing designs, it is best if your designs are sorted by
name. This way any design notes, design graphics or other companion
files are adjacent to one another in the Contents pane. Choose View ð
Sort Files by ð Name or use the keyboard shortcut Shift + N.
6
Copy Files from Original Diskettes.
Take one of your original diskettes and copy all of its files to the
temporary folder on your hard drive.
7
Convert Designs If Desired.
If you want the designs converted to a different file format, do it while the
designs are on your hard drive.
8
Move Files to the Appropriate New Diskette.
Use Thumbnail view to see your designs and to help you decide on which
what diskette to store your files. You can select multiple files at one time,
and then cut and paste them onto the appropriate diskette. If you are
keeping note files (.TXT) with design information, you will need to move
these along with the design files. Also, don’t forget to move companion
files like PEM, BMP, and LAY files.
Remember, space is limited on diskettes so do not over fill them. Always
leave at least 15% empty space. This little extra room will save you a lot
of frustration later on.
48 – BuzzXplore™ |
®
Copyright © 2002 Buzz Tools , Inc.
9
Do it Again.
When you are done with the first diskette, copy the next diskette to the
same folder location as the first diskette and repeat the process. See step 6.
When you are finished, save your original disks a safe place or make
backups of your new disks. Diskettes have a high failure rate and we
wouldn't want you to lose your valuable designs.
10 Optionally Print Reports.
You may want to print a report of the designs on each diskette. Since you
put a volume label on each diskette, this information will print on your
report and it will assist you in locating the correct diskette. If needed, you
can also use the report header field to add additional information to the
report.
You can store these printouts in a notebook by subject along with the
associated design diskette. Most office supplies stores sell notebook pages
that can be used to hold diskettes.
Change Your Open Settings
When BuzzXplore™ was installed on your computer, you were asked about
your design software and your initial Open Settings were configured for you.
However, occasionally you may need to change the open settings. Here is one
method:
1
Activate the File Filter.
If you do not see the file type filter pane, activate it by choosing
View ð Filter File Types or by clicking on the View Files of
Type button located on the top tool bar.
2
On the File Filter pane, locate the desired file type and double click on it.
The Open Settings dialog for that specific file type opens.
®
Copyright © 2002 Buzz Tools , Inc.
1|
How To… – 49
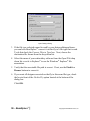
Open Settings Dialog
3
If the file type selected cannot be read by your design editing software,
you can have BuzzXplore™ convert it on-the-fly to a file type that is read.
To do this check the Convert Files to Type box. Next, choose the
destination file format from the drop down list.
4
Select the name of your embroidery software from the Open With drop
down list or set it to Explorer® to use the Windows® Explorer® file
association.
5
Verify that the executable file path is correct. If not, use the Find it or
Browse buttons to correct it.
6
If you want all designs converted on-the-fly to this same file type, check
the box in front of the On-the-Fly option located at the bottom of the
dialog box.
Click OK.
50 – BuzzXplore™ |
®
Copyright © 2002 Buzz Tools , Inc.
Chapter 2
BuzzXplore™ Basics
The designs stored on your computer are stored in files. Microsoft Windows®
stores your files in a structure similar to a paper filing system, with its
equivalents of filing cabinets, drawers, folders and documents. Using
BuzzXplore™, you can gain direct access to any file, folder, disk, or drive.
BuzzXplore™ displays your files in the structure you have on your drives.
You will not be moving your files into a separate catalog, but rather browsing
the files as they are stored on your drives. BuzzXplore™ does not take any
additional disk space to create and maintain catalogs.
Two Browse Modes
BuzzXploreÔ has two modes for browsing through disks and folders; Xplorer
mode and Catalog mode. You will probably use Xplorer mode for most
activities. However, it is important to recognize how each mode operates and
how you can switch from one mode to the other.
Xplorer Mode
By default, BuzzXplore™ displays your files in Xplorer
mode. This mode is very similar to Windows®
Explorer, so if you are familiar with Windows®
Explorer, you should feel right at home.
The list of computers, disks and folders in the lower
Folder pane (the folder tree) gives you direct access to
any drive or folder on your computer or on a network.
You click the plus sign next to a drive or folder to
expand that branch of the tree structure and to see the
subfolders it contains. Click on a minus sign to collapse
the branch and to hide the subfolders.
®
Copyright © 2002 Buzz Tools , Inc.
2|
BuzzXplore™ Basics – 51
When you click on a folder name in Folder pane on the left, its contents are
displayed in the Contents pane on the right. You can scroll the contents of the
right Contents pane using the Scroll button or by pressing the PgUp or PgDn
keys. You can quickly advance to the next folder with files by pressing the
Ctrl + PgDn keys.
Catalog Mode
You can also display your files in Catalog mode. Catalog mode is very similar
to Xplorer mode except you can include multiple folders in the Contents pane.
For those familiar with Buzz Tools Plus, this is similar to the classic interface.
Each item on the list of computers, disks and folders in the folder tree includes
a red selection box. Click on a selection box to
include the contents of its subfolders and files in the
right Contents pane. The files of the selected folders
are listed contiguously, which makes it easy to page
through multiple folders and the files are displayed
together without the constraints of folder boundaries.
When you click on an individual file, its folder path
is displayed at the top of the Contents pane. The
folder path is also displayed when multiple files are
selected that all belong to the same folder.
Otherwise, the top of the Contents pane displays
general information messages, such as the number of folders currently marked.
NOTE: Catalog Mode allows you to specify noncontiguous folders. This is
especially useful in batch operations (such as convert or unzip) and in printed reports.
Switching Modes
You can quickly switch between modes by clicking on the Use Catalog
Mode button or selecting the appropriate mode listed on the View menu.
You can switch from Xplorer mode to a new clear catalog by choosing New
Catalog from the View menu.
52 – BuzzXplore™ |
®
Copyright © 2002 Buzz Tools , Inc.
Changing the View
BuzzXplore™ has five main view options that affect how your files and folders
are displayed in the Contents pane. These settings affect your display in both
Xplorer and Catalog modes. When first launched, BuzzXploreÔ displays
medium sized Thumbnails. The view settings are changed using the View
menu.
The following views are available:
Thumbnail view: Displays a thumbnail picture of
designs, graphics, or other files along with the file name
and extension. File types that are not supported by
BuzzXplore™ are displayed as large icons.
Large Icons view: Shows the file name and extension
beneath a large icon. Files are listed in a horizontal
multiple-column format.
Small Icons view: Shows the file name and extension
beside a smaller icon. Files are listed in a horizontal
multiple-column format.
List view: List view is similar to the Small Icons view, but the files are listed
in a vertical-column format.
Detail view: Detail view displays more information about the files such as the
file size, type and last modification date. Files are listed in a vertical singlecolumn format.
Setting Thumbnail Size
Thumbnails are available in four sizes. Use the View menu to choose a
thumbnail size of Full Window, Large, Medium, or Small.
®
Copyright © 2002 Buzz Tools , Inc.
2|
BuzzXplore™ Basics – 53
Other Settings that Affect File Display
File Filter
The file filter determines which file types to display in both Xplorer and
Catalog modes. The File Filter pane is displayed in the upper left when file
filtering is turned on. It lists the file types (by category) that can be shown in
thumbnail view.
or by
You can turn the file filter on and off with the File Filter button
using the View menu. The box beside the file
type indicates whether or not the type is shown in
the Contents pane. You can quickly choose all
file types within a particular category by clicking
on the box beside the category name. If a
category check box is only half filled, only some
of its file types have been selected for display.
Sorting Files
The Contents pane of your BuzzXplore™ window may contain many files and
folders. You can change the order in which the files are displayed by sorting
them. The message area on top right of the Contents pane displays the current
sort criterion.
BuzzXplore™ applies the chosen sort criteria to every folder that you browse.
Your sort settings are saved between sessions so that the next time you start
BuzzXplore™ your files are sorted by the same criteria. In Catalog mode, the
Contents pane can display files in multiple folders; these files are sorted
without the constraints of folder boundaries.
Sorting Files Using the View Menu
You can sort by name, file type, date, folders (catalog mode only), design
width, design height, number of stitches, or number of colors (See View ð
Sort by… menu options.). When you sort by one of the sewing options (i.e.
design width, design height, number of stitches, or number of colors) any file
that cannot be sorted by the criteria is placed at the bottom of the folder.
54 – BuzzXplore™ |
®
Copyright © 2002 Buzz Tools , Inc.
Sorting By Column Click in the Detail View
When displaying files in a detail view, you can click on the column headers to
sort the list by that columns information. Subsequent clicks on the same
column header will reverse the sort order (toggles between ascending /
descending).
Detail View
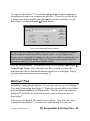
Thumbnail Options for Sewing Files
When you purchased BuzzXplore™, it came pre-packaged with the basic
BuzzXplore™ program and support for either Embroidery or Cross-stitch
designs. If you would like BuzzXplore to support both Embroidery designs
and Cross-stitch designs, you can do so by purchasing and installing both the
BuzzXplore Embroidery Edition and BuzzXplore Cross-Stitch Edition.
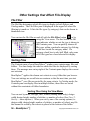
Realistic 3-D Threads
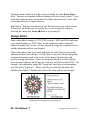
When you display your cross-stitch or embroidery files in thumbnail view,
your designs are displayed using realistic three-dimensional threads so you can
see how your designs will look when sewn. You can customize how the
threads are displayed with the Sewing ð Realistic 3-D Thread Settings menu.
You can also turn off the Realistic 3-D Threads from the Sewing Menu. You
might want to do this in order to improve the contrast of small thumbnail
images, or if your computer or monitor does not support High Color mode.
NOTE: You cannot display beautiful realistic threads if your monitor is set to 256
colors or less. Set your monitor to at least 16-bit High Color. For directions on
changing your color settings, see page 22.
®
Copyright © 2002 Buzz Tools , Inc.
2|
BuzzXplore™ Basics – 55
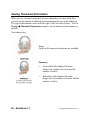
Sewing Thumbnail Information
When you are viewing Thumbnails of your embroidery or cross-stitch files,
you can set the amount of additional sewing information you want displayed.
The type of information varies with the type of file (see chart below). Use the
Sewing ð Thumbnail Information menu to set the amount of information to
include.
Your choices are:
None:
Only the file name and extension are included.
Summary:
56 – BuzzXplore™ |
·
Cross-stitch files display file name,
design size, number of crosses and the
number of colors.
·
Embroidery files display file name,
design size, the number of stitches and the
number of colors.
®
Copyright © 2002 Buzz Tools , Inc.
Details:
·
Cross-stitch files display the thread colors
along with the file name, design size,
number of crosses and the number of
colors.
·
Embroidery files display the thread colors
and stitching order along with the file
name, design size, the number of stitches
and the number of colors.
Hoops and Borders
You can choose whether to display the hoop boundary (embroidery designs
only) or the design border. These options are set from the Sewing menu.
Fabric Color
You can change the fabric color for design thumbnails. The fabric color
affects the background color of all designs. Use the Sewing ð Fabric Color
command to open the Color dialog box where you can choose one of the basic
colors or define custom colors.
ZIP Archives
What are ZIP Archive Files?
If you have ever surfed the Internet looking for design files, you will have
quickly noticed two things. First, the Internet is bursting with FREE designs
and second, most of these designs are distributed as ZIP archive files. ZIP
archives are files that contain other files and that are compressed so that they
take up less disk space. Most design files available on Internet are distributed
as ZIP archives because ZIP's make it easy to group files and make
transporting and copying these files faster.
®
Copyright © 2002 Buzz Tools , Inc.
2|
BuzzXplore™ Basics – 57
When you extract ZIP'd files, you decompress the files stored in the ZIP
archive and save them as separate files on a disk. This step is not necessary
with BuzzXplore™ because BuzzXplore™ allows you to include ZIP'd files and
even allows you to open them in your design software by automatically
extracting on-the-fly as needed. In BuzzXplore™, ZIP archives are treated like
folders and design files within the ZIP archive files are treated as ordinary
files, meaning you can view them, convert them, create notes for them, search
for them, etc…
You can also choose not to show the contents of ZIP archives by turning off
the Show ZIP Contents option on the View menu.
ZIP Extraction Tool
An easy way to extract ZIP'd files is to select the files in BuzzXplore™ and to
copy them to a folder of your choice. Alternatively, BuzzXplore™ also
includes a tool for the batch extraction or unzipping of ZIP’d files. When you
extract ZIP archives, you can choose to have the extracted files saved into the
same folder as the original ZIP archive or you can choose a new folder
location for the extracted files. Only the displayed file types are extracted.
Therefore, turn off your file filter if you want to extract all of the files in the
processed ZIPs.
Extract ZIP'd Files Wizard
58 – BuzzXplore™ |
®
Copyright © 2002 Buzz Tools , Inc.
To extract files from ZIP archives, choose BuzzTools ð Extract ZIP'd
Files…. You can choose to extract the currently selected ZIP archive only,
the current folder of ZIP archives (with or without subfolders), or, if you are in
Catalog Mode, the entire catalog.
NOTE: The contents of ZIP archives with passwords are not displayed in
BuzzXplore™ and are NOT available for extraction.
Create New ZIP Archives
You can create a new empty ZIP archive just as you might create a new empty
folder. To create a new ZIP archive, activate Xplorer mode and navigate to
the folder in which you want to create the new archive. Choose File ð New
ZIP Archive. You can then move or copy files to the ZIP archive just as if it
were a folder. The next chapter of this manual talks more about folders and
organizing your designs.
Printed Reports
The BuzzXplore™ report wizard guides you through printing thumbnail reports
or actual size templates of your files. To start the report wizard choose
BuzzTools ð Print Report…
When files are printed in reports, they are always sorted by folder and file
name regardless of how they are sorted for display purposes. Only the
displayed file types are included in your report so make sure the file filter pane
is set before you start the Print Report wizard. Each folder starts on a new
page, except ZIP archives do not cause a page break and their contents are
sorted by name alongside the other ordinary files.
You can choose from the following types of reports:
®
Copyright © 2002 Buzz Tools , Inc.
2|
BuzzXplore™ Basics – 59
Thumbnail reports can contain any
number of Thumbnail images per page
along with optional design information.
Actual Size reports print one design per
page along with optional design
information. Embroidery designs are
printed the same size they are when they
are stitched out and may be used as
templates for design placement.
BuzzXplore™ can also print a Folder Table of Contents that lists all of the
folders included in your current report.
60 – BuzzXplore™ |
®
Copyright © 2002 Buzz Tools , Inc.
Chapter 3
Organizing Your Designs
You have already learned how to use BuzzXplore™ to browse the drives and
folders on your computer. This chapter includes information about storage
options and about how to use BuzzXplore™ to organize your designs.
Where will you store your designs?
Before you start organizing your designs, you need to give some thought as to
whether you want to store your designs on your hard drive, on diskettes, Zip
disks or on writable compact discs. Below is information about each of these
methods to help you decide on the best method for you.
Storing Designs on Your Hard Drive
It is easiest to locate designs if they are all stored on
your hard drive. Computer hard drives are becoming
larger and less expensive too, which makes this method
of design storage even more attractive. In addition,
hard drives do not fail as often as diskettes or other
removable storage devices. If you are a computer
novice, we strongly recommend you keep designs on
your hard drive.
Backing Up the Files on Your Hard Drives
Unexpected disasters can happen even when your designs are stored on your
computer's hard drive. Occasionally, hard drives fail and computer viruses can
make your important files unusable. Therefore, it is essential to make
additional copies of your files to protect them from disaster.
Windows ® provides a system backup tool just for this purpose. The backup
tool allows you to make, compare, or restore backup copies of files and folders
®
Copyright © 2002 Buzz Tools , Inc.
3 | Organizing Your Designs
- 61
onto either floppy disks or tape. In addition, the manufacturers of Zip drives
and writable compact disc drives include similar backup programs that can be
used to write backups onto their supported media. Use one of these program
utilities to maintain current copies of the files you can't live without in case
anything ever happens to your computer or hard drive. Refer to a Windows®
Reference, your Zip drive manual or your compact disc documentation for
further instructions on your particular backup tool.
Storing Designs on Diskettes
You can also store designs on diskettes. However,
the space on diskettes is very limited which makes
organizing your designs more difficult. In addition,
reading and writing to diskettes is a lot slower then
your hard drive. Diskettes are more prone to error
and are adversely affected by heat and magnetic
fields. Diskettes fail three to five percent of the time, and are more prone to
failure when filled to capacity.
Backing Up Your Diskettes
To make an exact copy of a diskette, use your alternate mouse button and click
on the floppy drive icon located in the Folder pane. Choose Copy Disk from
the Popup menu and follow the directions. Refer to a Windows® Reference for
more information.
Storing Designs on Zip Disks or Other Removable Media
This option is slightly better than storing your designs on diskettes because
these storage devices have more space and are more reliable. However, since
many of the same considerations apply, be sure to read the information on
diskettes provided above and keep current backups of all your disks.
Backing Up Your Zip Disks
To make an exact copy of a Zip disk, use your alternate mouse button and click
on the zip drive icon located in the Folder pane. Choose Copy Disk from the
62 – BuzzXplore™ |
®
Copyright © 2002 Buzz Tools , Inc.
Popup menu and follow the directions. Refer to a Windows® Reference for
more information.
Storing Designs on Writable Compact Discs
The majority of new computers now come with a
writable compact disc drive (CD-RW drive). While
you can use CDs as your primary storage method, they
are harder to set up than a hard drive and cannot be
changed as quickly and easily. Compact discs are
more reliable than diskettes or Zip disks because they
do not store data magnetically, but they can still be
broken, scratched or lost. Therefore, we do not recommend CD's as your
primary method of design storage.
Backing Up Your Compact Discs
Most CD-RW drives come with a compact disc copy program for creating
exact copies of CDs. The procedure used by these programs differs, so please
refer to your compact disc documentation for specifics.
NOTE: Copying embroidery software and designs without authorization from the
manufacturer is usually illegal and the penalties for violating the Copyright Act can be
severe. This includes duplicating software to sell, to share with friends or to distribute
free over the Internet.
If you have copyright questions, you are encouraged to check the licensing agreement
that comes with the software, call the software manufacturer, or visit the
manufacturer's website to gain specific information on the copyright rules that pertain
to your software.
If you are aware of a copyright infringement, we encourage you to report it. To
contact the Embroidery Software Protection Coalition, call 1-888-921-5732, or visit
their web site at www.embroideryprotection.org.
®
Copyright © 2002 Buzz Tools , Inc.
3 | Organizing Your Designs
- 63
Classifying Designs
Your design files need to be organized so that you can find the desired design
quickly. You may have just a few design files when you start but after a few
years, you could easily have hundreds or even thousands. If you could only
look at your designs in a long list, it could take you a long time to find what
you are looking for. Fortunately, there is another option.
On Hard Drives
Just as paper files can be stored in folders within filing cabinets, the files on
your computer can be organized in folders on your disks. Folders are very
important for organizing your design files because they create the categories
you need to get organized.
In addition to storing files, folders can also contain other folders. These nested
folders (or subfolders) can further classify your designs and make it easy for
you to navigate the desired design. What you call the folders is a matter of
personal choice and differs from person to person. Some people like to
classify their designs by where they got them, others by subject matter. What
is most important is that you can quickly find your designs. After all, it is your
collection!
Let's say we have organized our designs by
subject matter. The main design folder on our C:
drive is called My Designs and a few of its
nested subfolders are called Alphabets, Angels,
Cartoons, Celestial, etc… Many of our
subfolders contain other subfolders. For
example, our alphabets folder contains the
subfolders Appliqué, Boston, Cross-stitch, and
Script.
64 – BuzzXplore™ |
®
Copyright © 2002 Buzz Tools , Inc.
Although you can create folders and subfolders as you organize your designs,
it is best to create a basic folder structure before you start. You can use
BuzzXplore to automatically create a folder tree of design categories to get you
started (choose BuzzTools ð Create Category Folders). You can also use the
same techniques to create folders as Windows® Explorer®. To create a new
folder, navigate to the location of the new folder and choose File ð New
Folder.
Once you have created your basic folders, use BuzzXplore™ to move or copy
your designs into categories, and if needed rename them. You can do this with
the Cut, Copy or Paste commands or by dragging and dropping files into place.
If you discover that you have duplicate or unwanted designs, you can delete
them by selecting them and pressing the Delete key.
For step by step directions on this process, please see Organize Designs Stored
on Hard or Zip Drives starting on page 45.
Diskettes
If you store your designs on diskettes, you will create main
categories for your designs by labeling the diskettes by
subject and by creating folders on your diskettes as needed.
Rather than browsing the designs on the diskettes, you will
probably find it easiest to print thumbnails reports and browse the printouts.
Printouts can be kept in notebooks separated by subject along with the
diskettes used to create them. Office supply stores sell special notebook sheets
for storing diskettes. See Organize Designs Stored on Diskettes on page 47 for
more information.
®
Copyright © 2002 Buzz Tools , Inc.
3 | Organizing Your Designs
- 65
66 – BuzzXplore™ |
®
Copyright © 2002 Buzz Tools , Inc.
Chapter 4
Design Notes & Finding Files
Finding the perfect design is always a challenge, whether your hobby is
embroidery, cross-stitch or both. Even when you have your designs filed in
folders by subject, there are many occasions where one design may actually
fall into multiple categories. For example, you may have a wonderful heart
design that is made up of flowers and a sentimental quote. When you
originally organized your designs, you may have filed this in your "Hearts"
folder or in "Flowers".
The simplest way to find this design may be to browse the two folders,
"Hearts" and "Flowers", until you locate the design you are looking for. This
might work, but perhaps you had a weak moment and instead filed the design
under "Love" or even under the name of the digitizer, "Lorie Fritsch". If this is
the case, you may not find the design at all. Fortunately, BuzzXploreÔ has
several tools to help you.
Finding Files
Locate a File or Folder
If you know the name of the file or part of the file name, you can search for it
using the BuzzXplore™ command Locate ð File or Folder….
Use to Locate a File Name or Folder Name
®
Copyright © 2002 Buzz Tools , Inc.
4 | Design Notes & Finding Files
- 67
Fill in the name of the file or folder you are looking for in the Enter Name
field. You may use standard wildcard characters in your search, where * is the
wild card replacement for any number of trailing characters and ? is the wild
card replacement for a single character.
BuzzXplore™ displays and selects the first file that meets your search criteria.
If this is not the design you are looking for, you can repeat the search by
selecting the menu item Locate ð Next or by pressing F3.
Design Notes
Some embroidery formats (i.e. PCS, PES version 4, ART and HUS) and some
cross-stitch formats (i.e. PAT) allow for the inclusion of short comments
within the design file. In fact, you may already be using the comments area to
include information about your designs.
Other embroiderers and cross-stitch hobbyists use note files to store specific
information about their designs. Usually, there is one note file per design that
contains information such as the source of the design, thread colors and
specific sewing instructions. Notes are frequently saved as .txt files and are
given the same name as the design, but of course, with the extension TXT. For
example, the embroidery design file "Apple.hus" may have a corresponding
note file called "Apple.txt". When your files are sorted by file name (the
default), BuzzXplore™ displays these note files along side of your designs.
This Design is Shown Adjacent to its Design Note.
68 – BuzzXplore™ |
®
Copyright © 2002 Buzz Tools , Inc.
You can use BuzzXplore™ to search through embedded design comments or
through your design notes (contained in text files). This gives you the ability
to locate your designs based on the information you have included. Use the
BuzzXplore™ command Locate ð Text in Notes….
Use to Locate Embedded Design Comments
NOTE: If you are storing your design notes in text files, it is important to remember
that the design file and the note file are separate entities. As you organize your
designs, you are responsible for making sure that your note files are stored in the same
folder as the corresponding design. This way, when you search your note files for
keywords or other text, you are able to find the design.
You can use BuzzXplore™ to create note files for your designs (BuzzTools ð
Create Design Notes). Once the basic note file is created, you may edit
individual note files to include information specific to your designs. Step by
step directions on this process start on page 41.
Windows® Find
In addition to using the BuzzXploreÔ Locate tools, you can use the Windows®
Find utility from within BuzzXploreÔ. Right click on any folder in the Folder
pane and choose Find from the Popup menu. The files you locate using the
Windows® Find utility are listed in a separate window that is not part of
BuzzXplore™.
Once you see the desired file, you have two options. First, if the file type is
supported by BuzzXplore™, you can click on the desired file with your
®
Copyright © 2002 Buzz Tools , Inc.
4 | Design Notes & Finding Files
- 69
alternate mouse button and choose BuzzXplore™ from the Popup menu.
BuzzXplore™ starts and browses the appropriate folder.
®
The Windows Find Utility
Or you can look at what folder the file is in and then navigate to it manually
from within BuzzXplore™. For further directions on using the Windows® Find
utility, please refer to a Microsoft Windows® reference.
70 – BuzzXplore™ |
®
Copyright © 2002 Buzz Tools , Inc.
Chapter 5
Editing Design Files
When a file is double clicked, BuzzXplore™ opens the file in the associated
program. Most file types have programs associated with them by Windows®
Explorer® and this association is used if appropriate. BuzzXplore™ also lets
you set BuzzXplore™ program specific associations. This means that when
you double-click a supported file type, you can have Windows® Explorer®
launch one program and BuzzXplore™ can launch another - although this is not
required.
Windows® File Associations
Most of your Windows® file associations are available from within
BuzzXplore™ on the Popup context menus, which are accessed by clicking on
a file with the alternate mouse button. The OPEN item on the Popup menu
uses the BuzzXplore™ open settings not the OPEN file association that may be
set from Windows® Explorer®. Sometimes the BuzzXplore™ open settings tell
BuzzXplore™ to use the Windows® File association and sometimes they are set
to use another program.
Since Windows® Explorer® allows you to set up multiple file associations for
each file type, any number of programs can appear in the Popup context menu.
If you need this functionality, you will need to set up the program associations
using Windows® Explorer® file associations. For further directions please
refer to a Microsoft® Windows® Reference.
On-the-Fly Conversions
When you double-click a design file, it is read into your design software (not
available on DOS based software programs). If you do not own software that
can read the selected design file type, BuzzXplore™ can convert the file on-thefly to a type that can be read. BuzzXplore™ supported embroidery file formats
®
Copyright © 2002 Buzz Tools , Inc.
5 | Editing Design Files
- 71
can be converted on-the-fly to other supported embroidery formats.
BuzzXplore™ supported cross-stitch file formats can be converted on-the-fly to
other supported cross-stitch formats. BuzzXplore™ specific file associations
are required for any file type that needs on-the-fly conversions.
When you are finished editing the design and are ready to return to
BuzzXplore™, save the design if you want to keep your changes and exit your
design software. BuzzXplore™ will display the changed design – assuming of
course that you have not excluded its file type on the File Filter pane.
On-the-Fly Embroidery Conversions
When you install BuzzXplore™ Embroidery Edition, the installation program
determines what embroidery programs you have installed on your computer. If
you have only one embroidery software program, BuzzXplore™ assumes that
the primary embroidery file format of that program is the software file format
you prefer to use. All other supported stitched-based design file formats are
automatically converted to that file format on-the-fly when you double-click
on a design file in BuzzXplore™. Your embroidery software is started for you
and the newly converted design file loaded.
For example, if your embroidery software is the Brother PE-Design program
and you do not have any other embroidery software installed on your
computer, BuzzXplore™ assumes you want all of your other stitched-based
72 – BuzzXplore™ |
®
Copyright © 2002 Buzz Tools , Inc.
embroidery design files converted on-the-fly to the Brother PES file format.
When you double-click on a Viking HUS design file, the design file is
converted to PES, your PE-Design program is started and the newly converted
design file is loaded.
If you have more than one embroidery design program installed on your
computer, you are prompted at installation time for the name of the embroidery
software you use most frequently. Design files not natively supported by any
of your installed embroidery programs are converted to the file type supported
by your favorite embroidery program.
The settings that determine which file type BuzzXplore™ converts to on-thefly, as well as the program used to edit each file type, can be changed after
installation.
On-the-Fly Cross-Stitch Conversions
When you install BuzzXplore™ Cross-Stitch Edition, the installation program
determines what cross-stitch programs you have installed on your computer. If
you have only one cross-stitch software program, BuzzXplore™ assumes that
the primary cross-stitch design file format of that program is the software file
format you prefer to use. All other supported cross-stitch formats are
automatically converted on-the-fly to that file type when you double-click on a
design file in BuzzXplore™. Your cross-stitch software is started for you and
the newly converted design file loaded.
For example, if your cross-stitch software is the Viking CrossStitcher program
and you do not have any other cross-stitch software installed on your
computer, BuzzXplore™ assumes you want all of your other cross-stitch design
files converted on-the-fly to the Viking KRZ format. When you double-click
on a Pattern Maker PAT design file, the design file is converted to KRZ, your
Viking CrossStitcher program is started, and the newly converted design file is
loaded.
If you have more than one cross-stitch program installed on your computer,
you are prompted at installation time for the name of the cross-stitch software
you use most frequently. Cross-stitch files not natively supported by any of
®
Copyright © 2002 Buzz Tools , Inc.
5 | Editing Design Files
- 73
your installed cross-stitch programs are converted to the file type supported by
your favorite cross-stitch program.
The settings that determine which file type BuzzXplore™ converts to on-thefly, as well as the program used to edit each file type, can be modified after
installation.
NOTE: BuzzXplore™ creates a new file for you during the on-the-fly conversion. The
name of the file is the same as the original design you double-clicked, but with the
appropriate extension and the file is located in the same folder as the original file. If
you do not save the converted file from your design software, BuzzXplore™ deletes
the new file when you exit your design program. If you have made changes to the
design file it is, of course, not deleted. See How Your Files Are Processed on page
77 for more information.
On-the-Fly Settings
You have installed BuzzXplore™ and now you find that all of your embroidery
designs are being converted and opened from BuzzXplore™ by the same
embroidery program or all your cross-stitch files are being converted and
opened from BuzzXplore™ by the same cross-stitch program. That is fine if
you have only one embroidery program or one cross-stitch program. But
perhaps you have more than one of these installed on your computer. You may
want "most" of your designs opened into the program you use most but want
one specific design file type opened by another program. For directions on
changing your open settings, see Change Your Open Settings starting on page
49 or check the command reference for File ðOpen Settings command located
in the program help.
74 – BuzzXplore™ |
®
Copyright © 2002 Buzz Tools , Inc.
Chapter 6
Converting Formats
BuzzXplore™ can convert cross-stitch files from one cross-stitch file format to
another and can convert embroidery files from one embroidery file format to
another. You can do these conversions on-the-fly by double-clicking on a
design (see previous chapter) or you can convert a batch of design files at once
by choosing the appropriate conversion tool from the BuzzTools menu.
Why Convert?
Different cross-stitch and embroidery programs require different design file
formats. This is because different software and embroidery machine
manufacturers have developed their software independently of one another and
have incorporated different features, color palettes and innovations in their
software and machines. If you are going to use another program's cross-stitch
or embroidery designs you need to convert the design to a format your
software can understand.
If you always use BuzzXplore™ to locate your designs and to launch your
design software, you do not need to convert designs ahead of time.
BuzzXplore™ automatically converts designs for you as needed when you
double-click on a design.
In addition to the convenience, this is beneficial. Every time a design is
converted, some information is lost in the process. If you keep your designs in
their original format, you can be assured that you are keeping the most
®
Copyright © 2002 Buzz Tools , Inc.
6 | Converting Formats - 75
accurate and detailed information available about the original design. See page
72 for more information about on-the-fly design conversions.
If you want to be able to open your designs directly from your design software,
or if your design software is a DOS based program (such as the Singer EU
embroidery program), you may need to do your conversions ahead of time. Or
perhaps you sell your designs and want to distribute them in multiple formats.
BuzzXplore™ provides a powerful tool for converting designs that allows you
to convert thousands of designs in only a few minutes. In addition, you can
modify numerous conversion settings so that you control how your designs are
converted. Beginning users usually have excellent results with BuzzXplore™
default conversion settings.
BuzzXplore™ Conversions
Conversion Tools
You can convert some or all of the files on your drives by choosing one of the
conversion wizards available from the BuzzTools menu. To convert
embroidery designs choose BuzzTools ð Convert Embroidery Files…. To
convert cross-stitch files choose BuzzTools ð Convert Cross-Stitch Files….
Whichever wizard you select, you can choose to convert the currently selected
designs, the current folder of designs, or, if you are in Catalog Mode, the entire
catalog. You may convert from multiple file types at once.
Don’t worry if your selection or catalog contains designs of the destination file
type or files that are not designs – these files are simply ignored. For example,
you may have a catalog consisting of embroidery PES and DST files along
with bitmap graphics. If you choose to convert the entire catalog to PES files,
the PES files already in your catalog and the bitmap files are ignored.
76 – BuzzXplore™ |
®
Copyright © 2002 Buzz Tools , Inc.
Original and Converted Design
When BuzzXplore™ is finished with the conversions, the program displays the
new files if their file type is not excluded by the file filter. See page 54 for
more information about file filters.
How Your Files are Processed
When you run one of the conversion wizards (available from the BuzzTools
menu), you are asked to specify the location for the converted files. You can
choose to have the new designs saved into the same folder as the original
designs or you can choose a new starting tree location for the conversions.
By default, the new file is named the same as the original but of course with a
new extension. However, if a newly created design file duplicates an existing
file name, the existing file is not overwritten. Instead, BuzzXplore™ first
compares the existing design file with the new file. If they are exactly the
same, the new file is not written at all.
If the file contents are different in any way, BuzzXplore™ creates a new name
for the new design file. The new name is the original name with a number
appended to the end. If you do not like the names selected, you can rename
them from BuzzXplore™ after the conversion process is complete.
®
Copyright © 2002 Buzz Tools , Inc.
6 | Converting Formats - 77
Once the new design file is created, the original design file is deleted if (and
only if) you specified the Delete Converted Files option. Using this option has
two advantages. First, you do not have duplicate designs cluttering up your
drives. Second, it allows you to see exactly where the conversion left off if the
conversion is interrupted. Remember if you are going to use this option to
save a copy of the original design!
Embroidery Conversions
Below is information that is specific to embroidery design conversions. If you
are running the BuzzXplore™ cross-stitch edition and do not have the
Embroidery Edition installed, you can jump ahead to cross-stitch specific
information on page 82.
Colors During Conversions
Each embroidery file format comes with certain standard colors and
restrictions. Some design formats have only a few color choices and some
have a plethora. Moreover, some designs don’t contain color information at
all; only color stops to let the embroiderer know it is time to change threads.
When embroidery design files are converted using BuzzXplore™, the best
possible match is made from the colors available. In some cases, this may
involve selecting a secondary color choice in order to preserve color stops.
DST and EXP files do not contain any embedded color information. They do
have color breaks, that is, markers in the file to tell the machines to stop
sewing, but no actual color values. A few programs save color information for
DST and EXP files in an auxiliary file. If BuzzXplore™ can locate the
auxiliary color file for a DST or EXP file, it displays the colors correctly.
When there is no auxiliary color file, BuzzXplore™ does not know what colors
the digitizer intended for the color breaks and the color stops are assigned a
color value so that the design can be displayed and converted. DST and EXP
files displayed in this manner are shown with an arbitrary color sequence. A
line is displayed for each color stop rather than a color value so you can write
in your color choices on a printed catalog if you like.
78 – BuzzXplore™ |
®
Copyright © 2002 Buzz Tools , Inc.
When EXP or DST designs are converted to another file format that requires a
color value, BuzzXplore™ uses the auxiliary colors file if it is available. If the
design does not have an auxiliary color file, BuzzXplore™ does not know what
color the digitizer intended for the color breaks. Should color break one be
green (for a tree) or blue (for sky)? Therefore, when these files are converted,
BuzzXplore™ assigns its arbitrary color choices to the file. These of course, do
not relate to an actual color value but represent the color break present in the
original file.
NOTE FOR FOR JANOME & ELNA USERS (SEW Format Only): Depending
on your settings, BuzzXplore™ may convert designs to the SEW format using the
entire SEW color palette. Although these converted designs may not display correctly
in versions 1 and 2 of the Janome New Home software, they display correctly in Buzz
Tools programs, and your sewing machine asks for the correct color. This is because
versions 1 and 2 of the Janome software display all colors that are not in its regular
palette as black, even if the color is a valid Janome thread color. Newer versions of
the Janome New Home software (2000 and up) support the majority of thread colors.
The colors used by Buzz Tools programs to represent the SEW colors were created by
matching the actual thread color to the Janome New Home SEW color code. This
information also applies to users of the Elna Envision Scan PC as they also use the
SEW design file format.
File Splitting
Each embroidery file format comes with certain file limitations and
restrictions. Typically, these limitations are on the number of stitches a design
may have or the number of color breaks. The limitations are specific to the
design format you are converting to and are usually not up for negotiation.
For example, if your embroidery software is the Janome Easy Scan, your
embroidery machine cannot stitch any design that contains over fourteen
colors. When you convert a design to the SEW format that contains twenty
colors, you cannot use the final design unless the design has been divided into
parts.
®
Copyright © 2002 Buzz Tools , Inc.
6 | Converting Formats - 79
During conversions, BuzzXplore™ will "split" a design with too many colors or
stitches in two or more files. The design in this example would be divided into
two files. File one would contain the color breaks one through fourteen and
file two would contain the color breaks thirteen though twenty.
This HUS design had to be split into two parts to convert correctly to PCS.
The new files names are the original name with a letter appended to the end.
File one is appended with the letter A, file two with the letter B and so on.
When you stitch these designs you sew design A first, followed by B, etc.
When you are sewing the multiple files of a split design, do not move the
design sections on your embroidery machine unless you move each section by
exactly the same amount. The designs overlay each other in the correct
position to create the complete design.
Design Rotation and Resizing
When you are converting designs, there may be instances when the original
design does not fit in the new file type’s hoop. Perhaps the original design
hoop was taller than it was wide, but your embroidery hoop is wider than it is
tall. Without rotating the design ninety degrees, the newly converted design
will not fit and cannot be sewn. BuzzXplore™ provides a rotation option that
automatically rotates designs if needed during conversions.
In addition, BuzzXplore™ provides a resizing option that can automatically
reduce the size of your designs if needed during conversions. If you select this
option, you control the maximum amount that a design can be reduced by
BuzzXplore™.
80 – BuzzXplore™ |
®
Copyright © 2002 Buzz Tools , Inc.
Before Resizing
After Resizing
Designs that have been shrunk contain the same number of stitches as the
original. The design size is reduced by shortening the length of the stitches.
This has the effect of making the finished design denser. Reduce a design too
much and the stitches are too close together to stitch. For most designs, you
can reduce them up to ten percent without any adverse stitching affects.
BuzzXplore™ flags every resized design with a # so that you can easily identify
them in your catalog and monitor them as you embroidery them on your
machine. For many designs, you can improve the stitching quality of reduced
designs by using a lighter weight thread.
Advanced Conversion Options
If you are an advanced user, you can control how your designs are converted.
The conversion defaults set by BuzzXplore™ are the ones that are the most
common for each embroidery file format. If these defaults do not work well
for you, you can modify a number of conversion settings. The second screen
of the Convert Embroidery wizard displays the file splitting criteria for the file
type you are currently converting to. In addition, you can choose whether to
use the default color palette or to use best possible colors for designs (CSD,
PCS and XXX file formats only).
If you are a beginning user, or you do not understand these settings, you should
not modify them. They have been set to the values needed by the majority of
users and it is possible that you could modify them in such a way as to make
your design conversions unusable.
On the third screen of the conversion Wizard, you may decide whether your
design is rotated or resized during conversions. This screen also displays a list
of hoop sizes if the format that you are converting to supports more than one
size. Place a check mark next to each hoop that BuzzXplore™ to may use.
®
Copyright © 2002 Buzz Tools , Inc.
6 | Converting Formats - 81
Cross-Stitch Conversions
Each cross-stitch file format also comes with certain standard colors and
design size restrictions. Some cross-stitch design formats allow for more
colors per design than other design formats. In addition, different cross-stitch
formats have different color choices available. When cross-stitch design files
are converted using BuzzXplore™, the best possible match is made from the
colors available.
Cross-Stitch conversions do not have any conversion options to date.
Cross-stitch designs that contain too many colors and designs that don't fit into
the new file type's grid are not converted.
82 – BuzzXplore™ |
®
Copyright © 2002 Buzz Tools , Inc.
Chapter 7
Other BuzzTools
Create Thumbnail Graphics
This tool creates individual pictures of your designs. This can be useful if you
are creating your own website and need individual graphics files or if you want
to re-digitize an existing design.
To create thumbnail graphics, choose BuzzTools ð Create Thumbnail
Graphics. You can choose to create graphics for the currently selected
designs, the current folder of designs, or, if you are in Catalog Mode, the entire
catalog. You can set the number of colors and transparency only if the target
graphics format supports them.
If you are creating graphics for use on a website you need to be aware that the
larger the picture, the longer it takes to load. Realistic stitches look best when
at least 300 pixels in size, but this size may be too large for web pages with
multiple images. When you create a web page of designs, you might want to
limit either graphic size or the number of images displayed per web page.
If you are creating graphics for re-digitizing use, turn off realistic 3-D threads
first (Sewing ð Use Realistic 3-D Threads) . This allows your digitizing
software to better see the boundaries of each color included in the design.
Slide Show
You can view your designs consecutively in full-screen mode using the Slide
Show tool. To start your slideshow, choose BuzzTools ð Slideshow. You can
choose to include the selected designs only, the current folder of designs, or, if
you are in Catalog Mode, the entire catalog. The Slide Show dialog lets you
customize the slide show settings and it displays information about specific
keys that may be used to control the slide show.
84 – BuzzXplore™ |
®
Copyright © 2002 Buzz Tools , Inc.
Windows® Explorer® Tools
When BuzzXplore™ was installed on your computer, your current Windows®
Explorer® file associations were examined.
Layout & Editing Users
If Windows® Explorer® wasn’t already configured to launch the appropriate
application when a PEL, PEM or PES file was double clicked, this was set up
for you. In addition, BuzzXplore™ has included a utility to allow you to open
PEC files. All you need to do is double click on a PEL, PES, PEM, PEC file in
Windows® Explorer® to open it in Layout & Editing.
PC-Designer Users
BuzzXplore™ has included a utility to allow you to open your Pfaff files and
the appropriate Windows® Explorer® association was added for you. All you
need to do is double click on a PCS, PCD, or PCQ file in Explorer® to open it
into PC-Designer.
Professional Sew Ware Users
BuzzXplore™ has included a utility to allow you to open your Singer XXX
files and the appropriate Windows® Explorer® association was added for you.
All you need to do is double click on a XXX file in Windows® Explorer® to
open it in PSW Software. This shortcut opens your Singer design files but
does not load any associated graphic files. If you need to open your design
along with the associated graphic, you need to do so from within the
Professional Sew Ware program and not use this feature.
®
Copyright © 2002 Buzz Tools , Inc.
7 | Other BuzzTools - 85
86 – BuzzXplore™ |
®
Copyright © 2002 Buzz Tools , Inc.
Appendices
88 – BuzzXplore™ |
®
Copyright © 2002 Buzz Tools , Inc.
A | BuzzXplore™ Workspace
Principle Parts
1
Title Bar
6
Contents Pane
2
Menu Bar
7
Path Name or Selection Information
3
Toolbar
8
Sort Criteria
4
File Filter Pane
9
Status Bar
5
Folder Pane
®
Copyright © 2002 Buzz Tools , Inc.
A | BuzzXplore Workspace - 89
Toolbar
The toolbar is displayed across the top of the application window, below the
menu bar. The toolbar provides quick mouse access to many of the commands
used in BuzzXplore™. Specifics about each of these commands may be found
in the program help in the Command Reference section.
The toolbar contains the following tools:
I CON
I CON N AME
D ESCRIPTION
Open
Opens the current selection. Same as the File ð
Open command.
Open with
BuzzEdit®
Opens the selected embroidery design in BuzzEdit ®.
File ð Open with BuzzEdit® command.
Cut
Removes the current selection and places it on the
Windows® Clipboard. Same as the Edit ð Cut
command.
Copy
Copies the current selection and places it on the
Windows® Clipboard. Same as the Edit ð Copy
command
Paste
Inserts the contents of the Windows® Clipboard and
places it into the current folder. Same as the Edit ð
Paste command.
Print Report Brings up the Report Wizard. Same as the
BuzzTools ð Print Report command.
90 – BuzzXplore™ |
®
Copyright © 2002 Buzz Tools , Inc.
New Catalog
·
In Catalog mode, deselects all folders.
·
In Xplorer mode, switches to Catalog mode and
deselects all folders.
Same as View ð New Catalog command.
Mode
Switches between Xplorer and Catalog modes.
Similar to the View ð Xplorer mode and View ð
Catalog Mode.
View Files
of Type
When this button is selected, the File Filter pane is
displayed in the upper left pane and file filters are
active. Same as the View ð Filter File Types
command.
Show ZIP
Contents
Allows you to view ZIP files as folders in the Folder
pane and their contents in the Contents pane. Same
as the View ð Show ZIP Contents command.
Change
View
Allows you to change how files display: Thumbnails
(Full Window, Large, Medium & Small), Large
Icons, Small Icons, List, Details. These view
options are also listed under the View menu.
Actual size
Allows you to view a selected design as an actual
size Popup. Same as the View ð Actual Size Popup
command.
Slideshow
Allows you to run a design a slideshow. Same as
the BuzzTools ð Slide Show command.
Realistic 3-D Switches between normal flat graphics and realistic
3-D threads view. Same as Sewing ð Use Realistic
Threads
3-D Threads command
®
Copyright © 2002 Buzz Tools , Inc.
A | BuzzXplore Workspace - 91
Status Bar
The status bar at the bottom of the BuzzXplore™ workspace displays the
following information:
The first part of the status bar describes the actions of menu items as you
use the arrow keys or mouse to navigate through menus, and describes
the actions of toolbar buttons under the mouse cursor. It is also used to
display general status messages.
The last part of the status bar displays a count of the number of files and
folders in the Contents pane
92 – BuzzXplore™ |
®
Copyright © 2002 Buzz Tools , Inc.
B | BuzzXplore™ Shortcut Keys
General
Help
F1
Exit
Alt + F4
Report Wizard
Ctrl + P
Cancel Current Operation
Escape
Editing
Cut
Ctrl + X
Copy
Ctrl + C
Paste
Ctrl + V
Delete Current Selection (Move to Recycling Bin)
Delete or Ctrl + D
Permanently Delete Current Selection
Shift + Delete
Select All
Ctrl + A
Select None
Escape
Locating
Locate in Text
F5
Locate File or Folders
F4
Locate Next
F3
Locate Next Folder with Files
Ctrl + PgDn
Previous Folder with Files
Ctrl + PgUp
®
Copyright © 2002 Buzz Tools , Inc.
B | BuzzXplore Shortcut Keys - 93
Sorting Contents Pane
To Sort by Name
Shift + N
To Sort by File Type
Shift + T
To Sort by Date
Shift + D
To Sort by File Size
Shift + S
To Sort by Folder (Catalog Mode Only)
Shift + F
Viewing
Toggle between Xplorer and Catalog Modes
Ctrl + M
New Empty Catalog
Ctrl + N
Actual Size Popup
Ctrl + F
Use Realistic 3-D Threads
Ctrl + T
Full Size Thumbnail View
Ctrl + 1
Large Thumbnail View
Ctrl + 2
Medium Thumbnail View
Ctrl + 3
Small Thumbnail View
Ctrl + 4
Refresh
Ctrl + R
Tools
Convert Embroidery Files
F6
Extract ZIP'd Files
F7
Create Design Notes
F8
Create Thumbnail Graphics
F9
94 – BuzzXplore™ |
®
Copyright © 2002 Buzz Tools , Inc.
C | Editions & Supported File Formats
When you purchased BuzzXplore™, it came pre-packaged with the basic
BuzzXplore™ program and support for either embroidery or cross-stitch
designs. If you would like BuzzXplore to support both embroidery designs
and cross-stitch designs, you can do so by purchasing and installing both the
BuzzXplore Embroidery Edition and BuzzXplore Cross-stitch Edition. These
programs are available from your local Buzz Tools dealer or from our website
at www.buzztools.com.
We continue to add support for new file versions and new software. Often
these are available as a free update from Buzztools.com website. Since we
continue to add new formats, please check your online help for a current list of
supported formats.
®
Copyright © 2002 Buzz Tools , Inc.
C | Supported File Formats - 95
96 – BuzzXplore™ |
®
Copyright © 2002 Buzz Tools , Inc.
D | Getting Help
Technical Support
Why Don't We Have Telephone Support?
At Buzz Tools®, we want to provide you with the best possible customer
service by responding to your concerns and questions in a timely manner.
Although we would like to talk to everyone personally, we are a VERY small
company started out of our love for embroidery. We simply do not have
adequate staff to provide telephone support.
However, in spite of our limitations, it is important to us to provide you with
the best possible products and support.
How to Obtain Support
If you are having difficulties with BuzzXplore™ please:
1
Read your manual and online help carefully. Most of your questions
can usually be answered in this way.
2
Contact your local dealer. If your problem is not addressed in this
manual, you can contact your local Buzz Tools® dealer for advice.
3
Visit us on the web. If you have access to the Internet, you can check our
online technical support at: www.buzztools.com. Follow the link to
BuzzXplore™ technical support pages from our main page.
Common problems and questions are posted on the BuzzXplore™ support
web page as needed. Bug fixes and minor enhancements are also posted on
the Buzz Tools® web site and are available for download free of charge.
In addition, Buzz Tools®, Inc. provides a Technical Support page where
you can send your specific questions about BuzzXplore™ to our technical
support staff. Our staff will contact you via e-mail regarding your
questions.
®
Copyright © 2002 Buzz Tools , Inc.
D | Getting Help – 97
4
Write Us. If none of the previous suggestions help, you can mail us a
detailed description of your problem or question, and we will get back to
you. Please include the following:
·
Details about your computer configuration (type of computer, type of
printer, operating system, etc…)
·
What version of BuzzXplore™ you are running (available from Help ð
About) and your BuzzXplore™ serial number off the CD sleeve
(REQUIRED).
·
Where you purchased BuzzXplore™.
·
A complete and detailed account of the problem or question. If you are
receiving an error message, please include the complete message and
the exact steps you took prior to the error.
·
Include your complete address, fax number, and telephone number
along with the best time to contact you.
·
Mail to:
Buzz Tools, Inc.
Atten: BuzzXplore™ Support
P.O. Box 1795
San Ramon, CA 94583.
Program Enhancements
As Buzz Tools® makes minor enhancements to our software, we post updates
on our web page: www.buzztools.com. Follow the link to the BuzzXplore™
support pages from our main page.
Join the BuzzXplore™ Email Newsletter
We have created a mail list in order to keep you informed of important
BuzzXplore™ updates and announcements. We do not submit or sell your
information to third parties, nor is this list used for posting messages (no
posting is allowed). If you would like to join our list, go to the main Buzz
Tools® web page, find the header Support on the left and click on the link
Information E-List.
98 – BuzzXplore™ |
®
Copyright © 2002 Buzz Tools , Inc.
Index
100 – BuzzXplore™ |
®
Copyright © 2002 Buzz Tools , Inc.
Index
Prerequisites .......................... 17
Removing .............................. 26
Shortcut Keys ........................ 93
System Requirements............. 19
Technical Support.................. 97
Views .................................... 53
Workspace............................. 89
B
Backing Up
Compact Discs........................63
Diskettes.................................62
Hard Drive..............................61
Zip Disks ................................62
Buzz Tools®
Free Designs ...........................16
Mailing Address .....................98
Product Information................17
Web Site.................................17
BuzzEdit® Lite
Installation..............................23
Removing ...............................26
BuzzTools Menu
Create Thumbnail Graphics ....84
Extract ZIP'd Files ..................58
Print Report ............................59
Slide Show .............................84
BuzzXplore™
Basics .....................................51
CD Browser............................19
Email Newsletter ....................98
Enhancements.........................98
Explorer Tools ........................85
How to....................................29
Installing.................................20
License Agreement ...............107
Modes Available.....................51
Notational Conventions ..........17
®
Copyright © 2002 Buzz Tools , Inc.
C
Catalog Mode
Switching To ......................... 32
Compact Discs
Backing Up............................ 63
Storing Designs On................ 63
Converting Designs ......... Also See
Cross-Stitch Conversions, Also
See Embroidery Conversions
Basic Information .................. 75
From Tools Menu .................. 76
How Designs are Processed ... 77
How to................................... 38
On-the-Fly ............................. 71
Settings.................................. 74
Why Convert ......................... 75
Copy
Files and Folders.................... 35
Copyright
BuzzXplore™ ........................... 3
Violations .............................. 63
Cross-Stitch Designs
Converting............................. 82
Index - 101
On-the-Fly ..........................73
Cut
Files and Folders.....................37
Display
Realistic Threads ................... 55
Set to High Color ................... 22
D
E
Design Notes
How to Create.........................41
Designs
Classifying..............................64
Converting........................75, 76
On-the-fly ...........................71
Editing....................................71
File Associations ....................71
Finding Notes .........................69
How to Convert ......................38
How to Organize...............45, 47
Locating .................................67
Notes ................................67, 68
On Diskettes ...........................62
On Your Hard Drive ...............61
On Zip Disks ..........................62
Opening ..................................49
Organizing........................61, 64
Professional Samples ........16, 25
Realistic Threads ....................55
Samples ..................................16
Thumbnails
Sizes ...................................53
View Options......................53
Where to Store........................61
Diskettes
Backing Up.............................62
Failure Rate ............................62
Storing Designs On.................62
Writing Volume Labels...........47
Embroidery Designs
Converting
Colors ................................ 78
Design Rotation ................. 80
File Splitting ...................... 79
On-the-Fly ......................... 72
Options .............................. 81
Resizing............................. 80
102 – BuzzXplore™ |
F
File Associations
Windows ............................... 71
File Menu
New ZIP Archive................... 59
File Types
Filtering ............................31, 54
Files
Backing Up............................ 61
Copying ................................. 35
Extracting from ZIPs ............. 43
Filtering by Type ................... 54
Finding .................................. 67
Locating ................................ 67
Move ..................................... 36
Renaming .............................. 37
Selecting................................ 34
Sorting................................... 54
Windows Find ....................... 69
®
Copyright © 2002 Buzz Tools , Inc.
Folders
Copying ..................................35
Creating New..........................34
Locating .................................67
Move ......................................36
Renaming ...............................37
Selecting.................................34
H
Help
Technical Support...................97
How to…
Change Open Settings.............49
Change Views.........................33
Choose File Types ..................31
Convert Designs .....................38
Copy and Paste .......................35
Copy Files ..............................35
Copy Folders ..........................35
Create Design Notes ...............41
Create Folders.........................34
Cut and Paste..........................37
Drag and Drop Copy...............36
Drag and Drop Move ..............37
Explore Your Designs.............30
Extract ZIP'd Files ..................43
Move Files and Folders...........36
Organize Designs
On Diskettes .......................47
On Hard Drives...................45
Rename Files ..........................37
Rename Folders ......................37
Select Files .............................34
Select Folders .........................34
Switch Modes .........................32
®
Copyright © 2002 Buzz Tools , Inc.
I
Installation
BuzzEdit® Lite....................... 23
BuzzXplore™ ......................... 20
BuzzXplore™ Default Directory
.......................................... 22
Professional Embroidery
Samples ............................. 25
J
Janome
SEW Format Note.................. 79
L
Layout & Editing Users ............. 85
License Agreement ...................107
M
Modes
Available ............................... 51
Catalog .................................. 52
Switching..........................32, 52
Xplorer .................................. 51
Mouse
Primary Button ...................... 36
Move
Files and Folders.................... 36
O
Open Settings
Index - 103
How to Change .......................49
P
PC-Designer Users .....................85
Printing
Reports ...................................59
Professional Sew Ware Users .....85
Create Graphics Files............. 84
Options .................................. 55
Realistic Threads ................... 55
Sewing Information ............... 56
Size........................................ 53
View...................................... 53
Tool Bar .................................... 90
V
R
Realistic 3-D Threads .................55
Rename
Files and Folders.....................37
S
Select
Files and Folders.....................34
Settings
Open.......................................49
Sewing Menu
Summary Information.............56
Shortcut Keys .............................93
Slide Show .................................84
Sorting Files
General Information................54
Status Bar ...................................92
T
Technical Support.......................97
Threads.. See Realistic 3-D Threads
Thumbnails
104 – BuzzXplore™ |
View Menu
Filter File Types..................... 54
Views
How to Change ...................... 33
Main View Options................ 53
X
Xplorer Mode ........ Also See Modes
How to Switch To.................. 32
Z
ZIP Archives
Creating New......................... 59
Extraction Tool...................... 58
How to Extract....................... 43
What are they?....................... 57
Why Use them? ..................... 57
Zip Disks
Backing Up............................ 62
Storing Designs On................ 62
®
Copyright © 2002 Buzz Tools , Inc.
License Agreement
License Agreement
IMPORTANT-PLEASE READ THESE
TERMS AND CONDITIONS CAREFULLY
This End User License Agreement ("Agreement") is entered into by and
between the user of this software ("You" or "Licensee") and Buzz Tools, Inc.
of San Ramon, California ("Buzz Tools" or "Licensor"). By installing or using
this software, You acknowledge that You have read this Agreement, that You
understand it, and that You agree to honor and be bound by the terms and
conditions contained herein. If You do not agree to the terms and conditions
of this Agreement, then You have no right to use any Buzz Tools product and
You immediately should contact Buzz Tools or the authorized reseller who
sold You this Buzz Tools product and obtain instructions about requesting a
refund.
Please be advised that by purchasing and using Buzz Tools’ products, and by
activating the use of those products by completing the software installation
procedure, You shall be deemed to have become a party to and bound by the
terms of this Agreement.
1. DEFINITIONS
For purposes of this Agreement, the following terms shall have the
following meanings:
"Documentation" shall mean all user documentation, including any user
manuals or instruction materials in any format, provided to You in connection
with Your purchase of the Licensed Products.
"Licensed Products" shall mean those Buzz Tools software products for which
You have purchased use rights as indicated by the title and serial number on
the CD included with this Agreement.
"License Term" shall mean in perpetuity or until the termination of this
Agreement according to its terms and conditions by either party.
106 – BuzzXplore™ |
®
Copyright © 2002 Buzz Tools , Inc.
2. GRANT OF LICENSE
Subject to the terms and conditions of this Agreement, Licensor grants to
Licensee a non-transferable and non-exclusive license to use the Licensed
Products and any accompanying Documentation during the License Term.
3. OWNERSHIP AND TITLE
Licensee shall have no ownership rights in any Licensed Products or
Documentation. Buzz Tools retains all title and ownership interest in the
Licensed Products and Documentation and any intellectual property embodied
therein (such as copyrights or patents). Any attempt by Licensee to transfer
any ownership rights in the Licensed Products or Documentation shall (a) be
null and void; (b) constitute a material breach and grounds for immediate
termination of this Agreement; and (c) trigger an immediate obligation on
Licensee to return of all Licensed Products and Documentation.
4. LIMITATIONS ON USE OF LICENSED PRODUCTS AND
DOCUMENTATION
(a) Licensee shall not use any Licensed Products or Documentation except as
authorized herein and shall not make, have made, or permit to be made, any
copies of the Licensed Products or Documentation except as expressly
authorized herein. Licensee shall not reverse engineer, decompile, or
disassemble any Licensed Product for any purpose without Licensor’s prior
express written consent, nor shall Licensee attempt to create the source code
from the object code or defeat any software key used to activate the Licensed
Products.
(b) The license granted herein is personal to Licensee and is not transferable
except upon Licensor’s prior written consent. In particular, Licensee shall not
attempt to sublicense, rent, lease, or otherwise permit any use by another of
any Licensed Product except as expressly provided herein.
(c) Licensee shall not remove or alter, without Licensor’s prior written consent,
any proprietary notice on any Licensed Product or Documentation.
(d) Licensee shall not divulge or distribute their product serial number to any
party other than the Licensor without Licensor’s prior written consent.
Copyright © 2002 Buzz Tools, Inc.
| License Agreement – 107
6. MAINTENANCE AND CUSTOMER SUPPORT
This Agreement does not provide You with any right to maintenance or
support from Buzz Tools. However, various forms of maintenance and/or
support are from time to time available on our web site at buzztools.com.
Please see the Buzz Tools web site or the authorized Buzz Tools reseller who
sold You the Licensed Products for further information.
7. TERM AND TERMINATION
This Agreement shall take effect upon Licensee’s purchase of a Licensed
Product and shall remain in effect until terminated by the Licensee upon one
month’s written notice, or by Licensor as set forth in this section. This
Agreement may be terminated by the Licensee only when all use of any
Licensed Product has been discontinued and all Licensed Products and
Documentation have been destroyed or have been returned to Buzz Tools.
Licensor may terminate this Agreement upon written notice if Licensee fails to
comply with any of the terms or conditions of this Agreement.
8. DISCLAIMERS AND WARRANTIES
EACH LICENSED PRODUCT COVERED UNDER THIS AGREEMENT IS
PROVIDED "AS IS," WITHOUT WARRANTY OF ANY KIND, EITHER
EXPRESS OR IMPLIED, INCLUDING, WITHOUT LIMITATION, ANY
WARRANTY FOR INFORMATION, SERVICES, OR PRODUCTS
PROVIDED THROUGH OR IN CONNECTION WITH THIS AGREEMENT
OR ANY IMPLIED WARRANTIES OF
MERCHANTABILITY OR FITNESS FOR A PARTICULAR PURPOSE.
LICENSOR DOES NOT WARRANT OR MAKE ANY
REPRESENTATIONS REGARDING THE USE OR THE RESULTS OF
THE USE OF ANY LICENSED PRODUCT. LICENSOR DOES NOT
WARRANT THAT ANY LICENSED PRODUCT ARE FREE FROM
ERROR OR MEET SPECIFIC REQUIREMENTS SUCH AS
COMPATIBILITY, REVERSE COMPATIBILITY, OR
INTEROPERABILITY REQUIREMENTS. LICENSEE ASSUMES FULL
RESPONSIBILITY FOR DECISIONS MADE OR ACTIONS TAKEN
108 – BuzzXplore™ |
®
Copyright © 2002 Buzz Tools , Inc.
BASED ON INFORMATION OBTAINED USING THE LICENSED
PRODUCTS. UNDER NO CIRCUMSTANCES SHALL LICENSOR BE
RESPONSIBLE FOR INCIDENTAL, SPECIAL, OR CONSEQUENTIAL
DAMAGES, EVEN IF LICENSOR HAS BEEN APPRISED OF THE
LIKELIHOOD OF SUCH DAMAGE OCCURRING. IN NO EVENT
SHALL LICENSOR’S LIABILITY TO ANY PARTY, INCLUDING
LICENSEE, EXCEED THE PURCHASE PRICE OR LICENSE FEE OF THE
RELEVANT LICENSED PRODUCT.
(b) Buzz Tools reserves the right to revise any Licensed Product, at any time,
without notification to Licensee or any other person.
9. AUDIT
If the Licensed Product is being used for commercial purposes Licensee shall
permit Licensor, upon reasonable notice (i.e., not less than three business
days), to conduct an audit of Licensee’s use of the Licensed Products to
determine compliance with the terms and conditions of this Agreement.
11. CHOICE OF LAW AND FORUM OF ANY DISPUTE
This Agreement shall be construed, interpreted, and governed by the laws of
the State of California without regard to conflicts of law provisions thereof.
The exclusive forum for any disputes arising out of or relating to this
Agreement shall be an appropriate federal or state court located in the County
of Contra Costa, the State of California, United States of America.
12. INTEGRATION
This Agreement sets forth the entire agreement and understanding between the
parties as to the subject matter hereof and merges all prior discussions between
them. Neither of the parties shall be bound by any warranties, understandings
or representations with respect to such subject matter other than as expressly
provided herein. Any waiver or modification of this Agreement shall only be
effective if it is in writing and signed by both parties hereto. If any part of this
Agreement is found invalid or unenforceable by a court of competent
jurisdiction, the remainder of the Agreement shall be interpreted so as to
reasonably effect the intention of the parties.
Copyright © 2002 Buzz Tools, Inc.
| License Agreement – 109