1
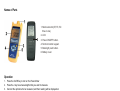
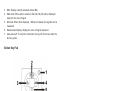
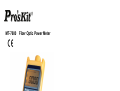
MT-7600 Fiber Optic Power Meter
99 Washington Street
Melrose, MA 02176
Phone 781-665-1400
Toll Free 1-800-517-8431
User’s Manual
Visit us at www.TestEquipmentDepot.com
1st Edition, 2011
©2011 Copy Right by Prokit’s Industries Co., Ltd.
Overview
Thank you for purchasing this instrument. To get the best use of your equipment
and ensure safe operation to provide the best possible reliability, convenience and
performance, please spend a few minutes to read this manual.
For the absolute power measurement and relative measurement of the link loss in
dB, thanks to its friendly operation interface, broad power measurement range,
high precision and high performance in application makes it an ideal tool for optical
fiber network.
Application
The MT-7600 Fiber Optic Power Meter is used for field or laboratory testing of fiber
optic systems at typically 850, 1300, 1310 and 1550 nm. It features superb
measurement confidence, ease of use and reduced cost of ownership, and is for
use by installers, technicians and engineers, telecom construction, maintenance,
CATV, LAN and R&D applications.
Specifications
1.
2.
3.
4.
5.
6.
7.
8.
9.
10.
11.
12.
13.
Sensor Element: InGaAs
Calibration Wavelengths: 850nm , 1300nm , 1310nm , 1550nm.
Power Range: +3dBm ~ -55dBm , 2mW ~ 4nW.
Resolution: 0.01.
Accuracy: 0.3dBm.
Connector: Multi-connector (ST, FC, SC 3 in 1)
Overload indication.
Low battery indication.
Auto-power-off function.
Back-light function..
Operating / storage: -0 to 50°C / -20 to 60°C (0~80%RH)
Power: 4 alkaline battery 1.5V (not included)
Accessories: User manual
Carrying case
1 piece of SC Patch cord
LC adaptor (optional)
14.
Size: 185 x 84 x 42 mm
15.
Weight: 420 g
1
Names of Parts
6
1. Multi-connector (ST, FC, SC
three in one)
2. LCD.
3. Power ON/OFF button.
4. Function button keypad.
5. Back-light push button.
6. Battery cover
Operation
1. Press the On/Off key to turn on the Power Meter
2. Press the λ key to set wavelengths that you want to measure.
3. Connect the optical net to be measured, and then reading will be displayed on
the LCD screen, including Linear and nonlinear value.
4. Relative power measurement. Press dB key, then current power value is stored
as a reference value in dB unit.
Optic Network System
2
Appendix:
Optical fiber loss measurement
Step 1- Optical Reference Level
Turn on optical power meter and press the λ key to select the wavelength.
Turn on optical light source and select the wavelength. Wait for 1-2 minutes
until it stabilize. Select a piece of patch cords, which is used to connect with
the light source. The patch cords must be the same fiber type as the fiber
under test. Connect the light source with the Power Meter through the
source patch cords. Power Meter will get the power measurement value.
This value should be close to the value of the light source. If it has wide
disparity, please make sure the fiber connection is clean properly else
replace jumpers.
Press the dB key; 0dB will be displayed on the screen. The tested power
values will be set to the reference value.
Step 2-Optical Loss Measurement
Keep the source patch cords connection with the light source.
Connect the Power Meter and light source (emitting source) to the optical
fiber link respectively.
LCD Display
850nm
1300nm
HI
AUTO OFF
1310nm
1550nm
dBm mWuW
dB
nWpW
1. Low-Battery indicator: Please use alkaline battery to increase normal
operation time. When low-bat indicator is lighted, please change battery
immediately. This can assure the stability of power.
2. Wave length: Display currently measurable wavelength.
3
3. dBm: Display currently selected unit as dBm.
4. Watt mode: When watt is selected, mW, uW, nW, pW, will be displayed
subject to the size of signal.
5. dB mode: When dB is displayed , difference between two signals can be
measured.
6. Measurement display: Display the value of signal measured.
7. Auto-power-off: To stop the instrument turning off 40 minutes after the
last key press.
Button Key Pad
1. Power button: Push the yellow POWER button. The display will come on.
Pushing POWER button again will turn the instrument off.
2. dBm/W: Push “dBm/W” to change the dBm display between linear and
log.
3. λ: Push “ λ” to Switch the operating wavelength between
850nm,1300nm,1310nm, 1550nm.
4. dB: push “dB” to display relative power, display will show dB R.
Back-light button: Push the button to turn the back-light ON or OFF.
5.
The back will automatic off after lighted 50 seconds.
4
CARE OF YOUR INSTRUMENT
1. Always clean the mating connector tip and ferrule before mating, using
approved materials. Clean the instrument using alcohol or other non solvent
cleaning agents. Acetone or other active solvents may damage the case.
2. When not in use, keep connectors covered and away from dust. Dust and
other particles, however, can range from tenths to hundredths of microns in
diameter. Their comparative size means that they can cover a part of the end
of a fiber core, and as a result will reduce the performance of your system
3. During prolonged storage, remove batteries to eliminate the possibility of acid
leakage. Use only high quality sealed alkaline batteries.
4. Do not touch connector tips with your fingers, since body oils and dirt can
impair connector performance.
5. Do not use damaged or incompatible connectors.
6. Limit the input optical power doesn’t over measuring range.
7. The instrument is resistant to normal dust and moisture, however it is not
waterproof. If moisture does get into the instrument, dry it out carefully before
using it again.
8. This meter is a high-accuracy correct instrument, don't disassembly or
open it by yourself, otherwise the quality is not guaranteed.
9. During storage and transport, keep the instrument in its carry case to protect
against crushing, vibration, dust and moisture.
10. Where possible, keep instrument away from strong sunlight.
Procedure for Stubborn Dirt
1. Moisten a new cotton swab with alcohol.
2. Clean the interface by rubbing the cotton swab over the surface using a
small circular movement.
3. Take a new, dry soft tissue and remove the alcohol, dissolved sediment and
dust, by rubbing gently over the surface using a small circular movement.
4. Blow away any remaining lint with compressed air.
5