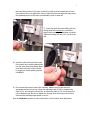
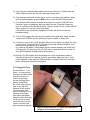
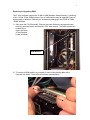
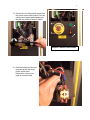
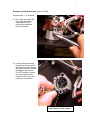
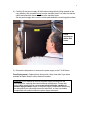
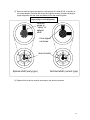
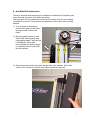
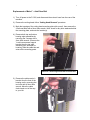
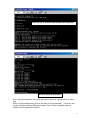
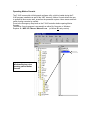
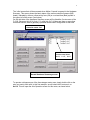
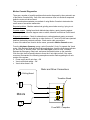
1
F-6100 Service Manual
Table of Contents
Part 1 – Maintenance
M-1.
M-2.
M-3.
M-4.
M-5.
M-6.
M-7.
M-8.
Cutting Head
Pneumatic System
Felt Pad Assembly
Bearing Carts and Tracks
Electronics Enclosure
Moving the F-6100
Power Supply Removal
Calibration
Part 2 – Repairs
A. Cutting Head
RH-1. Cutting Head Removal &
Repair (all)
RH-2. Flow Control Valve
Replacement
RH-3. Removing a Broken
Thumbscrew
B. Mechanical Components
RM-1.
RM-2.
RM-3.
RM-4.
RM-5.
Motor Belts and Pulleys
Bearings and Bearing Carts
X-axis Bearing Cart (top)
Y-axis Bearing Cart
Stepper Motor Replacement
RM-6. X-axis Reversing Units
RM-7. X-axis Main Drive Belts and
Adapter Plates
RM-8. Y-axis Main Drive Belt
RM-9. Y-Gantry Replacement
RM-10. Top Y-axis Reversing Unit
RM-11. Y-axis Drive Belt
C. Pneumatics System
RP-1. Pneumatics Panel and
Components (all)
RP-2. “PC” Solenoid Valves
D. Electronics Components
RE-1. Electronics Enclosure
Removal & Replacement
RE-2. Computer Disc Drive
Replacement
RE-3. PC Component Replacement
(Power supply, Modem, etc.)
RE-4. RAM Upgrade &
Replacement
RE-5. Electronics Enclosure
Components
RE-6. X, Y, and C-axis Drivers
RE-7. Electrical Control Switches
RE-8. X and Y-axis Home Sensors
RE-9. Limit Switches
RE-10. Power Supply (main)
RE-11. Cable Replacement
RE-12. Cooling Fan Replacement
E. Motion Control
RC-1. Resetting the Motion
Controller (Reset B)
RC-2. Motion Console and
Diagnostics
F-6100 Troubleshooting
Common problems and causes are organized by type (electronic, Cut issues, etc)
Please refer to appropriate sectio(s) for more information on recommended corrective action
PROBLEM
POSSIBLE CAUSE(S)
ACTION / SOLUTION(S)
Power off or disconnected
Check plug connections; turn on main switch
Check monitor switch, power strip switch and reset button
Rotate E-stop knob clockwise, and press Enable button
SECTION
Electrical or Basic functions
Machine not operating: (can't "Enable")
Emergency Stop button depressed
Enable light off; limit switch interference
Power-supply failure or cable disconnected;
check computer cooling fan function
E-stop or Enable Switch Malfunction
Enable light off, but machine functions
Enable LED bulb loose or burned out
Cutting head will not "home" (Rotational, C-axis)
Low, or no air pressure
C-axis sensor cable disconnected or damaged
Move head/gantry to right and upward to clear limits,
press green Enable button to light up
Check green and amber LED's on underside of power supply,
shut down computer and reconnect cable
Check connections to Enable and E-stop switches, or
Replace Enable switch assembly
Re-seat or replace Enable LED
RE-7
RE-7
RE-7
Turn on compressor
Check air hose connections
Check air pressure gauges, (50, 30, 30psi)
Check flow control valve tightness/connection
M-1
RH-1
Flow-control valve screw/knob too closed
Inspect and or reconnect red wire coupling under
cutting head
Replace cutting head if sensor connection damaged.
Open adjustment screw or knob slightly
Clear air hose to cutting head obstructed
Check clear air hose for kinks, pinches or leaks
RH-1
Debris in homing sensor area of cutting head
Brush or blow sensors clean
M-1
Debris behind or near head shaft
Brush or blow shaft area clean
M-1
Cutting head shaft coupling loose/unscrewed;
head cannot fully retract for sensor alignment.
Cutting head repair or replacement required, contact FTCO
RH-1
Sensor control cable loose or disconnected
Check connection to cutting head (C-axis) home sensor
Check "C-Home" LED on transition board
Check "Axis 2" high/low indicator in Motion Console
RH-1
RH-1
M-1
RC-2
PROBLEM
Cutting head will not "home"
(X-axis, Left-right, Y axis, up or down)
POSSIBLE CAUSE(S)
C-axis motor wire disconnected or damaged
ACTION / SOLUTION(S)
Inspect Motor control wire and connection plug and pins
SECTION
RH-1
C-axis driver defective or damaged
Run C-axis motor in Motion Console to diagnose
Replace C-axis Driver if defective
RC-2
RE-6
X or Y motor cable disconnected
Re-connect cable(s)
RM-5
X or Y motor cable damaged
RM-5
X or Y axis homing sensor, cable or connector
Inspect motor cables and connectors, X or Y axis motor
replacement may be requiured
Remove motor housing(s) and inspect belts, shaft, pulleys;
replace belt if torn or failed
Check corresponding axis sensor cables and connections
Driver axis electronic "fault"
Reboot computer and re-Enable after opening program
X or Y axis driver defective or blown
Power supply fuse blown to X and/or Y axis
Diagnose in Motion Console; Replace driver board
Check existing fuses, replace if blown (often blow due to Driver
short circuit)
RC-2, RE-6
RE-10
Limit switch interference due to misalignment
Check limit switch mounting brackets for misalignment, re-align
RE-9
Home sensor switch misaligned or damages
Verify which axis causes abort and inspect or repair
RC-2, RE-9
Incorrect Setup values for X and Y homes
Verify and correct Setup Home values
Blade magazine loose in cutting head
Properly insert and tighten magazine
Mat blade worn or damaged (tip)
Replace mat blade
V-groove magazine being used for thru-cutting
Replace with proper magazine
Insufficient blade depth on cutting head
Adjust blade depth screw to increase cut depth, (CW turn)
X or Y-axis motor belt failure
Machine "self-aborts" during homing
Mat Cutting Problems
Mat blade not cutting through mat
completely. (NOT corner undercuts!)
Use 6-ply magazine for thick fabric or 6-ply mats
Debris build-up on glide pad surface
Clean glide pad with air or solvent
Debris in cutting head blade-slide mechanism
Blow or brush head clean
Mat blade/fragment jammed in head mechanism
Carefully remove blade or fragment(s) from head
RM-1
RE-8
PROBLEM
Mat "ripping" during cut
Mat not cutting through at all
Mat not cutting fully at corners
(cut intersections, Undercuts)
Inconsistent Under/ overcuts in
corners, especially with fabric mats
Undercuts at diagonally opposite
corners, ovals also look "lumpy"
POSSIBLE CAUSE(S)
ACTION / SOLUTION(S)
SECTION
Insufficient air pressure
Flow-control valve coupling loose
Black air hose connection or fitting to head loose
Blade depth not set correctly for magazine
Check air supply (compressor), pressure gauges, pneumatic
hoses and connections
Tighten valve connection (turn nut from bottom CW)
Check/ tighten hose and fitting threaded into head
Turn blade depth adjusting screw CW for more cut depth
RH-2
RH-2
M-8
Tip of blade magazine damaged or chipped
Send replacement magazine; caution against over-tightening
Cutting head not homing correctly, blade not in
line with direction of travel
C-axis driver defective or incorrect configuration
C-axis knocked out of alignment during cutting
Incorrect Head Rotation Setting
MEI utility, Resetb
RC-1
Motion Console diagnostic of C-axis, replace if defective
Check for obstructions or tape on mat surface
Verify Head Rotation #, Advanced Settings
RC-2, RE-6
No magazine in cutting head
Blade tip broken off.
No blade in magazine
Flow-control valve closed excessively
Pneumatic hose connection or obstruction
Tip of blade worn or damaged (start of cut)
Insert blade and magazine
Replace blade
Insert blade into proper magazine
Gradually open flow-control valve screw/knob
Check for pinched hose (black or clear), leaking coupling on
pneumatics panel.
Replace blade
Over/Undercuts not properly calibrated
Change (increase), over/undercut values in Setup
M-8
Incorrect Under/overcut option selected in Setup
M-8
Incorrect head rotation setting
Select appropriate mat thickness for mat being cut,;
Setup, Under/ Overcuts.
Check cutting head for proper homing; see above
Insufficient blade plunge speed, flow control
valve closed down excessively.
Open valve adjusting screw/knob in small increments;
avoid hooking by opening too much
M-8
Flow-control valve coupling loose
Tighten valve connection (turn nut only from bottom CW)
RH-2
Flow-control valve closed excessively
M-8
Insufficient blade depth, tip wearing
Open flow-control screw in small increments until cut
lengths are of consistent length.
Increase blade depth slightly (CW)
X or Y-axis pulley loose
Tighten all pulley set screws securely, apply Loctite
RM-1
X or Y-axis driver defective, missing steps
Diagnose in Motion Console, Replace driver if required
RC-2, RE-6
M-1
M-2
M-8
M-8
PROBLEM
POSSIBLE CAUSE(S)
ACTION / SOLUTION(S)
SECTION
Gouging or scuffing on back of mat
Blade depth excessive, magazine digging into
mat surface, (4 or 6-ply magazines)
Reduce blade depth until scuffing eliminated. CCW turn of
Left depth adjusting screw.
M-8
Blade magazine damaged, burrs scratching mat
Sand magazine beveled face and edges, replace magazine.
Blade depth excessive for V-grooves;
surface of mat also usually scuffed
Reduce V-groove blade depth slightly by turning Right side
depth screw CCW.
Incorrect blade magazine being used, 4 or 6-ply
Use V-groove cartridge.
V-grooves cutting too deeply, mat
center falling through.
M-8
Gouge in back of bevel, lower-left
corner of opening from back of mat
Excessive blade depth setting on head, magazine Reduce blade depth slightly until gouge eliminated,
edge bumping into first cut
turn left depth screw CCW in 1/8 turn increments.
Excessive overcuts
Incorrect blade magazine used
Insert appropriate magazine
Incorrect Under/overcut option selected in Setup
Select appropriate mat type option in Setup
M-8
Over/Undercuts not properly calibrated
Decrease over/undercut values in Setup
M-8
Flow-control valve issue; plunge too rapid
Slightly close down flow-control valve (CW)
M-8
Cutting head rotation error
Check original Head Rotation value and re-set
M-8
Cutting head blade slide loose
Tighten one or both slide-bearing set screws, carefully
M-1
Glide pad "grabbing" during cutting; dirty or
sticky from adhesive spray, or damaged.
Clean glide pad thoroughly with solvent
Replace glide pad if damaged or worn
M-1
RH-1
Excessive blade depth for type of mat being cut
Reduce blade depth by turning depth adjusting screw CCW
M-8
Incorrect magazine used for thickness of mat;
i.e.: 6-ply mag for suede or 4-ply mat
Use proper blade magazine for mat being cut
Possible loose head-cart bearings, Y-axis
Tighten cart bearing set screws securely, Loctite sparingly
if possible. (2mm Allen key required)
RM-2
Head mounting bolts (4) loose.
Check and tighten mounting bolts. (5/32" Allen wrench)
RH-1
No slip sheet under mat
Put slip sheet under mat being cut (larger than mat)
Hooking cuts, especially in third
corner of rectangle opening, startof-cut
Outward hooking cuts (away from mat
opening) at start of cut
Terrible all-around cut quality;
especially ellipses and V-grooves
Mat blade tip breaking off
M-8
PROBLEM
Cutting head/gantry jams violently
Scratching/ scoring marks on
surface of mat board
POSSIBLE CAUSE(S)
Possible defective blades
ACTION / SOLUTION(S)
Try different box of blades, return suspect blades-RGA
Improper slip sheet material used; ie: "3X", etc.
Use regular 4-ply mat board for slip sheet
Slip sheet too small for mat being cut
Use properly sized slip sheet
Foreign matter lodged in mat or slip sheet
Move or replace slip sheet
Head rotation error, RB circles/ellipses or
Designer's Choice file, usually text cutting.
Software issue, version < 2.1.0
Tape or other residue on mat forces head to turn
Check/ clean mat surface for tape or ATG residue
Glide pad hitting loose button clamp & turning
Check and tighten clamp buttons (use coin)
Air pressure too low, head caught against
button clamp(s)
Check air gauges; adjust or turn on compressor; and
inspect glide pad for damage
Clamp button(s) loose, unscrewed
Check and tighten all clamp buttons (use coin)
Head or gantry colliding with stationary object;
furniture, shelving,etc.
Move machine or interfering object(s), check behind
machine as well.
Defective X or Y-axis driver
Diagnose in Motion Console, replace if required
X bearing cart / gantry jammed by T-nut in
top or bottom extrusion.
Remove top and bottom T-nuts from extrusion
Foreign matter caught under glide pad
Clean glide pad, use solvent if necessary
M-1
Glide pad scratched or damaged
Inspect pad, sand smooth any superficial scratches, may
be necessary to remove head and pad if damage is severe;
replace glide pad if excessively damaged
RH-1
Blade magazine scuffing mat surface
Inspect clamp buttons for tightness and burrs, tighten loose
clamps with coin, sand palpable burrs on clamp button faces
Reduce blade depth for Standard or V-groove adjusting screw
M-8
Possible drying of linear-bearing track felt wipes
Drip light machine oil onto felt wipes or bearing tracks, all 12
M-3
Loose or damaged button clamps scoring pad
Slight squeaking during head/gantry
movements
SECTION
M-2
RC-2
PROBLEM
Loud squeaking noise during X motion
POSSIBLE CAUSE(S)
ACTION / SOLUTION(S)
X-axis belt(s) rubbing inside or reversing unit block Spray WD-40 on belt teeth to reduce squeaking
and/or pulley teeth
Y axis border too large or small
Y-axis sensor misalignment, often caused
by mat jamming behind gantry.
Re-position Y-axis home sensor parallel with magnet,
fine -tune Home setting in Advanced settings; also check
limit switch clearance according to spec. (1/8")
Send replacement Y-axis Home sensor-switch
RE-8
Head cart bearings very loose
Cut accurate test mat and change X-Home setting;
Advanced Settings
Check/ tighten sensor and magnet for alignment, gap;
recalibrate in advanced settings with test mat.
Check bearing cart set screws (4), recalibrate.
RM-2
Head mounting bolts loose.
Tighten head mounting bolts, recalibrate
RH-1
Defective home sensor/switch; error message
Replace X or Y Axis Home sensor switch
RE-8
Y-gantry beam loosened and misaligned due to
impact, or shipping damage, etc.
Check squareness with test cut and visual alignment of spacer
blocks
RM-9
Defective home sensor-switch
X-axis border too large or small
X Home setting too large or small
X-axis magnet-sensor misaligned or loose
Blade magazine loosening or falling
out of head during cutting
Magazine holding thumbscrew not fully tightened. Drip small amount of lube onto thumbscrew threads to
ease tightening.
Replace with new type, larger diameter thumbscrew knob
Blade magazine tip damaged or chipped
Send replacement magazine
Ragged, wavy, "rough" cuts
Mat blade dull or damaged
Replace mat blade
Slip sheet overly worn, or contains debris
Turn over, clean, or replace slip sheet
Head rotation error, improper turn during cut
Check "homing" before and after cutting
Tape or other residue on mat forces head to turn
Check/ clean mat surface for tape or ATG residue
Opening fallout or debris interference during cut
Use Remount spray and/or tape mat edges down
Check behind slip sheet for debris
Mat not held flat against board
Use Remount spray and/or tape mat edges down
Excessive spray/ ATG buildup on glide pad
Clean glide pad with solvent
Mat borders "grabbing" during cut
8-ply cutting problems:
SECTION
M-1
PROBLEM
Blade tips breaking/ bending
POSSIBLE CAUSE(S)
Blade not fully retracting from mat at end of cuts
Bainbridge or Rising board too dense
Mat too dense; blade bent or broken
Under/overcut setting too small
Air pressure insufficient
Old-type Flow-control valve on cutting head
Excessive blade depth
Blade magazine worn or damaged
ACTION / SOLUTION(S)
Hold down and/or tape mat to slip sheet
Cut mat with 2 passes; 6-ply blade first, then 8-ply
See above
Increase Start of Cut value (~0.33-37)
Check compressor and gauges
Replace with newer knob-adjust flow-control valve
Reduce blade depth or "shim" between depth pin and screw
Replace blade magazine
Debossing magazine depth screw in too far
Loosen locknut, turn depth screw on magazine CCW, lock nut
Debossed impression too deep;
gouging mat surface
Debossing magazine depth screw out too far
Loosen locknut, turn depth screw on magazine CW, lock nut
Debossed opening size too large/small
Incorrect Debossing Offset value
Debossed opening not aligned with
cut opening, usually left to right
Incorrect Debossing "Lag" value
Mat sizing not accurate
Increase Debossing Offset to increase opening size,
and vice-versa. (Setup, Other , Debossing, Offset)
Increase Debossing Lag to move debosssed opening left,
and vice-versa. (Setup, Other , Debossing, Left)
Check mat borders with cut test, increase or decrease Home
border; Advanced Settings, Borders, Home X axis
Check Home X-axis dimension (see above)
Human or other error in flipping mat over
Cut opening from front of mat; "Front" option in Cut screen
Demo software screen shown when
F-6100 program opened
Machine clamps but will not cut;
Motion errors when trying to cut
Motion Controller board problem (MEI)
Insert MEI Utilities disc and run "Resetb" diagnostic file
Type in Manual Resetb command
Keyboard numeric keypad "frozen";
numbers changing erratically.
Num Lock button/LED not on
Press Num Lock button on keyboard
Keyboard cable not fully connected
Check/reconnect cable connections
Windows "freeze up"
Shut down with mouse; or Ctrl+Alt+Del; reboot
Cable not making full connection
Re-check cable and connector
Mouse driver error
Install mouse driver software from disc
Undercuts in corners
Outward hook in corners, Start of Cut
Debossing Problems:
Debossed impression too faint
Mat Borders (Home X axis), not accurate
SECTION
RH-2
M-8
Electronic or Computer Problems
Mouse cursor "frozen"
RC-1
RC-1
PROBLEM
"Mouse not found" message when
booting up computer.
POSSIBLE CAUSE(S)
Mouse not connected to correct COM port.
ACTION / SOLUTION(S)
Check mouse connection on "Com 1" port
Mouse cable not fully connected
Check mouse connection to Com 1 port
Mouse driver software not installed, corrupted
Install mouse driver software, in "white box"
Mouse and keyboard lockup
Computer/ Windows error
Attempt Ctrl+Alt+Del to close program;
shut down and reboot computer if still locked up
No monitor image/blank screen
Poor connection of monitor cable/video card
Computer not booting up properly
Check cable connections
Open lower box panel; check connections-Use Caution!
Hard drive issue, replace hard-drive or entire PC box.
Incorrect monitor resolution/color display setting
See procedure for resetting color and resolution (Win98)
Defective monitor
Swap to different computer to verify, replace if defective
Monitor setting for brightness or contrast too low
Adjust brightness with buttons on monitor
Poor or damaged monitor cable connection
Check and reconnect monitor cable, replace monitor if
damaged cable connector
Swap with different monitor/computer to verify; replace
Very dim or darkened monitor image
Monitor damaged or defective; power-surge or
lightning strike possible causes
Blue screen
Fatal Windows error?
Contact FTCO or computer service technician
"Check Setup Values" warning box
when clicking Cut Pattern
Setup file corrupted or deleted,
Setup #'s show as 0's
Check Recycle Bin, Restore Setup file
Replace Setup file with saved backup, (see Mei Utilities disc)
DC- Fonts or designs cut with partial
reverse-bevels
Missing or overlapped entities in drawing
Design includes arc-arc intersection(s)
Portion of drawing outside Borders lines
Zoom in to inspect all intersections
Draw in CAD instead of DC
Move entities entirely within cutting area
DC-Setup, "Smallest Entity" value set too large;
>.05
Multi-Opening Center Pattern de-selected
in Setup/ Operations/ Dialog Options
Set Smallest Entity to .005
Centering mode will not open when
button clicked on
Incorrect default dimensions,
Decimal points shown as commas,
Software won't accept size changes
Improper Windows setting(s);
Regional Settings in Control Panel, Languages
Select Multi-Opening Center Pettern in Setup by clicking on
on options box
Return Regional Settings to English (United States)
in Control Panel; Regional Settings,
Restore all Setup values from backup disc or hard copy
SECTION
PROBLEM
Run Time Error 13, "Type mismatch"
POSSIBLE CAUSE(S)
Same as above, Regional Setting issue.
Software bug; fractional inputs
ACTION / SOLUTION(S)
Same as above.
Use decimal number inputs, (patch needed)
SECTION
Motor belt failure
Inspect X and/or Y-axis belts, replaced if failed
RM-1
Possible pulley flange failure resulting from
loosened and misaligned pulley, belt "derailed"
Remove and replace damaged pulley; inspect belt for damage
and replace if necessary
RM-1
Possible X or Y-axis driver malfunction,
loud vibration noise usually involved
Diagnose in motion Console, replace driver if needed
RC-2, RE-6
Miscellaneous Issues
No X or Y motion during homing
sequence, and/or machine unable to
home afterwards, still makes motor
sounds
Possible motor cable connection problem/ failure Check motor cable connections, swap P201 and P203
connectors to isolate suspect cable.
Machine head does not retract
when cutting lengthy pattern (M.O.);
head/gantry hits limit switch
Possible screen-saver conflict, time delay is
too short.
Turn off Screen Saver, or increase delay time to 30+ minutes
Head/Gantry rapidly move to end of
frame and abort during V-groove cut;
V-grooves widths asymmetrical L-R
V-groove Equalization value too large;
Setup, V-grooves tab
Set Value to 0, "Save Settings"
Loud vibration noise during X or Y
movement
Possible X or Y driver defective
Swap motor cables to cause noise to move to opposite axis;
and/or, run each axis in MEI motion console to aid diagnosis;
send replacement driver ASAP.
Harmonic vibration during homing
and/or ellipse cutting
Torque rod housing resonating
Attach rubber bead molding to dampen vibration,
Check all housings for tightness of fastening hardware
Increase gap between housing and Y-gantry beam
Loud pneumatic noise when clamping
Y-axis cable chain housing vibrating against
gantry
Sticky pneumatic relay(s)
Clicking or Crunching sounds during
RC-2. RE-6
Replace pneumatics control panel
Replace "PC" solenoid valve
Bleed moisture trap(s), and/or drain compressor tank.
RP-1
RP-2
M-2
Pneumatic relay valve on panel sticking or
defective.
Improper air hose coupling; clear hoses at rest,
black hoses when head plunged.
Replace sticking PC valve or entire pnematics panel.
RP-1
Isolate leaking connection, disconnect and reconnect;
send replacement hose or coupling if defective or damaged
RP-1
M-2
Missing or damaged reversing unit bearings
Inspect hubs/shafts of suspect reversing units; listen for source
RM-6
Moisture allowed to build up in air lines
Hissing air leak noise at rest or
during cutting.
RC-2
PROBLEM
movement, X or Y axis
POSSIBLE CAUSE(S)
Damaged or defective cart bearing(s)
ACTION / SOLUTION(S)
of sounds to isolate problem. Replacement required.
Isolate axis and cart with bad bearing. Replacement required
SECTION
RM-2,3,4
1
Cutting Head Removal and Repairs
Head Removal Procedure
1) Shut down the F-6100 normally, and disconnect the main air hose from the rear of
the machine (or compressor). Remove the blade magazine from the cutting head.
2) Remove the cover
plate over the
cutting head by
removing the three
Allen screws, as
shown. (1/8” Allen
wrench)
3) Disconnect the
electrical
connectors to the
cutting head motor
and C-axis sensor.
Pinch the retaining
latches together as
you gently pull the
brown connector
blocks apart.
2
4) Remove both the
black and clear air
hoses from the
cutting head. If your
cutting head has
the brass nipple
connectors, pull on
the hose firmly until
it is removed. If you
have the quickdisconnect fittings,
push inward on the
orange collar as
you pull firmly
outward on the
hose.
5) Remove the four cutting
head mounting bolts with
a 5/32” Allen wrench, and
carefully slide the head off
to the right.
3
Glide Pad Cleaning and Replacement
1) Shut down the machine, and remove the cutting head. (See Cutting Head Removal
procedure).
2) Remove the glide pad by
removing the four flat head
mounting screws with a 5/64”
or 2mm Allen wrench. You
may have to clean the heads
of the screws first if the
recessed holes on the glide
pad have picked up a lot of
dirt and debris.
3) Inspect the glide pad surface
for excessive wear, by
checking to see if the
recessed center area is still
visible. If the center area is
nearly or completely flush with
the outer area containing the
mounting holes, the glide pad
should be replaced.
Also check the pad surface for
any deep scratches or gouges that may have occurred from abrasion with the clamp
buttons or other objects.
4) Clean the glide pad thoroughly with citrus solvent, alcohol, or other cleaning solution.
Also remove the blade-holding thumbscrew and clean the blade slide assembly and
other moving parts in the
cutting head at this time.
(see photo)
5) Replace the cleaned or new
glide pad onto the head.
Important: Do Not over
tighten the four small
mounting screws when remounting, as this may
damage or distort the pad
surface. Tighten the 4
screws snugly and equally.
6) Mount the cutting head back
onto the F-6100.
Clean moving parts with cotton swab and solvent
4
Flow Control Valve Replacement (part # 12-816)
This procedure covers replacement of the earlier flow control valve with the current
version, or replacement of a damaged or defective valve. It is recommended that you
replace the original brass nipple air fitting with one of the current “quick disconnect”
fittings at the same time. (part # 12-817)
1) Disconnect the main air hose from the pneumatics panel on the rear of the machine,
or from the air compressor. Raise the cutting head up at least a foot on the gantry
beam to make it more accessible. Shut down the machine or push in the Emergency
Stop knob.
2) Remove the cover plate
from the cutting head by
removing the three
screws with a 1/8” Allen
wrench. Unplug the Caxis motor and Home
sensor connectors to
avoid damage to the
wires.
3) If you are replacing one
of the early-type flow
control valves, you may
remove the black and
clear air hoses from the
brass fittings by cutting
the hose as close to the
brass nipple as possible.
Cut both hoses close to fittings at 90 degree angle
Use care to cut the hose
with as close to a 90 degree cut as
possible. (see photo)
4) Using a ¼” nut driver, unscrew the small
brass fitting from the cutting head. Make
sure that you are turning the nut driver
counter-clockwise as viewed from
below. Turning the tool in the incorrect
direction may result in breaking the
threaded portion of the fitting or valve off
inside the cutting head casting.
The existing flow control valve may be
removed by hand, or with a 5/16” nut
driver. (see below)
Turn CCW to remove brass air hose fitting
5
Please note: Use of an adjustable wrench or any type of pliers for removal or
installation of these air valves and fittings is not recommended. Fletcher-Terry will
not be responsible for damaged parts or repairs required to a cutting head caused
by the use of improper tools.
Unscrew existing valve by
hand CCW to remove
5) Prior to installing the new flow
control valve, it is advisable to
pre-set the flow adjustment knob:
A.
a. Begin by unscrewing the
knurled silver lock ring
completely, until it comes
into contact with the black
adjustment knob.
B.
b.
Then screw the adjusting
knob clockwise until moderate
resistance is felt. It is not necessary to
use great force to tighten the knob.
6
C.
c. Grasp the adjusting knob in
one hand and hold it
stationary, as you unscrew the
body of the valve itself 5 - 6 full
turns.
D
d.
Hold the knob still, and turn
the silver lock ring all the way in
(clockwise), locking the adjusting knob in
place.
6) Screw the new flow control valve into the
hole in the cutting head nearest the
cutting board, where the small ¼” brass
fitting was mounted initially. (Since this
valve works with the opposite air flow
direction as the original valve, it must be
mounted into the opposite side of the
cutting head air cylinder).
Use the 5/16” nut driver to tighten the
valve securely into the cutting head. Turn
7
the hose fitting portion of the valve to the left in order to face it toward the air hose.
Use caution not to over tighten the valve or hold the tool at an angle that may cause
the threaded portion of the valve to accidentally crack or shear off.
7) Insert the quick disconnect fitting into the
cutting head hole nearest you, where the
original flow control valve had been mounted.
Tighten this fitting with the 5/16” nut driver as
well.
8) Insert the clear air hose into the new
flow control valve, and the black hose
into the quick disconnect fitting. Make
sure that each hose is fully inserted
by tugging on it after pushing inward
completely.
9) Re-connect the main air hose to the machine. Make a test cut and check for
acceptable amount of over-cut. Open the adjusting knob (CCW), to lengthen the
Start of Cut, and close the valve (CW), to reduce the Start of Cut or slow down the
rate of blade plunge. Be sure to tighten the knurled silver lock ring once you have
achieved the desired plunge speed / over-cut.
See the Calibration section for more information on flow-control valve adjustment.
8
Removing a Broken Thumbscrew from the Cutting Head
This procedure will assist in safely removing a thumbscrew tip from the threaded hole in
the cutting head. The thumbscrew may snap off due to a mat jam during cutting, or from
over-tightening.
1) Remove the blade magazine
from the slot in the cutting
head. Pry the magazine out of
the slot with a flat blade
screwdriver as shown.
2) Press in the Emergency Stop knob, or turn off power to the machine by shutting
down Windows normally. Unplug the main air hose from the pneumatics panel on
the rear of the machine.
3) Remove the 3 cutting head cover plate screws with a 1/8” Allen wrench.
9
4) Disconnect both the C-axis motor and
sensor wire connectors, as shown.
5) Disconnect the black and clear air hoses
from the cutting head as well. Push inward
on the locking collar of the fitting as you pull
on the hose.
6) Remove the four cutting head
mounting bolts with a 5/32” Allen
wrench. Press back on the rotating
portion of the cutting head as you pull
to the right to remove.
10
7) Optional: Remove the glide pad by
removing the four mounting
screws with a 5/64” or 2mm Allen
wrench.
8) Using a good pair of tweezers or
needle-nose pliers, turn the tip of
the thumbscrew fragment
Clockwise to back it out. Do NOT
attempt to remove the four blade
slide assembly screws. Doing so
will cause the blade slide bearings
to fall out, requiring return to
FTCO for repair.
9) Turn the screw gradually with the
tweezers until there is enough to
grab onto at the broken part of the
screw. Then carefully grasp the
screw with pliers or tweezers and
back it out the rest of the way
Counter-clockwise.
Remove glide pad screws
Do Not remove the four blade slide assembly screws!!
11
Turn screw CCW from broken end to remove
10) Take this opportunity to clean and inspect the moving parts in the cutting head
thoroughly. Use a cotton swab and solvent to remove any dirt or adhesive residue
from the moving parts. Insert the new thumbscrew and reassemble the cutting head
onto the machine.
Flow Control Valve Replacement (part # 12-816)
This procedure covers replacement of the earlier flow control valve with the current
version, or replacement of a damaged or defective valve. It is recommended that you
replace the original brass nipple air fitting with one of the current “quick disconnect”
fittings at the same time. (part # 12-817)
1) Disconnect the main air hose from the pneumatics panel on the rear of the machine,
or from the air compressor. Raise the cutting head up at least a foot on the gantry
beam to make it more accessible. Shut down the machine or push in the Emergency
Stop knob.
2) Remove the cover plate from the cutting head by removing the three screws with a
1/8” Allen wrench. Unplug the C-axis motor and Home sensor connectors to avoid
damage to the wires.
3) If you are replacing
one of the early-type
flow control valves,
you may remove the
black and clear air
hoses from the brass
fittings by cutting the
hose as close to the
brass nipple as
possible. Use care to
cut the hose with as
close to a 90 degree
cut as possible. (see
photo)
Cut both hoses close to fittings at 90 degree angle
4) Using a ¼” nut driver, unscrew the small brass fitting from the cutting head. Make
sure that you are turning the nut driver counter-clockwise as viewed from below.
Turning the tool in the incorrect direction may result in breaking the threaded portion
of the fitting or valve off inside the cutting head casting. Using a 5/16” nut driver, (or
by hand), unscrew and remove the existing flow control valve from the cutting head
as well.
1
Please note: Use of an
adjustable wrench or any type
of pliers for removal or
installation of these air valves
and fittings is not
recommended. Fletcher-Terry
will not be responsible for
damaged parts or repairs
required to a cutting head
caused by the use of improper
tools.
Turn CCW to remove brass air hose fitting
Unscrew existing valve by
hand CCW to remove
2
A.
5) Prior to installing the new flow
control valve, it is advisable to
pre-set the flow adjustment knob:
a. Begin by unscrewing the
knurled silver lock ring
completely, until it comes
into contact with the black
adjustment knob.
b. Then screw the adjusting
knob clockwise until
moderate resistance is
felt. It is not necessary to
use great force to tighten
the knob.
C.
B.
c.) Grasp the adjusting knob in one
hand and hold it stationary, as you
unscrew the body of the valve itself
5 - 6 full turns.
3
D.
c. Hold the knob still, and
turn the silver lock ring all
the way in (clockwise),
locking the adjusting knob
in place.
6) Screw the new flow control valve into
the hole in the cutting head nearest the
cutting board, where the small ¼”
brass fitting was mounted initially.
(Since this valve works with the
opposite air flow direction as the
original valve, it must be mounted into
the opposite side of the cutting head
air cylinder).
Use the 5/16” nut driver to tighten the
valve securely into the cutting head.
Turn the hose fitting portion of the
valve to the left in order to face it
toward the air hose. Use caution not to
over tighten the valve or hold the tool
at an angle that may cause the
threaded portion of the valve to
accidentally crack or shear off.
7) Insert the quick disconnect fitting into the
cutting head hole nearest you, where the
original flow control valve had been mounted.
Tighten this fitting with the 5/16” nut driver as
well.
4
8) Insert the clear air hose into the
new flow control valve, and the
black hose into the quick
disconnect fitting. Make sure that
each hose is fully inserted by
tugging on it after pushing inward
completely.
9) Re-connect the main air hose to the machine. Make a test cut and check for
acceptable amount of over-cut. Open the adjusting knob (CCW), to lengthen the
Start of Cut, and close the valve (CW), to reduce the Start of Cut or slow down the
rate of blade plunge. Be sure to tighten the knurled silver lock ring once you have
achieved the desired plunge speed / over-cut.
See the Calibration section for more information on flow-control valve adjustment.
5
1
Removing a Broken Thumbscrew from the Cutting Head
This procedure will assist in safely removing a thumbscrew tip from the threaded hole in
the cutting head. The thumbscrew may snap off due to a mat jam during cutting, or from
over-tightening.
1) Remove the blade magazine
from the slot in the cutting
head. Pry the magazine out of
the slot with a flat blade
screwdriver as shown.
2) Press in the Emergency Stop knob, or turn off power to the machine by shutting
down Windows normally. Unplug the main air hose from the pneumatics panel on
the rear of the machine.
3) Remove the 3 cutting head cover plate screws with a 1/8” Allen wrench.
2
4) Disconnect both the C-axis motor and
sensor wire connectors, as shown.
5) Disconnect the black and clear air
hoses from the cutting head as well.
Push inward on the locking collar of
the fitting as you pull on the hose.
6) Remove the four cutting head
mounting bolts with a 5/32” Allen
wrench. Press back on the
rotating portion of the cutting
head as you pull to the right to
remove.
3
7) Optional: Remove the glide pad by
removing the four mounting
screws with a 5/64 or 2mm Allen
wrench.
8) Using a good pair of tweezers or
needle-nose pliers, turn the tip of
the thumbscrew fragment
Clockwise to back it out. Do NOT
attempt to remove the four blade
slide assembly screws. Doing so
will cause the blade slide bearings
to fall out, requiring return to
FTCO for repair.
9) Turn the screw gradually with the
tweezers until there is enough to
grab onto at the broken part of the
screw. Then carefully grasp the
screw with pliers or tweezers and
back it out the rest of the way
Counter-clockwise.
Remove glide pad screws
Do Not remove the four blade slide assembly screws!!
4
Turn screw CCW from broken end to remove
10) Take this opportunity to clean and inspect the moving parts in the cutting head
thoroughly. Use a cotton swab and solvent to remove any dirt or adhesive residue
from the moving parts. Insert the new thumbscrew and reassemble the cutting head
onto the machine.
1
REMOVAL / INSTALLATION PROCEDURE
F-6100 ELECTRONIC CONTROL ENCLOSURE
Removal Procedure
1. Turn off power to the F-6100 system.
2. Disconnect the power cord from the wall outlet/power strip, and from the center rear outlet of
the control enclosure.
3. Disconnect the eight (8) round AMP
connectors (P201-208) from the top
rear panel of the enclosure. Turn the
locking collar on the AMP connector
counter-clockwise and pull the plug
out straight to disengage. (Do not
lose or misplace the rubber O-rings,
as they will be needed for reinstallation of the new enclosure.)
4. Disconnect the connectors (monitor,
keyboard, mouse, printer, if present) from
the lower rear panel of the enclosure.
Loosen thumbscrews on the monitor and
mouse connectors and pull straight out.
5. If present, disconnect modem and
Ethernet cables, also on lower rear
enclosure panel. Release the plastic
retaining clip on each and pull out
straight.
2
6. Remove the two front cover panels
from the control enclosure. Using a
3/32” hex (Allen) wrench, remove
the six button head screws from
each panel.
7. Using a 5mm Allen wrench, loosen,
but do NOT remove, the three M8
button head bolts on the right inside
panel which attach the enclosure to
the frame extrusion. Turn each bolt
~1 ½ turns CCW.
Loosen 3 bolts and slide forward to lift off frame
8. Carefully slide the enclosure forward to allow the
bolt heads to align with the enlarged portion of the
keyhole slots, and lift away from the frame
extrusion to remove the box. Use caution, as the
enclosure weight is approximately 55lbs. (25 kg.)
Replace the two front cover panels onto the
enclosure, and pack for shipment.
Slide forward, then left
to remove
3
Re-installation Procedure
1. Remove the two front cover panels from the replacement Electronics enclosure.
2. Carefully lift the control enclosure onto the lower pulley block of the frame, and align the three
M8 bolt heads with the keyhole slots.
3. Slide the enclosure rearward onto the narrow portions of the keyhole slots, then tighten the
three bolts with the 5mm Allen wrench securely.
4. Continue the procedure by reversing the removal sequence above. (Cable connection
diagrams below). Do NOT replace the front cover panels until machine is fully powered up
and found to be functional.
5. Load the Setup file from the previous computer onto the replacement computer’s hard drive,
if it had been saved to a 3.5” floppy disc. Save it to the C:\Program Files\F-6100 directory,
and replace the existing file when prompted.
6. Replace the two front cover panels. Do not over-tighten the 12 button head 3/32” hex screws.
F-6100 Cable Connections
Pneumatic Outputs
P/J207
Motor Cables
P/J206 C
C P/J205
(Home only)
P/J204
Y
Y P/J203
P/J202
X
X P/J201
Home & Limits
P/J208
Power Supply
4
F-6100 PC Connections
MONITOR
Female
socket
COM 2
ETHERNET
(Open)
Male
socket
COM 1
MODEM
MOUSE
LPT1
(Printer)
KEYBOARD
Computer Disc Drive Replacement
All three disk drives (Hard disk drive,
3.5” Floppy drive, and CD-ROM
drive), in the F-6100 computer are
accessed by removing the lower
access panel on the front of the
electronics enclosure. Remove all six
screws with a 3/32” Allen wrench.
Turn off power to the system, and
unplug the power cord for safety.
Hard Disc Drive (part # 12-801)
1) Remove the three small Allen head screws from the bottom face of the electronics
enclosure. (3/32”) Slide the entire disc drive housing forward in the enclosure a few
inches; enough to permit access to the cable connectors at the rear of the hard drive
and the mounting
screws on each side.
2
Slide entire drive bay
housing forward
2) Reach behind the hard drive, and unplug both the power cable connector (white
translucent plug), and the gray data “ribbon” cable as well. Tip: You may place a
small piece of masking
tape on the top surface of
each connector to visually
aid in plugging them back
into the new drive later.
Tip: The Red wire in any
power connector
always faces toward the
center of the drive
itself.
3
3) Remove the two mounting screws from each side of the drive housing, as shown.
Carefully slide the hard drive forward and out to remove it from the drive bay.
4) Slide the replacement drive into the drive bay, and partially insert all four mounting
screws. Then tighten all four screws securely.
4
5) Plug the power and data cables back in to the rear of the drive. Carefully align the
ribbon cable connector with the pins, then push forward firmly.
6) Plug the power cord back in to the outlet, and turn on power to the machine. When
the boot process begins, press the DELete key to open the BIOS Setup screen.
7) From the main BIOS screen, press the down arrow key until the “IDE HDD Auto
Detection” option is highlighted, then press the Enter key. Press the Escape key
twice to exit back to the main BIOS screen. Then press the F10 key to Save and Exit
Setup, press the Y key (yes), then Enter again.
If the Windows boot up process completes normally, the new drive has been
installed correctly.
8) If the F-6100 program has not been pre-installed on the hard drive, install the latest
version from CD-ROM, and any subsequent “patch” update on floppy disc.
9) If a back-up copy of the F-6100 Setup file was previously made to a floppy disc, copy
it now to the C:\ Program Files \ F-6100 directory through Windows Explorer. Over
write the existing Setup file when prompted.
(If no backup is available, Setup values must be entered manually from within the F6100 program. The hard copy in the F-6100 owner’s manual binder will contain all
the original calibration settings created at the factory.)
10) Open the F-6100 program from the Desktop icon. Enter all necessary settings
manually at this time, if no backup Setup file was loaded. Make test cuts to verify
proper operation of the machine. Replace bottom 3 screws to hold drive housing in
place, and replace the lower access panel.
3.5” Floppy Disc Drive
Perform Steps 1 – 5 as
above. You may remove
the power and data cables
from the hard drive in
order to more easily
access the floppy drive
cables. (see photos)
Be sure to mark or place
tape on the cables in
advance to help remind
you which drive each
cable is intended for. Reinsertion of the floppy
drive ribbon and power
cables is a bit trickier than
for the hard drive cable;
use extra care to ensure
that the connector and
pins are properly aligned.
Remove ribbon cable from 3.5” floppy drive (note tape to
designate correct cable orientation)
5
No special computer setup
procedure is required for floppy
disc installation. If a warning
message during boot up is
shown “Floppy disc fail…”, turn
off power and re-check cable
connections to the rear of the
floppy drive.
When boot up is complete, insert
a floppy disc and Save to and
Open files from it to verify
operation.
Replace the 3 screws at the
bottom of the electronics
enclosure to mount the drive
housing. Replace the lower
access panel as well.
Remove Floppy drive power connector (hard drive cables
removed for ease of access)
Remove mounting screws from each side
Remove / Insert floppy drive
6
CD-ROM Drive
Verify that the “jumper” configuration on the rear of the new CD-ROM drive is set for the
“Slave” option. There will be a diagram on either the rear or top face of the drive
indicating each of the jumper options, usually: “CSEL”, “Slave”, or “Master”. In the CDROM diagram below, the “Slave” setting is the center jumper configuration.
Perform Steps 1 – 5 as above. (A Philips screwdriver is most often used for CD drives)
CD-ROM Mode jumper diagram
CD-ROM jumpers on
rear of drive set to
“Slave” option
Insert a Compact Disc into the new drive and verify proper operation.
1
PC Component Replacement
The following components may be replaced in the F-6100 PC enclosure:
•
•
•
•
•
Computer (“motherboard”)
Modem
Power Supply
Pentium cooling fan/heat sink
MEI (motion control) board
Use of properly grounded wrist band is highly advised to reduce possible damage to
components due to electrostatic discharge.(ESD)
Turn off power to the F-6100, and disconnect the power cord prior to performing any of
these repair procedures. All of the above components are accessed be removing the
lower access panel on the electronics enclosure. (6 Allen screws, 3/32” wrench size)
Computer Board (“Motherboard”)
The F-6100 computer board should only be replaced or serviced by an authorized
Fletcher-Terry technician. This includes replacement of the CMOS lithium battery.
The only user-serviceable components on the motherboard are the RAM modules, which
may be replaced or upgraded. (see “RAM Replacement” procedure)
Modem
The 56K Voice-Fax Modem is the most accessible of the components in the Computer
enclosure.
1) Disconnect the internal modem
(phone), cord from the underside
of the modem, plugged into the
“Line” jack (nearest the front).
2
2) Carefully cut any plastic cable ties holding
the modem board to the intermediate
adapter board.
3) Grasp the modem by the steel mounting
bracket, and gently pull out towards the
front, unplugging it from the rear socket.
3
4) Plug the new modem into the same vertical socket, making sure that the contacts
are properly aligned and fully seated. You may replace the cable ties that were
initially in place.
5) Plug the modem line back into the
“Line” socket on the underside of the
modem.
6) Plug the main power cord back in,
and boot up the computer normally. If
the modem hardware is at all different
from the original, Windows will detect
new hardware. Follow the “Install
New Hardware” Wizard prompts to
install the driver for the new modem.
Pentium Cooling Fan
1) Remove the modem (see above), to
permit access to the cooling fan.
2) Disconnect the white plastic cable
connector from the lower front area of
the computer board. Also disconnect
the intermediate cable connector
located a few inches down the wires
from the first one. This cable socket
will contain the red wires leading to
the cooling fan itself.
Disconnect these two cable plugs
4
3) Unscrew the entire cooling fan and
heat sink assembly from the
motherboard by turning it counterclockwise.
5
4) If the new fan does not have a heatsink attached, remove the four Philips
screws from the existing fan, and
transfer the heat sink to the new fan.
Align the fan and heat sink carefully,
and tighten the four screws.
Cooling fan and heat sink
5) Screw the new fan/sink assembly
into the socket on the
motherboard. Do not over-tighten!
Pentium CPU
6) Plug the intermediate and main connectors back into the appropriate sockets. Note:
the plugs and sockets are indexed, and cannot be plugged in backwards.
7) Replace the modem.
8) Turn on power to the F-6100, and visually confirm that the cooling fan is spinning.
6
MEI Board
1) Remove the modem (see above), to permit access to the adapter board.
2) Remove the 2 plastic screws
which mount the adapter card
to the standoff posts with a
small Philips screwdriver.
3) Unplug the adapter card from
right to left. Use care not to
bend or damage the long gold
connector pins.
7
4) Disconnect the MEI ribbon cable
from the underside of the MEI
board: open the locking tabs on
each side of the socket to release
the cable plug downward.
5) Unscrew the 3 hexagonal
plastic standoff posts from the
MEI board – Carefully! Use a ¼”
nut driver or just your fingers to
remove the posts.
8
6) Unplug the MEI board from
the motherboard from right
to left.
7) Plug the replacement MEI
board into the motherboard,
pushing firmly to the right to
ensure the pins are seated
properly. Apply pressure to
the rear socket portion of the
board only; avoid touching
the electronic components
on the MEI board surface.
Make sure that the pins are
correctly aligned to the
socket.
9
8) Screw the 3 plastic standoff posts back into the studs.
9) Plug the MEI ribbon cable into the socket; push alternately on each side of the plug
firmly upward on the cable plug until the locking tabs pivot downward. You should
hear an audible click when each tab has snapped into the locked postion.
10) Plug the adapter card into the MEI socket, and replace the 2 plastic Philips screws.
11) Replace the modem into its socket, and mount with cable ties (as above).
12) Power up the machine, and operate Motion Console, or make test cuts in the F-6100
program to verify proper operation of the MEI card.
10
PC Power Supply
The computer power supply unit is
located on the left wall of the PC
enclosure.
1) Loosen the bottom terminal
screws and disconnect the
U-shaped wire terminals
(DC Outputs). You may
mark or tape the wires to
facilitate re-assembly to the
correct terminal. The wires
are in sequence from front
to rear as follows:
•
•
•
•
•
•
•
•
+12V – Thick Yellow
RTN – Double black
-12V – Green
-5V – Orange
RTN – Yellow (thin)
RTN – Light Red (thin)
+5V – Red (thick)
+5V – Vacant
Use a “stubby” Philips screwdriver to loosen terminal screws
11
2) Loosen the top 3 (AC input), wire
terminal screws and remove the
wire terminals. (L - Red, N - White,
and FG - Green)
3) Loosen, but do not remove, the
four screws (2 front, 2 rear),
holding the power supply to the
mounting plate on keyhole slots
with a 3/32” Allen wrench. Lift up
the power supply and remove it
from the mounting plate.
4) Hang the power supply back onto the 4
mounting screws, and tighten the screws.
5) Replace all of the wires to the new power supply terminals, in the above sequence.
Double-check the wire connections before re-connecting the power cord and
powering up the system.
6) Connect the power cord and turn on the system. Check for normal boot up and
operation of the computer.
1
Replacing or Upgrading RAM
The F-6100 computer comes with 32 Mb or RAM (Random Access Memory), consisting
of two, 16 Mb, 72-pin SIMM modules. One or both modules may be replaced if found to
be damaged or defective. RAM may be increased by changing to two 32 Mb or 64Mb
“DIMM” modules.
1) Shut down the F-6100 normally. Remove the lower electronics enclosure access
panel by removing the six screws with a 3/32” Allen wrench. The RAM modules are
located at the
upper right area
of the computer
board, as shown.
RAM Modules
2) To remove a RAM module, pry outward on each of the retaining tabs with a
fingernail, as shown. The module will release upward slightly.
2
3) Lift up and pull out the upper RAM module to remove. Repeat the procedure for the
lower RAM module as well.
4) To replace the RAM module strip, insert vertically, push inward to the right, then
pivot downward to lock in position. You should hear a slight click when the module
retaining tabs have locked. Always insert the lower RAM module first.
Insert lower RAM
module and pivot
downward to lock
Insert top RAM
Module and pivot
downward to lock
Electronics Enclosure Component Replacement
The top half of the electronics enclosure contains the following replaceable components:
•
•
•
•
X, Y, and C axis drivers*
Internal driver cables
Transition Board assembly
Cooling fan
*See Driver Replacement procedure
Turn off power to the F-6100, unplug the power cord, and remove the upper access
panel from the electronics enclosure before performing any of the procedures below.
Note: You may “hinge” the rear panel of the enclosure partially open by removing the
three Allen screws from one side of the panel, and loosening the other three. This will
give you easier access to the hardware and connections at the rear of the enclosure.
Internal Driver Cables
There are three pairs of driver cables, two for each driver axis. One cable connects the
transition board to the rear driver plug; the other connects the front driver plug to the
external socket mounted to the rear wall of the enclosure. The cable connections on
both the drivers and transition board are, from bottom to top, X, Y, and C axis.
Front Plug to Socket Cables (ECS #’s_______)
1) Disconnect the external
cable plug from the socket
on the rear of the electronics
enclosure. Note the
orientation of the socket pins
before proceeding further.
1
2) Disconnect the front green plug
to the driver board.
3) Disconnect the Ground wire
terminal from the tab on the
driver mounting plate.
2
4) Using a small flat-blade screwdriver,
loosen the terminal screws for the
small black and clear-insulation
wires on the green connector plug.
These are the top two wires which
lead to a different external socket
than the rest of the wires.
Remove the two wire terminals,
noting the location of each.
5) Follow the cable to the socket
mounted to the rear panel of
the enclosure, and remove the
four screws and locking nuts.
(1/4” nut driver and 1/16” Allen
wrench) Be careful not to drop
any of the nuts down into the
PC enclosure.
3
6) Cut any plastic wire ties holding
the cable to the other cables, and
remove it from the enclosure.
7) Mount the new cable socket to the
enclosure rear wall with the existing
screws and nuts. Be sure to orient
the socket in the same direction as
the original.
8) Route the new cable up and over
the driver assembly area, and zip tie
it neatly to the other cables as
previously.
9) Insert the black and clear wires into
the green plug terminals, and
tighten the terminal screws.
10) Insert the green plug into the front cable socket, and connect the ground wire
terminal to the tab.
11) Plug the external motor cable back into the socket on the back panel of the
enclosure.
4
Rear Driver Plug to Transition Board Cables (ECS #’s _______)
1) Disconnect the rear green
plug from the driver board (Yaxis shown).
2) Disconnect the
corresponding white cable
plug on the transition board
(X-bottom, Y-center, C- top).
5
6
3) Carefully cut any plastic ties
holding the defective cable
to the other cables, and
remove it from the
enclosure.
4) Reverse the above steps to install the new cable. Use extra care in connecting the
white plugs to the transition board. Align the connector pins precisely, and do not
push in too forcefully, or the board itself may crack.
7
Transition Board (part #12-809)
The transition board links the computer /
MEI board to the drivers and other
electronics on the machine. Its primary
use is for diagnostics, as the LED’s show
the status of all the functional circuits on
the F-6100 system.
1) Disconnect the two large ribbon
cables from the lower edge of
the transition board by prying
the locking tabs outward. Note
the location of the cable plugs
by number: J102 – top, and
J101 – bottom.
8
2) Mark the white cable connectors at the
rear of the transition board with pencil or
felt-tip marker to aid in re-connecting
later, especially the three driver cable
plugs, (X, Y, and C axis) and the top two
connectors, #108 and #109.
3) Disconnect all of the white
connector plugs from the transition
board.
9
4) Loosen the 4 Allen screws (2front, 2-rear) on the transition
board mounting plate. Hinge
open the left side (from the
rear), of the rear enclosure
panel to allow access to the
rear plate screws.
Note: Removal of the
transition board by removing
the four Philips screws is
possible as well, but not
advised. The nylon spacers
between the board and
mounting plate will likely fall
down inside the enclosure
when removing and
remounting the transition
board assembly.
5) Lift up slightly, then to the left
to remove the transition
board and mounting plate
from the enclosure.
10
6) Set the transition board and
mounting plate assembly down on
a suitable work surface, and
remove the four Philips screws.
Transfer the new transition board
to the mounting plate, placing a
plastic spacer between the board
and plate at each corner.
7) Place the transition board and
plate back into the enclosure, and
tighten the four mounting plate
Allen screws.
8) Connect all of the cables back to the appropriate sockets. Carefully insert the ribbon
cable plugs into their sockets by pushing each side of the plug in alternately until you
hear an audible click when the locking tab snaps inward. Do NOT attempt to fold the
tabs up before the cable plug is fully seated in the socket.
9) Turn on the power and check for proper operation of the system. Replace the
electronics enclosure access panels.
11
Cooling Fan (part #12-890)
1) Disconnect the cable connector to the fan by
pressing inward on the locking tabs as you
pull the connector blocks apart.
“Hinge” open the rear enclosure panel by
removing all 3 screws from one side and
loosening the three on the other side to make
access to the nuts easier.
2) Using a 11/32” wrench and 3/32” Allen
wrench, remove the four fasteners from
the corners of the fan mount. Use care not
to drop any of the nuts down into the
enclosure.
3) Mount the new fan onto the rear panel,
and reconnect the plug and socket
connector.
12
Driver Replacement, X, Y, and C axis
Part #’s;
X / Y Axis Driver: 12-907
C Axis Driver: 12-810
This procedure assumes that a defective driver
board has been diagnosed, and that a
replacement driver has been made available for
repair.
1) Turn off power to the machine by shutting
down normally. Unplug the power cord from
the wall, or from the rear socket of the
enclosure.
Remove the top access panel from the
electronics enclosure by removing the six
screws with a 3/32” Allen wrench.
Remove six screws from top panel
2) Locate the defective driver
assembly at the left side of the
enclosure. The drivers are located:
X-axis; bottom, Y-axis; center, and
C-axis; top. Remove the front and
rear green connector plugs from
the driver, as shown. (photo shows
Y-axis driver being serviced)
1
3) Note the orientation of the
driver assembly prior to
proceeding further. Carefully
remove the four (4) screws
from the driver assembly with a
7/64” Allen wrench. Use caution
to avoid dropping any of the
screws down into the computer
area of the enclosure!
4) Verify that the DIP switches on the
replacement driver are in the proper
location. (see photo and diagram).
If required, carefully move the
switch to the designated location
with a fingernail or pen. Avoid using
metal tools when working with driver
boards, and be aware that they are
very susceptible to damage by static
discharge. Handle the driver by the
mounting plate only.
X and Y Axis DIP Switches
2
1
2
3
4
4
C-Axis Driver Switch Locations
2
3
X and Y Axis
Switch Locations
1
6) Plug the main power cord back in,
and turn on power to the machine.
Enable the system, and attempt to
make a test cut. If the machine is
still inoperable, Check the fuses
on the underside of the main
power supply enclosure on the
rear of the machine. (See Power
Supply replacement procedure).
Replace blown fuse(s) with 4 Amp
“slow-blow” type fuses, available
at Radio Shack or other electronic
retailers as required.
ON
ON
5) Mount the replacement driver onto
the mounting plate, making sure
that it is oriented properly. Insert
and tighten all 4 mounting screws
with the Allen wrench. Plug both
front and rear green plugs back
into the new driver assembly.
If the machine operates normally, replace the top access panel on the electronics
enclosure.
3
Electrical Control Switch Replacement
Main Power Switch
1) Remove the power cord from the wall outlet or from the rear socket on the
electronics enclosure.
2) Remove the top access panel from the electronics enclosure by removing the six
screws with a 3/32” Allen wrench. Loosen the top two screws of the lower access
panel.
Remove six screws
from top panel
Loosen top 2 screws
from bottom panel
2
3) Remove the four Allen head screws from
the center control switch panel. Pivot the
switch panel forward and downward so
that the rear of the switches is visible.
Remove 4 Switch Panel Screws
4) Note the locations of the wire
terminals at the rear of the
power switch block.
Remove the 4 wires from
each of connector tabs.
3
5) Squeeze the four retaining
tabs behind the panel, either
manually or with the tip of a
screwdriver, as shown, and
push the switch through
towards the front. Use care
not to damage any of the
other wires connected to the
Enable or Emergency Stop
switches.
Push the Switch through from the rear to remove
4
6) Push the replacement Power switch through the panel, making sure that the “I”
symbol embossed onto the rocker switch is in the upper position, and the “0” is
toward the bottom. (see photo) The white printed area of the switch block should
also be facing left.
7) Re-connect the wire terminals to the proper tabs on the rear of the switch block.
Make sure that the tabs are inserted fully into the terminal connectors.
8) Pivot the switch panel back up into its normal position, and re-insert the four
mounting screws.
9) Plug the power cord back in, and turn the power switch on. Power should be ON
when the top portion of the switch is depressed, and the rocker switch should be
lighted. Replace the top access panel if the switch functions normally, and tighten all
access panel screws.
5
Enable LED and Switch Replacement
(Enable Switch Assembly: part # 12-860; Enable LED bulb: #12-862)
Perform steps 1 – 3 as above.
4) Using a small flat blade screwdriver, carefully pry the lower plastic retaining tab from
the rear of the gray switch relay block, as shown. Then pry the top tab away from the
switch, and pull the relay block away. Note the orientation of which wire terminals
are located towards the top and bottom of the switch relay block. (Enable # 13 and
# 23 are at top)
5) To replace the LED bulb, simply
rotate the bulb counter-clockwise
~45 degrees, and pull out. Insert
the replacement LED, and push
inward and rotate 45 degrees
clockwise. Snap the relay block
back onto the switch, and replace
the switch panel and screws.
6
6) To replace the entire Enable
switch assembly: Remove
each wire terminal from the
rear gray and yellow relay
blocks. Attach one wire at a
time to the replacement
block to avoid the possibility
of an incorrect connection.
7) Loosen the two recessed screws from
the gray bayonet mount on the back
of the plate. Rotate the gray block
counter-clockwise about 90 degrees
and remove. Push the Enable button
cylinder through towards the front of
the panel to remove.
8) Insert the new Enable cylinder into
the switch panel from front to rear.
Attach the bayonet mount to the rear
of the cylinder, making sure that the
attachment tabs are oriented top and
bottom. Tighten both recessed
screws securely so that the screw tips
apply pressure to the rear of the
plate.
9) Snap the relay block tabs onto the
notches on the bayonet mount, bottom first, then top. Make sure all wire connections
are secure and properly oriented.
Replace the switch panel and screws, and plug the main power cord back in. Power
up the machine normally, and check the function of the Enable button / LED.
7
Emergency Stop Replacement (part # 12-808)
Perform steps 1 – 3 as above.
4) Pry off the two tabs at the
rear of the Emergency
Stop assembly, and
remove the relay block
from the Actuator.
5) Loosen the two recessed
screws from the rear of the
gray bayonet mount. Rotate
the mount counter-clockwise
90 degrees and remove.
DO NOT remove or loosen
the center Philips head
screw from the rear of the
assembly. (see photos)
Do NOT Remove This Screw!!!
8
Rotate E-Stop mount
CCW and Remove
6) Remove the Emergency Stop knob/ actuator from the panel by pushing it through
from the rear. Insert the replacement E-Stop actuator from the front, and reverse the
above steps to reassemble.
1
X and Y Axis Home Sensor Replacement
1) Turn off power to the machine normally, or push in the Emergency Stop knob.
Raise the cutting head upward manually at least 12” to access the Y Axis home
sensor mounted behind the Y-gantry beam.
The X-axis home sensor is mounted above the electronics enclosure on the upperleft reversing unit, and must be accessed from the rear of the machine, usually with
a step ladder or footstool.
Y-axis home sensor
Lower Y-axis limit switch
2) Cut any plastic “zip” wire ties holding
the home sensor wire and connector to
the gantry beam. Use caution when
cutting the wire ties to avoid damage to
the wires or insulation, and use the
appropriate cutting pliers.
2
3) Disconnect the electrical
connector to the
appropriate Home Sensor
by pressing the locking
tabs inward as you pull the
connector blocks apart.
4) Remove the two small
mounting screws holding
the black (“Hamlin”),
home sensor to the
aluminum mounting
bracket. (3/32” Allen
wrench) Note the
orientation and location of
the sensor on the bracket
prior to removal.
5) Mount the new Home Sensor onto the bracket in as close to the same position as
the original as possible. Tighten both Allen screws securely.
6) Reconnect the wire connector, and tie the wires neatly to the nylon mounting block
with new zip ties. Make sure that the connector and wire are not in the path of the
cutting head/Y-axis bearing cart.
3
7) Make a test cut to verify that the borders are measuring accurately. It may be
necessary to move the sensor and/or magnet on the bracket slightly in order to
achieve the desired border accuracy (see below*). Minor calibration (<1/32”),
corrections may be made in Advanced Settings, Borders, Home X or Y Axis.
* These are the general guidelines for moving an X or Y axis home sensor to correct for
inaccurate border dimensions:
X- Axis (Horizontal) Border measures:
Too Small; Move sensor left (facing rear of machine)
Too Large; move sensor right ( “
“ “
“ )
Y- Axis (Vertical) Border measures:
Too small; move sensor bracket up, or magnet downward
Too large; move sensor bracket down, or magnet upward
Move the sensor or magnet by the exact amount of the border error; i.e. + or - 1/16”.
Loosen bracket screw and move sensor left or right to adjust borders
X-axis limit switch
X-axis Home sensor
1
Limit Switch Replacement (part #’s: Limit Switch, 12-818, Actuator, 12-819)
There are four (4) safety “Limit” switches on the F-6100, one for each edge of the cutting
board. The most frequently damaged of the four is the lower Y-axis switch, located on
the lower end of the Y-gantry, below and behind the cutting head. This procedure
explains replacement of this switch, since it is also the most difficult to access and
replace.
Limit Switch Actuator
Part # 12-819
Limit Switch
Part # 12-818
1) Press in the Emergency Stop knob, or turn off power to the F-6100 by shutting down
normally. Raise the cutting head upward 12-18” in order to access the lower Y-axis
limit switch. Remove the large spring and
urethane bumper from the threaded post
as well. Note the location and orientation
of the switch prior to removal.
2) Remove the wire terminals from the limit
switch tabs by pulling upward firmly. Do
NOT pull on the wire itself! (Note that one
of the tabs [center] is vacant) If one of the
tabs has broken off inside of a wire
terminal, it will need to be removed at this
time with needle-nose pliers or tweezers.
2
3) Remove the two small slot-head
screws mounting the limit switch
and actuator to the bracket with an
offset or “stubby” flat blade
screwdriver. A mat blade may be
used if a suitable screwdriver is
not available. (see photo)
4) Pre-assemble the replacement limit
switch and actuator by placing the
mounting screws through the holes in
each. Align the switch correctly, and
insert the screws into the threaded
mounting bracket holes.
Limit Switch and Actuator pre-assembled
for lower Y-axis limit position
3
5) Tighten the mounting screws securely. Re-connect the wire terminals to the proper
limit switch tabs. Replace the bumper and spring onto the threaded post.
6) Turn on the machine, and press the Enable button. If the Enable light does not
remain on when released, double check the wire terminals and connections to this
switch, and to the other 3 limit switches as well. If the initial limit switch damage was
caused by a mat jamming behind the gantry during cutting, one or both of the limit
switch wires may have been damaged as well, or the Y home sensor mat be
misaligned*.
7) Make a test cut to ensure
that the cutting head /
gantry do not hit the limit
switch during homing
movement. Make sure that
the limit switch bracket is in
line with the Y-gantry
beam. There should be
~1/8” of clearance between
the limit switch roller and
bearing cart edge when it
is in the “Home” position.
(see photo)
1/8” between switch roller and bearing cart at “Home”
8) If the machine is unable to “Home” properly without hitting a limit switch, you must
move the switch and mounting bracket downward slightly. Use a 5mm Allen wrench
to slightly loosen the limit switch bracket. Make sure that the bearing cart will actuate
the switch approximately 1/8” below the home position by pushing downward on the
head after a mat cut is completed.
* See X and Y Axis Home Sensor Replacement procedure
1
Power Supply Removal / Replacement
The primary power supply for the F-6100 may be removed temporarily, when moving the
machine. This procedure also covers replacement of the power supply if required.
1) Shut down the F-6100 system normally. Unplug the power cord from the surge
protector or wall outlet.
2) Unplug the cable
from the underside of
the power supply.
Rotate the locking
collar counterclockwise and pull
downward to
disconnect.
3) Remove the two mounting bolts from the right side of the power supply mounting
plate, and the center bolt from the left side. Do NOT loosen or remove the two bolts
on the left side from the keyhole-slot openings. (see photo)
Do NOT
remove!
Remove these 3 bolts
2
4) Carefully lift the power supply off the fixed mounting bolts by lifting upward on the
carry handles, then rearward, away from the machine frame. Use care to avoid the
cables and pneumatic hoses attached to the machine frame.
Set the power supply down onto the rubber pads behind the mounting plate surface.
Avoid
catching on
cables and
hoses
5) Reverse the steps above to remount the power supply to the F-6100 frame.
Fuse Replacement: Replace blown fuse(s) with 4 Amp “slow-blow” type fuses,
available at Radio Shack or other electronic retailers.
Caution! Do not attempt to remove the power supply housing from the
mounting plate, exposing the internal electrical components. Contact with
high-voltage capacitors may cause severe electric shocks, resulting in
serious injury or death. Repair of the power supply components should only
be attempted by an authorized electronics technician; no user-serviceable
components are contained within the power supply enclosure.
Replacing Damaged Cables
In the event that a control cable to either the Y or C-axis motors, limit switches, home
sensors, or pneumatic hose is irreparably damaged, it will need to be replaced.
Replacing a cable is fairly simple, though time-consuming.
The cables and hoses that run through the black plastic “energy chain” or cable carriers
are organized as follows: (cable reference numbers shown in parentheses)
X-axis (large, horizontal – back of machine), cable carrier:
X-axis
carrier
Y-axis Motor cable (203)
*Plus (+) Y axis limit switch (top)
*Minus (-) Y axis limit switch (bottom), and
*Y-axis home sensor (*shared cable, # 204)
C axis (cutting head) motor cable (205)
C axis home sensor cable (206)
Black pneumatic hose (head plunge)
Clear pneumatic hose (head retract)
Y-axis
carrier
Y-axis (small, vertical – left of gantry) cable carrier: (above shown in bold)
*Located on back side of gantry beam in extrusion slot
To remove a cable or hose for replacement, the segmented cable carrier(s) must be
“unzipped” along their entire length. For this example, we will replace the C-axis motor
cable, as it involves one of the longest cable runs.
1) Turn off power to the machine normally. Remove the cover guard plate over the
cutting head by removing the three screws with a 1/8” Allen wrench.
2) Disconnect the C-motor
cable connector. Using a
small pair of cutting pliers,
carefully remove any
plastic cable “zip” ties
holding the cable to the Lmounting bracket. Note:
Keep any cable ties that
you cut in position, so that
it will be easier to
remember their locations
when re-assembling the
new cable and ties.
Cut cable ties carefully!
1
3) Using a stepladder or stool,
reach up and remove the two
small Philips or Allen screws
holding the top of the Y-axis
cable carrier to the gantry.
4) Begin unzipping the cable
carrier nearest the cutting
head, one link at a time, as
shown.
5) Continue until you reach the
top most link in the chain,
then snap the link open, as
shown, to permit the cable
connector block to pass
through.
2
6) Follow the damaged
cable up and over the top
of the Y-gantry bracket.
Cut any cable ties along
the top of the bracket to
allow removal. Use care
not to damage the other
cables or hoses.
7) Remove the two nuts (3/8”), from the bottom
side of the X-axis cable carrier tray. Lift the
carrier chain upward and free it from the
tray.
8) Unzip the X-axis cable chain,
starting with the top link, nearest the
Y-axis motor…
3
- Continue all the way, until you reach
the last link. Unsnap the link carefully,
and pass the cable and connector
through it.
9) Remove the cable connector from
the rear of the electronics
enclosure, in this case #205 for
the C-axis motor cable. Follow the
cable back to the X-axis cable
carrier, and cut any zip ties
holding it in place.
Unplug C-motor cable and cut cable ties
4
10) Connect the replacement cable to the
appropriate socket on the electronics
enclosure. (P205) Loosely route the
cable up and along the X-axis carrier,
and over the top of the machine
towards the front. Use care not to yank
on the brown connector or wires when
handling the cable. Attach, but do not
tighten any cable ties yet.
11) Connect the C-motor connector to the cutting head cable. Attach new zip ties to the
L-bracket and cable, making sure to allow adequate, but not excessive slack.
12) Thread the cable up through the Y-axis carrier, and zip it back up from the top, back
down to the cutting head, one link at a time. Make sure there are no kinks or twists
in the cables or hoses along the entire length of the carrier.
13) Thread the cable through the X-axis carrier behind the machine in the same
manner, and zip the carrier chain back up, beginning at the bottom, or tray end.
14) Inspect the cable for proper length and slack, then tie it in place at the appropriate
points as it was initially. Do not over tighten any cable ties holding pneumatic lines,
as it may pinch a hose and restrict airflow. Replace the screws and nuts holding the
carrier chains in place.
15) Power up the machine and make test cuts to verify proper operation.
5
Cooling Fan (part #12-890)
1) Disconnect the cable connector to the fan by
pressing inward on the locking tabs as you
pull the connector blocks apart.
“Hinge” open the rear enclosure panel by
removing all 3 screws from one side and
loosening the three on the other side to make
access to the nuts easier.
2) Using a 11/32” wrench and 3/32” Allen
wrench, remove the four fasteners from
the corners of the fan mount. Use care not
to drop any of the nuts down into the
enclosure.
3) Mount the new fan onto the rear panel,
and reconnect the plug and socket
connector.
1
Motor Drive Belts
The two toothed belts (part #12-830), should not require replacement under normal
conditions. It is a good idea to visually inspect each belt for any damage and for proper
tension on a yearly basis. This procedure covers inspection of drive belts and pulleys
only. For replacement and re-tensioning of motor drive belts, see the following section.
Y-axis motor belt access:
Remove the motor / pulley
housing from the top of the
Y gantry. There are two
mounting screws on each
side of the housing; early
machines will require a
1/8” Allen wrench; use a
5/16” nut driver or socket
on newer machines. (see
photos) Avoid using pliers
on these fasteners to
prevent rounding of the
screw heads or marring of
the housing finish.
X-axis belt access: Remove the Philips sheet-metal and hex-head screws from the
bottom of the torque rod housing on the right side of the machine. Remove the larger
Allen bolt from the top of the housing with a 5mm Allen wrench. Then remove the X-axis
belt/pulley cover by removing the two screws from the rear, as shown. (see photos)
1
Inspect each belt for wear,
fraying or other damage. The
belts should have equal
amounts of tension; you
should be able to deflect the
belts no more than ~1/4”
when pushing firmly inward
as shown in the photo.
Also inspect both large and
small pulleys, and verify that
they are properly aligned; the
black drive belt must be
parallel to the motor mounting
plate, as shown.
Misalignment of these pulleys
can result in failure of the
pulley side plate and/or damage to the belt.
X-axis belt cover removal, 2 rear screws
2
Proper Pulley Alignment (Y-axis, view from below)
Shaft
Drive Pulley
Motor Pulley
Belt
Motor Shaft
.375
.375
X
Motor mounting plate
=
X
Space between
motor plate and
each pulley must
be equal: ~3/8"
* The photo and diagram above show the Y-axis pulleys and belt as viewed from below.
The X-axis belt and pulleys will look similar, however, the motor mounting plate will be
on top.
3
Belt Deflection, ¼” maximum
Check both of the two pulley set screws on each pulley for tightness, as shown. One of
the two Motor pulley (smaller) set screws must be exactly perpendicular to the flat
surface of the motor shaft. (A step ladder [Y-axis], and proper lighting are needed to
perform this inspection). Use a 1/8” Allen wrench to tighten these screws securely. (see
diagram)
Motor Shaft
Correct
Set Screws
Motor Pulley
Incorrect
Motor Pulley to Shaft Alignment
4
Notify Fletcher-Terry if there is any belt damage, pulley misalignment, or extreme
looseness of any of the pulleys or set screws.
One motor pulley set screw must be perpendicular to flat surface of the motor shaft.
Motor Belt Replacement and Tensioning
1) Remove the appropriate motor housing(s), as above.
2) Loosen, but do not
remove the four motor
mounting bolts, as
shown. (You will need a
3/8” wrench/socket and a
5/32” Allen wrench.)
Loosen the nuts/bolts no
more than 1 - 2 turns.
3) Move the motor on the
mounting plate slide
holes toward the large
pulley in order to create
slack in the belt. Remove
the belt from both pulleys
(unless the belt has failed
during use and already
fallen off).
5
Y- Axis motor belt removal
4) Mount the replacement belt onto the pulleys, and slide the motor back away from the
large pulley.
5) A. Use a pry bar or other
suitable tool to create proper
tension on the belt, and tighten
the mounting bolts as you
maintain tension. There should
be no more than ¼” of belt
deflection when the motor
mounting bolts have been
tightened.
6
B. Optional: If you have a belt spreader
tool and tension gauge:
1. Insert the spreader tool between the
motor and reversing unit block, and
turn the knurled ring by hand to
spread the tool and create enough
belt tension to hold in place. Then
use the leverage rod to turn the
spreader another half turn or so.
Insert belt spreader tool between motor
and reversing unit block
2. Place the L-shaped
bracket across the two
pulleys, as shown. The
short bar of the “L”
should be over the
large pulley. Insert the
gauge tip through the
hole in the center of the
rod so that it contacts
the belt.
3. Push the gauge
through the hole only
as far as the “shoulder”
on the gauge rod, and
note the reading on the
dial. Press the Reset
button on the gauge
and take another
measurement. Repeat
this until you begin to get a consistent feel for using the gauge. The desired
tension should be 2 – 2.5 lbs.
7
4. Turn the spreader tool with
the leverage rod to increase
(or decrease) the belt
tension by ~1/4 turn
increments. Re-measure
the tension with the gauge
again several times.
Continue this procedure
until the tension reading is
consistently measured at
about 2 lbs.
5. Tighten the motor mounting
bolts, and make another
tension measurement. The
tension will have increased
slightly, depending how
loose the bolts had been.
The final belt tension should
not read significantly higher
than 2.5 lbs. Remove the
spreader tool from the
machine by turning the
knurled ring.
Close up of belt tension gauge tip. Push only
until shoulder contacts bracket.
6) Double check for proper pulley alignment and set screw tightness.
Replacing Motor and Drive Pulleys (Large pulley #12-828, Small pulley #12-829)
1)
Remove the appropriate motor housing(s), as above.
2) Loosen the 4 motor mounting bolts, slide the motor to the left, and remove the
motor belt. Inspect the belt for damage or wear; if either of the pulleys has failed or
been damaged, belt
replacement is recommended
as well.
3) Loosen and remove the two set
screws on the pulley that will be
removed with a 1/8” Allen
wrench. Place a pry bar or
large screwdriver between the
pulley and motor mounting
plate, and pry the pulley from
the shaft. Note: This may be
difficult when attempting to
remove a large drive pulley
from a splined shaft, as the set
8
screws have
usually caused
deformation of the
shaft itself. If
available, you may
use a “gear puller”
type tool to aid in
removal. (see
photos) Gear Puller
tools are available
at most Auto Parts
stores.
4) Clean the shaft of
any residual Loctite
with steel wool or
fine emery cloth.
Mount the
replacement pulley
Gear / Pulley “Puller” tool. Align pusher bolt with center of shaft.
onto the shaft,
taking care to
radially align one pulley set screw to the flat surface of the motor shaft (see
diagram above), or to the notch or spline or the shaft. (see below). Measure the
pulley distance between the pulley and motor plate (~3/8”), making sure that it is
aligned with the other pulley.
Tighten Pusher bolt to gradually remove pulley from shaft.
9
5) Remove each set screw and apply a small amount of Loctite (# 242, or similar), to
the screw threads. Re-insert the screws and tighten securely, double checking for
proper alignment with the shaft and distance from the mounting plate.
Large pulley to shaft alignment
One set
screw in
"valley" of
splined
shaft
Cone-tipped
set screw
Area of detail
Splined shaft (early type)
Notched shaft (current type)
6) Replace the belt and re-tension according to the above procedure.
10
1
Bearing and Bearing Cart Replacement
If a cartridge bearing is found to be damaged or defective, it will need to be replaced.
This section deals with replacement of any bearing in the X or Y axis bearing carts.
There are 12 sealed cartridge bearings, 4 in each cart. The 4 bearings in the Y-axis
(vertical movement) bearing cart are all accessible without removing the entire cart from
the machine. The 2 rear bearings in each of the X-axis bearing carts are not readily
accessible, however. Removal of the carts, along with other components, is required in
order to replace any of the 4 rear bearings. Please make sure you read and understand
the procedure thoroughly before attempting this repair.
Y- Axis Bearing Replacement
1) Shut down the F-6100 computer
normally. Remove the P201 and P203
cables from the rear of the electronics
controller. This will prevent accidental
damage to electronic components from
manual movement of the gantry and
cutting head. Disconnect the main air
hose from the rear of the machine.
2) Remove 3 button-head Allen screws to
remove the cutting head cover plate
(1/8” Allen wrench). Disconnect the
motor cable and C-axis sensor cable
plugs, as shown. Remove the black and clear air hoses from their quick disconnect
couplings as well.
2
3) Remove the 4 mounting bolts from
the cutting head with a 5/32” Allen
wrench, as shown. Retract the cutting
head glide pad from the slip sheet
surface, and remove the head by
pulling straight to the right. Be careful
not to bend or damage the two
locator pins on the head mounting
plate when removing.
4) Carefully remove the 4 cutting head
mounting plate bolts with a 5mm Allen
wrench. Be aware that there may be one or
more thin “shim” washers placed between
the mounting plate and bearing cart
surfaces. If present, these washers must be
placed in the same location(s) when
remounting the head afterwards. Tip: Mark
the location(s) of any shim washers, and the
top edge of the mounting plate with a pencil.
This will aid in re-mounting the plate in the
correct orientation afterwards.
3
5) To remove the top felt pad holder assembly
from the bearing cart, first trace the location
of the Y-axis Home magnet bracket onto the
black surface with a pencil. This will aid in
locating the magnet in the precise position
when re-assembling.
Remove the Y-axis magnet bracket by
removing the single screw with a 5/32” Allen
wrench.
6) Then remove the 3
screws from the pad
holder with a 3mm
Allen wrench, as
shown. Lift the pad
holder assembly off
to the right, as
shown. You may
remove the lower felt
pad holder as well.
4
Remove Pad Holder
Assembly from Y-axis
Bearing Cart
7) If you cannot determine which
bearing(s) are causing the
noise, you will need to remove
each bearing individually for
inspection and/or
replacement. Begin by
loosening one of the front
angled set screws (2mm Allen
wrench), which lock the
bearing eccentric pivot axle in
place. Loosen the screw as
far as possible without
actually removing it from the
threaded hole in the bearing
cart casting.
8) Loosen the eccentric
adjustment axle for the
bearing with a 5mm Allen
wrench, as shown. Turn the
axle in the direction which
reduces tension on the
bearing, usually counterclockwise.
5
9) Using a suitable punch rod or
other tool, insert into the
access hole on the right side
of the cart. With a small mallet
or hammer, gently tap the rod
to the left to remove the
bearing axle. Make sure that
the punch is perfectly aligned
with the axle, and that you do
not strike it too forcefully.
10) Remove the axle from the cart,
and the punch tool from the
access hole. You may use a
pair of tweezers, or ideally, a
magnet to remove the bearing
from the space between the
cart and gantry rail. (If you are
removing the lower bearing, it
will fall out once the axle and
tool have been pulled out; don’t
lose it!)
11) You will need to check the bearing by “feel” to determine whether or not it is
defective, since the moving
parts and bearings are sealed
inside and not visible. Hold
the hub of the bearing
between the thumb and
forefinger of one hand, while
rolling the outer ring with the
other hand. If there is any
roughness, sticking, or gritty
feeling when rolling the
bearing back and forth, it will
need to be replaced. A good
bearing will roll very smoothly,
and have an almost “liquid”
feel as it rotates.
Magnet
Bearing
6
12) To replace the bearing, reinsert it into position with the
magnet tool, and align it as
closely as possible with the
axle hole. Insert the axle
back into the hole and
through the bearing hub.
Push the axle completely
into the hole until it is nearly
flush with the cart surface.
13) Insert the long end of a 5mm
Allen wrench into the end of
the eccentric axle, and turn
clockwise until it is “snug”. DO
NOT over-tighten the
eccentric axle, as this may
damage the bearing, axle, or
even the bearing cart casting.
While holding tension on the
5mm wrench, tighten the 2mm
locking set screw which
corresponds to the axle. Apply
adequate torque to tighten the
screw fully, without stripping
the screw hole. A small
amount of Loctite or other
thread-locking compound may
be applied to the set screw
threads prior to tightening.
14) Rear bearings: Removal of the rear Y-axis cart bearings is similar, but with no
eccentric axle adjustment, making re-assembly easier. Visual access to the locking
set screws is however more difficult. Make certain that the bearing axle is fully reinserted into the hole before tightening the locking set screw. The flat head of the
axle will be nearly flush with the bearing cart casting when inserted properly.
15) Before replacing the felt pad holders, clean or trim off the dirty ends of each pad, and
lubricate by soaking them with a light oil (i.e. “3 in 1” oil). Use care not to lose the
small compression spring behind each pad. Make sure that the pads are correctly
aligned with the bearing tracks after re-assembly.
16) Replace the Y-axis magnet bracket carefully, using the pencil line to aid in
alignment. Do not over tighten the mounting screw, as the threaded hole in the
plastic pad holder will easily strip. Make a test cut to check the accuracy of the Yborder, and make any needed adjustments in Advanced Settings > Home Y Axis.
7
X- Axis Bearing Replacement (front)
1) Shut down the F-6100 computer normally. Remove the P201 and P203 cables from
the rear of the electronics controller. (see above) This will prevent accidental damage
to electronic components from manual movement of the gantry and cutting head.
Disconnect the main air hose from the rear of the machine.
2) Raise the cutting head upward manually about 2 feet in order to access the lower Xaxis bearing cart. Remove the large spring and urethane bumper from the threaded
post on the gantry standoff block.
Also remove the black plastic
guard which is held onto the
bearing cart with Velcro fasteners.
3) Remove the felt pad holder(s) from
the bearing cart by removing the 3
screws from each with a 3mm
Allen wrench.
4) Loosen the angled locking set
screw that corresponds to the
bearing you wish to remove using
a 2mm Allen wrench. Loosen the
screw as far as you can without
actually removing it from the hole.
5) Insert a rod or other suitable tool
into the access hole on the underside of the bearing cart. Tap upward with a mallet
or small hammer gently until the bearing axle is removed from the top of the bearing
cart.
6) Remove rod tool from the access hole. Remove the suspect bearing from the cart
with a magnet or tweezers, and inspect it (as above, step 9)
7) Replace the bearing by reversing the above steps. Adjust the eccentric axle as in
step 11 above. If the bearing noise is still present after replacing both front bearings,
the bearing cart will need to be removed in order to access the rear bearings.
X - Axis Bearing Cart removal (lower)
Perform the procedure below when it is
necessary to inspect or replace either of the
rear bearings, or if the bearing cart casting
itself is determined to be damaged or
defective, requiring replacement.
Important: Follow all steps below in the
precise sequence shown!
1) Move the Y gantry to the approximate
center of the machine frame manually,
8
and raise the cutting head upward at least 18”. Make sure that the X and Y axis
motor cables are disconnected from the electronics controller first.
2) Remove the urethane bumper, spring, and plastic guard strip as in step 2 above.
Then loosen the bolt at the lower end
of the cable channel with a 5mm Allen
wrench, as shown. Do not remove the
bolt entirely.
3) Remove both the left and right side felt
pad holders from the bearing cart by
removing the 3 Allen screws from each. (3mm
Allen wrench)
4) Pry the two yellow plastic molding strips outward, as shown, in order to access the
lower gantry mounting bolts. Remove both bolts with a 6mm Allen wrench.
9
5) Remove the flat head bolt from the
squaring adjustment tab on the left
side of the gantry. (5mm Allen) Do
NOT loosen or remove the squaring
adjustment bolt or locking nuts. (see
photo)
6) Remove the 4 mounting bolts on the
rear of the bearing cart adapter
plate with a 5mm Allen wrench. (see
photo) Do not loosen or remove the
bolt that mounts the drive belt
coupling to the adapter plate.
7)
Place a small piece of mat or
foam board (~3 5/8” wide),
between the gantry beam and
the cutting board surface. This
will support the lower end of
the gantry and help prevent
excessive flexing of the top
cart bearings while the lower
cart is removed.
10
8) Move the lower bearing cart and
standoff block gently to the right,
while supporting the lower end of
the Y-gantry. Move the cart away
from the gantry completely.
9) Loosen both of the front bearing locking set screws with a 2mm Allen wrench. Insert
a punch tool into the lower access hole of the bearing cart, align with the bearing axle,
and tap upward gently with a mallet, as shown.
Tap upward to remove bearing axles
11
Figure X - Remove bearing with magnet
Remove both of the front bearing
eccentric axles in this manner.
Support the cart from below as you
remove the second bearing, and
carefully remove it from the lower Xaxis rails.
10) Manually check each of the rear bearings for smooth operation. Replace both
bearings at this time if you are unsure of their condition.
11) Optional: If the bearing cart itself has been damaged or found to be defective,
remove the two recessed mounting bolts that attach it to the stand off block (5mm
Allen wrench). Mount the block onto the new bearing cart in the same manner, using
care to align the ends so that they are flush. (Remove the front 2 bearings from the
new cart before attempting to re-assemble onto the frame rails.)
12
Side view,
Standoff block
mounting bolts
Standoff block not
aligned with bearing
cart
13
12) Position the bearing cart back onto the frame rails, making sure that the rear
bearings are properly engaged with the rear rail. Insert one of the front bearings and
axles into the cart, and tighten the eccentric pivot and set screw enough to hold the
cart in place. Insert the second front bearing, and then adjust and tighten both
eccentric pivots and the corresponding set screws. Move the cart back and forth
several times to ensure that the bearings are all rolling smoothly on the tracks.
13) Move the cart and standoff block back to the left and align to the gantry squaring tab.
Re-insert the flat head tab bolt first, and tighten it securely into the threaded hole in
the standoff block. Also align the slot at the base of the cable channel with the
mounting bolt on top of the standoff block.
14) Insert the two large bolts back into the lower end of the gantry beam, and tighten
securely to the T-nuts in the standoff block channels.
15) Align the rear adapter plate to the bearing cart, then insert and securely tighten all 4
bolts which were removed in step 6 above.
16) Position the cable channel so that it is parallel with the gantry beam over its entire
length, then tighten the mounting bolt at the bottom of the channel. (see photo)
17) Re-assemble both felt pad holders to the bearing cart. Make sure all pads are clean,
lubricated, and properly aligned with the frame rails.
18) Re-mount the plastic bearing guard and bumper-spring assembly. Plug the motor
cables (P201 & P203), back into the controller box, power up the system, and make
test cuts.
1
Replacing Top X-axis Bearing Cart
1) Turn off power to the machine. You may also lower the machine down on its stand to
allow easier access to the top of the Y-gantry and top X-axis bearing cart. Refer to
instructions for lowering the F-6100 in the “Moving the F-6100” section. Otherwise, a
step ladder or stable step-stool will be required for much of this procedure.
2) Remove the Y-axis motor housing from the top of the Y-gantry. A 5/16” wrench or
1/8” Allen wrench will be required to remove the four fasteners, depending on the
age/ serial # of your machine.
3) Unplug the Y-motor cable plug from the top rear of the gantry area. Loosen and
remove the motor cable mounting bracket by removing the 5mm Allen bolt. Remove
the other 5mm Allen bolt from the top plate as well. Remove the 2 nylon bushings
from underneath the plate, and store them with the bolts for re-assembly later.
Remove two 5mm bolts
and nylon bushings
4) Move the Y-gantry to the approximate
center of the frame manually. Using
two 90-degree angle brackets, bolts,
and T-nuts, fix the lower bearing cart
to the bottom frame extrusion, as
shown. (5mm Allen wrench required)
Make sure that the bearing cart is
completely immobilized by the
brackets in both directions (left-toright)
2
5) Cut the cable tie(s) from the top
area behind the gantry, as
shown. Be careful not to damage
the cables or insulation.
6) Loosen the 5mm Allen bolt which
holds the top end of the cable
carrier channel to the top standoff
block. Do not remove the bolt
entirely, unless the carrier channel
has a hole instead of a slot in this
location.
3
7) Mark the location of the top-right
(from front), bumper bracket onto
the frame extrusion with a pencil.
Remove the bumper bracket with
a 5mm Allen wrench.
Mark bracket location here
8) Remove the vertical torque rod housing from the right side of the machine (as seen
from the front). Remove the fasteners from bottom to top: Philips screw, 5/16” hex
screw, and then the top 5mm Allen bolt. Slide the entire housing off the frame to the
right.
9) Remove the two nuts from
underneath the top of the X-axis
cable carrier chain, using a 3/8”
wrench.(rear of machine) You may
need to hold the heads of the
screws stationary from above with a
1/8” Allen wrench. Slide the entire
cable chain upward and off the
cable carrier bracket. Remove the
carrier bracket by removing the two
screws with a 5/32” Allen wrench.
4
10) Remove the four bolts
from the rear of the
bearing cart adapter
block, using a 5mm Allen
wrench. Do NOT loosen
or remove the single bolt
which mounts the block to
the X-axis belt coupling.
11) Strongly suggested: Loosen all four Y-axis motor mounting bolts/nuts (5/32” Allen
wrench and 3/8” wrench), and remove the Y-axis motor belt. Remove the motor
mount bolts entirely, and remove the Y-motor and pulley from the mounting plate.
This step helps to significantly reduce the weight of the top of the gantry, and
decreases the chance of the gantry being forced out of square. (see Motor
Replacement procedure)
12) From the front of the
machine, pry away the two
yellow plastic strips from
the top of the Y-gantry, in
order to access the two
large bolts underneath.
Remove both of the bolts
with a 6mm Allen wrench.
5
13) Carefully slide the top X-axis
bearing cart and standoff block
off to the right, and completely
off the upper rail extrusion. Be
careful not to bump or disturb
the top end of the gantry while
the bearing cart is removed.
14) Note the location and
orientation of the standoff
block on the bearing cart.
Loosen and remove the two
recessed bolts with a 5mm
Allen wrench, and remove the
standoff block from the
bearing cart. Note: Keep both
of the black plastic end caps
snapped onto the standoff
black – this will keep the Tnuts from falling out.
6
15) Mount the standoff block to the replacement bearing cart, in precisely the same
location and orientation as the original. Make sure that the block is mounted on the
same side as the eccentric-adjustable bearings. Tighten both recessed bolts very
securely when the block is perfectly aligned to the bearing cart.
16) Loosen both of the
eccentric pivot locking
set screws, ~1 turn
each with a 2mm Allen
wrench. Slide the
bearing cart / standoff
block assembly onto
the top rail of the
machine, with the
standoff block facing
the front.
17) Using a 5mm Allen
wrench, tighten both of
the eccentric bearing
axles until the bearings
feel properly snug on the
rails, then tighten each of
the 2mm set screws.
Slide the cart back and
forth to check for proper
alignment and rolling
movement on the rails.
Loosen the set screws
and re-adjust the
eccentric pivot axle(s) if
necessary, then retighten both set screws
securely.
7
18) Slide the bearing cart and block behind the top end of the gantry, and align the Tnuts with the holes in the gantry beam. Insert the mounting bolts through the beam,
and tighten them both securely with a 6mm Allen wrench.
19) Slide the top end of the Y-axis cable carrier channel back into alignment with the
standoff block, and tighten the 5mm bolt when the channel is parallel to the gantry
beam. Replace the cable tie at the top of the gantry and secure the rear cables into
position.
20) Go to the rear of the machine, and replace the four bolts into the adapter block.
Tighten all 4 securely.
21) Mount the cable carrier bracket to the rear of the adapter block with the two screws
(5/32” Allen wrench) Mount the cable chain onto the carrier bracket, and tighten the
two nuts underneath.
22) Mount the Y-axis motor back onto the motor mounting plate, and tighten the four
mounting bolts most of the way. Replace the motor belt, apply the proper tension,
and tighten the mounting bolts securely. (See Motor Belt Replacement procedure)
23) Replace the two bolts and nylon spacer-bushings through the top cable plate. Make
sure to mount the Y-axis motor cable bracket to the bolt that is towards the rear.
Plug the motor cable back into the socket, and turn the locking collar clockwise until
you feel a slight detent.
24) Replace the top right bumper bracket to the top extrusion, making sure to align it
with the pencil marks you traced onto the frame.
25) Replace the torque rod housing onto the right side of the machine: 5mm Allen bolt,
5/16” hex screw, then Philips screw. Make sure that the black rubber anti-vibration
strip is in place along the entire length of the housing.
26) Replace the Y-motor housing. (four 5/16” hex screws)
27) Remove the two angle brackets from the lower frame extrusion on either side of the
bearing cart. Remove the T-nuts from the slot in the extrusion to prevent possible
jamming with the bearing cart during cutting.
Replacement of Y- Axis Bearing Cart
1) Turn off power to the F-6100, and disconnect the main air hose from the rear of the
machine.
2) Remove the cutting head; follow “Cutting Head Removal” procedure.
3) Mark the top edge of the cutting head mounting plate with a pencil, then remove the
4 flat head bolts with a 5mm Allen wrench. Note: check for any shim washers behind
the mounting plate, and note the location(s).
4) Remove both top and bottom
bearing wipe assemblies by
removing the 3 screws with a
3mm Allen wrench. (Remove the
Y-axis home sensor magnet
bracket from the top wipe
assembly first, and mark its
location) Slide the cable ties and
wires off the mounting posts.
Remove Y-home magnet bracket from here first
5) Remove the cable carrier Lbracket from the front of the
bearing cart by removing the
two bolts with a 5mm Allen
wrench. Move the cable
chain/carrier out of the way
to your left.
1
6) Using a 2mm Allen wrench,
loosen both tensioning
screws on the top of the Yaxis bearing cart. Turn each
screw exactly 3 full turns
counter-clockwise.
7) Remove the two upper belt coupling
screws from the bearing cart with a
3mm Allen wrench. Slide the belt and
coupling plate downward from the cart,
and carefully note the orientation and
location of the belt on the toothed
plate. You may mark the belt or
toothed plate to aid in re-assembly.
Note location of
belt on coupling
plate
2
8) Remove the two lower, fixed belt
coupling screws as well, and slide
the belt and coupling downward
from the bearing cart. Note the
orientation and location of the belt
and coupling plate, and mark as
needed.
8a
8b
9) Loosen, but do not remove, one of the
eccentric locking set screws with a 2mm Allen
wrench. Loosen the eccentric bearing axle with a
5mm Allen wrench.
9a
9b
3
10) Insert a suitable punch
tool through the access
hole in the right side of
the cart, and gently tap
the bearing axle free.
Remove the punch tool
from the cart, and retrieve
the bearing. Repeat this
for the other front bearing
as well.
Remove bearing from
cart with magnet
Remove the Y-axis cart
from the gantry rails.
4
Re-assembly:
11) Remove the front two bearings from the new bearing cart, as in steps 9 and 10
above, and fit the cart over the Y-gantry beam so that the eccentric adjustable
(missing), bearings are towards the front.
12) Insert each bearing axle back into the cart, and through the hub of the bearing. Make
sure the bearings are properly aligned with the steel tracks, and that the bearing
axles are fully inserted into the bearing cart. The head of the axles should be nearly
flush with the cart surface when inserted fully.
13) Adjust the eccentric pivot axles with a 5mm Allen wrench for proper tightness to the
bearing tracks, then tighten the locking set screws with a 2mm Allen wrench. Roll the
cart up and down along the gantry repeatedly to check for smooth and quiet
operation.
14) Insert the top end of the belt and
coupling plate into the bearing cart,
and partially insert the two coupling
screws. Do not tighten the screws
yet.
15) Insert the lower end of the belt and
coupling into the bottom edge of
the cart. Insert the coupling
screws, align the belt with the
center mark on the cart, and
tighten the screws securely.
Align belt coupling to
center mark on cart
5
16) Align the top end of the belt
with the center mark on the cart
then tighten the two tensioning
screws on the top edge exactly
3 full turns each clockwise.
(2mm wrench)
Tighten screws after belt is properly tensioned
17) Confirm proper belt alignment, then tighten the top two belt coupling screws
securely. Slide the Y-axis cart up and down a few times to check.
18) Replace the two bearing wipe assemblies onto the top and bottom of the cart. Check
for proper alignment of the felt wipes to the bearing tracks, and lubricate if
necessary. Replace the cable ties and cables onto the mounting posts. Replace the
Y-axis sensor magnet bracket onto the top wipe assembly and align properly.
19) Mount the cutting head mounting plate back onto the bearing cart. Make sure it is
oriented correctly, and that any shim washers are replaced in the proper location(s)
behind the plate. Tighten the four flat head bolts securely. (5mm wrench)
20) Mount the cutting head back onto the mounting plate, and tighten the four bolts
securely. Reconnect the control cables and insert the pneumatic hoses into the
proper fittings.
6
1
Stepper Motor Replacement
(part #’s: X-axis:12-897
Y-axis:12-898)
The X and Y axis Stepper Motors are extremely durable and should rarely require
replacement. In the event of damage to one of the motors or cables, the small motor
pulley (part # 12-829), should be replaced as well, and shipped to the customer already
mounted to the motor shaft. The motor pulley should be spaced ¾” from the motor itself.
A step ladder or stool may be needed when replacing the Y-axis (top) motor.
1) Shut down power to the machine
normally. Remove the appropriate
motor housings from the motor that
is being replaced, using either a 1/8”
Allen wrench or a 5/16” nut driver.
Remove the long, vertical housing
from the right side of the frame, and
the belt housing from the rear of the
motor mounting plate when
accessing the X-axis motor.
Y-axis motor housing
X-axis motor belt housing
2
2) Disconnect the appropriate motor cable
to the motor being replaced. Turn the
locking collar counter-clockwise and pull
the plug straight out.
3) Remove the motor cable bracket from
the top mounting plate (Y-axis), or the lower
frame extrusion (X-axis). A 5mm “ball-end”
Allen wrench required. Replace the bolt into
the top bearing cart to prevent loss of the
nylon spacer underneath the mounting
plate.
Nylon spacer bushings – Y-axis
4) Loosen all 4 motor mounting bolts, (3/8”
socket or wrench and 5/32” Allen
wrench), and slide the motor towards the
large pulley to create slack in the belt.
Remove the belt from the motor pulley.
Loosen X-axis motor bolts/nuts
3
5) Remove all four motor mounting bolts, taking care not to lose any of the nuts or
washers. Use caution when removing the Y-axis motor; support the weight of the
motor when removing the
last of the bolts.
6) Transfer the cable mounting bracket from
the defective motor cable socket to the
replacement. Remove the four small Allen
bolts and nuts with a ¼” wrench or pliers,
and 3/32” Allen wrench.
Note: You may need to remove the cable
socket from the bracket on the X-axis
prior to removing the motor itself from the
machine.
X-axis motor cable bracket;
remove nuts/bolts
7) Mount the replacement stepper motor
back onto the existing motor mount plate.
Be sure to orient the motor so that the control cable is facing to the front (X-axis) or
left (Y-axis, from front of machine), so that it is does not interfere with the motor
housing(s). Do not tighten the mounting bolts completely yet.
4
8) Place the motor belt back over both pulleys, and slide the motor away from the large
pulley to tension the belt. (see Motor Belt Replacement procedure). Tighten the four
mounting bolts securely once proper belt tension (2+ lbs.) has been achieved.
9) Connect the motor control cable to the cable socket. Turn the locking collar
clockwise until you feel a slight detent.
10) Replace the motor housing(s). Turn on the power to the machine and make test cuts
to verify that the replacement motor is functional.
Note: The C-axis (cutting head) stepper motor should not be replaced during a field
repair; replacement or repair of the complete cutting head assembly (12-820) is required.
X – Axis Reversing Unit Replacement
Reversing units may require replacement in the event of failed or missing internal
cartridge bearings. All four X-axis reversing units are mounted to the machine frame
extrusions in a similar manner, however, each will require a different amount of
disassembly of the machine in order the access the suspect unit. This procedure covers
replacement of the top-left (from front), reversing unit, which is the most accessible Xaxis reversing unit.
1) Move the gantry to the center of the
machine frame, and lock it into
position with four angle brackets;
one on each side of the top and
bottom ends of the gantry. Use
spring-loaded T-nuts and flat head
M5 bolts to mount the brackets
securely to the frame.
2) Remove the cable carrier from the
carrier bracket, and the bracket from the rear of the top adapter block.
1
Remove 2 bracket screws
with 5/32” Allen wrench
3) Measure and record the
distance of the belt
coupling tension bolts
beyond the nuts. This will
assure accurate retensioning during reassembly.
2
4) Loosen and remove the two
tension bolts with a 5mm Allen
wrench, and remove the right
side coupling block to the right.
Note the orientation of the belt in
the coupling hardware for reassembly, and pull the belt free
of the coupling.
Slide right side belt
coupling out to right
3
5) Remove the X-axis
home sensor bracket
from the rear of the topright reversing unit
(5/32” Allen wrench)
6) Remove the reversing unit
from the frame by removing
the front and rear recessed
mounting bolts with a 5mm
Allen wrench, and pulling the
belt out through the
reversing unit.
Remove rear recessed bolt
4
Remove front recessed bolt
(pry yellow strip away first)
Remove reversing unit,
and pull belt out from front
5
7) Orient the new reversing unit
properly (pre-drilled sensor
bracket hole is toward top-rear),
and thread the belt back through
it. Use a steel ruler or other tool
to aid in bending the belt through
the internal pulley.
8) Mount the new reversing unit onto the frame with the existing hardware. Tighten the
front and rear universal (recessed), bolts securely.
9) Re-couple the end of the
belt into the coupling
hardware. Tighten the
tension bolts until the
distance of the protruding
ends matches the original
measurement (step 3)
Proper location of belt wedge in coupling
6
Re-insert tension bolts into right-side coupling block
10) Replace the cable carrier bracket, and the cable carrier onto the bracket with the
appropriate hardware.
11) Mount the X-home sensor onto the new reversing unit in the proper orientation and
location.
12) Remove the four angle brackets from the top and bottom ends of the gantry.
Remove all four T-nuts as well.
13) Make test cuts to confirm normal operation, and check accuracy of X-axis border.
7
X - Axis Main Belt Replacement
The two X-axis main belts should only be replaced as a matched pair. Replacing only
one of the belts may cause inconsistent cut results.
This procedure will cover replacement of the top X-axis belt, since this one is slightly
more difficult to access. The procedure for replacement of the bottom belt is virtually
identical.
1) Turn off power to the machine,
and move the gantry to the right to
the approximate center of the
frame.
2) Mount an angle bracket on each
side of both X-axis bearing carts
using spring-loaded T-nuts and flat
head M5 bolts. (5mm Allen
wrench) Make sure that the gantry
is completely locked in place with
the four brackets.
3) Remove the torque rod housing from the right side of the machine. (5mm Allen
wrench, 5/16” nut driver or wrench, and Philips screwdriver required)
1
4) Loosen the top torque rod
coupling bolts (4) enough
to permit free rotation of
the top X-axis reversing
unit shaft. (3/16” Allen
wrench)
5) Remove the two 3/8” nuts
from the underside of the
X-axis cable carrier
bracket. Pull the cables
upward to remove the
small bolts from the
bracket.
2
6) Remove the two screws from
the cable carrier bracket, and
remove it from the adapter
block.
7) Measure the length of
the bolts protruding
beyond the belt
coupling nuts. Record
the measurement for
use later when
reassembling the new
belt.
3
8) Loosen the two belt
coupling tension bolts to
reduce tension on the belt.
Then remove the single M5
bolt mounting the belt
coupling to the adapter
block.
9) Remove the two tension bolts completely from the coupling, and carefully note the
orientation of each end of the belt in the coupling hardware.
4
10) Remove both ends of the
belt from the couplings.
Push the belt as shown to
force the wedge free of
the coupling block.
11) Tape one end of the new belt to either end of the existing belt with strapping tape,
as shown. Try to keep the gap between the belt ends close to the actual tooth
spacing.
5
12) Carefully pull the opposite
end of the original belt out
through the reversing unit
as you feed the spliced
ends of the old and new
belts into the other
reversing unit. Keep pulling
until the splice comes out
at the back of the second
reversing unit.
13) Remove the tape splice, and insert both ends of the belt into the coupling properly.
14) Insert both tension bolts into the coupling hardware, and take up most of the belt
slack. Align the single bolt (left side of coupling) to the adapter block, and tighten
securely.
15) Tighten the tension bolts to take up the remaining slack in the belt, or until the bolt
ends are protruding from the coupling nuts equally and by the same distance as
originally. Note: the new belt is probably slightly longer or shorter than the original;
you must tension the belt by “feel” if this is the case.
16) Repeat the procedure for the lower X-axis belt. Since the belts are a matched pair,
simply tension each belt coupling equally to achieve the same tension for both belts.
17) Re-tighten the torque rod coupling bolts securely, then replace the housing with the
appropriate hardware.
18) Replace the X-axis cable carrier bracket to the adapter plate, and the carrier chain to
the bracket.
19) Remove the four angle brackets from the top and bottom frame extrusions. Remove
all four T-nuts as well to avoid the possibility of jamming.
20) Power up the machine and make test cuts to verify proper operation.
6
Adapter Plate Replacement
The two adapter plates or “blocks” will only require replacement in the event of an
undetected machining error, i.e. holes drilled too deeply, resulting in a weakened mount
to the belt coupling. The detailed instructions below cover the top X-axis adapter plate.
Steps 1 – 4 are identical to the above belt replacement procedure.
1) Turn off power to the machine, and move the gantry to the right to the approximate
center of the frame.
2) Mount an angle bracket on each side of both X-axis bearing carts using springloaded T-nuts and flat head M5 bolts. (5mm Allen wrench) Make sure that the gantry
is completely locked in place with the four brackets.
3) Remove the two 3/8” nuts from the underside of the X-axis cable carrier bracket. Pull
the cables upward to remove the small bolts from the bracket.
4) Remove the two screws from the cable carrier bracket, and remove it from the
adapter block.
5) Remove the bolt
mounting the belt
coupling to the lower left
hole in the adapter
block. (5mm Allen
wrench)
7
6) Remove the four longer M5
bolts which mount the
adapter plate to the rear of
the bearing cart, and
remove the plate from the
machine.
7) Remove the X-axis sensor magnet bracket from the right side of the adapter plate
with a 5/32” Allen wrench. Note the orientation of the bracket prior to removing it, and
measure its precise location on the adapter block.
8
8) Mount the new adapter block to the bearing cart with the four M5 bolts, align it with
the bearing cart, and tighten the bolts securely.
9) Replace the single M5 bolt from the adapter block to the belt coupling, and tighten it
securely.
10) Replace the X-sensor magnet onto the right side of the adapter plate. Position the
bracket so that there is ¼” of vertical distance between the magnet and the X-axis
home sensor.
Rear View of X-axis home sensor
and magnetic actuator - 1/4” of
vertical space between
Magnet
X-axis sensor
11) Replace the cable carrier bracket to the
adapter block, and the carrier to the
bracket.
12) Repeat the procedure for the lower
adapter plate in the same manner. (no
cable hardware or sensor magnet is
present.
¼” distance
End view of X-axis sensor and magnet
9
1
Replacement of Main Y – Axis Drive Belt
1) Turn off power to the F-6100, and disconnect the main air hose from the rear of the
machine.
2) Remove the cutting head; follow “Cutting Head Removal” procedure.
3) Mark the top edge of the cutting head mounting plate with a pencil, then remove the
4 flat head bolts with a 5mm Allen wrench. Note: check for any shim washers behind
the mounting plate, and note the location(s).
4) Remove both top and bottom
bearing wipe assemblies by
removing the 3 screws with a
3mm Allen wrench. (Remove the
Y-axis home sensor magnet
bracket from the top wipe
assembly first, and mark its
location) Slide the cable ties and
wires off the mounting posts.
Remove Y-home magnet bracket from here first
5) Remove the cable carrier Lbracket from the front of the
bearing cart by removing the
two bolts with a 5mm Allen
wrench. Move the cable
chain/carrier out of the way
to your left.
2
6) Using a 2mm Allen wrench,
loosen both tensioning
screws on the top of the Yaxis bearing cart. Turn each
screw exactly 3 full turns
counter-clockwise.
7) Remove the two upper belt coupling
screws from the bearing cart with a
3mm Allen wrench. Slide the belt and
coupling plate downward from the cart,
and carefully note the orientation and
location of the belt on the toothed
plate. You may mark the belt or
toothed plate to aid in re-assembly.
Note location of
belt on coupling
plate
3
8) Remove the two lower, fixed belt
coupling screws as well, and slide
the belt and coupling downward
from the bearing cart. Note the
orientation and location of the belt
and coupling plate, and mark as
needed.
8b
8a
9) Remove the Y-axis motor
housing from the top of
the Y-gantry.
10) Loosen the four motor
mounting bolts, and slide
the motor to the left to
create slack in the motor
belt. Remove the belt
from the large-diameter
pulley.
Loosen 4 mount bolts and slide motor left to remove belt
4
11) Remove the main drive belt from the Y-gantry by pulling it through both top and
bottom reversing units.
12) Insert the replacement belt into the
lower reversing unit a few inches.
Guide the belt around the
reversing unit toothed pulley with a
metal ruler or small screwdriver.
When you have successfully
routed the belt around the lower
reversing unit, continue to feed the
belt up through the channel inside
the Y-gantry extrusion beam.
13) When the end of the belt reaches
the upper reversing unit, use the
ruler or screwdriver to bend it
through and around the toothed
pulley in the same manner.
Note: You may need to remove the upper reversing unit from the top of the Y-gantry
beam in order to thread the belt through it. Loosen and remove both recessed universal
fastener bolts from the top end of the gantry with a 5mm Allen wrench. Carefully support
the weight of the Y-axis motor and lift the reversing unit off the Y-gantry.
You may also feed the belt into the top reversing unit first, and remove the lower unit
from the gantry instead.
Remover recessed
fasteners with ball-end
5mm Allen wrench
5
Insert belt into left slot in reversing unit
Use steel ruler to aid in belt turn around
inside of reversing unit
14) Insert the top end of the belt and
coupling plate into the bearing cart,
and partially insert the two coupling
screws. Do not tighten the screws yet.
15) Insert the lower end of the belt and
coupling into the bottom edge of the cart.
Insert the coupling screws, align the belt
with the center mark on the cart, and
tighten the screws securely.
6
16) Align the top end of the belt
with the center mark on the cart
then tighten the two tensioning
screws on the top edge exactly
3 full turns each clockwise.
(2mm wrench)
Align belt coupling to
center mark on cart
Tighten screws after belt is properly tensioned
17) Confirm proper belt alignment, then tighten the top two belt coupling screws
securely. Slide the Y-axis cart up and down a few times to check.
18) Replace the two bearing wipe assemblies onto the top and bottom of the cart. Check
for proper alignment of the felt wipes to the bearing tracks, and lubricate if
necessary. Replace the cable ties and cables onto the mounting posts. Replace the
Y-axis sensor magnet bracket onto the top wipe assembly and align properly.
19) Mount the cutting head mounting plate back onto the bearing cart. Make sure it is
oriented correctly, and that any shim washers are replaced in the proper location(s)
behind the plate. Tighten the four flat head bolts securely. (5mm wrench)
20) Mount the cutting head back onto the mounting plate, and tighten the four bolts
securely. Reconnect the control cables and insert the pneumatic hoses into the
proper fittings.
7
Optional Method:
1) De-couple the Y-axis belt from the bearing
cart, as above.
2) Tape the upper end of the existing belt to
one end of the new belt. Use heavy-duty
strapping tape, and tape the ends together
in alignment. Try to maintain equal belt
tooth spacing in the gap between the ends
of the belt.
Old belt
Maintain belt tooth spacing at spliced area
New belt
3) Slowly, but firmly pull the lower end of the existing belt upward from the lower
reversing unit, as you feed the spliced ends of the old/new belts into the top
reversing unit. Use a metal ruler to help guide the tip of the new belt around the
reversing unit pulleys.
4) Continue pulling the belt out until the spliced area comes out of the bottom reversing
unit. Remove the tape from the belts, and re-couple the ends of the new belt to the
reversing unit. (See above)
Y-Gantry Replacement
The Y-gantry assembly may be replaced in the event of damage or premature wear to
the steel bearing tracks. The Y-gantry assembly consists of:
- Aluminum extrusion with 2 steel-rod tracks
- Top and bottom reversing units (top unit with notched shaft)
- Y-axis bearing cart assembly
- Y-axis main drive belt (clear)
- 4 mounting bolts and T-nuts, and 1 captive T-nut on left side of extrusion
A new large-diameter pulley (# 12-828), and motor mounting plate may be used, instead
of transferring them from the original gantry. This will facilitate the repair procedure, and
assure that all hardware is compatible.
Follow the procedural steps below in sequence to maintain the squaring alignment as
much as possible.
1) Shut down the machine normally, and disconnect the main air hose from the rear of
the machine.
2) Remove the Y-axis motor housing from the top of the gantry assembly. Remove all
four mounting screws with either a 1/8” Allen wrench or a 5/16” nut driver or wrench.
3) Manually move the gantry to the approximate center of the machine. Mount an angle
bracket on each side of both top and bottom X-axis bearing carts: Insert springloaded T-nuts into the frame extrusions, and tighten the flat-head bolts securely with
a 5mm Allen wrench. Make sure there is no left-to-right movement of the gantry
possible once the four brackets are locked in place.
1
4) Follow the “Removing the Cutting Head”
procedure. Remove the cutting head
mounting plate as well, using a 5mm Allen
wrench to remove the four flat-head M5
bolts. Mark the top edge of the plate prior
to removal.
Mark Top edge of plate
and remove 4 bolts
5) Mark the location of the Y-home
magnet bracket onto the upper bearing
wipe assembly. Remove the magnet
bracket from the bearing wipe assembly.
(5/32” Allen wrench).
6) Remove both top and bottom bearing
wipe assemblies from the Y-axis bearing
cart using a 3mm Allen wrench. Slide the
cable tie(s) and wires off the end of the
mounting post(s).
2
7) Remove the two L-bracket bolts from
the front of the bearing cart, (5mm
wrench), and move the bracket and
cable carrier chain away from the cart
and gantry.
8) Trace the gantry location onto the
standoff blocks with a sharp pencil on both
sides of the bottom end of the gantry, and
on the right side of the top of the gantry.
This will aid in aligning the new gantry
during re-assembly.
9) Disconnect the Y-axis motor cable from
the top-rear of the gantry. Remove the
cable socket bracket from the top
mounting plate by removing the single
bolt with a 5mm Allen wrench. Re-insert
the bolt and screw loosely to avoid
losing the nylon spacer bushing under
the plate.
3
10) Loosen the four motor
mounting bolts, and remove
the Y-axis motor belt.
11) Remove the motor mount nuts
and bolts completely, and carefully
remove the Y-axis motor from the
rear of the mounting plate.
12) If a new large-diameter
pulley and motor
mounting plate have
not been supplied, you
must now remove the
pulley from the
reversing unit shaft.
Loosen the two set
screws with a 1/8”
Allen wrench and pry
the pulley from the
shaft. A “gear puller”
tool may be used, if
necessary. (see
below)
4
Gear Puller tool in proper position
Turn “Pusher” bolt Clockwise
to remove pulley from shaft
5
13) Remove the motor mounting
plate from the upper reversing
unit by removing the 3 M5
bolts. Do not lose the captive
lock nuts from the rear when
removing these bolts.
14) On the back (cutting board), side of the
Y-gantry, disconnect the wires to both
upper and lower limit switches. Note the
wire locations on the switch terminals prior
to removing. Do not loosen or remove the
switch or sensor mounting brackets at this
time.
15) Cut any cable ties holding the wires to
the back of the gantry, and pry the
yellow plastic strip from the rear slot to
allow the home and limit wires to be
freed from the extrusion. Disconnect the
Y-home sensor cable plug as well.
Cut top cable tie
6
Disconnect Y-axis
Home sensor cable
Cut lower cable ties
Pry yellow strip and wires
from rear extrusion slot
7
16) Remove the flat-head bolt
from the squaring adjustment
tab on the bottom left of the
gantry with a 5mm Allen
wrench. Do not loosen or
remove the adjusting bolt at
this time.
17) Pry the yellow plastic strips from the slots
in the front side of the Y-gantry extrusion
in order to access the four gantry
mounting bolts. Remove the bolts with a
6mm Allen wrench, and carefully remove
the gantry assembly from the machine
with assistance from another person, if
needed. Lay the gantry down flat on a
suitable work surface.
8
Remove bottom 2 bolts
first, then top 2 bolts
9
18) Carefully measure and record
the distance from the gantry
squaring tab to the extrusion.
Remove the bolt and tab
assembly completely with a
5mm Allen wrench. Also
remove the yellow plastic strip
from the left side of the gantry
extrusion.
19) Transfer the squaring tab and bolt to
the new gantry extrusion. Insert the
bolt into the captive T-nut in the
extrusion and tighten it fully. Adjust the
tab/nuts to match the previously
recorded distance from the tab to the
extrusion (if needed). Tighten both nuts
securely against the tab when this
exact distance is achieved. Place the
yellow strip into the slot in the new
extrusion.
10
20) Measure the locations of the limit switch and Y-home sensor brackets on the back of
the original gantry beam. Remove each bracket bolt with a 5mm Allen wrench, pop
out the spring-loaded T-nut, and transfer each bracket and switch to the new gantry
beam in precisely the same location and orientation. Transfer the nylon cable
holders to the new gantry as well. Note: Precise positioning of these switches is
important!
21) With assistance, align the new gantry with the standoff blocks, and insert the four
mounting bolts. You may use the existing captive T-nuts in the standoff blocks. Do
not tighten the bolts all the way yet.
22) Align the top of the gantry
to the pencil line you made
prior to disassembly, then
tighten the top two gantry
bolts.
Align to pencil mark on standoff block
11
23) Align and mount the squaring adjustment tab to the lower standoff block, and tighten
the flat head bolt securely. Make sure that the gantry is aligned with the pencil line(s)
you made on the lower standoff block, then tighten the two lower gantry mounting
bolts securely as well.
24) Insert the Y-home and lower Y axis limit switch wires into the slot in the rear of the
gantry extrusion. Snap the yellow molding strip over the wires to hold them in place.
Connect the home sensor cable plug and socket, and connect the limit switch wires
to the appropriate terminal tabs. Wrap the wires neatly together, and tie them
securely to the nylon cable holders with plastic cable ties.
25) Mount the motor plate onto the top reversing unit. Insert the captive nuts into the
hexagonal recesses on the back or the reversing unit one at a time, then insert and
slightly tighten its corresponding bolt. Align the plate so that it is perpendicular with
the gantry, and tighten all three bolts securely.
26) Mount the large pulley to the new gantry reversing unit shaft. Make sure that the
cone-tipped set screw is aligned radially with the notch in the shaft. Apply Loctite
thread compound to the set screws. Set the distance from the motor mounting plate
to the pulley to 3/8” and tighten the set screws securely.
27) Mount the Y-motor and pulley back onto the motor mounting plate. Place the belt
across both pulleys, adjust the tension to 2+ lbs., and tighten all four motor mounting
bolts securely. Replace the Y-motor housing. (see “Motor Belt Replacement”)
28) Re-mount the cable carrier L-bracket to the front of the bearing cart, and tighten the
two mounting bolts securely.
29) Remove the existing felt wipe assemblies from the new bearing cart, and transfer the
original assemblies. You may also swap the new felt pads into the original wipe
holders, but be careful not to lose the pressure springs located behind each pad.
30) Mount the Y-axis magnet bracket to the top bearing wipe holder, aligning it to the
pencil line as precisely as possible.
31) Assemble the cutting head mounting plate to the bearing cart, orienting it so that the
pencil mark you made is towards the top. Tighten the four mounting bolts securely.
32) Mount the cutting head onto the mounting plate. Connect the black and clear air
lines, and both electrical connectors. Replace the cutting head cover plate.
33) Remove the four angle brackets holding the X-axis bearing carts in position. Be sure
to remove all four T-nuts from the extrusions as well, in order to prevent possible
jamming.
34) Connect the main air hose, and power up the machine normally. Make test cuts and
check for correct Y-axis border measurement. Make minor adjustments in Settings >
Advanced Settings; Home Y Axis (Vertical). Minor adjustments to the X-axis border
may also be required.
12
Replacing Top Y-axis Reversing Unit
1) Shut down power to the machine
normally. Remove the Y-axis (top) motor
housings using either a 1/8” Allen
wrench or a 5/16” nut driver.
Y-axis motor housing
2) Disconnect the motor cable from behind
the motor. Turn the locking collar counterclockwise and pull the plug straight out.
3) Remove the motor cable bracket from
the top mounting plate (Y-axis). A 5mm
“ball-end” Allen wrench is required.
Replace the bolt into the top bearing cart
to prevent loss of the nylon spacer
underneath the mounting plate.
Nylon spacer bushings – Y-axis
1
Loosen all 4 motor
mounting bolts, (3/8” socket
or wrench and 5/32” Allen
wrench), and slide the
motor left towards the large
pulley to create slack in the
belt. Remove the belt from
the motor pulley.
Loosen 4 mount bolts and slide motor left to remove belt
1) Remove all four motor mounting bolts, taking care not to lose any of the nuts or
washers. Use caution when removing the Y-axis motor; support the weight of the
motor when removing the
last of the bolts.
2
Uncoupling the Y-axis Drive Belt
Head Removal Procedure
1) Shut down the F-6100 normally, and disconnect the main air hose from the rear of
the machine (or compressor). Remove the blade magazine from the cutting head.
2) Remove the cover
plate over the
cutting head by
removing the three
Allen screws, as
shown. (1/8” Allen
wrench)
3) Disconnect the
electrical
connectors to the
cutting head motor
and C-axis sensor.
Pinch the retaining
latches together as
you gently pull the
brown connector
blocks apart.
3
4) Remove both the
black and clear air
hoses from the
cutting head. If your
cutting head has the
brass nipple
connectors, pull on
the hose firmly until it
is removed. If you
have the quickdisconnect fittings,
push inward on the
orange collar as you
pull firmly downward
on the hose.
5) Remove the four cutting
head mounting bolts with
a 5/32” Allen wrench, and
carefully slide the head off
to the right.
4
Belt Uncoupling and Reversing Unit Repair
1) Mark the top edge of the cutting head
mounting plate with a pencil, then remove
the 4 flat head bolts with a 5mm Allen
wrench. Note: check for any shim
washers behind the mounting plate, and
note the location(s).
Remove 4 flat head bolts
2) Remove the top bearing wipe
assembly by removing the 3
screws with a 3mm Allen wrench.
(Remove the Y-axis home
sensor magnet bracket from the
top wipe assembly first, and
mark its location) Slide the cable
ties and wires off the mounting
post.
Remove Y-home magnet bracket from here first
5
3) Using a 2mm Allen wrench,
loosen both tensioning
screws on the top of the Yaxis bearing cart. Turn each
screw exactly 3 full turns
counter-clockwise.
4) Remove the two upper belt coupling
screws from the bearing cart with a
3mm Allen wrench. Slide the belt and
coupling plate upward from the cart,
and carefully note the orientation and
location of the belt on the toothed
plate. You may mark the belt or
toothed plate to aid in re-assembly.
Note location of
belt on coupling
plate
6
7) Loosen and remove both recessed universal fastener bolts from the top end of the
gantry with a 5mm Allen wrench. Pry away the yellow plastic strip from the left side of
the gantry to access the bolt head, as shown. (Motor mounting plate and large pulley are
not shown in the photo below).
Remover recessed
fasteners with ball-end
5mm Allen wrench
5) Remove the reversing unit (and motor and pulley, if still mounted), from the top of
the gantry beam. Pull the main drive belt out from the left side of the reversing unit
pulley.
6) Align the new reversing unit
with the top of the gantry, and
insert the belt about 2 inches.
You may turn the black pulley
clockwise slightly to help pull
the belt through.
Insert belt into left slot in reversing unit
7
7) Using a small metal ruler or
thin screwdriver, guide the
belt around the internal pulley
via the slot on the opposite
side. Rotate the pulley as
shown until the belt is guided
around the internal reversing
unit pulley and out from the
bottom-right.
8) Insert both right and left
universal fasteners into the
gantry beam and thread
partially into the reversing unit
block. Align the unit properly,
and tighten them both
securely with a 5mm Allen
wrench.
Use steel ruler to aid in belt turn around
inside of reversing unit
9) Insert the top end of the belt and
coupling plate into the bearing cart,
and partially insert the two coupling
screws. Do not fully tighten the screws
yet.
8
10) Align the top end of the belt with
the center mark on the cart, then
tighten the two tensioning screws
on the top edge exactly 3 full turns
each clockwise. (2mm wrench)
Align belt coupling to
center mark on cart
Tighten screws after belt is properly tensioned
11) Confirm proper belt alignment, then
tighten the top two belt coupling screws
securely. Slide the Y-axis cart up and
down a few times to check belt position.
12) Mount the felt bearing wipe assembly
back onto the top of the Y-axis bearing
cart. Mount the Y-axis magnet bracket
back onto the rear of the wipe assembly.
Do Not over-tighten the mounting screw;
the threaded hole is plastic!
13) Mount the motor back onto the mounting
plate, but do not fully tighten the bolts.
Re-mount the motor cable bracket at the
top-rear with the single Allen bolt. Place
the replacement belt onto the pulleys,
and slide the motor back away from the
large pulley.
Create belt tension with large screwdriver
9
14) Use a pry bar or other suitable tool to create proper tension on the belt, and tighten
the mounting bolts as you maintain tension. There should be no more than ¼” of belt
deflection when the motor mounting bolts have been tightened.
Belt Deflection, ¼” maximum
15) Mount the cutting head plate back onto the Y-axis bearing cart. Make sure that the
pencil mark you made previously is in the top position. Tighten all 4 flat head screws
securely with a 5mm Allen wrench.
16) Mount the cutting head back onto the head mounting plate, and tighten all 4
mounting bolts securely. (5/32” Allen wrench). Insert both pneumatic hoses fully in
the proper fittings, and connect both electrical connectors.
17) Connect the main air hose to the machine, and turn on the computer. Make a test
cut to verify normal operation of the machine.
18) Mount the cutting head guard plate and Y-axis motor housing back on to machine.
10
Uncoupling the Y-axis Drive Belt
1) Turn off power to the F-6100, and disconnect the main air hose from the rear of the
machine.
2) Remove the cutting head; follow “Cutting Head Removal” procedure.
3) Mark the top edge of the cutting head mounting plate with a pencil, then remove the
4 flat head bolts with a 5mm Allen wrench. Note: check for any shim washers behind
the mounting plate, and note the location(s).
4) Remove both top and bottom
bearing wipe assemblies by
removing the 3 screws with a
3mm Allen wrench. (Remove the
Y-axis home sensor magnet
bracket from the top wipe
assembly first, and mark its
location) Slide the cable ties and
wires off the mounting posts.
Remove Y-home magnet bracket from here first
5) Using a 2mm Allen wrench,
loosen both tensioning
screws on the top of the Yaxis bearing cart. Turn each
screw exactly 3 full turns
counter-clockwise.
6) Remove the two upper belt coupling
screws from the bearing cart with a
3mm Allen wrench. Slide the belt and
coupling plate downward from the cart,
and carefully note the orientation and
location of the belt on the toothed
plate. You may mark the belt or
toothed plate to aid in re-assembly.
Note location of
belt on coupling
plate
Resetting the Motion Controller; “Reset B” Procedure
There are at four methods of running the Reset B self-diagnostic utility:
•
•
•
•
F-6100 program; Advanced Settings
MEI Utilities disc
Start > Run command
Through MS-DOS Prompt
The simplest method of running the Resetb utility is through the F-6100 program itself.
From the Single-opening screen, click Settings > Advanced Settings. Click the
“Advanced Settings” text in the upper left
corner of the window, and select “Reset
Controller” from the drop-down menu.
The F-6100 program will then close
automatically, and a black DOS window will
open. Press in the Emergency Stop knob if
prompted, then press the Enter (or any) key
to run the Resetb utility.
If the DOS window does Not open when the
“Reset Controller” option is selected, proceed
on to running the Reset through the MEI
utilities disk.
MEI Utilities Disk
Insert the 3.5” disk labeled “MEI Utilities Disk, Version 1.0” into the floppy drive. Close
the F-6100 program if it is open, press in the Emergency Stop knob, and double-click the
My Computer desktop icon. Select the 3 1/2 Floppy (A) drive. A list of motion control
utility files will then show in the window for the floppy drive. Select the “Resetb” file by
double-clicking it.
The DOS window should then open, and prompt you to press any key to continue. The
diagnostic utility should then run. Close the DOS window when the blue bar at the top
shows as Finished. (see below)
The Resetb utility file may also be saved to the hard drive, and run from there as well.
If the disc has been erased or corrupted, or if there is a problem with the floppy drive
itself (dust buildup inside), you may then attempt to execute the file “manually” through
the Run menu.
1
“Manual” Reset B Procedure
Exit the F-6100 program, and press the Emergency Stop knob. Click the Start button,
then Run. Type the following command into the Run text line exactly:
C:\mei\25\setup\config –b0x340
then click OK.
(Make sure to type a space between the g in config and the - ).
The DOS window will then open to run the Resetb utility file. Press the Enter (or any) key
to continue and complete the diagnostic.
Press Enter key to proceed with Reset B utility
2
“Finished” indicates that diagnostic has run successfully
MS DOS Prompt Option
You may also run the Reset B utility through the MS DOS prompt, if all other attempts
have failed.
Exit the F-6100 program, and press the Emergency stop knob, as above.
Click Start > Programs > “MS DOS Prompt”. When the MS DOS window opens, type
the commands as shown below:
1) From C:\WINDOWS, type CD.. press
Enter.
2) From C:\> type CD MEI (space
between), then Enter.
3) From C:\MEI> type CD 25 press Enter.
4) From C:\MEI\25> type CD SETUP press
Enter key.
5) From C:\MEI\25\SETUP> type
CONFIG –B0X340 press Enter again.
6) The Reset B utility will then initiate, and
the screen will appear as below:
3
Press any key to continue and complete the diagnostic.
MS DOS Reset B completed
Note: Typing of characters is not case-dependent; shown as capitals above for clarity
only.
Some F-6100 controllers may show in the utility as “4 axis controller” . This is OK, and
merely indicates a different MEI board version. Only 3 of the 8 available axes are
actually used to operate the machine.
4
1
Operating Motion Console
The F-6100 comes with a full diagnostic software utility, which is loaded during the F6100 program installation as part of the “MEI” directory. Motion Console allows the user
to operate all three motor axes, as well as the pneumatic system. Home sensor and limit
switch function can also be verified.
Press in the Emergency Stop knob on the F-6100 controller before opening Motion
Console.
The Motion Console program is accessed from either My Computer or Windows
Explorer: C: \ MEI \ 25 \ Mocon \ Mocon31.exe (or Mocon 95, early version)
Windows Explorer view
showing path to Motion
Console
2
The initial screen that will be accessed when Motion Console is opened is the Hardware
Summary. This screen shows the basic status of the motion controller firmware (MEI
board), indicated by either a yellow smiley face (OK) or a red sad face (Bad) symbol in
the upper left of the screen. (see below)
On the right side of the Hardware Summary screen will be listed the 3 motor axes of the
F-6100, shown as Axis 0 (X), Axis 1 (Y), and Axis 2 (C). If there are fewer or more than
three axes shown, there is generally a problem with the MEI configuration at that time.
Controller status “OK”
3 motor axes listed:
0 = X, 1 = Y, 2 = C
Normal Hardware Summary screen
To operate or diagnose one of the three stepper motor axes, simply double click on the
axis you want to work with. In this first example, we will select the X motor axis, or
Axis 0. This will open the Axis Operation screen for this motor, as shown below.
3
Once the Axis Operation window has been opened, click the Relative Mode button (1),
then the Enable radio button (2), and the Clear Fault button (3), as shown above. Verify
that the Increment value is set to 5202 (1 inch of X or Y axis movement), and that the
Velocity and Acceleration are set to 15000 and 30000 respectively. These are default
settings only, and may be altered to check for specific motion control problems.
1
3
2
4
To operate the X-axis motor (left and right movement), first release the Emergency Stop
knob and press the Enable button on the controller. Click the Right arrow (4) to move the
head/gantry to the right by 1 inch. Each click of the Right or Left arrow buttons will move
the machine by one inch (5202 steps) in that direction. Increasing the Increment number
will move the gantry by a greater distance, i.e. 52020 = 10 inches.
4
Position Status - 5
Home and Limit Status
Axis Status: State, Source & Clear Fault
As the head and/or gantry are moving, you will notice the
numbers changing in the yellow “Position Status” boxes at
the upper left of the screen. (5) These numbers indicate the
total amount of movement of this axis, in steps. Right arrow
commands increase the Command and Actual fields, left
arrow commands decrease them. Click the Clear Position
button below the yellow fields to reset all the Position
Status numbers to 0.0.
If the Position Status numbers change during left or right
arrow commands, but the motor axis does not actually
move, this indicates that the motion controller (MEI), board
is operating normally, but that there is a problem with an
internal or external cable or connection, or more likely, a
problem with the driver circuit board for that axis.
Moving car indicates
motor axis in motion
5
Motion Console Diagnostics
There are a number of possible problems that can be diagnosed by the systematic use
of the Motion Console utility. One of the more common uses is to isolate a suspected
defective motor axis driver board.
This procedure demonstrates one method of using Motion Console to determine the
exact cause of a machine malfunction.
Reported problem: Machine makes loud grinding sound when moving / trying to cut.
Possible causes: Cutting head stuck behind clamp button, gantry jamming against
stationary object, defective stepper motor or cable, defective motor driver circuit board.
Diagnostic procedure: Check for obstructions to cutting head and gantry movement;
clamp button interference, shelving or other furniture, or T-nuts left in the frame jammed
between the bearing cart and extrusion. Check motor cable connections.
If none of the above are found to be the cause, proceed to Motion Console screen.
From the Hardware Summary screen, select Controller 0, Axis 0 to operate the X-axis
motor. Click Relative Mode and the Enable radio button, check the Axis status indicator
for “No Event” or “Normal” State. Click the Clear Fault button to clear, if needed.
Release the Emergency Stop knob, and press the Enable button on the controller.
Click the right, then left arrow buttons to move the X axis right and left. If the motor
moves as commanded, the following assumptions can be made regarding the X-axis
portion of the system:
• Power supply and X-axis fuse – OK
• X-axis motor and cables – OK
• X-axis driver board - OK
Motor and Driver Connections
C = Cutting Head
Transition Board
Y
C
Motors
Y
X
Drivers
X
From MEI / Computer
6
Proceed on to check operation of Controller 0, Axis 1 (Y-axis motor)
When attempting to operate the Y-axis motor, a loud noise is heard, and the Y-motor
does not move as commanded. The following may be deduced thus far:
• Power supply and Y-axis fuse – OK (power is reaching the Y-driver board and motor,
since noise is occurring.)
• Y-axis motor and/or cables – possible problem
• Y-axis driver board – possible problem
Proceed on to operate Axis 2 (C-axis, or cutting head motor), to verify that only one of
the motor axes is causing the abnormal sound. If the C-axis motor operates normally,
you may assume that the source of the problem lies with the Y-axis motor/driver system.
Press in the Emergency Stop knob to cut power to the motors and drivers. Disconnect
the P201 and P203 cables from the rear panel of the main controller, and swap their
locations. (P201 to J203, and P203 to J201) This will allow you to operate the X-axis
motor/external cable with the Y-axis driver and internal cables, and vice-versa.
Release the Emergency Stop knob, and press the lighted Enable button. In Motion
Console, operate Axis 0, which will now operate the Y-axis motor, since the external
motor cables have been swapped. You find that the Y-axis motor moves up and down as
commanded, with no loud noise. From this you conclude:
• Y-axis motor and external cable – OK
Proceed on to operate Axis 1. You find that the loud, grinding noise is now heard when
trying to operate the X-axis motor with the Y-axis driver and internal cables. This
information now isolates further the source of the problem:
•
Y-axis driver / internal cables - possible problem
External X & Y Motor cables swapped
C = Cutting Head
Transition Board
Y
C
Motors
Y
X
Drivers
X
From MEI / Computer
7
Press in the Emergency Stop knob again. Return the P201 and P203 external cable
plugs to the correct sockets. Remove the top access panel from the electronics
enclosure (6 – 3/32” Allen screws)
We now know that the entire X-axis portion of the system is OK, and that the Y-axis
motor and external cable is functioning normally as well. The next step is to rule out an
internal cable as the source of the Y-axis malfunction. To do this, we will remove and
swap the front and rear driver board plugs on both the X and Y axis. (the lower two
drivers on the left side of the enclosure).
In effect, we are simply substituting each driver board to operate the opposite motor
axis; the X-axis driver will operate the Y-axis cabling / motor, and vice versa.
Internal X & Y Driver cables swapped
C = Cutting Head
Transition Board
Y
C
Motors
Y-axis driver isolated
as cause of problem
Y
X
Drivers
X
From MEI / Computer
In Motion Console, go to Axis 0, and Enable the machine. When operating the X-axis
controller with the Y-axis driver board, the loud noise again occurs.
To confirm the Y-axis driver as the source of the problem, go to Axis 1 and operate the
Y-motor with the X-driver connected. The motor operates normally. This leaves no other
possible conclusion than a defective Y-axis driver board.
Connect the driver cable plugs back to the proper locations, and replace the defective
driver board.
Note: Do NOT swap either the X or Y axis driver cables with the C-axis cable. The
power ratings for the C-axis driver are different, and it could be damaged by running one
of the larger stepper motors through it.
1
Pneumatics Panel and Components
The pneumatics panel is located on the rear of the F-6100 frame and contains most of
the critical components of the pneumatics system. This section covers the replacement
of the entire pneumatics panel and its modular system components, including the button
clamp cylinders.
Pneumatics Panel Replacement (part no. 12-849)
1) Shut down the F-6100 system normally, and unplug the main air hose from the
pneumatics panel connection.
2) Disconnect the
controller cable from
the top edge of the
panel. Turn the locking
collar counterclockwise, and pull
straight up to unplug.
3) Disconnect the four small
air hoses from the top edge
of the pneumatics panel,
numbered “4, 3, 2, 1” from
left to right. Push
downward on the locking
collar and pull upward on
the hose to disconnect.
2
4) Trace the location of
the top edge of the
panel plate onto each
of the frame
extrusions with a
pencil. This will
assure that the
replacement panel is
located precisely on
the frame.
5) Remove the 2
mounting bolts from
the panel with a 5mm
Allen wrench. Take
care not to allow the
panel to slide
downward too much
as the bolts are
loosened. (You may
need assistance from
another person for
steps 5 and 6.)
6) Remove the panel, and place the new panel in position using the pencil lines traced
onto the frame extrusions. Also make sure that the T-nuts in the extrusion channels
are aligned with the holes in the pneumatics panel plate. You may slide them up or
down to re-position them if necessary. Insert the mounting bolts and tighten them
securely.
7) Re-connect the four small air hoses into the appropriate fittings on the top of the
panel. Both the hoses and fittings are numbered for reference. Push the hoses
3
downward firmly to connect, then pull upward to make sure that each hose is fully
inserted.
8) Re-connect the control cable plug into the top of the panel. Be sure to turn the
locking collar clockwise as far as it will go, until you feel a slight detent.
9) Plug the main air hose back onto the male fitting on the pneumatics panel. Verify
that the compressor is turned on, and that the three air gauges on the panel are set
to 50, 30, and 32 psi, reading left to right.
10) Make test cuts to confirm that the clamping system and cutting head are operating
normally.
4
“PC” valve Replacement
The most commonly replaced pneumatic components are the “PC”, or Pneumatic
Control valves on the pneumatics panel. These are numbered PC 0, 1, and 2, and
control air flow to the cutting head, clamps, and head back pressure respectively.
The PC valves are electrically controlled solenoid valves, and can be replaced relatively
easily.
1) Shut down the F-6100
normally, or push in the
Emergency Stop knob to
turn off power to the
pneumatics panel.
Disconnect the main air
hose from the
compressor to the
pneumatics panel.
2) Unplug the
electrical wire
connection to the
PC valve that is
being replaced.
Press in the
locking tab on
the connector
and pull gently to
the right to
disconnect.
Disconnect wire
plug on right side
5
3) Using a small, flat blade
screwdriver, remove the
two mounting screws from
the body of the PC valve
assembly. Make sure that
you remove the screws on
the left side of the valve,
and not the smaller,
recessed screws on the
right side. (See photo)
4) Pull the valve firmly off the
manifold once the screws
have been removed. A small
rubber gasket may remain
stuck to either the valve
body or the manifold
surface. You will need this
gasket if the replacement PC
valve did not come with one
attached. Do not attempt to
use more than one gasket
when mounting the new PC
valve back on the manifold.
5) Align the new PC valve to the manifold and insert the mounting screws, making sure
that the sealing gasket is free of debris and is properly located. Tighten both screws
securely.
6
6) Plug the electrical control
wires back into the right
side of the PC valve. Turn
the machine back on, and
plug the main air line
back into the pneumatics
panel. Check the
operation of the valve
with the manual actuating
button, and feel/listen for
air leaks when the button
is held down. This button
will either be brass or
black plastic.(see photo)
You may use a pen or
small screwdriver to
actuate the button.
Verify the proper operation of
the new PC valve by cutting a
test mat.
Regulator and Gauge Replacement
Black plastic PC actuator button
(part #’s required)
All three of the air gauges
and regulators on the F6100 pneumatics panel are
identical, however the air
fittings are different for
each. The regulator/gauge
assemblies are designated
as “Head”, “Clamps”, and
“Auxiliary” from left to right
on the panel. This sample
procedure will refer to the
Head pressure gauge and
regulator, although
replacement for all three is
similar.
Main air gauge and regulator
7
1) Disconnect the main air hose from the pneumatics panel.
2) Disconnect each air
hose from the fittings
which are connected
to the Head pressure
regulator, as shown.
Push inward on the
locking collar as you
pull the air hose out of
the fitting. You may
label each hose with
tape to help remind
you of its proper
connection / location
when re-assembling.
3) Grasp the main body of
the regulator, and turn
to the left as you hold
the mounting lock ring
on top of the bracket,
either by hand or with
large pliers, as shown.
Unscrew the lock ring
completely, and remove
the regulator/gauge
assembly from the
circular bracket hole.
Note: Certain regulator
types may require
removal of the
adjustment knob prior to
removing the locking
ring. Simply lift upward
on the knob, and pry off carefully. (see photo below)
8
4) Insert the new
regulator from
below, and tighten
the lock ring
securely. Connect
the air hoses into
the proper fittings,
and tug on each
to assure that they
are fully inserted.
Lift up and remove
adjustment knob
5) Reconnect the main air hose to the pneumatics panel, check the hose connections
for any air leaks, and the gauge for the correct pressure. (The Head, or Main
pressure gauge should be set to 50+ psi.) Pull upward on the large black regulator
knob to unlock it, then turn to increase or decrease the pressure. Verify in advance
that your compressor is turned on and supplying at least 80psi to the system.
Pneumatics Wire Harness Assembly Replacement (part # required)
Replacement of the PC valve control wires may be required if operation of the clamping
system or cutting head is intermittent or has failed.
1) Turn off the F-6100 normally.
Disconnect the main cable connector
from the top edge of the pneumatics
panel. Rotate the locking collar
counter-clockwise and pull upward on
the cable plug to remove.
2) Disconnect the PC valve control wires
from the right side of each of the
three valves (see above).
3) Remove the ground wire terminal
screw from the top of the pneumatics
panel, as shown. If the ground wire is
attached to one of the two socket
mounting screws, skip to step 4.
Remove ground terminal screw
9
4) Remove the two screws from the
electrical socket with a 3/32”
Allen wrench and 5/16” wrench
(see photo), and remove the
socket and wires from the panel.
5) Mount the replacement wire harness to the top of the pneumatics panel. Orient the
cable socket in the same manner as the original, and make sure to mount the
ground wire terminal so that the metal tab is in contact with the panel plate. Tighten
both mounting screws snugly.
6) Reconnect each of the 3 PC control wires to their respective valves, and plug the
main controller cable plug back into the socket on top of the panel. Turn the locking
collar clockwise until you feel a slight detent, indicating that it is fully connected.
7) Power up the machine and check the pneumatic operation by cutting a test mat.
Button Clamp Pneumatic Cylinder Replacement
Any of the button clamp cylinders may be replaced if the “lip” of the button is broken.
Verify the type of air fitting at the rear of the clamp cylinder; either an “L” or “T” type
connector. The top most vertical clamp, and furthest right horizontal clamp cylinders are
the only ones with an “L” type pneumatic fitting.
(part # -“L” connector: 12-840, “T” connector:
#12-839 )
1) Remove any mat board or slip sheet(s)
from the cutting board. Disconnect the main
air hose from the pneumatics panel.
2) Disconnect the black and clear air hoses
from the rear of the clamp cylinder. Push
inward on the locking collar as you pull on
the hose to remove. (For “T” type
connectors, do not be concerned with
marking the hoses for re-installation; only
the hose color is important with regard to
reconnecting to fittings.)
10
3) Remove the two mounting
wood screws from the cylinder
flange with a Philips
screwdriver, and remove the
button clamp cylinder from the
board.
4) Insert the replacement clamp cylinder into the cutting board, and orient the holes in
the flange to align with the existing holes in the particle board so that the air fittings
on the cylinder are located most conveniently for re-insertion of the hoses. Tighten
the two wood screws securely, but do not over-tighten or you will strip the holes in
the board.
5) Re-connect the air hoses to the clamp cylinder fittings. Make sure that the black
hose(s) are connected to the fitting(s) closest to the cutting board.
6) Reconnect the main air hose to the pneumatics panel. Actuate the PC 1 valve button
several times, and check the new cylinder’s hose connections for any air leaks.
1
“PC” valve Replacement
The most commonly replaced pneumatic components are the “PC”, or Pneumatic
Control valves on the pneumatics panel. These are numbered PC 0, 1, and 2, and
control air flow to the cutting head, clamps, and head back pressure respectively.
The PC valves are electrically controlled solenoid valves, and can be replaced relatively
easily.
1) Shut down the F-6100
normally, or push in the
Emergency Stop knob to
turn off power to the
pneumatics panel.
Disconnect the main air
hose from the
compressor to the
pneumatics panel.
2) Unplug the
electrical wire
connection to the
PC valve that is
being replaced.
Press in the
locking tab on
the connector
and pull gently to
the right to
disconnect.
Disconnect wire
plug on right side
2
3) Using a small, flat blade
screwdriver, remove the
two mounting screws from
the body of the PC valve
assembly. Make sure that
you remove the screws on
the left side of the valve,
and not the smaller,
recessed screws on the
right side. (See photo)
4) Pull the valve firmly off the
manifold once the screws
have been removed. A small
rubber gasket may remain
stuck to either the valve
body or the manifold
surface. You will need this
gasket if the replacement PC
valve did not come with one
attached. Do not attempt to
use more than one gasket
when mounting the new PC
valve back on the manifold.
5) Align the new PC valve to the manifold and insert the mounting screws, making sure
that the sealing gasket is free of debris and is properly located. Tighten both screws
securely.
3
6) Plug the electrical control
wires back into the right
side of the PC valve. Turn
the machine back on, and
plug the main air line
back into the pneumatics
panel. Check the
operation of the valve
with the manual actuating
button, and feel/listen for
air leaks when the button
is held down. This button
will either be brass or
black plastic.(see photo)
You may use a pen or
small screwdriver to
actuate the button.
Verify the proper operation of
the new PC valve by cutting a
test mat.
Black plastic PC actuator button