1
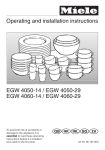
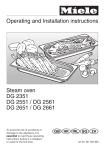
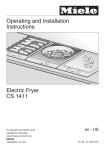
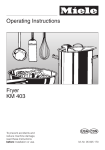
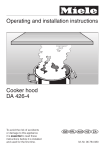
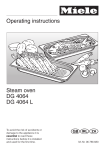
Operating instructions
Deep fat fryer
KM 403
To avoid the risk of accidents or
damage to the appliance it is
essential to read these
instructions before it is installed
or used for the first time.
GHirZ
M.-Nr. 05 813 370
Contents
Description of the appliance . . . . . . . . . . . . . . . . . . . . . . . . . . . . . . . . . . . . . . . . . 3
Warning and Safety instructions . . . . . . . . . . . . . . . . . . . . . . . . . . . . . . . . . . . . . 4
Caring for the environment . . . . . . . . . . . . . . . . . . . . . . . . . . . . . . . . . . . . . . . . . . 9
Before using for the first time . . . . . . . . . . . . . . . . . . . . . . . . . . . . . . . . . . . . . . . 10
General notes . . . . . . . . . . . . . . . . . . . . . . . . . . . . . . . . . . . . . . . . . . . . . . . . . . . . 10
Cleaning and heating up for the first time . . . . . . . . . . . . . . . . . . . . . . . . . . . . . . . 11
Using the fryer . . . . . . . . . . . . . . . . . . . . . . . . . . . . . . . . . . . . . . . . . . . . . . . . . . . 12
Switching on and off . . . . . . . . . . . . . . . . . . . . . . . . . . . . . . . . . . . . . . . . . . . . . . . 12
Before frying . . . . . . . . . . . . . . . . . . . . . . . . . . . . . . . . . . . . . . . . . . . . . . . . . . . . . 12
Frying . . . . . . . . . . . . . . . . . . . . . . . . . . . . . . . . . . . . . . . . . . . . . . . . . . . . . . . . . . . 13
Blanching . . . . . . . . . . . . . . . . . . . . . . . . . . . . . . . . . . . . . . . . . . . . . . . . . . . . . . . . 13
Frying tips . . . . . . . . . . . . . . . . . . . . . . . . . . . . . . . . . . . . . . . . . . . . . . . . . . . . . . . 16
After frying . . . . . . . . . . . . . . . . . . . . . . . . . . . . . . . . . . . . . . . . . . . . . . . . . . . . . . . 17
Safety cut-out switch . . . . . . . . . . . . . . . . . . . . . . . . . . . . . . . . . . . . . . . . . . . . . . . 18
Cleaning and care . . . . . . . . . . . . . . . . . . . . . . . . . . . . . . . . . . . . . . . . . . . . . . . . 19
General notes . . . . . . . . . . . . . . . . . . . . . . . . . . . . . . . . . . . . . . . . . . . . . . . . . . . . 19
E-Cloth . . . . . . . . . . . . . . . . . . . . . . . . . . . . . . . . . . . . . . . . . . . . . . . . . . . . . . . . . . 19
Frying basket . . . . . . . . . . . . . . . . . . . . . . . . . . . . . . . . . . . . . . . . . . . . . . . . . . . . . 20
Oil reservoir . . . . . . . . . . . . . . . . . . . . . . . . . . . . . . . . . . . . . . . . . . . . . . . . . . . . . . 20
Stainless steel surround. . . . . . . . . . . . . . . . . . . . . . . . . . . . . . . . . . . . . . . . . . . . . 21
Glass control panel . . . . . . . . . . . . . . . . . . . . . . . . . . . . . . . . . . . . . . . . . . . . . . . . 21
Lid . . . . . . . . . . . . . . . . . . . . . . . . . . . . . . . . . . . . . . . . . . . . . . . . . . . . . . . . . . . . . 21
Problem solving guide. . . . . . . . . . . . . . . . . . . . . . . . . . . . . . . . . . . . . . . . . . . . . 22
Electrical connection . . . . . . . . . . . . . . . . . . . . . . . . . . . . . . . . . . . . . . . . . . . . . . 23
Electrical connection . . . . . . . . . . . . . . . . . . . . . . . . . . . . . . . . . . . . . . . . . . . . . . . 23
After sales service . . . . . . . . . . . . . . . . . . . . . . . . . . . . . . . . . . . . . . . . . . . . . . . . 25
Data plate . . . . . . . . . . . . . . . . . . . . . . . . . . . . . . . . . . . . . . . . . . . . . . . . . . . . . . . 25
2
Description of the appliance
a Lid
i Drain tap
b Frying basket
j Control (red dot: 170 °C)
c Handle (fold-away, removable)
k Oil reservoir (capacity: min. 3.0 litres,
max. 4.0 litres)
d Hanging facility
e Basket hanging support
f Heating element (can be raised up;
rating - 2700 W)
g Temperature indicator light
h Operating indicator light
l Mains connection cable
m Plug
Depending on country of destination,
the appliance may be supplied with
or without a plug. The plug shown is
for illustration only.
3
Warning and Safety instructions
Building in and connection
This appliance complies with all
relevant legal safety requirements.
Improper use of the appliance can,
however, present a risk of both
personal injury and material
damage.
To avoid the risk of accidents and
damage to the appliance, read
these instructions carefully before
using it for the first time. They
contain important notes on the
installation, safety, operation and
care of the appliance.
Keep these instructions in a safe
place for reference and pass them
on to any future user.
If the appliance is supplied without a
plug, or if the plug is removed, it must
be connected to the mains electricity
supply by a suitably qualified and
competent electrician in strict
accordance with local and national
safety regulations. The manufacturer
cannot be held liable for damage
caused by incorrect installation or
connection.
The electrical safety of this
appliance can only be guaranteed
when continuity is complete between it
and an effective earthing system which
complies with local and national safety
regulations. It is most important that this
basic safety requirement is present and
tested regularly, and where there is any
doubt, the household wiring system
should be inspected by a qualified
electrician. The manufacturer cannot be
held liable for the consequences of an
inadequate earthing system (e.g.
electric shock).
Do not connect the appliance to
the mains electricity supply by an
extension lead. Extension leads do not
guarantee the required safety of the
appliance (e.g. danger of overheating).
This equipment may only be used
in mobile installations such as
ships, caravans, aircraft etc. if a risk
assessment of the installation has been
carried out by a suitably qualified
engineer.
4
Warning and Safety instructions
Correct usage
For safety reasons this appliance
must only be operated after it has
been built in. This is necessary to
ensure that all electrical components
are shielded.
This appliance is intended for
domestic use only and is not to be
used for commercial purposes.
Use this appliance for the
preparation of food only. Any other
usage is at the owner's risk and could
be dangerous. The manufacturer
cannot be held liable for damage
caused by incorrect or improper use of
the appliance.
Do not use the appliance to heat
up the room and never switch it on
with the heating element in the raised
position. Due to the high temperatures
radiated, objects near the appliance
could catch fire. The life of the
appliance could also be reduced.
This appliance must not be set up
or operated in the open air.
This appliance should only be
switched on when the lid has been
taken off and it has been filled with oil.
Handling and preparing food
correctly is essential for
maintaining good health. Please read
the "Frying tips" section in "Using the
fryer" later on in this booklet.
5
Warning and Safety instructions
Safety with children
The appliance is only intended for
use by adults who have read these
operating instructions.
This appliance is not a toy! To
avoid the risk of injury keep
children well away and do not let them
play with it or use the controls. They
will not understand the potential
dangers posed by it. They should be
supervised whenever you are working
in the kitchen.
Older children may use the
appliance only when its operation
has been clearly explained to them,
and they are able to use it safely,
recognising the dangers of misuse.
Supervise its use by the elderly or
infirm.
The appliance gets hot when in
use and remains hot for quite a
while after being switched off. To
safeguard against burning, keep
children well away from the appliance
at all times.
Do not store anything which might
arouse a child's interest in storage
areas above or next to the appliance.
Otherwise they could be tempted into
climbing onto the appliance with the
risk of burning themselves.
6
To prevent the risk of children
burning themselves with potentially
hot fat or oil please make sure that they
cannot access the drain tap and open
it.
Packaging, e.g. cling film,
polystyrene and plastic wrappings
must be kept out of the reach of babies
and young children. Danger of
suffocation. Dispose of or recycle all
packaging safely as soon as possible.
Old appliances must be
disconnected from the power
supply, any plug rendered useless and
the cable cut off directly behind the
appliance to ensure it presents no
danger to children while being stored
for disposal.
Warning and Safety instructions
Protecting the appliance from
damage
Protection from burning and
scalding
Do not drop anything on the glass
surface. Even a light object could
cause damage in certain
circumstances.
Never leave the appliance
unattended when using it.
Overheated oil can catch fire and could
even set the cooker hood on fire.
Never use open flames near the
appliance, e.g. candles or lighters. Fire
hazard!
Do not use a steam cleaner to
clean this appliance. The steam
could reach electrical components and
cause a short circuit. Pressurised
steam could also cause permanent
damage to the surface and to other
components, for which the
manufacturer cannot accept liability.
In countries where there are areas
which may be subject to infestation
by cockroaches or other vermin, pay
particular attention to keeping the
appliance and its surroundings in a
clean condition at all times. Any
damage which may be caused by
cockroaches and other vermin will not
be covered by the appliance
guarantee.
If frying oil does catch fire despite
this do not attempt to put out the
flames with water. Stifle the fire with a
suitable fire blanket or by covering with
the lid.
Avoid touching the appliance and
the frying oil when they are hot.
Both will remain hot for quite a while
after the appliance has been switched
off. Only the handle of the frying basket
can be touched safely.
For added protection, it is
advisable to use heat-resistant pot
holders or gloves when using the
appliance. Do not let them get damp or
wet, as this causes heat to transfer
through the material more quickly with
the risk of burning yourself.
Clean or change dirty oil or fat in
good time. Oil or fat containing
impurities is liable to catch fire.
7
Warning and Safety instructions
Appliance faults
Further safety notes
In the event of damage or a defect,
switch off the appliance immediately. Disconnect completely from the
electricity supply. If the appliance has
not yet been fully installed, the
electricity cable must be disconnected
from the supply point. If connected via
a plug and socket, switch off at the
socket and withdraw the plug. Contact
the Service Department.
Do not reconnect the appliance to the
mains electricity supply until after it has
been repaired.
When using an electric socket near
the appliance, care should be
taken that the cable of the electrical
appliance does not come into contact
with the hot appliance. The insulation
on the cable could become damaged,
giving rise to an electric shock hazard.
If there is any damage to the glass
surface the appliance must be
disconnected from the mains electricity
supply immediately and not used until it
has been repaired. Danger of electric
shock.
Repairs must only be carried out
by a suitably qualified and
competent person. Repairs and other
work by unqualified persons could be
very dangerous and could damage the
appliance. The manufacturer cannot be
held liable for unauthorised work. Never
open the housing of the appliance.
While the appliance is under
guarantee, repairs should only be
undertaken by a service technician
authorised by the manufacturer.
Otherwise the guarantee is invalidated.
8
Always ensure that food is
sufficiently cooked or reheated.
Many factors will affect the overall
cooking time, including the size and
amount of food and its temperature.
Some foods may contain
micro-organisms which are only
destroyed by thorough cooking;
therefore when cooking or reheating
foods such as poultry, it is particularly
important that the food is completely
cooked through. If in doubt, select a
longer cooking or reheating time.
Never use plastic containers for hot
fat. These melt at high
temperatures.
Do not dispose of used cooking oil
down the sink. It can damage
pipework and cause blockages in the
water pipes.
Dispose of it safely with your household
waste or ask your local authority about
disposal schemes in your area.
The manufacturer cannot be held
liable for damage caused by
non-compliance with these Warning
and Safety instructions.
Caring for the environment
Disposal of packing material
Disposal of your old appliance
The transport and protective packing
has been selected from materials which
are environmentally friendly for disposal
and can normally be recycled.
Electrical and electronic appliances
often contain materials which, if
handled or disposed of incorrectly,
could be potentially hazardous to
human health and to the environment.
They are, however, essential for the
correct functioning of your appliance.
Please do not therefore dispose of your
old appliance with your household
waste.
Packaging, e.g. cling film, polystyrene
and plastic wrappings must be kept out
of the reach of babies and young
children. Danger of suffocation.
Dispose of or recycle all packaging
materials as soon as possible.
Please dispose of it at your local
community waste collection / recycling
centre and ensure that it presents no
danger to children while being stored
for disposal.
It should be unplugged or
disconnected from the mains electricity
supply by a competent person. The
plug must be rendered useless and the
cable cut off directly behind it to
prevent misuse.
9
Before using for the first time
General notes
Please stick the extra data plate for the
appliance supplied with this
documentation in the space provided in
the "After sales service" section of this
booklet.
10
Before using for the first time
Cleaning and heating up for
the first time
Before using the fryer for the first time
clean it as follows:
^ Fill the oil reservoir with approx. 4
litres of water and add a little
washing up liquid. Ensure that the
water level is not higher than the
maximum level indicator which is
marked at the back of the reservoir.
Metal components have a protective
coating which may give off a slight
smell when heated up for the first time.
The smell and any vapours will
dissipate after a short time and do not
indicate a faulty connection or
appliance.
^ Turn the control in a clockwise
direction to 130 °C and bring the water to the boil.
^ When the water has started to boil,
switch off the fryer by turning the
control back anti-clockwise to "0".
Empty the water through the drain
tap into a heat resistant container
(see "After frying").
^ Rinse the oil reservoir out with hot
water.
^ Close the drain tap, raise the heating
element and dry the reservoir with a
clean cloth.
^ Clean all other appliance surfaces
with a damp cloth only, and then wipe
dry.
11
Using the fryer
Switching on and off
Before frying
To switch the fryer on, turn the control
in a clockwise direction a. To switch
off, turn the control anti-clockwise b
to "0".
Before frying make sure that the oil
reservoir has been filled with enough
frying oil or fat (min. 3 litres / 3 kg, max.
4 litres / 4 kg).
You cannot turn the control to "0" by
turning it past 200 °C.
Only use oil / fat which is suitable for
frying in and which can be heated to
a high temperature.
Never mix different types of Oil / fat
together.
Proceed as follows:
^ Make sure the drain tap is closed.
^ Fill the oil reservoir with oil / fat. Solid
fat should be cut up into small pieces
first.
When re-using fat which has
solidified in the reservoir, make a hole
in the solid fat as far as the element.
This allows any water which has
gathered under the fat to evaporate.
When the appliance is switched on, the
temperature indicator light g and the
operating indicator light h come on.
The temperature indicator light tacts on
and off in conjunction with the heating
element.
Only operate the fryer without the lid.
Never switch it on when it is empty
or when the heating element is
raised up.
12
^ Turn the control to 100 °C and wait
until the fat has melted.
^ When all the fat has melted check the
level in the reservoir. This needs to be
between the minimum and maximum
level indicators at the back of the
reservoir.
Using the fryer
Frying
Proceed as follows:
^ Set the frying temperature required
(see chart) and wait until the
temperature indicator light goes out
for the first time. The oil has now
reached the set temperature.
^ Carefully lower the frying basket
containing the food to be fried into
the hot oil. If the oil froths a lot, lift the
basket out of the oil briefly and then
slowly lower it into the hot fat again.
^ When the food is cooked, lift the
basket out of the hot oil. Shake the
basket a little to remove any excess
oil, and then hang it on its support.
Do not leave food suspended over the
reservoir for too long as steam from the
oil can cause the food to lose its
crispness. Finally, place the food onto
kitchen paper towel to soak up any
remaining excess oil.
Warning. Whilst frying food make
sure you to not touch the hot oil.
Protect you hands in particular, for
instance by wearing heat resistant
oven gloves.
Blanching
It is also possible to use this appliance
for blanching vegetables by using water instead of oil or fat.
13
Using the fryer
Food (fresh)
Quantity
Temperature*
in °C
Frying time
in minutes
Breaded chicken
portions
2 x 250 g pieces
170
8-10
Unbreaded turkey
steaks
2 x 250 g pieces
180
3-5
Cumberland
sausages
4
170
7-8
Camembert
4 pieces
170
2-3
Raw battered
vegetables
400 g
170
7-9
Raw battered
mushrooms
400 g
170
2-3
Saute potatoes
400 g
170
2-3
Croquette potatoes
400 g
170
pre-frying 2-4
frying 3-5
Fried bread
500 g
200
30 secs - 1 min
Chips
400 g
170
pre-frying 4-6
frying 2-4
Crisps
400 g
170
3-5
Jam doughnuts
4 pieces
170
6-8
Pineapple fritters
2 pieces
170
2-3
Banana fritters
2 pieces
170
3-4
*
The temperature setting for 170 °C is marked with a red dot.
Please note:
The times given are only a guide. The actual cooking times will depend on the size
and quantity of food cooked.
14
Using the fryer
Food (frozen)
Quantity
Temperature*
in °C
Frying time
in minutes
Fish fingers
300 g
170
4-6
Beef burgers
220 g
170
5-6
Croquette potatoes
400 g
170
pre-frying 1-2
frying 3-4
Chips
250 g
400 g
170
2-3
3-4
2 x 60 g
170
8-10
Scampi
250 g
170
4-5
Unbreaded
plaice fillets
300 g
170
3-5
Squid rings
250 g
180
2-3
Spring rolls
*
The temperature setting for 170 °C is marked with a red dot.
Please note:
The times given are only a guide. The actual cooking times will depend on the size
and quantity of food cooked.
15
Using the fryer
Frying tips
Handling and preparing food
correctly is essential for maintaining
good health. Food should be fried
until it is golden brown. Do not let it
get too dark.
Never add salt to food in hot fat. This
could cause the fat to boil over.
– The oil or fat needs to be hot enough
to seal the food quickly. If the
temperature is too low the food will
absorb too much fat, making it
difficult to digest.
It is important to wait until the
temperature indicator goes out
(which means the set temperature
has been reached), before adding
food to the fryer.
– Best results are achieved by keeping
to the temperature guidelines given
in the chart. Only use temperatures
above 170 °C where absolutely
necessary (e.g. for fish and meat
which has not been coated in
breadcrumbs or pastry).
– When frying deep frozen products
use the lowest temperature quoted
on the manufacturer’s packaging.
16
– Keep frying times as short as
possible.
– Use the correct ratio of food to fat.
This should be between 1:10 and
1:15. For example with a minimum fill
of 3 litres of oil you can cook about
300 g of frozen chips. Food will get
too hot if you use too much oil. If you
try and fry too much food at once the
oil will cool down too much.
– Heating the oil for too long will speed
up its deterioration rate.
– Food should be as dry as possible
for frying. Moisture can cause
frothing. Damp food should be dried
using paper towel. Remove any
excess ice and frost from deep
frozen food.
– Lower the frying basket slowly so
that the oil does not froth over.
– Rinsing freshly cut potatoes under
running water and then drying them
thoroughly with kitchen paper towel
will prevent them sticking together.
– Items containing yeast should be
placed in the fat with the risen side
downwards and turned over half way
through cooking.
– Never season food before frying it.
Salt, seasoning, icing sugar, etc.
should be added after the food has
been removed from the basket and
drained of excess fat.
Using the fryer
After frying
Switch the fryer off and filter the oil. This
not only removes impurities which can
affect the taste of the food, but will help
the oil last longer.
Proceed as follows:
^ Allow the oil to cool down, but not to
solidify.
If it has solidified it can be melted by
heating the fryer up to 100 °C.
^ Place a heat resistant container of a
suitable size, e.g. a metal pan,
beneath the drain tap under the
appliance.
^ Open the drain tap by turning it
anti-clockwise a as far as it will go.
^ After the oil has drained out, close
the tap by turning it clockwise b as
far as it will go. Check that you
cannot turn it any further.
^ Filter the oil by pouring it through
kitchen paper or a metal sieve lined
with kitchen or filter paper and store it
in a closed heat-resistant container
until it is needed again.
Make sure that the drain tap under
the appliance is always easy to
access for draining.
Make sure the oil has cooled down
sufficiently before draining it. If it is
too hot there is a risk of burning and
scalding.
Make sure the container you use for
draining the oil into is heat-resistant
and cannot melt.
After using the fryer do not replace
the lid until the appliance has cooled
down.
The oil must be replaced if it
– is very dark and thick
– smells unpleasant and froths
– begins to smoke at a temperature of
170 °C or less.
17
Using the fryer
Safety cut-out switch
Your fryer is fitted with a safety cut-out
which automatically switches it off if:
– the oil reservoir is not filled to at least
the lower level indicator.
– the fryer is switched on when empty.
– the fryer is switched on when the
heating element has been raised
(e.g. for cleaning).
The fryer has cut out automatically
when neither the temperature indicator
light nor the operating indicator light is
on and the oil is no longer being
heated.
18
^ Turn the control to "0" and wait until
the heating element has cooled
down.
^ Rectify whatever has caused the
automatic cut-out.
^ Press the pin (see arrow) which is on
the left rear underside of the fryer in
firmly. The fryer can now be used
again.
Cleaning and care
General notes
Clean the appliance regularly,
preferably after each use. Allow the
appliance to cool down to a safe
temperature before cleaning.
Do not use a steam cleaner to clean
this appliance. The steam could
reach the electrical components and
cause a short circuit. Pressurised
steam could also cause permanent
damage to the surface and to
components for which the
manufacturer cannot accept liability.
Do not use any sharp objects which
could damage the seal between the
glass surface and the surrounding
frame and between the frame and
the worktop.
Do not use any of the following as
they can damage the surface:
cleaning agents containing sand,
soda, alkalines, acids or chlorides,
grill and oven sprays, dishwasher
cleaner, stain or rust removers,
scouring agents or cream cleaners,
abrasive sponges and brushes.
When using cleaning agents for
stainless steel and glass surfaces
you must follow the manufacturers
instructions on the packaging.
Important: Do not use stainless steel
cleaning agents inside the oil
reservoir!
Always dry the appliance thoroughly
with a soft cloth after cleaning it with
water or a damp cloth. This prevents
a build-up of limescale deposits.
E-Cloth
A microfibre "E-Cloth" is available from
the Miele UK Spare Parts Department,
which is suitable for cleaning surfaces
such as stainless steel, glass, plastic
and chrome without the use of
chemicals.
19
Cleaning and care
Frying basket
Oil reservoir
After each use, clean the frying basket
by hand with hot water and a little
washing up liquid and then dry it
thoroughly. It is best to soak stubborn
soiling before cleaning. The handle can
be removed for cleaning.
^ Drain the oil out of the reservoir
before cleaning (see "After frying").
Then raise the heating element.
The frying basket must not be
washed in a dishwasher.
^ Use kitchen paper towel to remove
any large particles.
^ Fill the reservoir to the maximum
mark with a solution of hot water and
washing up liquid and wash out
thoroughly.
^ Drain the suds solution into a suitable
container and then clean the drain
outlet with a bottle brush. Finally rinse
the reservoir out with hot water and
and then dry both the reservoir and
the drain outlet thoroughly.
Do not use cleaning agents for
stainless steel in the oil reservoir.
20
Cleaning and care
Stainless steel surround
Glass control panel
Clean the stainless steel surround with
hot water and a little washing up liquid
applied with a soft sponge. Wipe dry
using a soft cloth. Soak stubborn soiling
first to loosen it.
Clean the glass surface and control
with a damp cloth only, and then wipe
dry with a soft cloth.
The stainless steel surround can be
cleaned using a Miele E-Cloth or a
proprietary non-abrasive cleaning
agent designed specifically for use on
stainless steel.
To help prevent re-soiling, a proprietary
conditioning agent for stainless steel,
such as Neoblank (available from the
Miele Spare Parts Department) can also
be used.
Follow the manufacturer's instructions
on the label and apply sparingly with an
even pressure following the direction of
the grain.
If wished, you can use a few drops of a
proprietary glass cleaning agent
afterwards. Please follow the
manufacturer’s instructions.
Lid
Clean the lid with hot water and a little
washing up liquid applied with a soft
sponge, and then wipe dry with a soft
cloth. Note: Please take care when
cleaning the lid as it scratches easily.
21
Problem solving guide
... the oil has an unpleasant odour.
Repairs to electrical appliances
must only be carried out by a
suitably qualified and competent
person in strict accordance with
current local and national safety
regulations. Unauthorised repairs
could be dangerous. The
manufacturer cannot be held liable
for unauthorised work.
However, some minor problems can be
resolved as follows:
What to do if, ...
... after switching on, the appliance
does not heat up.
Check whether
– the safety cut-out has been activated
(see "Safety cut-out switch").
– the appliance has been switched on
at the mains and that the mains fuse
is in order. If the fuse has blown,
contact an electrician or the Service
Department.
22
Check whether the oil
– is suitable for frying.
– needs changing.
... the food is not crisp and brown.
Ensure that the oil is hot enough and
that the frying basket is not overloaded.
Fry for longer if necessary.
Electrical connection
Electrical connection
All electrical work should be carried
out by a suitably qualified and
competent person in strict
accordance with current national
and local safety regulations
(BS 7651 in the UK).
Installation, repairs and other work
by unqualified persons could be
dangerous. The manufacturer
cannot be held liable for
unauthorised work.
Ensure power is not supplied to the
appliance until after installation or
repair work has been carried out.
The appliance must only be
operated when built-in. This is to
ensure that all electrical parts are
shielded. Live parts must not be
exposed.
Do not connect the appliance to the
mains electricity supply by an
extension lead. These do not
guarantee the required safety of the
appliance.
The voltage and connected load are
given on the data plate. Ensure that
these match the household mains
supply.
Connection should be made via a
suitable isolator or a double pole fused
spur connection unit which complies
with national and local safety
regulations and the on/off switch should
be easily accessible after the appliance
has been built in.
If the switch is not accessible after
installation (depending on country) an
additional means of disconnection must
be provided for all poles.
For extra safety it is advisable to install
a residual current device (RCD) with a
trip current of 30 mA.
When switched off there must be an
all-pole contact gap of 3 mm in the
isolator switch (including switch, fuses
and relays).
Important U.K.
This appliance is supplied for
connection to a single phase 230-240 V
50 Hz supply with a 3-core cable.
The wires in the mains lead are
coloured in accordance with the
following code:
Green/yellow = earth
Blue
= neutral
Brown
= live
WARNING
THIS APPLIANCE MUST BE
EARTHED
23
Electrical connection
Important
The electrical safety of this appliance
can only be guaranteed when
continuity is complete between the
appliance and an effective earthing
system, which complies with local and
national regulations. It is most important
that this basic safety requirement is
present and tested regularly and if
there is any doubt the electrical wiring
in the home should be inspected by a
qualified electrician. The manufacturer
cannot be held liable for the
consequences of an inadequate
earthing system such as an electric
shock.
The manufacturer cannot be held
liable for damage which is the direct
or indirect result of incorrect
installation or connection.
24
After sales service
In the event of any faults which you cannot remedy yourself, please contact
– Your Miele Dealer
or
– The Miele Service Department (see address on back cover).
When contacting the Service Department, please quote the model and serial
number of your appliance. These are given on the data plate.
Please note that telephone calls may be monitored and recorded for training
purposes.
Data plate
Space in which to stick the extra data plate supplied with the appliance. Ensure
that the model number is the same as the one on the front of these operating
instructions.
25
26
27
Alteration rights reserved / 4505
M.-Nr. 05 813 370 / 08
en - –