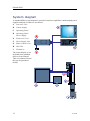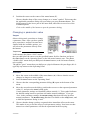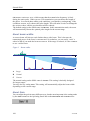
1
Operator manual
Simrad SH90
Fish finding sonar
www.simrad.com
TECHNOLOGY
FOR
SUSTAINABLE
FISHERIES
Simrad SH90
Operator manual
This manual provides you with the basic information
required to operate the Simrad SH90 Sonar. For a more
detailed description of the operation and functionality,
including menus and all parameters, refer to the Simrad
SH90 Reference manual.
All user documentation can also be downloaded from
http://www.simrad.com/sh90.
WARNING: The Simrad SH90 sonar must never be
powered up when the ship is in dry dock. The transducer
will be damaged if it transmits in open air. To prevent
inadvertent use of the sonar, pull out the mains plug on
the Processor Unit whenever the vessel is in dry dock.
372739/D
14.06.2012
©
Kongsberg Maritime AS
Revision status
Dokument nr: 372739 / Revisjon D / ISBN-13 978-82-8066-112-8
Rev.A
19.10.2009
Original issue.
Rev.B
10.05.2010
General update
Rev.C
20.08.2010
New procedures for software backup and restore.
Rev.D
14.06.2012
Revised for updated software version. Changes in structure and content.
Copyright
©2012 Kongsberg Maritime AS
The information contained in this document remains the sole property of Kongsberg Maritime AS. No part
of this document may be copied or reproduced in any form or by any means, and the information contained
within it is not to be communicated to a third party, without the prior written consent of Kongsberg
Maritime AS. The document, or any part of it, may not be translated to any other language without the
written approval from Kongsberg Maritime AS.
Disclaimer
Kongsberg Maritime AS endeavours to ensure that all information in this document is correct and fairly
stated, but does not accept liability for any errors or omissions.
Warning
The equipment to which this manual applies must only be used for the purpose for which it was
designed. Improper use or maintenance may cause damage to the equipment and/or injury
to personnel. The user must be familiar with the contents of the appropriate manuals before
attempting to install, operate or work on the equipment.
Kongsberg Maritime AS disclaims any responsibility for damage or injury caused by improper
installation, use or maintenance of the equipment.
Support information
If you require maintenance or repair, contact your local dealer. You can also contact us using the
following address: [email protected]. If you need information about our other products, visit
http://www.simrad.com. On this website you will also find a list of our dealers and distributors.
Kongsberg Maritime AS
www.kongsberg.com
Operator manual
Table of contents
ABOUT THIS MANUAL ....................................................... 7
SIMRAD SH90 ................................................................... 9
Important ................................................................................................................10
Before you switch on the SH90.................................................................... 10
When the SH90 is not used.......................................................................... 10
When you are docking your vessel ............................................................... 10
If something breaks down............................................................................ 10
Manual operation of the hull unit ................................................................. 10
Transducer handling.................................................................................... 11
System description ................................................................................................. 11
System diagram ......................................................................................................12
System units ...........................................................................................................13
Colour display ............................................................................................ 13
Processor Unit ............................................................................................ 13
Operating Panel .......................................................................................... 13
Operating Panel power supply ..................................................................... 13
Transceiver Unit ......................................................................................... 14
Power Supply Unit...................................................................................... 14
Hull Unit.................................................................................................... 14
Transducer ................................................................................................. 15
Key functionality ....................................................................................................16
Omni beam presentation.............................................................................. 16
Vertical slice presentation ............................................................................ 16
Combination of omni and vertical slice ........................................................ 17
Multiple frequency operation....................................................................... 17
Stabilization system .................................................................................... 17
Reception filters and functionality................................................................ 17
Support information ...............................................................................................19
GETTING STARTED.......................................................... 21
Operating Panel ......................................................................................................22
Power on/off procedures.........................................................................................22
Powering up the SH90 ................................................................................ 22
Powering off the SH90 ................................................................................ 24
Operating principles ...............................................................................................25
Controlling the cursor ................................................................................. 25
Understanding the menu button principles .................................................... 26
Changing a parameter value......................................................................... 27
Understanding the menu structure ................................................................ 28
Investigating the echo presentation and menu ............................................... 29
372739/D
3
Simrad SH90
Starting normal operation .......................................................................................31
Selecting the presentation mode................................................................... 31
Changing the menu language ....................................................................... 32
Changing the presentation colours................................................................ 32
Changing the operational range.................................................................... 33
Adjusting the vertical and horizontal gain..................................................... 34
Changing the operational frequency ............................................................. 35
Saving the current user settings.................................................................... 36
Adjusting the Automatic Gain Control (AGC) .............................................. 36
Adjusting the Reverberation Controlled Gain (RCG)..................................... 38
Adjusting the Time Variable Gain (TVG) ..................................................... 38
Typical parameter settings......................................................................................39
Setting the net............................................................................................. 40
Herring ...................................................................................................... 40
Pollock and saithe ....................................................................................... 40
Blue whiting............................................................................................... 41
Mackerel .................................................................................................... 41
Scattered fish .............................................................................................. 41
Echo presentations..................................................................................................42
Investigating the omni presentation .............................................................. 42
Investigating the vertical slice presentation................................................... 45
Investigating the catch data presentation....................................................... 47
Visual aids and cosmetics.......................................................................................49
Investigating the common information on the display.................................... 50
Moving the boundary lines .......................................................................... 50
Adjusting the variable range marker............................................................. 51
Moving the bearing (audio) line ................................................................... 51
Modifying the amount of visual aids (cosmetics) on the presentation.............. 53
Online help .............................................................................................................56
OPERATIONAL PROCEDURES .......................................... 58
Menu procedures ....................................................................................................59
Hiding (and retrieving) the menu ................................................................. 59
Simplifying the menu system with fewer buttons .......................................... 59
Gain and filter adjustment procedures....................................................................60
Adjusting the vertical and horizontal gain..................................................... 60
Adjusting the Automatic Gain Control (AGC) .............................................. 61
Adjusting the Reverberation Controlled Gain (RCG)..................................... 62
Adjusting the Time Variable Gain (TVG) ..................................................... 63
Adjusting the display gain ........................................................................... 64
Mode procedures ....................................................................................................65
Select presentation mode ............................................................................. 65
Defining the function of the Mode buttons on the Operating Panel ................. 65
4
372739/D
Operator manual
Sorting the presentation modes .................................................................... 66
Markers and symbols procedures ...........................................................................66
Adding 'Target' and 'Circle' markers to the sonar presentation ........................ 66
Adding an 'Own ship' symbol to the sonar presentation ................................. 67
Adding a 'Gear' symbol to the sonar presentation .......................................... 67
Investigating marker and symbol information ............................................... 68
Deleting a marker or symbol from the sonar presentation .............................. 69
Storage procedures .................................................................................................69
Storing sonar images on the computer hard disk............................................ 69
Recalling sonar images to view them............................................................ 70
Keeping sonar images from being deleted when the sonar is switched
off.............................................................................................................. 71
Deleting sonar images that are no longer required ......................................... 72
Renaming the sonar images that you wish to keep ......................................... 72
Printing sonar images.................................................................................. 72
Burning sonar images on a blank CD or DVD............................................... 73
Copying sonar images to a USB memory device ........................................... 73
Automatic search and tracking procedures ............................................................74
Starting the horizontal search program ......................................................... 74
Starting the vertical search program ............................................................. 75
Enabling position track................................................................................ 75
Enabling target track ................................................................................... 76
Adding a target tracking line........................................................................ 76
User setting procedures ..........................................................................................77
Saving the current user setting ..................................................................... 77
Loading a previously stored user setting ....................................................... 78
Renaming a user setting .............................................................................. 78
Deleting a user setting ................................................................................. 78
Loading the factory settings......................................................................... 79
Installation of optional functionality ......................................................................80
Opening the ‘Install Options’ parameter dialog ............................................. 80
About the ‘Install Options’ parameter dialog................................................. 80
Adding optional functionality ...................................................................... 81
PRESENTATION MODES .................................................. 82
OPERATING PANEL ......................................................... 85
MENU SYSTEM ................................................................ 87
Active menus ..........................................................................................................87
Horizontal menu ......................................................................................... 88
Vertical menu ............................................................................................. 90
Vertical 180 menu ....................................................................................... 92
Display menu ............................................................................................. 94
Setup menu ................................................................................................ 96
372739/D
5
Simrad SH90
Objects menu.............................................................................................. 98
Temporary menus ...................................................................................................99
Cosmetics menu ......................................................................................... 99
Store/Recall menu....................................................................................... 99
System Test menu ....................................................................................... 99
Sort Modes menu...................................................................................... 100
SONAR THEORY ............................................................ 101
Parameters ............................................................................................................101
What is TVG? .......................................................................................... 102
What is AGC? .......................................................................................... 102
What is the PP Filter?................................................................................ 103
About pulse form and length...................................................................... 103
About beam widths ................................................................................... 104
About Gain............................................................................................... 104
What is RCG? .......................................................................................... 105
About tilt.................................................................................................. 105
Noise and reverberation........................................................................................106
Cavitation................................................................................................. 107
Reverberation ........................................................................................... 107
Blocking .................................................................................................. 108
Check the noise yourself! .......................................................................... 108
Layers and deflections ..........................................................................................109
Temperature and salinity layers.................................................................. 109
Deflections ............................................................................................... 110
6
372739/D
About this manual
About this manual
Purpose
The purpose of this operator manual is to provide the descriptions and procedures
required to allow for safe and efficient use of the Simrad SH90.
A good understanding of system functions and controls is essential to fully take
advantage of the functionality provided. Sea conditions vary, sometimes drastically,
and it is not possible to identify settings that will provide the best data at all times.
Careful study of the information in this manual is highly recommended, preferably
while exploring the system’s functionality.
SH90 operation is a dynamic activity requiring regular adjustments and fine tuning to
achieve the best possible results under varying environmental conditions.
If you need more detailed information about this product, refer to the Simrad SH90
Reference manual.
Target audience
The manual is intended for all basic users of the Simrad SH90.
We assume that you are familiar with the basic acoustic principles of sound in water,
and that you have some experience with sonar operation.
Click “Help”!
Installed on your Simrad SH90 you will find a comprehensive on-line help system.
You may not find it in your language, but everything you can read in the Simrad SH90
Reference manual can also be found in the context sensitive on-line help.
To access this information click the Help button in the parameter dialog boxes.
Note that when you open the help system it will place itself on the top of the display
presentation!
Online information
All operation and installation end user documentation provided for your Simrad SH90
can be downloaded from http://www.simrad.com.
Registered trademarks
Windows®, Windows® XP®, and Windows® 7 are either registered trademarks, or
trademarks of Microsoft Corporation in the United States and/or other countries.
372739/D
7
Simrad SH90
Simrad®, SIMRAD® and the Simrad® logo are either registered trademarks, or
trademarks of Kongsberg Maritime AS in Norway and other countries.
8
372739/D
Simrad SH90
Simrad SH90
Study this chapter to familiarize yourself with the Simrad SH90.
Topics
• Important on page 10
• System description on page 11
• System diagram on page 12
• System units on page 13
• Key functionality on page 16
• Support information on page 19
372739/D
9
Simrad SH90
Important
As with all other advanced instruments, there are a few important things that you must be
aware of.
Topics
• Before you switch on the SH90 on page 10
• When the SH90 is not used on page 10
• When you are docking your vessel on page 10
• If something breaks down on page 10
• Manual operation of the hull unit on page 10
• Transducer handling on page 11
Before you switch on the SH90
Before you power up the sonar, make sure that you have sufficient water depth to lower
the transducer!
When the SH90 is not used
To protect the SH90 when it is not in use, we strongly advice you to hoist the transducer,
even though you may not switch off the power. In narrow or shallow waters this is very
important, since you may - in worst case - run the transducer into the bottom. This will
damage the transducer and the transducer shaft, and extensive repair is required.
When you are docking your vessel
It is very important that the SH90 system remains switched off when the vessel is in dry
dock. If the transducer is activated when out of water it may be damaged beyond repair.
As a safeguarding measure, we recommend that you remove the power fuses on the
SH90 system before the vessel is docked. As an extra safety measure, the SH90 is by
default powered up with the transmit power switched off.
If something breaks down
If you believe that something has broken down, contact your local dealer. He will be
able to assist.
A list of all our dealers is provided on http://www.simrad.com. If you are unable to
contact a dealer, observe the support information in this chapter.
→ Support information on page 19
Manual operation of the hull unit
In the event of improper operation, the powerful 3 kW electric motor may cause serious
damage to the equipment and/or injury to personnel.
10
372739/D
Simrad SH90
Therefore, before you start the manual operation, read carefully through the relevant
procedure(s). You will then familiarize yourself with the methods and the safety
requirements.
The relevant procedures are located in the SH90 Reference Manual.
Transducer handling
Note
All transducers must be handled as delicate items. Any wrongful handling may damage
the transducer beyond repair.
Do not activate the transducer when it is out of the water.
Do not handle the transducer roughly, avoid impacts.
Do not expose the transducer to direct sunlight or excessive heat.
Do not use high pressure water, sand blasting or metal tools to clean the transducer face.
Do not use strong solvents to clean the transducer face.
System description
The Simrad SH90 is an omnidirectional high frequency sonar.
It is designed for all sized fishing vessels, both purse seiners and trawlers.
The operational frequency is 114 kHz. The cylindrical multi-element transducer allows
the omnidirectional sonar beam to be tilted electronically from +10 to –60 degrees.
This allows you to automatically track schools of fish, and to observe the whole water
volume around the vessel. A stabilising system is included for electronic pitch and
roll compensation.
Great emphasis has been placed on giving the best possible sonar presentations on a
high resolution colour display.
The SH90 Processor Unit is controlled by Microsoft’s Windows XP® operating system,
which result in a flexible choice of presentation modes for a large range of user
applications. The signal processing and beamforming is performed in a fast digital
signal processing system using the full dynamic range of the signals. In addition to the
traditional single frequency transceiver system, the Simrad SH90 contains an advanced
frequency modulated filter system (FM).
372739/D
11
Simrad SH90
System diagram
A standard SH90 system diagram is provided. Interface capabilities, uninterrupted power
supplies and power cables are not shown.
A
Processor Unit
B
Colour display
C
Operating Panel
D
Operating Panel
Power Supply
E
Transceiver Unit
F
Power Supply Unit
G
Motor Control Unit
H
Hull Unit
I
Transducer
The colour display is not
included in the standard
delivery from Simrad.
This is a commercial item
that can be purchased
locally.
SIMRAD
B
MENU
PWR
A
SIMRAD SX90
SIMRAD
C
D
G
H
F
I
12
(CD015041-001)
E
372739/D
Simrad SH90
System units
The Simrad SH90 comprises the following units.
Topics
• Colour display on page 13
• Processor Unit on page 13
• Operating Panel on page 13
• Operating Panel power supply on page 13
• Transceiver Unit on page 14
• Power Supply Unit on page 14
• Hull Unit on page 14
• Transducer on page 15
Colour display
A commercial colour display is used with the Simrad SH90 system.
Note that the colour display is not a standard part of the SH90 delivery.
Processor Unit
The Processor Unit is a marine computer based on
the Microsoft Windows® XP® operating system. It is
designed for rugged use.
The computer is based on a commercial design, but
the software and hardware has been specified and
assembled by Simrad to suit the SH90 requirements.
The computer holds a DVD player and multiple USB ports for use with future software
upgrades.
Operating Panel
The Operating Panel contains all necessary control
functions for normal operation of the SH90.
The controls are arranged in logical function groups,
this gives a clear and easy operation.
The majority of the SH90 functions can be accessed
using the trackball on the Operating Panel and the menu system on the display. You
can also use a standard computer mouse.
Operating Panel power supply
A small commercial power supply is implemented to provide stand-by power to the
Operating Panel. The power supply is connected to the Processor Unit.
372739/D
13
Simrad SH90
Transceiver Unit
The SH90 Transceiver Unit is located in the sonar
room, close to the Hull Unit.
The transceiver performs the transmission and
reception control of the 480 transmitters and 480
receiver channels. 16 identical transceiver boards
are used. A dedicated power supply is provided to
supply the required DC voltages to the transceiver.
One Ethernet cable is used for communication with
the Processor Unit on the bridge, and a second Ethernet
cable is used to control the hull unit. The third Ethernet
cable connects to the Power Supply Unit.
The transducer cables from the hull unit are plugged into the side wall of the Transceiver
Unit cabinet using a special plug.
The Transceiver Unit is mounted on the bulkhead using powerful shock absorbers. The
connectors for power and interface are located at the bottom of the cabinet.
Power Supply Unit
A dedicated Power Supply Unit is provided. Its purpose
is to provide the Transceiver Unit with operational DC
power.
Caution
The Power Supply Unit contains high voltages.
Do not open the cabinet door while the SH90
is switched on.
Hull Unit
The Hull Unit is designed to lower the transducer
1.0 meters below the ship’s hull.
When the sonar is switched on, press the Down button on the Operating Panel to lower
the transducer into the water. Before the sonar is switched off, press the Up button on
the Operating Panel to retract the transducer into the installation trunk for protection.
If you forget this, the transducer is hoisted automatically before the sonar is switched
off. It is also hoisted automatically if a serious malfunction occurs to the communication
between the bridge and the hull unit.
The transducer can also be lowered to any selected middle position. In case of voltage
failure, the transducer can be raised or lowered manually by means of a hand crank.
The sensor for the electronic stabilisation of the sonar beams is housed in the Motor
Control Unit, which is mounted on the Hull Unit.
14
372739/D
Simrad SH90
Caution
If the transducer hits larger objects or bottom, the transducer shaft may be
bent, or - in worst case - it can be broken off. A broken transducer shaft will
cause water leakage through the top of the shaft.
In such cases, do not raise the transducer shaft to its upper position.
To prevent serious damage, you must have a water pump and a warning
system in the sonar room.
Transducer
The cylindrical Transducer allows the sonar beam to give full 360 degrees coverage of
the water volume from +10 and down to -60 degrees.
372739/D
15
Simrad SH90
Key functionality
The Simrad SH90 offers certain key functions.
The basic principles of the Simrad SH90 are unique because of the 480 transmitter and
480 receiver channels with their transducer elements spread around on the cylindrical
transducer.
The transmission, reception and data processing are under computer control, and the
powerful capabilities of the sonar are the results of sophisticated digital signal processing
software and state of the art hardware.
Topics
• Omni beam presentation on page 16
• Vertical slice presentation on page 16
• Combination of omni and vertical slice on page 17
• Multiple frequency operation on page 17
• Stabilization system on page 17
• Reception filters and functionality on page 17
Omni beam presentation
When the Omni beam is tilted, the total beam picture
can be compared with folding an umbrella, which
means that all beams in 360 degrees around the vessel
have the same tilt angle.
The beam can be tilted from +10 up to -60 degrees
down.
Vertical slice presentation
In addition to seeing the target from above, it is also
possible to see the target from the side, by using the
vertical slice presentation. In this case the beam covers
a continuous vertical beam from 0 to -60 degrees in
one transmission.
This vertical slice, which is presented by the white
bearing line (also frequently referred to as the “audio
line”) in the horizontal picture, can be selected to any
bearing by the manual training control.
In addition to the Omni picture, the vertical slice is especially useful for visualizing the
vertical distribution of a school of fish. In that way, it is not necessary to go over the
target to see the distribution on the echo sounder, which often results in a spreading
of the school.
16
372739/D
Simrad SH90
Combination of omni and vertical slice
The combination of the Omni mode and the vertical
slice will give an optimal visualization of the catch
situation.
Multiple frequency operation
In addition to the standard 114 kHz frequency, you can select any operational frequency
from 111,5 to 115,5 kHz in 0,5 kHz steps.
This is a very useful function when it is necessary to suppress interference from other
sonars.
Stabilization system
The Simrad SH90 is provided with
a stabilisation system.
When the beam stabilizer is activated,
both horizontal and vertical beams
will be stabilized electronically for
roll and pitch movements up to ±20
degrees. The beam direction will
then change continuously according to the vessel’s movements, and secure an optimal
contact with the targets even in rough seas.
The default sensor for the beam stabilizer function is located inside the Motor Control
Unit.
You can also connect an external motion sensor to the SH90. This will provide a more
accurate compensation.
Reception filters and functionality
A great effort has been made to reduce unwanted noise to get a clean and stable echo
presentation. To achieve this goal the sonar receiver has several filter functions.
FM Correlation filter
The FM (frequency modulation) is a sweep in frequencies. The receiver filters out those
signals that are the same as the transmitted. This provides a filtering effect, which
efficiently reduces interference, noise and reverberation.
In addition to giving a clean and stable echo presentation, this will normally also increase
the sonar's detection range. The advantage of the FM correlation filter is that it retains
the high resolution in range with long pulse lengths and high energy, and that it is not
sensitive to moving targets.
372739/D
17
Simrad SH90
Note that this filter is built into the software. It is not available as a function you can
control on the menu system.
Frequency selection
The multiple frequency selections can be used for suppression of interference from
other sonars.
The sound absorption in salt water increases with the frequency, thus giving the lower
frequencies a longer detection range.
Related topics
• Changing the operational frequency on page 35
AGC (Automatic Gain Control)
The AGC (Automatic Gain Control) senses the echo level in several directions, and use
this as a basis for adjusting all the receiver beams. The AGC will thus provide automatic
scaling of the data in order to maintain proper dynamic range based on all echo values
The strength of the filter can be selected in the menu.
Related topics
• Adjusting the Automatic Gain Control (AGC) on page 36
• What is AGC? on page 102
RCG (Reverberation Controlled Gain)
The RCG function adjust the picture to minimize influence from bottom and surface
reverberation.
The strength of the filter can be selected in the menu. With maximum strength is selected,
the RCG will effectively reduce the bottom in shallow water, while variations on the
bottom will be displayed. Note that scattered fish can be perceived as reverberation. The
RCG filter must therefore be used with care if scattered schools are to be detected.
Related topics
• Adjusting the Reverberation Controlled Gain (RCG) on page 38
• What is RCG? on page 105
18
372739/D
Simrad SH90
Ping-to-ping filter
The Simrad SH90 is equipped with a ping-to-ping filter (PP Filter) to provide a clean
and steady presentation by reducing the interference and noise. This filter compares the
echoes from a selected amount of transmissions (pings), and an echo has to be present in
the selected amount of pings in order to be presented on the display.
Note that in rough seas, when the beam easily can miss the target in several pings, the
PP Filter must be used with care.
Related topics
• What is the PP Filter? on page 103
TVG (Time Variable Gain)
The Time Variable Gain (TVG) function controls the gain of the receiver so that a school
with a given size and density is presented with approximately the same strength on
the display, inside the regulated TVG range. This can also be seen as a filter, because
it reduces the noise close to the vessel.
The regulated strength of the TVG can be selected in the menu.
Related topics
• Adjusting the Time Variable Gain (TVG) on page 38
• What is TVG? on page 102
Noise filter
The noise filter is designed to remove unwanted acoustic noise from the sonar picture.
It will reduce the interference from other acoustic systems (sonars and echo sounders) on
your own vessel and from other vessels in the vicinity. It will also suppress the noise
from your own propellers and from other similar noise sources.
Support information
If you need technical support for your Simrad SH90 you must contact your local
dealer, or one of our support departments. A list of all our dealers is provided on
http://www.simrad.com.
372739/D
19
Simrad SH90
Norway (Main office)
• Company name: Kongsberg Maritime AS / Simrad
• Address: Strandpromenaden 50, 3190 Horten, Norway
• Telephone: +47 33 03 40 00
• Telefax: +47 33 04 29 87
• E-mail address: [email protected]
• Website: http://www.simrad.no
Spain
• Company name: Simrad Spain
• Address: Poligono Partida Torres 38, 03570 Villajoyosa, Spain
• Telephone: +34 966 810 149
• Telefax: +34 966 852 304
• E-mail address: [email protected]
• Website: http://www.simrad.es
USA
• Company name: Kongsberg Underwater Technology Inc / Simrad Fisheries
• Address: 19210 33rd Ave W, Lynnwood, WA 98036, USA
• Telephone: +1 425 712 1136
• Telefax: +1 425 712 1193
• E-mail address: [email protected]
• Website: http://www.simrad.com
Malaysia
• Company name: Kongsberg Maritime Malaysia Sdn. Bhd
• Address: Unit 27-5 Signature Offices, The Boulevard, Mid Valley City, Lingkaran
Syed Putra, 59200 Kuala Lumpur, Malaysia
• Telephone: +65 6411 7488
• Telefax: +60 3 2201 3359
• E-mail address: [email protected]
• Website: http://www.simrad.com
20
372739/D
Getting started
Getting started
This chapter describes how to get started with the basic operation of the Simrad SH90.
It contains a brief overview of the basic system operation and procedures. If you are
a first time user, we recommend that you read through this chapter while operating
the Simrad SH90 so that you can familiarize yourself with the menus, dialog boxes
and display presentations.
Topics
• Operating Panel on page 22
• Power on/off procedures on page 22
• Operating principles on page 25
• Starting normal operation on page 31
• Typical parameter settings on page 39
• Echo presentations on page 42
• Visual aids and cosmetics on page 49
• Online help on page 56
Related topics
• Operational procedures on page 58
372739/D
21
Simrad SH90
Operating Panel
The Operating Panel is
the primary means of user
interface to access the SH90
functionality.
The most frequently used
functions are directly available
using the designated control
buttons on the Operating Panel.
You can enter operational
commands directly by the push
of a button. To use the functions provided by the menu system, use the trackball and
Select, View and Object buttons. These three buttons correspond to the three buttons
on a standard computer mouse.
The buttons on the Operating Panel are grouped in fields according to their purpose.
A Main switch: Power the sonar on (and off), lower and hoist the transducer
B Symbol: Control the target markers providing exact latitude and longitude
positioning.
C Mode: Select your favourite presentation mode or user setting with the push on
a button.
D Gain: Separate gain control for horizontal and vertical sonar presentation.
E Range: Separate range control for horizontal and vertical sonar presentation.
F Cursor: Menu and cursor control.
G Tilt: Easy control of the sonar's tilt angle, or start automatic search program.
H Various: Store interesting screen captures, and zoom in on details.
I
Train: Manual control of beam training, start automatic search and tracking
programs.
Power on/off procedures
These procedures explain how to switch the SH90 system on and off.
The operation is made using the buttons on the Operating Panel.
Topics
• Powering up the SH90 on page 22
• Powering off the SH90 on page 24
Powering up the SH90
Purpose
This procedure explains how to power up the Simrad SH90.
22
372739/D
Getting started
Note
Make sure that you have sufficient water below the hull before you lower the SH90
transducer!
Procedure
1 Press the Power button on the colour display.
2 Press the Power button on the Operating Panel, and keep it depressed for
approximately two seconds.
The green lamp on the right side of the button will flash to indicated
that the power has been switched on, and that the computer is
starting up.
After a short period you will see the sonar picture on the display.
POWER
Note
If the sonar system has been disconnected from AC power, the Processor Unit must
be started manually. Use the on/off switch behind the lid on the front panel.
3
4
Check that the water depth beneath the keel is sufficient to lower the transducer.
Press the Down button on the Operating Panel to lower the transducer.
The green lamp next to the button will flash, and an audible signal
indicates that the transducer is lowered.
When the lower position has been reached, the lamp will be lit
continuously, the audible signal stops, and the top button in the
Status parameter dialog shows Transducer:Down.
Down
Note
By default the transmit power is disabled when the sonar is powered up. This is
for safety reasons. On the Horizontal menu, you will see that the TX power button
flashes to remind you of this.
5
On the Horizontal menu, click TX power to select Full.
Tip
The sonar will start up even if circuit boards in the Transceiver Unit are
malfunctioning. The sonar will then need more time to perform the start-up
procedure, and a short message will be provided above the progress bar.
System ready for ping, but with reduced number of TRH32
After the sonar has started up, the TRU On/Off dialog can be opened by clicking
the TRU On/Off button on the Test menu. Click the Advanced button to obtain more
information.
372739/D
23
Simrad SH90
Powering off the SH90
Purpose
This procedure explains how to power off the Simrad SH90.
Procedure
1
Press the Up button on the Operating Panel.
The green lamp next to the button will flash, and an audible signal
indicates that the transducer is hoisted.
Up
When the upper position has been reached, the lamp will illuminate
continuously, the audible signal stops, and the upper button in the
Status menu shows Transducer: UP.
2
Press the Power button on the Operating Panel, and keep it depressed for
approximately two seconds.
The sonar is switched off. Note that you must not use the green
button on the Processor Unit, only this Power button on the
Operating Panel.
POWER
Tip
If you forget to hoist the transducer before you press the Power to switch off the
SH90, it will hoist the transducer automatically. You must then wait some extra time
before the sonar switches off.
If the sonar is switched off uncontrolled with the transducer in its lowered position,
the transducer will normally be hoisted automatically after approximately one
minute. You must however verify that this takes place. If the transducer is not
hoisted automatically, it can be raised manually by means of the hoist/lower switch
in the Motor Control Unit. If mains power is lost, you can also use the hand crank
provided.
3
24
Switch off the colour display.
372739/D
Getting started
Operating principles
The SH90 is operated using the dedicated Operating Panel. An optional mouse (or
trackball) can also be connected.
Topics
• Controlling the cursor on page 25
• Understanding the menu button principles on page 26
• Changing a parameter value on page 27
• Understanding the menu structure on page 28
• Investigating the echo presentation and menu on page 29
Important
In this manual, the phrase “click” means that you shall place the cursor over the specified
button, field or function, and press the Select button on the Operating Panel (or the left
mouse button) once. The phrase “double-click” means that you shall press the Select
button (or the left mouse button) twice rapidly.
The phrase “press” means that you shall press a physical button with your finger, this is
typically any button on the Operating Panel.
Controlling the cursor
Purpose
CURSOR
Menu
This procedure explains how to use the trackball
and adjacent buttons to control the display cursor.
You use the cursor and these buttons to access
the functions provided by menu system, and to
open the shortcut menus.
View
Select
Object
B
A
22
50
01
D
SONAR OPERA TING PANEL
(C
The trackball and the Select button corresponds
to a standard computer mouse with its left mouse
button.
L)
Tip
Procedure
1
Use the trackball (A) on the Operating Panel.
2
Observe that the cursor moves on the SH90 display, and that it changes its form
depending on its location.
3
Observe the location of the Select button (B).
4
Place the cursor over a button on the menu, and press the Select button to activate
the selected function.
5
Place the cursor in the echo presentation, and press the View button.
372739/D
25
Simrad SH90
6
Observe that a dedicated View shortcut menu opens.
Which menu that opens depends on the current presentation mode,
and in which display field you the cursor was located when you
pressed the View button.
View
Tip
You can open the same View shortcut menu by pressing the Select button twice
rapidly.
The functions on the View shortcut menu are all related to the visual presentation.
7
Place the cursor in the echo presentation, and press the Object button.
8
Observe that a dedicated Object shortcut menu opens.
The functions on the Object shortcut menu are all related to the
objects you have defined, such as tracked targets or markers.
Object
Understanding the menu button principles
Purpose
(C D015010A )
This procedure explains the operational
principles of the menu buttons.
Each menu contains several buttons. Each
button shows both the function and the current
parameter. The majority of the buttons in each
menu field have three functions:
-
• You can select a lower parameter value.
A
+
C
B
• You can select a higher parameter value.
• You can open the applicable parameter dialog at the bottom of the menu.
Procedure
1
Use the trackball on the Operating Panel, and position the cursor over the left side
of the button (A).
Observe that the shape of the cursor changes to a “minus” sign. This means that
the value of the parameter will decrease when you press the Select button on the
Operating Panel.
Click on the left side of the button to decrease the parameter value
2
Position the cursor over the right side of the button (B).
Observe that the shape of the cursor changes to a “plus” sign. This means that the
value of the parameter will increase when you press the Select button.
Click on the right side of the button to increase the parameter value
26
372739/D
Getting started
3
Position the cursor on the centre of the menu button (C).
Observe that the shape of the cursor changes to a “menu” symbol. This means that
the applicable parameter dialog will open when you press the Select button. The
dialog appears in the lower part of the menu field, and offers an overview of the
available options.
Click on the middle of the button to open the parameter dialog.
Changing a parameter value
Purpose
B
Observe this generic procedure to change
a parameter value. Once you have gained
more experience, and have become more
familiar with the available options, you
will select the parameters directly from
the buttons.
A
C
D
Important
(C D015010-003 )
In this manual, the phrase “click” means
that you shall place the cursor over the specified button, field or function, and press
the Select button on the Operating Panel (or the left mouse button) once. The phrase
“double-click” means that you shall press the Select button (or the left mouse button)
twice rapidly.
The phrase “press” means that you shall press a physical button with your finger, this is
typically any button on the Operating Panel.
Procedure
1
Move the cursor to the middle of the menu button (A). Observe that the cursor
changes its shape to a menu symbol.
2
Press the Select button on the Operating Panel.
3
Observe that the corresponding parameter dialog (B) opens at the bottom of the
menu.
4
Move the cursor down to the dialog, position the cursor over the requested parameter
value (C), and press the Select button again.
Certain parameter settings are identified with an asterisk (*). This symbol indicates
the default setting known to perform well under normal conditions. If you get
“lost“ in the parameter settings, the Default settings function will bring up these
normal parameters. The Default setting function is available on the Setup menu, and
a dedicated parameter dialog is used.
5
Observe that the change you have requested takes immediate effect on the sonar.
This makes it easy to test the effect of each parameter setting. Note however that
transceiver related parameters will first be operational in the next ping.
372739/D
27
Simrad SH90
6
Move the cursor down to the Close button (D) in the parameter dialog, and press
the Select button again.
7
Observe that the parameter dialog closes.
Tip
In the Simrad SH90, all parameters are stored automatically. This function will
cause the SH90 to remember all the selected parameter settings, even when it is
switched off.
Understanding the menu structure
Purpose
The menu contains several different buttons, tabs and parameter
dialogs. Observe this procedure to familiarize yourself with the
menu.
Procedure
1
Observe the blue field (A) at the top of the menu structure.
This is the Sonar type. This field simply states the name of
the sonar.
2
Observe the second button (B) from the top.
This is the Mode button. It is present on the top of every menu.
Click this button to change presentation mode. If you click
on the middle of the button you will open a dedicated menu
for mode selection. If you click on the right or left side of the
button you can scroll through the available modes.
3
Observe the vertical tabs on the right side of the menu body
(C).
These are the Tabs, and they are used to bring forward the
different menus.
Click on one of them to see the relevant menu.
4
Observe the main body of the menu (D).
This is the actual Menu. It contains a number of command buttons. Each menu
provides a separate set of buttons. Some of them may have buttons that are
unavailable in the present mode or system configuration.
5
Observe the buttons on the menu (E).
You can click on any Button to change the applicable parameter. If you click on
the middle of the button you will normally open a dedicated parameter dialog for
parameter selection. If you click on the right or left side of the button you can scroll
through the available choices.
28
372739/D
Getting started
6
7
At the bottom of the menu, observe the Parameter dialog (F).
When you click a menu button, the relevant parameter dialog opens at the bottom of
the menu. Each parameter dialog holds one or more buttons or menus. To close a
parameter dialog, click the Close button.
Most dialogs provide a Help button for access to the on-line help. In this example
you can see the Status dialog, which is replaced when a parameter dialog is opened.
At the very bottom of the menu system, observe the Messages (G).
The button at the bottom of the menu is used to provide relevant messages from
the sonar system. The background colour changes to reflect the importance of the
message.
Investigating the echo presentation and menu
Purpose
The purpose of this procedure is to familiarize yourself with the menu and echo
presentation area on the SH90.
Procedure
1 Once the SH90 is up and running, observe the layout of the display presentation:
2
3
4
On the right side, observe the menu system (A).
On the left side, observe the sonar echo presentation (B).
On the Operating Panel, press the Menu button (located above the large trackball).
Observe that the menu disappears from the display presentation.
When the menu is removed the echo presentation is extended to
cover the entire display.
Use the trackball, and move the cursor over to the left or right
side of the display.
372739/D
Menu
29
Simrad SH90
5
Observe that the menu reappears on the selected side (A), and that the remaining
echo presentation area is not re-scaled.
A
(CD015008C)
6
Move the cursor towards the centre of the display, and observe that the temporary
menu disappears.
7
On the Operating Panel, press the Menu button one more time, and observe that
the menu reappears.
30
372739/D
Getting started
Starting normal operation
Once you have powered up the complete SH90 system, you are ready to start the actual
operation.
When started up, the SH90 will automatically apply its previous setup parameters.
Observe these brief procedures to familiarize yourself with the basic operations with
echo presentations and menu operations.
Topics
• Selecting the presentation mode on page 31
• Changing the menu language on page 32
• Changing the presentation colours on page 32
• Changing the operational range on page 33
• Adjusting the vertical and horizontal gain on page 34
• Changing the operational frequency on page 35
• Saving the current user settings on page 36
• Adjusting the Automatic Gain Control (AGC) on page 36
• Adjusting the Reverberation Controlled Gain (RCG) on page 38
• Adjusting the Time Variable Gain (TVG) on page 38
Selecting the presentation mode
Purpose
Your SH90 sonar is equipped with several presentation modes. Observe these procedures
to choose the mode best fit for your current operations.
Procedure
1
Basic procedure
a
Locate the Mode field on your Operating Panel.
b
Press one of the four buttons to choose presentation mode.
Using this method, you can only choose between the four modes predefined fort
these buttons. Which modes to choose from are defined in the Sort Modes menu.
2
Alternative method
a
Locate the Mode button on the top of each menu.
b
Click Mode to choose presentation mode.
Click the left or right side of the Mode button to choose mode, or the middle of
the button to open the parameter dialog.
372739/D
31
Simrad SH90
Changing the menu language
Purpose
The menu system on your SH90 sonar is available in several languages.
Procedure
1
Click the Display tab to open the menu.
2
On the Display menu, click Language.
Use this function to choose the language used on the menu buttons.
3
Click either side of the button to leaf through the options, or the middle of the button
to open the parameter dialog.
Changing the presentation colours
Purpose
The echo presentation on your SH90 sonar can be provided using many colours and
different palettes to suit your preferences.
Procedure
1
Click the Display tab to open the menu.
2
On the Display menu, click Palette.
This parameter allows you to choose a presentation colour palette to suit your
personal preferences and the ambient light conditions.
3
Click either side of the button to leaf through the options, or the middle of the button
to open the parameter dialog.
4
On the Display menu, click Colours.
This parameter allows you to control how bright colours you wish to use. The
colour bar in the menu shows the colour range currently in use.
5
On the Display menu, click Resolution.
This parameter allows you to use 16 or 64 colours in the display presentation. This
is a personal preference. The chosen resolution is shown in the colour bar below
the button.
32
372739/D
Getting started
Changing the operational range
Purpose
The range of your SH90 sonar can be set individually for the horizontal and vertical
presentations.
• The range applied to the horizontal presentation modes can be changed using the
Operating Panel or the Range button on the Horizontal menu.
• The range applied to the vertical presentation modes can be changed using the
Operating Panel or the Range button on the Vertical menu.
Note
When this parameter is changed on a horizontal menu, the chosen setting is only put
to use on the horizontal sonar presentation. If you change the parameter on a vertical
menu, it is only applied to the vertical sonar slice presentation.
Procedure
1
Basic procedure
a
Observe the Range field on the Operating Panel.
It provides separate gain
controls for the horizontal and
vertical sonar presentations.
2
Range
V-
Range
V+
Range
H-
Range
H+
b
Press the Range H- and Range
H+ buttons to decrease or increase the horizontal range.
c
Press the Range V- and Range V+ buttons to decrease or increase the vertical
range.
Alternative method: Horizontal range
a
Click the Horizontal tab to open the menu.
b
On the Horizontal menu, click Range.
This parameter is used to control the range of the SH90, that is the distance
from the vessel to the outmost edge of the sonar beam.
c
372739/D
Click either side of the button to leaf through the options, or the middle of the
button to open the parameter dialog.
33
Simrad SH90
3
Alternative method: Vertical gain
a
Click the Vertical tab to open the menu.
b
On the Vertical menu, click Gain.
This parameter is used to control the range of the SH90, that is the distance
from the vessel to the outmost edge of the sonar beam.
c
Click either side of the button to leaf through the options, or the middle of the
button to open the parameter dialog.
Adjusting the vertical and horizontal gain
Purpose
The range of your SH90 sonar can be set individually for the horizontal and vertical
presentations.
• The gain applied to the horizontal presentation modes can be changed using the
Operating Panel or the Gain button on the Horizontal menu.
• The gain applied to the vertical presentation modes can be changed using the
Operating Panel or the Gain button on the Vertical menu.
Note
When this parameter is changed on a horizontal menu, the chosen setting is only put
to use on the horizontal sonar presentation. If you change the parameter on a vertical
menu, it is only applied to the vertical sonar slice presentation.
Procedure
1
Basic procedure
a
Observe the Gain field on the Operating Panel.
It provides separate gain
controls for the horizontal and
vertical sonar presentations.
34
Gain
V-
Gain
V+
Gain
H-
Gain
H+
b
Press the Gain H- and Gain H+
buttons to decrease or increase the horizontal gain.
c
Press the Gain V- and Gain V+ buttons to decrease or increase the vertical gain.
372739/D
Getting started
2
Alternative method: Horizontal gain
a
Click the Horizontal tab to open the menu.
b
On the Horizontal menu, click Gain.
This parameter is used to control the receiver gain, that is how much
amplification that is used on the received echoes.
c
3
Click either side of the button to leaf through the options, or the middle of the
button to open the parameter dialog.
Alternative method: Vertical gain
a
Click the Vertical tab to open the menu.
b
On the Vertical menu, click Gain.
This parameter is used to control the receiver gain, that is how much
amplification that is used on the received echoes.
c
Click either side of the button to leaf through the options, or the middle of the
button to open the parameter dialog.
Changing the operational frequency
Purpose
In addition to the standard 26 kHz frequency, you can select any operational frequency
from 20 to 30 kHz in 1 kHz steps.
This is a very useful function when it is necessary to suppress interference from other
sonars.
Note
When this parameter is changed on a horizontal menu, the chosen setting is only put
to use on the horizontal sonar presentation. If you change the parameter on a vertical
menu, it is only applied to the vertical sonar slice presentation.
372739/D
35
Simrad SH90
Procedure
1 Operational frequency, horizontal
a Click the Horizontal tab to open the menu.
b On the Horizontal menu, click Frequency.
2
This parameter is used to control the transmitter and receiver operational
frequency.
c Click either side of the button to leaf through the options, or the middle of the
button to open the parameter dialog.
Operational frequency, vertical
a Click the Vertical tab to open the menu.
b On the Vertical menu, click Frequency.
c
This parameter is used to control the transmitter and receiver operational
frequency.
Click either side of the button to leaf through the options, or the middle of the
button to open the parameter dialog.
Saving the current user settings
Purpose
All the parameter settings you make can be saved for later use.
Procedure
1 Click the Setup tab to open the menu.
2 On the Setup menu, click User setting button to open the parameter dialog.
3
This function allows you to save the current user settings (including parameter
selections), and to retrieve previously saved factory or user settings.
Click the Save current setting button.
The current setting is saved with the default identification name.
Adjusting the Automatic Gain Control (AGC)
Purpose
The AGC (Automatic Gain Control) function adjusts the gain using an image processing
algorithm. This processing depends on the strength of the incoming echo signal.
The image is analyzed, and reverberation and echoes are identified. Based on the
analysis, weak echoes are amplified, while strong echoes are reduced. The result is a
“normalizing” effect that reduces noise and reverberation. The AGC is functional up to
36
372739/D
Getting started
the sonar’s maximum range. As show in the menu, the AGC has four different settings.
These settings define the difference between the maximum and minimum echo level for
the filter to take effect.
Note
When this parameter is changed on a horizontal menu, the chosen setting is only put
to use on the horizontal sonar presentation. If you change the parameter on a vertical
menu, it is only applied to the vertical sonar slice presentation.
Tip
The most practical way to use the AGC (Automatic Gain Control) is to first switch it
off. Adjust the echo presentation using the gain until you have the best possible result,
then activate the AGC.
The AGC works best with even background (homogenous noise conditions) and
pronounced targets. With uniform sonar conditions you may benefit from strong AGC
compensation. However, if you are looking at scattered fish, reduce the AGC, and try
to add gain instead.
If you work close to other vessels, the noise from their propellers may be misinterpreted
as echoes. This will also reduce the visibility of other echoes. Reduce the AGC. The
same applies if the bottom conditions place your vessel with decreasing depth on one
side of the vessel and your targets on the other side.
If you have very strong echoes from a large school located close to your vessel (typically
closer than 150 meters), we recommend that you reduce or switch off the AGC. This is
because the AGC filter misinterprets the school for noise.
Keep in mind that the filters in the SH90 are implemented in “series”. The gain
compensations are made before the AGC. For this reason, your gain setting will always
have an effect on the AGC.
Related topics
• What is AGC? on page 102
Procedure
1
Click either the Horizontal or Vertical tab to open the respective menu.
2
Observe the AGC button.
3
Click either side of the button to leaf through the options, or the middle of the button
to open the parameter dialog.
372739/D
37
Simrad SH90
Adjusting the Reverberation Controlled Gain (RCG)
Purpose
The Reverberation Controlled Gain (RCG) regulates the receiver gain individually for
each of the receiving beams.
The RCG filter will enhance the visibility of schools, and reduce the reverberation from
bottom and surface echoes.
Scattered fish can be perceived as reverberation. The RCG function must therefore be
used with care if scattered schools are to be detected.
Note
When this parameter is changed on a horizontal menu, the chosen setting is only put
to use on the horizontal sonar presentation. If you change the parameter on a vertical
menu, it is only applied to the vertical sonar slice presentation.
Tip
We recommend that the RCG is active all the time, but be careful in the vertical
presentation. The Reverberation Controlled Gain (RCG) works best on small schools.
Setting “1” is intended for schools. Setting “2” is made for schools with higher density.
Try “3” for schools close to bottom, as this setting will also reduce the bottom echoes.
If you are looking for scattered fish, use RCG setting “4” or “5”.
Settings “6” and “7” are also intended for schools, while ”8” and “9” can be used on
scattered fish. These settings use alternative algorithms.
Related topics
• What is RCG? on page 105
Procedure
1
Click either the Horizontal or Vertical tab to open the respective menu.
2
Observe the RCG button.
3
Click either side of the button to leaf through the options, or the middle of the button
to open the parameter dialog.
Adjusting the Time Variable Gain (TVG)
Purpose
This parameter allows you to choose the Time Variable Gain setting in the SH90. This
function will automatically adjust the gain in the SH90 to compensate for geometric
spreading and absorption.
38
372739/D
Getting started
Note
When this parameter is changed on a horizontal menu, the chosen setting is only put
to use on the horizontal sonar presentation. If you change the parameter on a vertical
menu, it is only applied to the vertical sonar slice presentation.
Tip
For scattered fish, we suggest that you use the 40 log R setting. For small schools, try
30 log R, for large schools, use 20 log R. If you use 20 log R the bottom will always be
presented with the same echo strength.
If you wish to examine weak echoes very close to your vessel, you may wish to use
10 log R or 5 log R, or turn off the TVG.
Keep in mind that the filters in the SH90 are implemented in “series”. The TVG
compensations are made before the AGC (Automatic Gain Control). For this reason,
your TVG setting will always have an effect on the AGC.
If you disable the TVG compensation, maximum gain will be used on all ranges.
Related topics
• What is TVG? on page 102
Procedure
1 Click either the Horizontal or Vertical tab to open the respective menu.
2 Observe the TVG button.
3
Click either side of the button to leaf through the options, or the middle of the button
to open the parameter dialog.
Typical parameter settings
The SH90 offers numerous parameter settings. Choosing the correct settings for each
individual type of fisheries and species can be a challenge. In the following, we suggest a
selection of typical parameter settings. We acknowledge that sea and weather conditions,
vessel independent properties and personal preferences play a vital part when you “tune”
your sonar for best performance. These settings have however proven to be efficient for
several individual users, and may also serve you as a “base” for your own adjustments.
Topics
• Setting the net on page 40
• Herring on page 40
• Pollock and saithe on page 40
• Blue whiting on page 41
372739/D
39
Simrad SH90
• Mackerel on page 41
• Scattered fish on page 41
Setting the net
Parameter
Horizontal beam
Presentation mode
Bow Up / 270 Vertical
Gain
17
17
Pulse form
FM Auto
FM Auto
Beam
Narrow
N/A
TVG
20 log R
20 log R
AGC
Medium
Weak
RCG
2
2
Noise Filter
Weak
N/A
PP Filter
Medium
Medium
Parameter
Horizontal beam
Vertical beam
Presentation mode
Bow Up / 270 Vertical
Gain
20
17
Pulse form
FM Auto
FM Auto
Beam
Narrow
N/A
TVG
20 log R
20 log R
AGC
Medium
Weak
RCG
2
2
Noise Filter
Medium
N/A
PP Filter
Medium
Medium
Parameter
Horizontal beam
Vertical beam
Presentation mode
Bow Up / 270 Vertical
Gain
37
26
Pulse form
FM Short
FM Short
Beam
Normal
N/A
TVG
10 log R
10 log R
AGC
Off
Medium
RCG
4
4
Vertical beam
Herring
Pollock and saithe
40
372739/D
Getting started
Parameter
Horizontal beam
Vertical beam
Noise Filter
Medium
N/A
PP Filter
Medium
Medium
Parameter
Horizontal beam
Vertical beam
Presentation mode
Bow Up / 180 Vertical
Gain
17
17
Pulse form
CW Long
FM Auto
Beam
Narrow
N/A
TVG
40 log R
20 log R
AGC
Strong
Weak
RCG
4
Strong
Noise Filter
Medium
N/A
PP Filter
Medium
Medium
Parameter
Horizontal beam
Vertical beam
Presentation mode
Bow Up / 180 Vertical
Gain
20
20
Pulse form
FM Auto
FM Auto
Beam
Narrow
N/A
TVG
20 log R
20 log R
AGC
Strong
Weak
RCG
4
4
Noise Filter
Weak
N/A
PP Filter
Weak
Weak
Parameter
Horizontal beam
Vertical beam
Presentation mode
Bow Up / 270 Vertical
Gain
20
20
Pulse form
FM Short
FM Short
Beam
Normal
N/A
TVG
20 log R
20 log R
AGC
Weak
Medium
Blue whiting
Mackerel
Scattered fish
372739/D
41
Simrad SH90
Parameter
Horizontal beam
Vertical beam
RCG
4
4
Noise Filter
Medium
N/A
PP Filter
Medium
Medium
Echo presentations
The information provided by the SH90 is presented in individual views. Basically,
three different views are used.
• Omni presentation (horizontal)
• Vertical slice presentation
• Catch data presentation
The size of each view can easily be adjusted.
Topics
• Investigating the omni presentation on page 42
• Investigating the vertical slice presentation on page 45
• Investigating the catch data presentation on page 47
Related topics
• Presentation modes on page 82
Investigating the omni presentation
Purpose
Observe this procedure to familiarize yourself with
the omni presentation provided by the SH90. The
presentation can be arranged in three different ways.
1
True mode, in which the picture is locked to
a geographical position, and the vessel moves
around the screen according to its present course
and speed.
2
Bow up, in which the vessel symbol is stationary on the screen with the bow
pointing upwards.
3
North up, in which the vessel symbol is stationary on the screen with true north
always up.
When the Omni beam is tilted, the total beam picture can be compared with folding an
umbrella, which means that all beams in 360 degrees around the vessel have the same
tilt angle.
In several presentation modes, the omni presentation is combined with a vertical slice,
and/or with a catch data presentation.
42
372739/D
Getting started
Procedure
1
Locate the Mode button on the top of each menu.
2
Click Mode to choose presentation mode Bow Up/Vertical.
3
Observe the omni presentation, and compare it with the example provided.
This screen capture has been taken from an SX90 sonar working on a Norwegian
fishing vessel somewhere in the North Sea. The Bow Up/Vertical mode is used, and
several distinctive schools can be seen.
A
The information in the top left corner shows the current range, gain and tilt
settings.
B
The information in the top right corner shows the location of the cursor. The
depth of the cursor is calculated based on the selected tilt and the distance
from your own vessel.
C
In this mode, the vessel is placed at the centre of the omni presentation with the
ship's head pointing straight up. The compass rose on the outer presentation
circle will move to reflect the heading, observe the N, E, S and W characters to
identify the compass bearings.
The echoes immediately under and around the vessel symbol are noise from the
water passing the hull.
372739/D
43
Simrad SH90
D
Not all fish schools are interesting for the skipper. The three schools identified
are obviously too small.
E
This is the school of fish that the skipper is interested in. He has placed a target
track on it (3P) indicating that this is target no 3, and that this is his priority
target. The audio channel (the white line) is automatically placed on this priority
target, this allows you see the same school in the vertical slice presentation.
F
The line after the target shows the movement history of the target (school of
fish). The vertical line pointing up from the target track symbol indicates the
target's calculated course (direction) and speed (length).
G
The information in the bottom left corner provides the target's bearing and
distance (relative to the ship) and its speed. If you click on the target symbol,
the information will also appear in the parameter dialog under the menu.
H
The triangle identified as “17” is a standard marker.
I
The information in the bottom right corner provides the course, depth and
speed of the latest marker relative to the previous marker. Marker 17 is shown
here, and the current information is then relative to the position of marker 16.
This information is provided when you first establish the latest marker. It will
thus remain unchanged even if you move marker 17 manually.
J
The white line shown after the ship symbol indicates the previous movements
of your vessel.
Related topics
• Visual aids and cosmetics on page 49
• Markers and symbols procedures on page 66
44
372739/D
Getting started
Investigating the vertical slice presentation
Purpose
Observe this procedure to familiarize yourself with the
vertical slice presentation provided by the SH90.
In addition to seeing the target from above, it is also
possible to see the target from the side, by using the
vertical slice presentation. In this case the beam covers
a continuous vertical beam from 0 to -60 degrees in
one transmission.
This vertical slice, which is presented by the white bearing line (also referred to as the
“audio line”) in the horizontal picture, can be selected to any bearing by the manual
training control.
In addition to the Omni picture, the vertical slice is especially useful for visualizing the
vertical distribution of a school of fish. In that way, it is not necessary to go over the
target to see the distribution on the echo sounder, which often results in a spreading
of the school.
Important
Note that this view is by default located on the right hand side of the
SH90 presentation, and often hidden behind the menu. In order to see
the view, press the Menu button on the Operating panel, or click the
Full Screen:On button on the Display menu.
Menu
Procedure
1
Locate the Mode button on the top of each menu.
2
Click Mode to choose presentation mode Bow Up/Vertical.
3
Observe the vertical slice presentation, and compare it with the example provided.
372739/D
45
Simrad SH90
This is the same screen capture one more time, but this time with focus on the
vertical view in the bottom right corner. Note that the vertical view is made along
the white audio line in the omni presentation.
A
This information at the bottom left corner of the vertical views provides the
tilt, distance and depth of the cursor.
The information is only valid when the cursor is located within the view. Once
you move it outside, any spurious values may be displayed.
B
This is the same target as shown in the omni presentation. In the vertical view,
however, you see it sideways, like on an echo sounder. Note the appearance
of the bottom below the main school. The bottom can not be seen in the omni
presentation due to the reverberation filtering.
C
This is the school of fish that the skipper is interested in. He has placed a target
track on it (3P) indicating that this is target no 3, and that this is his priority
target. The same information is provided by the omni presentation.
D
This line indicates the current tilt. This is the same information as in the top
left corner of the omni presentation.
E
These are the depth lines in the vertical presentation. They are used to indicate
how deep the various targets are located. The units can be changed in the Units
parameter dialog.
Related topics
• Hiding (and retrieving) the menu on page 59
46
372739/D
Getting started
Investigating the catch data presentation
Purpose
The combination of the Omni mode and the vertical
slice will give an optimal visualization of the catch
situation. Observe this procedure to familiarize yourself
with the catch data presentation provided by the SH90.
The Catch Data view is only available in the following
presentation modes:
• Bow up/Vertical
• True motion/Vertical
• 270°/Vertical
The purpose of this view is to offer information related to the catch phase.
There are two catch data presentation modes, depending on the gear you have chosen in
the Gear dialog on the Setup menu. The screen capture shown here reflects a purse seine.
Important
Note that this view is by default located on the right hand side of the
SH90 presentation, and often hidden behind the menu. In order to see
the view, press the Menu button on the Operating panel, or click the
Full Screen:On button on the Display menu.
Menu
Note
In order to see the echo in the Catch Data view, you must start a target track on the
chosen target (school).
Procedure
1
Locate the Mode button on the top of each menu.
2
Click Mode to choose presentation mode Bow Up/Vertical.
3
Choose any echo on the sonar presentation, place the cursor on top of the echo, and
press the Target Track button on the Operating Panel to start a target track.
4
Observe the catch data presentation, and compare it with the example provided.
372739/D
47
Simrad SH90
This is the same screen capture one more time, but this time with focus on the catch
data presentation in the top right corner.
A This information at the bottom left corner of the catch data presentation
provides data related to the target. You can read its depth, position, movements,
area and the estimated volume of fish.
The quantity of fish depends on the parameters you have entered in the School
dialog on the Setup menu.
B This Net state button is only available if you use a purse seine. It initiates the
catch sequence, in which the SH90 can be used in a “tactical mode”. In this
mode, the purse seine is indicated as a yellow circle on the omni presentation.
If you use a trawl, this button is replaced with a temperature read-out. This
information however assumes that you have the applicable sensors connected
to the SH90.
C This line of yellow X'es indicate the height of the purse seine. This is the depth
you have defined in the Gear dialog on the Setup menu. It is thus a fixed value,
and it is not visible when you use a trawl.
D The vertical axis of the catch data coordinate system specifies the depth.
The range is defined in the CatchView menu. By default, the depth range is
automatic, but you can override this in the Range parameter dialog.
To open the CatchView menu, press the View button on the Operating Panel, or
the middle mouse button, when the cursor is located in the Catch data view.
Then, click View Menu in the View pop-up menu.
48
372739/D
Getting started
E
The information provided at the top of the view depends if you use a trawl
or a purse seine.
With a purse seine (as shown in the screen capture), the horizontal line at the
top of the presentation does not by itself offer any information. However, the
digits shown above it are important.
• The left digits are a timer. It will measure the time elapsed since you “shot”
the purse seine. The timer starts when you click the Net state button to
change its status from Ready to Shot.
• The middle digits measures the length of the purse seine that you have
released. As the length increases, a yellow bar provides a visual presentation.
The current depth of the footrope is also shown with in yellow.
• The right digits reflect the total length of the purse seine. This is the length
you have defined in the Gear dialog on the Setup menu. It is thus a fixed
value.
With a trawl, the horizontal line is used as a reflect the course of the trawl. If
you have an ITI system connected to the SH90, a trawl symbol will be shown
to indicate the position of the trawl opening relative to the target. You can then
easily manoeuvre your vessel to obtain the best possible catch.
F
This is the echo from your target. It is shown as in a vertical slice, which
means that it vertical position in the view reflects its actual depth. The echo
appears smaller than in the vertical slice presentation because the beam width is
only 11 degrees.
G
This information shows the course and speed of your own vessel.
Related topics
• Hiding (and retrieving) the menu on page 59
• Enabling target track on page 76
Visual aids and cosmetics
The sonar display contains not only the sonar picture and the menu system, but also other
information that is useful for efficient operation.
Topics
• Investigating the common information on the display on page 50
• Moving the boundary lines on page 50
• Adjusting the variable range marker on page 51
• Moving the bearing (audio) line on page 51
• Modifying the amount of visual aids (cosmetics) on the presentation on page 53
– Cosmetics: Bearing Card, Wind Marker and Distance Rings on page 54
– Cosmetics: Variable Range Marker, Compass Card and Vertical Ring on page 55
– Cosmetics: Depth Dividers, Minute Markers and Bow Marker on page 56
372739/D
49
Simrad SH90
Investigating the common information on the display
Purpose
Observe this procedure to familiarize yourself with the common information provided at
the top of the SH90 presentation.
Procedure
1
Locate the Mode button on the top of each menu.
2
Click Mode to choose presentation mode True Motion.
3
Observe the information provided on the top of the presentation.
In nearly all presentation modes, the following information is provided.
B
A
E
D
C
F
(CD015013A)
A
Current horizontal gain.
B
Current horizontal range.
C
The cursor's current geographical position (provided that the necessary sensor
is connected to the sonar).
D
The cursor's current bearing relative to the vessel or true north.
E
Current tilt.
F
Current range and depth of the cursor position.
Moving the boundary lines
Purpose
In most presentation modes with multiple views, the size of each view can easily be
modified by moving the boundary line between the views. Observe the following
procedure.
Procedure
1
50
Place the cursor on the boundary line. Observe that it changes its shape to a double
arrow (↔).
372739/D
Getting started
2
Press and hold the Select button on the Operating Panel (or the left mouse button)
3
Move the cursor with the Select button depressed. Observe that the
boundary line is moved.
Release the Select button.
Observe that the boundary line has been relocated to the new
cursor position.
4
5
Select
Adjusting the variable range marker
Purpose
The Variable Range Marker (VRM) consists of an adjustable range ring with range
read-out. It can be used for any type of distance marking relative to the vessel.
Procedure
1 Click the Display tab to open the menu.
2 Click the Cosmetics button to open the Cosmetics menu.
3
4
5
6
7
This menu allows you to control the amount of support information on the SH90
presentation.
Click the VRM button to activate the variable range marker.
A red dotted circle is shown on the sonar presentation. The range from the center
(vessel) is indicated in the lower right quadrant of the circle.
Place the cursor anywhere on the dotted line.
Press and hold the Select button on the Operating Panel (or the left mouse button)
Move the cursor to increase or decrease the diameter of the circle.
Release the Select button to lock the variable range marker to its
new size.
Select
Moving the bearing (audio) line
Purpose
The bearing line is shown as a while line starting at the center of the omni presentation
(vessel) and stretching out to the outer circle. The bearing line serves several important
purposes.
• It shows you the bearing to a selected target
• When you a using a presentation mode with a vertical slice, the bearing line defines
the direction of the vertical view.
Tip
The white Bearing line is also frequently referred to as the “Audio line”.
372739/D
51
Simrad SH90
Procedure
1
Basic procedure
a
Observe the Train field on the Operating Panel.
It provides two separate buttons to move the
bearing line.
b
2
3
Press either of the two buttons to change the
direction of the bearing line.
Alternative method 1
a
Place the cursor anywhere on the bearing line.
b
Press and hold the Select button on the Operating Panel (or the left mouse
button)
c
Move the cursor to change the direction of the bearing line.
d
Release the Select button to lock the bearing line to its new
direction.
Select
Alternative method 2
a
Click the Horizontal tab to open the menu.
b
On the Horizontal menu, click Bearing.
This parameter is – when opened from the Horizontal menu – used to control
the bearing of the horizontal sonar beam.
c
52
Click either side of the button to leaf through the options, or the middle of the
button to open the parameter dialog.
372739/D
Getting started
Modifying the amount of visual aids (cosmetics) on the
presentation
Purpose
The choices in the Cosmetics menu allows you to enable
or disable a range of visual aids in the sonar picture.
Procedure
1
Click the Display tab to open the menu.
2
Click the Cosmetics button to open the Cosmetics
menu.
This menu allows you to control the amount of
support information on the SH90 presentation.
3
Observe a range of parameters available to provide
you with additional information on the sonar
picture.
372739/D
53
Simrad SH90
Cosmetics: Bearing Card, Wind Marker and Distance Rings
Bearing Card
The Bearing Card (A)
shows the current bearing
relative to the vessel.
The markers are shown
as short white lines for
every 10th degree along
the outer circle of the
sonar view.
Wind Marker
B
400
300
200
100
C
The Wind Marker (B)
is shown as an arrow
drawn from the Compass
card pointing towards the
centre of the display. If a
wind sensor is connected
to the sonar, it will
A
automatically show the
current wind direction.
Otherwise, the wind
Bearing Card (A), Wind Marker (B) and Distance Rings (C)
direction may be entered
manually. The arrow has
a fixed length, it is not scaled according to the current wind speed.
(CD015013B)
Distance Rings
The Distance Rings (C) are shown as dotted rings, each with a range read-out on the left
hand side of the display centre.
54
372739/D
Getting started
Cosmetics: Variable Range Marker, Compass Card and Vertical Ring
Variable Range
Marker (VRM)
The Variable Range
Marker (VRM) (D)
consists of an adjustable
range ring with range
read-out. It can be used
for any type of distance
marking relative to the
vessel. To adjust the
marker, locate the cursor
on the marker ring,
press the Select on the
Operating Panel, and
move the cursor with the
Select button depressed.
When the button is
released, the variable
range marker radius will
be locked to the new
position.
Compass Card
Variable Range Marker (D), Compass Card (E) and
Vertical Ring (F)
The Compass Card (E)
is shown as short yellow lines for every 10th degree along the outermost circle of the
sonar view. A triangle symbol indicates each 90th degree. It has labels indicating North,
East, South and West. It is updated when the heading of own ship has changed more
than 1 degree.
Vertical Ring
The Vertical Ring (F) shows the selected range of the vertical slice as a full circle in
the horizontal presentation. This is an indication of which distance a target should be
presented in the vertical view. The Vertical Ring will only be visible in those modes that
support a vertical slice.
372739/D
55
Simrad SH90
Cosmetics: Depth Dividers, Minute Markers and Bow Marker
Depth Dividers
The Depth Dividers (G)
are horizontal dotted
lines used to visualize the
depth steps in the vertical
slices.
Minute Marker
The Minute Markers
(H) are shown as small
circles on the track
history of the ship.
Bow Marker
The Bow Marker (I) is
heading marker. It is a
dotted line drawn from
the bow of your own ship.
Depth Dividers (G), Minute Markers (H) and Bow Marker
(I)
Online help
Purpose
The Simrad SH90 sonar is equipped with a comprehensive
context sensitive online help system. Help is provided in two
levels;
• On-line and
• Free
The help system is available from all the parameter dialogs
and menus by clicking the Help button.
Important
The online help is only available in English.
Procedure
1 Click the Horizontal tab to open the menu.
56
372739/D
Getting started
2
Click the middle of the Range button to open the parameter dialog.
3
In the parameter dialog, click the Help button.
Once pressed, the first help text will appear in the bottom of the menu. This is
the On-line text. It is short, context sensitive, and designed not to interrupt the
operation of the sonar.
4
In the help dialog, click the Free button.
This will open the complete interactive manual. It contains the same information as
the printed SH90 Reference Manual, but the information is made available using the
menu on the left hand side and interactive links throughout the document.
5
Click Free in the bottom left corner to return to the small on-line parameter dialog.
Important
If you click Close button to close the large interactive manual window (Free), this
view will automatically reappear the next time you click a Help button.
6
In the help dialog, click the Close button.
372739/D
57
Simrad SH90
Operational procedures
This chapter contains several operational procedures explaining how you can put your
Simrad SH90 to use.
Are there any procedures missing? Are you performing an operation that we have not
explained? Write an e-mail to [email protected] and let us know. We may
then include the procedure in the next version of this manual.
Topics
• Menu procedures on page 59
• Gain and filter adjustment procedures on page 60
• Mode procedures on page 65
• Markers and symbols procedures on page 66
• Storage procedures on page 69
• Automatic search and tracking procedures on page 74
• User setting procedures on page 77
58
372739/D
Operational procedures
Menu procedures
This section provides general procedures for menu handling.
Topics
• Hiding (and retrieving) the menu on page 59
• Simplifying the menu system with fewer buttons on page 59
Hiding (and retrieving) the menu
The menu is normally located on the right hand side of the display presentation, but if
you don't need it, you can easily remove it.
1
Basic procedure
a
Press the Menu button on the Operating Panel.
The Menu button acts as a toggle switch. Press once to remove
the menu, and one more time to retrieve it.
2
3
Menu
Alternative method
a
Click the Display tab on the sonar menu.
b
Click the Full screen: OFF button.
How to recall the menu
a
Move the cursor to the far left or far right
side of the display
b
Observe that the menu system appears. It can
be shown on either side, and will not have any effect on the sonar presentation.
c
Open the Display menu, and click Full screen: ON.
Simplifying the menu system with fewer buttons
This procedure explains how you can easily reduce the number of buttons on the sonar
menus. This can be useful if you never use them.
1
Click the Display tab to open the Display menu.
2
Click the Menu button.
3
In the parameter dialog, select the menu level
you wish to use.
4
Click Close to exit.
372739/D
59
Simrad SH90
Gain and filter adjustment procedures
This section explains how to control the manual and automatic gain settings on the
SH90 sonar.
Topics
• Adjusting the vertical and horizontal gain on page 60
• Adjusting the Automatic Gain Control (AGC) on page 61
• Adjusting the Reverberation Controlled Gain (RCG) on page 62
• Adjusting the Time Variable Gain (TVG) on page 63
• Adjusting the display gain on page 64
Adjusting the vertical and horizontal gain
Purpose
The range of your SH90 sonar can be set individually for the horizontal and vertical
presentations.
• The gain applied to the horizontal presentation modes can be changed using the
Operating Panel or the Gain button on the Horizontal menu.
• The gain applied to the vertical presentation modes can be changed using the
Operating Panel or the Gain button on the Vertical menu.
Note
When this parameter is changed on a horizontal menu, the chosen setting is only put
to use on the horizontal sonar presentation. If you change the parameter on a vertical
menu, it is only applied to the vertical sonar slice presentation.
Procedure
1
Basic procedure
a
Observe the Gain field on the Operating Panel.
It provides separate gain
controls for the horizontal and
vertical sonar presentations.
60
Gain
V-
Gain
V+
Gain
H-
Gain
H+
b
Press the Gain H- and Gain H+
buttons to decrease or increase the horizontal gain.
c
Press the Gain V- and Gain V+ buttons to decrease or increase the vertical gain.
372739/D
Operational procedures
2
Alternative method: Horizontal gain
a
Click the Horizontal tab to open the menu.
b
On the Horizontal menu, click Gain.
This parameter is used to control the receiver gain, that is how much
amplification that is used on the received echoes.
c
3
Click either side of the button to leaf through the options, or the middle of the
button to open the parameter dialog.
Alternative method: Vertical gain
a
Click the Vertical tab to open the menu.
b
On the Vertical menu, click Gain.
This parameter is used to control the receiver gain, that is how much
amplification that is used on the received echoes.
c
Click either side of the button to leaf through the options, or the middle of the
button to open the parameter dialog.
Adjusting the Automatic Gain Control (AGC)
Purpose
The AGC (Automatic Gain Control) function adjusts the gain using an image processing
algorithm. This processing depends on the strength of the incoming echo signal.
The image is analyzed, and reverberation and echoes are identified. Based on the
analysis, weak echoes are amplified, while strong echoes are reduced. The result is a
“normalizing” effect that reduces noise and reverberation. The AGC is functional up to
the sonar’s maximum range. As show in the menu, the AGC has four different settings.
These settings define the difference between the maximum and minimum echo level for
the filter to take effect.
Note
When this parameter is changed on a horizontal menu, the chosen setting is only put
to use on the horizontal sonar presentation. If you change the parameter on a vertical
menu, it is only applied to the vertical sonar slice presentation.
372739/D
61
Simrad SH90
Tip
The most practical way to use the AGC (Automatic Gain Control) is to first switch it
off. Adjust the echo presentation using the gain until you have the best possible result,
then activate the AGC.
The AGC works best with even background (homogenous noise conditions) and
pronounced targets. With uniform sonar conditions you may benefit from strong AGC
compensation. However, if you are looking at scattered fish, reduce the AGC, and try
to add gain instead.
If you work close to other vessels, the noise from their propellers may be misinterpreted
as echoes. This will also reduce the visibility of other echoes. Reduce the AGC. The
same applies if the bottom conditions place your vessel with decreasing depth on one
side of the vessel and your targets on the other side.
If you have very strong echoes from a large school located close to your vessel (typically
closer than 150 meters), we recommend that you reduce or switch off the AGC. This is
because the AGC filter misinterprets the school for noise.
Keep in mind that the filters in the SH90 are implemented in “series”. The gain
compensations are made before the AGC. For this reason, your gain setting will always
have an effect on the AGC.
Related topics
• What is AGC? on page 102
Procedure
1
Click either the Horizontal or Vertical tab to open the respective menu.
2
Observe the AGC button.
3
Click either side of the button to leaf through the options, or the middle of the button
to open the parameter dialog.
Adjusting the Reverberation Controlled Gain (RCG)
Purpose
The Reverberation Controlled Gain (RCG) regulates the receiver gain individually for
each of the receiving beams.
The RCG filter will enhance the visibility of schools, and reduce the reverberation from
bottom and surface echoes.
Scattered fish can be perceived as reverberation. The RCG function must therefore be
used with care if scattered schools are to be detected.
62
372739/D
Operational procedures
Note
When this parameter is changed on a horizontal menu, the chosen setting is only put
to use on the horizontal sonar presentation. If you change the parameter on a vertical
menu, it is only applied to the vertical sonar slice presentation.
Tip
We recommend that the RCG is active all the time, but be careful in the vertical
presentation. The Reverberation Controlled Gain (RCG) works best on small schools.
Setting “1” is intended for schools. Setting “2” is made for schools with higher density.
Try “3” for schools close to bottom, as this setting will also reduce the bottom echoes.
If you are looking for scattered fish, use RCG setting “4” or “5”.
Settings “6” and “7” are also intended for schools, while ”8” and “9” can be used on
scattered fish. These settings use alternative algorithms.
Related topics
• What is RCG? on page 105
Procedure
1
Click either the Horizontal or Vertical tab to open the respective menu.
2
Observe the RCG button.
3
Click either side of the button to leaf through the options, or the middle of the button
to open the parameter dialog.
Adjusting the Time Variable Gain (TVG)
Purpose
This parameter allows you to choose the Time Variable Gain setting in the SH90. This
function will automatically adjust the gain in the SH90 to compensate for geometric
spreading and absorption.
Note
When this parameter is changed on a horizontal menu, the chosen setting is only put
to use on the horizontal sonar presentation. If you change the parameter on a vertical
menu, it is only applied to the vertical sonar slice presentation.
372739/D
63
Simrad SH90
Tip
For scattered fish, we suggest that you use the 40 log R setting. For small schools, try
30 log R, for large schools, use 20 log R. If you use 20 log R the bottom will always be
presented with the same echo strength.
If you wish to examine weak echoes very close to your vessel, you may wish to use
10 log R or 5 log R, or turn off the TVG.
Keep in mind that the filters in the SH90 are implemented in “series”. The TVG
compensations are made before the AGC (Automatic Gain Control). For this reason,
your TVG setting will always have an effect on the AGC.
If you disable the TVG compensation, maximum gain will be used on all ranges.
Related topics
• What is TVG? on page 102
Procedure
1
Click either the Horizontal or Vertical tab to open the respective menu.
2
Observe the TVG button.
3
Click either side of the button to leaf through the options, or the middle of the button
to open the parameter dialog.
Adjusting the display gain
Purpose
This function controls the “amount” of echo that are displayed – the strength of the
echo presentation on the display. Use this control together with Gain to control the
SH90 sensitivity.
Tip
Adjust the display gain so that you can se the target without too much noise and
reverberation on the screen. This is a matter of individual preference.
Procedure
1
Click the Display tab to open the menu.
2
Observe the Display Gain button.
3
Click either side of the button to leaf through the options, or the middle of the button
to open the parameter dialog.
64
372739/D
Operational procedures
Mode procedures
This section explains how to choose presentation modes, and how to set up the Mode
buttons on the SH90 Operating Panel.
Topics
• Select presentation mode on page 65
• Defining the function of the Mode buttons on the Operating Panel on page 65
• Sorting the presentation modes on page 66
Related topics
• Presentation modes on page 82
Select presentation mode
Your SH90 sonar is equipped with several presentation modes. Observe these procedures
to choose the mode best fit for your current operations.
1
Basic procedure
a
Locate the Mode field on your Operating Panel
b
Press one of the four buttons to choose mode.
Note
Using this method, you can only choose between four modes. Which modes to
choose from are defined by sorting the modes.
2
Alternative method
a
Locate the Mode button on the top of each menu.
b
Click the Mode button to choose presentation mode.
Click the left or right side of the Mode button to choose mode, or the middle of
the button to open the parameter dialog.
Defining the function of the Mode buttons on the Operating
Panel
The Mode buttons on your SH90 Operating Panel can either be used to select presentation
mode, or user settings. You can switch between these options.
1
Click the Display tab to open the Display menu.
2
Click the Mode Buttons: button to select Mode or User.
372739/D
65
Simrad SH90
Sorting the presentation modes
Your SH90 sonar provides you with a selection of presentation modes. This list of modes
can be sorted to suit your preferences. The top four modes on your list can be chosen by
pressing the four Mode buttons on the Operating Panel.
1
Click the Setup tab to open the Setup menu.
2
Click the Sort Modes button to open the Sort Modes menu.
The Sort Modes menu lists all the available modes in their current order.
3
Click one of the presentation modes.
Observe that the Move down and/or Move up buttons at the bottom of the menu
are activated.
4
Click the Move down or Move up button to move the chosen presentation mode
down or up the list.
5
When the list has been arranged in the order you wish to keep, click Apply.
The current order is saved automatically.
6
Click Close to exit.
Markers and symbols procedures
This section explains how to add, investigate and delete symbols and markers on the
SH90 sonar presentation.
Topics
• Adding 'Target' and 'Circle' markers to the sonar presentation on page 66
• Adding an 'Own ship' symbol to the sonar presentation on page 67
• Adding a 'Gear' symbol to the sonar presentation on page 67
• Investigating marker and symbol information on page 68
• Deleting a marker or symbol from the sonar presentation on page 69
Adding 'Target' and 'Circle' markers to the sonar presentation
1
Move the cursor on the sonar picture, and position it wherever you wish to place
the marker.
2
Press the requested marker button in the Symbol field on the Operating Panel to
place the marker.
About Target markers
This button places a Target marker at the cursor location.
66
372739/D
Operational procedures
A triangular symbol with a corresponding number will appear on the
screen over the target, while position data for the defined marker is
displayed in the Objects menu.
• The system continues to track the markers even when outside the
sonar range.
• The Target marker button can also be used for manual target tracking as the system
is designed to calculate the speed, course and distance between the last two chosen
targets.
• These target marker data are displayed in white figures for 15 minutes in the lower
right hand corner of the horizontal presentation.
• This function is also an effective method for determining the distance between two
selected points on the screen.
About Circle markers
This button places a Circle marker at the cursor location.
A circular symbol will appear on the screen at the chosen location.
The size of the symbol is equal to that of the purse seine selected. This
marker may be used to estimate the size of a school of fish or as an
indication of the size of the purse seine.
Adding an 'Own ship' symbol to the sonar presentation
1
Press the Own ship button in the Symbol field on the Operating Panel.
The square Own ship symbol is placed on the screen at the vessel’s
current location.
Adding a 'Gear' symbol to the sonar presentation
1
Press the Gear button in the Symbol field on the Operating Panel.
The gear symbol will either be a purse seine circle or a trawl symbol
depending on the parameter chosen by the Gear button in the Setup
menu. The selected gear symbol will be displayed in yellow.
How to use the seine circle
1 Press the Gear button on the Operating Panel.
2
3
The purse seine circle will appear on the forward end of the ship symbol on the
corresponding side of the vessel selected in the Setup menu. The circle will follow
the vessel’s movements.
At the moment the seine is shot, press the Gear button again.
The purse seine circle will remain stationary and indicate the ideal path for setting
the seine. Three square symbols on the ship’s course line indicate the: shooting,
one half, and the end of the seine positions. Three different nets can be defined
if you click Gear on the Setup menu.
Press the Gear button to delete the purse seine circle.
372739/D
67
Simrad SH90
How to use the trawl symbol
This is a useful aid in providing an overview of the trawl operation. Trawl data can be
set manually using the menu or automatically by interfacing a Simrad FS trawl sonar or
Simrad ITI trawl monitoring system with the sonar.
In the manual mode the trawl symbol will be displayed with the selected size, depth and
distance. When the FS70, FS900 or FS3000 trawl sonar is connected, the trawl symbol
will automatically be displayed with the correct depth in the vertical modes. When
the ITI trawl system is connected, the trawl symbol will be displayed with the correct
distance, bearing and depth. If required, the trawl opening, ambient water temperature,
and trawl-filling indicator may also be displayed. This is assumed that the proper sensors
are connected to the ITI system.
How to define and change the gear properties
The gear properties are changed by means of the Gear button on the Setup menu.
1
2
3
4
5
Click the middle of the Gear button to open the parameter dialog.
Click once on the gear you wish to use.
Click the Edit button at the bottom of the Gear parameter dialog.
For each of the gear parameters available, select the requested value.
Click Close when all the parameters have been defined.
Investigating marker and symbol information
1
2
68
Click the Objects tab to open the menu.
Observe that all the current objects (markers and symbols) are listed.
• The Objects menu is shown in all presentation modes, and displays the range (R),
bearing (B) and depth (D) to all selected objects.
• The identification (ID) abbreviations for the different objects are:
– AT: Automatic target track marker
– Ci: Circle marker
– M: Target marker
– OS: Own Ship marker
– PT: Position track marker
– F: Radio buoy marker
• The number behind the ID abbreviation refers to the same number on the object
in the sonar presentation. The “P” after the Automatic target track marker
indicates the priority level where the audio channel is locked to the target.
• When you select a Target marker, Automatic target track markeror a Radio
buoy marker in the list, a dotted bearing line from the vessel to the marker will
be shown.
372739/D
Operational procedures
3
4
To retrieve the information about an object, click the object abbreviation in the list.
Observe that a dedicated parameter dialog with all known object information
appears at the bottom of the menu.
Deleting a marker or symbol from the sonar presentation
1
2
3
Click the Objects tab to open the menu.
Click on the object that you wish to delete.
Click the Delete button at the bottom of the list.
Alternative method
1 Place the cursor on the object.
2 Press the Object button on the Operating Panel (or the right mouse button)
3 Click Delete on the menu.
Storage procedures
This section explains how to store and recall sonar images on the SH90.
Topics
• Storing sonar images on the computer hard disk on page 69
• Recalling sonar images to view them on page 70
• Keeping sonar images from being deleted when the sonar is switched off on page 71
• Deleting sonar images that are no longer required on page 72
• Renaming the sonar images that you wish to keep on page 72
• Printing sonar images on page 72
• Burning sonar images on a blank CD or DVD on page 73
• Copying sonar images to a USB memory device on page 73
Storing sonar images on the computer hard disk
Note that the Record button on the Operating Panel can be pressed at any time to start
recording. It is not necessary to open the Store/Recall menu first. When this button is
used, the currently selected recording mode will be used.
Prepare the recording parameters
1 Click the Setup tab to open the menu.
2 Click the Store/Recall button to open the Store/Recall menu.
3
Click the Store mode button to choose recording mode.
372739/D
69
Simrad SH90
Click the left side of the Store mode button to scroll down the list of options. Click
the middle of the button to open the parameter dialogue for direct access to the
requested setting, or click the right side of the button to scroll up the list of options.
4
Record the images.
5
Click the Close button to close the Store/Recall menu.
Once the recording has been activated, the sonar will save sonar images as defined
by the Store mode setting. Each image is added to the list of temporary files located
below the buttons. Each file name reflects the date and time.
Record a single image
1
To record a single image:
A
Click the Store button.
or
B
2
Press the Record button on the Operating Panel.
Observe that the message field below the menu displays the image file name on a
green background.
Record multiple images
1
To start recording:
A
Click the Store button.
or
B
Press the Record button on the Operating Panel.
2
Observe that the message field below the menu displays the image file names on a
green background.
3
To stop recording:
A
Click the Store button.
or
B
Press the Record button on the Operating Panel.
Recalling sonar images to view them
Observe the following procedure to recall sonar images.
Preparations
1
Click the Setup tab to open the menu.
2
Click the Store/Recall button to open the Store/Recall menu.
70
372739/D
Operational procedures
3
Observe the list of images in the Store/Recall menu.
To recall a single image
1 Click the Recall mode button, and select Single shot.
2
3
4
Click one of the images to select it.
Click the Recall button to view the image.
The chosen image will be displayed. The phrase “RECALL” is used to indicate that
a recalled image has replaced the sonar image.
Click the Object button on the Operating Panel to restore normal operation.
To recall several images
1 Click the Recall mode button, and select how long time you wish to see each image.
2
3
To select a number of images files, click the top file, then hold the Select button
on the Operating Panel depressed while you move the cursor down to select the
other files in the field.
Click the Recall button to view the images.
• The chosen images will be displayed, one by one. The phrase “RECALL” is used
to indicate that a recalled image has replaced the sonar image.
• When all images has been displayed, the sonar will automatically resume normal
operation.
Keeping sonar images from being deleted when the sonar is
switched off
When you store new sonar images, they will by default be added to the list of Temporary
files. This list will contain maximum 100 images, and when this limit has been reached,
the oldest files will be automatically removed.
1 Click the Setup tab to open the menu.
2 Click the Store/Recall button to open the Store/Recall menu.
3 Observe the list of images in the Store/Recall menu. There are two lists, one for
temporary files, and one for permanent.
4 Click one of the images in the Temporary files field to select it.
5 Click the arrow on the top of the Permanent files field to move the selected image
down.
The Permanent files list does not limit the number of files it can contain. This is however
limited by the storage capacity of the hard disk in the Processor Unit.
372739/D
71
Simrad SH90
Deleting sonar images that are no longer required
1
2
3
4
5
Click the Setup tab to open the menu.
Click the Store/Recall button to open the Store/Recall menu.
Observe the list of images in the Store/Recall menu.
Click one of the images to select it.
Click the Delete button at the bottom of the file fields to delete the selected image.
Renaming the sonar images that you wish to keep
1
2
3
4
5
6
7
8
Click the Setup tab to open the menu.
Click the Store/Recall button to open the Store/Recall menu.
Observe the list of images in the Store/Recall menu.
Click one of the images in the Permanent files field to select it.
Click the Rename button below the files to rename the selected image.
• Observe that a parameter dialogue opens to present the current file name.
• Observe that an on-screen keyboard opens to allow you to enter characters.
Place the cursor at the beginning of the current file name, and click the Del (Delete)
button on the on-line keyboard to remove the characters in the current file name.
• Make sure that you do not delete the file name extension .bmp.
Click the necessary characters on the on-line keyboard to build a new file name.
Click the Close button in the parameter dialogue when you have completed the
new file name.
Figure 1
On-screen keyboard
You are also permitted to change the file name on images in the Temporary files field.
However, if you wish to transfer the chosen image to the Permanent files field afterwards,
you will find that the new file name is changed by the transfer process.
Printing sonar images
1
2
72
Click the Setup tab to open the menu.
Click the Store/Recall button to open the Store/Recall menu.
372739/D
Operational procedures
3
Observe the list of images in the Store/Recall menu.
4
Click one of the images to select it.
5
Click the Print button below the files to print the selected image.
The image will be sent to the default printer connected to the Processor Unit. You are not
allowed to control the output size and format.
Burning sonar images on a blank CD or DVD
The SH90 Processor Unit is provided with a CD player capable of burning blank CDs.
Observe the following procedure to burn selected sonar images on a blank CD. Do not
attempt this while the sonar is in use searching for fish!
Note
This procedure assumes that you have basic knowledge of file management in Windows.
To access the operating system functions, you can click any Help button. When the help
window opens, you can also access the Taskbar with the Start button.
1
Insert a blank recordable CD in the Processor Unit.
2
Observe that the operating system's auto-start function opens a dialogue requesting
guidance.
3
Select Open writable CD folder using Windows Explorer, and click OK.
4
Observe that a Windows Explorer window opens.
5
By means of normal Windows functions, navigate to the folder
d:/winson/screendumps.
6
Double-click to open sub-folder Permanent or Temporary.
7
Click to select the images you wish to burn on the CD, and copy them to the CD's
Windows Explorer window.
8
Click Write these files to CD in the Windows Explorer window, and wait until the
process has finished.
9
Remove the CD, and close the Windows Explorer window.
Copying sonar images to a USB memory device
The SH90 Processor Unit is provided with several USB interface ports. These are located
on the rear side of the cabinet, and on some models below the CD player under the front
cover. Observe the following procedure to copy selected sonar images over to a USB
memory stick. Do not attempt this while the sonar is in use searching for fish!
Note
This procedure assumes that you have basic knowledge of file management in Windows.
1
Insert a USB memory stick into the Processor Unit.
372739/D
73
Simrad SH90
2
Observe that the operating system's auto-start function opens a dialogue requesting
guidance.
3
Select Open Windows Explorer, and click OK.
4
Observe that a Windows Explorer window opens.
5
By means of normal Windows functions, navigate to the folder
d:/winson/screendumps.
6
Double-click to open sub-folder Permanent or Temporary.
7
Click to select the images you wish to copy to the USB memory stick, and copy
them to the USB's Windows Explorer window.
8
Remove the USB memory stick, and close the Windows Explorer window.
To access the operating system functions, you can click any Help button. When the help
window opens, you can also access the Taskbar with the Start button.
Automatic search and tracking procedures
The SH90 sonar provides you with two automatic search programs, horizontal and
vertical. Both are initiated from the Operating Unit
Topics
• Starting the horizontal search program on page 74
• Starting the vertical search program on page 75
• Enabling position track on page 75
• Enabling target track on page 76
• Adding a target tracking line on page 76
Starting the horizontal search program
Observe the following procedure to run the automatic search program.
TRAIN
Position
Track
Manual
Target
Track
Auto
Search
(CD015022-008)
Procedure
1
74
Press the Auto search button in the Train field on the Operating Panel to start the
horizontal search program.
372739/D
Operational procedures
2
Hold the Auto search button depressed while you also press one of the two “arrow”
buttons in the Train field.
3
Observe that the opening angle of the search sector is adjusted accordingly.
4
Release the Auto search button, press and hold one of the two “arrow” buttons.
5
Observe that the centre of the search sector is trained accordingly.
To exit the search program, press the Manual button.
Starting the vertical search program
Observe the following procedure to run the automatic search program.
Procedure
1
Press the Auto button in the Tilt field on the Operating Panel to start the vertical
search program.
Auto
2
Hold the Auto button depressed while you also press one of the two “arrow” buttons
in the Tilt field.
3
Observe that the vertical opening angle of the search sector is adjusted accordingly.
4
Release the Auto button, press and hold one of the two “arrow” buttons.
5
Observe that the centre of the vertical search sector is adjusted accordingly.
6
To exit the search program, press the Manual button.
Manual
Enabling position track
Observe this procedure to initiate a position track.
1
Place the cursor over the desired location.
2
Press the Position track button in the Train field on the Operating Panel.
A geographically fixed circle will appear on the display, and its position will
automatically be tracked by the system with respect to the bearing and tilt angle. The
track parameters can be investigated by accessing the Objects menu. When the Auto Tilt
function is activated in the Position Track mode the tilt search centre is automatically
adjusted with regard to the distance to the tracked position.
372739/D
75
Simrad SH90
Enabling target track
Observe this procedure to initiate a target track.
1
Place the cursor over the desired target.
2
Press the Target track button in the Train field on the Operating Panel.
A circle with dedicated identification (A) will appear on the display and its position will
automatically be tracked by the system using the strongest echo centred in the track
window (B) represented by the two bars on the audio line. The size of the track window
may be selected using the Track Window button in the Setup menu.
Figure 2
Target tracking with related symbols
E
C
A
B
(CD015005L)
1P
D
The vector (C) originating from the target's centre indicates its course and speed. The
length of the vector increases relative to the target's speed. One knot is represented by a
small mark on the vector. A course line (D) can also be displayed showing the target's
track. A point ahead of the target indicates you position after a given time, and this time
can be set using the Movements button on the Setup menu. Target tracking symbols and
data are displayed with a light violet colour.
Adding a target tracking line
Observe this procedure to add a tracking line to a tracked target to indicate its movement
history.
Procedure
1
Choose an presentation mode with a horizontal presentation.
2
Place the cursor in the horizontal presentation.
3
Press the View button in the Cursor field on the Operating Panel.
4
Observe that a short-cut menu appears on the display.
76
372739/D
Operational procedures
5
Click View Menu, and observe that the GeoView menu opens.
6
Click the Target track button on the GeoView menu.
7
Observe that the Target track parameter dialog opens below the menu.
8
Choose the length of the tracking line, and click Close to exit.
User setting procedures
This section explains how to handle user and default settings on the SH90 sonar.
Topics
• Saving the current user setting on page 77
• Loading a previously stored user setting on page 78
• Renaming a user setting on page 78
• Deleting a user setting on page 78
• Loading the factory settings on page 79
Saving the current user setting
Purpose
All the parameter settings you make can be saved for later use.
Procedure
1
Click the Setup tab to open the menu.
2
On the Setup menu, click User setting button to open the parameter dialog.
This function allows you to save the current user settings (including parameter
selections), and to retrieve previously saved factory or user settings.
3
Click the Save current setting button.
The current setting is saved with the default identification name.
372739/D
77
Simrad SH90
Loading a previously stored user setting
1
Click the Setup tab to open the menu.
2
Click the User setting button to open the parameter dialog.
3
Click the desired user setting to select it.
4
Click the Load button.
5
Click OK in the next parameter dialog to confirm the selection.
The selected setting is loaded.
Renaming a user setting
Note
In principles you can use any name, but the Mode buttons on the Operator Panel will
only choose from User 1, User 2, User 3 and User 4. These names must also be on the
top of the list. If you wish to add users, apply names like for example “User 5 Charlie”.
1
Click the Setup tab to open the menu.
2
Click the User setting button to open the parameter dialog.
3
Click the one of the user settings on the list to select it.
4
Click the Rename button.
• Observe that a parameter dialog opens to present the current name.
• Observe that an on-line keyboard opens to allow you to enter characters.
5
Place the cursor at the beginning of the current name, and click the Del (Delete)
button on the on-line keyboard to remove the characters.
6
Click the necessary characters on the on-line keyboard to build a new name.
7
Click the OK button in the parameter dialog when you have completed the new
name.
8
Click the Close button in the User Setting parameter dialog when you have completed
the procedure.
The new name is saved automatically.
Deleting a user setting
1
Click the Setup tab to open the menu.
2
Click the User setting button to open the parameter dialog.
3
Click the desired user setting to select it.
4
Click the Delete button.
5
Click OK in the next parameter dialog to confirm the selection.
The selected user setting is deleted.
78
372739/D
Operational procedures
Loading the factory settings
1
Click the Setup tab to open the Setup menu.
2
Click the Default setting button.
3
Click OK in the next parameter dialog to confirm the action.
The factory settings are loaded and implemented.
372739/D
79
Simrad SH90
Installation of optional functionality
Optional functionality may be added to the SH90.
All options are pre-programmed into the standard sonar version. When ordering a
permanent option installation, a code word will be released from Simrad. For installation
of options, observe the following procedures.
Topics
• Opening the ‘Install Options’ parameter dialog on page 80
• About the ‘Install Options’ parameter dialog on page 80
• Adding optional functionality on page 81
Opening the ‘Install Options’ parameter dialog
This procedure explains how to locate and open the Install Options parameter dialog.
1
Select the Setup menu.
2
Click the Test button to open the System test menu.
3
Click the Installation Menu button.
4
Observe that the installation menu bar is shown on the top of the screen.
5
Click Options →Install options.
6
Observe that the Install Options parameter dialog opens.
About the ‘Install Options’ parameter dialog
The Install Options parameter dialog can be opened from
the Installation Menu. The Installation Menu is in turn opened
from the System test menu.
The Install Options parameter dialog allows you to look up
the unique hardware ID that identifies the sonar. You are
also permitted to enter a dedicated code to unlock optional
functionality.
Each sonar is identified by a unique hardware ID (HWID). If
you return this number to your dealer, he can provide you with
the code necessary to activate the optional functionality. A
dedicated procedure is provided.
→ Opening the ‘Install Options’ parameter dialog on page 80
→ Adding optional functionality on page 81
80
372739/D
Operational procedures
Parameters
1
HWID
This field displays the unique 12-character hardware identification code. This code
is different for each SH90 sonar. Simrad uses this code to generate the 32-character
code word used for a permanent option installation.
2
Add License String
This button is used for permanent installation of the chosen option. When you
click the button, this will activate the on-screen keyboard used to type the required
32-character code word.
3
Close
Click to close the parameter dialog. The currently selected parameter setting will
be kept.
Adding optional functionality
This procedure explains how to add optional functionality permanently to the sonar.
1
Obtain the option code as follows:
a
Open the Install Options parameter dialog, and write down the HWID number.
b
Send the HWID number to your dealer. Makes sure that you write down the
character string correctly!
c
Use the sonar without the option until your dealer approaches you with a code
word.
2
Open the Install Options parameter dialog, and click the Add License String number.
3
Place the cursor in the text field.
4
Type the code word on the on-screen keyboard.
5
Check that the 32 characters are entered correctly into the text field.
6
Click the Apply License String button.
7
Close the parameter dialog.
8
Restart the sonar
9
Check that the option is available for use.
372739/D
81
Simrad SH90
Presentation modes
The SH90 sonar provides you with several different presentation modes. These have been
created to cover all your operational needs for various types of fishing and fishing gear.
Bow up
When Bow up mode is selected, the vessel symbol is stationary on the screen with the
bow pointing upwards.
The echo presentation covers 360 degrees around the vessel, and all echoes are updated
for every ping. The distance from the vessel symbol to the outer echo ring is equal to the
selected range. The movement of the echoes across the presentation is controlled by a
combination of the vessel’s course and speed, and the target’s own movements.
Bow up/Audio
When Bow up/Audio mode is selected, the upper half of the screen shows a bow-up
presentation, while the lower part is used for a recording of the audio channel.
The audio channel is shown with a continuous white line in the horizontal picture, and it
can be trained in any direction. The recorded echoes are a direct replica of the echoes
under the white audio line.
As the audio channel is recorded over a period of time, this mode is especially useful
for detection of weak echoes mixed with reverberation or noise. The information
recorded by the audio channel is always stored in the computer, even if another mode
is selected. That means that this recording will always be presented when selecting
the Bow up/Audio mode.
Note that the vessel symbol can be moved to any position in the horizontal view with the
cursor and the Off Centre button on the Operating Panel.
Bow up/Vertical
When Bow up/Vertical mode is selected, the picture is divided into three sections.
The left side is a bow-up presentation similar to the Bow up mode previously described.
The upper part on the right hand side is a Catch data presentation, while the lower part
is a Vertical slice presentation.
82
372739/D
Presentation modes
Bow up/Dual Vertical
When Bow up/Dual vertical mode is selected, the upper part of the screen shows a
curtailed bow-up presentation, while the lower part shows two vertical slice presentations.
The bearing of the left vertical presentation is indicated by the white audio line in the
horizontal presentation, while the bearing of the right vertical presentation is indicated
by the yellow-dashed line. All borders between the different views may be moved to any
position by means the trackball.
Bow up/180° Vertical
When the Bow up/180° Vertical mode is selected, the upper part of the screen shows a
curtailed Bow up presentation, while the lower part shows a 180 degrees Vertical slice
presentation.
This mode is mainly intended for trawlers, where the vertical view acts as a multibeam
echo sounder. The bearing of the vertical slice can be selected in the Vertical View menu.
You can control the audio line, an indicator line, or you can set it to be locked in forward,
aft or athwart ships position. As the cylindrical transducer has a “blind zone” straight
down, an echo presentation in this direction will be limited to two approximately 60
degrees sectors. To avoid this “blind zone”, the vertical slice is made “tippable”, and
by selecting a -60 degrees tip angle (or less), a full 180 degrees coverage is obtained.
The tip angle can be adjusted from +10 to -90 degrees. In addition to the read-out in
the Tip menu button, the selected tip angle is shown with a dotted yellow line in the tilt
indicator in the upper left corner.
True motion
When True motion mode is selected, the picture is locked to a geographical position,
where the vessel moves around the screen according to its present course and speed.
All echoes are always presented in their correct position relative to the vessel, and their
movements on the screen will be a true representation of the movements of the targets
through the water. When the vessel symbol reaches the edge of the screen, it will
automatically be moved back to the centre, or to a position determined by the Off Centre
button on the Operating Panel. This position is reset to the screen centre whenever the
mode is changed.
When you press the Target Track button on the Operating Panel, the target will
automatically be moved to the screen centre.
True motion/Vertical
When True motion/Vertical mode is selected, the picture is divided into three sections.
The left side is a True motion presentation similar to the true motion mode previously
described. The upper part on the right hand side is a Catch data presentation, while the
lower part is a Vertical slice presentation.
372739/D
83
Simrad SH90
North up
When North up mode is selected, true north is always up on the screen.
The vessel symbol is stationary with the bow pointing in the vessel’s course direction.
The movement of the echoes across the screen are controlled by a combination of the
vessel’s course and speed and the target’s own movements.
Dual 1
The Dual 1 mode is a kind of “two sonars in one” operation, where each presentation is
updated for every second transmission.
All settings can be set individually for each of the two presentations. This makes the
dual mode especially useful for optimizing settings by directly comparing the two
presentations. To optimize the horizontal settings, use the Horizontal menu to try
different settings in the upper picture. These settings are automatically transferred to the
other modes. The dual operation may also be used for other user applications, where
different range, tilt, frequency and other parameters can be selected.
Dual 2
The Dual 2 mode is very similar to the Dual 1 mode previously described, but the “two
sonars” are presented next to each other.
All settings can still be set individually for each of the two presentations.
270°/Vertical
The 270°/Vertical mode is specially designed for purse seining. The vertical half slice is
displayed in the lower left corner for normal setting with the net on the starboard side.
If the net is set on the port side, the 60 degrees vertical slice will be displayed in the
lower right hand corner. With this presentation, it is easy to keep the best contact
with a school in both the vertical and horizontal presentation, and to determine its size
distribution. The position of the school relative to the bottom is another important
information provided by this presentation. The Catch data presentation for purse seining
is shown on the right hand side. It shows all the net data relative to the target and the
bottom, as well as all available target data.
84
372739/D
Operating Panel
Operating Panel
The frequently used functions are
directly accessible by the designated
control buttons on the Operating
Panel, and may enter operational
commands directly. The buttons are
grouped in fields according to their
purpose. Most sonar functions are
also accessible and activated using
the menu system on the display
and the trackball and Select button
on the Operating Panel.
Figure 3
Operating Panel
Main Switch
This is the sonar's “on/off” switch. It has been previously explained.
→ Power on/off procedures on page 22
Symbol
Circle marker and Gear symbol. The two markers will be placed at the cursor's location
when you press the button. The Own ship symbol produces a square symbol on the screen
at the vessel’s current location when the button is pressed, while the Gear symbol is
used to deploy a seine or trawl symbol.
→ Markers and symbols procedures on page 66
Mode
These four buttons provide fast access to the four presentation modes you select, or
to four predefined user configurations. You must select which four modes or user
configurations to select, and in which order they shall appear. To choose button function,
click Mode button on the Display menu. To define the order of the presentation modes,
click Sort modes on the Setup menu.
→ Mode procedures on page 65
→ User setting procedures on page 77
Gain
This is where you set up the gain in both horizontal and vertical presentations.
→ Adjusting the vertical and horizontal gain on page 60
372739/D
85
Simrad SH90
Range
This is where you select the range in the horizontal and vertical presentations.
Cursor
The trackball is used to move the cursor on the display. The Menu button is used to hide
the menu, while the Select button is used to make selections on the display. The View and
Object buttons open specific short-cut menus.
→ Controlling the cursor on page 25
Tilt
These are the buttons used to tilt the sonar beam up or down. You can also start an
automatic tilt program to carry out automatic searches.
→ Starting the vertical search program on page 75
Train
These buttons control the sideways movements (training) of the sonar beam. You can
also start an automatic training program to carry out automatic searches, and you can
lock the beam on a chosen target or position.
→ Starting the horizontal search program on page 74
→ Adding 'Target' and 'Circle' markers to the sonar presentation on page 66
Various
These buttons are used to start a recording and to zoom in on the sonar picture.
→ Storage procedures on page 69
86
372739/D
Menu system
Menu system
The Simrad SH90 sonar is equipped with an extensive menu system, and you will use
this to choose parameters for the various operational modes and functions.
The chapter gives you a short description of each menu choice.
This chapter does not describe all the menu buttons on the SH90. For a complete
description of these, refer to the SH90 Reference Manual.
In order to select active menu and to click the various buttons, you must use the cursor.
The cursor is controlled by the trackball on the Operating Panel, and to “click” you
simply press the Select button.
Topics
• Active menus on page 87
• Temporary menus on page 99
Active menus
The active menus are those relevant for the different presentation modes. The menus are
shown with vertical selector tabs on the right hand side, and each menu can easily be
selected using the trackball and the Select button on the Operating Panel. All menus have
access to on-line help through a Help button.
Topics
• Horizontal menu on page 88
• Vertical menu on page 90
• Vertical 180 menu on page 92
• Display menu on page 94
• Setup menu on page 96
• Objects menu on page 98
372739/D
87
Simrad SH90
Horizontal menu
The Horizontal menu is used to control the horizontal
presentations. The parameters chosen are present in
all presentation modes. When a horizontal parameter
setting is selected and defined in one mode, the chosen
settings will automatically be applied to all modes.
The Horizontal 2 menu is identical to the Horizontal
menu. It is used during Dual 1 and Dual 2 operations.
Parameters
1
Mode
The purpose of the Mode button is to choose the
presentation mode.
2
Range
This parameter is used to control the range of the
SH90, that is the distance from the vessel to the
outmost edge of the sonar beam.
3
Tilt
This parameter allows you to manually control the
angle of the sonar beam tilt.
4
Bearing
This parameter is – when opened from the
Horizontal menu – used to control the bearing of
the horizontal sonar beam.
5
Gain
This parameter is used to control the receiver
gain, that is how much amplification that is used
on the received echoes.
The chosen gain is only applied to the horizontal
presentation.
If you activate the AGC (Automatic Gain Control) function, this gain setting is
influenced.
6
Pulse Form
This parameter dialog is used to select the shape of the transmitter pulses.
These can either be CW (Continuous Wave) with different pulse lengths, or FM
(Frequency Modulation) with different pulse lengths and a continuous frequency
sweep.
7
TX Power
This parameter dialog is used to select the output power from the SH90 transmitters.
88
372739/D
Menu system
8
Beam
This parameter allows you to control the vertical beam width in the horizontal
presentation.
9
Frequency
This parameter is used to control the transmitter and receiver operational frequency.
10 TVG
This parameter allows you to choose the Time Variable Gain setting in the SH90.
This function will automatically adjust the gain in the SH90 to compensate for
geometric spreading and absorption.
11 AGC
This parameter controls the Automatic Gain Control. This function will
automatically reduce the gain if you experience reverberation and noise, or increase
it if the conditions permit it.
12 RCG
This parameter is used to control the Reverberation Controlled Gain. This function
will automatically remove unwanted reverberation from the bottom or from the sea
surface. It may however also remove scattered fish from the presentation.
13 Noise Filter
This parameter allows you to control the built-in filter designed to remove unwanted
acoustic noise from the SH90 presentation.
It will reduce the interference from other acoustic systems (sonars and echo
sounders) on your own vessel and from other vessels in the vicinity. It will also
suppress the noise from your own and other vessels’ propellers, and from other
similar noise sources.
14 PP Filter
This parameter controls the ping-ping filter, which reduces the amount of unwanted
noise and echoes on the screen. The filter will only show you the echoes if they are
still present after several consecutive pings (2, 4 or 8). This function will provide
you with a more stable echo presentation, as spurious echoes will be suppressed.
15 Status
The Status parameter dialog contains a transducer position indicator, as well as
presentation of current time, date, latitude, longitude, heading and speed. Some of
the buttons allow you to adjust these parameters.
372739/D
89
Simrad SH90
Vertical menu
The Vertical menu is only shown in modes with a
vertical slice function. All relevant settings, except the
TX Power, can be selected separately for the vertical
modes independent of the horizontal settings. When
any vertical setting is selected and defined in one mode,
the setting will be applied to all vertical modes.
Parameters
1
Mode
The purpose of the Mode button is to choose the
presentation mode.
2
Range
This parameter is used to control the range of the
SH90, that is the distance from the vessel to the
outmost edge of the sonar beam.
3
Bearing
This parameter controls – when opened from the
Vertical menu – the bearing of the vertical slice,
and thus the audio line.
4
Gain
This parameter is used to control the receiver
gain, that is how much amplification that is used
on the received echoes.
The chosen gain is only applied to the vertical
presentation.
If you activate the AGC (Automatic Gain Control)
function, this gain setting is influenced.
5
Pulse Form
This parameter dialog is used to select the shape of
the transmitter pulses.
These can either be CW (Continuous Wave) with different pulse lengths, or FM
(Frequency Modulation) with different pulse lengths and a continuous frequency
sweep.
6
TX Power
This parameter dialog is used to select the output power from the SH90 transmitters.
7
Frequency
This parameter is used to control the transmitter and receiver operational frequency.
90
372739/D
Menu system
8
TVG
This parameter allows you to choose the Time Variable Gain setting in the SH90.
This function will automatically adjust the gain in the SH90 to compensate for
geometric spreading and absorption.
9
AGC
This parameter controls the Automatic Gain Control. This function will
automatically reduce the gain if you experience reverberation and noise, or increase
it if the conditions permit it.
10 RCG
This parameter is used to control the Reverberation Controlled Gain. This function
will automatically remove unwanted reverberation from the bottom or from the sea
surface. It may however also remove scattered fish from the presentation.
11 PP Filter
This parameter controls the ping-ping filter, which reduces the amount of unwanted
noise and echoes on the screen. The filter will only show you the echoes if they are
still present after several consecutive pings (2, 4 or 8). This function will provide
you with a more stable echo presentation, as spurious echoes will be suppressed.
12 Status
The Status parameter dialog contains a transducer position indicator, as well as
presentation of current time, date, latitude, longitude, heading and speed. Some of
the buttons allow you to adjust these parameters.
372739/D
91
Simrad SH90
Vertical 180 menu
The Vertical 180 menu is only shown when the Bow
up/180° Vertical mode is chosen. All relevant settings,
except the TX Power, can be selected separately for the
vertical modes independent of the horizontal settings.
When any vertical setting is selected and defined in one
mode, the setting will be applied to all vertical modes.
The Tip button is only available on this menu. The
Tip button is used to tip the vertical slice to avoid the
blind zone.
Parameters
1 Mode
The purpose of the Mode button is to choose the
presentation mode.
2
Range
This parameter is used to control the range of the
SH90, that is the distance from the vessel to the
outmost edge of the sonar beam.
3
Tip
This parameter controls the angle of the vertical
slice in the Bow up/180° Vertical mode. Use this
feature to avoid the vertical blind zone.
4
Bearing
This parameter controls – when opened from the
Vertical menu – the bearing of the vertical slice,
and thus the audio line.
5
Gain
This parameter is used to control the receiver
gain, that is how much amplification that is used
on the received echoes.
The chosen gain is only applied to the vertical presentation.
If you activate the AGC (Automatic Gain Control) function, this gain setting is
influenced.
6
Pulse Form
This parameter dialog is used to select the shape of the transmitter pulses.
These can either be CW (Continuous Wave) with different pulse lengths, or FM
(Frequency Modulation) with different pulse lengths and a continuous frequency
sweep.
7
TX Power
This parameter dialog is used to select the output power from the SH90 transmitters.
92
372739/D
Menu system
8
Frequency
This parameter is used to control the transmitter and receiver operational frequency.
9
TVG
This parameter allows you to choose the Time Variable Gain setting in the SH90.
This function will automatically adjust the gain in the SH90 to compensate for
geometric spreading and absorption.
10 AGC
This parameter controls the Automatic Gain Control. This function will
automatically reduce the gain if you experience reverberation and noise, or increase
it if the conditions permit it.
11 RCG
This parameter is used to control the Reverberation Controlled Gain. This function
will automatically remove unwanted reverberation from the bottom or from the sea
surface. It may however also remove scattered fish from the presentation.
12 PP Filter
This parameter controls the ping-ping filter, which reduces the amount of unwanted
noise and echoes on the screen. The filter will only show you the echoes if they are
still present after several consecutive pings (2, 4 or 8). This function will provide
you with a more stable echo presentation, as spurious echoes will be suppressed.
13 Status
The Status parameter dialog contains a transducer position indicator, as well as
presentation of current time, date, latitude, longitude, heading and speed. Some of
the buttons allow you to adjust these parameters.
372739/D
93
Simrad SH90
Display menu
The Display menu is shown in all presentation modes,
and provides access to parameters controlling the visual
presentation of the SH90 presentations.
Note that some of the choices on the menu are simple
on/off buttons.
Parameters
1
Mode
The purpose of the Mode button is to choose the
presentation mode.
2
Full Screen
This is an on/off switch. When switched “on”
the menu system is removed from the SH90
presentation. To recall the menu, move the cursor
to the left side of the screen, observe that the menu
appears, then switch Full Screen “off”.
The same function is provided by the Menu button
on the Operating Panel.
3
Palette
This parameter allows you to choose a presentation
colour palette to suit your personal preferences
and the ambient light conditions.
4
Display Gain
This function controls the “amount” of echo
that are displayed – the strength of the echo
presentation on the display. Use this control
together with Gain to control the SH90 sensitivity.
5
Colour Threshold
This function is provided to control how many colours you wish to use in the echo
presentation.
The selected colour threshold is reflected in the colour bar in the Display menu.
6
Colours
This parameter allows you to control how bright colours you wish to use. The
colour bar in the menu shows the colour range currently in use.
7
Resolution
Select 16 or 64 colours in the display presentation. This is a personal preference.
The chosen resolution is shown in the colour bar below the button.
8
Panel Backlight
This function controls the intensity of the button backlighting in the Operating Panel.
94
372739/D
Menu system
9
Mode buttons
Use this button to choose how the Mode buttons on the Operating
Panel shall work. You can either choose between the four most
frequent modes, or the four most frequent user settings.
Mode
1
10 Language
Use this function to choose the language used on the menu buttons.
11 Units
This parameter allows you to choose the measurement units used by the SH90.
12 Cosmetics
Click to access the Cosmetics menu, which allows you to control the amount of
support information on the SH90 presentation.
13 Bearing
Set up the vertical slice – and thus the sound channel – bearing to be relative or
related to true north.
14 Menu
This function allows you to choose if you wish to see the complete menus (as
described here), or just the most important settings.
15 Status
The Status parameter dialog contains a transducer position indicator, as well as
presentation of current time, date, latitude, longitude, heading and speed. Some of
the buttons allow you to adjust these parameters.
372739/D
95
Simrad SH90
Setup menu
The Setup menu is shown in all presentation modes, and
gives access to parameters controlling the processing
and algorithms in the SH90.
It also provides access to specific system parameters
and functions such as Test and Store/Recall.
Parameters
1 Mode
The purpose of the Mode button is to choose the
presentation mode.
2
Store/Recall
Click this button to record and playback SH90
images.
3
Test
Click this button to access the test software in
the SH90. These utilities are only provided for
certified service technicians, and they are not
documented.
4
Gear
This function allows you to select the type of
fishing gear you use. This will draw the gear in the
right size and position relative to the own vessel
symbol in the SH90 presentation.
5
School
This function allows you to obtain information
of the volume estimation of a school. The
information is used in the automatic target tracking
program.
6
Dead Reckoning
This is an on/off function. When switched “off”, the GPS is used to calculate the
position of your vessel. When “on”, the position is calculated based on the current
speed and the input from the gyro.
7
Stabilizer
This is an “on/off” switch. When the stabilizer function is active, the SH90 will
automatically adjust the presentation to compensate for the ship's movements
in the sea.
8
Movements
This function makes it possible to estimate the position of a tracked school at a
given future time.
9
96
Track window
372739/D
Menu system
This command enables you to adjust the size of the “window” the SH90 places on
the chosen target. The SH90 will use the echoes detected within this “window”
to control the tracking.
10 Wind direction
If you do not have a wind sensor connected to your SH90, you can use this
parameter to set the wind direction manually.
11 Wind speed
This is not a parameter. It is only a presentation of the current wind speed provided
that a wind sensor is connected to the SH90.
12 Sort Modes
Click this button to open the Sort Modes menu. This menu is used
to select the presentation modes to be activated by the four Mode
buttons on the Operating Panel. The four upper presentation modes
in the Sort Modes menu will always be the four modes activated
by the four Mode buttons in the order they are sorted.
Mode
1
13 External sync(hronisation)
This function makes it possible to eliminate interference from other Simrad sonars
on board your vessel. If the sonars are connected together, you can use these settings
to synchronise their transmissions.
14 Fish alarm
This function makes it possible to set up the SH90 to warn you when a school of
fish are detected inside a selected search sector. The selected sector is shown with
white dashed lines in the horizontal presentation.
15 User setting
This function allows you to save the current user settings (including parameter
selections), and to retrieve previously saved factory or user settings.
16 Default Setting
Click this button to retrieve the default factory settings.
17 Status
The Status parameter dialog contains a transducer position indicator, as well as
presentation of current time, date, latitude, longitude, heading and speed. Some of
the buttons allow you to adjust these parameters.
372739/D
97
Simrad SH90
Objects menu
The Objects menu is shown in all presentation modes,
and displays the Range (R), Bearing (B) and Depth (D)
to all selected objects. The identifying abbreviations
for the different objects are:
• AT: Automatic Target Track marker
• Ci: Circle marker
• M: Target marker
• OS: Own Ship marker
• PT: Position Track marker
• F: Radio Buoy marker (if a GPS buoy system is
connected)
To delete an object, select the relevant marker in the
list, and click the Delete button in the lower part of the
menu.
Click the Delete All button to delete all objects.
To delete an object, select the relevant marker in the
list, and click the Delete button in the lower part of the
menu.
Click the Delete All button to delete all objects.
The number behind the identifying abbreviation
refers to the same number on the object in the sonar
presentation. The P after the Automatic Target Track
marker indicates the priority level where the audio
channel is locked to the target.
When selecting an object in the list, a list with all the
available object data will be shown below the Objects
menu. When selecting a Target marker, Automatic
Target Track marker or a Radio Buoy marker in the
list, a dotted bearing line from the vessel to the marker
will be presented.
The parameters for each marker are shown in the Inspect Object parameter dialog. Click
on a marker to investigate its parameters.
Parameters
1 Mode
The purpose of the Mode button is to choose the presentation mode.
2
Delete (object)
In the Objects menu, click to select an item from the list of current marker objects.
Then, click this button to delete the selected object. On the sonar presentation,
position the cursor on the object, open the Object pop-up, and click Delete (object).
98
372739/D
Menu system
3
DeleteAll (objects)
Click once to delete all current objects from the Objects menu.
4
Inspect Object
The Inspect Object parameter dialog allows you to investigate the specific
parameters for each selected object.
The parameter dialog opens automatically when you click on one of the object IDs.
5
Status
The Status parameter dialog contains a transducer position indicator, as well as
presentation of current time, date, latitude, longitude, heading and speed. Some of
the buttons allow you to adjust these parameters.
Temporary menus
The temporary menus are those selected from the active menus. They are also shown
with vertical tabs on the right side of the menu, and can easily be selected by the trackball
and the Select button. The temporary menus must however be removed manually using
the Close button in the bottom of menu.
All temporary menus have access to on-line help through a Help button.
Topics
• Cosmetics menu on page 99
• Store/Recall menu on page 99
• System Test menu on page 99
• Sort Modes menu on page 100
Cosmetics menu
The Cosmetics menu is activated by pressing the Cosmetics button in the Display menu.
The menu provides access to various parameters controlling the appearance of the sonar
picture. All the functions - except Track History - are on/off buttons.
Store/Recall menu
The Store/Recall menu is activated by the Store/Recall button in the Setup menu. This
menu is used to store single display pictures or a sequence or pictures. The stored
pictures can easily be recalled for evaluation or comparing schools.
→ Storage procedures on page 69
→ Setup menu on page 96
System Test menu
The System test menu is activated by the Test button in the Setup menu.
372739/D
99
Simrad SH90
This menu provides several sensor measurements and test functions for operational and
functional tests. Note that tests are designed only to be carried out by qualified service
engineers. From this menu you can also access the Message Bar configuration.
→ Setup menu on page 96
Sort Modes menu
This menu is used to select the presentation modes to be activated by the four Mode
buttons on the Operating Panel.
The four upper presentation modes in this menu will always be the modes selected by
the four Mode buttons in the order they are sorted. In order to sort the modes, click on a
mode to select it, and click the Move Up and Move Down buttons to move the selected
mode up or down the list. When the modes are organized in the requested order, click the
Apply button to save the setting, and Close to close the menu.
→ Mode procedures on page 65
100
372739/D
Sonar theory
Sonar theory
This chapter explains some of the basic theory related to settings, error sources and
noise conditions.
Topics
• Parameters on page 101
• Noise and reverberation on page 106
• Layers and deflections on page 109
Parameters
A sonar will transmit a sound wave into the water around the vessel. When this sound
wave hits fish, bottom, or other objects in the water, a part of the sound will be returned
as echoes. These echoes are collected by the sonar, interpreted by the sonar computers,
and presented on the display.
The most important interpretation is however left to you, and it may often be difficult to
distinguish the echoes and identify the targets. In order to help you with this, the SH90
sonar provides numerous advanced filter and gain functions. You can also tilt the sonar
beam vertically in order to achieve an optimum result, and you can use the vertical
slice to view “across” the water column.
This section provides you with some basic theory about some of the key parameters
that are available.
Topics
• What is TVG? on page 102
• What is AGC? on page 102
• What is the PP Filter? on page 103
• About pulse form and length on page 103
• About beam widths on page 104
• About Gain on page 104
• What is RCG? on page 105
• About tilt on page 105
372739/D
101
Simrad SH90
What is TVG?
TVG means Time Varied Gain. As echoes will be weaker when the distance to them
increase, the sonar will automatically amplify distant echoes more than close echoes.
In practice, the gain will increase in proportion with how long the sonar must wait for
the echoes.
Figure 4
The TVG principle: The gain at time (B) is larger than at time (A)
(CD015005-003)
C
A
0
1
10
B
100
1000
When you choose the TVG setting you can either switch it off, or choose a “X log R”
value. The different settings determine how much gain the sonar will use as time elapses
along the X-axis. A higher value for “X” will make the angle (C) steeper.
Tip
For scattered fish, we suggest that you use the 40 log R setting. For small schools, try
30 log R, for large schools, use 20 log R. If you use 20 log R the bottom will always be
presented with the same echo strength.
If you wish to examine weak echoes very close to your vessel, you may wish to use
10 log R or 5 log R, or turn off the TVG.
Keep in mind that the filters in the SH90 are implemented in “series”. The TVG
compensations are made before the AGC (Automatic Gain Control). For this reason,
your TVG setting will always have an effect on the AGC.
If you disable the TVG compensation, maximum gain will be used on all ranges.
What is AGC?
AGC means Automatic Gain Control. The AGC will automatically scale the received
echo data to maintain a proper dynamic range based on all the incoming echo values. In
addition to Off, the strength of the filter can be set to three different levels.
The AGC (Automatic Gain Control) function adjusts the gain using an image processing
algorithm. This processing depends on the strength of the incoming echo signal.
The image is analyzed, and reverberation and echoes are identified. Based on the
analysis, weak echoes are amplified, while strong echoes are reduced. The result is a
“normalizing” effect that reduces noise and reverberation. The AGC is functional up to
102
372739/D
Sonar theory
the sonar’s maximum range. As show in the menu, the AGC has four different settings.
These settings define the difference between the maximum and minimum echo level for
the filter to take effect.
Tip
The most practical way to use the AGC (Automatic Gain Control) is to first switch it
off. Adjust the echo presentation using the gain until you have the best possible result,
then activate the AGC.
The AGC works best with even background (homogenous noise conditions) and
pronounced targets. With uniform sonar conditions you may benefit from strong AGC
compensation. However, if you are looking at scattered fish, reduce the AGC, and try
to add gain instead.
If you work close to other vessels, the noise from their propellers may be misinterpreted
as echoes. This will also reduce the visibility of other echoes. Reduce the AGC. The
same applies if the bottom conditions place your vessel with decreasing depth on one
side of the vessel and your targets on the other side.
If you have very strong echoes from a large school located close to your vessel (typically
closer than 150 meters), we recommend that you reduce or switch off the AGC. This is
because the AGC filter misinterprets the school for noise.
Keep in mind that the filters in the SH90 are implemented in “series”. The gain
compensations are made before the AGC. For this reason, your gain setting will always
have an effect on the AGC.
What is the PP Filter?
PP Filter means Ping-to-Ping filter. When this function is activated, the sonar will
compare the echoes from one ping with the echoes from the next pings. If an echo is
present at the first ping, but then disappears at the next, the sonar will interpret this as
noise and reverberation, and suppress it.
If you choose setting Weak, the sonar will only compare two consecutive pings. If
you choose settings Medium or Strong the sonar will compare four and eight pings
respectively.
About pulse form and length
On the SH90 sonar, you can transmit sound modulated as
• FM
• CW
FM means frequency modulated, which means that the frequency of the transmitted pulse
is changed during the transmission. In most cases this method will provide better echo
presentation and stability, and you will avoid excessive noise and reverberation.
372739/D
103
Simrad SH90
CW means continuous wave, which means that the transmission frequency is fixed
during the entire pulse. When you use CW transmission you can choose the length of
the pulses. In a search phase under good conditions, you should try setting Long. If the
conditions worsen, try to shorten the pulse length. This will make it easier to distinguish
the various echoes, and the reverberation will be reduced.
The default setting on the SH90 sonar is FM Auto. In this transmission mode, the sonar
will automatically choose the optimal pulse length for the current range.
About beam widths
A narrow beam will always reach further than a wide beam. This is because the
transmitted power of the sonar is concentrated. Nevertheless, you can easily “miss” a
school of fish if you make the beam too narrow. If the range is reduced, it is the common
to use a wider beam.
Figure 5
Beam widths
A
Large
B
Normal
C
Narrow
The normal setting on the SH90 sonar is Normal. This setting is basically designed
for longer ranges.
You may also try setting Auto. This setting will automatically adjust the beam width
depending on the current range.
About Gain
You can adjust the gain in many different ways, but the most important is the setting made
by the Gain buttons on the Operating Panel and on the Horizontal and Vertical menus.
104
372739/D
Sonar theory
If you have too much gain, you will see a sonar picture with too many echoes. This is
because the large amplification presents all kind of noise and reverberation that the
sonar picks up. If the gain is smaller the noise and reverberation will disappear, but if it
the gain is too small the fish echoes may disappear as well. In most cases you should
try with a medium value.
On this sonar, you can adjust the horizontal and vertical gain independent of each other.
The horizontal gain is used when the sonar operates in a horizontal mode, for example
Bow up or True motion. If you switch to a mode with a vertical view, for example True
motion/Vertical, your sonar will need a different gain setting for the beams directed
towards the bottom.
To adjust the gain, see the relevant procedures.
Related topics
• Adjusting the vertical and horizontal gain on page 60
What is RCG?
RCG means Reverberation Controlled Gain. This is a two-dimensional filtering of the
received echoes in order to suppress unwanted surface and bottom reverberation.
If you select Strong, the bottom echoes will disappear altogether if the bottom is flat,
while schools of fish close to the bottom will be easier to see.
Note that scattered fish may be more difficult to spot if the RCG function is active, as
these can be misinterpreted as reverberation. It is therefore important that you use the
RCG with great care if your are searching for scattered fish.
Tip
We recommend that the RCG is active all the time, but be careful in the vertical
presentation. The Reverberation Controlled Gain (RCG) works best on small schools.
Setting “1” is intended for schools. Setting “2” is made for schools with higher density.
Try “3” for schools close to bottom, as this setting will also reduce the bottom echoes.
If you are looking for scattered fish, use RCG setting “4” or “5”.
Settings “6” and “7” are also intended for schools, while ”8” and “9” can be used on
scattered fish. These settings use alternative algorithms.
About tilt
The sonar beam can be tilted vertically in steps of 1 degree, and the chosen tilt is shown
on the sonar picture. At 0 degrees tilt you will transmit the sonar beam in parallel with
the sea surface, while 60 degrees tilt will direct it almost straight down.
372739/D
105
Simrad SH90
Figure 6
Tilt
C
A
B
(CD015005D)
The challenge will always be to find a tilt that prevents the fish echoes to be buried in
reverberation and bottom echoes.
If you use a high tilt value (A) the fish will easily be disguised by the bottom echoes, but
a strong RCG setting will help. As the distance from the bottom to the fish increases,
the fish will be easier to see when the RCG removes the bottom echoes. However, this
assumes that the fish echoes are considerably stronger than the bottom echoes.
If you use a very small tilt (C) you will not be bothered by bottom echoes. If the sea
surface is gusty, you will however easily see echoes from the waves. These echoes will
normally be rather weak, and will hardly move in relation to your vessel.
By means of a medium tilt angle (B) you will most likely be able to pick up scattered
fish or schools if these are located at some distance above the bottom. The upper school
in the illustration will appear on the sonar picture before the bottom echo, while the
lower school will easily be disguised by the bottom echoes. Once again you can activate
the RCG function to improve the reading.
Noise and reverberation
Every time you use the sonar the quality of your search operations will depend on
numerous error sources caused by the natural environment and physical properties of
your vessel. We distinguish between the two terms noise and reverberation.
• Noise is generated by the vessel: engine, propellers, winches, refrigerating plants etc.
• Reverberation is caused by natural conditions in the sea: temperature, salinity, sea
state and bottom conditions.
The most common cause of acoustic noise is the propeller and the cavitation caused by
its rotation. Other typical noise sources on board your vessels are winches, refrigerating
plants, power generators, pumps and cranes. If you experience problems you think
are caused by noise, try to find out which system that causes the noise, and contact
your dealer for advice.
Topics
• Cavitation on page 107
106
372739/D
Sonar theory
• Reverberation on page 107
• Blocking on page 108
• Check the noise yourself! on page 108
Cavitation
As the propeller blades move through the water, low pressure areas are formed as the
water accelerates around and moves past the blades. The faster the blades move, the
lower the pressure around it will become. As it reaches vapour pressure, the water
vaporizes and forms small bubbles of gas. This is cavitation.
Figure 7
Cavitation [1]
When the bubbles collapse, they cause very strong local shock-waves in the water.
These may be audible and can also damage the propeller blades. In addition to this, the
cavitation will generate very strong reverberation, commonly seen as a red stripe of
echoes behind the vessel.
If you have big problems with cavitation, try to adjust the propeller pitch and/or the
number of revolutions.
Reverberation
Reverberation is generated when the echoes from your sonar transmission are reflected
not only by fish and objects in the water, but also from the bottom and the sea surface.
1.
Photo from US Navy/Wikipedia in the public domain.
372739/D
107
Simrad SH90
Figure 8
Reverberation
B
A
(CD015005E)
The echoes from the bottom will vary with how uneven the bottom is, what kind of
bottom you have under your vessel, (rock, mud, sand etc.) as well as your current tilt
setting. The echo from the sea surface will vary with the current sea state and your
current tilt setting.
The illustration demonstrates how the bottom and the sea surface return echoes back to
your sonar transducer. In situation (A) you will see several weak echoes from the waves
and from the rock on the bottom, you will still be able to identify the school of fish. In
situation (B) you will be able to identify the upper school of fish, but the lower school
will be hidden in the shadow of the rock.
Be aware of that other vessels close to you will also generate reverberation due to the
water disturbance caused by the wake, the propellers and the cooling water spill.
Blocking
The movement of your vessel through the water will often – especially in higher sea states
– cause air bubbles to be generated, and these bubbles will move along the hull. This is
called blocking. In order to prevent this noise from disturbing your sonar operations, it is
important to lower the sonar transducer as far down below the hull as possible.
Check the noise yourself!
If you are bothered with acoustic or electric noise, you can easily run a few simple
tests to identify the cause of the problem.
How to check the acoustic noise
This procedure provides a simple method to check the acoustic noise.
1
Click the Setup tab to open the menu.
2
Click the Test button to open the System test menu.
3
Click the Test config button, and select Noise and VR in the parameter dialog.
4
Click the Close button in the parameter dialog to close it.
5
Observe the Echo level button on the System test menu.
6
Read the noise level.
108
372739/D
Sonar theory
The level your read in the button is the current noise in the direction of the cursor.
The noise is provided in dB, and the number should be as small as possible.
In order to reduce the noise, try to adjust the propeller pitch and the number of
revolutions.
How to check for electrical noise
This procedure provides a simple method to check the electrical noise.
1
Switch off all electric equipment that can cause electrical noise.
This includes motor, propellers, thrusters, winches, cooling- and air conditioning
systems, pumps, cranes, hydraulic systems etc.
2
Switch the equipment on again one at the time, and check the sonar every time.
With luck, you will spot which of your electrical systems that create the noise. To
deal with the problem, consult your dealer and/or a certified ships electrician.
Layers and deflections
Your sonar operations may also be disturbed by environmental situations that you are
unable to control. Two typical conditions are temperature and salinity layers, and
deflections caused by increasing or decreasing water temperature.
Temperature and salinity layers
You may experience that temperature and/or salinity layers exist in the water column.
Since the speed of sound in water depends on its temperature and salinity, such layers
will cause the sound beam to be reflected.
Figure 9
Temperature and salinity layers
A
B
(CD015005F)
If you transmit a sonar beam down towards a temperature or salinity layer (A), it may
be reflected as indicated in the illustration. The school of fish (B) you thought you
would see will not be visible at all.
372739/D
109
Simrad SH90
Deflections
On warm days – especially during summer – the sea surface will be heated by the sun,
and the water temperature will gradually decrease with increasing depth.
Figure 10
Water temperatures on warm days
B
A
(CD015005G)
When the temperature decreases (A) closer to the bottom, the sonar beam is deflected
down as indicated by the illustration. The school of fish (B) you thought you would
see is not visible at all.
On cold days, you may experience the opposite: the cold water will be close to the
surface, and the water temperature increases with increasing depth.
Figure 11
Water temperatures on cold days
A
B
(CD015005H)
When the temperature decreases (A) closer to the surface, the sonar beam is deflected up
as indicated by the illustration. The school of fish (B) you thought you would see is once
again not visible at all, and you will also see a ring of surface echoes.
110
372739/D
Index
Index
270°/Vertical
presentation mode, 84
A
About
on-line help, 56
Simrad SH90, 11
Acoustic noise
test, 108
Active menus, 87
Add
circle marker, 66
gear symbol, 67
own ship symbol, 67
target marker, 66
vessel symbol, 67
Add License String, 81
Adjusting
bearing line, 51
Variable Range Marker, 51
AGC
adjust, 37, 61
Automatic Gain Control, 18
menu button, 89, 91, 93
theory, 102
AT
Automatic Target Track
marker, 98
Audience
this manual, 7
Automatic
position
track, 75
target
track, 76
tilt
program, 75
train
program, 74
Automatic Gain Control, 18
adjust, 37, 61
Automatic Target Track
marker, 98
B
Basic
functionality, 16
Basic description
Processor Unit, 13
Beam
menu button, 89
Beam stabilization, 17
Beam width
theory, 104
372739/D
Bearing
display read-out, 50
menu button, 88, 90, 92
Bearing (display)
menu button, 95
Bearing Card, 54
Bearing line
moving, 51
Blocking
theory, 108
Boundary lines
moving, 50
Bow Markers, 56
Bow up
presentation mode, 82
Bow up/180° Vertical
presentation mode, 83
Bow up/Audio
presentation mode, 82
Bow up/Dual Vertical
presentation mode, 83
Bow up/Vertical
presentation mode, 82
Burn on CD
sonar images, 73
Button
basic operation, 26
C
Catch data presentation, 47
Cavitation
theory, 107
Ci
Circle marker, 98
Circle
marker, 98
marker investigate, 68
marker, delete, 69
Circle marker
about, 67
add, 66
Click
definition, 25, 27
Colour display
description, 13
minimum specifications, 13
Colour Threshold
menu button, 94
Colours
menu button, 94
Combination
Omni/Vertical, 17
Compass Card, 55
Context sensitive
help, 56
Context sensitive on-line
help, 7
Copy to USB
sonar images, 73
Cosmetics
descriptions, 53
menu, 99
menu button, 95
D
Dead Reckoning
menu button, 96
Default Setting
menu button, 97
Default settings
delete, 79
Define
Mode buttons, 65
Deflections
theory, 110
Delete
marker, 69
(object), 98
sonar images, 72
user setting, 78
Delete All
(objects), 99
Depth Dividers, 56
Depth range
transducer, 14
Description
Hull Unit, 14
menu system, 87
Operating panel, 85
Operating Panel, 13
Operating Panel power
supply, 13
Operating principles, 25
Power Supply Unit, 14
presentation modes, 82
Processor Unit, 13
system, 11
Transceiver Unit, 14
Transducer, 15
Diagram
system, 12
Display
menu, 94
modes, 82
Display gain
adjust, 64
Display Gain
menu button, 94
Distance Rings, 54
Double-click
111
Simrad SH90
definition, 25, 27
Drawing
system, 12
Dual 1
presentation mode, 84
Dual 2
presentation mode, 84
E
Electrical noise
test, 109
External sync(hronisation)
menu button, 97
F
F
Radio Buoy marker, 98
Factory settings
delete, 79
Familiarization
Simrad SH90, 9
Filter
FM Correlation, 17
Noise, 19
Fish alarm
menu button, 97
FM Correlation
filter, 17
Frequency
menu button, 89–90, 93
multiple, 18
select, 35
Full Screen
menu button, 94
Functionality
AGC, 18
basic, 16
catch data presentation, 47
FM Correlation filter, 17
key, 16
Multiple frequency, 17
Noise filter, 19
omni beam, 16
PP Filter, 19
RCG, 18
reception filters, 17
stabilization, 17
TVG, 19
vertical slice, 16, 45
G
Gain
display read-out, 50
menu button, 88, 90, 92
select, 34, 60
theory, 104
112
Gear
menu button, 96
symbol investigate, 68
symbol, delete, 69
Gear properties
change, 68
Gear symbol
add, 67
Getting started, 21
H
Handling rules
transducer, 11
Hardware identification, 81
Heat, excessive
do NOT expose
transducer, 11
Help
on-line, 7, 56
Horizontal
menu, 88
search
program, 74
Horizontal gain
select, 34, 60
Horizontal range
select, 33
How to
add circle marker, 66
add gear symbol, 67
add target marker, 66
add vessel symbol, 67
adjust AGC, 37, 61
adjust display gain, 64
adjust RCG, 38, 62
adjust the bearing line, 51
adjust the Variable
Range Marker, 51
adjust TVG, 38, 63
burn sonar images on
CD, 73
change a parameter
setting, 27
change gear properties, 68
change operational
frequency, 35
check the noise, 108
copy sonar imagesto
USB, 73
define gear properties, 68
define Mode buttons, 65
delete marker, 69
delete onar images, 72
delete user setting, 78
hide menu, 59
hide the menu, 29
horizontal
search program, 74
introduction to
procedures, 58
investigate marker, 68
keep sonar images, 71
load factory settings, 79
load user setting, 78
move the boundary lines, 50
position
track, 75
power off SH90, 24
power on SH90, 22
print sonar images, 72
recall sonar images, 70
rename sonar images, 72
rename user setting, 78
retrieve menu, 59
retrieve the menu, 29
save user setting, 36, 42, 77
select gain, 34, 60
select horizontal gain,
34, 60
select horizontal range, 33
select language, 32
select mode, 65
select presentation
mode, 31
select range, 33
select vertical gain, 34, 60
select vertical range, 33
simplify menu, 59
sort modes, 66
store sonar images, 69
target
track, 76
tracking line, 76
track
position, 75
target, 76
tracking line
target, 76
use seine circle, 67
use the trawl symbol, 68
vertical
search program, 75
Hull Unit
description, 14
HWID, 81
I
Images
burn on CD, 73
copy to USB, 73
delete, 72
keep, 71
print, 72
recall, 70
372739/D
Index
rename, 72
store, 69
Important
if something breaks
down, 10
information, 10
transducer handling, 11
when docking, 10
when the SH90 is not
used, 10
Inspect Object
menu button, 99
Interactive reference
manual, 56
Interference
suppression, 18
Introduction
Simrad SH90, 9
Investigate
marker, 68
K
Keep
sonar images, 71
Key functionality, 16
L
Language
menu button, 95
select, 32
Lifting
transducer, 11
Load
factory settings, 79
user setting, 78
Lowering range
transducer, 14
M
M
Target marker, 98
Main units, 13
Marker
Automatic Target Track, 98
Circle, 98
delete, 69
investigate, 68
Own Ship, 98
Position Track, 98
Radio Buoy, 98
Target, 98
Maximum speed, 14
Menu
buttons, 26
Cosmetics, 99
Display, 94
372739/D
hide, 59
Horizontal, 88
main, 29
menu button, 95
Objects, 98
retrieve, 59
Setup, 96
simplify, 59
Sort modes, 100
Store/Recall, 99
structure, 28
System test, 99
tabs, 28
Vertical, 90
Vertical 180, 92
Menu button
AGC, 89, 91, 93
Beam, 89
Bearing, 88, 90, 92
Bearing (display), 95
Colour Threshold, 94
Colours, 94
Cosmetics, 95
Dead Reckoning, 96
Default Setting, 97
Delete (object), 98
Delete All (objects), 99
Display Gain, 94
External
sync(hronisation),
97
Fish alarm, 97
Frequency, 89–90, 93
Full Screen, 94
Gain, 88, 90, 92
Gear, 96
Inspect Object, 99
Language, 95
Menu, 95
Mode, 88, 90, 92, 94, 96, 98
Mode buttons, 95
Movements, 96
Noise Filter, 89
Palette, 94
Panel Backlight, 94
PP Filter, 89, 91, 93
Pulse Form, 88, 90, 92
Range, 88, 90, 92
RCG, 89, 91, 93
Resolution, 94
School, 96
Sort Modes, 97
Stabilizer, 96
Status, 89, 91, 93, 95, 97, 99
Store/Recall, 96
Test, 96
Tilt, 88
Tip, 92
Track window, 97
TVG, 89, 91, 93
TX Power, 88, 90, 92
Units, 95
User setting, 97
Wind direction, 97
Wind speed, 97
Menu system, 87
Menus
active, 87
Minute Markers, 56
Mode
270°/Vertical, 84
Bow up, 82
Bow up/180° Vertical, 83
Bow up/Audio, 82
Bow up/Dual Vertical, 83
Bow up/Vertical, 82
define buttons, 65
Dual 1, 84
Dual 2, 84
menu button, 88, 90, 92,
94, 96, 98
North up, 84
select, 31, 65
True motion, 83
True motion/Vertical, 83
Mode buttons
menu button, 95
Modes
display, 82
sort, 66
Movements
menu button, 96
Multiple frequency
function, 17
selection, 18
N
Noise
test, 108
theory, 106
Noise filter, 19
Noise Filter
menu button, 89
North up
presentation mode, 84
O
Object
Delete, 98
Delete All, 99
Objects
menu, 98
Off
procedure, 24
Off/on
113
Simrad SH90
procedures, 22
Omni beam
description, 16
Omni/Vertical
combination, 17
On
procedure, 22
On-line help, 7
about, 56
Free mode, 56
On-line mode, 56
On/off
procedures, 22
Operating panel
description, 85
Operating Panel
description, 13
Operating Panel power
supply
description, 13
Operating principles, 25
Operating system
Processor Unit, 13
Operational
modes, 82
Operational frequency
select, 35
Operational procedures
introduction, 58
OS
Own Ship marker, 98
Own ship
marker investigate, 68
marker, delete, 69
Own Ship
marker, 98
Own ship symbol
add, 67
P
Palette
menu button, 94
Panel Backlight
menu button, 94
Parameter
change a setting, 27
Pictures
burn on CD, 73
copy to USB, 73
delete, 72
keep, 71
print, 72
recall, 70
rename, 72
store, 69
Ping-to-ping filter, 19
Pitch stabilization, 17
114
Position
display read-out, 50
track, 75
Position Track
marker, 98
Power off
procedure, 24
Power on
procedure, 22
Power on/off
procedures, 22
Power supply
Operating Panel, 13
Power Supply Unit
description, 14
PP Filter
menu button, 89, 91, 93
Ping-to-ping filter, 19
theory, 103
Presentation
270°/Vertical, 84
Bow up, 82
Bow up/180° Vertical, 83
Bow up/Audio, 82
Bow up/Dual Vertical, 83
Bow up/Vertical, 82
catch data, 47
Dual 1, 84
Dual 2, 84
modes, 82
North up, 84
True motion, 83
True motion/Vertical, 83
Presentation mode
270°/Vertical, 84
Bow up, 82
Bow up/180° Vertical, 83
Bow up/Audio, 82
Bow up/Dual Vertical, 83
Bow up/Vertical, 82
Dual 1, 84
Dual 2, 84
North up, 84
True motion, 83
True motion/Vertical, 83
Press
definition, 25, 27
Principles
operation, 25
Print
sonar images, 72
Procedure
add circle marker, 66
add gear symbol, 67
add target marker, 66
add vessel symbol, 67
adjust AGC, 37, 61
adjust display gain, 64
adjust RCG, 38, 62
adjust TVG, 38, 63
adjusting the bearing
line, 51
adjusting the Variable
Range Marker, 51
burn sonar images on
CD, 73
change a parameter
setting, 27
change gear properties, 68
change operational
frequency, 35
copy sonar images to
USB, 73
define gear properties, 68
define Mode buttons, 65
delete marker, 69
delete onar images, 72
delete user setting, 78
hide menu, 59
horizontal
search program, 74
investigate marker, 68
keep sonar images, 71
load factory settings, 79
load user setting, 78
position
track, 75
power off SH90, 24
power on SH90, 22
print sonar images, 72
recall sonar images, 70
rename sonar images, 72
rename user setting, 78
retrieve menu, 59
save user setting, 36, 42, 77
select gain, 34, 60
select horizontal gain,
34, 60
select horizontal range, 33
select language, 32
select mode, 65
select presentation
mode, 31
select range, 33
select vertical gain, 34, 60
select vertical range, 33
simplify menu, 59
sort modes, 66
store sonar images, 69
target
track, 76
tracking line, 76
track
position, 75
target, 76
tracking line
372739/D
Index
target, 76
use seine circle, 67
use the trawl symbol, 68
vertical
search program, 75
Procedures
introduction, 58
power on/off, 22
Processor Unit
description, 13
PT
Position Track marker, 98
Pulse form
theory, 103
Pulse Form
menu button, 88, 90, 92
Pulse length
theory, 103
Purpose
this manual, 7
R
Radio Buoy
marker, 98
Range
display read-out, 50
menu button, 88, 90, 92
select, 33
RCG
adjust, 38, 62
menu button, 89, 91, 93
Reverberation
Controlled Gain, 18
theory, 105
Reader
this manual, 7
Recall
sonar images, 70
Reception
filters, 17
Reference manual
interactive, 56
Registered trademarks, 7
Rename
sonar images, 72
user setting, 78
Resolution
menu button, 94
Reverberation
theory, 106–107
Reverberation Controlled
Gain, 18
adjust, 38, 62
Roll stabilization, 17
S
Salinity layers
372739/D
theory, 109
Save
user setting, 36, 42, 77
School
menu button, 96
Search
program
horizontal, 74
vertical, 75
Seine circle
use, 67
Select
gain, 34, 60
horizontal gain, 34, 60
horizontal range, 33
language, 32
operational frequency, 35
presentation mode, 31, 65
range, 33
vertical gain, 34, 60
vertical range, 33
Selection
multiple frequency, 18
Setup
menu, 96
SH90
basic information, 11
familiarization, 9
introduction, 9
Key functionality, 16
main units, 13
Ship speed
maximum, 14
Simrad SH90
basic information, 11
familiarization, 9
introduction, 9
Key functionality, 16
main units, 13
Slice
vertical, 16, 45
Sonar images
burn on CD, 73
copy to USB, 73
delete, 72
keep, 71
print, 72
recall, 70
rename, 72
store, 69
Sonar theory, 101
Sort
modes, 66
Sort modes
menu, 100
Sort Modes
menu button, 97
Speed
maximum, 14
Stabilization
system, 17
Stabilizer
menu button, 96
Status
menu button, 89, 91, 93,
95, 97, 99
Store
sonar images, 69
Store/Recall
menu, 99
menu button, 96
Sunlight
do NOT expose
transducer, 11
Switch off
procedure, 24
Switch on
procedure, 22
System
description, 11
diagram, 12
System test
menu, 99
System units, 13
T
Tab, 28
Target
marker, 98
marker investigate, 68
marker, delete, 69
track, 76
tracking
line, 76
Target audience
this manual, 7
Target marker
about, 66
add, 66
Temperature layers
theory, 109
Test
menu button, 96
Theory
AGC, 102
basic, 101
beam width, 104
blocking, 108
cavitation, 107
deflections, 110
gain, 104
noise, 106
PP Filter, 103
pulse form, 103
pulse length, 103
115
Simrad SH90
RCG, 105
reverberation, 106–107
salinity layers, 109
temperature layers, 109
tilt, 105
TVG, 102
This manual
purpose, 7
target audience, 7
Tilt
display read-out, 50
menu button, 88
theory, 105
Time Variable Gain, 19
adjust, 38, 63
Tip
menu button, 92
Track
position, 75
target, 76
Track window
menu button, 97
Tracking
line, 76
Trademarks, 7
Transceiver Unit
description, 14
Transducer
description, 15
handling, 11
lifting, 11
lowering range, 14
Transducer handling, 11
Trawl symbol
use, 68
True motion
presentation mode, 83
True motion/Vertical
presentation mode, 83
TVG
adjust, 38, 63
menu button, 89, 91, 93
theory, 102
Time Variable Gain, 19
TX Power
menu button, 88, 90, 92
U
V
Variable Range Marker, 55
Variable Range Marker
(VRM)
moving, 51
Vertical
menu, 90
search
program, 75
Vertical 180
menu, 92
Vertical gain
select, 34, 60
Vertical range
select, 33
Vertical Ring, 55
Vertical slice, 16, 45
Vertical/Omni
combination, 17
Vessel speed
maximum, 14
Vessel symbol
add, 67
Visual
aids, 39, 49
VRM, 55
moving, 51
W
What is
AGC, 102
beam width, 104
blocking, 108
cavitation, 107
gain, 104
PP Filter, 103
pulse form, 103
pulse length, 103
RCG, 105
reverberation, 107
tilt, 105
TVG, 102
Wind direction
menu button, 97
Wind Marker, 54
Wind speed
menu button, 97
Units
main, 13
menu button, 95
User setting
delete, 78
load, 78
menu button, 97
rename, 78
save, 36, 42, 77
116
372739/D
Simrad SH90
117
372739/D
©2012
Kongsberg Maritime AS