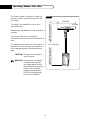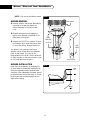
1
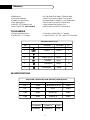
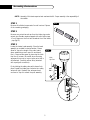
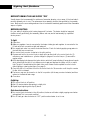
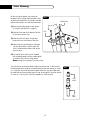
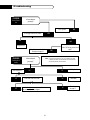
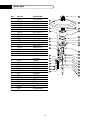
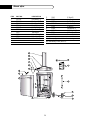
Dynamic Cooking Systems, Inc.
THE PHOENIX 111 PATIO HEATER
Use and Care Guide
Models:
■
■
■
■
■
■
CE-PHFS-DW-BK-L
CE-PHFS-DW-BL-L
CE-PHFS-DW-BZ-L
CE-PHFS-DW-GN-L
CE-PHFS-DW-SS-L
CE-PHFS-DW-WT-L
A Message To Our Customers
We are glad you selected the Phoenix III by DCS. Because this appliance contains features not found on any
other patio heater, we recommend that you read this entire booklet before your first use. Keep it in a handy
place as it has answers to questions that may occur during future use. Feel free to contact us if we can help
you. When you write please include the model number of the heater. We thank you for buying the patio
heater Made in America and wish you many years of enjoyment.
To help serve you better, please fill out and return the Ownership Registration Card and keep this guide handy,
as it will help answer questions that may arise as you use your DCS Phoenix III.
For your convenience, product questions can be answered by a DCS Customer Service
Representative by phone: 1-714-372-7000, or Fax: 714-372-7003,
or by mail:
DCS
Attention Customer Service,
5800 Skylab Road, Huntington Beach, CA 92647
WARNING
If the information in this manual is not followed exactly, a fire or explosion may result causing property damage,
personal injury or death.
PRECAUTION
Do not store or use gasoline or other flammable vapors and liquids in the vicinity of this or any other appliance.
WARNING
Improper installation, adjustment alteration, service or maintenance can cause property damage, injury or death.
Read the installation, operating and maintenance instructions thoroughly before use, installing or servicing this
equipment. For outdoor use only.
FOR YOUR SAFETY WHAT TO DO IF YOU SMELL GAS
• Shut off gas to the appliance.
• Extinguish any open flame.
• If odor continues, immediately call your gas supplier.
PLEASE RETAIN THIS MANUAL
FOR FUTURE REFERENCE.
1
Table Of Contents
SAFETY PRACTICES AND PRECAUTIONS ......................................................................3
FEATURES ...............................................................................................................................................4
ASSEMBLY TOOL & FASTENERS .............................................................................................4
GAS SPECIFICATIONS .....................................................................................................................4
ASSEMBLY INSTRUCTIONS .....................................................................................................5-8
LP GAS HOOK-UP ................................................................................................................................9
GAS SOUNDNESS ..............................................................................................................................10
REFLECTOR SHIELD ASSEMBLY INSTRUCTIONS...................................................11
LOCATING HEATER FOR USE.................................................................................................12
LIGHTING INSTRUCTIONS ......................................................................................................13
STORAGE / INSECT WARNING ..............................................................................................14
BURNER REMOVAL / INSTALLATION ...............................................................................15
PILOT CLEANING ..............................................................................................................................16
TROUBLESHOOTING GUIDE .............................................................................................17-18
PARTS LIST .......................................................................................................................................19-20
2
Safety Practices & Precautions
• Read and become familiar with the entire manual.
• Do not use in an explosive atmosphere, keep heater away from areas where gasoline or other
flammable liquids or vapors are stored or used.
• Before each use check for damaged parts such as hoses, regulators, pilot or burner.
• Do not attempt to alter unit in any manner, ie: shorten post length, bypass safety valve or operate
heater without the reflector.
• Heater must always be placed on a hard and level surface.
• Always maintain proper clearance to combustible materials. (Top 19’’ sides and rear 27”),
see page 11.
• Never replace or substitute the regulator with any other regulator other than a factory suggested
replacement.
• It is imperative that the control compartment, burners, and circulating air passageways of the heater
must be kept clean. The heater should be inspected before each use, and at least annually by a
qualified service person, for the presence of spiders, webs or other insects. The burner area is a
common and desired spider haven. Spider webs can present a dangerous condition which can
damage the heater and render it unsafe for use.
CHECK THE HEATER IMMEDIATELY IF ANY OF THE FOLLOWING
CONDITIONS EXIST
1) The smell of gas in conjunction with extreme yellow tipping of the burner flames.
2) The heater does not reach temperature.
3) The heater glow is excessively uneven.
4) The burner makes popping noises during use. (a slight popping noise is normal when the
burner is extinguished).
• Installation must be carried out in accordance with local regulations in force.
• Do not clean heater with combustible or corrosive cleaners.
• Do not use if wind velocity is greater than 10 miles per hour, because of flame out possibility.
• To avoid the risk of burns or accidental clothing ignition, do not touch the heater anywhere near the
burner assembly during operation.
• Do not touch the burner assembly or reflector shield until after the heater has cooled for
approximately 20 minutes after use.
• Carefully monitor young children in the vicinity of any operating heater.
• Never connect an unregulated gas supply.
• Always ensure that there is ample fresh air ventilation. this unit is for outdoor use only.
• Do not hang clothing or any other flammable materials from, on, or near the heater.
• A minimum inlet pressure must not exceed 100 psi.
• The heater is shipped from the factory for LP use. never substitute gases without first converting the
heater with a factory supplied conversion kit.
• A minimum supply pressure of 37 mbar is required for the purpose of input adjustment.
• Do not paint either the emitter screen, valve panel or reflector.
• All leak tests should be done with a soap solution.
• Matches should never be used for this purpose.
• The LP tank should be turned off when the heater is not in use.
• Do not install unit in basements or below ground level.
• Avoid twisting the flexible tube. Regularly check the gas supply hose for wear, replace as necessary.
• Servicing must be carried out by a qualified technician.
3
Features
• Weatherproof
• Uniform Heat Pattern
• Durable Non-Slip Wheels
• Piezo Spark Ignition
• Heats (16’-20’) Diameter Area
• Uses 13 kg LP Tank (not included)
• All High Heat Parts Made Of Stainless Steel
• Flame Out Protection Safety Control Valve
• Weighted Base For Stability / Low Maintenance
• Easy Access Door With A Positive Latch
• Large Stainless Steel Emitter Grid
• Easy Access Door With A Positive Latch
TOOLS NEEDED
• Phillips Head Screwdriver
• Pipe Wrench ( 2” or larger)
• Channel Lock Pliers (Min. 2” Capacity)
• Open End (7/16”, 3/4”, 7/8”, and 15 /16” Wrenches
FASTENER DIRECTORY
ITEM
PICTORIAL
QTY.
PART NUMBER
DESCRIPTION
1
1/4-20 ACORN NUT
15019-02
4
2
1/4-20 BOLT
15003-06
8
3
WASHER - FLAT - SS
15005-15
12
4
WASHER - SPLIT - SS
15005-10
4
5
no. 10 - 24 X 1/2
S/S SCREWS
15001-26
3
6
1/4-20 KEPS NUT
15021-09
12
7
NYLON WASHER
8
15005-08
GAS SPECIFICATIONS
SPECIFIED CATEGORY AND DELIVERY PRESSURES:
GAS CATEGORY
OPERATING PRESSURE
COUNTRY
INJECTOR SIZE
1 3P
37 mbar
GB, IE, FR, BE, PT, ES, CH
50 DMS
1 3P
50 mbar
NL, ES
52 DMS
1 3B/P
30 mbar
DK, SE, FI, NL
50 DMS
1 3B/P
50 mbar
FR, DE, CH, AT
53 DMS
UNIT GROSS INPUT RATING
G31 PROPANE
43,000 Btu / hr
12.6 Kw
G30 BUTANE
43,000 Btu / hr
12.6 Kw
4
Assembly Instructions
NOTE: Assembly of this heater requires basic mechanical skills. Proper assembly is the responsibility of
the installer.
STEP 1
FIG.01
Remove all individual components from all cartons. Dispose
of the remaining packaging.
STEP 2
Remove one protective end cap from the intake pipe, make
certain pipe threads remain wrapped with white teflon tape.
• Do not tape over the first two threads at the of the intake
pipe (fig. 01)
STEP 3
Locate the heater head assembly. Place the head
assembly on a stable horizontal surface. Please
allow for the entire length of the patio heater
when establishing a work area (i.e. workbench,
floor). Remove valve panel by removing the knob
then the (4) screws. Be careful when removing
valve panel so as not to tug on igniter wire that is
still attached. Carefully remove wire, (attached
with a push/pull connection).
FIG.02
Match
Light Cover
Firmly holding the safety valve with channel lock
pliers, thread the intake pipe clockwise into safety
valve until tight. Reattach the valve panel and
continue to step 4 to attach the post assembly.
Dynamic
5
Cooking
Systems
, Inc.
Assembly Instructions
STEP 4
Remove the protective endcap at the bottom of the intake pipe. Make certain that the threads remain
bare. Locate the reducer fitting and thread it onto the open end of the intake pipe. Hold the intake
pipe above the threads with your channel lock pliers and tighten the reducer fitting clockwise onto the
intake pipe.
HARDWARE USED
1) P/N 18159 Reducer Fitting (1)
FIG.03
INSTALL REDUCER
FITTING
INTAKE PIPE
CHANNEL LOCK
PLIERS
STEP 4
6
Assembly Instructions
STEP 5
Locate the post assembly. Carefully insert the
intake pipe through the top of the post assembly
being careful not to allow the head assembly to
slide too far down the post as undue scraping may
occur. Align the screw holes on the panel of the
burner head and the post assembly. Fasten the
burner and post with the #10 screws.
HARDWARE USED
1) P/N 15001-26
#10 Machine Screws (3)
STEP 4
BASE COVER
POST
STEP 5
7
Assembly Instructions
STEP 6
FIG.05
To join the post assembly with base cabinet
you will need to place the base upright on the
floor and lift the post assembly and place it
onto the cabinet with the burner panel facing
the same side as the door. Tighten the (8)
nuts and bolts at the bottom of post assembly
to the top of the cabinet base. Replace valve
panel utilizing step 2 in the reverse order.
2
1
3
HARDWARE USED
1) P/N 15003-05
2) P/N 15005-08
3) P/N 15021-09
1/4-20 Bolts (8)
Washers Nylon (8)
(Painted Models Only)
1/4-20 Keps Nuts (8)
STEP 7
Hold the reducer fitting with a 15/16” wrench
and tighten the hose / regulator assembly onto
the reducer fitting. (Not included)
STEP 8
Do not attach the reflector shield until all
leak testing has been completed.This unit is
tippable once the post assembly is fastened to the cabinet base and could damage or misshapen
the reflector shield prior to use.
FIG.06
HIGH
PRESSURE HOSE
8
LP Gas Hook-Up
The heater comes equipped with a regulator/hose assembly for connection to a standard 13kg
gas tank (not included) and 18” tank strap to secure the tank within the base. A dented or rusty LP
tank may be hazardous and should be checked by your LP supplier.
Never use an LP tank with a damaged valve. The LP tank must be arranged to provide for vapor
withdrawal from the operating cylinder.
Never connect an unregulated LP tank to the heater. The heater is shipped from the factory for LP
use, never substitute gases without first converting the heater with a factory supplied conversion kit.
Conversion kits are available through customer service.
LP GAS CONNECTION-REFERENCE
The heater is designed to house a 13 Kg. gas cylinder in the base assembly. Open the door, and
place the cylinder into the housing. The regulator can then be screwed into the cylinder. The regulator
and the tank have right-handed threads (clockwise to tighten no teflon tape is required). When
tightening be careful not to put too much force on the cylinder valve.
CHECK THE FOLLOWING CONNECTIONS
1) Regulator to gas cylinder.
2) All connections on the hose/regulator assembly.
3) The reducer fitting and the intake pipe.
4) Intake pipe fitting at base of safety valve. The remaining connections are to be tested after the
heater has been lit. (See lighting instructions on page 12).
5) Pilot tubing to safety valve.
6) Orifice fitting and Safety valve.
7) Pilot tubing and the pilot. Once leak tested, close the door and replace the valve panel.
NOTE: Gas connections on the heater head assembly
are leak tested at the factory prior to
shipment.
FIG.07
3
1
2
GAS CYLINDER
(NOT INCLUDED)
9
Gas Sounding Test
PRECAUTIONS
FIG.08
• Periodically check the whole gas system for leaks
or immediately check if the smell of gas is
detected.
• Extinguish all open flames
• Never leak test while smoking. If you can not
stop a leak, turn off the cylinder valve and call
the dealer you purchased the heater from or
customer service.
7
ORIFICE FITTING &
SAFETY VALVE
PILOT ASSEMBLY
&
PILOT TUBING
6
• Do not use heater until all connections have
been leak tested and do not leak.
• When leak testing, refer to the connections
diagrams below.
INTAKE
4
PIPE FITTING
• Only those parts recommended by the
manufacturer should be used.
• Substitution of parts can void warranty.
TEST POINTS
LEAK TEST
Make a soap solution of one part liquid detergent, and one
part water.The soap solution can be applied with a spray
bottle, brush or rag, soap bubbles will appear where a leak
is present. Make sure the safety valve control knob is in
the “OFF” position. Turn the gas supply on check for
leaks at leak point. If a leak is present, turn off supply,
tighten any leaking fittings, turn gas on and recheck.
10
FIG.09
5 PILOT TUBING
TO SAFETY VALVE
Assembly Instructions
STEP 9
FIG.10
Locate the cap nuts, washers (4 ea.) and
reflector shield.Tip the heater backwards and
support it with stable horizontal surface (i.e.
sawhorse, workbench step ladder).
Install the reflector shield with the cap nuts
and washers. Use caution not to over-tighten
or damage the reflector. Return the unit to
its upright position and continue to the next
section for recommended locations and
usage.
ACORN NUT
REFLECTOR
SPLIT WASHER
FLAT WASHER
HARDWARE USED
1) P/N 15005-15
2) P/N 15019-07
3) P/N 15005-10
Washers - Flat (4)
1/4 Cap Acorn Nuts (4)
Washers - Split (4)
BURNER HEAD
FIG.11
11
Locating Heater For Use
This outdoor heater is primarily for temporary
heating of outdoor patios, decks, spas, pool, and
work areas.
FIG.12
27”
COMBUSTIBLES
19” MINIMUM
This heater is not intended for indoor use or
enclosed area use.
Always ensure that adequate fresh air ventilation is
provided.
The minimum clearances to combustible
construction shown here must be maintained at all
times.
WALL / COMBUSTIBLES
The installation must conform to local codes, or in
the absence of local codes, with the standard for
the storage and handling of liquefied petroleum
gases.
CAUTION: The heater must be placed on
level, firm ground.
WARNING: Never operate in an explosive
atmosphere keep away from
areas where gasoline or other
flammable liquids or vapors are
stored or used. Heater will
engage the ground and start
to roll once a minimum angle
from center is established.
12
Lighting And Shutdown
BEFORE TURNING THE GAS SUPPLY “ON”
Visually inspect the hose assembly for evidence of excessive abrasion, cuts or wear. If the hose leaks it
must be replaced prior to use. The replacement hose assembly shall be that specified by the manufacturer. Make sure the surrounding areas are free of combustible materials, gasoline and other flammable
vapors or liquids.
BEFORE LIGHTING
For your safety, if relighting a hot heater, always wait 5 minutes. The heater should be inspected
(emitter screen, gas hookup, pilot assembly) before each use, and at least annually by a qualified
service person.
To light:
1) Open door.
2) Make sure regulator hose is connected to the heater intake pipe and regulator is connected to the
LP tank with both connections tight and leakproof.
3) Turn supply tank valve in a counter-clockwise direction. Check for leaks by applying soapy water to
the tank and hose connections.
4) Turn control knob counter clockwise to the pilot position.
5) Depress and hold in the control knob to begin pilot gas flow, hold in the control knob for (3)
minutes on new installations or cylinder changes to purge air from the lines, or (5) seconds for
regular relight.
6) While depressing knob, depress the igniter button which will snap indicating it has produced a spark
which should light the pilot. If not, depress control again and depress the igniter until lit or match
light.The pilot is located behind the match hole cover. Rotate the disc upward from the hole for
match lighting or viewing (see figure 2 on page 5).
7) Once the pilot is lit, continue to hold in the control knob for 30 seconds or until the pilot remains
lit after knob is released.
8) The burner may now be turned on to the full on position (all the way counter-clockwise) and then
reduce to the desired heat range.
9) Close door.
Relighting:
1) Turn control knob to off position.
2) Wait (5) minutes before attempting to relight pilot.
3) Repeat steps beginning with step (4) above.
Shut down instructions:
1) Turn control knob clockwise to the off position, the burner will make a slight popping sound when
extinguished.This is a normal condition.
2) Turn LP-tank gas valve clockwise to “OFF” position when heater is not in use.
13
Storage And Insect Warning
NOTE: When storing the heater, the connection between the LP cylinder and the heater must be
disconnected and the LP cylinder removed and stored outdoors in a well ventilated area
SPIDER & INSECT WARNING:
Spiders or insects can nest in the burners or orifices of this or any outdoor gas appliance.This is a very
dangerous condition which can damage the heater and render it unsafe for use.You must inspect the
burner at least once a year or immediately if any of the following conditions occur:
1) The smell of gas in conjunction with extreme yellow tipping of burner.
2) The heater does not reach temperature.
3) The heater glow is excessively uneven.
4) The burner makes popping noises.
If blockage exists, clean the burner immediately (see page 14).
CLEANING:
Cleaning must be done when the heater is COLD. Your heater will last longer if maintained properly.
It is important that the flow or combustion air must never be obstructed. Orifices and air openings
must be kept free of dirt and spiderwebs. NEVER use a cleaning agent which is flammable or
corrosive.
DCS recommends on painted models that the heater body components; below the stainless steel
burner head (post, door, and cabinet base) are periodically protected with a coat of automobile wax. If
repainting is necessary, paint only the post/base assembly. Do not paint the safety valve cylinder, valve
panel or instruction plate.
The ports of the burner head must remain clear so that the gas flow is unrestricted. The air inlet of
the venturi tube must also be kept clear for combustion air supply. If the heater is not performing
properly it may be necessary to clean the burner. See the next section for burner removal.
14
Burner Removal And Installation
NOTE: Unit must be cold before removal
FIG.13
Emitter assembly
BURNER REMOVAL
1) Remove reflector and emitter assembly by
removing the screws that fasten the
emitter assembly to the lower screen
cone.
2) Remove valve panel; avoid tugging the
ignition wire attached to backside of the
valve panel at the igniter.
3) Remove the 1/4 NPT nut (using a 7/8 open
end wrench) which holds the burner head
to the orifice fitting. Remove the burner.
LOWER
SCREEN CONE
1/4 NPT NUT
PIEZO
IGNITER
Any debris in the opening of the burner
assembly can be cleared with a straightened
piece of coat hanger. Any rust can be
removed with a wire brush. Never use wood
or plastic objects to clear ports, wood or plastic can break and block the ports.
BURNER INSTALLATION
Install the burner assembly by reversing the
(4) steps used for disassembly making certain
the burner assembly stands centered when
complete. After reassembly, the heater should
be tested observe the burner flame. It should
be as shown with the flame being blue with
slight yellow tipping.
VALVE PANEL ASSEMBLY
FIG.14
15
Pilot Cleaning
When storing the heater the connection
between the LP cylinder and the heater must
be disconnected and the LP cylinder removed
and stored outdoors in a well ventilated area.
FIG.15
THERMOCOUPLE
1) Removing the valve panel to gain access
to the pilot. (see figure 2 on page 5).
2) Remove the screw which fastens the pilot
to the lower screen cone.
PILOT
3) Hold the pilot with pliers, loosen and
remove the nut at the base of the pilot.
4) Inspect the pilot and tubing for blockage,
you should be able to see through the
pilot. If obstructed by debris clear with a
piece of wire.
IGNITER
5) The cap-like pilot orifice can be cleaned
with a sewing needle. Use the needle gently
on inside of the orifice to clear debris.
Never enlarge the opening of the pilot orifice.
The pilot burner provides a flame to light the main burner. It also heats a
thermocouple which must be hot before allowing the main burner to come
on. If the pilot is blocked (by debris, spider webs, etc); the pilot flame may
be small and the thermocouple may not heat up enough for the main burner
to come on. If this occurs it will be necessary to clean the pilot.
FIG.16
PILOT
ORIFICE
PILOT
TUBING
16
Troubleshooting
PROBLEM:
Pilot does not light
using the piezo
lighter.
Can you Match light the
pilot?
Piezo igniter problem. Is there a spark at the pilot
when the piezo is pressed?
YES
See lighting
instructions
Call customer service
for replacement pilot
assembly.
Is there adequate gas supply
available?
NO
Remove valve panel, make sure
igniter wire is attached to piezo
igniter. Touch valve panel to safety valve cylinder to ground, and
try again. Is there a spark?
Has the igniter wire insulation been
pinched, cut, or burnt away?
YES
YES
YES
NO
NO
Is gas cylinder full?
Is supply hose bent
or kinked?
NO
YES
NO
NO
Are lighting instructions being followed?
Replace piezo igniter.
call customer service for
replacement
YES
Check pilot for blockage.
See page 15
17
Straighten
hose
Troubleshooting
PROBLEM:
Is there adequate
gas supply?
Burner flame is
low.
NO
Fill LP cylinder
YES
Is the supply hose bent or kinked?
YES
NO
Straighten hose
Check the burner and orifices for
blockage, see page 15
PROBLEM:
Is there adequate
gas supply?
Emitter glow is
uneven.
Is the heater level?
YES
Is the control knob in the full “on”
position? (all the way counter clockwise)?
Note: It is normal for the bottom 1/2” to 1” of the emitter not to glow.
In addition, the section of the emitter above the valve panel may
also glow less than the rest of the emitter.
YES
NO
Fill LP cylinder
YES
Is the lower screen cone tilted?
NO
Level heater
YES
Loosen but don’t remove screws at top of
safety valve cylinder, level, retighten
NO
Clean burner
see page 15.
18
Parts List
1
ITEM
PART NO.
DESCRIPTION
1.
2.
2.b
3.
4.
5.
6.
7.
8.
9.
10.
11.
12.
13.
14.
15.
16.
17.
15019-07
15005-10
15005-15
23002-SP
15021-09
23018-01
15003-15
15001-26
12015
23083
15077
15005-23
23024
15001-26
23064
16025-4
23080
13025-XX
1/4-20 Acorn Nut
Split Washer
Flat Washer
Reflector
1/4-20 Keps Nut
Emitter Assembly
Bolt 1/4-20 x 3/4
Screw #10-24 x 1/2
Burner Head
Burner Assembly
Nut 1/4 NPT
Internal TH.Washer, 08
Match Hole Cover
Screws 10-24 x 1/2
Valve Panel Assembly
Piezo Igniter
LowerScreen Cone Assy.
Orifice LP Gas (refer gas
spec. table pg.4)
Flat Washer
Orifice Fitting
Safety Valve
Pilot WeldAssembly
Pilot Orifice LP Gas
1/4 Tubing Ferrule
Thermocouple
Pilot Tubing
Intake Pipe
900 Elbow
Test Point
Valve Block
Knob
Valve Support Bracket
18.
19.
20.
21.
22.
23.
24.
25.
26.
27.
28.
29.
30.
31.
15005-25
13024
13066
13231-01 LP
13028-10
13027
13229
23094
18018-03
18184
13226
18181
14154-01
23065
19
3
2
2b
6
4
5
7
8
24
9
21
10
22
11
23
16
17
25
18
27
28
12
30
15
14
19
Dynamic
Cooking
Systems,
Inc.
29
20
31
26
13
Parts List
ITEM
PART NO.
DESCRIPTION
1.
2.
3.
4.
5.
6.
7.
8.
9.
10.
23121-XX
23096-XX
23106-XX
17314
15003-15
15005-8
23112
18159
18290
23122
Post Assembly (1)
Base Assembly (1)
Door (1)
Manual (1)
1/4-20 Bolt (8)
Nylon Washer (8)
Tank Retainer
Reducer Fitting (1)
Rubber Foot (4)
Rubber Collar (1)
11.
12.
13.
14.
15.
16.
17.
18.
19.
18143
23112
18023
18024-03
23119
23108
15021-09
23114
14088
6” Wheel (2)
Axle (1)
Cap Nuts (2)
Door Handle (1)
SS Spring (1)
Latch Bracket (1)
1/4-20 Hex Nut (8)
18” Tank Strap (1)
Grommet (1)
Note : Please specify your model color when reordering
post, base assembly, or door (items 1-3).
1
10
2
8
6
5
4
17
15
3
14
18
7
19
11
13
9
12
20
As product improvement is an
ongoing process at DCS, we
reserve the right to change
specifications or design without
notice.
5800 Skylab Road, Huntington Beach, CA 92647 Tel: (714) 372-7000
Fax: (714) 372-7001 Customer Service: (888) 281-5698
www.dcsappliances.com
Part No. 17379 Rev. B
Litho in USA 08/2001