1
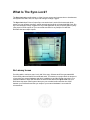
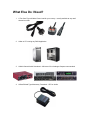
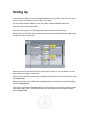
Owners Manual
If you’re reading this then your new Sync-Lock should be safe in your hands!
It will run off a standard Boss/Roland Type 9 Volt DC Negative Tip Power Supply. 200mA is
plenty.
Using the supplied External Power Supply you need to source a mains to Figure 8 Type power
lead suitable for your country.
Plug it in and your Sync-Lock is on and ready to go.
What Is The Sync-Lock?
The Sync-Lock takes audio pulses or ‘clicks’ from any source and converts them to simultaneous
and synchronous Midi Clock, Din Sync and Analogue Voltage Triggers.
The Sync-Lock Input Pulse to Output Sync conversion time is under 20 microseconds which
means you can generate zero-jitter, sample-accurate and perfectly grid-quantized Midi Clock, Din
Sync and Analogue Voltage Triggers from any DAW Application on any computer platform just by
using a pair of audio outputs on your connected soundcard or any Sampler or Hard Disk
Recorder that has multiple outputs.
No Latency Issues
Providing stable, continuous sync is only half of the story. Software and Driver generated Midi
Clock usually starts well before the soundcard audio. This means your project audio is always out
of sync with your external hardware and this is in addition to any start lag that may exist in your
external hardware to begin with. Because the Audio Pulses fed into the Sync-Lock from your
DAW share the same overall system latency as your recorded audio tracks the time offset
between your DAW audio and the sync output to your external hardware is now under 20
microseconds.
Inside The Box
1.
2.
3.
4.
5.
The Sync-Lock
Power Supply
Owner’s Manual
Sync-Gen Plug-In Installer CD
Y-Split Stereo Plug to Dual Mono Socket Adapter
What Else Do I Need?
1. A Two Core Figure 8 Mains Power Lead for your country – usually available at any retail
electronics outlet.
2. A Mac or PC running any DAW Application
3. A Multi-Channel Audio Soundcard – Minimum of four Analogue Outputs recommended.
4. A Boss/Roland Type Momentary Footswitch – DP2 or similar.
Connections
Left Hand Side
Power
[DC In] - Standard Boss/Roland Type 9 Volt Negative Tip Power
Supply. 200mA is plenty.
Top 1/4” Socket
[Audio Clock Input] - This socket is where the Sync-Lock receives
incoming continuous sync pulses.
Bottom 1/4” Socket
[Audio Start/Stop In] - This socket is where the Sync-Lock receives
incoming Start and Stop pulses.
Threshold LEDs
When sufficient input level to generate reliable sync/start-stop is received
at the Sync-Lock input sockets these LEDs will illuminate.
Right Hand Side
Top Midi Socket
[Midi Clock Out] – Standard Midi Clock is Output.
TRS 1/4” Socket
[Pulse Out] - Dual Function - This is a stereo socket. Connect using the
provided Y-Split that provides Tip and Ring connections to dual Mono
Sockets.
Tip Socket
[Tip] - Provides quantized Analogue Pulse Triggers at 16 per bar when
the Sync-Lock receives 24ppq at its Audio Clock Input.
Ring Socket
[Ring] - Provides a footswitch connection to force Stop/Reset/Ready.
Bottom Din Socket
[Din Sync Out] – Standard Din Sync is Output.
Start/Stop LED
Green is running and Red is Stopped/Ready.
Tempo LED
Flashes Red on every Quarter Note while running.
Setting Up
Initial setup of the DAW for use with the Sync-Lock takes a few minutes. Once done and saved
with the project as a template you never have to do it again.
On the included Software CDRom you will find a WAV Sample called Edited 964 Click.
Copy this to your computer Hard Drive.
Open up a new project in your DAW Application and create two new Audio Tracks.
Name these two Tracks [SL-Sync] and [SL-Start] or something that clearly indicates which tracks
are which to make it easy for you.
Now route these two new Audio Tracks to a spare pair of outputs on your soundcard – let’s call
them Output 3 and Output 4 respectively.
Make sure that Output 3 is patched with an unbalanced instrument lead to the [Audio Clock Input]
of the Sync-Lock.
Make sure that Output 4 is patched with an unbalanced instrument lead to the [Audio Start/Stop
Input] of the Sync-Lock.
Zoom right in at the start of the Sync-Lock Sync Track so that you are looking at a single quarter
note interval within a bar. This is the track where you will create the stream of audio pulses to
drive the Sync-Lock.
In your DAW Application Preferences – change the EDIT GRID to triplet divisions – this is
important because Midi Clock and Din Sync run at 24 Pulses Per Quarter Note and we need to
provide pulses to the Sync-Lock at these same intervals.
Check your Zoom settings and make sure you can see 24 grid markers for each beat in a bar.
Now drag or copy your 964 Click sample to the very start of the track.
(Note: If you are using a DAW Application that places a fade-up or volume envelope at the very
start of the Audio Phrase or Sample – make sure you disable this so the Sync-Lock gets the very
front of the Sync Pulse.)
Do this for the very first Sync Pulse Sample and then copy from that so they are all
identical!
[NB: Some DAW Applications also have settings relating to Looping – make sure there is no
audio muting enabled at the Loop Point]
Drag or copy and paste another to the very next 24th grid marker.
Do this six times and then select and copy these six samples to fill a full beat of 24.
Now select all 24 and copy this another 3 times to make a full bar.
Now you have one complete bar of 24ppq pulses locked to your DAW Tempo Grid.
Copy this first complete bar as many times as you need for the entire length of the song.
Your Sync-Lock master sync track is now complete.
The Start/Stop Track is very simple. This is the track that will be used to send a start and/or stop
signals.
On your Sync-Lock Start Track place a single 964 Click Sample at the start of Bar 1.
(Note: Again, the same applies here. If you are using a DAW Application that places a fade-up or
volume envelope at the very start of the Audio Phrase or Sample – make sure you disable this so
the Sync-Lock gets the very front of the Sync Pulse.)
That’s it.
Now Save your Song/Project as a Template so every time you start a new Song/Project – your
Sync-Lock will be ready to run every time.
Using the Sync-Lock
Input Level
All sound card and audio interfaces are slightly different but as a starting point set your Track
Output Levels that connect to the Sync-Lock to around -20dB.
The Sync-Lock has a wide Sync-Threshold window but too much or too little level will make the
output sync erratic. Don’t panic if things don’t sync up as they should straight away. Once you get
the right input level your external devices will lock up perfectly. Make a note of what works for
your audio interface and save it with your project.
Footswitch
The Footswitch is an important part in the operation of the Sync-Lock.
Because the sync input signal is coming off the DAW as Audio Pulses and we can stop playback
at any point; this in turn means that the Sync-Lock may not always be sent an Audio Stop Pulse
to reset the Din-Sync and Midi Clock devices.
The result being that all slave devices are left ‘waiting’ in limbo for the next sync signal and so restart exactly where they left off rather than starting from the beginning of the sequence.
If you do stop and restart your DAW (or Hard Disk Recorder) simply press the Footswitch once to
force all slaves to Hard Reset and wait for the Next Start/Sync command from Sync-Lock.
Play
Once you have set things up correctly, press play on your DAW and your connected Midi Clock,
Din Sync and Trigger driven devices will play in sync.
You should see the Start/Stop LED change from Steady Red to Steady Green which shows all
slave devices have received a Start Message.
You should also see the Tempo LED flash Red on each Quarter Note which indicates the SyncLock is sending correct tempo sync pulses.
External Start Offset Compensation
The ultra-fast, discrete component level detection system coupled with lean firmware coding built
into the Sync-Lock allows it to provide stable external synchronization with a fixed latency of 20
microseconds.
All external devices – software and hardware alike – take a fixed period of time to respond to a
start message and begin playing. Sometimes it’s a little. Sometimes it’s more. Another great
feature when using the Sync-Lock with any DAW Application is that you can very easily reduce
this offset to zero so that you get precision sync and perfect lock at the same time.
Here is a simple way to work out your start offset and eliminate it in your setup.
1.
2.
3.
4.
5.
6.
7.
8.
9.
10.
11.
Lockup your external device [say an MPC-3000] with your DAW via the Sync-Lock.
Record the Audio output from the MPC-3000 into your DAW – 2 Bars is plenty.
Edit the 2 Bar Loop perfectly so that it plays in time in the project.
Copy the loop into a new track so that is runs for a few minutes.
Start your song from the beginning making sure Sync-Lock is set correctly and your
MPC-3000 is running in sync.
Almost all DAW applications have a Track delay feature and most of these can be set in
[Samples] rather than [Milliseconds].
Make sure the DAW Audio Loop and the Midi Clock Driven External Audio are both
panned centre in your mix so you can hear Flam/Phase clearly.
While playing, adjust the track delay of the DAW Audio Loop in 20 sample increments
and listen to the sound.
Keep increasing the Track Delay like this until you get to a setting where the DAW Audio
and the External Audio almost Phase Cancel each other – it will be obvious!
Make a note of that Track Delay setting.
Set all your DAW Audio Tracks to this setting for perfect Sync Start with the outside
world.
Specifications
Input Impedance
10k
Input Socket Type
6.5mm Unbalanced. Phase
Independent.
Threshold Level Range
350mV - 1.4V
Optimum Input Level
500mV
Power Supply
9VDC Negative Tip 50mA
Start/Stop Input to Output Conversion Time
20 uSec
Clock Input to Sync Output Conversion Time
20 uSec
Trigger Output Type
+5v/20ms
Trigger Socket Output Impedance
1k
Footswitch Type
Boss/Roland – DP2
Why is all this important?
If you use a computer for making music there are many reasons you may wish to connect an
external sequencer or drum machine to it so they can play together in time for performance or
recordings.
Over the last 40 years of recorded music, much of what has been produced in almost any genre
you can think of has been done using synchronized electronic instruments. Certain styles like
Acid House, Techno and Trance came about through the connecting and synchronizing of
various rhythm and sequencing instruments in the early 1980s.
In that same time period there have been thousands of electronic instruments development that
are unique in the sounds and rhythms they make and the way we interact with them as
performance devices.
The modern DAW Application owes its very existence to this same heritage.
Early sequencing programs like Cubase or Notator Logic on the Atari 1040ST used the emerging
power and technology of computers to offer the same creative compositional features as their
earlier hardware ancestors but with even more scope and flexibility.
Move forward to today and much of what we see in Logic Pro, Cubase, Pro-Tools, Sonar and
Ableton Live has the same concept but with far more processing power and even more creative
scope. Despite modern Plug-Ins and Virtual Instruments emulating much of what has gone
before, musicians and producers still use vintage and current external hardware to make music.
Take a look at eBay and see the prices paid today for a Linn LM-1, a MiniMoog or a TB-303. All
are now over twenty years old. These instruments are still in very high demand despite high
quality audio samples and virtual software versions of them being available for a fraction of their
current real-world dollar value.
Getting a genuine vintage or retro analogue sound is an important factor as is the creative
performance potential and interface aspect of these instruments. The way we interact with
external hardware is different from software and invites hand-on interaction between players and
instruments.
With the DAW now taking centre stage as the creative hub of the modern music studio and with
so much quality external hardware being available to us to use in our music making, it follows that
we still need to connect them in a way that reliably keeps time.
Because Tempo and Rhythm are most important in this application – we need a Rhythmic Timing
Reference rather than an Absolute Timing Reference like MTC (Midi Time Code) or SMPTE
between the computer music application and the outside world.
Midi was introduced in 1983 so if you have an external hardware instrument made anytime after
that you would most likely do this using Midi Clock.
[TR-909/MPC-60/MPC-3000/Elektron Machine Drum/Roland MV-8800/Roland Fantom etc]
If you have vintage instruments made prior to this you would most likely use Din Sync or Sync-24
which uses Analogue Voltage Pulses on a 5 Pin Din Socket to achieve the same result.
[Roland TB-303/TR-808/TR-606/Sakata DPM-48/Korg KPR-77/Kawai R-100 etc]
If your instrument has neither Midi nor Din Sync but still allows external synchronization there will
be connections that allow separate external Analogue Voltage Triggers to drive the start/stop and
clocking directly.
[Linn LM-1/Linndrum/Roland SH-101/System 104 Sequencer/System 700/Moog 960/Analogics
ACS etc]
Sync In The Modern World
All good computer DAW applications provide Host Midi Clock to the outside world for Tempo
Synchronization.
None provide Din-Sync or Analogue Voltage Triggers directly.
To generate Din-Sync or Voltage Triggers from a DAW for vintage gear you must use external
hardware conversion of the Host Generated Midi Clock.
There are stand alone converters like our very own Sync-Shift MKII.
Other stand alone units include devices by Kenton, Encore, the Korg KMS-30, Roland SBX
Series and Garfield Electronics etc.
Some sequencers and drum machines also provide internal Midi Clock conversion.
Some examples being the Roland TR-707/MSQ-100/MSQ-700/Future Retro Mobius.
The conversion itself will always introduce a certain amount of delay and poor converter design
introduces sync jitter and results in sloppy timing in your external devices.
From this summary you can conclude that the only way to get Tempo Reference Sync to all the
wondrous external electronic musical devices that exist on the planet from any DAW application
of your choice is via Midi Clock.
USB and FireWire
Have a look at the back of your PC or MAC – no Midi Ports.
What we do have however are loads of USB and FireWire ports and you must connect a
dedicated interface to one of these to enable your DAW application to generate Midi Clock to the
outside world.
There are dedicated Midi only interfaces and most if not all external soundcards provide at least
one Midi Output too.
All good. Or is it?
As good as any DAW Application may be at keeping things in time within the computer itself,
keeping time with the outside world is a very different thing.
The shortcomings of Midi Sync in a modern computer based environment is a lengthy and
involved topic and beyond the scope of this simple introduction. Take a look at our website for
ways to check for yourself just how good or bad your Midi Clock stability really is.
How Does This Affect Me?
1: Sloppy Timing Sounds Bad.
If you connect external hardware (or even another computer application) to a DAW with rough
Midi Clock – you get sloppy timing. There is a simple test for this.
Take any external sequencer or rhythm unit and program in a quarter note rim shot pattern or use
any sound with a fast attack. Now record a few bars with the unit running under its own sync into
a two track editor like Peak or SoundForge. Zoom in and put markers right at the start of each
sound on the timeline. Set the preferences to view the timeline in samples and take a note of the
numbers between each quarter note. They should be close to equal depending on how good your
hardware is.
Now connect your Midi Out from your DAW USB or FireWire port and do the same test but this
time run your external hardware slaved to the DAW generated Midi Clock. Have a look at the
numbers and compare the results.
2: Recorded Audio is out of time.
The above example shows how poor DAW Midi Clock can make for a rough groove in a live
performance or studio Improvisation but the very same issue also applies when using DAW Midi
Clock to record external audio back into the DAW itself.
Let’s say you borrow an AKAI MPC-3000 to record some tight beats into your DAW Application.
Listening back, the groove sounds sloppy. You zoom into the recorded waveform and the beats
don’t line up with the quantize grid properly and need editing or re-timing to make it sit properly.
It sounds nowhere near as tight as when the MPC-3000 was playing by itself, and you must
spend time and effort correcting the result.
3. Latency
DAW generated Midi Clock will usually fire before your soundcard audio has time to get to the
speakers. This can be anywhere between 3ms and 25ms on a bad system. You can compensate
for it by ear in the DAW Application but it’s a less than rewarding experience.
The Sync-Lock addresses all of these three issues.
Innerclock Systems Pty Ltd October 2009
No part of this document may be reproduced as part unless prior written consent is obtained.
[email protected]
www.innerclocksystems.com