1
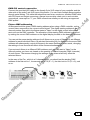
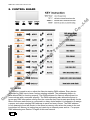
ia
n
g
Li
g
ht
in
g
T
ec
hn
o
lo
gy
C
o.
,L
td
RG-P47IC10-KE7A
—RGBW 4IN1 10W7Leds Indoor Par Can
G
ua
ng
z
ho
u
G
el
USER MANUAL
Guangzhou Geliang Lighting Technology Co.,Ltd
Tel:+8620-86872001/2/3
www.rigelighting.com
CONTENS
1. GENERAL
INFORMATION
1
2
,L
td
2. PACKING LIST
3. SCHEMATIC DIAGRAM
C
o.
2
2
gy
4. PRODUCT FEATURES
lo
5. TECHNICAL SPECIFICATIONS
ec
7. UNDERSTANDING DMX
4
6
7
10. MAINTENANCE AND CLEANING
7
Li
g
ht
9. DMX CHANNEL TRAITS
ng
z
ho
u
G
el
ia
n
g
11. 1-YEAR LIMITED WARRANTY
ua
3
in
g
T
8. CONTROL BOARD
G
hn
o
6. MOUNTING AND INSTALLATION
3
8
RGBW 4IN1 10W7Leds Indoor Par Can
1. GENERAL INFORMATION
,L
td
INTRODUCTION: Congratulations, you have just purchased one of the most innovative
and reliable lighting fixtures on the market today! The Par Can has been designed to
perform reliably for years when the guidelines in this booklet are followed. Please read and
understand the instructions in this manual carefully and thoroughly before attempting to
operate this unit. This manual contains important information regarding safety protocol that
must be strictly adhered to at all times.
hn
o
lo
gy
C
o.
UNPACKING: Thank you for purchasing the Par. Every Par has been thoroughly tested
and has been shipped in perfect operating condition. Carefully check the shipping carton
for damage that may have occurred during shipping. If the carton appears to be damaged,
carefully inspect your unit for damage and be sure all accessories necessary to operate the
unit have arrived intact. In the event damage has been found or parts are missing, please
contact our customer support team for further instructions. Please do not return this unit to
your dealer without first contacting customer support at the number listed below.
T
ec
CUSTOMER SUPPORT: We provides a customer support line, to provide set up
help and to answer any question should you encounter problems during your set up or
initial operation. You may also visit us on the web at www.rigelighting.com for any
comments or suggestions. For service related issue please contact us.
ia
n
g
Li
g
ht
in
g
Voice: +8620-86872001/2/3
Fax: +8620-86872001/2/3
E-mail: [email protected]
Forum: www.rigelighting.com/net
address: No.61 , fengshen da dao , Xinhua street , Huadu district , Guangzhou , China
Working Time: (BeiJing Time)
Monday to Friday
08:00~12:00 13:30~17:30 18:30~20:30
Saturday 09:00~12:00 13:30~17:00
Note: all the rest of China's holidays!
G
el
Warning! To prevent or reduce the risk of electrical shock or fire, do not expose this unitto
rain or moisture.
ho
u
Caution! There are no user serviceable parts inside this unit. Do not attempt any repairs
yourself, doing so will void your manufactures warranty.
Important: Damages caused by the disregard of the instructions in this user manual are not subject to warranty.
G
ua
ng
z
Please do not discard the shipping carton in the trash. Please recycle
whenever possible.
1
RGBW 4IN1 10W7Leds Indoor Par Can
2. PACKING LIST
,L
td
RGBW 4IN1 10W7Leds Indoor Par Can 1 pcs
User Manual 1 pcs
Power cable 1 pcs
3-XLR signal cable 1 pcs
u
G
el
ia
n
g
Li
g
ht
in
g
T
ec
hn
o
lo
gy
C
o.
3. SCHEMATIC DIAGRAM
ho
4. PRODUCT FEATURES
G
ua
ng
z
Unlimited programming effects
Professional color mixing
Soft light effect
High power Led 10W /pcs RGBW 4IN1
32-bit color (16.7 million color combinations)
Protection class IP43
Dual hanging bars ,firm and secure
Die cast aluminum fixture body
Quick and easy installation
Sealed for long, durable lifetime
Indoors use
2
RGBW 4IN1 10W7Leds Indoor Par Can
5. TECHNICAL SPECIFICATIONS
Li
g
ht
in
g
T
ec
hn
o
lo
gy
C
o.
,L
td
Black
Main Color
Dia cast aluminum
Main Material
body:Dia cast aluminum , glass plane , Plastic knobs
Control Mode
Automatic run mode, DMX-512 mode, Sound active mode
9 DMX Channels
DMX Channels
256 level
Gray Level
LEDs
RGBW 4in1 10W/pcs total 7pcs
Service Life
50000 Hrs
25°
Beam angle
IP43
Protect Level
Power supply
Power Requirements AC100-240V 50/60HZ DC:24V 4A
Power Consumption 70 Watts
Working Temperature
-25℃ ~ +45℃
Weights and Measures
width
8" / 204mm
8" / 204mm , 11.2" / 284mm (including dual hanging bars)
length
7.6" / 194mm , 10.2" /258mm (including dual hanging bars)
heigth
4.5kg
Net Weight
5.5kg
Cross Weight
g
6. MOUNTING AND INSTALLATION
el
ia
n
Cautions:
For added protection mount the fixtures in areas outside walking paths, seating areas, or in
areas were the fixture might be reached by unauthorized personal.
u
G
Before mounting the fixture to any surface, make sure that the installation area can hold a
minimum point load of 10 times the device’s weight.
ng
z
ho
Fixture installation must always be secured with a secondary safety attachment, such as
an appropriate safety cable.
G
ua
Never stand directly below the device when mounting, removing, or servicing the fixture.
CAUTION!
Be sure a qualified electrician performs all electrical
connections.
The Par is fully operational in two different mounting positions, hanging upside-down from
a ceiling, or set on a flat level surface (see illustration on next page). Be sure this fixture is
3
RGBW 4IN1 10W7Leds Indoor Par Can
kept at least 0.5m away from any flammable materials (decoration etc.). Always use and
install the supplied safety cable as a safety measure to prevent accidental damage and/or
injury in the event the clamp fails.
C
o.
,L
td
Mounting points
Overhead mounting requires extensive experience, including amongst others calculating
working load limits, a fine knowledge of the installation material being used, and periodic
safety inspection of all installation material and the fixture. If you lack these qualifications,
do not attempt the installation yourself. Improper installation can result in bodily injury.
gy
Be sure to complete all rigging and installation procedures before connecting the main
power cord to the appropriate wall outlet.
lo
7. UNDERSTANDING DMX
ht
in
g
T
ec
hn
o
DMX-512: DMX is short for Digital Multiplex. This is a universal protocol used by most
lighting and controller manufactures as a form of communication between intelligent
fixtures and controllers. DMX allows all makes and models of different manufactures to
be linked together and operate from a single controller. This is possible as long as all
the fixtures and the controller are DMX compliant. A DMX controller sends the DMX data
instructions to the fixture allowing the user to control the different aspects of an intelligent
light. DMX data is sent out as serial data that travels from fixture to fixture via data “IN” and
data “OUT” XLR terminals located on the fixtures (most controllers will only have output
jacks).
G
el
ia
n
g
Li
g
DMX Linking: To ensure proper DMX data transmission, always use proper DMX
cables and a terminator. When using several DMX fixtures try to use the shortest cable
path possible. Never split a DMX line with a “Y” style connector. The order in which the
fixtures are connected in a DMX line does not influence the DMX addressing. For example;
a fixture assigned a DMX address of 1 may be placed anywhere in the DMX chain, at the
beginning, at the end, or anywhere in the middle. The DMX controller knows to send data
assigned to address 1 to that fixture no matter where it is located in the DMX chain. The
Par can be controlled via DMX-512 protocol. The Par is a 9-channel DMX fixture. The DMX
address is set electronically using the controls on the LED menu.
G
ua
ng
z
ho
u
Data Cable (DMX Cable) Requirements (For DMX and Master/Slave
Operation): Your fixture and your DMX controller require a standard 3-pin or 5-pin XLR
connector for data input and data output (the figure on the next page is of a 3-Pin XLR
connector). If you are making your own cables, be sure to use two conductor shielded
digital DMX cable rated at 120 ohms; this cable is designed for DMX transmission and
may be purchased from your Elation dealer or at most professional lighting retailers. Your
cables should be made with a male and female XLR connector on either end of the cable.
Also, remember that a DMX line must be daisy chained and cannot be split, unless using
an approved DMX splitter .
Be sure to follow the above figure when making your own cables. Do not use the ground
lug on the XLR connector. Do not connect the cable’s shield conductor to the ground lug or
allow the shield conductor to come in contact with the XLR’s outer casing. Grounding the
shield could cause a short circuit and erratic behavior.
4
RGBW 4IN1 10W7Leds Indoor Par Can
,L
td
DMX-512 control connection
Connect the provided XLR cable to the female 3-pin XLR output of your controller and the
other side to the male 3-pin XLR input of the fixture. You can chain multiple fixture together
through serial linking. The cable that should be used is two conductor, shielded DMX cable
with XLR input and output connectors. Always be sure daisy chain your in and out data
connections, never split or “Y” your DMX connections unless you are using an approved
DMX splitter
lo
gy
C
o.
Fixture DMX addressing
All fixtures should be given a DMX starting address when using a DMX controller, so the
correct fixture responds to the correct control signal. This digital starting address is the
channel number from which the fixture starts to “listen” to the digital control information
sent out from the DMX controller. The allocation of this starting DMX address is achieved
by setting the correct DMX address on the digital display located on the base of the fixture.
ec
hn
o
You can set the same starting address for all fixtures or a group of fixtures, or set different
address for each individual fixture. Be advised that setting all you fixtures to the same DMX
address will subsequently control all fixtures in the same fashion, in other words, changing
the settings of one channel will affect all the fixtures simultaneously.
in
g
T
If you set each fixture to a different DMX address, each unit will start to “listen” to the
channel number you have set, based on the quantity of control channels (DMX channels)
of each fixture. That means changing the settings of one channel will only affect the
selected fixture.
G
ua
ng
z
ho
u
G
el
ia
n
g
Li
g
ht
In the case of the Par , which is a 9 channel fixture, you should set the starting DMX
address of the first unit to 1, the second unit to 10 (9 + 1), the third unit to 19 (10 + 9), and
so on.
5
RGBW 4IN1 10W7Leds Indoor Par Can
ho
u
G
el
ia
n
g
Li
g
ht
in
g
T
ec
hn
o
lo
gy
C
o.
,L
td
8. CONTROL BOARD
ng
z
8.1 ADDR
G
ua
This function is used to set or adjust the fixture’s starting DMX address. Every device
controlled by DMX has to have a unique starting address. The addressing feature is
what allows DMX to function properly. The DMX address of a fixture is what allows it to
communicate with a controller properly. The DMX addressing also allows the fixture to
ignore any DMX information coming from the controller that is not meant specifically for the
fixture. Because each fixture is connected in a daisy-chain fashion it is imperative to assign
a proper and unique starting DMX address to each and every fixture. The DMX address
is non-destructive and will remain in the fixture’s memory even when the power to the unit
is switched off. Memory is backed-up and retain by an internal power source . For proper
DMX addressing see Section 7/Page5 of this user manual.
6
RGBW 4IN1 10W7Leds Indoor Par Can
8.2 Automatic Mode
This function including FLAS,FADE,ACS- ,three modes,which allows the internal
programs to run in either stand-alone or master-salve mode.
This function allows you to control the fixture via the sound with two different effect.
8.4 Synchronization mode (Master-slave mode)
gy
C
o.
In “Master” mode the fixture will send DMX data to other fixtures connect via the DMX
chain. Please follow this way to set Master-slave mode:
Master: Automatic Mode or Sound Control Mode
Slave: address setting is "d001".
,L
td
8.3 Sound Control Mode
lo
9. DMX CHANNEL TRAITS
CH8
ec
T
ia
n
CH9
in
g
CH7
ht
CH6
Total Dimmer (0-100%)
Red dimmer (0-100%)
Green dimmer (0-100%)
Blue dimmer (0-100%)
White dimmer (0-100%)
Close
Strobe effect (slow-fast)
Close
Color fade effect (slow-fast)
Close
Color jump change effect (slow-fast)
Close
Sound active mode (color jump change)
sound active mode (flash)
Li
g
0-255
0-255
0-255
0-255
0-255
0
1-255
0
1-255
0
1-255
0
1-128
129-255
g
CH1
CH2
CH3
CH4
CH5
hn
o
Channel Value Function
el
10. MAINTENANCE AND CLEANING
u
G
10.1 The following points have to be considered during the
inspection:
G
ua
ng
z
ho
2. All screws for installing the devices or parts of the device have to be tightly
connected and must not be corroded.
3. There must not be any deformations on the housing .color lenses, fixations and
installation spots.
4. Mechanically moved parts must not show any traces of wearing and must not
rotate with unbalances.
5. The electric power supply cables must not show any damage, material fatigue or
sediments.
Further instructions depending on the installation spot and usage have to be adhering by a
skilled installer and any safety problems have to be removed.
In order to make the fixture in good condition and extend the life time .we suggest a regular
7
RGBW 4IN1 10W7Leds Indoor Par Can
C
o.
We recommend a frequent cleaning of the device please use a moist , lint-free cloth .
Never use alcohol or solvents
There are no serviceable parts inside the device please refer to the instructions under
“installation instructions”.
,L
td
cleaning to the fixture
1. Clean the inside and outside lens each week to avoid the weakness of the lights
due to accumulation of dust.
2. A detailed electric check by approved electrical engineer each three months,
make sure that the circuit contacts are in good condition, prevent the poor
contact of circuit from overheating.
gy
11. 1-YEAR LIMITED WARRANTY
A. Hereby warrants, to the original purchaser, our products to be free of
manufacturing defects in material and workmanship for a period of one years, (365
days) from the date of purchase.
●●
B. For warranty service, send the product only to the our factory. All shipping
charges must be pre-paid. If the entire instrument is sent, it must be shipped in
its original package. No accessories should be shipped with the product. If any
accessories are shipped with the product, we shall have no liability what so ever
for loss of or damage to any such accessories, nor for the safe return thereof.
●●
C. This warranty is void if the product is modified in any manner which we
concludes, after inspection, affects the reliability of the product; if the product has
been repaired or serviced by anyone other than the our factory unless prior written
authorization was issued to purchaser by us; if the product is damaged because
not properly maintained as set forth in the instruction manual.
●●
D. This is not a service contract, and this warranty does not include maintenance,
cleaning or periodic check-up. During the period specified above, we will replace
defective parts at its expense, and will absorb all expenses for warranty service
and repair labor by reason of defects in material or workmanship. The sole
responsibility of us under this warranty shall be limited to the repair of the product,
or replacement thereof, including parts, at the sole discretion of us.
●●
E. Our company reserves the right to make changes in design and/or
improvements upon its products without any obligation to include these changes in
any products theretofore manufactured.
ng
z
ho
u
G
el
ia
n
g
Li
g
ht
in
g
T
ec
hn
o
lo
●●
●●
G
ua
F. No warranty, whether expressed or implied, is given or made with respect
to any accessory supplied with products described above. Except to the extent
prohibited by applicable law, all implied warranties made by us in connection
with this product, including warranties of merchantability or fitness, are limited
in duration to the warranty period set forth above. And no warranties, whether
expressed or implied, including warranties of merchantability or fitness, shall apply
to this product after said period has expired. The consumer’s and or Dealer’s
sole remedy shall be such repair or replacement as is expressly provided above;
and under no circumstances shall we be liable for any loss or damage, direct or
8
RGBW 4IN1 10W7Leds Indoor Par Can
consequential, arising out of the use of, or inability to use, this product.
G. This warranty is the only written warranty applicable to our products and
supersedes all prior warranties and written descriptions of warranty terms and
conditions heretofore published.
G
ua
ng
z
ho
u
G
el
ia
n
g
Li
g
ht
in
g
T
ec
hn
o
lo
gy
C
o.
,L
td
●●
9
G
u
ho
ng
z
ua
g
ia
n
el
G
in
g
ht
Li
g
gy
lo
hn
o
ec
T
C
o.
,L
td


![[The Title of Document Property show here]](http://vs1.manualzilla.com/store/data/005994745_1-f223bc2d0ad8253f48371e2cafafa3dd-150x150.png)

![[The Title of Document Property show here]](http://vs1.manualzilla.com/store/data/005679617_1-26050dab619968a0ccd4ef0aac394c5d-150x150.png)