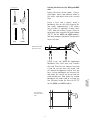
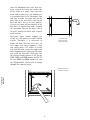
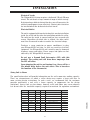
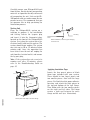
1
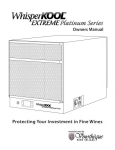
WhisperKOOL
®
XLT
Owner’s Manual
Protecting Your Investment In Fine Wines
Copyright ©1998-2004 Vinothèque Wine Cellars All rights reserved.
This manual, the product design, and the design concepts are copyrighted by Vinothèque Wine
Cellars, with all rights reserved. Your rights with regard to the hardware and manual are
subject to the restrictions and limitations imposed by the copyright laws of the United States
of America. Under copyright laws, this manual may not be copied, reproduced, translated,
transmitted, or reduced to any printed or electronic medium or to any machine-readable form,
for any purpose, in whole or in part, without the written consent of Vinothèque Wine Cellars.
Every effort has been made to ensure that the information in this manual is accurate.
Vinothèque Wine Cellars is not responsible for printing or clerical errors.
Vinothèque Wine Cellars reserves the right to make corrections or improvements to the
information provided and to the related hardware at any time, without notice.
Vinothèque, and WhisperKOOL are registered trademarks, and ECE is a trademark of
Vinothèque Wine Cellars. All rights reserved.
Mention of third-party products is for informational purposes only and constitutes neither an
endorsement nor a recommendation. Vinothèque Wine Cellars assumes no liability with regard
to the performance or use of these products.
Rev. 17-1103
TABLE OF CONTENTS
Table of
Contents
Introduction. . . . . . . . . . . . . . . . . . . . . . . . . . . . . . . . . . 2
What Is the WhisperKOOL® System?....................................... 2
How Does the WhisperKOOL System Work?..............................2
Receiving and Unpacking. . . . . . . . . . . . . . . . . . . . 3
Preparing the Wine Cellar...............................4
Mounting the Unit......................................................................5
Ventilation.................................................................................6
Cutting the hole for the WhisperKOOL unit...............................7
Installation.........................................................9
Electrical Needs........................................................................9
Sizing Unit to Room...................................................................9
Placement of Unit................................................................................11
Installing Thermostat...........................................................................11
PDT JR. Operating Instructions. . . . . . . . . . . . . 14
Using the WhisperKOOL System. . . . . . . . . . . . . . . 12 PDT Operating Instructions...........................15
Condensate Evaporator Switch................................................12
Drain Line...............................................................................12
Liquid Measuring Thermostat System
13
Normal Operation..........................................16
Maintenance.......................................................................16
Humidity Control.................................................................16
Troubleshooting Guide...................................17
Solutions to Common Problems..........................................17
Technical Assistance. . . . . . . . . . . . . . . . . . . . . . . 22
How to Contact Customer Service. . . . . . . . . . . . . . . . . . . . . . . . . . 2 2
Warranty Clarification on WhisperKOOL Product..23
Limits and Exclusions. . . . . . . . . . . . . . . . . . . . . . . . . . . . . . . . . . . . . . 2 3
Vinothèque Customer Service.............................................23
Warranty Service................................................................24
Limited Warranty. . . . . . . . . . . . . . . . . . . . . . . . . . . . . . . 25
NEW OWNERS PLEASE NOTE…
ALWAYS PLACE UNIT IN UPRIGHT POSITION
Do not start or plug-in your new unit for 24 hours after delivery. . .
Units are sometimes accidentally tipped onto their sides
during shipping which may allow compressor oil to escape their
reservoirs. . .
Premature starting—before the oil has had a chance to
resettle—can cause damage to the compressor and result in a
lack of cooling.
A DEDICATED 20 AMP CIRCUIT IS HIGHLY
RECOMMENDED FOR OPTIMUM OPERATION!
-1-
Introduction
INTRODUCTION
Thank you for purchasing the WhisperKOOL® wine cellar
temperature and humidity maintenance system.
Please take the time to read through the owner's manual so
you understand the correct operations of the WhisperKOOL
unit.
What Is the WhisperKOOL System?
The WhisperKOOL system is a specialized refrigeration unit
designed for one purpose only: to maintain the optimal
temperature and humidity levels conducive to the proper aging
of fine wines. It is a self-contained cooling unit designed to be
mounted through the wall into the wine cellar.
How Does the WhisperKOOL System Work?
• The WhisperKOOL system is designed to maintain humidity,
while measuring and maintaining the wine temperature in
the cellar. This is achieved by gently cooling rather than by
quick-chilling.
• Temperature Setting: The WhisperKOOL unit can be set at
any temperature within the acceptable wine-aging range of
50°F -to- 70°F. It is designed to cool 30°F cooler than the
ambient temperature of the space it is exhausting to.
• Humidity Control: There are no separate controls for
maintaining proper humidity. Humidity is managed through
the design and engineering of the unit. As the temperature
begins to drop within the wine cellar, the relative humidity
will rise, while the absolute humidity will stay the same. For
more information about this process, see Normal Operation
on page 14.
• The WhisperKOOL system is designed to be mounted
through an interior wall into the cellar. The unit will operate
correctly in a controlled environment to properly manage
the effective cooling of the cellar. The unit is not designed to
withstand the elements of an outdoor climate where summer
temperatures exceed 85 degrees or in winter environments
where temperatures reach freezing. The components are not
designed for these extreme conditions and premature failure
may occur.
Note: Improperly preparing your enclosure or incorrectly
installing your WhisperKOOL system may cause unit failure,
leaking of condensation, and other negative side effects.
-2-
RECEIVING AND UNPACKING
Please examine the WhisperKOOL packaging for any damage
to the carton. Note any damage on the bill of lading, shipper’s
receipt, or airbill. Damaged merchandise should be accepted.
Contact Vinothèque Customer Service immediately.
Please leave the WhisperKOOL System in its original box until
you are ready for installation. This will allow you to move the
product safely without damaging it. When you are ready to
remove the product from the box, see Installation on page 7.
Note: Save your box and all packing materials. They provide
the only safe means of transporting the unit.
-3-
Receiving and
Unpacking
A representative will file a claim with the shipping company,
arrange for a replacement unit to be shipped to you and for the
original unit to be picked up. In some instances, an inspection
must take place at the point of receipt, in which case you
will be contacted by the shipping company to schedule an
appointment to inspect the damaged goods.
PREPARING THE
WINE CELLAR
The performance and life of your WhisperKOOL System are contingent upon the steps you
take in preparing the wine cellar.
Preparing the
Wine Cellar
It is highly recommended that you obtain the assistance of a wine
storage professional.
Wine storage professionals work with licensed contractors, refrigeration technicians, and
racking companies to build well-insulated, beautiful, and protective wine cellars. In some
areas of the country, these professionals are not available. We have put together some
useful tips to assist in the installation process.
Our recommendations are meant to act as a guide in the process of building a proper
enclosure. Your intended location may have specific needs that we do not address.
Wall & Ceiling Framing
Build wine cellar walls using standard 2x4 or 2x6 construction methods and ceiling joists
following the guidelines of local and state codes in your area. The general rule for a cellar
is the thicker the walls, the higher the insulation factor, the better the cellar remains at a
consistent temperature.
Insulation
Insulation is REQUIRED with the use of the WhisperKOOL product; Standard “Fiberglass”
or “Rigid Foam” insulation is normally used in cellar construction, or in some cases,
“blown in” insulation is used. It is very important that all walls and ceiling be insulated to
keep the cellar temperature as consistent as possible during the summer and winter months.
The R factor or thickness of insulation is determined by the thickness of the walls and
ceiling. For example, fiberglass insulation of R13 is designed to be used in a 2x4 wall.R19
is used in a 2x6 wall. It is important to use the correct insulation for the wall thickness.
Vapor Barrier
Vapor barrier is REQUIRED if a climate control cooling unit is installed to keep the cellar at
the correct temperature and humidity. 6mm plastic sheeting is applied to the warm side of the
cellar walls.The vapor barrier must be either applied to the outside walls and ceiling, or if it is
impossible to get to the outside, then the plastic must be applied from within the cellar. The
most common method is to wrap the entire interior, leaving the plastic loose in the stud cavity
so the insulation can be placed between each stud. All walls and ceiling must be wrapped in
plastic for a complete vapor barrier.In areas of humidity, such as the southern and gulf states,
the vapor barrier will prevent infiltration of warm moist air. The moist air can cause mold
to form. The cooling unit will strip excessive moisture from the air and create water, which
will need to be dissipated back out of the cellar using the Condensate Evaporator system
or drain line. In dry climates, the vapor barrier will provide more control over retaining the
higher correct humidity within the cellar.
Ducting
The unit is designed to exhaust into an open area. Any attempt to duct the exhaust ports
to redirect airflow will result in voiding the warranty. The fans are not designed to push air
through a restricted duct system. The fans and compressor will be over worked and may
result in premature failure.
-4-
Unobstructed Airflow
Mounting the Unit
Unobstructed airflow to and from
the unit is a critical factor in
the unit’s overall performance.
Make sure there is a threefoot horizontal clearance in the
front of the unit. This will assure
that the unit can move the air
around in an efficient manner.
Avoid the attempt to camouflage
the unit by installing racking in
front of the unit. This will restrict
airflow and thus the unit’s ability
to work efficiently.
The unit should be mounted
within 18 inches of the top of
the room in order to achieve
sufficient cooling. As the room
cools down, the warm air will
rise to the ceiling. Mounting
the WhisperKOOL high in the
room will create a consistently
cool environment by capturing
the warm air and replacing it
with cool air. Mounting the unit
low in the room will result in
a temperature variation in the
room due to the unit’s inability to
draw warm air from the ceiling of
the cellar to the unit itself.
Preparing the
Wine Cellar
Front of WhisperKOOL, inside cellar.
Door
An exterior grade (1 3/4”) door must be installed as a cellar door. It is very important that weather stripping
is attached to all 4 sides of the doorjam. A bottom “sweep” or threshold is also required. The door must have
a very good seal to keep the cool cellar air from escaping out of the cellar. One of the most common problems
with cooling units running continually is due to the door not sealing properly. In cases where glass doors are
used and the room size is close to the recommended unit size, the next larger size WhisperKOOL should be
used. This will compensate for the insulation loss due to the inefficient door.
-5-
Ventilation
The necessity of dissipating heat away
from the unit is critical to the unit’s
performance and cannot be overstated.
As the unit operates and cools, a greater
amount of heat is generated on the exhaust
side of the unit. Adequate ventilation is
required in order to dissipate heat away
from the unit. If ventilation is inadequate,
the exhaust will heat up and adversely
affect the unit’s ability to cool. In some
cases, it may be advisable to install a
vent fan to dissipate heat within the
exhaust area on the backside of the unit.
However, you must have a fresh air inlet
as well. Do not attempt to install ducting
on the unit. The fans are not designed
for ducting and will result in premature
failure of the unit.
Preparing the
Wine Cellar
Unobstructed Airflow
Unobstructed airflow to and from the
unit is a critical factor in the unit’s
overall performance. Make sure there is a
minimum three-foot horizontal clearance
from the rear of the unit. This will assure
that the unit can move the air around in
an efficient manner.
Rear of WhisperKOOL exhaust area
Ambient Temperature Factor
The cooling system has the ability to cool
a maximum of 30°F below the ambient
temperature in the room it is exhausting to.
Therefore you want to exhaust the unit in a
room which will not exceed 85°F. Otherwise
the unit will not have the capacity to keep
the wine at a desirable 55°F.
-6-
Cutting the hole for the WhisperKOOL
unit
Tools Needed
Locate the center of the room. Using a
stud finder, locate two adjacent studs in
the walls, and mark them with vertical
lines.
Phillips
Screwdriver
Level
Using a level and a pencil, mark a
horizontal line on the wall between the
two studs, approximately 1.25 inches
(or as close as possible if more than
1.25”) from the ceiling. Using a ruler or
measuring tape, measure 16 inches down
(22.75” for the 6000 and 8000 models),
and mark another horizontal line parallel
to the first one.
Saw
Hammer
Mark the horizontal
lines with a level.
Cut horizontal
lines from stud to
stud.
-7-
Preparing the
Wine Cellar
Using a saw, cut along the uppermost
horizontal line until your saw reaches
the stud. Turn the saw around, inserting
it into the cut you have just made, and
cut toward the opposite stud so that you
have a clean horizontal cut between the
two studs. Be careful not to cut into the
studs themselves. Now make the second
horizontal cut from stud to stud on the
line 16 inches below the first cut (22.75"
for the 6000 and 8000 models).
Once the horizontal lines have been cut,
make vertical cuts using the inside edge
of the studs as a guide. Once you have
made both vertical cuts, you should have
a rectangular hole in the sheetrock. Now
you have to make the same hole on the
other side of the wall. Since you already
have one hole, this is an easy process.
Using a nail, mark all four corners of the
first hole by making nail holes through
the sheetrock. Then on the other side of
the wall, connect the holes with a pencil
mark and cut.
Sheetrock alone cannot support the
weight of a 65-pound (or more) cooling
system. Therefore, it is necessary to
frame the hole that you have just cut
with upper and lower supports. Using
two two-by-fours 14.5 inches in length
and eight 6d nails, secure the upper and
lower supports to the right and left studs,
just inside the sheetrock. Make sure that
the internal height remains at 16" for the
1600, 3000 and 4200 models and 22.75"
for the 6000 and 8000 models so that
the WhisperKOOL system will fit snugly
through the framed cut-out.
Cut vertical lines
along the inside
edge of the studs.
Preparing the
Wine Cellar
Frame the hole with
two-by-four supports.
-8-
INSTALLATION
Electrical Needs
The WhisperKOOL System requires a dedicated 110-volt 20-amp
circuit. The unit draws a large amount of amps at initial start up.
By designating a dedicated circuit breaker, you will guarantee the
unit has enough power to run effectively. Contact your electrician
for installation-of this dedicated electrical circuit.
Electrical Outlet
The unit is equipped with two electrical outlets, one for installation
inside the cellar and the other for installation outside the cellar.
The outlet on the inside is covered and has been secured with
screws. Regardless of which side is utilized, the other outlet
must then be covered in order to avoid a live electrical charge.
Purchase a surge protector or power conditioner to plug
your WhisperKOOL unit into. As with any sensitive electrical
equipment, the WhisperKOOL unit’s circuitry may be damaged
by power surges and spikes. Power surges and spikes are not
covered by the WhisperKOOL warranty.
Do not use a Ground Fault Interrupter (GFI) with this
product. The cooling unit will draw more amperage than
the GFI will allow.
Upon plugging the unit in and turning it on, there will be a
five minute delay before the unit starts. This is based on
the function of the thermostat.
Sizing Unit to Room
The specification chart will provide information on the unit’s room size cooling capacity.
There are circumstances in which a cellar design may require a larger unit due to
some existing design restrictions. In such a case, we recommend that the customer
consider purchasing a unit with a larger capacity to compensate for the design
limitations. Issues such as glass doors, concrete walls and floors may seem adequate
but do not offer the insulation capacity required to maintain the optimum environment.
MODEL
BTU
AMPS
AMPS
(starting) (running)
PRODUCT DIMENSIONS
ROOM SIZE
(H x W x D)
(cubic feet)
1600
13
4.5
15.75" x 14.25" x 17"
300
WK 3000
3000
16
6
15.75" x 14.25" x 17"
650
WK 4200
4200
18
9
15.75" x 14.25" x 17"
1000
WK 6000
6000
22
9.5
22.5" x 14.25" x 21.25"
1500
WK 8000
8000
32
10
22.5" x 14.25" x 21.25"
2000
-9-
Installation
WK 1600
Carefully remove your WhisperKOOL unit
from the box. Do not destroy your packing
material, as it provides the only safe means
of transporting the unit. Units weigh 65–
100 pounds and are cumbersome for one
person to carry. We recommend that you
get someone else to help you during the
installation process.
Testing Unit
Place the WhisperKOOL system on a
tabletop to prepare it for installation
and testing. Locate the by-pass plug
and insert it into the thermostat plug,
located on the front of the WhisperKOOL
System. Next, plug the system into a live
electrical outlet and turn the unit on. The
system should begin cooling. The system
may take up to 10 to 15 minutes before
running cool. Once the operation has
been tested, turn the unit off, unplug the
unit from the electrical outlet, and remove
the by-pass plug.
�
Test Plug
Before installation, use the by-pass test plug
to test the unit.
Note: If the system does not seem to be
running cool after 15 minutes, please
refer to the Troubleshooting Guide on
page 15.
Applying Insulation Tape
Locate the four precut pieces of black
foam tape included with your system.
There should be two larger pieces and
two smaller pieces. Start with the large
pieces. Peel back the white-paper adhesive
covering, and attach the large pieces to
the top and bottom of the unit flange.
Then follow with the two smaller pieces
on the right and left sides. This foam
creates a tight seal between the unit’s
flange and the wall (see illustration).
Adhesive Covering
Foam Tape
Flange
Installation
Attach precut foam tape to the unitʼs flange.
-10-
Electrical Outlet
The unit is equipped with two electrical
outlets, one for installation inside the
cellar and the other for installation
outside the cellar. The outlet on the
inside is covered and has been secured
with screws. Regardless of which side
is utilized, the other outlet must then be
covered in order to avoid live electrical
charge.
Two-by-Four Upper Support
Wall Stud
Wall Stud
2” x 4”
Lower Support
Drain line
Electrical Outlets
Slide unit, outside-in, into your
cellar, and secure all screws firmly
to the studs and supports.
Installing Thermostat
Attach the thermostat to the front of the
unit using the mounting bracket. Make
sure the black male plastic plug from
the unit is securely fitted into the female
plug located on the circuit board of the
thermostat. To complete the installation,
insert the small black screws into each
side of the thermostat PDT/PDT Jr.
securing it to the mounting bracket.
�
Attach the PDT mounting bracket.
Attach the PDT to the mounting bracket.
-11-
Installation
Placement of Unit
Slide the unit from the outside wall into
your wine cellar with the outer flange
flush to the outside wall. Secure the flange
to the wall through the predrilled holes.
The screws should penetrate the studs
as well as the upper and lower supports
to provide adequate support for the
WhisperKOOL System (see illustration).
Seal all cracks and gaps around the
WhisperKOOL unit to prevent air leakage.
If you use molding, it should be attached
to the walls, never to the WhisperKOOL
unit itself.
Using the WhisperKOOL
System
USING THE WHISPERKOOL SYSTEM
Power Switch
Drain Line
The new series WhisperKOOL units come
equipped with an On/Off switch. The On/
Off switch is simply used when the owner
does not need to utilize the equipment.
All units come with a drain line for
additional removal of excessive
condensate. This is a back up system to
the Condensate Evaporator. If the unit is
installed in a high humidity area of the
country, it is mandatory to install the
drain line attachment. In high humidity,
the cooling unit will strip excess water
from the air in order to maintain the
proper level of humidity within the cellar.
The Condensate Evaporator will heat and
dissipate the excess moisture through
the rear of the unit. However in extreme
humidity, additional condensate will be
created. Conversely the high humidity air
has less capacity to absorb additional
moisture through the exhaust of the unit.
Thus the drain line will prevent overflow
and leaking by allowing for discharge of
the additional condensate.
NOTE; (It will take five minutes before the
unit begins to operate once the switch is
placed in the “On” position. This is due
to the designed safety delay in the PDT
thermostat.)
Condensate Evaporator Switch
The Condensate Evaporator is a heating
element that automatically evaporates
excess condensate that accumulates in
the cooling system as a by-product of
refrigeration. Like most cooling systems,
WhisperKOOL uses heat from the
compressor to evaporate and eliminate
the majority of the water that accumulates
during normal use. However, during certain
weather conditions or in humid areas (above
80%), more condensate will accumulate
than the cooling system can evaporate
with heat from the compressor alone.
Only the WhisperKOOL units are equipped
with sophisticated heating elements that
automatically sense the presence of water
and work continually until the water is
gone.
Setting the Condensate Evaporator to the
“On” setting causes the heating element to
operate whenever water is present in the
compressor pan.
®
If your wine cellar is located in a dry
climate, there is a good chance that the
unit will not accumulate excessive water.
Therefore, elect to save electricity by
setting the Condensate Evaporator to the
“AUTO” position.
Switches
Location of control switches
-12-
LIQUID MEASURING THERMOSTAT
SYSTEM
All WhisperKOOL units come equipped
with our Precision Digital Technology
(PDT/PDT JR)
liquid
temperature
measuring thermostat system. This system
incorporates the following advantages:
To Use the thermostat:
1. Locate an empty wine bottle.
2. Fill 3/4 full with room temperature tap
water.
1. Self-Calibrating Probe: The probe
contains a sensor chip, which actually
communicates back and forth to the
thermostat. This results in a consistent
temperature setting and accuracy.
3. Place bottle probe securely into bottle.
Avoid pulling too much on the probe cord.
It may become disconnected resulting in
non operation of the unit.
2. Built in Defrost Cycle: The unit is
designed to shut off for five minutes
every ninety minutes in order to prevent
frost build up. This allows the cooling
unit to continue to cool effectively in
demanding environments. A count down
timer is observed by depressing the
center button on the thermostat. (PDT
upgrade version only)
Note: Thermostat can be set between
50°F and 76°F.
Remember: The WhisperKOOL System is
based on the temperature of the wine.
Do not be misled by thermostats reading
air temperature. The air temperature in
the cellar will be cooler than the liquid
temperature of the wine while it is coming
to optimum balanced temperature.
3. Heavy-duty Circuitry: The circuitry
within this new unit has been upgraded
to resist power surges, which play
havoc on electrical components. This
improvement will ensure years of
trouble-free use. However, for high
reliability, we still recommend that the
customer install a surge protector for
the unit itself.
Room-temperature
Water
4. Fahrenheit and Celsius Readout (PDT
upgrade version only): The thermostat
has the ability to produce the readout in
both Fahrenheit and Celsius for overseas
customers. The readout can be changed
by depressing both the center and right
buttons at the same time.
Measuring liquid temperature has a few
unique advantages:
1. Wine temperature is kept in a very
precise controlled environment. This
assures a consistent temperature.
Fill an empty bottle with room-temperature water;
then insert the probe.
2. By measuring the liquid temperature
rather than air, the unit will run less
often
-13-
Liquid Measuring
Thermostat System
4. Place bottle with probe in a central location
of your wine cellar.
PDT JR OPERATING INSTRUCTIONS
PDT JR Operating
Instructions
Operating Instructions for Vinothèque PDT JR. Thermostat
Indicators
There are three colored lights on the left side of the
thermostat:
• PWR (Green) – When this light is on, the unit is powered.
• RUN (Yellow) – When this light is on, the compressor is
running. If the light is flashing, the unit is currently in the fiveminute lockout.
• SET (Red) – This light flashes when the set-point temperature
is changed by pressing one of the three control buttons (see
below). It flashes once for each press of the ⇑ or ⇓ button, and
twice when the 55 button is pressed.
When the unit is first turned on, all three lights flash slowly
while the thermostat starts up. Once the unit completes its
start-up check, the compressor is locked out for five minutes.
During this time the RUN light will be flashing slowly (1 flash
per second).
All three lights will flash rapidly if there is no probe connected
to the thermostat.
Buttons
To change the set-point temperature, press either the ⇑ or ⇓
button. The SET light will flash once for each 1°F the set-point
is changed. This set-point will remain in memory until you
change it.
If you forget where the unit is set, pressing the 55 button will
reset the set-point to 55°F and the SET light will flash twice.
The temperature cannot be adjusted below 50°F or above 76°F.
Attempting to set the unit outside this range will cause the SET
light to rapidly flash.
Operation
Whenever the compressor shuts off normally, a five-minute
lockout period begins and the RUN light will be flashing slowly
(1 flash per second).
If the compressor runs for 90 continuous minutes, a five-minute
defrost cycle is forced, during which time the compressor will
not run. During this defrost cycle the RUN light will be flashing
rapidly (2.5 flashes per second).
-14-
PDT OPERATING INSTRUCTIONS
The unit is set at 55°F at the factory. To raise or lower the
set temperature, press the set button while at the same time
pressing either the arrow up or arrow down button.
1
WINE Temperature Indicator
Wine Temperature Reading
WINE
ON
SET
2
3
LED Screen
PDT
55F
Precision digital Technology Thermostat
Temperature
SET
4
5
7
Temperature SET Indicator
Button
Unit ON Indicator Button
6
UP Arrow Button
8
DOWN Arrow Button
SET Temperature Button
2. LED Screen: Displays your thermostat readings.
3. Wine Temperature Reading: The temperature the water
bottle is registering to the thermostat.
4. Temperature SET Indicator: A red LED bar will light up when
you are setting the temperature.
5. Unit ON Indicator: A red LED bar will light up every time the
unit turns on to run a cooling cycle.
6. SET Button: Used to set the temperature you want the unit to
maintain.
7. UP Arrow Button: Used with the SET button to set temperature
higher. In addition, by pressing and holding the button it will
allow you to see the 5-minute count down.
8. DOWN Arrow Button: Used with the SET button to set
temperature lower.
*Up and Down Arrow Buttons used simultaneously will change
the temperature read out from Fahrenheit to Celsius*
-15-
PDT Operating
Instructions
1. Wine Temperature Indicator: A red LED bar will light up
when the thermostat is reading the liquid temperature in the
bottle via the probe. This will remain lit and the temperature
you see displayed is what the probe is reading.
NORMAL OPERATION
WhisperKOOL systems are designed to maintain both
temperature and humidity. Once the system is installed and
the temperature set, it will run continuously until the wine
cellar is at your set wine temperature. This may be as much as
two weeks, depending on the size of the room, the quality (Rvalue) of insulation, the original temperature of the wine, and
the number of bottles residing in the cellar. Once the cellar has
achieved the set temperature, the WhisperKOOL unit will cycle
to maintain ±0.5°F of your set temperature.
The WhisperKOOL system will run more often than a
refrigerator or air conditioner, due to its gentle cooling
and humidity maintenance.
Normal
Operation
People often make the mistake of comparing the performance
of refrigerators with the performance and cycling of wine
storage equipment. Wine cellar cooling systems are highly
specialized and designed for one purpose only–long term
storage of wine.
Maintenance
The following maintenance should be performed on your
WhisperKOOL unit at least once every six months to promote
longevity and optimal performance.
Vacuum the back of the WhisperKOOL unit to clean the
condenser coils and prevent air blockage. The condenser coils
reside behind the grill on the back of the WhisperKOOL unit.
Don’t try to open the unit itself. Just vacuum the surface of the
grill and remove any lint or dust that has accumulated.
Humidity Control
There are no separate switches in order to maintain humidity.
The cooling unit is designed to maintain relative humidity at
50-70%.
The WhisperKOOL units do not create humidity. If you live in
a dry area of the country you many need to create humidity in
the wine cellar. This can be done by introducing a non-heat
humidifier, or installing a small fountain within the cellar.
The back side of a
WhisperKOOL unit.
Intake Grill
-16-
TROUBLESHOOTING GUIDE
Problem
Likely Cause
The unit does not
cool the room
Remedy
Inadequate door seal
Improperly mounted unit
Unit has inadequate ventilation
See “Door Seal” section on pg. 16
See “Unit Mounting” section on pg. 17
See “Airflow” and “Ventilation” sections on pg. 15
Water leaking out
the front fan vents
Internal condensation drain
is clogged
See Water Leaking, Front in the
“Condensation” section on pg. 17
Water leaking
from the rear
Condensate Evaporator is not
properly set for local climate
Drain line is not attached
See Water Leaking, Rear in the
“Condensation” section on pg. 18
See “Drain line” section on pg. 10
Unit is icing up
Thermostat is faulty
Unit is low on refrigerant
See “Thermostat” section on pg. 17
See “Icing Up” section on pg. 18
Unit isn’t running
Problem with local electrical
or makes intermittent circuit
clicking noises
See “Power Requirements” section on pg. 19
Try this first!
Clean off any accumulated dust, lint, or other debris from the front and rear
intake grills. This will restrict the airflow and may affect the unit’s ability
to function properly. Periodically cleaning the unit’s vents will help assure
maximum cooling efficiency.
Ventilation
Proper ventilation of the WhisperKOOL unit is one of the most
important and often overlooked issues associated with the unit’s
performance.The WhisperKOOL unit does create a large amount
of heat, which needs to dissipate away from the unit freely in
order to cool correctly. This issue is sometimes overlooked for
several reasons:
1.) If there is inadequate ventilation on the rear side of the unit,
this will result in further heat buildup and will cause it to
recirculate the hot air near the ceiling on the exhaust side of
the unit, therefore limiting the ability to cool the room.
-17-
Troubleshooting Guide
Airflow
Proper airflow is critical to the performance of the WhisperKOOL
unit. Any obstruction to the intake and exhaust ports on either
side of the unit will compromise the unit’s ability to cool. Make
sure the WhisperKOOL unit fan vents are clear. Check the front
and rear intake vents for any possible obstruction. There should
be a minimum clearance of three feet directly in front of the
intake and exhaust vents.
2.) Even though the space may seem to be
adequate, the heat needs to be able to
dissipate away from the unit. A lack
of ventilation will cause the room to
become extremely warm.
If the air temperature is cooling, it confirms
a lack of proper ventilation.
If the exhaust area is confined, (for example,
if the unit vents into a crawlspace), then
as the temperature outside the unit rises,
the WhisperKOOL unit must expend more
energy (and will generate more heat) in
order to maintain a cool temperature inside
the room. Eventually, the unit cannot keep
up and the temperature inside the cellar
climbs.
3.) The WhisperKOOL unit is designed
to cool 30°F cooler than the ambient
temperature of the room it is exhausting
the hot air to (rear side of unit). This
means that in order to maintain an
optimum temperature of 55°F, the
temperature on the exhaust side of
the WhisperKOOL unit cannot be more
than 85°F.
PDT
on digital
Precisi
WINE
ON
SET
55 F
Techno
To solve the problem, make sure that the
WhisperKOOL vents into a space where
heat cannot build up.
Door Seal
A high quality door with a proper seal
is another important aspect of a welldesigned cellar. If there is a gap between
the bottom of the door and the floor, the
cool air will sink and flow out beneath
the door. While the release of the cool
air may be subtle, it will require the
WhisperKOOL unit to continue to operate
without achieving the desired results. Use
good-quality weather-stripping and seals
around the cellar door to prevent cool air
leakage. For more details, see Preparing
the Wine Cellar, “Door” on page 5.
stat
logy Thermo
e
Temperatur
SET
Air flows on both sides of the wall.
Troubleshooting Guide
In order to determine if ventilation may be
the problem, try the following tests.
1.) Measure the air temperature at the
intake grill on the backside of the
WhisperKOOL unit. Measure the air
temperature in front of the circulation
fans in front of the unit. If there is a
30°F temperature variation, then the
unit is running correctly.
PDT
Precision
WINE
ON
SET
55 F
digital
tat
gy Thermos
Technolo
ature
Temper
SET
2.) It the air temperature is greater than
85°F at the intake grill on the backside
of the WhisperKOOL unit, then the
room is inadequately ventilated.
3.) To further test this situation, locate
a household fan and point it directly
to the rear intake grill on the unit.
Operate the fan at maximum capacity
with the rear area open to ventilation.
Wait fifteen minutes and measure
the air temperature coming from the
circulating fans in front of the unit.
Cool air drops and exits beneath door.
-18-
Unit Mounting
Mounting the unit in the cellar has a
significant impact on the unit’s ability to
cool the air in the room. A law of nature
states that warm air rises while cool air
falls. The unit must be mounted high in
the room in order to capture the warm
air and replace with cool air. If the unit
is mounted low in the cellar, it has a
tendency to circulate the cool air at the
bottom of the cellar but has no ability
to draw the warm air from the higher
space in the cellar. This will result in an
inconsistent temperature range.
Let the unit run for 24 hours.
5.) After 24 hours, use an accurate
thermometer (preferably a highquality digital thermometer) to
measure the temperature of air
coming out of the WhisperKOOL
unit’s front fans. If it is cooling the
room, then the problem may lie with
the thermostat.
If the WhisperKOOL unit cools the room
without the PDT installed, then the
thermostat should be replaced. The bypass plug will allow the WhisperKOOL
unit to continue to function, but it will not
be able to monitor or maintain the correct
temperature automatically without the
thermostat.
If you continue to run the WhisperKOOL on
the by-pass plug without the thermostat,
you will need to turn off the WhisperKOOL
unit periodically to keep it from icing up.
We recommend cycling the unit on and
off every eight hours if possible or as
needed.
For replacement of the PDT, please
contact Customer Service. See Warranty
Service on page 22.
Mount WhisperKOOL high in the room.
Thermostat
If the WhisperKOOL unit is not cooling
the room, it might be due to a faulty
thermostat. Use the following procedure
to test the thermostat.
Condensation
Water Leaking, Front
1.) Unplug the WhisperKOOL unit.
2.) The PDT thermostat is attached
to the front of the WhisperKOOL unit
with two screws, one at each end of
the thermostat. Remove the screws and
detach the PDT.
3.) Unplug the PDT from the main
unit, and plug in the by-pass plug.
The by-pass plug lets you run the
WhisperKOOL without having the
thermostat installed.
The only way to effectively prevent
this problem is to make sure that the
WhisperKOOL is installed in a relatively
dust-free environment.
4.) Plug the WhisperKOOL unit back
in. The unit will begin running and
cooling immediately.
-19-
Troubleshooting Guide
Moisture condensation is the natural result
of cooling air. The WhisperKOOL has
an internal drain for removing collected
condensation from the evaporator coil
going to the compressor pan where it
is evaporated and dissipated into the
exhausting environment. Water leaking
from the front vents is caused by build-up
of dust from the air circulating inside the
cellar. This accumulation clogs the drain
line from the evaporator pan, resulting in
the overflow.
Your options to resolve this problem are
either to send the unit back to the factory
or disassemble the unit and clear the
clogged drain line yourself. However,
unauthorized repairs will void warranty.
Icing Up
In the unlikely event that your WhisperKOOL
unit is icing up in front, unplug the unit for
24 hours and allow the ice to melt away.
Plug the unit back in and test on the bypass plug for 24 hours (refer to page 8).
Within the 24 hour period the unit should
not develop ice and should be generating
cold air. If the unit is functioning properly
when on by-pass, the icing may have been
a result of a faulty thermostat (see page
17). If while on by-pass, the unit continues
to form ice, first check that all 4 fans are
working. Secondly, check to see if the
unit is blowing cold air. If the air is cool to
luke warm, but not cold, the unit requires
further service. The WhisperKOOL may
have low refrigerant.
Please contact Customer Service for
assistance and instructions.
Water Leaking, Rear
The WhisperKOOL product is designed to
dissipate excessive moisture by collecting
it in the compressor pan and using the
natural compressor heat along with a
heating element to remove condensate.
Operating the WhisperKOOL in excessively
humid conditions can cause the unit to
accumulate more condensation (water)
then the unit can dissipate while operating,
resulting in leakage. In order to resolve
this issue, the unit is designed with both
a Condensate Evaporator control switch
and an external drain line (see page 10).
The Condensate Evaporator switch will
allow you to operate the heating element
continuously whether the unit is operating
or not. (See Condensate Evaporator on
page 10.)
Troubleshooting Guide
Please contact Customer Service for
assistance and guidelines.
-20-
Troubleshooting Guide
Power Requirements
When the WhisperKOOL starts to operate,
it draws several times more power (amps)
during the start-up cycle than it does
during normal operation. Make sure you
have the WhisperKOOL on a dedicated
electrical line at a minimum of 20 amps.
See the Product Information Table on
page 7 to find the correct amperage
requirement for your unit.
Make sure that the power line for the
WhisperKOOL does not have any additional
equipment installed on that circuit. An
extra load on the line may be drawing
power away from the WhisperKOOL
unit. In some cases it may not be readily
apparent that an additional appliance or
electrical device has been installed on
the circuit breaker. In addition, the unit
may not be used on an electrical line with
a Ground Fault Interrupter (GFI). The
WhisperKOOL will draw more amperage
than the GFI will allow.
Consumer Care Program
The Consumer Care Program is designed
to expedite the shipment of a replacement
unit to your location quickly in order to
get your cellar cooling again.
This program involves contacting our
Customer Service department to
purchase a refurbished unit in exchange
for your original unit. You will receive
a unit which has undergone our five star
refurbishment program. The unit is tested
in our controlled environment and is
ready for immediate use.
Upon receiving the unit, you will be
required to repackage your old unit and
ship it back to the factory.
Complete details of our program including
pricing are available by contacting our
Customer Service department.
-21-
Technical
Assistance
TECHNICAL ASSISTANCE
Vinothèque Customer Service is available Monday through
Friday from 8:00 a.m. to 4:00 p.m. Pacific Standard Time.
Please make sure that you have the following information
available before you call:
• The model and serial number of your WhisperKOOL
unit.
• Type of thermostat used with your WhisperKOOL.
• Location and installation details, such as ventilation,
construction and size of room.
How To Contact Vinothèque Customer Service
Telephone
(209) 466-9463 (800) 343-9463
Fax
(209) 466-4606
Website
www.vinotheque.com
Address
Vinothèque Wine Cellars
1738 East Alpine Avenue
Stockton, CA 95205
-22-
WARRANTY CLARIFICATION ON
WHISPERKOOL PRODUCT
associated with proper installation will
cause the unit to operate incorrectly and
limit its ability to cool and the longevity of
the unit itself.
Limits and Exclusions
There are no express warranties except as
listed in the Limited Warranty on page 23.
Follow Troubleshooting Outline
In order to avoid any unnecessary
expense it is essential that you follow
the troubleshooting guidelines provided
herein. The majority of the problematic
issues associated with the WhisperKOOL
product have to do with the incorrect
design of the cellar or improper use
of the product rather than a faulty
WhisperKOOL unit itself. Many of the units
returned for repair test
out satisfactory within
our correct operating
parameters. Please take
the time to review the
troubleshooting guide
prior to contacting
our Customer Service
department.
All express and implied
warranties, including
the warranties of
merchantability and
fitness for a particular
purpose, are limited to
the applicable warranty
period as set forth
above.
Vinothèque Customer
Service
We at Vinothèque strive
to provide the best possible customer
service for our clients. Because each cellar
design is custom and has its own unique
design parameters, we are often at a
disadvantage in terms of assisting the
customer with their specific problems.
We are required to ask multiple questions
regarding fundamental design issues
such as where the unit is mounted, what
type of power and amperage the unit is
connected to, etc. The majority of the
problems associated with the product are
associated with the incorrect installation
or sizing of the units.
Some states do not
allow the exclusion
or limitation of consequential damages,
or limitations on how long an implied
warranty lasts, so the above exclusions
or limitations may not apply to you. This
warranty gives you specific legal rights,
and you may also have other rights, which
vary from state to state.
If a problem arises with your WhisperKOOL
system during the warranty period, you must
contact Vinothèque Customer Service for
warranty coverage and repairs.
If a problem is not handled to your
satisfaction, write to Vinothèque Wine
Cellars, Attn. Customer Service, 1738
East Alpine Avenue, Stockton, CA 95205
or call (209) 466-9463.
Your Distributor or Cellar Contractor
should be able to assist you with
designing and correctly installing the unit
to adequately cool your cellar. If you have
built your own cellar independent of a
professional consultant or contractor, you
Correct WhisperKOOL Installation
Failing to address all of the variables
-23-
Warranty Clarification
on WhisperKOOL Product
Vinothèque shall not be liable for special,
incidental, consequential, or punitive
damages, including, without limitation,
loss of goodwill, profits, or revenue; loss
of wine; loss of use of this product or any
associated equipment; cost of substitute
equipment; downtime costs; or claims
of any party dealing with buyer for such
damages, resulting from the use of this
product or arising from breach of warranty
or contract, negligence, or any other legal
theory.
may be unfamiliar with all of the complex
issues associated with the proper use of
this product. Therefore read and follow
the installation instructions and troubleshooting guide carefully prior to shipping
the unit back to the factory for repair.
to the box must be noted on the
shipping document. Please contact
Vinothèque Customer Service to
assist in filing a damage claim.
Damage must be reported within 15
days.
2.) In the event that the consumer has
received a unit that is operating
incorrectly, Vinothèque Customer
Service must be contacted for
warranty coverage.
Warranty Clarification
on WhisperKOOL Product
Warranty Service
To obtain warranty service, you must:
1.) Be the original retail purchaser of
the product. Serial Number and/or
Proof of purchase is required.
3.) In the event that the unit is
inspected and approved for
warranty coverage, Vinothèque will
repair the unit, ship it back to the
customer freight prepaid
(2
day air).
2.) Contact our Customer Service
Department at (800) 343-9463
to receive a Return Merchandise
Authorization number and a prepaid
return shipping tag.
4.) If the unit tests without fault,
the customer will be responsible
for paying the freight charges
associated with returning the unit
to their location.
3.) Package the unit in the original
box or equivalent. This will assure
the necessary protection required
during shipping. Mark the box with
the return address, RMA# and
arrows noting “this end up”.
Testing a Return Unit
All units sent in for repair are tested
thoroughly in order to determine whether
a malfunction is occurring. The following
test procedures are conducted.
Items not Covered Under Warranty
Removal and installation of unit into cellar.
Unauthorized repairs made on the unit.
Damage resulting from shipping.
The unit will first be physically inspected for
damage. Damaged units due to freight are
the responsibility of the customer, unless
a damage claim has been initiated.
Incorrect installation and use of the
product, including and not limited to:
Inadequate sizing of the unit.
Amperage load is tested to assure no
electrical malfunctions are evident. The
units will draw significant amps upon start
up. Assuring a 20 amp dedicated circuit
is vital to the performance of the unit. If
the unit is testing adequately within our
parameters, a thermostat graph test is
conducted. This involves placing the unit
in a controlled environment and having it
run at maximum performance levels. The
graph will document whether the unit is
cooling sufficiently and consistently.
Inadequate ventilation to the exhaust side
of the unit.
Constricted airflow, such as ducting, to
and from unit.
Insufficient power source from which to
draw proper amperage.
Freight
Vinothèque certifies that all units
manufactured have been tested and are in
correct operating condition upon leaving
the factory.
If the unit fails to cool adequately, the
unit will then be examined for refrigerant
amounts and charge.
1.) It is the responsibility of the
consumer to inspect the unit upon
arrival to assure that no freight
damage has occurred. Any damage
All warranty repairs will be completed
upon detection.
-24-
LIMITED WARRANTY
Vinothèque Wine Cellars (Vinothèque) warrants this product against
defects in material or workmanship as follows:
1. LABOR: For a period of one year from the date of purchase.
If this Product is determined to be defective, Vinothèque will
repair or replace the Product, at its option, at no charge.
After the Warranty Period, the customer is responsible for all
labor charges.
2. PARTS: Vinothèque will supply, at no charge, new or rebuilt
replacements parts in exchange for defective parts for a
period of one (1) year. The compressor part only is warranted
for five years.
3. FREIGHT:During the first twelve months from the date of
purchase, Vinothèque will cover freight for the repair of units
under warranty to customers within the continental United
States. All WhisperKOOL units must be shipped to the
factory. Vinothèque will pay to have the unit shipped back to
the customer.
Proof of purchase in the form of a bill of sale or receipted invoice,
which is evidence that the unit is within the warranty period, must
be presented to obtain warranty service.
This warranty is invalid if the factory-applied serial number has been
altered or removed from the Product.
REPAIR OR REPLACEMENT AS PROVIDED UNDER THIS
WARRANTY IS THE EXCLUSIVE REMEDY OF THE CONSUMER.
VINOTHÈQUE SHALL NOT BE LIABLE FOR ANY INCIDENTAL
OR CONSEQUENTIAL DAMAGES FOR BREACH OF ANY
EXPRESS OR IMPLIED WARRANTY ON THIS PRODUCT.
EXCEPT TO THE EXTENT PROHIBITED BY APPLICABLE LAW,
ANY IMPLIED WARRANTY OF MERCHANTABILITY OR FITNESS
FOR A PARTICULAR PURPOSE ON THIS PRODUCT IS LIMITED
IN DURATION TO THE DURATION OF THIS WARRANTY.
Some states do not allow the exclusion or limitation of incidental or
consequential damages, or allow limitations on how long an implied
warranty lasts, so the above limitations or exclusions may not apply
to you. This warranty gives you specific legal rights, and you may
have other rights, which vary from state to state.
-25-
Limited Warranty
This warranty does not cover cosmetic damage caused during
installation or damage due to acts of God, accident, misuse, abuse,
negligence, commercial use, or modification of, or to any part of
the Product. This warranty does not cover damage due to improper
operation or maintenance, connection to improper voltage supply,
or attempted repair by anyone other than Vinothèque to service the
Product. This warranty does not cover Products sold AS IS or WITH
ALL FAULTS. This warranty is valid only in the United States.
1738 East Alpine Avenue
Stockton, California 95205
www.vinotheque.com