1
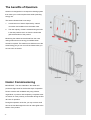
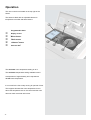
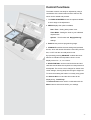
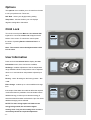
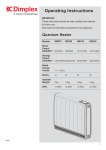
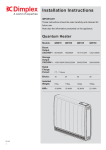
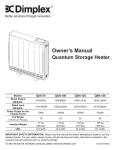
A world of expertise
Operating Instructions
IMPORTANT
These instructions should be read carefully and retained for
future use.
Note also the information presented on the appliance.
Quantum Heater
Models:
QM070
QM100
QM125
QM150
Boost
Output
230/240V~:
567/630W
792/880W
1017/1130W
1242/1380W
Storage
Element
Rating
230/240V~:
1435/1560W 2042/2220W
2540/2760W
3024/3300W
Rated
Charge
Period:
7.7 - 7 Hours
Energy Cells:18
24
30
36
Installed
Weight:
91kg
115kg
142kg
165kg
kWh:
10.9kWh
15.5kWh
19.3kWh
23.1kWh
11854-2 Shetland
Rev. 221/229
-1-
IMPORTANT
IMPORTANT
These instructions should be
read carefully and retained for
future use.
Note also the information
presented on the appliance.
WARNING - THE SURFACE OF THIS HEATER
CAN BE HOT.
• The surface temperatures of this heater are within the
requirements of EN60335-2-61, the European Standard
covering the safety requirements for Electric Storage
Heaters, and momentary contact with any part of the heater
should not cause injury. However, in order to be effective,
heaters of any type do get hot, especially around the air
outlet grille.
• If the supply cord is damaged, it must be replaced by a
qualified individual in order to avoid a hazard.
• This appliance can be used by children aged from 8 years
and above and persons with reduced physical, sensory or
mental capabilities or lack of experience and knowledge if
they have been given supervision or instruction concerning
use of the appliance in a safe way and understand
the hazards involved. Children must not play with the
appliance. Cleaning and user maintenance must not be
made by children without supervision.
• Children of less than 3 years should be kept away unless
continuously supervised. Children aged from 3 years and
less than 8 years shall only switch on/off the appliance
provided that it has been placed or installed in its intended
normal operating position and they have been given
supervision or instruction concerning use of the appliance
in a safe way and understand the hazards involved.
Children aged from 3 years and less than 8 years must not
plug in, regulate and clean the appliance or perform user
maintenance.
CAUTION — Some parts of this product can become
very hot and cause burns. Particular attention has to
be given where children and vulnerable people are
present.
• If aged or infirm persons, or young children, are likely to
be left unsupervised in the vicinity of a heater precautions
should be taken to ensure that prolonged contact with the
heater cannot occur. Where particularly vulnerable people
are likely to be left unsupervised in the vicinity of the heater
we recommend that a guard is fitted around the heater, as
is normal with heating appliances in similar circumstances.
A range of guards specially designed for Dimplex heaters
is available. If you require further information on these
guards, please see contact details on back page of these
instructions.
-2-
CAUTION: DO NOT COVER SURFACES OF THE
HEATER AND DO NOT OBSTRUCT AIR OUTLET
GRILLES.
• Surfaces of the heater should not be covered or obstructed
as this can cause excessive temperatures that can be
hazardous and may cause safety cut-outs to operate. This
will stop the heater from working.
• Do not put clothes, fabrics or any combustible materials on
the heater.
• Do not allow objects to come within 250mm (10”) of the top
and 75mm (3”) of the ends of the heater. Do not allow any
obstruction to be placed on the floor within 300mm (12”) of
the front of the heater and 75mm (3”) of each side.
Do not place objects within
300mm of the front of the
heater and 150mm (min.
75mm) either side.
• Curtains must not come to within 75mm (3”) of the top of
the heater.
• DO NOT SIT OR STAND ON THE HEATER.
• DO NOT PLACE OBJECTS IN CONTACT WITH THE
HEATER.
• IMPORTANT - Due to the newness of materials the heater will
produce a smell for the first few days of operation. Rooms must
be well ventilated and young children, caged birds, or persons
with respiratory complaints must not remain in close proximity
to the heater during the first 48 hours of operation.
ATTENTION:
IN ORDER TO AVOID
OVERHEATING DO NOT
COVER THE HEATER
PLEASE NOTE: YOUR HEATER IS VERY HEAVY AND
MUST BE SECURELY FIXED TO A SOUND WALL.
• No attempt should be made to move the heater without
first seeking specialist advice. If you are not happy that the
heater has been securely fixed, please inform your installer.
-3-
The benefits of Quantum
Quantum is designed to be a responsive heating system
that meets your comfort requirements while optimising
energy use.
The heater releases heat in two ways:
1.
A small amount of heat is dispersed by ‘natural’
convection and radiation from the heater case.
2.
The vast majority of heat is released using the builtin fan that pushes hot air out from the heat outlet
grille at the bottom of the product.
Minimising the release of stored heat from the outer
casing means that more energy is available when
warmth is required. This makes more efficient use of the
stored energy as you can ‘turn off’ the heater when you
are out or do not need it.
Heater Commissioning
IMPORTANT - The new materials in the heater will
produce a slight smell for the first few days of operation.
Rooms must be well ventilated and young children,
caged birds, or persons with respiratory complaints must
not remain in close proximity to the heater during the first
48 hours of operation.
During first operation of the fan you may notice a small
amount of dust discharged from the air outlet grille at the
bottom of the product.
-4-
Function
NOTE
Compared with traditional storage heaters the amount
of energy released from the outer case of the heater
is significantly reduced, resulting in lower surface
DUE TO THE LOW ENERGY LOSSES FROM
temperatures. This allows more efficient running
THE CASING OF THE HEATER THE SURFACE
because the Quantum is heating the room only when
TEMPERATURE MAY APPEAR TO BE LOW, BUT
you want it to.
THIS IS NORMAL.
The stored energy is primarily released by using a low
speed fan to ‘push’ the heat from the stored core and
into the room. Running the timed programs or adjusting
NOTE
the temperature thermostat will prompt the heater to run
the fan automatically if it is required.
OCCASIONAL CLICKING SOUNDS DURING
OPERATION ARE DUE TO TEMPERATURE
CHANGES IN THE STORAGE CORE.
-5-
Operation
The user controls are located on the top right of the
heater.
The heater is fitted with an adjustable electronic
temperature controller and three buttons.
1
2
Programmable timer
1
2
3
4
5
Display screen
‘Menu’ button
‘Back’ button
‘Advance’ button
‘Selector Dial’
3
4
5
The minimum room temperature setting is 16°C.
The maximum temperature setting available is 26°C.
A temperature of approximately 20°C represents a
normal room temperature.
It is normal for the fan to stop running for periods of time.
This happens because the room temperature is at or
above the temperature set on the control and the room
does not need more heat at this time.
-6-
Control Functions
The heater controls can easily be adjusted by using a
combination of the three buttons and the selector dial,
which can be rotated and pressed.
1. The DISPLAY SCREEN shows the options available
at each stage of the adjustment.
1
2
2. MENU displays the options available;
Date / Time - Setting today’s date / time.
Timer Mode - Setting the timer to your individual
requirements.
Options - Time formats and ‘Daylight Saving’
3
settings.
3. BACK shows previous programming stage.
4
4. ADVANCE overrides the time settings and activates
5
the fan, which will remain ON until the next OFF period is
due, or OFF until the next ON period is due.
By repeatedly pressing ADVANCE enables the boost
element to maintain the temperature shown on the
display screen for 1, 2, 3 or 4 hours.
5. SELECTOR DIAL can be turned clockwise and anticlockwise and enables the required room temperature to
be adjusted. The screen colour changes for warmer and
cooler settings, showing deep blue through to bright red.
To check what setting the heater is currently using press
the Selector Dial once and the timer mode will be
displayed e.g. ‘Out All Day’.
The Selector Dial is also used in combination with the
Menu button to select and confirm your settings.
-7-
Setting the Date and Time
Your Quantum controller incorporates a real time clock
with calendar function. The time clock has a battery
backup that will keep the clock running in the event of a
mains power outage.
To adjust the time or date follow the steps below.
Note - the display screen will return to standard
display after a period of 20 seconds of inactivity.
1
Main Menu
2
Date / Time
Press the Menu button (1).
Timer Mode
Select Date / Time by pressing the Selector Dial (2).
Options
1
Date / Time
⊳
Rotate Selector Dial
to select the correct
‘day’ and press centre of dial to select.
Friday
u
24-08-2012
2
16 : 38
1
Rotate Selector Dial to select the correct ‘day of the
Date / Time
Friday
month’ and press centre of dial to select. Repeat this
operation until date and time have been set and press
Back to return to the Main Screen.
-8-
24-08-2012
16 : 38
2
Choosing and Setting a
Timer Mode
Your Quantum controller comes pre-programmed with a
set of operating periods.
There are three options available - two presets and one
user adjustable timer;
1. Out All Day (pre-programmed) - has the following
preset times Monday to Sunday, which can be altered
if desired;
06.00 until 08.30
17.00 until 22.00
2. Home All Day (pre-programmed) - has the following
preset times Monday to Sunday, which can be altered if
desired;
06.30 until 09.30
11.00 until 13.00
15.00 until 17.00
18.00 until 22.00
3. User Timer - provides greatest flexibility to the user.
Four time slots are available throughout the day and
these can be customised for each day of the week.
Note: times must be programmed before using User
Timer mode.
-9-
To choose a Timer Mode press Menu and rotate the
Selector Dial to select ‘Timer Mode’.
Main Menu
1
Date / Time
Timer Mode
2
Options
Select the mode required, again by rotating and pressing
the Selector Dial.
For options Out All Day, Home All Day and User
Timer Mode
Timer, three choices are available - Select, Preview
and Modify.
Out All Day
Home All Day
User Timer
1
2
Select - choose this timer option.
Preview - view the times currently set.
Modify - change the times currently set.
When Modify is chosen, select and change each option
by rotating and pressing the Selector Dial. When a day
is complete select Save to update it.
Once the first day has been set up it is possible to copy
Timer Mode
Select
these settings to successive days or all days by again
2
choosing Modify, selecting the day with the correct
Preview
settings and either choosing Copy next or Copy all.
Modify
If preferred each day can be modified individually and
saved. It is also possible to Clear each day or Clear all
days. Options are;
Save - save times for one day.
Copy next - copy times to following day.
Copy all - copy times to all seven days.
⊳
Clear - zero all times that day.
ON 06.00
OFF 08.30
Clear all - zero times for all seven days.
ON 17.00
OFF 22.30
TUE
SAVE
- 10 -
1
u
NOTE ONCE MODIFIED A PROGRAMME
MUST THEN BE SELECTED IF YOU WANT TO
BEGIN USING IT.
Main Screen
After 20 seconds the heater will default back to the Main
Screen. Here the chosen temperature is displayed along
with Comfort On or Comfort Off, which tells you whether
21°C
you are in a timed heating period or not. Any use of the
Comfort On
Selector Dial will show the Timer Mode in use.
Advance function will be displayed here, and pressing the
When left inactive for a long period of time this display
will ‘sleep’ and the text will disappear. Press the Selector
Dial for its return.
Advance
NOTE BOOST PERIODS CAN ONLY BE
SELECTED WHEN IN
‘COMFORT OFF’ MODE
A supplemental heating (boost) element controlled by the
electronic thermostat is provided in case additional room
heating is required. This will operate only by selecting
‘Advance’ and then selecting Boost Periods 1 hour, 2
hours, 3 hours, 4 hours.
Note: The boost element will only activate if the level
of stored energy is less than 50%.
Use this function only if you require a room temperature
that is greater than what can be achieved using the
stored energy alone. For example, when pressing
‘Advance’ in the evening on a very cold day.
- 11 -
Options
The Options menu enables you to choose time formats
to suit your preferences. These are;
DST Rule - Select your daylight saving setting.
Temp Units - Choose whether your unit displays
degrees centrigrade or fahrenheit.
Child Lock
To lock the controls press Back and the Selector Dial
together for 3 seconds. Child Lock will appear at the
bottom of the screen. To unlock the control repeat
the action of pressing Back and Selector Dial for 3
Options
DST rule
Temp Units
seconds.
Note - The controls cannot be adjusted when child
lock is active.
User Information
Press and hold the Selector Dial to display the User
Information menu, three choices are available;
1
SP Range - enables adjustment of the set temperature
range available. Minimum temperature can be adjusted
Child Lock
down to 7°C and maximum temperature adjusted up to
30°C.
Factory - return all settings to the factory presets - Yes
or No.
Extra Charge - enables up to 4 hours additional charge
time.
User Info
If the output of the heater is not able to deliver the required
SP Range
comfort level then it is possible to force the heater to store
Factory
additional energy. In this way more electrical energy is
stored and this will increase comfort levels. Up to four hours
additional charging can be selected.
NOTE: The extra charge option will lead to more
energy being stored, this will lead to higher
running costs. Only use this setting when a room is
consistently below the required temperature.
- 12 -
Extra Charge
1
Important
During the initial operation some odour may be noticed due to the newness of materials used in manufacture. This
is normal and will disappear after a short period of use. It is however advisable to keep the room well ventilated.
ROOMS MUST BE WELL VENTILATED AND YOUNG CHILDREN, CAGED BIRDS, OR PERSONS WITH
RESPIRATORY COMPLAINTS MUST NOT REMAIN IN CLOSE PROXIMITY TO THE HEATER DURING THE
FIRST 48 HOURS OF OPERATION.
Cleaning
To maintain the external appearance of the heater it need only be wiped over occasionally with a dry duster. During
the summer months, or at other times when the appliance is not in use and is completely cold, the opportunity should
be taken to wipe over with a damp cloth. Do not use abrasive cleaning powders or furniture polish.
Discolouration of wall finishes can sometimes occur immediately above a heater due to the properties of some paints
and decorating materials or the presence of environmental impurities in the air (such as soot or incense generated
from the burning of candles, etc.). A suitable shelf (available from Dimplex) may be fitted to limit the extent of any wall
discolouration.
- 13 -
- 14 -
- 15 -
After Sale Service
If this product appears damaged when first received or does not function correctly contact us by e-mail aftersales@
dimplex.co.uk or ring 0844 879 35 88 and we will be able to help. For ROI please phone 01 842 4833.
Do not return the product in the first instance as this may delay us providing you with a satisfactory service.
ACCIDENTAL DAMAGE IS NOT COVERED UNDER THE WARRANTY.
Your product is guaranteed for two years from the date of purchase. Within this period, we undertake to repair this product
free of charge provided it has been installed and operated in accordance with these instructions.
Should you require assistance with this product please go to www.dimplex.co.uk and click on “Customer Support” or
e-mail us at [email protected]
Alternatively call our contact centre on 0844 879 35 88 (UK only). This is a Lo-call number from a BT landline - other
providers including mobile phones may charge you more. For ROI please phone 01 842 4833.
To assist you, we will need the following information: model number and serial number (these can be found on the
product, on the top right hand side of the rear heat shield, directly behind the control cover), nature of the fault and date
of purchase. Please retain your receipt as proof of purchase. Your rights under this guarantee are additional to your
statutory rights, which in turn are not affected by this guarantee.
Spares can be purchased on line, go to www.dimplex.co.uk/outlet_store
Heater Guards
A range of protective guards are available to fit the Quantum heater. They ensure contact with hot surfaces is avoided
and prevent tampering with the product. For more information please contact;
Aiano Ltd. - Tel: 020 7987 1184, Web: www.aianos.co.uk
Co-ordinated Heating
Dimplex manufactures a complete range of heating appliances, to provide co-ordinated heating throughout the home
or office. Visit our website or contact us on the details above for more information on how we can help with your
heating requirements.
Recycling
For electrical products sold within the European Community. At the end of the electrical products useful
life it should not be disposed of with household waste. Please recycle where facilities exist.
Check with your Local Authority or retailer for recycling advice in your country.
This product complies with the European Safety Standards EN60335-2-30 and the European Standard Electromagnetic Compatibility (EMC) EN55014, EN60555-2 and EN60555-3.
These cover the essential requirements of EEC Directives 2006/95/EC and 2004/108/EC
Dimplex, Millbrook House, Grange Drive, Hedge End, Southampton SO30 2DF
A world of expertise
Customer Help Line: 0844 879 3588
Fax: 0844 879 3583
Email: [email protected]
Website: www.dimplex.co.uk
© GDC Group Ltd. All rights reserved.
Material contained in this publication may not be reproduced in whole or in part, without prior permission in writing.
A division of the GDC Group Ltd, Millbrook House, Grange Drive, Hedge End, Southampton SO30 2DF
- 16 -