1
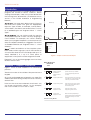
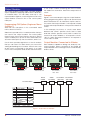
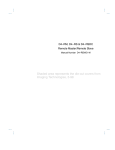
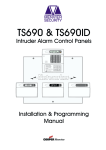
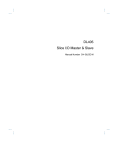
TS2500
1040 Zone IntruderAlarm
Control System
SYSTEM OPEN
17:30
01 Jan
_
~
A
1
2
B
4
5
6
C
7
8
9
D
ENT
0
ESC
3
Sett ing the Syst em
E n t er y ou r pa s s c o de X X X X
th en l ea v e th e p r o tec t e d a re a.
Unsetting the System
G o di r e ct ly to t h e k e yp ad an d
en te r y ou r p as s c o d e X X X X .
Resetting
E n t er y ou r pa s s c o de X X X X f o ll ow e d
by E N T the n 3 . Te l eph o n e y o u r a l ar m
c o m pan y a nd fo ll o w th ei r i ns tr uc t io ns .
!
OPEN
_
~
Se e U se r Ma n ua l
A
1
2
Part Set
B ELL TES T
W ALK TEST
3
RE SET
B
4
5
6
Part Set
NE W CODE
CHIME
24 Hr OMIT
C
7
8
9
Part Set
ZONE OM IT
SILENT
D
ENT
0
ESC
FULL S ET
_
OPEN ~
Engineers menu 2
Select option :-
Quick Guide
Engineers menu 2
Select option :-
_
~
TS2500 Hints and Tips
Introduction
This booklet gives a series of worked examples of how to
program the TS2500 for various situations. Before
studying the examples, make sure you are familiar with
the following terms and facilities. (All references are to
sections in the TS2500 Installation & Programming
Manual.)
P
1004
P
1005
P
Stores
1006
C
C
CP
1007
XN
Workshop
. You assign each detector a circuit type so
that the control panel can give the appropriate
response. Types include, for example, normal alarms,
24hour alarms, fire alarms and several others. For a full
list of available types see “Engineer’s Menu 1 - Circuit
Types”.
P
Canteen
P
1002
Sales
. You can further modify the way the
control panel responds to each circuit by assigning a
circuit attribute. For example, the “chime” attribute
allows you to program the panel to sound a chime tone
every time a particular detector is triggered. For a full list
of available attributes see “Engineer’s Menu 1 - Circuit
Attributes”.
Office
1003
1008
1001
C
RK
P
C
Key:
P Passive Infra-Red Detector
C
Magnetic Contact
RK Remote Keypad
. A ward is a subdivision of the complete system.
Each ward contains a group of circuits that can be set
or unset at the same time. The TS2500 provides up to 16
wards, labelled A, B, C up to P. Each piece of
equipment on the system must be assigned to a ward.
CP
Control Panel
XN Xnode
Figure 1. Simple Commercial Example.
Examples 1 to 4 on the following pages show how these
facilities can be used.
Example 1: Simple Commercial
Enter Engineer's
Passcode
1234
Figure 1 shows a small installation in a commercial
premises.
Then key in:
The door from sales to the outside of the premises has a
keypad.
1
All circuits and keypads are assigned to one ward. The
ward has a final exit setting mode, with 60 seconds entry
and exit time.
Note how the zones are numbered: since there is only
one Xnode connected to network 1 (in this example)
then zone numbers run from 1001 to 1008.
ENT
4
ENT
To:
Notes:
Assign circuit types.
System can have up to 16 wards.
and attributes.
For this example assign all circuits
Allocate circuits to
to ward A.
ward A.
1
ENT
5
ENT
Program system timers.
Each ward must have its own exit and
entry delay time. In the example, ward
A has entry and exit times of 60s.
1
ENT
6
ENT
Program setting modes.
Each ward must have its own setting
mode. In the example ward A has a
final exit setting mode.
4
4
ENT
ENT
2
3
ENT
ENT
Program network
Assign the xnode to ward A.
equipment to ward.
Assign all keypads to ward A.
Program other
Make sure that all peripherals (for
equipment to ward.
example panel tamper and bell tamper)
are assigned correctly, in this case
to ward A.
Return to Day Mode.
2
TS2500 Hints and Tips
Example 2: Simple Domestic
This example shows how to program the TS2500 as a
domestic system, with three part set levels. Figure 2
shows a plan of a three bedrom house. The purpose of
the example is to show the minimum programming
needed to create a working alarm system, so the
amount of equipment indicated is overspecified for this
particular application
Each detector is connected to an individual circuit. All
the detectors downstairs and the keypad by the front
door are connected to the xnode in the kitchen. The
upstairs detectors and keypad are connected to the
xnode on the landing. Both xnodes are fitted with
internal speakers. The external bell outside the house is
connected to the control panel.
Enter Engineer's
Passcode
1234
Then key in:
1
ENT
4
ENT
You must then use User Menu 3 option 2 to assign:
Wards D and C to Part Set Group 1 (perimeter set)
Wards A. D and C Part Set Group 2 (night set)
Ward D to Part Set Group 3 (garage set).
1
ENT
5
ENT
1007
1006
C
Kitchen
C
Ward D
1003
C
XN
Ward A
CP
S
Lounge
1002
1004
C
RK
1008
C
P
1009
Passive Infra-Red Detector
C
Magnetic Contact
S
Smoke Detector
RK Remote Keypad
CP Control Panel
XN Xnode
Bathroom
P
Bedroom 2
Ward B
1010
Landing
XN
Bell External sounder
RK
Bedroom 3
Bedroom 1
Bell
Figure 2. Simple Domestic Installation.
3
P
1001
Key:
Allocate zones to wards.
circuits to ward A and upstairs circuits
to ward B etc.
Program system timers.
Each ward must have its own exit and
entry delay time. In the example, ward
1
ENT
6
ENT
Program setting modes.
Each ward must have its own setting
mode. In the example ward A is has a
timed mode, ward B is instant.
4
ENT
2
ENT
Program network equipment Make sure that the downstairs xnode,
to wards.
is assigned to ward A, and the
upstairs xnode to ward B.
Assign the downstairs keypad to
ward A and the upstairs keypad to
ward B.
4
ENT
3
ENT
Program other equipment
to wards.
Make sure that tampers, are assigned
to the correct nodes.
In the example the panel and bellbox
tamper are assigned to ward A and B.
Log Off Engineer Mode.
Enter Master User's
Passcode
5678
Then key in:
ENT
ENT
ENT
ENT
To:
Notes:
Enter User Menu 3.
Program Part set Groups.
Assign ward A to Part set Group 1.
Log Off User Programming Mode.
In a simple example like this it seems unnecessary to
assign one ward to one Part Set Group. However, in a
larger installation with more Wards you can use the
same programming commands to assign several
Wards to individual Part Set Groups.
Hall
Garage
System can have up to 16 wards.
For this example assign downstairs
P
Dining Room
1005
Notes:
A and B have entry and exit times of
20s.
2
Ward C
Assign circuit types.
Assign circuit attributes.
The table opposite shows the minimum number of
Engineering Menus needed to set up this example as a
working system.
To implement the part set facility you should use Menu 1
option 4 to assign the zones as follows:
zones 1002, 1007 and 1008 to Ward A
zones 1003, 1006 and 1001 to Ward C
zones 1004 and 1005 to Ward D
zones 1010 and 1009 to Ward B.
To:
P
Note that in this example the zone numbers run from
1001 to 1010 with no gaps. This is because the
downstairs xnode has a full set of eight detectors.
TS2500 Hints and Tips
Example 3. Multiuser System
A landlord has a block of four small industrial units to let.
Each unit is fitted with a personnel door and a large
vehicle door. At the back of the unit is a small room that
can be used as an office. At the end of the block of units
is a service room.
The landlord wishes to fit each unit with its own alarm
system, operated solely by the tenant. In each unit the
installer fits door contacts on both external doors, a
panic alarm in the office, a smoke detector in the
ceiling and a PIR to cover most of the main area of the
unit. A keypad next to the personnel door allows the
tenant to set and unset the system. A bell/strobe unit on
the outside of the unit provides an alarm. The installer
connects all the devices in a unit to a single xnode,
fitted inside the unit and connected by cable to the
service room.
In the service room the installer fits the control panel,
another keypad (for programming the system) and a
PIR and door contact to protect the service room.
C
ENT
1001
C
5
ENT
ENT
Assign circuit types.
Assign detectors in each unit to
Assign circuit attributes.
respective Ward. Assign detectors in
Allocate zones to wards.
service room to Ward E.
Program system timers.
Each ward must have its own exit and
Ward B
C
1013
PA
1010
Fr
1011
C 1009
1012
XN
RK
Bell
C
1018
Ward C
1021
PA
Fr
1019
1020
XN
C
1026
Ward D
1029
PA
Fr
C
1025
1028
XN
60s.
1
6
Program setting modes.
RK
Each ward must have its own setting
Ward E
final exit.
ENT
2
ENT
Program network equipment Make sure that eac xnode is assigned
to wards.
to its own ward.
C 1033
XN
1034
Bell
Assign keypads to respective wards.
Key:
4
ENT
3
ENT
Program other equipment
Make sure that tampers are assigned
to wards.
to the correct nodes.
P Passive Infra-Red Detector
C
In the example the panel and service
room bellbox tamper are assigned
to ward E.
Return to Day Mode.
Magnetic Contact
PA
Panic Alarm
Fr
Smoke Detector
RK Remote Keypad
See also “Ward Sounder Control” on page 6.
CP
Control Panel
XN Xnode
Bell Bell/Strobe
4
P
CP
mode. All wards are programed as
4
P
RK
A to D have entry and exit times of
ENT
P
1027
entry delay time. In the example, wards
ENT
P
RK
Bell
Bell
4
1004
XN
C 1017
1234
1
1002
Fr
Enter Engineer's
Passcode
ENT
Ward A
1005
PA
1003
During programming the installer assigns each unit to
an individual ward, A to D, and the service room to Ward
E. Note how the zone numbering has gaps in it. This is
because each xnode has only five detectors.
1
RK
Bell
P
TS2500 Hints and Tips
Example 4. Foyer Mode
P
Ward B
A building owner wants the control panel to arm the
reception area when the tenants have set all of wards
B,C,D,E,F. The first person into the building in the
morning is always the security guard who will only turn off
the reception area as he is not permitted to access the
offices.
1
ENT
4
5
ENT
ENT
To:
Assign detectors:
Assign circuit attributes.
In reception to Ward A,
Allocate zones to wards.
In each office to respective Ward.
Program system timers.
Each ward must have its own exit and
C
Ward D
Ward A
ENT
Program setting modes.
Office Area
Ward D
C
60s.
6
P
Ward D
C
Reception Area
Ward A
A and B have entry and exit times of
ENT
XN
Notes:
Assign circuit types.
entry delay time. In the example, ward
1
Ward C
C
C
Ward A
Then key in:
ENT
Office Area
Ward C
P
1234
1
Ward C
Office Area
Ward B
Ward B
Enter Engineer's
Passcode
P
Ward A
Each ward must have its own setting
mode.
CP
RK
4
ENT
2
ENT
Program network equipment Make sure that xnode are assigned
to wards.
to wards C and E.
C
Ward E
C
P
Assign keypad in reception to
ward A.
4
ENT
3
ENT
Program other equipment
Make sure that tampers are assigned
to wards.
to the correct nodes.
Ward E
Ward F
In the example the panel and bellbox
Office Area
Ward F
tamper are assigned to ward A.
Assign Wards B, C, D, E and F to
"Ward A Foyer Mode".
Office Area
Ward E
XN
Log Off Engineer Mode.
Enter Master User's
Passcode
Ward F
P
5678
Then key in:
ENT
2
ENT
ENT
ENT
To:
Notes:
Key:
Enter User Menu 3.
Program Part set Groups.
Assign ward A to Part set Group 1.
P
Passive Infra-Red Detector
XN
Xnode
CP
Control Panel
Log Off User Programming Mode.
Remote Keypad
RK
Operation:
Assuming the system is fully set, at 7.00am the security
guard enters the reception area and enters his
passcode at the remote keypad in the reception area,
to unset ward A (Foyer). When the next user arrives they
enter their passcode into the keypad which unsets their
own office. This may continue until all offices are unset
by their respective users.
At 6.00pm the security guard leaves the premises. He
locks the main entrance but does not set the system
because one of the staff is working late in the one of the
offices. At 7.00pm the user now wishes to leave the
premises. They unlock the main entrance door and
enter their passcode at the remote keypad.
After leaving and securing the main entrance door the
system sets their ward and, because they are the last
user to set, also sets ward A (Foyer).
C
Magnetic Contact
Users:
No
Type
Wards
001
Master
ABCDEF
002
Standard Ward
A (Security Guard)
003
Standard Ward
B
004
Standard Ward
C
005
Standard Ward
D
006
Standard Ward
E
007
Standard Ward
F
Figure 3. Foyer Mode Example
Note: Do not assign ward A itself to foyer mode, only the
rest of the wards. This means that only the outputs
allocated to ward A will trigger.
5
TS2500 Hints and Tips
Ward Sounder Control
If you want to make keypads assigned to individual
wards give entry and exit tone for their own wards only
then you need to do the following:
1. Set the Ward Sounder Control jumper on each of the
keypads to “enabled” (see diagram).
TSNIB
The TSNIB is a Network Interface Buffer Board for use with
the Networker range of control panels. This Interface will
allow the connection of remote keypads or nodes, up
to a maximum distance of 1km from the Driver Board. It
can also be used in situations that require cabling to be
run in areas with electrical or radio interference.
Tips
Adding or Removing Equipment
CCT A
ZA
LED MIMIC
1
2
3
4
ENG
REMOTE
I/D
TB
CCT B
ZB
WARD SOUNDER
CONTROL
TA
I/D
Selector
A B C D E O/P
-
SPK
Ward Sounder
Control Jumper
Enabled
+
ENT KEY
DISABLED
Disabled
Figure 4. NetLCD Sounder Control Jumper
When the jumper is set to enabled the keypad sounder
activates when the panel speaker and the output on
the keypad are active at the same time.
2. Use Engineering Menu 4 option 3 to assign the control
panel speaker to all wards that need tones from their
keypad sounders.
3. Use Engineering Menu 3 option 8 to assign the outputs
of the keypads to ward sounder control for the relevant
wards.
Internal Digital Communicator.
1. To use the internal digital communicator you must
connect a stand alone digital communicator that is
only programmed with the central station phone
number.
2. Use Engineering Menu 3 option C 9 to set up
accounts to wards and program digi channels.
Always remove power (mains and battery) from the
system before adding or removing equipment.
Initial Power Up
When you initially power up the system will ask you to
confirm the equipment attached to the networks. If the
system reports more Lecs than you have actually
connected it may be that a remote keypad is not
initialised. The control panels sees remote keypads that
have not been initialised as Lecs. To initialise a keypad
press any of the keys.
Keypads
If you connect a remote keypad to a Network then you
lose six zones. The control panel sees a keypad that is
directly connected to a Network cable as equivalent to
an xnode or ts900 node. All such devices provide zone
numbers in blocks of eight. Since the keypad itself can
only provide connections for two zones then the
remaining six zone numbers cannot be used.
Keypads connected to separate Networks can be used
simultaneously. In the same way, keypads connected
to separate xnodes do not lock each other out.
Outputs
To toggle outputs on nodes use Engineer’s Menu 3
option 9 submenu 6, and leave the selected output on
test.
You cannot disable channels on the internal
communicator. The only way to do this is to assign
channels to an event that is not going to cause an
alarm.
User Codes
Note that if you change any channel output on the
internal communicator then you are changing it for
every ward.
When such a user sets a ward from a keypad that is not
allocated to the ward then the control panel will set the
ward instantly.
6
If you want a user to set a ward from a keypads that is not
assigned to the ward then make sure that you give them
a Standard Global or Manager type code.
TS2500 Hints and Tips
Fault Finding
The TS2500 has various diagnostic functions to help you
in fault finding the system. To access these functions go
to Engineer’s Menu 3 option 9. The most useful of these
functions are number 7 - Confirm Network devices and
no 9 + A + [
- View Network Devices and Network
Errors.
One of the most difficult of faults to find is when the
control panel looses communication with an item of
remote equipment, for example an xnode. This may be
caused by one of the following problems: network
equipment faulty, power supply faults, earthing faults, or
cabling faults.
1. Use Network Errors to check if you have any data
problems. The keypad displays the location of the last
device problem, for example:
NETWORK 1 0010
LAST ERROR 2,07
2. Press 0 to reset the error counter.
3. Power down and disconnect the node indicated in
the display (2,07 in the example shown above).
Re-attach the network cable so that the rest of the
newtwork is still connected to the control panel.
4. Re-apply power. The keypads display the “Relearn
Required” message. Confirm the new number of
network devices connected as described in the TS2500
Installation Manual.
While the black lead is still connected to earth set the
meter to low dc. Connect the red lead to A and then to
B.
If the meter shows a stable reading greater than about
0.5V then you may have a short to earth. Check the
entire length of the cable for wiring faults or damage, for
example staples through the cable.
Please note that some power supplies have a
grounded printed circuit board. If one of these is
connected to your network then you will have earthing
problems. We recommend using our TSPS1 and
TS519.XB power supplies.
If none of the problems above exist then check the
continuity of the cable.
If all else fails then power down the panel and connect
a single xnode to the panel on a short length of cable.
Power up the panel. The keypads display the “Relearn
Required” message. Confirm that only one device is
connected, as described in the TS2500 Installation
Manual. Check again for network errors. If the keypad
still displays network errors then power down again and
connect the xnode to another network. Power up,
confirm that only one xnode is connnected and check
again for network errors. If the errors have gone then the
control panel has got a faulty network.
5. Repeat steps 1 and 2 to check wether there are any
data errors. If there are no errors then the node you have
disconnected is faulty
4. If there are still errors then the problem may be with
the previous node.
If you cannot isolate the fault to one item of equipment
it is possible that the dc power supply to the remote
equipment is low. Starting at the end of the network
farthest from the panel put your meter to low DC and
connect the black lead to A and the red lead to B. The
meter should read at least 12V all along the network
line.
If the meter reads less than 12V then you may need to
decrease the resistance of the cables by doubling up,
or adding a remote power supply.
If the power supply voltage is adequate check for
earthing faults. Set your meter to low ac and connect
the black lead to earth and the red lead first to A and
then to B.
The meter should read no higher than 1V. If the reading
is higher then you have ac hum on the dc line. Fit an
appropriate filter.
7
TS2500 Hints and Tips
to the output modules remaining after those used by
the ward mimic infomation. Each LED corresponds to a
circuit.
Output Modules
The Output Module provides eight switched negative
outputs capable of supplying 100mA each to drive LEDs
or miniature relays. You can daisy chain up to 128
Ouput Modules together, connecting the first one to the
Ouput Module connector JP2 on the control panel
main pcb.
Example
Figure 5 shows an example using four Output Modules.
During programming Mimic Options 00 and 02 have
been selected as Yes. All other Mimic Options are No.
This means that Output Module 1 will respond to Ward
A-H Bell and Output Module 2 will respond to Ward A-H
Strobe.
Programming OM Options (Engineers Menu
4 option 7)
There are two sub-options in this command: ward
mimic and circuit mimic.
In the example two blocks of circuits have been
defined. Start 1/End 1 specifies circuits 1001 to 1008
and Start 2/End 2 specifies circuits 2001 to 2008. This
means that Output Modules 3 will respond to circuits
1001 to 1008, and Output Module 4 will respond to
circuits 2001 to 2008.
Ward mimic provides a list of ward information that you
can send to the output modules. The control panel
transmits every item in the list that you say yes to. The first
output module picks up the first item transmitted, the
second module picks up the second item, and so on.
Output Modules Connected to XNodes
Circuit mimic provides eight blocks of circuit numbers
that you can select. For each block you choose the
starting and ending circuit number. A block can cover
all the circuits connected to the panel, or a single
circuit. The control panel sends all the selected circuits
Each XNode is capable of driving one, and only one,
Output Module. When connected to an XNode an
Output Module mimics the eight circuits of that XNode,
and no others.
To control
panel
Ward Bell A-H
Ward Strobe A-H
To Control Panel
No.
00
01
02
03
04
05
Mimic Option
Ward A-H Bell SAB
Ward I-P Bell SAB
Ward A-H Strobe
Ward I-P Strobe
Ward A-H SW12V
Ward I-P SW12V
Circuit Mimic
1001-1008
Wards
A-H Bell
Wards
A-H Strobe
OM 1
OM 2
Circuit Mimic
2001-2008
Circuit Mimic Circuit Mimic
1001-1008
2001-2008
OM 3
OM 4
Yes/No
Yes
No
Yes
No
No
No
81 Internal Digi
No
Circuit Mimics
Start 1 1001
End 1 1008
Start 2 2001
End 2 2008
Figure 5. Output Mocule Example
8
Part No. 496504 Issue 1