1
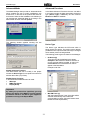
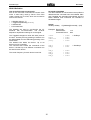
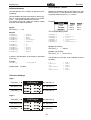
Re:control M208 Manager Configuration software Version 1.0.3 Dominating Entertainment. Revox of Switzerland. Re:control M208 Manager Content General 2 The Configuration-Software Installation of the M208 Manager Start of the M208 Manager Establish the PC-Connection to the M208 2 2 3 4 Working with the M208 Manager Establish the connection/-Status Open a project Create a new project Make a copy of a new project 5 5 5 6 6 Editing the project - Assignements Editing the project - Information Download a project out of the M 208 Download problems 7 8 8 9 Download Firmware 9 Advanced Mode 11 Advanced Functions Product File mpi Declaration and Syntax mpi-File Definition Hardkeys Definition Softkeys Cross references [X-References] Chain of commands [Macro] 11-12 13 14-16 17 18 19 20 Expert Functions 21 System requirements 22 1 Re:control M208 Manager General The Configuration Software M208 Manager installation The M208-Manager is a PC program with which the M208 can be programmed based on the wishes and needs of the enduser. After downloading the Software M208 from the Revox homepage (www.revox.com) you can unpack the ZIPFile. Additional to the source selection, the downloading of a new firmware for the processor it is also possible to make various even more specific configuration while using the „Advanced functions“ and the „Expert functions. Start the installation with a double click on to the setup.exe file. In these modes the device configuration can be changed, Infrared codes can be red and the content of the M 208 can be copied. This manual will explain to you in the first part the basic functions of the M 208 Manager. In the second part the functions for the advanced users are described. The installation guide will lead you through the installation process. Revox recommends not to change the proposed directory names. M208 Manager already installed? In case that you do have already an earlier version of the M 208 installed, please deinstall this SW with one of the deinstallation tools of Windows. After the succesfull installation of the M 208 Manager an icon M208 Project Manager will appear in the Start directory of Windows. 2 Re:control M208 Manager Starting the M208 Manager After the installation you can start the M 208 Manager. The first window which you will see is the Database Browser. The Database Browser is a library of devices which are at the moment supported by Revox. The devices are ranked after the brand name of the products and will be from time to time updated by Revox. 3 Re:control M208 Manager PC-Connection between PC and M208 On the lower part of the M208 there is the USBconnection which is called M208 link. You can find it underneath the cover. Via this connection you can download a new configuration of the M 208 from the PC. 4 5 6 8 9 0 Connect the M208 with the USB cable to your PC. The USB cable is part of the standard delivery package. After connecting the M208 with the PC a new message will appear on the screen mentioning that a new device with the name Revox M208-USB Link has been found. Install the USB drivers The Revox USB driver is not on the Windows operating system. This is the reason why the PC asks you to insall the driver. Revox does not recommend to choose the windows option “search for drivers” but to indicate the following directory C:\ Programme\ Revox\ M208\ USB Driver. In this directory your PC will find the needed driver named 208usb.sys Follow the Windows installation instructions and remove after the installation the USB cable from the M208. When reconnecting the M208 with the PC, your PC will recognize the M208 automatically. Remark: Each USB-Chip of the M208 Remote Control does have an individual code which will be saved by Windows. It is now possible that especially WIN98 tries to reinstall the driver, when you are connecting a second M 208 to the PC. Just ignore this message until Windows recognizes also this new M208. USB Windows PC 4 Re:control M208 Manager Working with the M208 Manager Establish connection/ -Status Open a project Start the M208 Manager. In case that you did not yet connect the M208 with the PC, you will see the message “not connected”: With Open you can open an existing project Not Connected means that no connection between the PC and the M208 has been established. The M208 has not been recognized by the PC yet. Once the connection has been established or the installation of the USB driver has been completed the message changes to “Connected”: In the second window you will have to choose the project. Connected (Rx0, Tx0) indicates that you are using now the M208 Manager for data transfers, whereas Rx and Tx shows the number of received or sent bytes. Status of the connection The command Open will open a project. In this example the project M208 V1.00.mpj was chosen. L mpj 5 All project names end with the extension *.mpj Re:control M208 Manager Create a new project Create a copy of a new project In case you would like to create a new project, choose New Project. Would you like to establish a new project which is based on an existing project, then activate with a click Copy Project from: Introduce into the next window the name which you want to give to the project. In this example the project was named Test. Now you can choose by clicking on ... the path and finally to the project which shall serve as a base for creating a new project. The M208 creates now automatically in the below shown chart under Location a directory named Eigene Dateien\ M208 Projects with the new project inside. As a result the M208 Manager shows now the new project. 6 Re:control M208 Manager Work on the project – Assignments After you have created a new project the Manager shows you a new window M208 Project [name xyz]. In this window all 9 source buttons of the M208 can be seen. You can now put on each of these source buttons actual sources/products. It starts with the TUNER and ends with button SOUND. Just proceed as follows: • Each button can be configured individually. One button can control only one device or shows a selection of up to 6 products/sources (see TV). • The wished product can be selected in the Database Browser and with Drag and Drop (or press with the right finger on to the right button of your mouse, keep it pressed, move the item to the button of the M 208 and let it drop there). In the example below the Revox M51 FM-Tuner is being dropped on to the button TUNER of the M208. • In the field Device Name you can change the device name which shall appear in the Display of the M208. The name can contain up to 8 digits. • M51-Select defines if, and which IR-code will be send after choosing a source button on the M208. You can choose from all on commands in the M51products. Exception when you choose: NONE In this case in the product file (mpi) POWER_ON is explicitly defined. Therefore this command will be send. In case there isn’t any definition of POWERON, no IR-command will be send while pressing the source button. 7 Re:control M208 Manager Work on the project - Information Download a project to the Remote Control Text field linked to the project After you have configured all needed buttons and after saving the project to your PC you can start the download to the M208. In the second register card Information you can enter a more detailed description of the project. This field is only visible in the M208 Manager. Important Remark The project will be saved on to the MMC-Memory card. Without a MMC card in the M208 the download will not work. We recommend to use only the MMC cards of Revox. They have been tested by Revox and Revox assures their proper functioning and compatibility to the M208. In order to start the download, you can choose either in the Menu Tools the option Download To M208 or simply press the icon . You can only make a download when the M208 Project-window is active. This means that the windows colour is different from the other colours of the non active windows ( -Icon remains otherwise grey). Text field M208 Remote Control Would you like to show information or e.g. the customers name also on the M208 you can do this in the field M208 Setup/ Project Menu . On the M208 you will be able to see the text which has been introduced in the above example: During the download you will be able to see for a short period of time an indication how far the download has advanced. After finishing the information appears: 8 download the following Re:control M208 Manager Downloadproblem Firmware Download In case there was a problem during the downloading the following error message appears: Besides the downloading of the projects, it is even possible to download the latest firmware. Firmware is that part of the Software which is saved on to the processor of the M208. The Firmware contains basic functions such as the operating system. Revox will regularly not only update the library of products but also the Database Browser and the Firmware. You can find the latest Software Versions of the M208 always in the package which you have downloaded and which is normally stored under C:\Programme\ Revox\ M208\ Firmware. In case this happens please check the USBconnection and make sure that the MMC-card is correctly locked in the M208. In order to download a new firmware on to the M208 Remote Control, start the M208 Manager again and select under Tools the option Update Firmware. In case the MMC card is not properly locked in the M208 you may also see the below error message: The following window will appear: Check the version of the Firmware In a first step you can with Check Version control whether your M208 does actually work with an older version of Firmware. The latest version will be shown one line below. In our example this would be the Version 0.48. Loading of New Firmware In the field Update you can start the loading of the new firmware on to the Remote Control. You can modify in the field Browse the directory name for the Firmware. With the standard configuration of the M208 Manager the path will always be correct. 9 Re:control M208 Manager During the Download a status information appears in the upper part of the screen. After the update the following window appears: 10 Re:control M208 Manager Advanced Mode Advanced Functions The M208 Manager does provide an Advanced Mode which enables the user to make modifications two levels lower, on the level of the product files and their environment. After the first installation of the M208 you can activiate the Advanced Mode by choosing in the Menu Tools and then the field options: In the Mode Advanced Functions the user can define in an opened project the data respectively the device type (Device Type). Additionally the two functions Browse and Edit are available. The following window appears showing the two options: Device Type The Device type indicates the IR-Format which is being used by the device. The product type is already predefined in the mpi-File and should only be changed when another product is being defined. The following product types are listed on the Manager: No Device [0] There isn’t any device defined for this button. Exception: With this device button a selection of up to 6 products shall be possible. In order to do this No Device has to be selected in order to appear in the Main Menu Example under TV: Enable advanced Functions This Mode allows the user to modify in the project window the Device Type for one product as well as to edit the device files (*.mpi-Files). Enable Expert Functions In this Mode three additional tools can used: IR Scope MMC Data Viewer Display Dump Important By editing the product files (mpi-Files) you may destroy the ability of the M208 to control properly the devices. Revox is not able to give support for problems occuring in the Expert Mode. 11 M51 FM-Tuner [1] With this adjustment the Tuner of the M51 will be selected automatically- this includes the synchronisation routines. (Remark: Please check the SW and HW requirements) Re:control M208 Manager Device Type Browse Original RC28 [2] Like with other Revox Remote Controls such as the RC28 all commands of the M208 are being send with RC5-product address, which have been selected under M51 Select. Example: M51 Select: AUX2 All buttons such as e.g. CH+ are being send as a RC5Code with the RC5 address Aux2. Softkeys can in the RC28 adjustments not be defined. M37/ M57 Server [3] With this adjustment the Menu of the Server will be selected directly. This includes the synchronisation routine. (Please verify the system requirements for the Server-/Communication Module). Feller BEAMIT [4] Choose this adjustment when you do have a light control BEAMIT of Feller at home. Infrared (RC5) [5] Choose this adjustment when the product does contain product files (mpi-File) and IR-datas on a RC5 basis. The used frequency is automatically 36kHz. The RC5-code is equipped with a ToggleBit function. Infrared (RAW) [6] This adjustments is to be chosen in case that the product file (mpi-File) does contain IR-datas on a RAW-basis. RAW datas define an IR code based on: - Frequency (IR_CARRIER), - Repetitions breakes (IR_PAUSE) and - Rate of Repetitions (IR_REPEAT) - Impulse-/ Pause-duration (IR_TIMEx) Normally all mpi-Files, which are needed during the creation of a project can be copied out of the Database Browser into the Project-Files under their own names. From there they can be integrated into a mpi-File. Edit The function Edit enables the user to modify the shown mpi-File. With Edit a text editors appears, which shows the mpi-File: The way and if at all an IR code is being repeated, is defined in the mpi-File with the from Revox developed syntax. In the mpi-File the allocation of the Device Type is done with figures: 0 1 2 3 = No Device = M51 FM-Tuner = Original RC28 = M37/ M57 Server 4 = Feller Beamit 5 = Infrared RC5 6 = Infrared RAW 7 = M51 SAT Module M51 SAT Module With this adjustment the Menu of the SAT will be selected directly. This includes the synchronisation routine. (Please verify the system requirements for the SAT- /Communication Module). After you have modified the mpi-file you can save the file. Without saving the modified version all changes will disappear when you close this window. L Further information concerning the creation of a product file can be found in the chapter product-File mpi. L Further information to the creation of a product file mpi you can get from the chapter product file mpi. 12 Re:control M208 Manager Product-File mpi Each device is based on a text-file with the ending mpi. In this file all functions and declarations for the control of a device is defined. Example:: M51-DVD Player Å # define lines without functions Å the to be controlled product Å Name of the Remote control if known Å Type IR-Code Å Editors name Å Version-Number Å Date of the latest modifications ########################################## # Device: M51 DVD Player # Remote Name: RC28 # Type: Infrared (RC5) # Written by: Stefan N. # Version: 1.00 # Date: 17.05.2006 ########################################## DESCRIPTION DEVICE NAME SELECT = = = = "Revox M51 DVD Player" 5 "DVD" 2 Å Indication in the Database Browser Å Device Type, here 5 = Infrared RC5 Å Name in the Display of the M208 (max. 8 letters/numbers) Å Defines which IR-code will be send while pressing the button. ########################################## # Softkeys ########################################## SOFTKEY_1 = "Sound" SOFTKEY_2 = "Angle" SOFTKEY_3 = "Subtitle" SOFTKEY_4 = "Setup" Sound Angle Subtitle Setup = = = = Å Definition of Softkeys which are shown in the Display of the M208. Too long names will be shown as XXX. Å Name of the softkeys Softkeys may not have the same names as Hardkeys!!! $142B $141F $142D $1435 Å IR-Code of the Softkeys; here RC5-Code ########################################## # Hardkeys ########################################## NUM_0 ... NUM_9 OK RED GREEN YELLOW BLUE = $1400 = = = = = = $1409 $142C $142B $142C $142D $142E TRACK_UP TRACK_DOWN SCAN_UP SCAN_DOWN PLAY PAUSE STOP MENU EXIT POWER_OFF POWER_ON = = = = = = = = = = = $1420 $1421 $1434 $1432 $1428 $1430 $1436 $1422 $142E $140C $143F Å Definition of the M208-buttons. All buttons except the 9 device buttons are being described here. Buttons without use can be left away. Å The style of writing is strictly defined by the operating sytem of the M 208. ###################################### # X-References ###################################### UP = "CHANNEL_UP" DOWN = "CHANNEL_DOWN" RIGHT = "VOLUME_UP" LEFT = "VOLUME_DOWN" PAUSE = "PLAY" Å Defines allocations of one IR code to several buttons, the so called X-Preferences Å e.g. the button Up does have the same function as the button CHANNEL_UP 13 Re:control M208 Manager Declaration and Syntax mpi-File NAME The defintion of name indicates which name shall appear in the header of the M208-Display. The display can only show 8 digits properly, additional digits will only be shown with ... . Basically the mpi-files do define the functions and attributes of the product-file. The definitions in the mpifile do have priority to the adjustments made in the Setup Menu of the M208 Remote Control. Definition in mpi-file: Example:IR-Power In the Setup of the M208 the factory setting is IRPower : Low But in the mpi-File IR-power was defined as follows: IR_POWER = 2 (High). In this case the Remote Control will always send with high IR power (High). Example: NAME NAME = “ xxx“ = "DVD" Indication in the M208-Display: DESCRIPTION The definition in the DESCRIPTION File indicates the name with which the mpi-File is shown in the Database Browser of the M208-Manager. Therefore the name of the mpi-file can be different from the name shown in the Database Browser. This enables a good description of the products in the Database Browser and a windows compatible naming of the mpi files. DEVICE DEVICE defines the IR-Datatyp. See also chapter Advanced Functions. Selection field in the M208 Manager: Device Type Associated definitions in the Mpi-File: DEVICE = 0 1 2 3 4 5 6 Definition of the Mpi-File: DESCRIPTION = “ xxx“ Example: Device-File: M51 DVD.mpi DESCRIPTION = "Revox M51 DVD Player" = No Device = M51 FM-Tuner = Original RC28 = M37/ M57 Server = Feller Beamit = Infrared RC5 = Infrared RAW SELECT SELECT defines if and which IR Code will be send by the Remote Control. You can choose from all oncommands of the M51 devices. IR_POWER Exception when choosing: NONE In case that in the product file (mpi) POWER_ON is explicitly defined, this command will be send. If there is no definition for POWER_ON no IR-command will be send while pressing the device button. IR-Power: Low Range : approx. 20 m* IR-Power: High Range: approx. 40 m* *no obstacles Choose in the 208 Manager: Definition in the mpi file: IR_POWER defines the power the IR codes are sent. There are two power levels existing: Selection field in the M208 Setup: IR-Power Associated definition in the Mpi-File: IR_POWER = M51 Select SELECT = 0= Default 1 = LOW 2 = HIGH 0 = None 1 = Tuner 2 = DVD 3 = Tape/ Rec-In 4 = Server/ Aux1 5 = Aux2 6 = Aux3 7 = Local 8 = TV 9 = Video1 10 = Video2 11 = Video3 12 = Video4 IR_POWER = 0 selects the IR power which is defined in the Setup of the M208. * The Range is correlated to the sensitiveness of the IR Receiver and the position the product has been installed. # (Remark) With the special sign # you can introduce comments into the mpi-files, which do not have a function. 14 Re:control M208 Manager Infrared-RAW Definition IR_TIME The IR_TIME defines the Impuls- and pause duration of a IR-Code. Different times can be defined here. It is not defined whether the defined time is being used for an impuls or a pause as IR_TIME only defines the time elapsed between flanks. In case the IR-Codes in the mpi-file are defined as RAW-Daten a detailed decoding of the IR code is necessary. RAW-Datas define an IR-Code based on: - Carrier frequency (IR_CARRIER) - Repetition Pause (IR_PAUSE) - Repetition Rate (IR_REPEAT) - Impuls-/ Pause-Duration (IR_TIMEx) In the following chart a IR-impuls is shown it becomes visible that the IR_TIME_1 is existing as a pause and also as an impuls. Example: A typical IR-code is built as follows: IR_TIME x 4 ⇑ Impulspackage with startbits ⇑ Repetition IR_TIME_1 IR_TIME_2 IR_TIME_3 IR_TIME_4 In the mpi-file these 4 declaratoins are being used. Only whole-numbers can be used. IR_CARRIER IR_PAUSE IR_REPEAT IR_TIME IR_TIME 1 IR_TIME 2 IR_TIME 3 IR_TIME … [kHz] [ms] [µs] : Value : Value : Value : Value 3 1 2 = 540 = 1570 = 4130 = 8420 IR-Code Description in the mpi-File 1-450 1-65 0-65 1-65535 POWER_ON = "43 > 1212111111111" IR_REPEAT [ > ] IR_REPEAT defines how often a repetition of the IRcode shall take place. The repetition is defined in the mpi-file with sign >. All figures (IR_TIME x), which are on the righthandside of the > Symbol, will be recognized as a repetition code. IR_CARRIER IR_CARIER is the carrier frequency of the IR signal in kHz. The maximum frequency is 450 kHz. Higher frequencies can not be processed. Exception IR_REPEAT =0 The repetition code will be repeated as long as the button (Soft- or Hardkey) will be pressed. Toggle-Code A Toggle-Code changes the Code with each press of a button between two values. IR_PAUSE IR_PAUSE defines the pauses between the first impuls package and the repetitions, in case the button is pressed for a longer time or IR_REPEAT is greater than 0. This way the long pressing of a button (e.g. several times sending the volume up command) can be differentiated from pressing a button several times (e.g. channel 11). The M208 can generate such commands in case two commands have been defined in the mpi-file for each button (Hardkey or Softkey). IR_PAUSE Syntax Name (Soft- Hardkey) = “Code 1, Code 2“ Example: Power 15 = "2211 1111211211, 2112 1111211211" Re:control M208 Manager IR-RC5 Definition RC5-Code of the M208 Is a device defined as a RC5-Code in the mpi-file the address and the command has to be indicated. Startand Toggelbits are generated automatically from the M208. Address and commands are indicated in hexadezimal digits. How is the RC5-Code constructed? RC5 is the most often used Remote Control Code which is also being used by Revox. Each RC5 codes consists out of 14 BIT, which are successive send to the receiver: • • • • 2 Startbits (always “1”) 1 Toggel bit (alternating 1” or “0’) 5 Address bits 6 Command bits Syntax: Hardkey /Softkey = $ [Address][Command] The Startbits are used to synchronize the IRReceiver with IR-Transmission. The receiver adjusts its amplification settings on to the signal. Examplel: Revox DVD Address DVD: Command Sound: The Toggelbit changes its value with each press of a button. That way the long pressing of a button can be differentiated from the alternating pressing of the same button. The address bits define the device. Up to 32 devices can be controlled. The command bits contain the commands of the device. Like that up to 64 different commands can be send for each device. Sound Angle Subtitle Setup . . NUM_0 NUM_1 . . NUM_6 NUM_7 NUM_8 NUM_9 The carrier frequency for each device is 36 kHz. 16 = = = = $142B $141F $142D $1435 = $1400 = $1401 = = = = $1406 $1407 $1408 $1409 (hex) 14 h 2B h ⇐ Softkeys ⇐ Hardtkeys Re:control M208 Manager Definition Hardkeys The hardkeys are preset in the mpi-file. You always have to follow this writing style. It is important to differentiate between capitals and lower case letters! !can not be edited ! POWER_OFF SETUP OFF Individual Softkeys Individual Softkey Device buttons TUNER DVD TV SERVER SAT VIDEO AUDIO LIGHT Product Test Sound SOUND VOL + CH + MUTE VOL - CH - VOLUME_UP /_DOWN CH_+ / CH_- MUTE MENU ! can not be edited ! MORE MENU Navigation OK OK EXIT ENTER EXIT ENTER PLAY REC STOP PAUSE REC TRACK_UP / _DOWN SCAN_UP / _DOWN NUM_0 bis NUM_9 1 2 3 4 5 6 7 8 9 STAR BAR 0 Navigation Cross The navigation cross is being described in the mpi-file as follows: UP RED LEFT GREEN RIGHT OK YELLOW BLUE DOWN 17 Re:control M208 Manager Definition Softkeys Special Softkeys- ”Rocker“ The arrangement of the softkeys is defined by their numbering. Besides the standard location of the softkeys as right and left column, it is also possible to create a „Rocker“ to typically linked functions, e.g. +/- Volume. Unused Softkeys still have to be listed, but without any text. As a text all german letters without any umlauts (ö,ü,ä …) and special characters can be used. You should not exceed 8 digits per softkey. Capital and lower case letters are possible. Example: Page 1 ⇐ line 1 ⇐ line 2 ⇐ line 3 Syntax: SOFTKEY_X = “xxx“ The corresponding Syntax: Beispiel SOFTKEY_1 SOFTKEY_2 SOFTKEY_3 SOFTKEY_4 SOFTKEY_5 SOFTKEY_6 = = = = = = "Text" "Power" "EPG" "OPT+" "TV_Radio" "Source" SOFTKEY_1 SOFTKEY_2 SOFTKEY_3 SOFTKEY_4 SOFTKEY_5 SOFTKEY_6 SOFTKEY_7 SOFTKEY_8 SOFTKEY_9 SOFTKEY_10 SOFTKEY_11 SOFTKEY_12 = = = = = = "" "" "Last" "Info" "List" "Wide" Syntax: left Softkey SOFTKEY_X = “x\Zeile“ Example: SOFTKEY_5 -\1 Center;+ -\2 Surround;+ -\3 Subwoofer;+ Display M208: TV Radio Allocation Softkeys Page 1 Ó SOFTKEY_2 SOFTKEY_3 Î Í SOFTKEY_4 SOFTKEY_5 Ò Ñ SOFTKEY_6 Page 2 SOFTKEY_7 Ô Softkeys "-\1" "Center;+" "-\2" "Surround;+" "-\3" "Subwoofer;+" The allocation of IR-Codes in this example are done as follows: = "TV_Radio" Softkeys = = = = = = Syntax: right Softkey SOFTKEY_X+1 = “Center text; y“ A Space in the description of the softkey is generated by the sign “_“. SOFTKEY_1 Ô Page 2 ... line 4 line 5 line 6 Ó SOFTKEY_8 SOFTKEY_9 Î Í SOFTKEY_... SOFTKEY_... Ò Ñ SOFTKEY_... 18 = = = = = = $1019 $1018 $101B $101A $1017 $1016 Re:control M208 Manager Cross References [X-References] With the definition of cross references you can put the same command on to two different buttons (Hard- or Softkeys) the IR code does not have to be executed twice. In order to do this, you do insert one time the IR-code for the button (Hard or Softkeys) and do introduce afterwards in the X-References the additional buttons which shall use the same IR code. Example TV-Remote Control The M 208 does have a navigation cross as well as separate buttons for the volume +/- and the channels +/-. By using the cross references it is now possible to put on to the buttons left/right of the navigation cross the same codes as on the volume +/- buttons. Such a x-reference looks then as follows: ###################################### # X-References ###################################### VOLUME_UP = "RIGTH" VOLUME_DOWN = "LEFT" Such a X-Reference can be realised between Hardand Softkeys, between Hard- and Hardkeys and between Soft- and Hardkeys. 19 Re:control M208 Manager Chain of commands [Macro] General explanation Using a macro you can define a chain of commands, which are triggered by a single button. This increases the comfort of use significant, e.g. as several devices can be switched on at once. Macro start: Macros can either be started from a softkey or a hardkey. Device: To use macros the software version of the M208 has to be 0.70 or higher. If necessary update your M208 with the latest software. Syntax of a macro example: Valid devices: TUNER, DVD, TV, SERVER, SAT, VIDEO, AUDIO, LIGHT, SOUND c ALL_ON = “ TV:Power, 2 ; SOUND: DVD_ON “ d STAR = “ TV2:Video; LIGHT:OK,4; SAT:Power ” Explanation to c Macro start: ALL_ON All of the 9 device buttons of the M208 can be defined as (macro) device. Again each device button can contain up to 6 single devices. A single device consists out of a mpi-file, which actually represents e.g. the Revox plasma 42HD on the TV device button. If there is more than one device (mpi-file) assigned to a device button, the assignment is defined by the number 1 to 6. (self defined softkey) Device 1: TV Command 1: Power Pause 1: yes, 2 x 100 ms = 200 ms Device 2: SOUND Command 2: DVD_ON Pause 2: no Device-Assignment Example: TV2 or SAT4 End Explanation to d Macro start: STAR This variable definition of a macro, which is not fixed to a special device, offers the big advantage to be able to exchange devices without defining a new macro, as long as the commands, e.g. Power (for the macro) exists also at the new device. Therefor it is important for the softkey definition that certain commands always use the same description, e.g. Power. - Note upper and lower case - (predefined hardkey) Device 1: TV2 Command 1: Video Pause 1: no Device 2: LIGHT Command 2: OK Pause 2: yes, 4 x 100 ms = 400 ms Device 3 SAT Command 3: Power Pause 3: no Command: As a command all within the mpi-file defined hard- and softkeys can be used. The commands for the M51 sources are reside within the sound.mpi file. The following commands are available there: TUNER_ON LOCAL_ON End DVD_ON TV_ON AUX1_ON AUX2_ON AUX3_ON TAPE_ON VIDEO1_ON VIDEO2_ON VIDEO3_ON VIDEO4_ON SERVER_ON M51_OFF - Note upper and lower case Pause: the number behind the command, separated by a comma, is defining the delay to the next sent command Delay time: number x 100 ms Example: STAR= “TV2:Video,4;SAT:Power” Delay time: 400 ms Max. length of a macro: 20 256 signs (complete line) Re:control M208 Manager Expert-Functions IR Scope (BETA-Version) The IR-Scope can make an IR-code visible. In order to do that the M208 does have to be connected with the PC. When choosing in the Menu Option and then Tools you can in the Expert-Functions see 3 additional functions: MMC Data Viewer Display Dump IR Scope MMC Data Viewer The MMC Data Viewer shows the memory content of the MMC card. Using the measuring feature Measure you can mark two points of the IR-signal with the mouse cursor. The IR-Scope shows in the lower toolbar the time and the corresponding frequency which is belonging to these two points. If you want to measure the carrier frequency take a package of 10 impulses to reduce rounding and metering errors. In this case the read off frequency has to be multiplied by 10. Display Dump From the Display Dump the content of the M208-Dispalys can be copied into a temporary file in order to further process them in other windows programs. Procedure 1. Connect the M208 through the USB-cable with the PC and start the Display Dump. 2. Choose on the M208 the Display the setting you want to copy. 3. Decide whether the USB Icon shall be shown and whether a Display Border around the Display shall be shown. 4. By using the button Refresh you renew the content of the display. 5. The button Copy to Clipboard copies the display content into the temporary memory. 21 Re:control M208 Manager System Requirements Operating System: WIN 98, WIN 2000, WIN XP Available Memory on the HD: 5 MB Working Memory available: 256 MB USB-Interface 1.0 or 2.0 Description of Version: 1.0.0 22