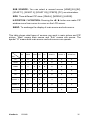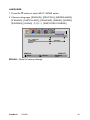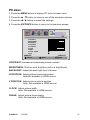
1
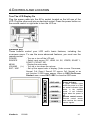
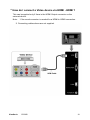
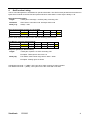
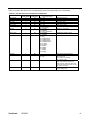
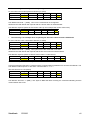
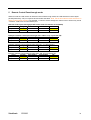
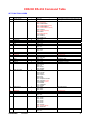
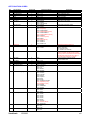
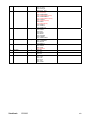
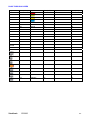
® ViewSonic CD3200 LCD Commercial Display Model No. : VS11857 Contents Compliance Information.............................................................................. 1 Important Safety Instructions...................................................................... 2 Declaration of RoHS Compliance............................................................... 3 Copyright Information ................................................................................. 4 Product Registration ................................................................................... 4 SAFETY AND PRECAUTIONS ........................................................... 5 OPERATING SAFETY5.............................................................................. 5 REPAIR ...................................................................................................... 6 Notes for Service Engineers.................................................................. 6 Point of use............................................................................................ 7 Environmental conditions ...................................................................... 7 Connecting ............................................................................................ 8 PRECAUTIONS.......................................................................................... 9 IMPORTANT ADDITIONAL SAFETY INSTRUCTIONS ............................. 9 INTRODUCTION................................................................................ 10 SERVICE.................................................................................................. 10 PERFORMANCE CHARACTERISTICS................................................... 10 INCLUDED EQUIPMENT......................................................................... 12 CONNECTING EXTERNAL DEVICES .............................................. 13 CONTROLS AND LOCATION........................................................... 14 REMOTE CONTROL ......................................................................... 15 SUMMARY OF REMOTE CONTROL BUTTONS ............................. 16 CONNECTIONS & APPLICATIONS.................................................. 17 GENERAL CONTROLS & ADJUSTMENT ....................................... 21 TURNING THE LCD DISPLAY ON AND OFF.......................................... 21 VOLUME CONTROL................................................................................ 21 SETTING THE SLEEP TIMER ................................................................. 21 SWITCHING PC / HDMI / VIDEO / SCART MODES ............................... 22 VIEWING THE MENUS AND ON-SCREEN DISPLAYS .......................... 23 PICTURE SETTING ................................................................................. 24 SOUND ADJUSTMENT ........................................................................... 27 FUNCTION ............................................................................................... 32 PC MENU ................................................................................................. 37 ViewSonic CD3200 OTHER FUNCTIONS......................................................................... 40 TROUBLESHOOTING....................................................................... 41 PC INPUT PRESET TIMING TABLE................................................. 43 SPECIFICATIONS ............................................................................. 44 Customer Support............................................................................ 45 Limited Warranty .............................................................................. 46 ViewSonic CD3200 Compliance Information Warning: You are cautioned that changes or modifications not expressly approved by the party responsible for compliance could void your authority to operate the equipment. For Canada This Class B digital apparatus complies with Canadian ICES-003. Cet appareil numérique de la classe B est conforme à la norme NMB-003 du Canada. CE Conformity for European Countries The device complies with the requirements of the EEC directive 89/336/ EEC as amended by 92/31/EEC and 93/68/EEC Art.5 with regard to "Electromagnetic compatibility", and 73/23/EEC as amended by 93/68/ EEC Art.13 with regard to "Safety." Following information is only for EU-member states: The mark shown to the right is in compliance with the Waste Electrical and Electronic Equipment Directive 2002/96/EC (WEEE). The mark indicates the requirement NOT to dispose the equipment as unsorted municipal waste, but use the return and collection systems according to local law. ViewSonic CD3200 1 Important Safety Instructions 1. Read these instructions completely before using the equipment. 2. Keep these instructions in a safe place. 3. Heed all warnings. 4. Follow all instructions. 5. Do not use this equipment near water. Warning: To reduce the risk of fire or electric shock, do not expose this apparatus to rain or moisture. 6. Clean with a soft, dry cloth. If further cleaning is required, see “Cleaning the Display” in this guide for further instructions. 7. Do not block any ventilation openings. Install the equipment in accordance with the manufacturer’s instructions. 8. Do not install near any heat sources such as radiators, heat registers, stoves, or other devices (including amplifiers) that produce heat. 9. Do not attempt to circumvent the safety provisions of the polarized or groundingtype plug. A polarized plug has two blades with one wider than the other. A grounding type plug has two blades and a third grounding prong. The wide blade and the third prong are provided for your safety. If the plug does not fit into your outlet, consult an electrician for replacement of the outlet. 10. Protect the power cord from being tread upon or pinched, particularly at the plug, and the point where if emerges from the equipment. Be sure that the power outlet is located near the equipment so that it is easily accessible. 11. Only use attachments/accessories specified by the manufacturer. 12. Use only with the cart, stand, tripod, bracket, or table specified by the manufacturer, or sold with the equipment. When a cart is used, use caution when moving the cart/equipment combination to avoid injury from tipping over. 13. Unplug this equipment when it will be unused for long periods of time. 14. Refer all servicing to qualified service personnel. Service is required when the unit has been damaged in any way, such as: if the power-supply cord or plug is damaged, if liquid is spilled onto or objects fall into the unit, if the unit is exposed to rain or moisture, or if the unit does not operate normally or has been dropped. ViewSonic CD3200 2 Declaration of RoHS Compliance This product has been designed and manufactured in compliance with Directive 2002/ 95/EC of the European Parliament and the Council on restriction of the use of certain hazardous substances in electrical and electronic equipment (RoHS Directive) and is deemed to comply with the maximum concentration values issued by the European Technical Adaptation Committee (TAC) as shown below: Substance Proposed Maximum Concentration Actual Concentration Lead (Pb) 0.1% < 0.1% Mercury (Hg) 0.1% < 0.1% Cadmium (Cd) 0.01% < 0.01% Hexavalent Chromium (Cr6+) 0.1% < 0.1% Polybrominated biphenyls (PBB) 0.1% < 0.1% Polybrominated diphenyl ethers (PBDE) 0.1% < 0.1% Certain components of products as stated above are exempted under the Annex of the RoHS Directives as noted below: Examples of exempted components are: 1. Mercury in compact fluorescent lamps not exceeding 5 mg per lamp and in other lamps not specifically mentioned in the Annex of RoHS Directive. 2. Lead in glass of cathode ray tubes, electronic components, fluorescent tubes, and electronic ceramic parts (e.g. piezoelectronic devices). 3. Lead in high temperature type solders (i.e. lead-based alloys containing 85% by weight or more lead). 4. Lead as an allotting element in steel containing up to 0.35% lead by weight, aluminium containing up to 0.4% lead by weight and as a cooper alloy containing up to 4% lead by weight. ViewSonic CD3200 3 Copyright Information Copyright © ViewSonic® Corporation, 2007. All rights reserved. Macintosh and Power Macintosh are registered trademarks of Apple Computer, Inc. Microsoft, Windows, Windows NT, and the Windows logo are registered trademarks of Microsoft Corporation in the United States and other countries. ViewSonic, the three birds logo, OnView, ViewMatch, and ViewMeter are registered trademarks of ViewSonic Corporation. VESA is a registered trademark of the Video Electronics Standards Association. DPMS and DDC are trademarks of VESA. ENERGY STAR® is a registered trademark of the U.S. Environmental Protection Agency (EPA). As an ENERGY STAR® partner, ViewSonic Corporation has determined that this product meets the ENERGY STAR® guidelines for energy efficiency. Disclaimer: ViewSonic Corporation shall not be liable for technical or editorial errors or omissions contained herein; nor for incidental or consequential damages resulting from furnishing this material, or the performance or use of this product. In the interest of continuing product improvement, ViewSonic Corporation reserves the right to change product specifications without notice. Information in this document may change without notice. No part of this document may be copied, reproduced, or transmitted by any means, for any purpose without prior written permission from ViewSonic Corporation. Product Registration To meet your future needs, and to receive any additional product information as it becomes available, please register your product on the Internet at: www.viewsonic.com. The ViewSonic Wizard CD-ROM also provides an opportunity for you to print the registration form, which you may mail or fax to ViewSonic. For Your Records Product Name: Model Number: Document Number: Serial Number: Purchase Date: CD3200 ViewSonic 32” LCD Commercial Display VS11857 CD3200-1_UG_ENG Rev. 1A 05-23-07 _______________________________ _______________________________ Product disposal at end of product life The lamp in this product contains mercury. Please dispose of in accordance with local, state or federal laws. ViewSonic is concerned about the preservation of our environment. Please dispose of this product properly at the end of its useful life. For the recycling information, please refer to our website: 1. USA: www.viewsonic.com/pdf/RecyclePlus.pdf 2. Europe: www.viewsoniceurope.com 3. Taiwan: recycle.epa.gov.tw ViewSonic CD3200 4 1.SAFETY AND PRECAUTIONS Please read through this section carefully and follow the instructions to maximize the reliable operation and lifetime of your LCD display. Always keep these instructions handy and close by your LCD display. Keep the instructions and the packaging so that if you sell or give away your LCD display you can give them to the new owner. OPERATING SAFETY • Never open the housing of the LCD display /power supply! When the housing is open there is a danger of injury from electric shock! • Do not insert any objects through the slots and openings of the monitor. This may lead to an electrical short-circuit or even fire resulting in damage to your LCD display. • Slots and openings in the LCD display are for ventilation purpose. Do not cover these openings, as this may lead to overheating. • Do not allow children to play unattended with electrical equipment. Children may not always correctly recognize danger. • This LCD display is intended for personal use only. It not intended for commercial use in a heavy industry environment. • An injury hazard exists when the display breaks. Wear protective gloves to pack the broken parts and send them into your service centre for proper disposal. Then wash your hands with soap, because it is possible for chemicals to escape. • Never exert pressure on the display. This could break the monitor. • Do not touch the display with your fingers or with sharp objects to avoid damage. ViewSonic CD3200 5 Contact the Call Centre immediately in any of the following situations. Do NOT plug in or turn on your display: ♦ if the power cable/power supply overheats or is damaged ♦ if liquid has got into the monitor ♦ if the LCD display is dropped or the housing damaged REPAIR • Leave all repairs of your LCD display to authorised and qualified personnel only. • Should a repair be necessary, please contact one of our authorized service partners only. NOTES FOR SERVICE ENGINEERS • Before opening the housing, disconnect the product from all power sources and remove any connecting cables. If the display has not been disconnected from the power outlet before being opened, there is a danger to life through electric shock. There is also a risk of damage to the components. • Internal components of the LCD display may be damaged by electrostatic discharge (ESD). Carry out repairs in an ESD-protected workshop. If no such workshop is available, wear an antistatic wrist strap or touch a highly conductive metal object. We can repair damage sustained by inappropriate handling for a fee. • Use only original spare parts. ViewSonic CD3200 6 POINT OF USE • Keep your LCD display and all units connected to it away from moisture and avoid dust, heat and direct sunlight. Failure to observe these instructions can lead to malfunctions or damage to the LCD display. • Place and operate all units on a stable, level and vibration-free surface in order to avoid the LCD display from falling. ENVIRONMENTAL CONDITIONS • The LCD display can be operated most reliably at ambient temperatures between +41°F and +95°F (5° C to 35° C) and at a relative humidity between 20% and 85% (without condensation). • When switched off, the LCD display can be stored most reliably between -4°F and +140°F (-20° C - +60° C), up to the maximum height of 39,000 ft (12,000 m) above sea level at a relative humidity between 10% and 85% (without condensation). • After transporting your LCD display please wait until it has assumed the ambient temperature before connecting and switching it on. Extremely high variations in the temperature or humidity may result in condensation forming on the inside of the LCD display which could cause an electrical short-circuit. ViewSonic CD3200 7 CONNECTING Observe the following instructions to connect your LCD display properly: POWER SUPPLY • Do not open the power supply housing. An open housing presents a lethal hazard from electrical shock. There are no parts inside to be cleaned or serviced. • Operate your LCD display only with grounded outlets with AC 100-240V~/ 50-60 Hz. If you are not sure about the power supply at your location, check with your power company. • Use only the power supply and power connection cable provided. • For additional safety we recommend use of a surge protector to protect your LCD display from damage resulting from voltage surges or lightning. • To remove the LCD display from the power supply, disconnect the plug from the AC outlet. • The power outlet must be in the vicinity of your LCD display and within reach of the power cables. DO NOT stretch the power cables tightly to reach a power outlet. • You should arrange the LCD display cables in a manner that no one can trip over or step on them. • To avoid damage of cable do not place any objects or furniture on the cable. ViewSonic CD3200 8 PRECAUTIONS Caution! There are no parts which can be serviced or cleaned inside of the display housing. You can increase the life of your LCD display by taking the following precautions: • Before cleaning always disconnect the power line and all connection cables. • Do not use any solvents, caustic or gaseous cleaning agents. • Clean the display with a soft, lint-free cloth. • Ensure that no water droplets remain on the screen. Water can cause permanent discoloration. • Do not expose the screen to bright sunlight or ultraviolet radiation. ViewSonic CD3200 9 2.INTRODUCTION Thank you for purchasing our LCD Multi-display. We thank you for your confidence in our products and are pleased to greet you as a new customer. We focused on great features, ease of use and reliability in manufacturing your LCD display. SERVICE Your display comes with a one-year warranty, this is in addition to your statutory rights. This manual contains a separate chapter on Troubleshooting on page 37. PERFORMANCE CHARACTERISTICS Advantages in relation to CRT (cathode ray tube) displays: ¾ ¾ ¾ Less space required Lighter weight Lower power consumption ViewSonic CD3200 10 Further features ¾ Multi-sources input included D-SUB, HDMI, SCART 1, SCART 2, SCART 2 S, COMPONENT, VIDEO , and S-VIDEO. ¾ Easy-to-use remote control, and OSD (on-screen display) menu. ¾ Experience PIP (picture in picture) and POP (picture of picture; Split Screen.) ¾ Aspect Ratio modes include Full, Panoramic, Normal, Zoom 1, and Zoom 2. ¾ APC (auto picture control) settings include Movie, Bright, Manual and Standard. ¾ Automatic sleep timer control from 10 to 120 minutes in 10-minute increments. ¾ Automatic Power Off feature after 10 minutes without a signal. ¾ Provided component video input for high definition LCD (HD ready), resolution up to 720p, 1080i ¾ Provided 6 Equalizer modes for selection. RS232 Protocal One of the instinct features of CD3200 is the RS232 protocol. The CD3200 can be controlled thorough the serial port from a PC. The release of the RS232 protocol will base on Viewsonic release notes. The Viewsonic_RS232_protocal document defines the command code and format of the RS232 protocol. ViewSonic CD3200 11 INCLUDED EQUIPMENT Please check that you have received the following items with your LCD unit. LCD USER’S MANUAL User’s Manual Remote Control & Batteries(AAA X2) Power Cord ViewSonic CD3200 12 3.CONNECTING EXTERNAL DEVICES Interface I Interface II Note: Audio out L/R The level of audio output cannot be changed using the volume control on your display. This connector should be used with an external audio amplifier that can be used to control the volume. ViewSonic CD3200 13 4.CONTROLS AND LOCATION Turn The LCD Display On Plug the power cable into the AC-in socket located on the left rear of the LCD. Plug the other end into an electrical socket. Press the power button on the remote control or right side to turn the LCD on . Function Key These buttons control your LCD unit’s basic features, including the on-screen menu. To use the more advanced features, you must use the remote control. POWER SOURCE MENU VOLUME (-/+) EXIT / ARC : Turn on or turn off the LCD unit. : Select input source (PC, HDMI, AV, SV, YPBPR, SCART 1, SCART 2, SCART 2S). : Display the main menu. : Turn up or turn down the volume. : Set up the aspect ratio of display (Video source: Panorama, Normal, Full, Zoom1, Zoom2; PC source: Full, Normal) or as exit function if OSD menu appear. When in OSD (On-Screen Display) menu, press EXIT / ARC to close the OSD menu EXIT/ ARC + _ VOLUME CHANNEL MENU SOURCE POWER ViewSonic CD3200 Power indicator: A green indicator lights when the power is on and an amber indicator lights when in the standby mode. A red indicator lights when the power is off. Remote control sensor: Remote control sensor that receives the remote control signals. 14 5.REMOTE CONTROL ViewSonic CD3200 15 6.SUMMARY OF REMOTE CONTROL BUTTONS Power control POWER button Turn the LCD on or off. Selecting the primary signal source PC/HD button Switch to PC , HDMI mode. VIDEO button Switch to AV / S-Video and YPBPR mode. SCART Switch to SCART 1 / SCART 2 and SCART 2S mode. Menu Settings MENU button Display the on-screen menu. EXIT Exit a menu or sub-menu. △/▽/◁/▷ Access menu items. Sound Control VOL△/▽ button Increase/ Decrease volume level. MUTE button Temporarily turn off audio. PIP Control PIP ON/OFF button △/▽ button Enable/Disable PIP viewing window. Toggle PIPmode : PIP → POP → OFF. Select PIP input source: PC→HDMI→AV→SV→SCART 1→ SCART 2→SCART 2S→YPBPR→PC. SIZE button Toggle PIP window size: Small / Middle / Large. Audio/Video button Toggle audio/video source between the primary display and the PIP window. POSITION button Move the PIP window position . Other Function INFO button Display current /Input source/signal format. ARC button (Aspect Ratio Control) In PC mode:Set the picture mode to Full, Normal. In Video mode:Toggle the picture mode between Normal → APC button (Automatic Picture Control) Toggle screen luminosity between Standard, Movie, Bright, Manual SLEEP button Select a pre-set time for automatic power down. FREEZE button Temporary pause current image. ViewSonic CD3200 16 7.CONNECTIONS & APPLICATIONS VIDEO DEVICE (eg. DVD Player or Set-top Box…) Interface I VIDEO L R Y Pb Pr HDMI to HDMI Cable HDMI L R PC Note: 1. No sound connector is needed for a HDMI to HDMI connection. 2. HDMI and VGA cables are not supplied. ViewSonic CD3200 17 * How do I connect a Video device via HDMI - HDMI ? This can be applied only if there is the HDMI Output connector on the external device. Note: 1. No sound connector is needed for a HDMI to HDMI connection. 2. Connecting cables above are not supplied. ViewSonic CD3200 18 * How do I connect a PC via D-SUB ? 1. Connect a VGA cable between the D-SUB connector on the LCD and the D-SUB connector on PC. 2. Connect an audio cable between the PC AUDIO IN jack on the LCD and AUDIO OUT jack on PC. 3. Cables are not included. ViewSonic CD3200 19 * How do I connect a video device via general cables? This LCD accepts different video input, if video device has a connector with better quality, please connect the better one. The sequence of video quality from the best to the normal is Componet, Scart, S-Video. Note: Cables are not supplied. ViewSonic CD3200 S/P DIF Subwoofer 20 8.GENERAL CONTROLS & ADJUSTMENT TURNING THE LCD DISPLAY ON AND OFF 1. Press the POWER button on the Remote Control. 2. You can also use the POWER button at the right of the panel. VOLUME CONTROL Using Volume Control Press VOL▲ / VOL▼ button to turn up or turn down the sound volume. Using Mute At any time, users can temporarily turn off the sound by pressing the MUTE button. 1. Press the MUTE button and the sound cuts off. 2. Press the MUTE again or VOL▲ / VOL▼ button to turn the sound back to the previous level. SETTING THE SLEEP TIMER You can set the Sleep Timer to turn off the LCD automatically. The time can be set from OFF to 120 minutes. 1. Press the SLEEP button to set the Sleep Timer screen. 2. Press the SLEEP button repeatedly to change the sleep time (in 10 minutes intervals). ViewSonic CD3200 21 SWITCHING PC / HDMI / VIDEO / SCART MODES 1. Turn on the power. 2. Select an input source as described below: PC/HD button switch to PC , HDMI mode VIDEO button switch to AV / SV / YPBPR mode (Composite, Y/C and Component signal) SCART button switch to SCART 1, SCART 2, SCART 2S Source button ViewSonic CD3200 22 VIEWING THE MENUS AND ON-SCREEN DISPLAYS 1. With the power on, press the MENU button. The main menu appears on the screen. PICTURE PICTURE MODE CONTRAST BRIGHTNESS BACKLIGHT HUE COLOR SHARPNESS COLOR MODE STANDARD EXIT MAIN:AV SELECT MOVE SUB:OFF EXIT EXIT 2. Use the W / X button to select one of the menu options, and then press the S / T button to access the sub-menu. 3. Press the W / X button to make adjustments. 4. Press EXIT/INFO button to exit from the menu. Note: The menu varies according to which input source is selected. ViewSonic CD3200 23 PICTURE SETTING You may need to perform separate adjustments for brightness and contrast for the different video modes. Typically, PC mode will be best viewed with lower brightness and contrast settings than are appropriate for the other modes. 1. Press the MENU button to display PICTURE from the main menu. 2. Press the S / T button to select the desired item. 3. Press the W / X button to adjust ranges from minimum to maximum. 4. Press the EXIT/INFO button to return to the previous screen. PICTURE PICTURE MODE CONTRAST BRIGHTNESS BACKLIGHT HUE COLOR SHARPNESS COLOR MODE MANUAL MAIN:AV SELECT SUB:OFF MOVE EXIT EXIT PICTURE MODES: [MANUAL]:Select this mode if you want to manually adjust each setting. Adjustments are only available under this mode. [STANDARD]: Standardizes picture adjustment [MOVIE]: Heighten contrast and sharpness [BRIGHT]: Display a clear and bright picture. ViewSonic CD3200 24 PICTURE SETTINGS: CONTRAST: Increase and decrease picture contrast BRIGHTNESS: Adjust picture brightness BACKLIGHT: Adjust the back light level of screen HUE: COLOR: Adjust picture color SHARPNESS: Adjust image COLOR MODE: 1. Press the S / T buttons to select COLOR MODE option, and then press the X button to enter the COLOR TEMP. sub-menu. PICTURE PICTURE MODE CONTRAST BRIGHTNESS BACKLIGHT HUE COLOR SHARPNESS COLOR MODE MANUAL MAIN:AV SELECT SUB:OFF MOVE EXIT EXIT 2. Press the X button to choose the color of picture mode. [NORMAL], [WARM], [COOL], [MANUAL]. Users can adjust Color R/G/B only in [Manual]. PICTURE COLOR TEMP. USER – R USER – G USER – B MANUAL MAIN:AV MOVE ViewSonic CD3200 SUB:OFF SELECT EXIT EXIT 25 3. Press S / T buttons to move USER-R/G/B and then press the X button to enter the desired setting. USER-R: adjust color of red rate. USER-G: adjust color of green rate. USER-B: adjust color of blue rate. ViewSonic CD3200 26 SOUND ADJUSTMENT 1. Press the MENU button to display SOUND from the main menu. 2. Press the S / T button to move to one of the sub-menu options. 3. Press the W / X button to select the settings. 4. Press the EXIT/INFO button to return to the previous screen. SOUND SOURCE AVC MODE EQUALIZER BASS TREBLE BALANCE MAIN ON OFF MAIN:AV SELECT SUB:OFF MOVE EXIT EXIT SOURCE: Choose the sound source from the [MAIN] or [SUB] display. You can enable this function while in PIP (picture in picture) or POP (picture of picture). AVC: You can set AVC (Auto Volume Control ) options to ON or OFF. [ON]: For general use, like commercial advertisment,AVC can avoid the sound turns up or down suddenly. [OFF]: For special sound effect, like opera or symphony, volume can be performed in accordance with the orginal sound level. MODE: Select the audio mode to [OFF], [EQ]. [In OFF mode] BASS: Adjust low tone of sound. TREBLE: Adjust high tone of sound. BALANCE: Adjust the volume balance between the left and right speakers. ViewSonic CD3200 27 [In EQ mode] (EQ is shortened for Equalizer). BALANCE: Adjust the volume balance between the left and right speakers. EQUALIZER: 1. Press the S / T button to enter the EQUALIZER menu. SOUND SOURCE AVC MODE EQUALIZER BASS TREBLE BALANCE MAIN ON EQ MAIN:AV MOVE SUB:OFF SELECT EXIT EXIT 2. Press the X button to select the EQUALIZER options. SOUND EQUALIZER 120 HZ 500 HZ 1.5 KHZ 5 KHZ 10 KHZ MANUAL MAIN:AV MOVE SUB:OFF SELECT EXIT EXIT 3. There are 6 Equalizer modes available: [MANUAL], [VOICE] ,[POP], [ROCK] , [JAZZ] , [CLASSIC]. 4. Settings for VOICE , POP, ROCK , JAZZ and CLASSICAL are pre-configured. You cannot adjust these settings. The frequency responses are as below: Note: Functions in grey are preconfigured. ViewSonic CD3200 28 VOICE: SOUND EQUALIZER 120 HZ 500 HZ 1.5 KHZ 5 KHZ 10 KHZ VOICE MAIN:AV MOVE SUB:OFF SELECT EXIT EXIT POP: SOUND EQUALIZER 120 HZ 500 HZ 1.5 KHZ 5 KHZ 10 KHZ POP MAIN:AV MOVE SUB:OFF SELECT EXIT EXIT ROCK: SOUND EQUALIZER 120 HZ 500 HZ 1.5 KHZ 5 KHZ 10 KHZ ROCK MAIN:AV MOVE SUB:OFF SELECT EXIT EXIT Note: Functions in grey are preconfigured. ViewSonic CD3200 29 JAZZ: SOUND EQUALIZER 120 HZ 500 HZ 1.5 KHZ 5 KHZ 10 KHZ JAZZ MAIN:AV MOVE SUB:OFF SELECT EXIT EXIT CLASSICAL: SOUND EQUALIZER 120 HZ 500 HZ 1.5 KHZ 5 KHZ 10 KHZ CLASSIC MAIN:AV MOVE SUB:OFF SELECT EXIT EXIT Note: Functions in grey are preconfigured. ViewSonic CD3200 30 5. In MANUAL mode, press S / T buttons to the band and press W / X buttons to select the desired frequency settings. MANUAL: SOUND EQUALIZER 120 HZ 500 HZ 1.5 KHZ 5 KHZ 10 KHZ MANUAL MAIN:AV MOVE SUB:OFF SELECT EXIT EXIT AUDIO SWAP Button Note: When using the PIP feature in PC mode, you are able to listen to the sound of the [SUB] screen instead of the [MAIN] screen by selecting the AUDIO SWAP button. ViewSonic CD3200 31 FUNCTION 1. Press the MENU button to display FUNCTION from the main menu. 2. Press the S / T button to move to one of the sub-menu options. 3. Press the W / X button to select the settings. 4. Press the EXIT/INFO button to return to the previous screen. FUNCTION W OFF X X W English X X MULTI MODE PIP FUNCTION LANGUAGE RECALL MAIN:AV MOVE SUB:OFF SELECT EXIT EXIT MULTI MODE: 1. Press the T button to select MULTI MODE option. 2. Press the W / X button to select the [OFF], [PIP], [POP] mode. FUNCTION MULTI MODE PIP FUNCTION LANGUAGE RECALL OFF ENGLISH MAIN:AV MOVE ViewSonic CD3200 SUB:OFF SELECT EXIT EXIT 32 [OFF]:Only show the primary source.(No PIP/POP) [PIP] :Show PIP in a screen. [POP] :Show PIP side by side with the main source. 3. Press the EXIT/INFO button to return to the previous screen. ViewSonic CD3200 33 PIP FUNCTION: 1. Press the T button to select PIP FUNCTION option. FUNCTION MULTI MODE PIP FUNCTION LANGUAGE RECALL PIP ENGLISH MAIN:AV MOVE SUB:OFF SELECT EXIT EXIT 2. Press the X button to enter PIP FUNCTION sub-menu. FUNCTION SUB SOURCE SIZE H - POSITION V - POSITION SWAP HDMI SMALL MAIN:AV MOVE SUB:HDMI SELECT EXIT EXIT 3. Press the S / T button to move to one of the sub-menu items. 4. Press the W / X button to select the settings. ViewSonic CD3200 34 SUB SOURCE: You can select a second source [HDMI],[AV],[SV], [SCART 1], [SCART 2], [SCART 2S], [YPBPR], [PC], as sub-window. SIZE: Three different PIP sizes. [SMALL], [MIDDLE], [LARGE]. H-POSITION / V-POSITION: Pressing the W / X button can make PIP window move from corner to corner on the LCD screen. SWAP: To exchange the display of main source and sub-source. This table shows what types of sources can work in main picture and PIP picture. “Main” means main source and “Sub” means sub source. The symbol “O” means both main source and sub source can operate. Sub PC HDMI YPBPR SV AV SCART 1 SCART 2 SCART 2S PC X X X O O O O O HDMI X X X O O O O O YPBPR X X X O O O O O SV O O O X O O O O AV O O O O X O O O SCART 1 O O O O O X O O SCART 2 O O O O O O X O SCART 2S O O O O O O O X Main ViewSonic CD3200 35 LANGUAGE: 1. Press the T button to select MULTI MODE option. 2. Choose a language. [ENGLISH], [DEUTSCH], [NEDERLANDS], [ITALIANO], [CASTELLANO], [FRANCAIS], [DANSK], [NORSK], [SVENSKA], [SUOMI], 简体中文 [SIMPLIFIED CHINESE] FUNCTION MULTI MODE PIP FUNCTION LANGUAGE RECALL OFF ENGLISH MAIN:AV MOVE SUB:OFF SELECT EXIT EXIT RECALL: Reset to factory settings. ViewSonic CD3200 36 PC MENU 1. Press the MENU button to display PC from the main menu. 2. Press the S / T button to move to one of the sub-menu options. 3. Press the W / X button to select the settings. 4. Press the EXIT/INFO button to return to the previous screen. PC CONTRAST BRIGHTNESS BACKLIGHT H-POSITION V-POSITION CLOCK PHASE COLOR MODE AUTO MAIN:PC SELECT SUB:OFF MOVE EXIT EXIT CONTRAST: Increase and decrease picture contrast BRIGHTNESS: Darken and brighten picture brightness BACKLIGHT: Adjust the back light level of screen H POSITION: Adjust picture horizontal position. Note:Not available in HDMI source. V POSITION: Adjust picture vertical position. Note: Not available in HDMI source. CLOCK: Adjust picture width. Note: Not available in HDMI source. PHASE: Adjust picture focus quality. Note: Not available in HDMI source. ViewSonic CD3200 37 COLOR MODE : 1. Press the S / T buttons to select COLOR MODE option, and then press the X button to enter the COLOR TEMP. sub-menu. PC CONTRAST BRIGHTNESS BACKLIGHT H-POSITION V-POSITION CLOCK PHASE COLOR MODE AUTO MAIN:PC MOVE SUB:OFF SELECT EXIT EXIT 2. Press the X button to choose the color of picture mode. [NORMAL], [WARM], [COOL], [MANUAL]. PC COLOR TEMP. USER – R USER – G USER – B MANUAL MAIN:PC MOVE SUB:OFF SELECT EXIT EXIT 3. Press S / T buttons to move USER-R/G/B and then press the X button to enter the desired setting. USER-R: adjust the red ratio of the picture USER-G: adjust the green ratio of the picture USER-B: adjust the blue ratio of the picture ViewSonic CD3200 38 PC COLOR TEMP. USER – R USER – G USER – B MANUAL MAIN:PC MOVE SUB:OFF SELECT EXIT EXIT AUTO: Automatically adjust picture. Press the X button to adjust picture position automatically. Screen will disappear until it has completed adjustment. PC CONTRAST BRIGHTNESS BACKLIGHT H-POSITION V-POSITION CLOCK PHASE COLOR MODE AUTO MAIN:PC MOVE ViewSonic CD3200 SUB:OFF SELECT EXIT EXIT 39 9.OTHER FUNCTIONS 1. – ARC - Aspect Ratio Control Press ARC to adjust different picture format on the screen. Please note: in some sources, some modes are only available. In PC mode , only FULL and NORMAL modes are available. FULL: This mode expands the width of 4:3 video sources evenly to fill the 16:9 screen. There will be distortion at the center of the screen as well as edges. NORMAL : This sets the aspect ratio to 4:3 for traditional TV programs. There will be black bars at either side of the screen. PANORAMIC : Expands 4:3 video sources to fit the 16:9 screen by expanding the image at the edges of the screen. This creates less distortion at the centre of the screen. ZOOM 1 (16:9) : Some DVD movies may not fill the top and bottom of the screen. The 16:9 zoom function extends the height to fill the screen. ZOOM 2 (14:9) : In the mode, to display 14:9 broadcasts in the correct proportions. There will be black boards at both sides of the screen. 2. – APC - Automatic Picture Control Press APC button on the remote control repeatedly to cycle through the APC settings. This is to adjust the brightness and contrast of screen. * Movie: the contrast is around 0.51 times of standard mode. * Manual: default brightness is around 0.91 times that of standard mode, and adjustment is available. * Standard: the standard settings for the best picture. * Bright: the contrast is around 1.37 times that of standard mode. ViewSonic CD3200 40 10.TROUBLESHOOTING Many times, problems have simple causes. We would like to give you some tips to solve some common problems. Should these tips not help, please contact your dealer. There is no picture. z Make sure the power cord is properly connected. z Make sure the input mode is set correctly. There is no picture. z Make sure the Contrast/Brightness is properly adjusted. z Make sure all external devices are connected properly. Picture is too bright. z Check the APC function setting. z Check Contrast/Brightness adjustment. The picture is too dark. z Check the APC function setting. z Check Contrast/Brightness adjustment. Remote control does not work. z Check the batteries in the remote control are not flat. z Make sure the sensor of LCD is not under strong lighting. The picture is not sharp. z Check the colour adjustment. z Check the Sharpness adjustment. ViewSonic CD3200 41 The picture is jittery. z Make sure the LCD isn’t near Microwave Oven or other equipment. The picture has double or triple image. z There may be reflected signals from mountains or buildings. The picture is spotty. z There may be interference from automobiles,trains, high voltage lines, neon light, etc. There are stripes on the screen or colours fade. z Is the unit receiving interference from other devices? Transmission of radio broadcasting station and transmission of amateur radio and cellular phones may also cause interference. z Place the unit as far apart as possible from devices that may cause possible interference. ViewSonic CD3200 42 11.PC INPUT PRESET TIMING TABLE Analog Input No. Mode H-Resolution H.Freq. V.Freq. H. V. Pixel CLK Name V-Resolution (KHz) (Hz) Polarity Polarity (MHz) 1 VGA 640 * 350 31.469 70.087 - - 25.175 2 VGA 640 * 480 31.469 59.941 - - 25.175 3 MAC 640 * 480 35.0 66.667 - - 30.240 4 SVGA 800 * 600 35.16 56.25 + + 36.000 5 SVGA 800 * 600 37.879 60.317 + + 40.000 6 XGA 1024 * 768 48.363 60.004 - - 65.000 7 XGA 1024 * 768 56.476 70.069 - - 75.000 8 WXGA 1280 * 768 47.78 59.87 - + 79.50 9 WXGA 1360 * 768 47.7 59.94 + + 85.5 * The resolution and the frequencies are displayed on the screen may not exactly same as this list. ViewSonic CD3200 43 12.SPECIFICATIONS ITEMS SPECIFICATION Screen Size 32″ TFT-LCD Panel Aspect Ratio 16:9 Resolution 1366 x 768 Display Area (Opening) 703.6 mm x 398.3 mm Panel Display colors 16,7M colors (8 bits) Contrast Ratio 1200 : 1 (typ.) Brightness (center) 500 cd / m2 (typ.) Viewing Angle (CR>10) 176o (Hor.) / 176o ( Ver.) Response Time (GTG) 8 ms (typ.) Video Colour System AV1 (scart) Video Input PC Input ViewSonic AV2 (composite) PAL / SECAM / NTSC 21-pin SCART (RGB / CVBS) x 1 21-pin SCART (RGB / CVBS / SVHS) x 1 Composite (RCA jack) x1 x1 S-Video AV3 (component) Y Pb Pr (720p / 1080 i , HD ready) x 1 AV4 (HDMI) HDMI 19 pin x1 VGA Connection D-Sub 15 pin x1 Scanning Frequency fH = 31.5 ~ 75KHz / fV = 56 ~ 75Hz CD3200 (HDMI 1.0/HDCP 1.1) 44 ITEMS Audio Input Video Output Audio Output SPECIFICATION Audio 1 Scart Audio 2 Composite/S-Video Audio 3 Component Audio 4 PC x 1 SCART 2 CVBS (SCART 1) x 1 Speaker ( build-in) 10W+10W (rms) @ THD < 10% (optional) Line Out Left / Right / Subwoofer S/P DIF HDMI loop through OSD Language English, French, German, Spanish, Italian, Finnish, Swedish, Dutch, Danish, Norwegian, Simplified Chinese Function Keys Power, Source, Menu, Up/Down, +/-(Volume), EXIT/ARC Video Performance 3D Comb-filter, 3D De-interlace , Aspect Ratio Control (ARC) ,Auto Picture Control (APC), Video Enhance,Noise Reduction, Picture in Picture (PIP), Picture on Picture (POP) Audio Performance Equalizer, Subwoofer, Auto Volume Control (AVC) Other Control Sleep Timer, Auto Power Off Power Supply AC 100V ~ 240V , 50 / 60Hz Feature Power Dimension x2 x1 x1 Power Consumption < 190 W WxHxD 828 mm*515 mm* 99 mm Weight (net) Without Accessories 15 kg ViewSonic CD3200 45 Customer Support For technical support or product service, see the table below or contact your reseller. NOTE: You will need the product serial number. Country/Region Website T = Telephone F = FAX Email Australia/New Zealand www.viewsonic.com.au AUS= 1800 880 818 NZ= 0800 008 822 [email protected] Canada www.viewsonic.com T= 1-866-463-4775 F= 1-909-468-5814 [email protected] Europe/Middle East/ Baltic countries/North Africa www.viewsoniceurope.com Contact your reseller Hong Kong www.hk.viewsonic.com T= 852 3102 2900 [email protected] India www.in.viewsonic.com T= 1800 11 9999 [email protected] Korea www.kr.viewsonic.com T= 080 333 2131 [email protected] Latin America (Argentina) www.viewsonic.com/la/ T= 0800-666-0098 F= 1-909-444-5655 [email protected] Latin America (Brazil) www.viewsonic.com/la/ T= 0800-891-1829 F= 1-909-444-5655 [email protected] Latin America (Chile) www.viewsonic.com/la/ T= 800-440303 F= 1-909-444-5655 [email protected] Latin America (Columbia) www.viewsonic.com/la/ T= 01800-9-156588 F= 1-909-444-5655 [email protected] Latin America (Mexico) www.viewsonic.com/la/ T= 001-866-823-2004 F= 1-909-444-5655 [email protected] Latin America (Peru) www.viewsonic.com/la/ T= 0800-53311 F= 1-909-444-5655 [email protected] Macau www.hk.viewsonic.com T= 853 700 303 [email protected] Puerto Rico & Virgin Islands www.viewsonic.com T= 1-800-688-6688 (English) [email protected] T= 1-866-379-1304 (Spanish) [email protected] F= 1-909-468-1202 Singapore/Malaysia/ Thailand www.ap.viewsonic.com T= 65 6461 6044 South Africa www.viewsoniceurope.com www.viewsoniceurope.com/uk/Support/Calldesk.htm United Kingdom www.viewsoniceurope.com www.viewsoniceurope.com/uk/Support/Calldesk.htm /uk/ United States www.viewsonic.com ViewSonic CD3200 T= 1-800-688-6688 F= 1-909-468-1202 [email protected] [email protected] 46 Limited Warranty VIEWSONIC® LCD DISPLAY What the warranty covers: ViewSonic warrants its products to be free from defects in material and workmanship, under normal use, during the warranty period. If a product proves to be defective in material or workmanship during the warranty period, ViewSonic will, at its sole option, repair or replace the product with a like product. Replacement product or parts may include remanufactured or refurbished parts or components. How long the warranty is effective: ViewSonic LCD displays are warranted for 1 year for all parts including the light source and 1 year for all labor from the date of the first consumer purchase. Who the warranty protects: This warranty is valid only for the first consumer purchaser. What the warranty does not cover: 1. Any product on which the serial number has been defaced, modified or removed. 2. Damage, deterioration or malfunction resulting from: a. Accident, misuse, neglect, fire, water, lightning, or other acts of nature, unauthorized product modification, or failure to follow instructions supplied with the product. b. Repair or attempted repair by anyone not authorized by ViewSonic. c. Any damage of the product due to shipment. d. Removal or installation of the product. e. Causes external to the product, such as electrical power fluctuations or failure. f. Use of supplies or parts not meeting ViewSonic’s specifications. g. Normal wear and tear. h. Any other cause which does not relate to a product defect. 3. Any product exhibiting a condition commonly known as "image burn-in" which results when a static image is displayed on the product for an extended period of time. 4. Removal, installation, and set-up service charges. How to get service: 1. For information about receiving service under warranty, contact ViewSonic Customer Support (Please refer to Customer Support page). You will need to provide your product's serial number. 2. To obtain warranted service, you will be required to provide (a) the original dated sales slip, (b) your name, (c) your address, (d) a description of the problem, and (e) the serial number of the product. 3. Take or ship the product freight prepaid in the original container to an authorized ViewSonic service center or ViewSonic. 4. For additional information or the name of the nearest ViewSonic service center, contact ViewSonic. Limitation of implied warranties: There are no warranties, express or implied, which extend beyond the description contained herein including the implied warranty of merchantability and fitness for a particular purpose. Exclusion of damages: ViewSonic's liability is limited to the cost of repair or replacement of the product. ViewSonic shall not be liable for: 1. Damage to other property caused by any defects in the product, damages based upon inconvenience, loss of use of the product, loss of time, loss of profits, loss of business opportunity, loss of goodwill, interference with business relationships, or other commercial loss, even if advised of the possibility of such damages. 2. Any other damages, whether incidental, consequential or otherwise. 3. Any claim against the customer by any other party. Effect of state law: This warranty gives you specific legal rights, and you may also have other rights which vary from state to state. Some states do not allow limitations on implied warranties and/or do not allow the exclusion of incidental or consequential damages, so the above limitations and exclusions may not apply to you. Sales outside the U.S.A. and Canada: For warranty information and service on ViewSonic products sold outside of the U.S.A. and Canada, contact ViewSonic or your local ViewSonic dealer. The warranty period for this product in mainland China (Hong Kong, Macao and Taiwan Excluded) is subject to the terms and conditions of the Maintenance Guarantee Card. 4.3: ViewSonic LCD Warranty ViewSonic CD3200 LCD_LW01 Rev. 1a 06-30-06 47 CD3200 RS-232 Protocol Table of content 1 2 Introduction.................................................................................................... ii Description..................................................................................................... ii 2.1 Hardware specification ........................................................................... ii 2.2 Communication Setting .......................................................................... ii 2.3 Command Message Reference .............................................................. ii 3 Set-Function Listing ....................................................................................... ii 4 Get-Function Listing...................................................................................... vi 5 Remote Control Pass-through mode ............................................................ ix Table 2-1: PC Set-function command to LCD Monitor (ID=C0h) ....................................................iv Table 2-2: PC Get-function command to LCD Monitor................................................................... vii Table 2-3: Baseline RCU Pass-through codes.................................................................................x ViewSonic CD3200 i 1 Introduction This document describes the hardware interface spec and software protocols of RS232 interface communication between Viewsonic Commercial Display and PC or other control unit with RS232 protocol. The protocol divide into three sections: z Set-Function z Get-Function z Remote control pass-through mode ※In below document, “PC” will represents all the control units that can sent or receive the RS232 protocol command. 2 2.1 Description Hardware specification Viewsonic LCD communication port in the rear side (1) Connector type: DSUB 9 Pin Male (2) Pin Assignment Pin # 1 2 3 4 5 6 7 8 9 frame Male DSUB 9Pin (outside view) Signal NC RXD TXD NC GND NC NC NC NC GND Remark Input to LCD Monitor Output from LCD Monitor *Use of crossover (null modem) cable required for use with PC 2.2 Communication Setting - Baud Rate Select: - Data bits: - Parity: - Stop Bits: 9600bps (fixed) 8bits (fixed) None (fixed) 1(fixed) 2.3 Command Message Reference PC sends to Monitor command packet followed by “CR”. Every time PC sends control command to the Monitor, the Monitor shall response as follows: 1. If the message is receives correctly it will send “+” (02Bh) followed by “CR” (00Dh) 2. If the message is receives incorrectly it will send “-” (02Dh) followed by “CR” (00Dh) 3 Set-Function Listing The PC can control the LCD Monitor for specific actions. The Set-Function command allows you to control the LCD monitor behavior in a remote sit through the RS232 port. The Set-Function packet format consists of 5 bytes. Note that the “Value” byte is always = 00. ViewSonic CD3200 ii Set-Function description: Length: Total bytes of message = 5 ASCII (35H) excluding “CR” Command: Function command code: One byte ASCII code Value[1~3]: Three bytes ASCII that defines the value Set-Function format: Value1 1 Byte 3 Value2 1 Byte 4 Value3 1 Byte 5 CR 1 Byte 6 All Set-Function from PC to Monitor (ASCII) Length Command Value1 Name 5 1 Byte 1 Byte Byte Count Bytes order 1 2 3 Value2 1 Byte 4 Value3 1 Byte 5 CR 00D 6 Example: Set Mute-ON command (ASCII) Length Command Value1 Name 5 6 0 Byte Count Bytes order 1 2 3 Value2 0 4 Value3 0 5 CR 00D 6 Example: Set Mute-OFF command (ASCII) Length Command Value1 Name 5 6 0 Byte Count Bytes order 1 2 3 Value2 0 4 Value3 1 5 CR 00D 6 Example: Set Tint to -50 command (ASCII) Length Command Value1 Name 5 ‘ Byte Count Bytes order 1 2 3 Value2 5 4 Value3 0 5 CR 00D 6 Name Byte Count Bytes order ViewSonic Length 1 Byte 1 CD3200 Command 1 Byte 2 iii LCD Monitor will send “+” (02Bh) and “CR” bytes to PC after receiving a valid command. LCD Monitor will send “-” (02Dh) and “CR” bytes to PC if the command is not valid. Value Range: Command Code: Three bytes ASCII value range Function command code in ASCII Table 3-1: PC Set-function command to LCD Monitor (ID=C0h) Set Function HDTV Power Command Code (ASCII) ! Command Code (Hex) 21 Input Select “ 22 Contrast Brightness Sharpness Color Tint Flesh tone # $ % & ‘ ( 23 24 25 26 27 28 White Balance ) 29 Reserved Reserved Reserved Sound Effect * + , - 2A 2B 2C 2D Bass Treble Balance Picture Size . / 0 1 2E 2F 30 31 OSD Language 2 32 OSD timeout 3 33 Reserved Volume Mute 4 5 6 34 35 36 ViewSonic CD3200 Value Range (Three ASCII bytes) 000: STBY 001: ON 000: VGA 001: DVI 002: COMPOSITE1 003: COMPOSITE2 004: COMPONENT1 005: COMPONENT2 006: S-Video1 007: S-Video2 008: HDMI1 009: HDMI2 010: HDMI3 011: HDMI4 012: HDMI5 ~ 000 ~ 100 000 ~ 100 000 ~ 100 000 ~ 100 -50 ~ +50 000: OFF 001: ON 000: STD 001: WARM 002: COLD 000: SRS OFF 001: SRS ON 000 ~ 100 000 ~ 100 000 ~ 100 000: SMART 001: 4 x 3 002: 16 x 9 003: ZOOM 000: English 001: Deutsch 002: Francias 003: Italiano 004: Espanol 005: Dutch 006: Dansk 007:Traditional Chinese 008: Japanese 009: Brazilian 010: Reserved 011: Reserved 012: Reserved : : 999: Reserved 000: 10sec 001: 20sec 002: 30sec Comments Controlled the HDTV power status: ON or Standby Set and reset Flesh tone Sets White balance For future use For future use For future use Set and reset SRS Sets Bass value Sets Treble value Sets Balance position Set OSD timeout For future use 000 ~ 100 000: OFF 001: ON (mute) iv Sleep 7 37 000: OFF 001: 10 Min 002: 20 Min 003: 30 Min 004: 60 Min 005: 90 Min 006: 120 Min 007: 150 Min ~ Reserved PIP Mode 8 9 38 39 PIP Sound select : 3A PIP position ; 3B PIP Input < 3C TV Channel Reserved Reserved Number Key Pad = > ? @ A 3D 3E 3F 40 41 Remote Control B 42 000: DISABLE 001: ENABLE 002: PASS THROUGH Key Pad C 43 000: DISABLE 001: ENABLE Factory reset ~ 7E 000 ViewSonic CD3200 For future use 000: OFF 001: ON 000: MAIN 001: PIP 000: UP_LEFT 001: UP_RIGHT 002: DOWN_LEFT 003: DOWN_ RIGHT 000: None 001: None 002: COMPOSIT1 003: COMPOSIT2 004: COMPONENT1 005: COMPONENT2 006: S-Video1 007: S-Video2 008: HDMI1 009: HDMI2 010: HDMI3 011: HDMI4 012: HDMI5 ~ 000 ~ 999 For future use For future use 000 ~ 009 000: UP 001: DOWN 002: LEFT 003: RIGHT 004: ENTER 005: INPUT 006: MENU/EXIT ~ Disable: RCU has no effect on HDTV. Enabled: RCU controls the HDTV. This is the power up default on the HDTV. Pass through: RCU has no effect on HDTV and all RCU command codes are transmitted to FC via the RS232 port. See page ix for more details Disable: Key Pad have no effect on HDTV. Enabled: Key Pad control the HDTV. This is the power up default on the HDTV. Rests HDTV to factory setting v 4 Get-Function Listing The PC can interrogate the LCD Monitor for specific information. The Get-Function packet format consists of 5 bytes which is similar to the Set-Function packet structure. Note that the “Value” byte is always = 00. Get-Function description: Length: Total bytes of message = 5 ASCII (35H), excluding “CR” Command: Get-Function command code: One byte ASCII code Value[1~3]: Always = 000 Get-Function format from PC to LCD (ASCII) Length Command Value1 Name 5 1 Byte 0 Byte Count Bytes order 1 2 3 Value2 0 4 Value3 0 5 CR 00D 6 Monitor shall response to Get-Function with the following packet format: LCD Monitor response packet format: Length Value1 Value2 Name 5 1 Byte 1 Byte Byte Count Bytes order 1 2 3 Value3 1 Byte 4 Value4 1 Byte 5 CR 00D 6 Response packet (to Get-Function): Length: Total bytes of packet = 5 ASCII excluding “CR” Exception: Total bytes for On-Hours = 6 Value[1-4]: Four ASCII codes: Value range is from 0000 ~ 9999 Exception: Value[1-5] for On-Hours LCD Monitor will send “+” (02Bh), “CR” bytes to PC after receiving a valid command LCD Monitor will send “-” (02Dh), “CR” bytes to PC if the command is not valid ViewSonic CD3200 vi Table 4-1 outlines the Get-function command list that must be supported by the LCD Monitor Table 4-1: PC Get-function command to LCD Monitor Get Function Command Code (ASCII) a b c d e f g Command Code (Hex) 61 62 63 64 65 66 67 Get-RCU h 68 Get-Key Pad i 69 Get-Input select j 6A Reserved Get-Power status k l 6B 6C Get-On hours m 6D 00000 ~ 99999 Get-ACK z 7A 000 Get-Contrast Get-Brightness Get-Sharpness Get-Color Get-Tint Get-Volume Get-Mute ViewSonic CD3200 Response Range (Three ASCII bytes) 000 ~ 100 000 ~ 100 000 ~ 100 000 ~ 100 -50 ~ +50 000 ~ 100 000: OFF (unmuted) 001: ON (muted) 000: DISABLE 001: ENABLE 002: PASS THROUGH 000: DISABLE 001: ENABLE 000: VGA 001: DVI 002: COMPOSITE1 003: COMPOSITE2 004: COMPONENT1 005: COMPONENT2 006: S-Video1 007: S-Video2 008: HDMI1 009: HDMI2 010: HDMI3 011: HDMI4 012: HDMI5 000: STBY 001: ON Comments Gets Contrast value Gets Brightness value Gets Sharpness value Gets Color value Gets Tint value Gets Volume value Gets Mute ON/OFF status Gets RCU mode status Gets Buttons ON/OFF status Gets Input select status Reserved for future expansion Gets the status of the HDTV power. HDTV response: 000 = HDTV is in standby 001 = HDTV is ON Get the ON hours of the HDTV. HDTV shall accumulate the ON hours in Flash memory. When it receives this command it will response with the ON hour value of 5 bytes. This command is used to test the communication link. vii The following is an example of PC requesting the volume value from the LCD Monitor: PC send Get-Volume-value packet to Monitor (In ASCII) Length Command Value1 Value2 Name 5 f 0 0 Byte Count Bytes order 1 2 3 4 Value3 0 5 CR 00D 6 LCD Monitor will send “-” (02Dh), “CR” to PC if command is not recognized. Otherwise the LCD Monitor will respond with the volume value as outlined below: LCD-Monitor response packet to Get-volume-value (in this example the volume value is 50): Length Value1 Value2 Value3 Value4 CR Name 5 0 0 5 0 00D Byte Count Bytes order 1 2 3 4 5 6 The following is an example of PC requesting the On-hours value from the LCD Monitor PC send “Get-On hours” command to Monitor (In ASCII) Length Command Value1 Value2 Name 5 m 0 0 Byte Count Bytes order 1 2 3 4 Value3 0 5 CR 00D 6 LCD Monitor will send “-” (02Dh), “CR” bytes to PC if the command is not valid Otherwise the LCD Monitor will respond with the On-Hours value as outlined below: LCD-Monitor response packet to Get-On-hours value is 12,500 hours): Length Value1 Value2 Value3 Value4 Value5 Name 6 1 2 5 0 0 Byte Count Bytes order 1 2 3 4 5 6 Note that this response contain 6-bytes CR 00D 7 A special command “Get-ACK” is used to test the communication link between PC and the LCD Monitor. The LCD Monitor shall response to “Get-ACK” command with a “+” or “-“. Get-ACK from PC to LCD (ASCII) Length Command Name 5 z Byte Count Bytes order 1 2 Value1 0 3 Value2 0 4 Value3 0 5 CR 00D 6 LCD Monitor will send “+” (02Bh); “CR” bytes to NMP-530 after receiving the command indicating that the communication link is OK ViewSonic CD3200 viii 5 Remote Control Pass-through mode When PC sets the LCD monitor to Remote Control Pass through mode, the LCD shall send a three bytes packet (followed by “CR”) in response to RCU button activation. Note, that in this mode the RCU shall have no effect on the monitor function. For example: “+Volume” will not change the volume in the LCD but only sends “+Volume” code to PC over the RS232 port. Remote Control pass-through packet format from LCD monitor to PC(ASCII) Length RCU-Code1 RCU-Code2 CR Name 3 MSB LSB 00D Byte Count Bytes order 1 2 3 4 Example: Remote Control pass-through when “Menu” key is pressed (1A) Length RCU-Code1 RCU-Code2 CR Name 3 1 A 00D Byte Count Bytes order 1 2 3 4 Example: Remote Control pass-through when key “1” is pressed (01) Length RCU-Code1 RCU-Code2 CR Name 3 0 1 00D Byte Count Bytes order 1 2 3 4 Example: Remote Control pass-through when “OK” key is pressed (1F) Length RCU-Code1 RCU-Code2 CR Name 3 1 F 00D Byte Count Bytes order 1 2 3 4 ViewSonic CD3200 ix Table 5-1: Baseline RCU Pass-through codes Key 1 /SPACE 2 /ABC 3 /DEF 4 /GHI 5 /JKL 6 /MNO 7 /PQRS 8 /TUV 9 /WXYZ 0 /@:/ 100 RECALL SHIFT CLEAR ZOOM VOLUME UP (+) VOLUME DOWN (-) MUTE CHANNEL/PAGE UP (+) CHANNEL/PAGE DOWN (-) ON/STANDBY SOURCES (INPUTS) PIP/POP WIDE SLEEP MENU UP DOWN LEFT RIGHT OK (ENTER) PLAY PAUSE FAST FORWARD FAST BACKWARD SKIP REPLAY STOP RECORD ViewSonic CD3200 Code (HEX) 01 02 03 04 05 06 07 08 09 0A 0B 0C 0D 0E 0F 10 11 12 13 14 15 16 17 18 19 1A 1B 1C 1D 1E 1F 20 21 22 23 24 25 26 27 28 29 2A 2B 2C 2D 2E 2F Key Code (HEX) 31 32 33 34 35 36 37 38 39 3A 3B 3C 3D 3E 3F 40 41 42 43 44 45 46 47 48 49 4A 4B 4C 4D 4E 4F 50 51 52 53 54 55 56 57 58 59 5A 5B 5C 5D 5E 5F x CD3200 RS-232 Command Table SET FUNCTION CODES No 1 Set Function Monitor Power 2 Input Select “ 3 4 5 6 7 8 Contrast Brightness Sharpness Saturation Hue Flesh tone (None) # $ % & ‘ ( 9 White Balance (None) ) 10 11 12 13 Reserved Reserved Reserved Sound Effect (None) * + , - 14 15 16 17 Bass Treble Balance Picture Size . / 0 1 18 OSD Language 2 19 OSD timeout 3 20 21 22 Reserved Volume Mute 4 5 6 23 Sleep 7 24 25 Reserved PIP Mode 8 9 ViewSonic CD3200 Command ! Value Range 000: ON 001: STBY 000: VGA 001: DVI (None) 002: COMPOSITE1 003: COMPOSITE2 (None) 004: COMPONENT1 005: COMPONENT2 (None) 006: S-Video1 007: S-Video2 (None) 008: HDMI1 009: HDMI2 (None) 010: SCART 1 011: SCART 2 012: SCART 2S 000 ~ 100 000 ~ 100 000 ~ 100 000 ~ 100 000 ~ 100 000: ON 001: OFF 000: STD 001: Warm 002: Cold 000: SRS ON 001: SRS OFF 000 ~ 100 000 ~ 100 000 ~ 100 000: Panorama 001: Normal 002: Full 003: ZOOM 004: ZOOM2 000: English 001: Deutsch 002: Francias 003: Italiano 004: Espanol 005: Dutch 006: Dansk 007: Simplified Chinese 008: Japanese (none) 009: Brazilian (none) 010: NORSK 011: SVENSKA 012: SUOMI 000: 10sec 001: 20sec 002: 30sec Comments Controlled the Monitor power status: ON or Standby Set and reset Flesh tone Sets White balance For future use For future use For future use Set and reset SRS Sets Bass value Sets Treble value Sets Balance position Set OSD timeout For future use 000 ~ 100 000: ON 001: OFF 000: OFF 001: 10 Min 002: 20 Min 003: 30 Min 004: 60 Min 005: 90 Min 006: 120 Min 007: 150 Min (None) 008 : Reserved For future use 000: PIP 001: OFF xi 002: POP 26 PIP Sound select : 27 PIP position ; 28 PIP Input < 29 30 31 32 33 TV Channel Reserved Reserved Number Key Pad = > ? @ A 34 Remote Control B 000: Disable 001: Enable 002: Pass through 35 Key Pad C 000: Disable 001: Enable 36 37 Factory reset Picture Mode ~ D 38 Color Temp E 39 AVC F 40 Mode G 41 Equalizer H 42 PC / Auto I 000 000: USER 001: STANDARD 002: MOVIE 003: BRIGHT 000: NORMAL 001: WARM 002: COOL 003: MANAUL 000: ON 001: OFF 000: OFF 001: EQ 000: Manual 001: Voice 002: POP 003: Rock 004: Jazz 005: Classic 000: Execute ViewSonic CD3200 000: Main 001: PIP 000: Up_left 001: Up_right 002: Down_left 003: Down_ right 000: VGA 001: DVI (None) 002: COMPOSITE1 003: COMPOSITE2 (None) 004: COMPONENT1 005: COMPONENT2 (None) 006: S-Video1 007: S-Video2 (None) 008: HDMI1 009: HDMI2 (None) 010: SCART 1 011: SCART 2 012: SCART 2S 000 ~ 099 For future use For future use 000 ~ 009 000: UP 001: DOWN 002: LEFT 003: RIGHT 004: MENU 005: SOURCE 006: POWER 007: ASPECT/EXIT Disable: RCU has no effect on LCD monitor. Enabled: RCU controls the LCD monitor. This is the power up default on the LCD monitor. Pass through: RCU has no effect on LCD monitor and all RCU command codes are transmitted to HOST via the RS232 port. See Table 3-3 Disable: Key Pad have no effect on LCD Monitor. Enabled: Key Pad control the LCD Monitor. This is the power up default on the LCD monitor. Rests monitor to factory setting xii GET FUNCTION CODES No 1 2 3 4 5 6 7 8 Get Function Get-Contrast Get-Brightness Get-Sharpness Saturation Hue Get-Volume Get-Mute Get-RCU 9 Get-Key Pad i 10 Get-Input select j 11 12 Reserved Get-Power k l 13 Get-On hours (None) m 0000 ~ 9999 14 Get-ACK z 000 15 16 17 18 Get-Bass Get-Treble Get-Balance Get-Picture Size n o p q 19 Get-OSD Language r 20 Get-OSD timeout s 21 Get-Sleep t 22 Get-PIP Mode u 23 Get-PIP Sound select v 000 ~ 100 000 ~ 100 000 ~ 100 000: Panorama 001: Normal 002: Full 003: ZOOM 004: ZOOM2 000: English 001: Deutsch 002: Francias 003: Italiano 004: Espanol 005: Dutch 006: Dansk 007: Simplified Chinese 008: Japanese (none) 009: Brazilian (none) 010: NORSK 011: SVENSKA 012: SUOMI 000: 10sec 001: 20sec 002: 30sec 000: OFF 001: 10 Min 002: 20 Min 003: 30 Min 004: 60 Min 005: 90 Min 006: 120 Min 007: 150 Min (None) 008 : Reserved 000: PIP 001: OFF 002: POP 000: Main 001: PIP ViewSonic CD3200 Command a b c d e f g h Response Range 000 ~ 100 000 ~ 100 000 ~ 100 000 ~ 100 000 ~ 100 000 ~ 100 000: ON 001: OFF 000: Disable 001: Enable 002: Pass through 000: Disable 001: Enable 000: VGA 001: DVI (None) 002: COMPOSITE1 003: COMPOSITE2 (None) 004: COMPONENT1 005: COMPONENT2 (None) 006: S-Video1 007: S-Video2 (None) 008: HDMI1 009: HDMI2 (None) 010: SCART 1 011: SCART 2 012: SCART 2S 000 = ON 001 = STBY Comments Gets Contrast value Gets Brightness value Gets Sharpness value Gets Color value Gets Tint value Gets Volume value Gets Mute ON/OFF status Gets RCU mode status Gets Buttons ON/OFF status Reserved for future expansion Gets the status of the Monitor power. Monitor response: 00 = Monitor is ON 01 = Monitor is in standby Get the ON hours of the Monitor. Monitor shall accumulate the ON hours in Flash memory. When it receives this command it will response with the ON hour value of two bytes. See example on page-9 This command is used to test the communication link. xiii 24 Get-PIP position w 25 Get-PIP Input x 26 Get-Key Pad (None) y 27 Get-Picture Mode [ 28 Get-Color Temp ] 29 Get-AVC { 30 Get-Mode } 31 Get-Equalizer \ ViewSonic CD3200 000: Up_left 001: Up_right 002: Down_left 003: Down_ right 000: VGA 001: DVI (None) 002: COMPOSITE1 003: COMPOSITE2 (None) 004: COMPONENT1 005: COMPONENT2 (None) 006: S-Video1 007: S-Video2 (None) 008: HDMI1 009: HDMI2 (None) 010: SCART 1 011: SCART 2 012: SCART 2S 000: UP 001: DOWN 002: LEFT 003: RIGHT 004: MENU 005: SOURCE 006: POWER 007: ASPECT/EXIT 000: USER 001: STANDARD 002: MOVIE 003: BRIGHT 000: NORMAL 001: WARM 002: COOL 003: MANUAL 000: ON 001: OFF 000: OFF 001: EQ 000: Manual 001: Voice 002: POP 003: Rock 004: Jazz 005: Classic xiv PASS THROUGH CODES Key Code(HEX) 1 Code(HEX) Key Code(HEX) 01 19 SOURCE/UP 32 2 02 1A SOURCE/DOWN 33 3 03 1B SIZE 34 4 04 1C POSITION 35 5 05 ARC 1D 36 6 06 APC 1E 37 7 07 MUTE 1F 38 8 08 EXIT 20 39 9 09 UP 21 3A 0 0A DOWN 22 3B 100 0B LEFT 23 3C RTN 0C RIGHT 24 3D VOLUME UP 0D MENU 25 3E VOLUME DOWN CH UP 0E TV 26 3F 0F PC/HD 27 40 CH DOWN 10 VIDEO 28 41 11 SCART 29 42 12 SOUND 2A 43 13 FREEZE 2B 44 14 PROGRAM 2C 45 15 SLEEP 2D 46 16 AUDIO 2E 47 17 VIDEO 2F 48 18 ON/OFF 31 49 ViewSonic CD3200 Key xv