1
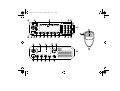
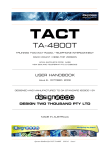
GM1200 (EN) Stage4 Page 1 Thursday, May 1, 1997 1:28 pm
GM1200 User Guide
GM1200
User Guide
Contents
Page:
Page:
General Information............................................ 2
Radio Controls ................................................... 2
Call Diversion ................................................9
External Alarm...............................................9
Display Icons ...................................................... 3
Special Calls .....................................................10
Audio Tones ........................................................ 3
Short Data Messages (SDM) ......................10
Status Calls .................................................13
Emergency Calls .........................................13
Priority Calls ................................................14
Broadcast Calls ...........................................14
DTMF ..........................................................14
Turning the Radio On/Off.................................... 4
Making a Call ..................................................... 5
Shortform Dialling ......................................... 5
Fixed and Dynamic Groups .......................... 6
Dedicated Calls............................................. 6
Manual Dialling ............................................. 6
Keypad Edit................................................... 6
Last Number Redial ...................................... 7
Cancelling a Call ................................................ 7
Ending a Call ...................................................... 7
Receiving a Call ................................................ 7
Receiving a Call on an OACSU System ....... 7
Receiving a Call on an FOACSU System ..... 8
Call in Absence............................................. 8
Personality Selection.........................................14
Conventional Mode......................................15
Call Progress.....................................................16
Call Progress-Sending ................................16
Call Progress-Receiving..............................16
Call Progress-Cancelling.............................17
Call Progress-Ending ..................................17
Safety Information .............................................18
Computer Software Copyrights .........................18
Contents
1
English
GM1200 (EN) Stage4 Page 2 Thursday, May 1, 1997 1:28 pm
General Information
General Information
Radio Controls
This user guide covers the operation of the 1200
Series mobile radios used on MPT1327 Trunked
Radio Systems. Please note that the location of the
system may affect the types of call which are
available. The radio display prompts are available in
various languages. Please consult your dealer for
further information.
Numbers refer to the illustrations on inside covers.
This user guide describes the operation of radios
with (K8) and without (K4) a keypad. On radios
without a keypad the different types of call
described below can only be selected via the
shortform dial position selector (16 & 17). Please
consult your dealer for further information.
1.
On/Off and Volume Control
2.
Light Emitting Diodes (LED)
Red: On when radio is transmitting
Green: Flashes to indicate NO SERVICE.
3.
Alpha-numeric Display
Two lines of 14 characters (K8) or one line of 9
characters (K4), backlit.
4.
Dedicated Call Button
(On K4 either
or
)
M
5.
Emergency Button
6.
Clear Button for cancelling a call, or clearing
down at the end of a call, or deleting an SDM in
the SDM stack, or
Monitor Button (conventional mode).
7.
Edit/Clear Button for correcting keypad entries
or for clearing down at the end of call.
8.
Keypad
0 to 9 for entering digits
#
for sending a call
call modifier for priority, broadcast,
✱
emergency and status calls.
9.
Status Button for sending status messages.
WARNING: When installing or removing the
mobile radio from the vehicle it
must be switched off.
10. External Alarm Button
English
2
General Information/Radio Controls
GM1200 (EN) Stage4 Page 3 Thursday, May 1, 1997 1:28 pm
Display Icons
11. Personality Selection
Audio Tones
12-13. Not Used
High pitched tone
14. Data Key for interrogating the data message
stack or initiating a short data call request.
Self test:
Sounded on power up.
Tone A:
Call clear indication.
15. Call in Absence Selector
Tone B:
Traffic channel allocated
and PTT/Mic/
Loudspeaker enabled.
Tone C1:
System busy.
Tone C2:
Unavailable.
Tone C3:
Called party busy.
Tone C4:
Invalid number.
Tone D:
Call set up in progress,
wait for further
indications.
Tone E:
Incoming call, press PTT,
then wait for further
indications.
Tone F:
Transaction confirmed,
called unit will call
back.
Tone G:
Look at display for call set
up or system information.
Tone H:
Invalid entry.
16-17. Shortform Dial Position Selector or
Channel Selector (conventional mode).
18. Microphone Connector
When installing the microphone, turn the radio
off and on again.
19. Transmit (PTT)
Push to talk, release to listen.
20. Clear Button (on rear) for cancelling a call or
clearing down at the end of a call. Activated
when the microphone is replaced.
Display Icons
Scanning.
Registered/Call Monitoring
(conventional mode).
Loudspeaker Open.
Call In Absence received.
External Alarm selected.
Data message(s) in the Data Message stack.
Low pitched tone
Display Icons/Audio Tones
3
English
GM1200 (EN) Stage4 Page 4 Thursday, May 1, 1997 1:28 pm
Turning the Radio ON/OFF
Key click:
Confidence tone when
any key pressed/speech
limitation warning.
Fail tone:
Hardware error/call
timed out (conventional
mode).
Note: In the following pages two types of radio display
Note: If the radio fails the self test routine, consult your
dealer.
When the self test is complete the radio will display:
K8
TEXT
K4
213
TEXT
followed by
examples will be shown :
K8
TEXT
213
K4
where "213" is the identity of the radio.
213
TEXT
After this text has been displayed, the radio will scan
for system access with the LED flashing GREEN
and the scanning icon
lit.
Turning the Radio ON/OFF
Turn the radio on by pressing the combined ON/
OFF/VOLUME control (1). The radio then enters a
self test routine. During the test the display will be
activated, the self test tone will sound, and the LED
will light green. If the radio fails the self test a
continuous low tone will sound and the display will
show a fault code, e.g. “02”:
K8
K4
RADIO FAULT 02
ERR
02
until the radio is turned off by pressing the control
(1) again.
English
4
Turning the Radio ON/OFF
When a control channel is acquired, the green LED
will go off and the scanning icon
will be replaced
by the registered icon
.
Use the combined ON/OFF/VOLUME control (1) to
adjust the volume to a comfortable listening level.
GM1200 (EN) Stage4 Page 5 Thursday, May 1, 1997 1:28 pm
Making a Call
Making a Call
For example:
The radio is capable of making a variety of calls,
including calls to individual radios, groups of radios
and calls to private and public telephone systems.
Before you can make a call the radio must be in the
IDLE STATE, i.e. a personality has been selected
and no call is in progress (see "Personality
Selection"). In the IDLE STATE the radio displays:
K8
K8
K4
JOHN SMITH
JOHN
or
213
213
or
K4
POSITION 15
TEXT
213
POS
ID
15
213
or
The 1200 series radios can make calls by using
Shortform Dialling, or Dedicated Calls. K8 radios
can also make calls using Manual Dialling.
Shortform Dialling
When the radio is in the IDLE STATE shortform
dialling may be used. This allows quick access to up
to 40 preprogrammed numbers of up to 14 digits (on
K4 radios, only the last 8 digits are displayed) using
the shortform dial position selector (16 & 17).
Depending on the way your radio is programmed,
the radio will display the alphanumeric alias, the
number to be dialled or the position in the list.
GROUP
01
GRP
01
where 01 indicates position in Fixed Group list.
or
BA 123 SERVICE
BA
123
where BA 123 SERVICE is an Dynamic Group alpha alias.
or
DYNAMIC
01
DYN
01
where 01 indicates position in Dynamic Group list.
The call request is sent either by pressing the PTT
key (19) or # .
Making a Call
5
English
GM1200 (EN) Stage4 Page 6 Thursday, May 1, 1997 1:28 pm
Fixed and Dynamic Groups
If the shortform dial position selector (16 & 17) is
operated, but no call request is sent, the display will
be held until tone H sounds. The display will then
revert to the IDLE STATE.
Note: When the shortform dial number is displayed, it
may be edited as described in the Keypad Edit
section (K8 only).
Fixed and Dynamic Groups
A fixed group is a group of users, the address
(number) of which is pre-programmed into your
radio by your dealer.
A dynamic group is a group of users, the address
(number) of which is sent to your radio ‘over air’ at
any time via the system controller. Therefore at any
time you may become a member of a dynamic
group, able to receive calls and (depending on how
your radio is programmed) send calls to that group.
Incoming calls to fixed and dynamic group numbers
are detailed in Receiving a Call and displayed
under Call Progress - Receiving.
To make an outgoing call to a fixed or dynamic
group address, use the shortform dial position
selector (16 & 17) when the radio is in the IDLE
STATE as detailed in Shortform Dialling.
English
6
Fixed and Dynamic Groups
Dedicated Calls
Hold the dedicated call button (4) down for a preset
period to make a call to a preprogrammed number.
The number will then be displayed and the
conversation can go ahead.
Manual Dialling (K8 only)
To make a call enter the telephone number, the
identity of the radio or group of radios via the keypad
(8), e.g. "210" followed by # or PTT:
210#
Keypad Edit (K8 only)
Before a call is initiated the last digit may be deleted
by pressing the edit button
(7). Press the button
again to delete the next digit and enter the correct
digit. If the edit button
(7) is pressed during a
call, the call will be ended.
GM1200 (EN) Stage4 Page 7 Thursday, May 1, 1997 1:28 pm
Receiving a Call
Last Number Redial
Receiving a Call
The last number dialled by the radio is stored in the
memory of the radio. For status calls only the called
number will be stored, not the status message.
Partially entered numbers are also stored.
There are two types of systems on which the radio
may be used, Off Air Call Set Up (OACSU) and
Full Off Air Call Set Up (FOACSU).
The stored number can be displayed when the radio
is in the IDLE STATE. This number may be recalled
by pressing the PTT key (19). The number may also
be edited, see Keypad Edit.
If you are in doubt about which system you are
operating on, consult your dealer.
Receiving a call on an Off Air Call Set Up
(OACSU) System
When the radio is called, tone D will sound and the
display will change to:
Cancelling a Call
At any time while setting up a call it may be
cancelled by pressing the clear button C (6) or by
dialling ✱ # . See "Call Progress - Cancelling a
Call".
Ending a Call
A call should always be ended by pressing the clear
button C (6), by replacing the microphone, by
dialling ✱ # or by pressing the edit/clear button
(7). See "Call Progress - Ending a Call".
ALERTED
213
ALERT
followed by
213
This will be followed by tone B and the display will
change to indicate the type of call being received.
See "Call Progress - Receiving".
Cancelling a Call/Ending a Call/Receiving a Call
7
English
GM1200 (EN) Stage4 Page 8 Thursday, May 1, 1997 1:28 pm
Receiving a Call
Receiving a call on a Full Off Air Call Set Up
(FOACSU) System
When the radio is called, tone E will sound and the
display will change to:
ALERTED
213
ALERT
followed by
When a call has been stored by the radio, tone G
will sound every ten seconds and the display will
show the identity of the calling party. The call in
absence icon
will be lit.
To view the calls in the stack, press the call in
absence button
(15). The call in absence
display will look like this:
213
01
Press either the PTT or # key (K8 only) or lift the
microphone to accept the call. Tone D will sound
until a traffic channel is allocated then tone B will
sound and the display will change to indicate the
type of call being received. See "Call Progress Receiving".
Note: The system may have a limited call time and the
call may be terminated automatically if this call
time is exceeded.
Call in Absence
If a call is not answered within a preprogrammed
amount of time, the call will be stored by the radio.
Up to 10 calls can be stored. If the same radio calls
more than once the call is only stored once. When
10 calls have been stored by the radio, the eleventh
call received overwrites the first.
English
8
Receiving a Call/Call in Absence
213
01
followed by
213
where "01" indicates the position in the stack and
"213" is the number of the calling party.
The most recent call stored by the radio will be on
position "01". Operate the selector (16 & 17) to
display any other calls in the stack.
Press either the PTT or # key (K8 only) to make a
call. The number stays in the stack until the clear
button C (6) is pressed, ✱ # is dialled or the
personality of the radio is changed.
To exit the Call in Absence stack, press the call in
absence button
(15).
Note: The calls in the stack are not deleted when the
radio is turned off. It is not possible to call back
status calls.
GM1200 (EN) Stage4 Page 9 Thursday, May 1, 1997 1:28 pm
Receiving a Call
Call Diversion
Incoming speech calls or status calls can be
diverted either from your radio (initiated by pressing
4
1 ) or from another radio (initiated by
✱
pressing ✱ 4 4 ). On K4 radios Call Diversion/
Cancellation may be programmed in the shortform
dial list. Please contact your dealer for further
information.
When the radio is in the IDLE STATE, call diversion
can be initiated by pressing:
✱
4
(or
1
4
)
✱
to divert all calls
✱
4
1
(or
4
)
1
✱
to divert speech calls only
✱
4
1
(or
4
)
2
✱
to divert status calls only
followed by the ID of the receiving radio and
#
.
Examples:
Pressing
4
✱
1
2
3
4
#
Pressing
4
4
DIVERTING
DIVERT
A call will then automatically be set up to the radio
which is receiving the diverted calls.
Cancel call diversion by pressing
#
4
1
#
4
4
✱
followed by
followed by
1
1
or
or
2
2
, if necessary or
, if necessary, and
"ID".
Press
radio.
#
4
5
to cancel calls redirected to your
External Alarm
✱
will divert all calls from your radio to the radio with
the ID "234".
✱
If a call is made to a radio whose calls are currently
being diverted, tone D will sound and the display of
the calling radio will change to:
✱
2
3
4
✱
4
3
2
The external alarm button
(10) activates the
vehicle horn and/or lights to inform you a call is
being received.
Press the button to turn the external alarm on and
the
icon will be lit.
#
will redirect all calls to the radio with the ID "234" to
the radio with the ID "432".
Press the button again to turn it off.
Please contact your dealer for further information.
Receiving a Call/Call Diversion/External Alarm
9
English
GM1200 (EN) Stage4 Page 10 Thursday, May 1, 1997 1:28 pm
Special Calls
Special Calls
Displaying Incoming Data
Short Data Messages (SDM)
The short data message display can be switched
ON and OFF using the keypad controls as follows:
Short data messages may be set up, sent and
received using the radio keypad and controls.
Outgoing data messages from the keypad are
limited to numeric data only in any combination of
up to 20 characters.
Note: Non keypad radios cannot generate or display
incoming SDMs and may only be used for data
when connected to external data terminal
equipment (DTE).
Receiving Short Data Messages
On receiving an SDM, tone G sounds and the
display shows:
DATA RECEIVED
The data message icon
is lit whenever SDMs
are in the data message stack, i.e. displayable,
unless the message display has been turned off
(refer to Displaying Incoming Data).
♦
Enter ✱ 23000
short data display.
#
to turn OFF the incoming
♦
Enter ✱ 23001
short data display.
#
to turn ON the incoming
The SDM display defaults to ON, however the option
setting is retained when the radio is switched off.
Note: This feature is important if the radio is being used
with external data terminal equipment (DTE), to
prevent loss of data messages.
With the SDM display set to ON, on reception of a
valid SDM, either it can be displayed by the radio
and/or passed to external DTE. In either case, the
SDM is received and accepted (acknowledged) by
the radio. Only if the SDM is of an un-displayable
format AND the external DTE is disconnected, is the
SDM rejected by the radio.
With the SDM display set to OFF, on reception of a
valid SDM, it will not be added to the data message
stack for display, but passed to the external DTE,
which if accepted will be acknowledged by the radio.
However, if the DTE is not present e.g.
disconnected, the SDM is rejected by the radio. In
this case the SDM will not be accepted
(acknowledged) by the radio and will not be lost.
English
10
Special Calls/Short Data Messages
GM1200 (EN) Stage4 Page 11 Thursday, May 1, 1997 1:28 pm
Special Calls
Summary
01
If using the radio only, the SDM display should be
set to ON.
DATA
213
If using the radio with external DTE which is
permanently connected in normal use, the SDM
display should be set to ON.
where 01 indicates the position in the stack (01 is
the most recent message), and 213 is the number of
the calling party.
If using the radio with external DTE which may be
disconnected in normal use, then set the display to
OFF prior to disconnecting the external DTE to
avoid SDM loss.
To scroll through the other entries in the stack use
the short form dial position selector (16 & 17).
Storing SDMs
Incoming SDMs are stored on receipt in the Short
Data Message stack. Up to five SDMs can be stored
by the radio. When five SDMs have been stored, the
sixth SDM overwrites the first. The data message
icon is lit whenever SDMs are in the stack.
SDMs are not stored when the radio is switched
OFF.
To exit the data message stack interrogate mode
press the data key D (14).
Note: You must exit the data message stack interrogate
mode to put the radio in the idle state in order to
make other calls or enter the call in absence
stack.
Scrolling SDMs
From the stack, the entire currently selected SDM
may be displayed by scrolling, which can be either
on a character or word basis.
Press Edit
Interrogating the SDM stack
To interrogate the SDM stack, with the radio in the
idle state, press the data key D (14) to enter the
SDM stack interrogate mode.
(7) to display the SDM.
To scroll on a character basis, press keypad button
6 to scroll to the left and keypad button 4 to
scroll to the right. Hold down either button to
continue scrolling to the end/beginning of message.
The first entry in the stack will be displayed as
shown in the following example:
Special Calls/Short Data Messages
11
English
GM1200 (EN) Stage4 Page 12 Thursday, May 1, 1997 1:28 pm
Special Calls
To scroll on a word basis, press keypad button 8
to scroll forward through the message and keypad
button 2 to scroll backwards. The display shows
as many complete words as the display allows, after
which they are split and displayed section by
section.
Press Edit
(7) to return to the SDM stack
interrogate mode to select and display other SDMs.
Deleting Messages from the SDM Stack
Pressing either Clear button C (6) or keypad keys
# will delete the currently selected SDM from
✱
the stack. The radio returns to the SDM stack
interrogate mode after each deletion until the last
message is deleted when the display returns to the
idle state and the SDM icon
is extinguished.
Status replies to an SDM
Where an SDM contains a calling party number, the
radio can respond with a status message.
From the SDM stack interrogate mode or SDM
scrolling mode, press the status key S (9). The
radio will exit the data mode and enter the dialling
state for example:
213S
English
12
Special Calls/Short Data Messages
The status digits can then be specified as in normal
status mode.
Making an SDM Call
SDM calls may be set up in one of three ways, via
the data key D , manually via the keypad or via the
shortform dialling feature.
To make an SDM call via the data key, select the
desired address as detailed in Making a Call, press
the D key (14) followed by the data message
string which may only consist of digits (0-9).
i.e. ADDRESS ( D ) DATA
To make an SDM call via the keypad, enter
2
✱
✱ followed by the data message string
(digits 0-9), press ✱ followed by the desired
address as described in Making a Call.
i.e. ✱ 2 ✱ DATA ✱ ADDRESS
Note: The maximum data message size is limited to 20
characters which includes address information
and data selection characters.
To make an SDM call via the shortform dialling
feature, select the pre-programmed address and
send the message as detailed in Shortform
Dialling.
Note: The maximum data message size is limited to 14
characters which includes address information
and data selection characters.
GM1200 (EN) Stage4 Page 13 Thursday, May 1, 1997 1:28 pm
Special Calls
Receiving a Status Call
A status is a code for transmitting prearranged
messages. For example, status "05" may indicate
"Return to base". When the radio receives a status
call, tone G will sound and the display changes to:
In order to make a status call via the status button,
choose the desired address as described in Making
a Call. Then press the status button S (9),
followed by two status digits. The display then
changes to:
S05
213
RETURN TO BASE
S05
213
RETURN TO BASE
S05
followed by
213
and
RETURN
if status text is preprogrammed in the radio.
Making a Status Call
For radios with a keypad, status calls may be
initiated in two different ways, via the status key
S (9) or manually via the keypad (8).
On K4 radios status calls can only be made if they
are preprogrammed into the radio on the selector
(16 & 17).
The status number may be edited by using the edit
key
(7), please refer to Keypad Edit.
To initiate a status call via the keypad (8) enter
0 then enter the status e.g. "05" followed by
✱
✱ and the desired address.
In both cases the call is handled as described in
Making a Call.
Making an Emergency Call
Hold the emergency button (5) down for a preset
period of time to make a call to a preprogrammed
emergency number. No further button press is
required to establish the call.
If provided by the system, the user can also dial a
preprogrammed emergency number via the keypad
(8). Please contact your dealer for further
information.
Special Calls/Status/Emergency
13
English
GM1200 (EN) Stage4 Page 14 Thursday, May 1, 1997 1:28 pm
Personality Selection
A dialled number may also be given an emergency
priority by prefixing the required number by
9
✱
✱ . The call is then initiated as previously
described. The display changes are described in
"Call Progress - Sending".
Making a Priority Call
A priority call allows you to gain priority over other
users of the system when requesting a call. Priority
calls are indicated by prefixing the required number
by ✱ 8 ✱ . The call is then initiated as previously
described. The display changes are described in
"Call Progress - Sending".
Making a Broadcast Call
A broadcast call allows you to make broadcast calls
to groups of radios. Broadcast calls are indicated by
prefixing the required number by ✱ 1 1 ✱ .
The call is then initiated as previously described.
Note that on a broadcast call only the calling radio
can talk and there is no indication that any units
have received the call.
English
14
DTMF (K8 only)
DTMF means Dual Tone Multi Frequency and is
used when the radio is required to operate in a radio
system with an interface to telephone systems.
The access code for DTMF is system dependent,
please contact your dealer for further information.
Enter the access code. To generate the DTMF tones
press and hold the PTT (19) while entering the
desired number.
Personality Selection
The radio may be programmed with a number of
different personalities. To change personality press
the personality selection button P (11). Release
the button when the desired personality is displayed:
PERSONALITY
1
PER
or
CONVENTIONAL
Special Calls/Priority/Broadcast/DTMF/Personality Selection
CONV
1
GM1200 (EN) Stage4 Page 15 Thursday, May 1, 1997 1:28 pm
Personality Selection
In the conventional mode the radio is equipped with
a time out timer. A speech limitation warning will
sound a few seconds before the transmitter is
switched off. The call timed out tone will sound, until
the PTT is released.
Conventional Mode
In the conventional mode the radio operates as a
standard two-way radio.
Select the personality "Conventional" as described
above. The display shows:
CHANNEL
To generate the DTMF tones press and hold the
PTT (19) while entering the desired number.
01
CH
01
Use the channel selector (16 & 17) to display the
desired channel.
Prior to transmission always make sure that the
channel is free (red LED not flashing). Press the
PTT key (19) to transmit, release it to listen. The red
LED lights while the radio transmits and flashes if
the channel is busy.
Some channels may be monitored for activity by
pressing the monitor button C (6). The icon will
be lit until the channel is changed or the monitor
button C (6) is pressed again. The icon will also
light briefly when the microphone is taken out of its
holder. Please consult your dealer for further
information.
Personality Selection/Conventional Mode
15
English
GM1200 (EN) Stage4 Page 16 Thursday, May 1, 1997 1:28 pm
Call Progress
Call Progress
Tone Display K8
Call Progress - Sending
Tone Display K8
Display K4
CALL FAIL
C FAIL
C2
TIMEOUT
T OUT
Comment
D
CALLING
CALL
Trying to connect call
D
CALLING
PRIOR
Priority call sent,
modifier *8* used
PRIORITY
CALL
DATA
D
CALLING
EMERG
EMERGENCY
Emergency call sent,
modifier *9* used
followed by
CALL FAIL
C FAIL
SCANNING
SCAN
CALL FAIL
READY
READY
Call can proceed
G/D
QUEUED
QUEUED
Call queued on system
D
DIVERTING
DIVERT
Calls to called unit have
been diverted
C2
UNOBTAINABLE
UNOBT
Call unobtainable
C2
UNAVAILABLE
UNAV'L
Unit unavailable
C4
INVALID NUMBER
INV NO
Incorrect number
C1
SYSTEM BUSY
S BUSY
System busy, try again
D
ALERTING
ALERT
Alerting called unit
C3
ENGAGED
ENGAGE
Called unit is busy
F
WILL CALL BACK
C BACK
Called unit will call back
English
16
System access lost,
try again
C FAIL
Call Progress - Receiving
Tone Display K8
Display K4
D
ALERTED
NNN
ALERT
E
ALERTED
NNN
ALERT
D/E
ALERTED
CALL
B
XXX
Call request timed out.
Check service is
available
followed by
Data Call initiated,
display held for 2 secs.
CALLING
Comment
Call failed, try again
followed by
H
followed by
D
Display K4
C2
Call Progress/Sending/Receiving
NNN
EMERG
EMERGENCY
Comment
A call is being received
on OACSU
A call is being received
on FOACSU.
Press PTT or “#” or lift
microphone to
accept call
Emergency call being
received
followed by
ALERT
G
ALERTED
Data call being received
NNN
DATA RECEIVED
B
NNN
XXX
NNN
Call from radio in
your fleet
GM1200 (EN) Stage4 Page 17 Thursday, May 1, 1997 1:28 pm
Call Progress
Tone Display K8
Display K4
Comment
B
INTERFLEET XXX
INT FL
Call from radio in
another fleet
B
TELEPHONE
XXX
TEL
Call from public
telephone system
B
PABX
XXX
PABX
Call from private
telephone system
B
CALL
XXX
CALL
Call identity unknown
to the system
B
DYNAMIC
NN
DYN
NN
B
GROUP
NN
GRP
NN
B
SYS WIDE
XXX
S WIDE
Dynamic Group call
received
(maybe alpha alias)
Fixed Group call received
Call to all radios in use
on the system
Call Progress - Cancelling a call
Tone Display K8
D/G
CANCELLING
Display K4
CANCEL
Comment
Call successfully
cancelled by user
Call Progress - Ending a call
Tone Display K8
G
CALL ENDED
Note:
Display K4
C END
Comment
Another call can now
be made
For K8 radios only, in the above displays “XXX” is an
elapsed time counter.
Call Progress/Cancelling/Ending
17
English
GM1200 (EN) Stage4 Page 18 Thursday, May 1, 1997 1:28 pm
Safety Information
Safety Information
Every radio, when transmitting, radiates energy into
the atmosphere which may, under certain
conditions, cause the generation of a spark.
All users of vehicles fitted with radios should be
aware of the following warnings:
Do not operate radio near
inflammable liquids or in the vicinity of
explosive devices
During normal use, the radio will subject you to radio
energy substantially below the level where any kind
of harm is reported.
To ensure personal safety, please observe the
following simple rules:
■ DO NOT transmit when the antenna is very
close to, or touching, exposed parts of the body,
especially the face and eyes.
■ DO NOT hold the transmit (PTT) key in when not
actually desiring to transmit.
■ DO NOT allow children to play with any radio
equipment containing a transmitter.
■ DO NOT operate radio whilst driving. It should
also be noticed that the use of a hand held
microphone while driving could constitute an
offence under the Road Traffic Regulation.
English
18
Computer Software Copyright
The products described in this manual may include copyrighted computer
programmes stored in semiconductor memories or other media. Laws in the
United States of America and other countries preserve for Motorola Europe
and Motorola Inc. certain exclusive rights for copyrighted computer
programmes, including the right to copy or reproduce in any form the
copyrighted computer programme. Accordingly, any copyrighted computer
programmes contained in the products described in this manual may not be
copied or reproduced in any manner without the express written permission of
the holders of the rights. Furthermore, the purchase of these products shall not
be deemed to grant either directly or by implication, estoppel, or otherwise, any
licence under the copyrights, patents, or patent applications of the holders of
the rights, except for the normal non-exclusive royalty free licence to use that
arises by operation of the law in the sale of the product.
Safety Information/Computer Software Copyright
GM1200 User Gde Cover Page 2 Thursday, May 1, 1997 1:19 pm
2
1
3
D
18
17
16
15
P
14
13
11
3
2
1
12
S
9
10
4
5
A
1
2
3
4
5
6
7
8
9
*
0
#
8
7
K8
20
C
19
6
17
16
K4
18
P
C
11
6
10
15
4