1
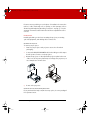
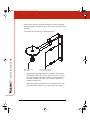
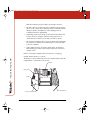
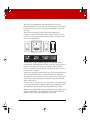
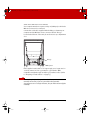
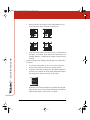
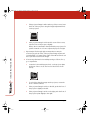
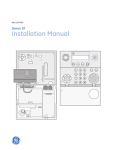
IRP_Install_1.fm Page -1 Monday, February 3, 2003 4:19 PM
Interactive Rear Projector (IRP)
Installation Guide
Part Number 370-0129-00
©2003 PolyVision Corporation
All rights reserved
Printed in the USA
IRP_Install_1.fm Page 0 Monday, February 3, 2003 4:19 PM
Information in this document is subject to change without notice.
Reproduction in any manner without written permission of
PolyVision Corporation is forbidden.
PolyVision Corporation, a Steelcase company, reserves the right
to make changes in product design, or detail, and to discontinue
any product or material without notice.
PolyVision Corporation
4888 S Old Peachtree Rd.
Norcross, GA 30071
Phone: 1-800-620-POLY
www.polyvision.com
IRP_Install_1.fm Page 1 Monday, February 3, 2003 4:19 PM
Interactive Rear Projection
TABLE OF CONTENTS
Overview . . . . . . . . . . . . . . . . . . . . . . . . . . . . . . . . . . . . . . . . . . . . . . . . 3
Spatial Requirements . . . . . . . . . . . . . . . . . . . . . . . . . . . . . . . . . . . 4
IRP 4500 Spatial Requirements . . . . . . . . . . . . . . . . . . . . . . . . . 4
IRP 4100 Spatial Requirements . . . . . . . . . . . . . . . . . . . . . . . . . .5
IRP 5100 Spatial Requirements . . . . . . . . . . . . . . . . . . . . . . . . . . 6
Technical Description . . . . . . . . . . . . . . . . . . . . . . . . . . . . . . . . . . . 6
Installing the IRP 4100 and 5100 . . . . . . . . . . . . . . . . . . . . . . . . . . . . . 8
Components . . . . . . . . . . . . . . . . . . . . . . . . . . . . . . . . . . . . . . . . . . . 8
Installation . . . . . . . . . . . . . . . . . . . . . . . . . . . . . . . . . . . . . . . . . . . . 8
Image Adjustments . . . . . . . . . . . . . . . . . . . . . . . . . . . . . . . . . . . . . 9
Installing the IRP 4500 . . . . . . . . . . . . . . . . . . . . . . . . . . . . . . . . . . . . .10
Components . . . . . . . . . . . . . . . . . . . . . . . . . . . . . . . . . . . . . . . . . . .10
Removal from Shipping Pallet . . . . . . . . . . . . . . . . . . . . . . . . . .10
Installation . . . . . . . . . . . . . . . . . . . . . . . . . . . . . . . . . . . . . . . . . . . . 11
Mounting the Projector . . . . . . . . . . . . . . . . . . . . . . . . . . . . . . . . 11
Installing the Optional Keyboard/Mouse Tray . . . . . . . . . . . . . . 11
Installing Optional Magnetic Pen Holder . . . . . . . . . . . . . . . . . .13
Assembling the Optional Video Camera Pedestal . . . . . . . . . . .13
Cable Connections . . . . . . . . . . . . . . . . . . . . . . . . . . . . . . . . . . . . . .15
Preparing to Install Cables . . . . . . . . . . . . . . . . . . . . . . . . . . . . .15
Routing Cables in the IRP 4500 Console . . . . . . . . . . . . . . . . . .16
Host Computer Connections in the Console (Optional) . . . . . .18
Serial Cable Connection to Host Computer . . . . . . . . . . . . . . . .19
Optional Video Connections and Operation . . . . . . . . . . . . . . 20
Optional Audio Connections and Operation . . . . . . . . . . . . . . 20
Testing Connections . . . . . . . . . . . . . . . . . . . . . . . . . . . . . . . . . . . .21
Powering On the System . . . . . . . . . . . . . . . . . . . . . . . . . . . . . . .21
What You Should See . . . . . . . . . . . . . . . . . . . . . . . . . . . . . . . . .21
Cable Connection Checks . . . . . . . . . . . . . . . . . . . . . . . . . . . . . 22
Powering Off the System . . . . . . . . . . . . . . . . . . . . . . . . . . . . . . 22
Image Adjustments . . . . . . . . . . . . . . . . . . . . . . . . . . . . . . . . . . . . 23
1
IRP_Install_1.fm Page 2 Monday, February 3, 2003 4:19 PM
Interactive Rear Projection (IRP)
Maintenance Tools and Documentation . . . . . . . . . . . . . . . . . . . 28
Hardware Adjustments and Testing . . . . . . . . . . . . . . . . . . . . . . . . . 29
Computer Display Controller Settings . . . . . . . . . . . . . . . . . . . . . 29
Testing the Electronic Pen . . . . . . . . . . . . . . . . . . . . . . . . . . . . . . . 29
Moving the IRP 4500. . . . . . . . . . . . . . . . . . . . . . . . . . . . . . . . . . . . . . 30
Repositioning the IRP 4500 . . . . . . . . . . . . . . . . . . . . . . . . . . . . . . 30
Moving the IRP 4500 to Another Room . . . . . . . . . . . . . . . . . . . . . . 31
Preparing the Projector Mounting Platform for a Move . . . . . . . . . 31
Removing and Replacing the IRP 4500 Screen . . . . . . . . . . . . . . .32
Removing the Webster Screen . . . . . . . . . . . . . . . . . . . . . . . . . .32
Replacing the Screen . . . . . . . . . . . . . . . . . . . . . . . . . . . . . . . . .34
Check Seating on Upper and Lower Spindles . . . . . . . . . . . . . .37
Transporting the IRP 4500 . . . . . . . . . . . . . . . . . . . . . . . . . . . . . . . .37
Packaging and Protective Covering for the Console . . . . . . . . .37
Preventative Maintenance and Helpful Tips . . . . . . . . . . . . . . . . . . . .39
Cleaning . . . . . . . . . . . . . . . . . . . . . . . . . . . . . . . . . . . . . . . . . . . . . .39
Care of Electronic Pen and Battery Replacement . . . . . . . . . . . . .39
Helpful Tips for Using Your Electronic Pen . . . . . . . . . . . . . . . . . . 40
Conserving Your Projector Lamp . . . . . . . . . . . . . . . . . . . . . . . . . . . 41
IRP 4500 Fuse Replacements . . . . . . . . . . . . . . . . . . . . . . . . . . . . . 41
Troubleshooting . . . . . . . . . . . . . . . . . . . . . . . . . . . . . . . . . . . . . . . . . .42
Hardware Condition Indicators . . . . . . . . . . . . . . . . . . . . . . . . . . . .42
Operating LEDs . . . . . . . . . . . . . . . . . . . . . . . . . . . . . . . . . . . . . .42
Indicator Sound Signals . . . . . . . . . . . . . . . . . . . . . . . . . . . . . . .43
Troubleshooting the Cable Connections . . . . . . . . . . . . . . . . . . . .43
Problems with Electronic Pen . . . . . . . . . . . . . . . . . . . . . . . . . . . . .45
Other Hardware Repairs . . . . . . . . . . . . . . . . . . . . . . . . . . . . . . . . .45
Replacement Parts and Supplies. . . . . . . . . . . . . . . . . . . . . . . . . . . . 46
FCC COMPLIANCE . . . . . . . . . . . . . . . . . . . . . . . . . . . . . . . . . . . . . . . . .47
CE MARK . . . . . . . . . . . . . . . . . . . . . . . . . . . . . . . . . . . . . . . . . . . . . 48
CDRH COMPLIANCE AND LASER SAFETY . . . . . . . . . . . . . . . . . . . . 48
SUMMARY OF SAFETY AND ENVIRONMENTAL CERTIFICATIONS . . 48
PolyVision Technical Support . . . . . . . . . . . . . . . . . . . . . . . . . . . . . . 49
2
IRP_Install_1.fm Page 3 Monday, February 3, 2003 4:19 PM
Overview
This manual provides installation instructions for the Webster IRP
(interactive rear projection) systems:
•
IRP model 4500 is self-contained system that can be moved
from room to room.
•
IRP models 4100 and 5100 are wall or cabinet mounted systems
that require user-supplied projector mounting assembly. They
can be mounted to a wall, in a conference room where there is
space behind the wall, or in a customized projector cabinet.
Refer to CAD drawings that accompany this manual for
architectural specifications that are necessary for installing
these systems.
Refer to the Webster User Guide for instructions regarding software
installation, projection alignment, and operating the system.
OVERVIEW
3
IRP_Install_1.fm Page 4 Monday, February 3, 2003 4:19 PM
Spatial Requirements
Spatial requirements for the Webster IRP systems depend upon the
model you are installing.
IRP 4500 SPATIAL REQUIREMENTS
IRP 4500 is a self-contained, rear projection console unit. It has a 47"
by 35" (1190 mm x 89o mm) translucent screen for viewing.
46.80" (1189 mm)
SCREEN
58.48" (1485 mm)
SCREEN
Interactive Rear Projection (IRP)
35.06"
(891 mm)
SCREEN
81.12"
(2060 mm)
4.65"
(118 mm)
The console measures 53-5/16" wide (1354 mm) by 80-1/2" high
(2045 mm) by 30-3/4" deep (781 mm) and has large casters for easy
moving. No disassembly or folding is required to fit through standard
office doors.
4
OVERVIEW
IRP_Install_1.fm Page 5 Monday, February 3, 2003 4:19 PM
Screen
PC
Compartment
Power
Center Panel
Accessory
Compartment
To fit through smaller than standard doors, the console can be
reduced in height by partial disassembly. Refer to “Removing and
Replacing the IRP 4500 Screen” on page 32.
A computer to be used with the IRP 4500 must not be more than 10"
(254 mm) wide by 20" (508 mm) high by 20" (508 mm) deep; a tower
case is preferred.
IRP 4100 SPATIAL REQUIREMENTS
IRP 4100 is a wall or cabinet mounted rear projection screen that
includes a metal frame fitted with cabling and an IR receiver for the
electronic pen.
OVERVIEW
5
IRP_Install_1.fm Page 6 Monday, February 3, 2003 4:19 PM
The translucent screen measures 47" (1190 mm) by 35" (890 mm)
(58.5" [1490 mm] diagonal).
The wall mounted unit measures 53" (1350 mm) wide by 48"
(1230 mm) high by 3.5" (90 mm) deep.
IRP 5100 SPATIAL REQUIREMENTS
IRP 5100 is a wall or cabinet mounted rear projection screen that
includes a metal frame fitted with cabling and an IR receiver for the
electronic pen.
The translucent screen measures 54" (1370 mm) by 40.5" (1030 mm)
(67.5" [1710 mm] diagonal).
The wall mounted unit measures 60.5" (1540 mm) wide by 54"
(1370 mm) high by 3.5" (90 mm) deep.
Technical Description
Interactive Rear Projection (IRP)
Two laser scanners are used to collect data about the position and
movement of the electronic pen. These operations take place in real
time, with the data being interpreted and forwarded to the host
computer.
The beams from the two scanners sweep across the writing surface,
and the laser light reflected from the pen is collected on its return
path off the scanner mirror of origin and focused on the respective
photodiode. Gathering information from the two scanners at
essentially the same time allows the exact position of the pen to be
tracked by triangulation anywhere on the writing surface.
Scanners
6
OVERVIEW
IRP_Install_1.fm Page 7 Monday, February 3, 2003 4:19 PM
For the scanner data to accurately show the pen position on the
writing surface, the scanned laser beams are aligned in a predetermined pattern with respect to the writing surface, both in
azimuth and in pitch. Additional encoded retro-reflectors (calibration
strips) located at the corners of the writing surface provide feedback
for establishing and maintaining these alignments.
In addition to being a passive element that reflects the laser scanner
beams for positional information, the electronic pen is an active
source of information. The status of the pen tip-switch and the two
barrel button switches are transmitted via a separate IR link to a
separate IR receiver located behind the translucent writing surface.
There the signals are decoded and sent on to the Digital Signal
Processor, where this additional information is combined with the
pen position before being sent to the host computer.
OVERVIEW
7
IRP_Install_1.fm Page 8 Monday, February 3, 2003 4:19 PM
Installing the IRP 4100 and 5100
Interactive Rear Projection (IRP)
Components
•
Laser-scanned electronic writing surface
•
Electronic pen (with battery)
•
Wall or cabinet mounting frame including:
•
Wiring harness
•
Three-pronged IEC power cable, type SJT
•
Serial cable for computer connection
•
Calibration kit
•
Two infra-red receiver modules for electronic pen
•
Webster User Guide
•
Webster CD-ROM
•
CAD drawings including architectural specifications
Installation
IRP models 4100 and 5100 are designed for custom applications and
installations. Installation usually involves providing a wall opening
appropriate for the mounting frame, and providing a projector and
mirrors appropriate for your application.
CAD drawings included with the 4100 and 5100 systems provide
architectural specifications for the wall opening and for mounting
the system.
Refer to the Webster User Guide for information regarding using the
software and operating the system.
8
INSTALLING THE IRP 4100 AND 5100
IRP_Install_1.fm Page 9 Monday, February 3, 2003 4:19 PM
Image Adjustments
When properly installed and adjusted, the projected image should
just fill the entire screen. The edges of the image should be straight
and parallel to the edges of the screen. The distance between the
edges of the screen and the edges of the image should be no more
than 0.2” (5mm) on all sides.
To adjust the image:
1
Display an image that has very clear boundaries on all four
sides. Some users may find it easier to use their computer's
Desktop screen, while others may wish to run an application
that enables them to display a full-screen, all white image (such
as a paint program, or the Webster application window with the
Current Board selected and shown in full-screen view).
2
If the image on your screen is too large or too small, adjust the
projector zoom until the image nearly fills the IRP screen without
extending beyond its edges in any direction.
Refer to the documentation that came with your projector for
specific instructions on how to find and adjust the projector
zoom control.
3
If the image on your screen is not in focus, adjust the projector
focus until the image is clear and sharp.
Refer to the documentation that came with your projector for
specific instructions on how to find and adjust the projector
focus control.
4
If the image is not square with your screen or you cannot obtain
a clear image, contact the vendor who designed and/or installed
your custom projector installation and work with them to
complete the image adjustments.
INSTALLING THE IRP 4100 AND 5100
9
IRP_Install_1.fm Page 10 Monday, February 3, 2003 4:19 PM
Installing the IRP 4500
Read through this entire section regarding installation before
actually beginning work. The IRP 4500 is a combination of high
precision mechanical, optical, and electronic components. Although
the installation needs to be done carefully, it can be handled by
most people who can follow detailed directions and have
mechanical assembly skills. However, knowing exactly what to
expect and all the steps involved will save you time and reduce the
chances of making needless mistakes.
Components
The IRP 4500 system includes:
•
Interactive Rear Projection (IRP)
•
•
•
•
•
•
•
•
•
•
•
•
Rear-projection console with customized projector mounting
platform and laser-scanned, electronic writing surface
Three- pronged IEC power cable, type SJT
Serial cable for computer connection
Webster User Guide
Webster CD-ROM
Calibration kit
Batteries (spare for electronic pen)
Electronic pen with battery
VGA cable
Installation and maintenance toolkit
(Optional) Pedestal for mounting a user supplied miniature CCD
video camera on the side of the console
(Optional) Magnetic pen holder to hold electronic pen, spare
battery, and projector remote control
(Optional) Keyboard/mouse tray kit
REMOVAL FROM SHIPPING PALLET
A separate document titled Information for Unpacking and
Installation comes on the outside of the IRP 4500 packaging when it
is on the shipping pallet. Refer to that document to remove the unit
and other cartons from the pallet and to place them where you will
continue with the installation.
10
INSTALLING THE IRP 4500
IRP_Install_1.fm Page 11 Monday, February 3, 2003 4:19 PM
If cannot move your IRP 4500 to the place of installation because the
unit is too tall to fit through a door opening or other passage, refer to
“Removing and Replacing the IRP 4500 Screen” on page 32 or in the
separate document located inside the left front compartment of the
console.
Installation
Installing the IRP 4500 involves mounting the projector, mounting
optional equipment, and making cable connections.
MOUNTING THE PROJECTOR
To mount your projector:
1
Remove your projector and projector accessories from their
packaging.
2
Connect the PROJECTOR POWER cable in the IRP 4500 cable tray to
the IEC power connector on the projector.
3
Mount the projector on the adjustable projector plate in the rear
of the console. Projector plates vary according to the projector you
use. Samples are shown below.
4
Power on the projector.
INSTALLING THE OPTIONAL KEYBOARD/MOUSE TRAY
If you purchased the keyboard/mouse tray option, it comes packaged
in a separate carton.
INSTALLING THE IRP 4500
11
IRP_Install_1.fm Page 12 Monday, February 3, 2003 4:19 PM
The tools required to assemble the keyboard tray are listed on the
Keyboard tray kit packing list and are located in the IRP 4500 toolkit
envelope shipped inside the accessory compartment on the left front
of the console.
Use the keyboard tray kit packing list and accompanying assembly
diagram to identify the parts of the keyboard tray assembly.
To assemble and install the keyboard/mouse tray:
Interactive Rear Projection (IRP)
Mount carriage assembly
to frame with two 10-32
screws provided.
Insert tray assembly into
carriage assembly as shown.
Adjust tray tension here with 3/16"
Allen wrench provided in tool kit.
12
1
Using the 5/32" allen wrench (provided), remove the two
shipping restraining bars, one on each side of the console. Keep
these bars and screws with your pallet and packing materials if
the unit will need to be reshipped.
2
Note the general arrangement and orientation of the kit parts
and determine which set of holes on the side of the console to
use for mounting the carriage and arm assembly. You can mount
INSTALLING THE IRP 4500
IRP_Install_1.fm Page 13 Monday, February 3, 2003 4:19 PM
the assembly on either side of the console, but the left side is
usually recommended.
3
Fasten the carriage and arm assembly to the console with the
two cap screws and tighten with the 5/32" allen wrench.
4
Slip the keyboard tray and pedestal assembly into the carriage
and arm assembly.
5
Place the keyboard mouse pad on the tray.
6
Make sure the tray moves easily in its various directions. Adjust
the tension in the two pivot points, as desired, using the 3/16"
allen wrench.
INSTALLING OPTIONAL MAGNETIC PEN HOLDER
The optional magnetic pen holder can be placed on any metal
surface of the console and moved at any time.
Store projector remote
Store pen spare battery
Store electronic pen
ASSEMBLING THE OPTIONAL VIDEO CAMERA PEDESTAL
Your video camera pedestal comes packaged in a separate carton.
The tools required to assemble the video camera pedestal are listed
on the video camera pedestal kit packing list and are located in the
IRP 4500 toolkit envelope shipped inside the accessory
compartment (left-rear) of the console.
INSTALLING THE IRP 4500
13
IRP_Install_1.fm Page 14 Monday, February 3, 2003 4:19 PM
Use the video camera pedestal kit packing list and accompanying
assembly diagram to identify the parts of the video camera pedestal
assembly.
Interactive Rear Projection (IRP)
To assemble the optional video camera pedestal:
Secure camera with
1/4-20 screw
14
Attach with 10-32 screws
using 5/23" Allen wrench
1
Note the general arrangement and orientation of the kit parts
and determine which set of holes on the side of the console to
use for mounting the pedestal assembly. You can mount the
assembly on either side of the console, but the right side is
usually recommended.
2
Fasten the pedestal assembly to the console with the two cap
screws and tighten with the 5/32" allen wrench (provided).
INSTALLING THE IRP 4500
IRP_Install_1.fm Page 15 Monday, February 3, 2003 4:19 PM
Cable Connections
NO TE :
NOTE
Disconnect the IRP 4500 main power cable and turn off the MAIN
POWER, PROJECTOR POWER, and SPEAKER POWER switches on the
power panel before proceeding. Do not reconnect the power cable or
turn on any of the power switches until all cabling and connections
have been completed.
PREPARING TO INSTALL CABLES
Locate and have ready to use:
•
A grounded extension cord to reach a power receptacle. (An 8foot (24oo mm) IEC Type SJT power cord is included with the IRP
4500.)
For safety and continued conformance to UL Standard 1950, a
type SJT power cord with grounded connections on both ends
must be used. Always use with a grounded socket outlet. Do not
use a cable that has been damaged.
•
An RS-232 serial interface extension cable (“straight-through”)
to connect your host computer to the Webster screen in the
console.
A 12-foot (3700 mm) serial cable is included with the IRP 4500,
which is adequate if you are putting your host computer in the
IRP 4500 PC compartment.
The IRP 4500 RS-232 serial cable has a full complement of nine
wires. Any RS-232 extension cable should also have the full
complement of nine wires. (Although only three wires are used
for data and ground, control signals on two other wires are used
by Webster to generate carrier detect (DCD). For further
information, refer to Application Note AN1001 on “PC Serial Port
Cabling Specifications for Webster”.
•
A 6-foot (18oo mm) VGA cable is included with the IRP 4500,
which is adequate if you are putting your host computer in the
PC compartment.
If you want to connect an auxiliary display monitor to your
computer in addition to the IRP 4500, you can use your original
INSTALLING THE IRP 4500
15
IRP_Install_1.fm Page 16 Monday, February 3, 2003 4:19 PM
VGA cable with the projector VGA loop-through connector.
•
An audio cable to connect your host computer to the projector.
(A 6-foot (18oo mm) stereo mini-plug cable is included with the
IRP 4500, which is adequate if you are putting your host
computer in the PC compartment.
•
Depending on the positioning of your keyboard tray, keyboard,
mouse, and host computer, it may be necessary for you to
obtain extension cables for your keyboard and/or mouse.
•
Phone line and network cables of various types and lengths may
be required to complete the communication connections with
your host computer.
•
Some additional audio and video patch cables are included
with the IRP 4500. Other cables may be required to meet your
specific needs.
Refer to “Troubleshooting the Cable Connections” on page 43.
ROUTING CABLES IN THE IRP 4500 CONSOLE
Interactive Rear Projection (IRP)
The IRP 4500 can accommodate your host computer either in the PC
compartment or outside the console unit.
Projector
Power Panel
Toolkit
PC Compartment
Accessory Compartment
16
INSTALLING THE IRP 4500
IRP_Install_1.fm Page 17 Monday, February 3, 2003 4:19 PM
The accessory compartment on the left side of the console is
planned primarily for access to the inside of the power control panel,
but it can also be used for some accessory equipment of your own
choosing.
The power control panel, shown below, has IEC-type cable
connectors on the inside as well as the outside, and there are AC
power drop cords running inside from the panel to both the PC and
accessory compartments.
You will need to connect various cables to the IRP 4500 power
control panel on the left hand side of the console, to the projector in
the rear of the unit, and to your host computer. Cables may run
inside or outside the console unit, to or from the projector, and to or
from your host computer.
Cable access openings to the inside of the console are located above
and to the right of the power control panel. There are additional
openings at bottom rear of the console on either side, at either end
of the built-in cable tray that runs between the right and left-hand
sides of the console.
You have your choice as how to route your cables. It is usually better
to group and route cables together, depending on their type, source,
and destination. Use the built-in cable tray whenever possible.
When you are satisfied with the final organization and routing of your
cables, you may want to use tie wraps to provide strain relief and
maintain order for the cables within the console unit.
INSTALLING THE IRP 4500
17
IRP_Install_1.fm Page 18 Monday, February 3, 2003 4:19 PM
HOST COMPUTER CONNECTIONS IN THE CONSOLE (OPTIONAL)
Ordinarily, you will be powering the computer on and off along with
the entire system using the IRP 4500 MAIN POWER switch located on
the power panel, on the left side of the console.
Interactive Rear Projection (IRP)
To route cables in the IRP 4500 console:
18
1
If you choose to put your host computer in the PC compartment
of the IRP 4500 console, assure that the computer will fit
comfortably in the space to allow adequate access for reaching
switches, seeing lights, and connecting cables. It will be most
convenient if your cable connectors are at the rear of the
compartment for access through the access panel in the rear.
2
Connect the COMPUTER POWER supply cord pre-wired in that
area to your computer.
3
Connect the VGA cable supplied with the IRP 4500 between your
computer and your projector (refer to your projector manual for
information about connections).
4
If you want to use your computer display monitor for an auxiliary
display, connect your original VGA cable between your monitor
and the projector.
5
Place your computer keyboard and mouse on the IRP 4500
keyboard tray (refer to “Installing the Optional Keyboard/Mouse
Tray” on page 11) and connect the cables to your host computer.
Depending on the location of these components, it may be
necessary for you to obtain extension cables for your keyboard
and/or mouse.
6
You can put other accessory equipment of your own choosing in
the accessory compartment of the IRP 4500 console if it does
not get too crowded. You can connect the AC power supply cord
pre-wired in that area to your accessory equipment.
INSTALLING THE IRP 4500
IRP_Install_1.fm Page 19 Monday, February 3, 2003 4:19 PM
SERIAL CABLE CONNECTION TO HOST COMPUTER
Your computer must have a spare serial port (COM port) to which the
Webster screen can be connected.
Connect the serial cable supplied with the IRP 4500 between your
computer and the Webster screen connector labeled “RS-232”
located at the left rear of the unit, above the accessory compartment
door.
RS-232
Projector
If the supplied serial cable is not long enough, use a longer version
or add an extension. Use a 9-pin male to 9-pin female “IBM
compatible straight-through serial (RS-232) interface cable.” (Refer
to “Preparing to Install Cables” on page 15.)
NO TE :
NOTE
The total length of an RS-232 cable and cable extension should
normally not exceed 50 feet. It is possible under favorable
circumstances to run a longer distance, but you will need to verify the
reliability.
INSTALLING THE IRP 4500
19
IRP_Install_1.fm Page 20 Monday, February 3, 2003 4:19 PM
OPTIONAL VIDEO CONNECTIONS AND OPERATION
If you want to use your IRP 4500 to display video from a source other
than your host computer, there are video input connections available
on the projector. These video inputs are similar to those on a typical
VCR or home television set.
See the documentation supplied with your projector for directions to
connect and operate a video player, a television receiver, etc.
OPTIONAL AUDIO CONNECTIONS AND OPERATION
You can output audio to the IRP 4500 speakers by connecting your
audio source with the stereo mini-plug labeled “SPKR IN” located
behind the PC compartment door. Audio output can be line-out from
your computer, external speaker line-out from the projector, or
unamplified audio from another source.
You can elect to use your projector speaker, the console stereo
speakers, neither, or both. The standard configuration is to connect
the audio output from your host computer to the IRP 4500 speakers.
Interactive Rear Projection (IRP)
There are three speakers in the IRP 4500. One is located in the builtin projector and two are located in the front fascia of the console.
The volume can be controlled either by using your projector remote
controller or by adjusting the strength of the input audio, depending
on your configuration.
In order to operate the console stereo speakers, you must have a
connection to the console audio line-in and have the IRP 4500 MAIN
POWER switch and SPEAKER POWER switch both on.
For computer related applications, it is best to leave the projector
audio settings at nominal levels and use the interactive computer
desktop controls to make adjustments in volume and balance.
To operate the projector speakers, connect the audio source to the
projector. To control the volume of the projector speaker, refer to
your projector manual.
20
INSTALLING THE IRP 4500
IRP_Install_1.fm Page 21 Monday, February 3, 2003 4:19 PM
Testing Connections
You are now ready to power up and test your IRP 4500 for the first
time.
POWERING ON THE SYSTEM
To power on the system:
1
Plug the main power cord into the IRP 4500 control panel at one
end and into a grounded outlet on the other end.
NO TE :
NOTE
If you need an extension for the power, always use a grounded cord.
(Refer to“Preparing to Install Cables” on page 15.)
2
Turn on your host computer if it is not in the IRP 4500 console
and it is on a separate power switch.
3
Turn on the IRP 4500 Main Power and Projector Power switches
on the power panel. Also turn on the Speaker Power switch if you
want to use the console speakers.
4
Allow the projector to warm up (about one minute) and wait for
your computer to boot up. If your computer does not
automatically start up the operating system (Windows or
Macintosh), start the operating system from the keyboard.
WHAT YOU SHOULD SEE
You should see both the power light (at the lower, left-hand corner of
the screen) and the operating light (beneath the header cover, above
the top midpoint of the screen) come on. You should also see the
projector and computer come on and, after a minute or so of warm
up, light up the screen with the initial display.
If your projected image is not properly positioned on the screen or is
of the wrong size or shape for the screen, do not worry about that for
now. Those issues will be addressed “Image Adjustments” on
page 23. The important thing at this point is to get a good video
image on the screen from your computer.
INSTALLING THE IRP 4500
21
IRP_Install_1.fm Page 22 Monday, February 3, 2003 4:19 PM
From this point on you can use you IRP 4500 as your computer
desktop interface. Your keyboard and mouse should operate with
the IRP 4500 display screen just as they would with a regular display
monitor. Sound and sound control should be available on the
various speakers and user interfaces, depending on your particular
configuration.
However, the image on the screen may not yet be properly aligned,
and you cannot yet use your electronic pen as a substitute for the
mouse. To align the system, refer to “Image Adjustments” on
page 23.
You may want to adjust the projector main lens focus in a preliminary
fashion to be able to carry out the steps in this subsection.
CABLE CONNECTION CHECKS
Refer to “Troubleshooting the Cable Connections” on page 43 for
additional information.
Interactive Rear Projection (IRP)
If all the components and both Webster indicator lights do not come
on, assure that:
•
AC power is actually available at the outlet.
•
The power cords are all properly attached at both ends.
•
Both IRP 4500 power switches are in the on position.
If the projector does not come on, assure that:
•
The projector switch on the IRP 4500 control panel is on.
•
The projector switch on the projector is on.
•
The projector power cable is properly connected at both ends.
POWERING OFF THE SYSTEM
To power off the system:
22
1
Assure that your host computer is ready to be powered off.
2
Turn off the IRP 4500 Main Power switch.
3
Turn off your host computer power if it is not in the IRP 4500
console and it is on a separate power switch.
INSTALLING THE IRP 4500
IRP_Install_1.fm Page 23 Monday, February 3, 2003 4:19 PM
Image Adjustments
When properly adjusted, the projected image should just fill the
entire screen. The edges of the image should be straight and parallel
to the edges of the screen. The distance between the edges of the
screen and the edges of the image should be no more than 0.2”
(5mm) on all sides.
To adjust the image:
1
Display an image that has very clear boundaries on all four
sides. Some users may find it easier to use their computer's
Desktop screen, while others may wish to run an application
that enables them to display a full-screen, all white image (such
as a paint program, or the Webster application window with the
Current Board selected and shown in full-screen view).
2
If the image on your screen is too large or too small, adjust the
projector zoom until the image nearly fills the IRP screen without
extending beyond its edges in any direction.
Refer to the documentation that came with your projector for
specific instructions on how to find and adjust the projector
zoom control.
3
If the image on your screen is not in focus, adjust the projector
focus until the image is clear and sharp.
Refer to the documentation that came with your projector for
specific instructions on how to find and adjust the projector
focus control.
4
If the image on your screen is not square with the screen, place
the alignment pattern decals in the corners of the IRP screen,
as follows:
a
Locate the alignment pattern decals in the toolkit taped to
the inside of the IRP accessory compartment (left-rear of the
console). The decals will appear to be a single large pattern
printed in black on transparent plastic and mounted on a
paper backing.
INSTALLING THE IRP 4500
23
Interactive Rear Projection (IRP)
IRP_Install_1.fm Page 24 Monday, February 3, 2003 4:19 PM
5
24
b
Remove decals from backing so this single pattern can be
broken apart into the four decals, shown below.
c
Position decals in each corner of the screen, as indicated by
the letters on the decal. These decals are backed with a lowstrength adhesive, so that they can easily be repositioned if
needed)
Center the image horizontally by adjusting the secondary mirror
as follows:
a
To open the center panel on the console, press inward on
the top of the panel and release it to open the latch.
b
Locate the horizontal centering knob through the rightmost
of the two cut out windows in the sheet metal plate behind
the center panel. The knob label is shown below.
c
Adjust the horizontal centering knob until the left and right
edges at the bottom of the projected image are in balanced,
using the decal grids on the screen as a guide.
INSTALLING THE IRP 4500
IRP_Install_1.fm Page 25 Monday, February 3, 2003 4:19 PM
6
Center the image vertically by adjusting the secondary mirror as
follows:
a
Locate the vertical centering knob through the leftmost of
the two cut out windows in the sheet metal plate behind the
center panel. The knob label is shown below.
b
Adjust the vertical centering knob until the projected image
is balanced, using decal grids as a guide.
c
If necessary, adjust the tilt control on the projector to ensure
that the bottom edge of the projected image is level. The
projector tilt adjustment is typically located on a corner of
the projector and is labeled as shown.
Refer to the documentation that came with your projector for
specific instructions on how to find and adjust the projector
tilt control.
7
Repeat steps five and six until both the sides and the bottom of
the image are square and are located within 0.2” (5mm) of the
edges of the IRP screen.
8
If necessary, eliminate vertical keystoning, as follows. If not, go
to step ten.
INSTALLING THE IRP 4500
25
IRP_Install_1.fm Page 26 Monday, February 3, 2003 4:19 PM
a
If the projected image is wider at the top of the screen, lower
the front of the projector using the height adjustment knob
on the projector.
b
If the projected image is wider at the bottom of the screen,
raise the front of the projector slightly.
Refer to the documentation that came with your projector for
specific instructions on how to adjust the projector height.
Interactive Rear Projection (IRP)
9
Repeat steps five through eight as many times as may be
necessary to get both sides of the projected image square and
located within 0.2” (5mm) of the edges of the IRP screen at both
the top and the bottom of the image.
10 If necessary, eliminate horizontal keystoning as follows. If not,
go to step twelve.
26
a
Locate the horizontal keystone knob on the projector plate
at the rear of the console. The knob is labeled as shown
below).
b
To unlock the plate that supports the projector, rotate the
knob counter-clockwise.
c
If the projected image is wider on the left, push the front of
the projector slightly to the left.
d
If the projected image is wider on the right, push the front of
the projector plate slightly to the right.
INSTALLING THE IRP 4500
IRP_Install_1.fm Page 27 Monday, February 3, 2003 4:19 PM
e
To lock the plate in the desired position, rotate the knob
clockwise.
11 Repeat steps five through ten as many times as necessary to get
all edges of the projected image square and located within 0.2”
(5mm) of the frame on the IRP screen on all sides.
12 If necessary, readjust the focus and zoom on your projector.
13 If you are not able to get a satisfactory image by making these
adjustments, call PolyVision Technical Support for assistance at
1.800.620.POLY.
INSTALLING THE IRP 4500
27
IRP_Install_1.fm Page 28 Monday, February 3, 2003 4:19 PM
Maintenance Tools and Documentation
After completing this installation, we recommend that you gather the
various tools and documentation together and place them together
in their “assigned space” so that you will be able to easily locate
them in the future.
Inside the accessory compartment in the left front of the console
should be:
•
IRP 4500 toolkit with:
•
5/32" L-type allen wrench
•
3/16" T-type allen wrench
Instructions for Unmounting Webster IRP 4500 Webster Screen
•
Instructions for Mounting Webster IRP 4500 Webster Screen
Interactive Rear Projection (IRP)
•
28
INSTALLING THE IRP 4500
IRP_Install_1.fm Page 29 Monday, February 3, 2003 4:19 PM
Hardware Adjustments and Testing
This section describes IRP 4100, 4500, and 5100 adjustments and
testing.
Computer Display Controller Settings
Your computer must output video at a resolution that is compatible
with your projector. Refer to the documentation that came with your
projector to determine its native resolution. Adjust the video output
on your computer to match the native resolution of the projector. (In
Windows, use the Control Panel | Display interface. On a Macintosh
use the Control Panel | Monitors interface.) It may be necessary to
restart your computer to apply the changed settings.
Testing the Electronic Pen
Verify that the electronic pen can perform the following functions:
•
Make sure the pen can track the cursor accurately in all four
corners of the screen. (If not, laser alignment may be necessary.
Refer to the Webster User Guide.)
•
Verify that you can click and double-click reliably.
•
Verify that you can track the cursor both with the pen near the
screen and with the pen pressed in contact with the screen.
•
Check the operation of dragging (hold the pen tip against the
screen and drag it to another location).
•
Check the operation of the right mouse button (hold down on
the first barrel button while you depress the pen tip).
•
Check the operation of the alternate left mouse button (depress
the second barrel button at any time).
•
Check the remote operation of the pen (depress the second
barrel button while holding the pen away from the screen, up to
10 feet away).
HARDWARE ADJUSTMENTS AND TESTING
29
IRP_Install_1.fm Page 30 Monday, February 3, 2003 4:19 PM
Moving the IRP 4500
This section provides instructions for moving and repositioning the
IRP 4500.
Remember that the IRP 4500 contains both electronic and optical
components and needs to be handled with care. Your consideration
during operation, and especially during moving, will assure that it
continues to operate reliably.
WARNING!
Interactive Rear Projection (IRP)
Safety standards relating to possible overbalance situations have
dictated that the IRP 4500 not have locking casters. This permits the
unit to roll freely when an unexpected force is applied to the board,
rather than tip over. Consequently, the unit must not be left on a
sloping floor where it could roll by itself. Also, should you block or
obstruct any of the casters, you could upset the unit if a large force
were to be applied to the board.
NO TE :
NOTE
When moving or repositioning the IRP 4500, take care to avoid
applying force to or bumping the Webster screen, screen assembly,
or screen header cover.
Repositioning the IRP 4500
To reposition the IRP 4500 at its current location:
30
1
Make sure that anyone assigned with moving the unit
understands the need for careful handling.
2
Remove the projector from the projector mounting platform.
3
Use the hand grip on each side of the Webster screen to push or
pull the unit when moving or repositioning.
MOVING THE IRP 4500
IRP_Install_1.fm Page 31 Monday, February 3, 2003 4:19 PM
Moving the IRP 4500 to Another Room
You can roll the IRP 4500 anywhere that it can conveniently fit. In
selecting a place to locate the console, be sure to allow space for
accessing the required computer equipment during operation and
assure access to power and a phone line or network connection if
necessary.
Moving the IRP 4500 is best done by two people unless it just needs
to be repositioned.
WARNING!
Check door heights and other clearances before making a move. It is
especially important that the IRP 4500 not be accidentally subjected
to shocks such as might occur by impacting a door header or by
bouncing across a rugged surface.
You may find that you cannot move your IRP 4500 to another location
because the unit is too tall to fit through a door opening or other
passage. If this is the case, refer to “Removing and Replacing the IRP
4500 Screen” on page 32 or in the separate document located inside
the accessory compartment (left-rear) of the console.
To move the unit:
1
Disconnect all power and communication cables before moving
the unit.
2
Make sure that the cables are completely disconnected and/or
are safely stowed so they are not damaged or create a hazard
during movement.
3
Remove the projector from the projector mounting platform.
4
Position the keyboard tray to the side of the console and
remove, if necessary, the equipment from the tray for safety
while moving.
Preparing the Projector Mounting Platform for a Move
If you are moving the IRP 4500 only a short way and all passageways
have plenty of clearance, you may be able to leave the projector
mounting platform in its extended position for the move.
MOVING THE IRP 4500
31
IRP_Install_1.fm Page 32 Monday, February 3, 2003 4:19 PM
If clearance is not adequate, prepare the projector for a move:
1
Turn off the power and unplug the power cable at the front of the
projector. Lift the projector off the IRP 4500 projector mounting
plate, noting the original placement of the feet. Be careful while
handling the projector not to disturb the mechanical settings of
the projector height, tilt, focus, or zoom.
2
Handle the projector separately for the move. Do not try to carry
it on the projector mounting platform.
After the move:
1
Replace the projector on the projector mounting platform in the
same location as prior to removing it.
2
Plug in the projector power cable at the front of the projector.
As long as proper you exercise proper care, you do not need to be
concerned about hardware alignments being affected by a move.
Interactive Rear Projection (IRP)
Removing and Replacing the IRP 4500 Screen
Follow these instructions to remove the Webster screen from the IRP
4500.
Locate and have ready to use:
•
Small or medium sized phillips screwdriver
•
Thin-bladed screwdriver or small knife
•
5/32" allen wrench (located in your IRP 4500 toolkit inside the
accessory compartment on the left front of the console)
REMOVING THE WEBSTER SCREEN
To remove the Webster screen:
1
Turn off main power to the IRP 4500 and unplug the main power
cord.
2
To remove the Webster screen header cover:
a
32
remove the two thumb screws at the ends of the top of the
cover.
MOVING THE IRP 4500
IRP_Install_1.fm Page 33 Monday, February 3, 2003 4:19 PM
b
Lift up vertically on the cover and rotate the bottom of the
cover out slightly to disengage it from the locating pins on
either side at the bottom.
c
Lift the cover off and set it aside along with the two thumb
screws.
4
Unplug the A/C power cord from the left end.
5
Unplug the RS-232 ribbon cable (marked RS-232) from the top,
left end.
6
Unplug the IR receiver ribbon cable (marked IR RCV) from the
top, middle.
7
Further free up the RS-232 and IR receiver cables by detaching
the in-line ferrite filter, through which they both pass, from the
header.
8
Push the unplugged A/C power cord and two ribbons cables
(along with their in-line ferrite filter) gently through the oblong
hole in the header.
9
Replace the header cover as follows:
NO TE :
NOTE
If you will be replacing the Webster screen very soon, you can leave
the header cover off the screen for the time being. If you will not be
replacing it for a while, it is best to replace the header cover.
a
Position the cover over the locating pins on either side at
the bottom, in and then down.
b
Lower the cover into place with its top all the way back.
c
Replace the two thumb screws at the ends of the top of the
cover.
10 To release the Webster screen from the frame:
a
Using a thin-bladed screwdriver or small knife, expose the
access holes for the two lower mounting screws by removing
the plastic hole covers at the two lower corners in the front
of the screen frame. (Use care not to scratch the surface of
the frame with your tool.)
MOVING THE IRP 4500
33
IRP_Install_1.fm Page 34 Monday, February 3, 2003 4:19 PM
b
Using a 5/32" allen wrench (provided), remove the two lower
mounting screws. (Be very careful not to let the screws drop
off the end of the wrench as you pull the loose screws out of
the holes on the end of the wrench.)
c
Replace the two plastic hole covers so you don't misplace
them. (If you will be re-mounting the Webster screen very
soon, just put them aside for the time being.)
11 To remove the Webster screen, with two people, one on each
end of the Webster screen, lift the screen straight up about 1/2
inch (12 mm). Then take the screen off the top spindles by
moving it directly away from the frame in a horizontal direction.
You may need to gently wiggle the screen as you are moving it
out so that the keyhole slots slip off the spindles.
12 Place the Webster screen out of the way, preferably in a secure,
vertical position against a wall.
Interactive Rear Projection (IRP)
WARNING!
The Webster screen is delicate. Use care when handling to avoid
scratching either the front or rear surface.
13 Replace the two lower mounting screws so you don't misplace
them. (If you will be re-mounting the Webster screen very soon,
just put them aside for the time being.)
WARNING!
The IRP 4500 requires a dust-free interior environment to operate
properly. Be very careful not to touch the visible mirror surfaces and
not to allow any dust, dirt, or moisture to enter the opening. Unless
the Webster screen will be off only for a very brief time, you should
tape a strong protective wrapping over the opening.
REPLACING THE SCREEN
To replace the screen:
1
34
Remove any protective wrapping from the screen opening on the
IRP 4500. Remove the Webster screen from its shipping carton if
necessary.
MOVING THE IRP 4500
IRP_Install_1.fm Page 35 Monday, February 3, 2003 4:19 PM
2
Using a 5/32" allen wrench, remove the two screws from the
lower spindles on the frame, if necessary. Make sure both the
top two spindles and the lower two spindles are tightly fastened
to the frame.
3
To hang the Webster screen on the IRP 4500 frame:
a
With two people, one on each end of the Webster screen, lift
the screen into position and pass the power, RS-232, and IR
receiver cables through the oblong hole in the header.
b
Line up the top two keyhole slots on the back of the screen
with the top two mounting spindles on the frame. Move the
screen straight back so both keyhole slots slide over their
spindles. In the process, you will have to press back on the
screen hard enough to compress the foam baffles around
the periphery.
c
When you can feel that both top screen keyhole slots are
over their spindles, let down on the screen about 1/2 inch
(12 mm) so the spindles both slide up into their respective
slots. Do not release your hold on the screen until you have
confirmed, by trying to wiggle the screen in and out, that the
spindles are all the way to the top of their slots.
d
Using a thin-bladed screwdriver or small knife, expose the
access holes for the two lower mounting screws by removing
the plastic hole covers at the two lower corners in the front
of the screen frame. (Use care not to scratch the surface of
the frame with your tool.)
e
Using a flashlight, look through the two access holes to
make sure the two lower keyhole slots are lined up with the
screw holes in the lower spindles.
4
To secure the Webster screen to the frame, use the 5/32" allen
wrench to insert and tighten the two lower mounting screws. You
will need to place the screws on the end of the wrench, insert
them through the access holes, start them in their threads, and
then tighten. (Be very careful not to let the screws drop off the
end of the wrench.)
5
Replace the two plastic hole covers.
MOVING THE IRP 4500
35
IRP_Install_1.fm Page 36 Monday, February 3, 2003 4:19 PM
6
To remove the Webster screen header cover (unless you did not
actually replace it when removing the screen):
a
Remove the two thumb screws at the ends of the top of the
cover.
b
Lift up vertically on the cover and rotate the bottom of the
cover out slightly to disengage it from the locating pins on
either side at the bottom.
c
Lift the cover off and set it aside along with the two thumb
screws.
7
Plug the IR receiver ribbon cable (marked IR RCV) into the
connector at the top, middle.
8
Plug the RS-232 ribbon cable (marked RS-232) into the
connector at the top, left end.
9
Make sure the two ribbon cables lay neatly on top of oneanother.
Interactive Rear Projection (IRP)
10 Attach the in-line ferrite filter, through which the two ribbon
cables both pass, to the header at the left of the power and
control unit, with the retainer provided.
11 Plug the A/C power cord into the connector at the left end.
12 To replace the Webster screen header cover:
a
Position the cover over the locating pins on either side at
the bottom, in and then down.
b
Lower the cover into place with its top all the way back.
c
Replace the two thumb screws at the ends of the top of the
cover.
13 You are ready to plug the main power cord back into the IRP
4500. Do not turn on the main power until you are assured that
all equipment items connected to the power are in operating
condition.
36
MOVING THE IRP 4500
IRP_Install_1.fm Page 37 Monday, February 3, 2003 4:19 PM
CHECK SEATING ON UPPER AND LOWER SPINDLES
Make sure your Webster screen is hanging properly on the two upper
mounting spindles. Both spindles should be identically saddled in
the top of their keyhole slots at the top of the back of the Webster.
Make sure your Webster screen is located properly on the two lower
mounting spindles and that the lower mounting screws are properly
tightened.
Transporting the IRP 4500
Follow these instructions if you need to move the IRP 4500 in a
vehicle to another location.
PACKAGING AND PROTECTIVE COVERING FOR THE CONSOLE
The ideal packaging and protection for the IRP 4500 is to reuse the
materials with which the unit was originally shipped. Note that those
materials were designed to constrain the console unit on the pallet
only with tie downs underneath the frame and with the two special
shipping restraining bars on either end.
Without a pallet and special packaging, the unit can also be shipped
using techniques and equipment designed for large electronic
systems. If covered and strapped to the side of a van carefully, it can
be moved as if it were a heavy piece of quality furniture. The Webster
screen is especially susceptible to scratches or cracking and should
be guarded accordingly.
If you need to remove the Webster screen to move the unit through
doorways or other passages, consider remounting it on the console
for actual transportation. This is probably the best way to protect
both pieces from mishandling and damage. Alternatively, you will
need to provide an air-tight/moisture-proof covering for the
unoccupied opening on the console and possibly a carton or other
protective covering for the separate Webster screen.
To transport the IRP 4500:
1
Please read and follow all instructions in the section
“Repositioning the IRP 4500” on page 30. All of those
instructions also apply equally to transporting the IRP 4500.
MOVING THE IRP 4500
37
IRP_Install_1.fm Page 38 Monday, February 3, 2003 4:19 PM
Always remove the projector from the projector mounting
platform. (Refer to“Preparing the Projector Mounting Platform for
a Move” on page 31.)
3
Package the projector separately in an adequately padded
carton during transportation.
4
Transport is best done with two people.
5
Always move, transport, and store the console in the proper
vertical orientation.
6
Be careful not to leave the console where it could be bumped or
roll away on its casters.
7
Do not subject the console to shocks, heavy vibration, or rough
handling.
8
If packaged separately, do not remove the Webster screen from
its shipping container or uncover the opening in the console unit
until you are ready for to mount it.
Interactive Rear Projection (IRP)
2
38
MOVING THE IRP 4500
IRP_Install_1.fm Page 39 Monday, February 3, 2003 4:19 PM
Preventative Maintenance and Helpful Tips
If you spend a modest amount of time with preventative
maintenance as described in this section, your IRP 4100, 4500, or
5100 will operate more reliably and you will obtain better results.
Do not write on the screen with any marking pen, and be careful not
to abrade or scratch the screen.
Cleaning
The calibration strips near the four corners of the screen need to be
kept clean; the two at the bottom are especially likely to accumulate
dust. Once a week, wipe each strip gently with a clean, soft, dry cloth
or a feather duster.
Clean the writing surface as needed with a dry, soft cloth.
Occasionally clean all the above parts with a cloth dampened with
water or window glass cleaner. If you need further help to remove
light oils or greasy spots, use a cloth dampened with a dilute
solution of water and household detergent, and then wipe with a
water-dampened cloth.
WARNING!
Do not spray any fluid directly on your Webster screen in such a way
that the it accumulates and can run into a component. (Always use a
cloth dampened with the fluid.)
Care of Electronic Pen and Battery Replacement
Keep the reflective tip of your electronic pen clean by wiping it off
occasionally (once a week) with a dry, soft cloth.
When you are not using you pen, place it on the keyboard tray or in
the optional magnetic pen holder which can be attached to any
metal surface and moved at any time.
Do not place the pen when it can fall or be knocked off onto the floor.
It can withstand occasional shocks, but not regular rough handling.
PREVENTATIVE MAINTENANCE AND HELPFUL TIPS
39
IRP_Install_1.fm Page 40 Monday, February 3, 2003 4:19 PM
Keep a spare battery on hand (refer to “Replacement Parts and
Supplies” on page 46) and replace the battery every six to twelve
months, depending on your level of use. You can wait for it to fail,
but doing do may put you in an awkward situation.
Symptoms of a low battery include erratic responses when using the
pen, and a reduced range of operation.
To replace the battery, unscrew the cap on the far end of the pen. The
inside case and cap are marked to show the polarity (+ and direction) of the battery, but also note the orientation of the battery
itself. Remove the battery and replace it with a new one, making sure
to put the new one in with the correct orientation.
Interactive Rear Projection (IRP)
Helpful Tips for Using Your Electronic Pen
40
•
Remember that you can also use the second electronic pen
barrel button as a clicker for the left mouse button at a distance
from the screen.
•
Use only the Webster electronic pen. Do not use Webster dryerase pens and erasers with the IRP 4500.
•
Be sure not to cover the reflective tip of the pen with your fingers
when writing.
•
Make sure you fully depress the pen tip when clicking, drawing
and dragging the cursor.
•
Hold your electronic within 30 degrees of perpendicular to the
screen.
•
When you are not using you pen, place it on the keyboard tray or
in the magnetic pen holder which can be attached to any metal
part of the console.
•
Do not place the unused pen on the ledge at the bottom of the
screen.
•
Keep the calibration strips at either end of the ledge at the
bottom of the screen clean with a soft, dry cloth.
•
Do not place anything over either of the calibration strips at the
ends of the ledge at the bottom of the screen.
PREVENTATIVE MAINTENANCE AND HELPFUL TIPS
IRP_Install_1.fm Page 41 Monday, February 3, 2003 4:19 PM
•
You can use your computer mouse and keyboard along with your
electronic pen any time you like. Use whatever combination of
devices that best suits your applications and style.
Conserving Your Projector Lamp
The projector lamp is a relatively costly expendable item. You may
want to establish a regular practice of turning off the lamp when your
IRP 4100, 4500, or 5100 is not actually being used, even though you
leave the system on as a whole.
For the IRP 4500, do not use the Projector Power switch on the
control panel to turn off the projector lamp as a rule. Although this
will work, it may in fact reduce the lamp life because the projector
cooling fans would be turned off at the same time.
IRP 4500 Fuse Replacements
A replaceable fuse (10 amp, T10A/250V 5x20 mm, slow blow) is
located in the console power entry module just beneath the power
connector. If your power indicator light does not come on and
everything else appears to be in order, you should check this fuse.
In addition, the internally provided speaker cable inside the left front
compartment includes an in-line fuse from its power source (2 amp,
AGC ¼" x 1¼").
PREVENTATIVE MAINTENANCE AND HELPFUL TIPS
41
IRP_Install_1.fm Page 42 Monday, February 3, 2003 4:19 PM
Troubleshooting
Use this section if you have operation problems with Webster 4100,
4500, or 5100 hardware. If you have installation problems, see the
respective sections on hardware and software installation. Refer to
the Webster User Guide for information about software alignment
and troubleshooting.
Webster IRP is manufactured to comply with a variety of electrical,
physical, radio interference, and laser operation safety
requirements. Do not continue to use malfunctioning equipment or
attempt to correct hardware problems without observing all related
safety precautions as directed.
Hardware Condition Indicators
Interactive Rear Projection (IRP)
The green power indicator light is located at the lower left-hand
corner of the Webster screen. It is on when the Main Power switch is
on, power cables are properly connected, the power entry fuse is
intact, and the Webster power supply is functioning properly.
OPERATING LEDS
The operating lights are located just beneath the Webster screen
header cover, and are visible above the midpoint of the screen.
42
•
When your electronic pen is positioned near or on the screen,
the red operating light turns on.
•
When there is a Webster initialization error (refer to the Webster
User Guide), the red operating light blinks (and the indicator
speaker in the header also beeps repeatedly).
•
When the electronic pen tip switch is depressed, the green
operating light turns on.
•
When either of the electronic pen barrel buttons is depressed
without the pen tip switch being depressed, the green operating
light blinks.
TROUBLESHOOTING
IRP_Install_1.fm Page 43 Monday, February 3, 2003 4:19 PM
INDICATOR SOUND SIGNALS
The indicator sound speaker is located internally near the middle of
the Webster screen header.
When there is a Webster initialization error the speaker beeps
repeatedly and the red operating light also blinks. Refer to the
Webster User Guide.
Troubleshooting the Cable Connections
If you are not getting any projected image:
•
Make sure the Projector Power and the Main Power switches on
the main control panel are both on.
•
Make sure the projector power switch is on.
•
Make sure the projector power cable is properly connected at
both ends.
•
IRP 4500 only: A minor power surge may cause the lamp to shut
off. Turn the projector off, wait at least 30 seconds, then turn it
back on to reset the projector.
•
IRP 4500 only: Make sure the fan in the built-in projector is on (it
has power).
•
Make sure there is not a lens cap on the lens.
•
Make sure the projector lamp is not off because the projector is
in standby.
•
Wait for up to one minute for the projector lamp to warm up.
•
Check the projector built-in menu display by pressing menu on
the projector control panel (or remote controller).
•
If you continue to see no evidence of projector light, your
projector lamp may be burned out and needs to be replaced.
If you are getting a projected image but not video from the computer:
•
Make sure that your computer display controller is set for a
resolution and refresh rate that is compatible with your
projector.
TROUBLESHOOTING
43
IRP_Install_1.fm Page 44 Monday, February 3, 2003 4:19 PM
•
IRP 4500 only: Make sure that the cables between your
computer and the projector are all connected properly. Refer
to“Cable Connections” on page 15.
•
Make sure you have selected computer on the projector control
panel (or remote controller).
•
Change the video resolution setting of your computer display
controller to agree with your projector. Change the monitor
model setting so that the output video refresh rate is not more
than 75 Hz.
•
Shut down your Windows or Macintosh operating system, cycle
computer power, and restart the computer while leaving the
projector on.
Interactive Rear Projection (IRP)
If you are getting video from the computer but the image is of poor
quality or unstable:
•
Refer to “Auto Image” instructions in your projector’s manual. It
may help to disable your Windows screen saver while making
this adjustment.
•
Adjust Brightness, Contrast, Tint, and Color (refer to the
projector’s manual).
•
Change the video resolution setting of your computer display
controller to agree with your projector. Change the monitor
model setting so that the output video refresh rate is not more
than 75 Hz.
•
Shut down your Window or Macintosh operating system, cycle
computer power, and restart the computer while leaving the
projector on.
If you have a portable or laptop computer and when you are
connected to the projector you get a projected image but the image
on your computer display disappears:
•
44
You will need to set up your computer to re-activate its built-in
display. Refer to your projector manual or your computer manual
or call PolyVision Technical Support at 1.800.620.POLY.
TROUBLESHOOTING
IRP_Install_1.fm Page 45 Monday, February 3, 2003 4:19 PM
Problems with Electronic Pen
•
Keep the reflective tip of your electronic pen clean by wiping it
off occasionally (once a week) with a dry, soft cloth.
•
Keep the calibration strips at either end of the ledge at the
bottom of the writing surface clean with a soft, dry cloth.
•
If your electronic pen does not track accurately with the cursor
on the screen or does not track accurately while writing and
erasing, refer to the Webster User Guide for information on
projection alignment.
•
If the cursor suddenly jumps way out of alignment with the pen
or it does not respond properly to the projection alignment
procedure in the Webster User Guide, power down the entire
unit. Then power it back on and perform the Hardware
Calibration procedure. If the alignment still cannot be corrected,
call PolyVision Technical support at 1.800.620.POLY for further
assistance.
•
If you are having increasing trouble with the pen operating
remotely from the screen or with the pen failing to click or write,
your pen battery may need to be replaced (refer to
“Replacement Parts and Supplies” on page 46).
Other Hardware Repairs
Only limited hardware repairs can be made to the IRP 4100, 4500,
5100 without the assistance of a specially trained technician. Refer
to “Preventative Maintenance and Helpful Tips” on page 39.
If there are indications of the need for additional expertise to
diagnose or repair your Webster, please do not attempt to make this
diagnosis or repair on your own or without a qualified technician
who has access to the appropriate tools, parts, and instructions. For
warranty or non-warranty service, contact your authorized reseller or
PolyVision Technical Support at 1.800.620.POLY.
TROUBLESHOOTING
45
IRP_Install_1.fm Page 46 Monday, February 3, 2003 4:19 PM
Replacement Parts and Supplies
The following items are available for purchase from Webster or
through your Webster dealer:
Part No.
Description
804
750-0026-00
Electronic IR Pen, with battery
850
780-0007-00
Battery for Electronic IR Pen
(one ½-AA lithium)
750-0059-01
Lenscap Assy, IR Pen
Interactive Rear Projection (IRP)
Model
46
REPLACEMENT PARTS AND SUPPLIES
IRP_Install_1.fm Page 47 Monday, February 3, 2003 4:19 PM
FCC COMPLIANCE
THIS DEVICE COMPLIES WITH PART 15 OF THE FCC RULES. OPERATION
IS SUBJECT TO THE FOLLOWING TWO CONDITIONS: (1) This device
may not cause harmful interference, and (2) this device must accept
any interference received, including interference that may cause
undesired operation.
The Webster is supplied with a grounded AC power cable, a shielded
serial communications cable, and a double-shielded VGA video
cable of a type and quality to ensure compliance with the FCC rules.
Use only these original or equivalent cables for continued FCC
compliance.
WARNING!
Changes or modifications not expressly approved by the party
responsible for compliance could void the user's authority to operate
the equipment.
The Webster IRP system has been tested and found to comply with
the limits for a Class A digital device pursuant to part 15 of the FCC
rules. These limits are designed to provide reasonable protection
against harmful interference in a commercial installation. However,
there is no guarantee that interference will not occur in a particular
installation. This equipment generates, uses, and can radiate radio
frequency energy and, if not installed and used in accordance with
this Installation and Operation manual, may cause harmful
interference to radio communications. If this equipment does cause
interference to radio or television reception, which can be
determined by turning the equipment off and on, the user is
encouraged to try to correct the interference by one or more of the
following measures:
•
Reorient or relocate the receiving antenna.
•
Increase the separation between the Webster and the receiver.
•
Plug the Webster into a different outlet so that the Webster and
the receiver are on different branch circuits.
FCC COMPLIANCE
47
IRP_Install_1.fm Page 48 Monday, February 3, 2003 4:19 PM
•
Consult the dealer or an experienced radio/television technician
for help.
CE MARK
The Webster IRP system has been tested and found to comply with
safety and radiation standards defined in EN60950 and IEC 825
Class 1.
CDRH COMPLIANCE AND LASER SAFETY
This device has been self-certified by Webster as a Class I laser
product according to procedures established by the U.S. Federal
Drug Administration Center for Devices and Radiological Health
(CDRH). It conforms to the applicable requirements of 21 CFR 1040 at
the date of manufacture. As such, it can be used in normal
operations without risk of biological hazard.
SUMMARY OF SAFETY AND ENVIRONMENTAL CERTIFICATIONS
Interactive Rear Projection (IRP)
The Webster IRP whiteboard has been tested and found to comply
with safety and environmental certifications as follows:
48
•
UL Standard 1950
•
CSA Standard 22.2.950
•
EN60950 (CE Mark)
•
FCC Rules Subpart J of Part 15 (Class A)
•
VDE 0871 Level A
•
CISPR 22
•
CDRH 21 CFR 1040 (Class I)
•
IEC 825 (Class 1)
FCC COMPLIANCE
IRP_Install_1.fm Page 49 Monday, February 3, 2003 4:19 PM
PolyVision Technical Support
For technical support or to order parts, contact PolyVision
Corporation at:
1.800.620.POLY from inside the USA, or
+ 32 (0)89 32 31 30 from outside the USA
or e-mail us at [email protected]
POLYVISION TECHNICAL SUPPORT
49