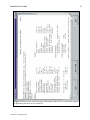
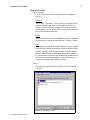
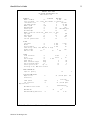
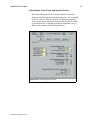
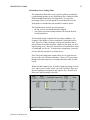
1
BandSel
For Windows
A Program for Improving Bandsaw Design and Operation
User's Manual
Thin Kerf Technologies Inc.
5454 192 Street
Surrey, B.C.
Canada
V3S 8E5
Web: www.thinkerf.com
Email: [email protected]
(604) 576-9455
Fax: (604) 576-8449
BandSel For Windows User's Manual
Version 2.0
© 2000 Thin Kerf Technologies Inc., 5454 192 St., Surrey, B.C., Canada
Tel. (604) 576-9455 Fax. (604) 576-8449
www.thinkerf.com
All rights reserved.
No part of this document may be reproduced or transmitted in any form or by any means,
electronic of mechanical, for any purpose, without the express written permission of Thin
Kerf Technologies Inc. who have copyright to the material herein.
Printed in Canada
Thin Kerf Technologies Inc.
BandSel User’s Guide
iii
TABLE OF CONTENTS
Introduction . . . . . . . . . . . . . . . . . . . . . . . . . . . . . . . . . . . . . . . . . . . . . . . . . . . . . . . . . . . . . . . 1
Purposes and Uses of BandSel . . . . . . . . . . . . . . . . . . . . . . . . . . . . . . . . . . . . . . . . . . . 1
Information from BandSel . . . . . . . . . . . . . . . . . . . . . . . . . . . . . . . . . . . . . . . . . . . . . 2
What’s New in BandSel for Windows . . . . . . . . . . . . . . . . . . . . . . . . . . . . . . . . . . . . . 2
Overview of How to Use BandSel . . . . . . . . . . . . . . . . . . . . . . . . . . . . . . . . . . . . . . . . 5
Installing and Running BandSel . . . . . . . . . . . . . . . . . . . . . . . . . . . . . . . . . . . . . . . . . . 7
System Requirements . . . . . . . . . . . . . . . . . . . . . . . . . . . . . . . . . . . . . . . . . . . . . . . . . . 7
Installing BandSel . . . . . . . . . . . . . . . . . . . . . . . . . . . . . . . . . . . . . . . . . . . . . . . . . . . . 7
Screen Size . . . . . . . . . . . . . . . . . . . . . . . . . . . . . . . . . . . . . . . . . . . . . . . . . . . . . . . . . . 8
Adding a BandSel Icon to your Desktop . . . . . . . . . . . . . . . . . . . . . . . . . . . . . . . . . . . 9
Registering BandSel . . . . . . . . . . . . . . . . . . . . . . . . . . . . . . . . . . . . . . . . . . . . . . . . . . . 9
Starting BandSel . . . . . . . . . . . . . . . . . . . . . . . . . . . . . . . . . . . . . . . . . . . . . . . . . . . . . 10
Quick-Start Tutorial . . . . . . . . . . . . . . . . . . . . . . . . . . . . . . . . . . . . . . . . . . . . . . . . . . . . . . . . 12
Opening the Tutorial Machine File . . . . . . . . . . . . . . . . . . . . . . . . . . . . . . . . . . . . . . 12
Viewing the Master Variation . . . . . . . . . . . . . . . . . . . . . . . . . . . . . . . . . . . . . . . . . . 12
Creating a New Variation . . . . . . . . . . . . . . . . . . . . . . . . . . . . . . . . . . . . . . . . . . . . . 13
Moving to Another Variation . . . . . . . . . . . . . . . . . . . . . . . . . . . . . . . . . . . . . . . . . . . 13
Making Changes to Your Variations . . . . . . . . . . . . . . . . . . . . . . . . . . . . . . . . . . . . . 13
Printing Reports . . . . . . . . . . . . . . . . . . . . . . . . . . . . . . . . . . . . . . . . . . . . . . . . . . . . . 14
Closing and Exiting BandSel For Windows . . . . . . . . . . . . . . . . . . . . . . . . . . . . . . . 14
Exiting BandSel . . . . . . . . . . . . . . . . . . . . . . . . . . . . . . . . . . . . . . . . . . . . . . . . . . . . . 14
Managing Your Files and Variations . . . . . . . . . . . . . . . . . . . . . . . . . . . . . . . . . . . . . . . . . . . 15
The Main Screen . . . . . . . . . . . . . . . . . . . . . . . . . . . . . . . . . . . . . . . . . . . . . . . . . . . . 15
Opening A Machine File . . . . . . . . . . . . . . . . . . . . . . . . . . . . . . . . . . . . . . . . . . . . . . 15
The Master Variation. . . . . . . . . . . . . . . . . . . . . . . . . . . . . . . . . . . . . . . . . . . . . . . . . 19
Selecting a Default Printer . . . . . . . . . . . . . . . . . . . . . . . . . . . . . . . . . . . . . . . . . . . . . 20
Other Options in the File Menu . . . . . . . . . . . . . . . . . . . . . . . . . . . . . . . . . . . . . . . . . 21
The Variations Menu . . . . . . . . . . . . . . . . . . . . . . . . . . . . . . . . . . . . . . . . . . . . . . . . . 21
Print Menu . . . . . . . . . . . . . . . . . . . . . . . . . . . . . . . . . . . . . . . . . . . . . . . . . . . . . . . . . 24
Windows Menu . . . . . . . . . . . . . . . . . . . . . . . . . . . . . . . . . . . . . . . . . . . . . . . . . . . . . 24
Design Screen . . . . . . . . . . . . . . . . . . . . . . . . . . . . . . . . . . . . . . . . . . . . . . . . . . . . . . . . . . . . 27
The User Entry Area . . . . . . . . . . . . . . . . . . . . . . . . . . . . . . . . . . . . . . . . . . . . . . . . . 27
The Calculations Area . . . . . . . . . . . . . . . . . . . . . . . . . . . . . . . . . . . . . . . . . . . . . . . . 29
Entering Data . . . . . . . . . . . . . . . . . . . . . . . . . . . . . . . . . . . . . . . . . . . . . . . . . . . . . . . 29
Invalid Data . . . . . . . . . . . . . . . . . . . . . . . . . . . . . . . . . . . . . . . . . . . . . . . . . . . . . . . . 30
User Entry: Bandmill Design Section . . . . . . . . . . . . . . . . . . . . . . . . . . . . . . . . . . . . 35
User Entry: Tooth Design Section . . . . . . . . . . . . . . . . . . . . . . . . . . . . . . . . . . . . . . . 37
User Entry: Guide Location Section . . . . . . . . . . . . . . . . . . . . . . . . . . . . . . . . . . . . . 39
User Entry: Wood Properties Section . . . . . . . . . . . . . . . . . . . . . . . . . . . . . . . . . . . . 41
User Entry: Description Section . . . . . . . . . . . . . . . . . . . . . . . . . . . . . . . . . . . . . . . . 42
Calculations Area: Gullet Cracking Section . . . . . . . . . . . . . . . . . . . . . . . . . . . . . . . 43
Calculations Area: Guide Pressure Section . . . . . . . . . . . . . . . . . . . . . . . . . . . . . . . 44
Calculations Area: Tooth Design Section . . . . . . . . . . . . . . . . . . . . . . . . . . . . . . . . . 46
Thin Kerf Technologies Inc.
BandSel User’s Guide
iv
Calculations Area: Feeds and Speeds Section . . . . . . . . . . . . . . . . . . . . . . . . . . . . . . 47
Navigating Around the Feed Speed Screen . . . . . . . . . . . . . . . . . . . . . . . . . . . . . . . . 50
Calculations Area: Cutting Time . . . . . . . . . . . . . . . . . . . . . . . . . . . . . . . . . . . . . . . . 50
Calculations Area: Power . . . . . . . . . . . . . . . . . . . . . . . . . . . . . . . . . . . . . . . . . . . . . 52
The Basics of Bandsaw Operation and Design . . . . . . . . . . . . . . . . . . . . . . . . . . . . . 53
Trade-offs . . . . . . . . . . . . . . . . . . . . . . . . . . . . . . . . . . . . . . . . . . . . . . . . . . . . . . . . . . 53
Factors that affect Surface Roughness . . . . . . . . . . . . . . . . . . . . . . . . . . . . . . . . . . . . 55
Factors that affect Blade Stiffness . . . . . . . . . . . . . . . . . . . . . . . . . . . . . . . . . . . . . . . 55
Factors that affect the Cutting Force and Power . . . . . . . . . . . . . . . . . . . . . . . . . . . . 56
Factors that affect Gullet Cracking . . . . . . . . . . . . . . . . . . . . . . . . . . . . . . . . . . . . . . 56
Assessing Blade and Bandmill Maintenance . . . . . . . . . . . . . . . . . . . . . . . . . . . . . . . 57
Guidelines for Assessing the Condition of the Wheels . . . . . . . . . . . . . . . . . . . . . . . 57
Rating the Level of Tensioning . . . . . . . . . . . . . . . . . . . . . . . . . . . . . . . . . . . . . . . . . 58
Rating the Condition of the Gullet . . . . . . . . . . . . . . . . . . . . . . . . . . . . . . . . . . . . . . . 59
How to use BandSel for Trouble-Shooting Sawing Problems . . . . . . . . . . . . . . . . . . . . . . . 60
Appendix A: Template Files . . . . . . . . . . . . . . . . . . . . . . . . . . . . . . . . . . . . . . . . . . . . . . . . . 64
Thin Kerf Technologies Inc.
BandSel User’s Guide
1
SECTION 1
INTRODUCTION
BandSel is a computer program that helps saw filers, maintenance
supervisors and production managers make decisions about saw design
and operation. BandSel includes the tried-and-true rules of bandsaw
design and also incorporates the latest developments in bandsaw
technology. BandSel is unique. It uses a computer model of the bandsaw
blade, including the teeth, roll tensioning, bandmill strain and blade speed
to estimate blade stiffness, which is the most important factor affecting
cutting accuracy.
The core of BandSel is it’s ability to calculate saw stiffness, and from that,
sawing deviation. In the previous version of BandSel, sawing performance
was expressed with the Load Index, which is a number that is proportional
to sawing deviation. So if the Load Index increased by a certain
percentage, then the sawing deviation would be expected to go up by the
same percentage. This version of BandSel incorporates several years of
experience with Load Index, on machines ranging from portables to nine
foot headrigs, so the user now sees the within-board sawing deviation, the
most common measure of saw performance.
Saw filers know how to increase saw stiffness, but they also know that to
increase the stiffness will also increase the likelihood of gullet cracking.
BandSel provides a Bandsaw Fatigue Index to warn when the stresses in
the saw are becoming too large. On the other hand, if the Fatigue Index
indicates low stresses then there is an opportunity to make changes that
increase the stiffness and reduce sawing deviation without the danger of
developing gullet cracks within an unacceptably short time in operation.
BandSel provides the capability to investigate trade-offs and to look for
windows of opportunity without the cost and risk of mill trials. BandSel
tells you which options should work and which will not. BandSel's Design
Screen feature is a tool for investigating the compromises such as that
between kerf and sawing accuracy.
Thin Kerf Technologies Inc.
BandSel User’s Guide
2
Purposes and Uses of BandSel
1. To make a computer file that stores important information for each
bandmill. This information can be printed for your records, workorders or reports.
2. To check if bandmill operating conditions and design are within
acceptable limits.
3. To look for opportunities to reduce kerf or increase throughput.
4. To optimize the trade-off between production and recovery
5. To reduce the guess-work and time to find solutions to sawing
problems.
6. To aid in the training of apprentice filers and benchmen.
Information from BandSel
Bite per tooth and gullet loading.
Gullet area calculation based on Armstrong Formula 'D'.
Guide pressure settings.
Power requirements.
Recommended minimum and maximum feed speeds.
Effect of side clearance and gullet overloading on sawing deviation.
A Bandsaw Fatigue Index to warn if the blade is over-stressed.
Warnings when operational limits are exceeded.
What’s New in BandSel for Windows
This section will provide an overview on the features that have been
added or from the DOS version of BandSel. Details of each point will
be provided in appropriate sections.
Template Files Used to Create New Machine Files
You can choose from several Template files to supply default data
when you create a new Machine file. You can also create your own
template file.
Machine Files are Now Independent
BandSel users can now share Machine Files.
Direct Calculation of Sawing Deviation
Within-board sawing deviations is calculated instead of the Load
Index, although the technology is still being used in the program.
Extensive Feed Speed Analysis
You are no longer restricted to three depth of cuts (maximum, average
and minimum). BandSel now allows 20. For each depth of cut you
can enter its own operating parameters such as Guide Span and Feed
Speed so that individual Recommended Maximum Feed Speed and GFI
can be determined.
Thin Kerf Technologies Inc.
BandSel User’s Guide
3
Improved Horsepower Calculations
Power calculations are now based on wood density and bite per tooth.
Input Screens and Worksheets Have Been Incorporated
Previous versions had individual input screens such as the Blade
Design Screen. Calculated values and analysis of these numbers were
then done on worksheets. BandSel has now combined the two into one
screen - the Design Screen. A typical Design Screen is shown in
Figure 1. . Having all the information on one screen makes it easier to
navigate through the numbers and makes information more accessible.
Several Variations Can Be Opened at Once
BandSel now allows multiple Variations to be opened at the same
time. Going from one to the other can be done just by clicking on one
Design Screen to the other.
Better Printing Capabilities
BandSel for Windows now has more powerful printing capabilities
including Print Preview and Print to File commands.
Thin Kerf Technologies Inc.
BandSel User’s Guide
Figure 1 All input screens and worksheets have been incorporated into the Design Screen.
Thin Kerf Technologies Inc.
4
BandSel User’s Guide
Machine File
5
Overview of How to Use BandSel
BandSel is a database program and a calculation program. The
BandSel database stores the dimensions, operating settings and
feed speeds for each bandmill chosen for analysis. These files
are called Machine Files and each has a name that the user
supplies. For instance, the files could be named:
HeadrigA
S_Resaw
HorizSix
Quads
NewResaw
(Headrig 'A')
(South Resaw)
(Horizontal 6')
(Quad bandmills)
(New resaw)
The last file, 'NewResaw', is for a bandmill that is being
considered for purchase. See Figure 2 below.
BandSel
T
+)))))))))0)))))))3)))))0))))))))))),
HeadrigA
S_Resaw
Quads
S))0)))Q S)))))))Q S)))Q
*
* - Master
* - Strain1
* - Strain2
* - Faster1
* - Faster2
R - Ga_15
HorSix
NewResaw
))))))Q S)))))))Q
A
A
Machine Files
Variations
Figure 2. Examples of Machine and Variation files.
Master File
Thin Kerf Technologies Inc.
Within each Machine File there is one copy of the bandmill data
for the machine as it is now. This is called the Master Variation.
There is no need to re-enter all the data. Since it is desirable not
to change this information unless a permanent change is made to
the machine, BandSel works with copies of the data in the Master
variation. This allows the user to investigate the effect of changes
without worrying whether the data will be lost. Each of these
copies is called a Variation and is stored within the Machine File
under a unique name and description. For instance, the HeadrigA
Machine File may have the following Variations:
BandSel User’s Guide
6
Master
Strain1
Strain2
Faster1
Faster2
Ga_15
-
Master
Strain increased 1000 lb.
Strain increased 2000 lb.
Feed speeds increased 10%
Feed speeds increased 5%
15 ga. plate
The data for the Master File is entered in the Design Screen which
asks the user for all the information that describes a bandmill.
Variation File
Thin Kerf Technologies Inc.
Operating parameters you have entered through the Design Screen
are used to calculate the performance parameters that tell how
well the saw will cut. The data can be changed, which allows the
user to investigate the effects of changing one or more variables.
These changes can be saved or stored in a new Variation for
future reference. The data and calculations for the variations can
be printed or written to a file for inclusion in reports.
BandSel User’s Guide
7
SECTION 2
INSTALLING AND RUNNING BANDSEL
If there are problems installing or running BandSel on your
computer, call Thin Kerf Technologies at 1-800-6363-TKT or
email us at [email protected].
System Requirements
Pentium 75 MHZ or higher processor
Operating system MS-Windows 95/98
Hard drive 10 Mb free space
8 Mb RAM minimum, 16 Mb of RAM recommended
CD-ROM drive
VGA or higher resolution monitor, Super VGA recommended
(Minimum 600 x 800 resolution)
Installing BandSel
1.
2.
3.
4.
Close all applications currently running on Windows.
Insert the BandSel CD into your CD-ROM drive.
Open Windows Explorer.
In Explorer, double-click the drive for your CD-ROM to
see what is on the CD.
5. On the CD, find the file: "setup.exe"
6. Double-click the file and the setup routine will start.
7. Please follow the instructions on the screen to finish
setting up BandSel.
Thin Kerf Technologies Inc.
BandSel User’s Guide
NOTE
8
During setup, you may get the following message:
Setup cannot continue because some system files
are out of date on your system. Click OK if you
would like setup to update these files for you
now. You will need to restart Windows before you
can run setup again. Click Cancel to Exit setup
without updating system files.
Click the OK button so that BandSel can update your
Windows files. Your computer will automatically restart and
you will have to start the installation procedure over again.
Screen Size
BandSel displays a lot of information on the screen. We
recommend that you should run your monitor at 1024 x 768
with a minimum of 800 x 600. To check what screen area
your monitor is at please do the following:
1. Click the Windows "Start" button.
2. Select the "Settings" option.
3. From the Settings menu select the "Control Panel" option.
You should now be in the Control Panel window.
4. Find the Display icon and double-click it so that the
"Display Properties" window will appear.
5. In the Display Properties window select the "Settings" tab.
6. You should see the "Screen Area" box. The screen area is
fine if the number is greater than or equal to 1024 x 768
pixels. If this is the case, press the Cancel button and
proceed to the next section: "Starting BandSel". If not,
please continue with these instructions.
7. Using the mouse, you can change the screen area by
clicking the left mouse button on the slider and dragging it
left or right. You should be dragging the slider to the right
to increase the screen area. Drag the slider until the screen
area is 1024 x 768.
NOTE
The screen area depends on the user. As you increase the
area, the smaller the writing will appear on the screen. If you
prefer smaller lettering, you can drag the slider as much as
you want to the right.
8. After selecting your screen area, press the ‘Apply’ button.
9. A new window "Display Properties" will pop-up. Press
the "OK" button. Your screen should black out as
Windows is resizing your screen.
10. When the screen reappears, press the "Yes" button on the
new window that has popped up.
Thin Kerf Technologies Inc.
BandSel User’s Guide
9
11. Press "OK" on the Display Properties window.
12. Center the screen.
Adding a BandSel Icon to your Desktop
1. Open up your Windows Explorer.
2. Find the file: ‘BandSel_Win.exe’ in your hard drive. If you
did not change the directory where BandSel would be installed
during the installation procedure this file would be in the
directory:C:\Program Files\BandSel_Win
3. Click the file once.
4. On the File menu, click Create Shortcut
5. You will see a new file named: Shortcut to
BandSel_Win.exe Drag this file onto the desktop.
Registering BandSel
You must register BandSel before you use the program. The
registering procedure will start when you first try to run the
program.
1. Click the Windows Start Menu button.
2. Click the Programs option and move the mouse to the
"BandSel for Windows" option.
3. Click the new option also titled "BandSel for Windows".
4. The registration window will open up asking the user for
the Company and Division Name and the Serial Number.
You find all this information on the BandSel CD label
(refer to Figure 3. ).
Important
Thin Kerf Technologies Inc.
You must enter the Company and Division Name exactly as
shown on the CD label. This includes punctuation, capital
letters and spaces.
BandSel User’s Guide
10
Figure 3. You must register your copy of BandSel before using the program. Enter
the Company Name, Division, and Serial Number as indicated on the CD label.
5
After you entered the information, press the ‘Register’
button to finish the process.
6. A window will open to tell you if you registered the
program properly or not. If it was successful, pressing the
‘OK’ button would automatically start the program.
If it wasn’t registered right, press the ‘OK’ button so that
you can try again. You can try to register as many times as
needed. If you have problems registering, please contact
TKT.
Registering the software is done only once.
Starting BandSel
To start the program follow Steps 1 - 3 in the above section. If
you added an icon on your desktop you can also double-click it
to start the program.
After doing this, the Startup screen appears which shows the
registered company Name and Division. This window will
close by itself and proceed to the main part of the BandSel
program. (see Figure 4 ).
Thin Kerf Technologies Inc.
BandSel User’s Guide
Figure 4. Opening screen.
Thin Kerf Technologies Inc.
11
BandSel User’s Guide
12
SECTION 3
QUICK-START TUTORIAL
This section provides a quick-start into BandSel by showing an
example of entering and analyzing the data for one bandsaw. The
instructions in this tutorial are not detailed, but the tutorial does
introduce the important ideas of creating the Machine File,
entering the data and analyzing the data. For more detailed
instructions, see Sections 4 and 5.
This tutorial uses a Machine File supplied with BandSel. There is
no need to enter data, but changes can be made without causing
problems.
Step 1
Opening the Tutorial Machine File
If you are already in BandSel, you should be in a window that
let’s you open an existing Machine File or to create a new one.
If you are not in the program, start BandSel as specified in the
previous section.
Click on the button that says: ‘Open an Existing Machine
File’.
In the next window, you will have a list of Machine Files.
Click on the file: ‘TUTORIAL.SEL’.
Now press the ‘Open’ button.
Step 2
Viewing the Master Variation
The TUTORIAL file has two Variations. We will open the
Master Variation. To do this, click the ‘Open’ button on the
new window.
In a few seconds the Master Variation’s Design Screen will
open.
Thin Kerf Technologies Inc.
BandSel User’s Guide
13
Notice on top of this window that the Variation’s name and
description is shown.
Step 3
Creating a New Variation
Let’s say you want to see what will happen if you changed the
strain on your bandsaw. We will now create a new variation
so that the Master variation’s data will be kept as a record of
your current cutting conditions.
On top of the screen you would see the menus for BandSel.
Select the ‘Variations’ menu and click ‘New Variation’. This
new window allows you enter a name for this Variation.
BandSel automatically enters a name for the variation. In this
case it is ‘Variation2' since it is the first variation for this
Machine file. Enter this field and replace ‘Variation2' with
‘Strain Changed’.
Next select the ‘Description’ field and type:
Strain increased to 20000 lb
To create this Variation and to view it, press the ‘Save’ button.
You now have two Design Screens on display.
Step 4
Moving to Another Variation
The Variation you just created now sits on top of the Master
Variation. To view the Master, press the ‘Windows’ menu
and you will see all the variations currently opened. Move the
mouse down to where it says ‘1. Master - ’ and select it. The
Master Design Screen should now be on top. Return to the
‘Windows’ menu and put the new Variation on top.
Step 5
Making Changes to Your Variations
We have not increased the strain yet. In the Design Screen for
the ‘Strain Changed’ Variation, find the tab labeled ‘Feed
Speed’ and select it. Click the ‘Bandmill Design’ tab as well.
Select the ‘Strain’ field, delete the current value and replace it
with ‘20000'. Now press the ‘Enter’ key. You may have
noticed that the Recommended Maximum Feed Speed for
Sawing Deviation for the depth of cut of 1 inch increased from
875 to 983 Fpm. This can be verified by checking with the
Master Variation.
Thin Kerf Technologies Inc.
BandSel User’s Guide
Step 6
14
Saving Your Changes
To save your changes, go to the ‘Variations’ menu and select
the ‘Save’ option.
Step 7
Printing Reports
Make sure your printer is on. Go to the ‘Print’ menu and
select the ‘Print’ option. A report is now automatically being
sent to the computer.
If you have several printers connected to your computer,
BandSel lets you choose which one to send the report to. This
option is found in the File menu.
Step 8
Closing and Exiting BandSel For Windows
On the ‘File’ menu you will find the ‘Close’ option. Choose
this option to close this Machine file. If you made changes to
a Variation but did not save it, BandSel will ask if you want to
save the changes before closing the file.
Step 9
Exiting BandSel
The ‘Exit’ option is also found in the ‘File’ menu. Use this to
quit BandSel.
Thin Kerf Technologies Inc.
BandSel User’s Guide
15
SECTION 4
MANAGING YOUR FILES AND VARIATIONS
This section provides:
1. Detailed definitions on menu options on the BandSel main
screen.
2. Instructions for creating a new or opening a Machine File.
3. Saving your work
4. Instructions for printing reports.
5. Instructions for accessing the Help Screens.
The Main Screen
You reach the Main screen after you have created or opened a
Machine file. Below is a description of all menu options
available for the Main screen. Some of these options would be
described in further detail if needed later in this section. These
menus are all located on the top of the Main Screen.
As you use this software, you will realize that at times, some
options would not be available. For example the Open and New
option in the File Menu will not be available when you already
have a Machine File opened. You must close or delete the file
before you open or create a new one.
The first part of this section will show you how to open or
create a new Variation. Then it will discuss the rest of the
options in the File Menu followed by the remaining four menus
- Variations, Windows, Print, and Help.
Opening A Machine File
Step 1
Thin Kerf Technologies Inc.
To open a Machine File, use the ‘Open’ option in the File
Menu. The window that opens is used to find existing Machine
Files. Figure 5 shows how you can navigate around your
computer to look for Machine Files.
BandSel User’s Guide
16
Figure 5 Use this window to search your computer for existing Machine Files.
When BandSel was installed, it created a directory named
‘Data’. This would be the default directory when you search
for existing Machine Files. We recommend that you keep all
your Machine File under one directory - not necessarily the one
supplied by BandSel.
Anytime you want to exit this window, press the ‘Cancel’
button to return to the Main screen.
Step 2
After you have found the Machine File, highlight it. The file’s
name that you chose is shown in the field labelled - ‘File
name:’.
Step 3
Press the ‘Open’ button. The next window shows all the
Variations for this Machine File (see Figure 6).
Hint
Thin Kerf Technologies Inc.
If you are not sure you have a Machine File opened, the top of
the Main screen will provide a full path of the current Machine
File. If it reads ‘BandSel For Windows’, then you have no
Machine Files opened.
BandSel User’s Guide
Hint
Step 4
17
Selecting a Machine File and double-clicking it in the File List
is the same thing as selecting the Machine File and pressing
the ‘Open’ button.
Use the mouse to highlight and select the Variation you would
like to work with and click the ‘Open’ button.
If you press the ‘Open’ button without choosing a Variation,
the Master variation will be displayed.
Figure 6 Select the Variation you want to open and press the Open button.
Thin Kerf Technologies Inc.
BandSel User’s Guide
18
Creating A New Machine File
Step 1
To start a new Machine file, select the ‘New’ option in the
‘File’ menu. The window that opens (Figure 7) allows you
enter the new filename, a brief description of it and the
creator.
Step 2
Selecting a Template
Templates are only used to supply default data. The values for
each template are provided in Appendix A and you should
choose the one closest to your bandsaw. This will cut data
entry time in the future.
If you don’t select a template, the first one in the list will be
used.
Use the mouse to select a template.
Figure 7 Choosing a template, entering a description and the creator’s
name.
Step 3 (optional)
Entering A Variation Description
Although optional, we advise that each variation have its own
description. For instance our Tutorial Machine file may have
Thin Kerf Technologies Inc.
BandSel User’s Guide
19
the following Variations:
Master - Master
Strain1 - Strain increased 1000 lb
Strain2 - Strain increased 2000 lb
Faster1 - Feed speeds increased 10%
Ga_15 - 15 ga. plate
Move the cursor with the mouse to this field if you want to
enter a description to this Machine File. This field is limited
to 60 characters. Anything after that will not be included in the
description of this Machine file.
Step 4 (optional)
Entering a Creator’s Name
You also have an option to enter the creator of this Machine
File. This field is limited to 60 characters
After entering all three fields, press the ‘Continue’ button to
enter the next window or the ‘Cancel’ button to exit.
Step 5
Selecting the Machine File Location
The next window is similar to the one to let you search for
existing Machine files (Figure 8). It is navigated around the
same way. The default directory is also ‘Data’. If you delete
this directory, then the default directory is where you installed
your BandSel.
Step 6
Entering a Machine Filename
Click on the field titled - ‘File name’. Type in a valid
filename. You are limited to 255 characters and cannot
contain the characters: \,/,*,?,<,> or |.
Step 7
Saving Your Machine File
Press the ‘Save’ button to create your new Machine file. You
will get an error message if you entered an invalid filename. If
you enter a filename that already exists, BandSel would ask if
you want to replace it.
Pressing the ‘Cancel’ button anytime will close this window
and return to the Main screen.
Step 8
The Master Variation
Anytime you create a new Machine file, a Master variation is
Thin Kerf Technologies Inc.
BandSel User’s Guide
20
created using data from the template file you selected. This
variation will automatically open.
Thin Kerf Technologies Inc.
BandSel User’s Guide
21
Figure 8 Enter you the name of the new
Machine file and press the Save button.
Selecting a Default Printer
Figure 9 BandSel lets you change your
default printer.
Use this option if you want to change or check which is your
default printer . The Printer Select window as shown in
Figure 9 first shows what is the default printer and then has a
list of all printers connected to your printer.
Click the ‘Use Default’ button or ‘Cancel’ button if you don’t
want to change the printer.
To change a printer, select the printer from the list and then
press the ‘Select Printer’ button.
Changing the printer while in BandSel does not make a
permanent change to your Windows environment.
Thin Kerf Technologies Inc.
BandSel User’s Guide
22
Other Options in the File Menu
Save
Saves the Machine File but does not close it.
Save As
Saves the current Machine File under a different
filename.You would be asked if you want to save your
changes before you save the file. If you don’t, BandSel
would make a copy of the most recently saved version of
the current Machine File.
The window is the same one shown in Diagram 9.
Save As Template
Use this option to save the current variation as a template
file. A window will open to prompt you to enter the
template name and where do put the file. The default
directory is ‘Template’ and should be saved in here. If you
don’t, BandSel will not be able to find it.
Close Closes the current Machine File. You will be asked if
you would like to save changes to the Variations that
are opened.
You cannot have more than one Machine file opened.
Delete Deletes the current Machine File.
Exit
Use this to exit BandSel. BandSel will ask if you
would like to save any changes that you have made
The Variations Menu
Open Master
Opens the Master Variation. The Master Variation opens
automatically when you create a new Machine file. You
won’t be able to access this option if the Master Variation
is already opened.
Open A Variation
Use this option to see which Variations have not yet been
opened (see Figure 10). To open a Variation, select the
one you want and press the ‘Open’ button.
Pressing the ‘Cancel’ button would bring you back to the
Main screen.
Thin Kerf Technologies Inc.
BandSel User’s Guide
23
This option is not available if all Variations are already
opened.
Figure 10 This window shows the Variations that are not opened.
Select the Variation you want to open and press the ‘Open’ button
Open All Variations
Opens all Variations that are not opened. Again, this option is
not available if all Variations are already opened.
New Variation
To copy the Master as a new Variation select this option and
follow these steps:
Step 1
If the Master has been changed but not saved, you will first be
asked to select one of three options:
Yes - Save the Master and continue making a new Variation..
No - Don’t save the Master and continue making a new
Variation.
Cancel - Don’t save the Master and cancel making a new
Variation.
Step 2
This next window prompts you to enter a Variation name.
BandSel provides you with a name. The list on the right
shows all the Variations in this Machine. You cannot use and
of these and will be notified if you entered one of these. Refer
to Figure 11.
Step 3 (optional)
Next, enter a description. This is optional but we do
recommend that you have one for each Variation.
Examples of names and descriptions are as below:
Thin Kerf Technologies Inc.
BandSel User’s Guide
24
Newsaw- Standard + 15000 lb strain + 17 Ga
Dryfir - Standard: Effects of cutting dry belt fir
Topguide- Effects of installing a moving top guide
Faster - Effects of faster feeds for small logs
Lessside- Standard+ reduction of side clearance to 0.025"
PitchA - Tooth pitch of 1.5 inches
PitchB - Tooth pitch of 2 inches
Step 4
Press the ‘Save’ button to create and open the Variation or the
‘Cancel’ button to quit making a Variation.
Figure 11 Adding a Variation
Save
Changes to a Variation are not permanent until they are
saved. This allows the user to do a quick ‘what if’ without
altering the existing data. Use this ‘Save’ option to save the
changes.
Save As
Creates a new variation using data from the current Variation.
Again, you will be asked to save the current variation first
before a new one is created.
The steps are similar to creating a new Variation and the
same window is used (see Figure 11).
Rename
Renames the current variation. You cannot rename the
Master or use an existing Variation name. The steps are
similar to creating a new Variation.
Close
Closes the current variation. If you made changes, you would
Thin Kerf Technologies Inc.
BandSel User’s Guide
25
be asked if you want to save these changes.
Delete
Deletes the current variation. This option will not work with
the Master.
Print Menu
BandSel allows you to generate a quick report on an opened
Variation. You have the option to direct it to your printer,
screen or to a text file.
To Printer - Let’s you print the current variation. Make sure
your printer is on and there is plenty of paper.
Print Preview - Let’s you print the current Variation. An
example is shown on the following page. Use the
scrollbars to view the whole report. In the preview mode,
you also have the option to print the report or to save it to
a file.
To print the report, press the ‘Print’ button.
Text File
To save the report in a file, press the ‘Save to File’ button.
Use the window that just opened to enter the file name and
where you want to put it. Again, the default directory is
‘Data’.
The file is saved as a text file so that you can use it in any
word processor and can be used in your reports.
Windows Menu
Cascade
Organizes all the Design Screen one on top of the other
with just the top of the windows in view.
Tile Horizontally
Organizes all the Design Screens horizontally.
Tile Vertically
Organizes all the Design Screen vertically.
Under the ‘Tile Vertically’ option, BandSel provides a list of
all opened Variations. Use this list to bring a Variation to the
top of the screen.
Thin Kerf Technologies Inc.
BandSel User’s Guide
Figure 12 Print preview screen lets you see the report on the screen. You have the options
to print the report or to save in a text file.
Thin Kerf Technologies Inc.
26
BandSel User’s Guide
27
Help Menu Options
Online Manual
Use this option to view this manual online (see diagram
below).
Contents
The first tab, ‘Contents’, is like a Table of Contents for the
manual. Each heading with an icon in the of a book is a
Chapter. Double-clicking a chapter will show the sections
in that chapter. If you double-click a section, the contents of
the section would be displayed.
Index
This tab lists all the sections in alphabetical order. Highlight
the section you want to read and press the ‘Display’ button.
Find
This tab lets you search the online manual. Type in a phrase
in the first line and the second line list all the matches in the
manual. Initially, all the entries would be selected and the
third list shows all the sections that contain these matches.
If you select one of the matches the third list would show all
the sections containing that phrase. Select the section you
want to read and press the ‘Display’ button.
About
Provides copyright information and the version of BandSel
you have.
Figure 13 The Help screen.
Thin Kerf Technologies Inc.
BandSel User’s Guide
28
SECTION 5
DESIGN SCREEN
This section provides:
1. Detailed definitions of the input variables
2. Instructions for moving around the Design Screen
As you create new Variations and view them, each Variation will
have its own ‘Design Screen’ window. Here, you can make changes
to your bandsaw properties such as blade thickness and operating
parameters such as guide span. Calculated values such as GFI and
kerf will automatically reflect the changes you have made.
The Design Screen is divided into two ‘tabbed’ sections - the User
Entry Area on the left and the Calculations Area on the right. This
chapter will first provide a brief description of both areas and then a
detail explanation on each tabbed section. Please refer to Figure 14
throughout this section. The Master Variation you see in the
diagram is from the Tutorial file.
The User Entry Area
Other than operation parameters for feed speed calculations,
values required by the users are displayed in the User Entry
Area.
The User Entry Area has six tabbed sections: Blade Design,
Bandmill, Tooth Design, Guide Location, Wood Properties and
Description. Please familiarize yourself with each section so
that you know where each user input is located.
To move from one section to another, use the mouse to click the
section’s title
Thin Kerf Technologies Inc.
BandSel User’s Guide
Figure 14 The Design Screen. Other than feed speed calculations, user inputs can be
found in the User Entry Area and calculated values are found in the Calculations Area.
Thin Kerf Technologies Inc.
29
BandSel User’s Guide
30
The Calculations Area
BandSel generates all the important numbers you need to
finish the design of your Bandmill. The numbers are provided
in the Calculations Area and consists of six sections: Gullet
Cracking, Guide Pressure, Feed Speeds, Cutting Time and
Tooth Design.
Entering Data
The reason for creating variations is to allow you to change
existing parameters to your Bandmill to see how it will affect
performance. This way, you can eliminate costly trial and
error tests. To change an operating parameter do the
following:
Step 1
Click on the section where the operating parameter is located.
Step 2
Click on the field to change.
Step 3
Type in a valid number.
Step 4
To finish the calculations, press the ‘Enter’ key or move the
cursor to another field.
For example, let’s say you want to increase your side
clearance by 0.010 inches but would like to see the affects on
the kerf before you save the changes. In the User Entry Area,
click on the Tooth Design section. Click also the Tooth
Design section in the Calculations Area. At the moment the
side clearance is 0.015 giving a kerf of 0.093 inches. To
increase the side clearance enter the field with the label ‘Side
Clearance’. Change the value to 0.025 and press the ‘Enter’
key. Increasing your side clearance by 0.010 inches will
increase you kerf size to 0.113 inches.
It is important to press the ‘Enter’ key. Otherwise BandSel
will not perform any recalculations. Pressing the ‘Tab’ key
will do the same thing and also move the cursor to the next
field.
Hint
Option Buttons
Thin Kerf Technologies Inc.
Double-clicking a field will select the number in that field. If
you do this, BandSel will delete this old number as you type in
a new one.
Sometimes you change values by using option buttons like the
Tensioning options in the Blade Design section. You select
BandSel User’s Guide
31
one of the four choices by clicking the buttons next to the
label
Invalid Data
BandSel will generate error messages if you provide invalid
data. This is most likely due to non-numeric entries or outside
of the allowable range for that field. Table 1 lists all the user
entries. Limitations and units are also provided where
applicable. You will not be able to enter another field until
you change the value. BandSel will also not let you use the
menus if you provide bad data.
Thin Kerf Technologies Inc.
BandSel User’s Guide
32
BANDSEL DATA SHEET
THIN KERF TECHNOLOGIES INC
www.thinkerf.com
BANDMILL
MINIMUM
MAXIMUM
Wheel diameter
In.
3.000
120
Strain system : Air, Lever Arm, Rubber, or Hydraulic
Indicated strain
lb
0
100,000
Top wheel weight
lb
0
10,000
Wheel speed
rpm
0
6,000
Maximum span
in
>0
100
Guide span
in
>0
Maximum Span
Minimum span
in
>0
100
Wheel condition: Excellent, Good, Fair, or Poor
Top span
in
>0
100
Bottom span
in
>0
100
Tare power
hp
0
500
Current guide offset
in
>0
2
BLADE
Thickness
in
0.001
Width
in
0.010
Discard width
in
0.010
Tensioning : None, Low, Medium, or High
Blade length
ft
3
Saw run time
hrs
>0
100
TOOTH
Side clearance
in
Pitch
in
Gullet depth
in
Hook angle
Deg.
Back clearance angle
Deg.
Gullet bottom radius
in
Actual gullet area
Sq. in.
Grinding: Fine, Medium or Coarse
0.001
0.005
0.010
0
0
>0
>0
WOOD PROPERTIES
Specific gravity
CUTTING CONDITIONS
Depth of cut
Elevation)
Feed speed
Cut elevation
Depth Of Cut)
in
>0
fpm
in
3
5
12
60
60
2
6
in
2
(Guide Span - Cut
0
>0
and <100
1000
(Guide Span -
Maximum Span
in
Table 1. User Entries and their units and limits.
Thin Kerf Technologies Inc.
100
>0
Minimum Bite Per Tooth
Maximum GFI
Maximum Sawing Deviation
0.500
20
20
>0
>0
1
1.5
0.25
>0
BandSel User’s Guide
33
User Entry: Blade Design Section
Blade
Thickness
The Blade Design Section asks for the dimensions of the saw
plate, excluding the teeth, and the level of tensioning. You
will find this in the User Entry Area (see below). Figure 16
shows the blade dimensions
Blade
Width
Figure 16 Blade dimensions
Figure 15 Blade Design Screen
Thin Kerf Technologies Inc.
BandSel User’s Guide
34
Blade Thickness
For reference, Table 2 lists the thicknesses for gauges of
plate.
Birmingham Gauge
Plate Thickness
(Inches)
10
0.134
11
0.120
12
0.109
13
0.095
14
0.083
15
0.072
16
0.065
17
0.058
18
0.049
19
0.042
Table 2. Plate Thickness for Birmingham Gauges.
Blade Width
The Blade Width is measured from the back of the blade to
the bottom of the gullet. This is different that the usual way
that blade width is defined by saw filers. Usually, the blade
width is measured from the tooth tip.
Discard Width
The Discard Width is measured from the back of the blade to
the bottom of the gullet. It is the width of the narrowest
blade run on the Bandmill and is used as the width of the
blade for the fatigue calculations.
Blade Length
The Blade Length is the distance around the blade from one
point back to itself. An indirect measurement of blade length
is to multiply the tooth pitch, in inches, by the number of
teeth on the blade. This number, divided by 12, gives the
blade length in feet.
Time Between Saw Changes
The Time Between Saw Changes is the number of hours
between regrinding of the gullet that the blade is running on
the wheels, including idling time. If, for example, the teeth
are sharpened at the end of every shift, but the gullets are
ground only after every second shift then the Time Between
Saw Changes is the running time for two shifts.
Thin Kerf Technologies Inc.
BandSel User’s Guide
Tensioning
35
Tensioning puts tensile stress on the back and front edges of
the blade. Increasing the stress on the gullet line increases
the stiffness of the blade, but also increases the likelihood of
gullet cracking. Assessing the level of Tensioning in a
bandsaw is not an exact science. Factors such as tire line
width, the amount of damage that occurs to the blades, etc.,
need to be considered. It is difficult to say exactly what the
stresses are in the blade so BandSel uses the terms, 'Low',
'Medium' and 'High' to describe the amount of tensioning.
Section 7 describes how to assess the level of tensioning. As
a quick guide for wide bandsaws, use the following:
Low
Medium
High
Tensioned to a 60 ft. or 80 ft. circle gauge
Tensioned to a 40 ft. circle gauge with no
light showing. The blade lies flat on the
levelling slab.
Tensioned to a 40 ft. circle gauge, with
light showing. The blade may have to be
held flat on the levelling slab.
To be on the safe side, it is advisable to see what the effect of
one higher level of tensioning is on the Fatigue Cracking
Index.
Thin Kerf Technologies Inc.
BandSel User’s Guide
36
User Entry: Bandmill Design Section
Figure 17 Bandmill Design screen
Wheel Diameter and
Wheel Speed
BandSel uses Wheel Diameter and Wheel Speed in the
calculation of blade speed, guide pressure, blade stiffness, and
the bending stresses in the blade that affect the Fatigue Cracking
Index.
Strain System Design
The Strain System Design has a slight effect on blade stiffness
as long as the top arbour is not 'dead'. When the top wheel does
not move, the actual strain in the blade decreases as the blade
comes up to speed. Dead-weight lever systems are usually
satisfactory, but may loose their freedom of movement as the
pivot edges wear.
Strain
In BandSel, strain is the force shown on the strain indicator.
The indicator could be an electric load cell, a modified pressure
gauge or the total weight on the end of a lever arm multiplied by
the leverage factor.
Weight of Top Wheel
Assembly
Depending on the construction of the bandmill, the Weight of
the Top Wheel Assembly may not be accounted for by the strain
Thin Kerf Technologies Inc.
BandSel User’s Guide
37
indicator. If this is the case then the actual strain on the blade is
less than what is shown on the indicator and the actual blade
stiffness will be less than what is calculated by BandSel. If the
strain is zero when the blade is loose, then the weight of the top
wheel is accounted for and zero should be entered. Dead-weight
lever arm systems do not account for the weight of the top wheel
unless separate counter-weights are used to balance the weight
of the top wheel.
Condition of the Wheels
The Condition of the Wheels affects the likelihood that gullet
cracking will occur. Wheels that have too much crown, are not
round, or are not concentric to the arbour put extra stress on the
blade. Assessing the wheel condition is not a precise science so
BandSel uses the simple terms, Excellent, Good, Fair and Poor
to describe the wheel condition. Depending on when the wheels
were last ground, use 'Fair' or 'Good' to rate the wheels. Section
7 describes how to assess the condition of the wheels in more
detail.
Tare Power
The Tare Power is the amount of power lost due to the friction
from the blade running over the guides, belt losses, windage,
etc. Tare power increases with the size of the bandmill. Typical
values are 10 to 15 hp for a 5 foot bandmill and 15 to 25 hp for
an 8 foot. The tare power for a bandmill can be measured with a
wattmeter when the bandmill is idling.
Saw Speed
Saw Speed (Blade speed) is the only calculated number in the
User Entry Area.
Thin Kerf Technologies Inc.
BandSel User’s Guide
38
User Entry: Tooth Design Section
The Tooth Design Screen asks for information on the tooth
dimensions and the gullet preparation. The tooth dimensions are
shown on the following page.
Figure 18 Tooth Design Screen
Tooth Pitch
Gullet Depth
Hook Angle and
Back Clearance Angle
Gullet Radius
The variables of the tooth geometry are shown in Figure 19. These
variables are the Tooth Pitch, Gullet Depth, Hook Angle, and the
Back Clearance Angle. For the Armstrong Formula 'D' tooth shapes,
the radius at the bottom of the gullet is equal to half the width of the
grinding wheel. Also shown in this diagram is the Hook Length.
Side Clearance
The Side Clearance is the distance that the tip of the tooth protrudes
from the one side of the saw plate. Kerf is the sum of the plate
thickness and twice the side clearance.
Thin Kerf Technologies Inc.
BandSel User’s Guide
39
Hook Angle
Pitch
Back Clearance Angle
Hook Length
Depth
Gullet Radius
Figure 19 Tooth Dimensions.
Actual Gullet Area
The gullet area generally determines the maximum feed speed. The
Actual Gullet Area can be found by tracing the tooth pattern onto grid
paper and then counting the number of squares. BandSel calculates
an area based on the Armstrong Formula 'D' tooth shape and displays
it in this section. You may choose between either values to be used in
the calculations.
If you would like to use your own area in the calculations click the
option button labelled - ‘Enter Own Area’. Then, enter the gullet area
in the field provided.
To use the Armstrong Formula ‘D’, click the option button labelled ‘Use Armstrong D Formula’.
Grinding Factor
Thin Kerf Technologies Inc.
Gullet cracks start from the scratches and burrs produced by the grinding
wheel. The effects of these stress raisers are difficult to quantify. BandSel
uses a Gullet Condition Factor that rates how the condition of the gullet
affects the stress at the bottom of the gullet. Section 7 describes in more
detail the factors that affect the Gullet Condition Factor, but as a quick
guide, use the coarseness of the grinding wheel (Fine, Medium and
Coarse) for setting the Gullet Condition Factor.
BandSel User’s Guide
40
User Entry: Guide Location Section
The Guide Location Screen asks for information on the location
and possible range of motion of the guides. The locations of the
guides are defined in Figure 21.
Figure 20 Guide Location Screen
Top Span
Bottom Span
The Top Span is the distance from center of the top wheel to the top
guide when the guide is in the 'Up' position. The Bottom Span is the
distance from center of the bottom wheel to the bottom guide. This
information is needed to calculate the guide offset.
Maximum Span
Minimum Span
The Maximum Span is the distance between the guides when the top
guide is in the 'Up' position. The Minimum Span is measured when
the top guide is in the 'Down' position. If the top guide can not move,
then the maximum and minimum spans are equal. The program uses
these values to ensure that the cutting span entered into BandSel is
within these limits.
Current Guide Offset
The Current Guide Offset is the guide offset on the bandmill as it is
now. BandSel will calculate the actual guide pressure and recommend
a guide offset in the Guide Pressure Section of the Calculations Area.
Thin Kerf Technologies Inc.
BandSel User’s Guide
41
Top Span
Top Guide in Up Position
Maximum Span
Top Guide in Down Position
Guide Offset
Minimum Span
Minimum Span
Figure 21 Guide Spans
Thin Kerf Technologies Inc.
BandSel User’s Guide
42
User Entry: Wood Properties Section
BandSel provides a list of commercial hardwoods and softwoods,
including tropical woods, along with their specific gravities.
Specific gravity is used to calculate horsepower for your entered feed
speeds. It is a measurement of the density of the wood. Density can
be given as so many pounds per cubic foot or kilograms per cubic
meter. Specific gravity is just the density of wood divided by the
density of water. If the wood’s specific gravity is less than 1.00, it will
float.
In this tabbed section, the first list provides the names of the
generic species. Selecting one will provide in the second list, the
wood species name. If you select a species name, the bottom of
this tab will display what you have chosen and its specific gravity.
BandSel provides an average for the specific gravity. The actual
number can differ by at least10%. This program allows you to use
your own wood species name and specific gravity. Just make the
changes to the Wood Species field and the Specific Gravity field.
Frozen and very
dry wood
Cutting frozen wood or very dry wood is more difficult than
cutting green wood. Checking this box has the same effect as
adding 10% to the specific gravity.
Figure 22 Wood Properties Screen.
You can either use the values from
the list or enter in you own wood
species and specific gravity.
Thin Kerf Technologies Inc.
BandSel User’s Guide
43
User Entry: Description Section
You can make changes to the Variation’s description in this
section.
Registration information is also provided.
Figure 23 The Description Section.
Thin Kerf Technologies Inc.
BandSel User’s Guide
44
Calculations Area: Gullet Cracking Section
Bandsaw Fatigue
Index
The Bandsaw Fatigue Index (BFI) shows when the stresses in
the blade are too large or the time between saw changes is too
long. Larger stresses and longer run times result in a smaller BFI
and an increased likelihood of gullet cracking.
Expect cracking problems if the BFI is less than 1.5. On the
other hand, a BFI of 3 or 4 indicates conservative stresses on the
blade.
Figure 24 Gullet Cracking Section.
Thin Kerf Technologies Inc.
BandSel User’s Guide
45
Calculations Area: Guide Pressure Section
The Guide Pressure Worksheet calculates the proper offset for
the guides.
Ideal Guide Pressure
and Guide Offset
The Guide Pressure is the force that the blade puts on the
guides. This force is a result of adjusting the guides to be
proud of the front surface of the wheels by a distance called the
Guide Offset. It is important to have the correct guide pressure.
If the pressure is too low the cutting forces can pull the blade
away from the guides. Without the support of the guides the
blade stiffness is reduced, resulting in increased sawing
deviation. If the pressure is too high then the guides will wear
quickly, especially the front corner of the guide (and the back
for a double-cut saw). The wear on the front corner of the
guides allows the front edge of the blade to bend over slightly
which has the same effect as a guide lead that changes through
the shift. The overall wear of the guide causes the target size to
change over time. This contributes directly to the BetweenBoard sawing deviation and indirectly to the Within-Board
deviation.
BandSel calculates the Ideal or Recommended Guide Pressure
and Offset as well as the Current Guide Pressure given the
Current Guide Offset.
Sine Bar Settings
For users that have a Sine Bar similar to the one shown in
Figure 26, BandSel calculates the micrometer settings of a 5
inch Sine Bar for both the bottom and top spans.
Figure 25 Guide Pressure Screen
Thin Kerf Technologies Inc.
BandSel User’s Guide
Figure 26 Sine Bar for setting Guide Pressure.
Thin Kerf Technologies Inc.
46
BandSel User’s Guide
47
Calculations Area: Tooth Design Section
The Tooth Design Worksheet looks at three factors of tooth design,
the most important of which is the gullet area.
Kerf
The Kerf is the width of the tooth tip.
Hook Length
The Hook Length is the length of the straight section of the tooth
profile just below the tooth tip. See Diagram 28. If this length is too
short then there will be problems swaging or tipping the teeth. The
calculation of the Hook Length is based on the Armstrong Formula 'D'
tooth profile. Hook Length is affected by the hook angle, gullet depth
and the width of the grinding wheel.
Gullet Area
This value is the number used in the calculations and is either what
you’ve entered in the Tooth Design Screen or is calculated from the
Armstrong Formula ‘D’. We recommend that you use the Armstrong
Formula ‘D’ as you can see the impact of changing the tooth pitch or
depth on gullet area without having to sketch a tooth on grid paper
and count squares.
Figure 27 Tooth Design Screen
Thin Kerf Technologies Inc.
BandSel User’s Guide
48
Calculations Area: Feeds and Speeds Section
The Feeds and Speeds Screen is used to establish if the tooth
design is suitable for the range of cuts being used. For each depth
of cut you enter for analysis, BandSel will determine important
values such as the recommended maximum feed speed according
to a maximum GFI or maximum sawing deviation that you set.
Below is an example of the Feed Speed screen.
Figure 28 Feeds and Speeds Section
Thin Kerf Technologies Inc.
BandSel User’s Guide
49
User Entries
Depth of Cut
Feed Speed
Guide Span
Because the Feed Speed and Guide Span may change with the
depth of cut, this information is required. The program will not
accept a Guide Span outside of the maximum or minimum guide
span entered in the Guide Location Screen.
Cut Elevation
The Cut Elevation is the distance from the bottom guide to the
bottom of the log or cant. This locates the cutting zone, i.e.,
whether the cutting is taking place close to the bottom guide or
near the middle of the span.
Minimum Bite Per
Tooth
The smallest bite you want to use to avoid making fine sawdust.
GFI and Standard
Deviation
BandSel recommends three maximum feed speeds. Two of them
are dependent on what you enter as a maximum GFI and standard
deviation. We recommend that you first start out with a GFI of
0.6 to a maximum of 0.7. For larger depth of cuts, you can go as
high as 0.8.
The maximum standard deviation will depend on the maximum
allowable for your sawmill.
Calculated Values
Bite Per Tooth
The bite per tooth influences the quality of the surface finish. The
wood is considered to be rough when the bite per tooth is greater
than 0.050 inches.
Gullet Feed Index
The Gullet Feed Index (GFI) is the volume of solid wood removed
and stored in the gullet, divided by the volume of the gullet. From the
graph on the following page you can see that GFI has a significant
affect on sawing deviation. If the GFI is larger than 0.7, the sawing
deviation will be large due to the problems caused by sawdust
spillage. As stated before, the GFI should be less than 0.7, and
preferably below 0.6.
Power
Power requirements are calculated for each feed speed.
Estimated Sawing
Deviation
The within-board sawing deviation is calculated for each feed speed
and current cutting conditions. Note that this is not the total sawing
deviation, which includes the between-board deviation, and calculated
as:
ST =
Thin Kerf Technologies Inc.
2
SW
+ S B2
50
Sawing Deviation
BandSel User’s Guide
0 .3
0 .4
0 .5
0 .6
0 .7
0 .8
G u lle t F e e d I n d e x
Figure 29 As you increase your Gullet Feed Index (GFI), you sawing deviation also
increases.
Recommended
Maximum Feed
Speeds
BandSel recommends 3 Maximum Feed Speeds limited by either
tooth bending, gullet overloading, or sawing deviation.
To prevent tooth bending, the bite per tooth should be less than
the blade thickness. The number BandSel provides is the
maximum feed speed before the bite per tooth exceeds the blade
thickness.
BandSel uses the entered ‘Maximum GFI’ and ‘Maximum Sawing
Deviation’ value to determine the other two maximum feed
speeds.
If the feed speed you entered is greater than any of the
recommended feed speeds, that feed speed would be shown in red.
Recommended
Minimum Feed Speed
Thin Kerf Technologies Inc.
Recommended Minimum Feed Speed is selected so that the bite
per tooth is larger than the side clearance. This ensures that the
amount of sawdust spillage is limited, which avoids the problem
of snaking due to sawdust packing between the blade and the
wood.
BandSel User’s Guide
51
The second feed speed is calculated using the ‘Minimum Bite Per
Tooth’ entered by the user.
Navigating Around the Feed Speed Screen
Adding a depth of
cut
To add a depth of cut use the ‘Add’ button on the Feed Speed
Screen. The window that opens (see Figure 30) requires you to
enter the new depth of cut, cut elevation, feed speed, and guide
span. The Guide Span is initially set to the Maximum Span.
BandSel inserts values for the maximum GFI and standard
deviation and the bite per tooth.
Figure 30 Adding a new depth of cut.
The number of depth of cuts for each Variation is limited to 20.
Sorting your depth
of cuts
Use the ‘Rearrange’ button to sort your depth of cuts in ascending
order. This is useful when you add or change a depth of cut.
Removing a Depth
Of Cut
Use the ‘Remove’ button to delete the current depth of cut. You
will not be able to all depths of cut as BandSel requires that there
will be at least one per Variation.
Saving Your
Changes
With the ‘Save/Copy’ button, you would be able to choose your
depth of cuts in three different ways:
1. Update only the current Variation. Will only save these
depth of cuts in the current variation.
2. Update all opened Variations. Saves all opened Variations
using the feed speed calculations from the current Variation.
3. Update all Variations. Will save all variations in the opened
Machine File using the values from the current Variation’s
feed speed calculations.
Thin Kerf Technologies Inc.
BandSel User’s Guide
52
Calculations Area: Cutting Time
The information from this screen is used to optimize production
by minimizing the time to cut 10,000 lineal feet of material of the
different depths listed in the Feed Speed tab. You enter the
percentage of pieces of each depth of cut and BandSel uses the
feed speeds to calculate the time needed to cut these pieces.
This information is used for several situations:
• the log or piece size distribution has changed
• you want to select the tooth pitch that will result in the best
overall production
No one blade design is optimal for all cutting conditions. For
example, if the depths of cut are small then a small pitch works
well. However, if the percentage of deep cuts increases then it
may be better to increase the pitch. Otherwise, the deep cuts will
take too long to cut. However, the decision is based on how much
of each depth is to be cut. To make these comparisons, you need
to know the time needed to cut all the pieces.
Note: The total cutting time assumes there are no gaps between
pieces as they are fed into the bandsaw. However, if you assume
that the time between pieces is constant, then the results are still
useful.
When you add a depth of cut, its initial cutting percentage is set to
zero. Once you are in this screen, you won’t be able to leave it if
the total cutting percentage does not equal to 100. BandSel will
alert you if the percentage is not 100.
Figure 31 Cutting Time Screen
Thin Kerf Technologies Inc.
BandSel User’s Guide
53
Calculations Area: Power
The power value in this section is the largest calculated power
for all the depth of cuts.
Figure 32 Power Screen.
Thin Kerf Technologies Inc.
BandSel User’s Guide
54
SECTION 6
THE BASICS OF BANDSAW OPERATION AND DESIGN
This section provides:
1. Information on bandsaws that will help the user to
understand the inner workings of BandSel
2. guidance on selecting and making successful
improvements to Bandmill.
Trade-offs
Bandsaw design involves trade-offs. The ultimate thin kerf
bandsaw will not have the lowest maintenance costs while a high
production mill will require a thicker blade that can withstand the
abuse. The operating factors are:
production,
recovery (sawing accuracy),
maintenance costs, and
surface finish.
To obtain the best balance of these factors involves trade-offs
about saw design and maintenance. The decisions are related to:
tooth design and sharpness (cutting forces)
blade stiffness
blade stresses and gullet cracking
Factors that affect Sawing Accuracy
Sawing accuracy is determined, in order of importance, by:
1. how well the wood is fed and controlled during the cut.
2. the size of the cutting forces that cause the blade to bend
3. the ability of the blade to resist bending.
If the condition and alignment of the feed system is poor it is a
waste of time and resources trying to make a thin kerf bandsaw
run. Also, as the blade becomes thinner and more fragile it can
Thin Kerf Technologies Inc.
BandSel User’s Guide
55
not withstand imbalanced or the occasional large cutting force due
to inconsistent tooth preparation. Having a thicker blade is the
common method for compensating for (but not fixing) these two
problems.
The amount of sawdust spillage affects sawing accuracy. This is
generally quantified with the Gullet Feed Index (GFI) which is the
defined as:
GFI '
Bite x Depth of Cut
Gullet Area
If the GFI is greater than 0.6 then sawdust spillage begins to have
an effect on sawing deviation. See Diagram 6. If the GFI gets to
be 0.7 then the sawing accuracy is becoming unacceptable.
In general the side clearance should be smaller than the bite per
tooth to avoid sawdust spillage. However, it is also important not
to have too small a side clearance. The Minimum Critical Side
Clearance is different for each Bandmill, but is generally between
0.020 and 0.025 inches. If the side clearance is smaller then the
sawing deviation will increase.
Deep cuts
For deep depths of cut it may not be practical to avoid overloading
the gullet with sawdust. In this case a different set of conditions
must be satisfied to obtain acceptable sawing accuracy. Since the
gullet is overloaded, the side clearance needs to be larger than the
bite to allow the sawdust to spill easily. The larger the Gullet
Feed Index, the more clearance is needed.
Factors that affect Production
Production volume is controlled by:
1) Blade robustness. The robustness of the blade is important
since more can go wrong at higher feed speeds.
2) Gullet capacity. The gullet must have the capacity to carry all
the sawdust that is produced.
3) Feed speeds. Proper selection of feed speeds is important,
especially for feed systems that automatically set the speed
based on log diameter.
4) Stoppages. It may be better to slow down the feed speed of the
Bandmill to obtain a smoother mill flow, thus avoiding pile-
Thin Kerf Technologies Inc.
BandSel User’s Guide
56
ups on the conveyors. The net result is an increase in
production for the whole mill.
5) Loading and scanning time. The time required for loading and
scanning logs is generally more than half of the cycle time for
the log. Headrigs and scanning twins/quads cut for only a
third of time.
6) Wood properties. Cutting dense wood requires more power
and produces larger cutting forces. Expect the cutting
deviation to increase as the specific gravity (density) increases.
7) Tooth sharpness. Sharp teeth and fewer grinding errors reduce
the adverse effects of other factors that increase the cutting
forces. This also results in less benchwork.
Factors that affect Surface Roughness
Surface roughness is determined by the bite per tooth and tooth
sharpness. The larger the bite the worse the surface finish. Side
ground teeth also produce smoother lumber. The wood species
also has an effect. Note that if the surface becomes too rough then
the side clearance is being reduced.
Factors that affect Blade Stiffness
The factors that affect blade stiffness are, in order of importance:
1)
2)
3)
4)
5)
6)
7)
Plate thickness
Guide span
Strain
Tensioning
Blade width
Gullet depth
Wheel speed and Strain system design
Use BandSel to change these factors and see what happens to the
BandSaw Load Index (BLI). A smaller BLI results from a stiffer
blade.
Factors that affect the Cutting Force and Power
Thin Kerf Technologies Inc.
BandSel User’s Guide
57
In BandSel the variable that accounts for the cutting force and the
power requirements is the specific gravity of the wood. The
higher the density the more resistance the wood will provide to the
teeth.
In general, the power consumption rises if the bite per tooth is
smaller than 0.020 inches because the teeth are rubbing more than
cutting a clean chip.
NOTE
The power calculation in BandSel is for sharp teeth. The cutting
forces and power will increase towards the end of a shift. This is
one reason why the motor size should be about 20-30% larger
than the calculations indicate.
Factors that affect Gullet Cracking
Basic rule
Any change that
increases blade
stiffness will increase
the likelihood of
cracking.
Thin Kerf Technologies Inc.
The largest stress in a blade results from the blade bending over
the wheels. Larger wheels reduce this stress, but the blade
thickness has a greater effect. For example, reducing the blade
thickness by 10% reduces the bending stress by 33%. The stress
from Bandmill strain is reduced by 10% but the net result is a
23% reduction in the sum of these two stresses.
The Bandsaw Fatigue Index provides an indication of how
changes in blade dimensions, strain, strain system, wheel speed,
grinding finish, and wheel condition affect the fatigue life of the
blade. BandSel uses the discard width of the blade for the fatigue
calculations because the narrower blade has greater stresses.
BandSel User’s Guide
58
SECTION 7
ASSESSING BLADE AND BANDMILL
MAINTENANCE
There is very little information or formulas available for assessing
the condition of the bandmill and blades. This section provides
some guidelines and a checklist for such assessments.
Guidelines for Assessing the Condition of the Wheels
The factors involved are:
Crown
Concentricity
Balancing
The condition of the wheels affects the stresses in the blade,
which in turn, affects the stiffness and fatigue life of the blade.
The wheel crown should not be greater than 0.010 inches for a 10
or 12 inch wide wheel at 12,000 -15,000 lb strain. Bandmill with
lower strain will require more crown to ensure the tracking
stability of the band on the wheels and high-strain mills will have
a crown of only a few thousandths of an inch. If the crown is
larger then the tension in the blade will have to be increased to
avoid tight-centered saws. If the crown is not checked and
corrected, the tensioning will have to become so great that the
front edge of the blade forms a ripple.
Wheel balancing has some effect on blade life, but the effect will
be less than the effect on bearing life..
If the wheel rim is not concentric then stress on the blade will
increase, resulting in increased likelihood of cracking. Even
Thin Kerf Technologies Inc.
BandSel User’s Guide
59
though the wheel may be balanced it may not be round. This outof-roundness will stretch the blade once every wheel revolution
and can have a significant effect on fatigue life of the blade. The
most likely cause of out-of-round wheels is aggressive grinding of
the wheels. If the wheel has a hard spot or the grinder is flexible
then the grinding wheel will bounce. Slow grinding with a
motorized grinding wheel is recommended. There are two checks
for out-of-roundness:
1) large counter balance masses have to attached to the wheel
to obtain balance.
2) the total indicator reading (TIR) around the wheel rim is
more than 0.005 inches.
A good wheel should only be 0.002 inches TIR.
Rating the Level of Tensioning
The level of tensioning affects the stress is on the gullet. As this
stress increases so does the blade stiffness. However, the
likelihood of gullet cracks also increases.
A rule-of-thumb for assessing the tensioning is to measure the
light-gap with a circle gauge.
Low
Medium
High
Tensioned to a 60 ft. or 80 ft. circle gauge
Tensioned to a 40 ft. circle gauge with no
light showing. The blade lies flat on the
levelling slab.
Tensioned to a 40 ft. circle gauge, with
light showing. The blade may have to be
held flat on the levelling slab.
Other factors that affect the assessment of tensioning are:
1) Tire line width. The further the rolling is carried out to the
edges of the saw the higher the stress on the gullet.
2) Gullet peening and Proctor rolling reduce or eliminate the
stresses at the gullet bottom and greatly reduces the
likelihood of gullet cracking. These procedures do not
significantly affect blade stiffness.
3) If the blades require much re-levelling or re-tensioning
then more stresses are put on the gullet each time the saw
is benched.
Thin Kerf Technologies Inc.
BandSel User’s Guide
60
Rating the Condition of the Gullet
The condition of the gullet reflects the smoothness of the grinding
and the changes in the metal that occur as a result of the grinding.
Gullet cracks start from tiny scratches in the surface of the gullet.
The smaller these scratches are, the less likelihood there is of a
crack starting at all; or the initial growth of the crack will be so
slow that the crack will be ground out during the next sharpening.
The most important factor affecting gullet condition is wheel grit.
BandSel classifies the gullet condition as fine, medium or coarse.
A flood lubricated borazon wheel will produce a fine surface,
almost polished. A medium surface is like a metal nail file. A
coarse surface is like a file for metal.
Cracks may also start in the burrs along the edge of the gullet.
Burrs are highly deformed metal with very rough surfaces that act
as ideal places for cracks to start. If burrs are present, consider
down-grading the grinding factor used in BandSel.
Changes in the metal result from the heat generated during
grinding. If steel is heated to a high temperature then cooled
quickly it can become very brittle. A brittle skin on the gullet
bottom, especially at the edges, will crack very easily. This
burning of the gullet results from:
1) heavy grinding
2) grinding with a dull or plugged wheel
3) high wheel speed
Peening or Proctor rolling crushes the corners of the gullet
bottom. This results in a smooth surface and creates stresses that
hinder cracking. If the gullets are peened then the grinding factor
in BandSel can be up graded.
Thin Kerf Technologies Inc.
BandSel User’s Guide
61
SECTION 8
HOW TO USE BANDSEL FOR TROUBLESHOOTING SAWING PROBLEMS
BandSel is designed to investigate whether a change in the saw or feed
speed will help production or improve quality. BandSel can also be used
to solve problems with existing bandmill.
The problems that BandSel can help solve are:
High sawing deviation
Gullet cracking
Saw stalling
Rough surface
Excessive guide wear
A Problem and Solution Grid is provided at the end of this section that
lists the problem, the indicator and source of the problem, and some
possible solutions.
Indicators from
BandSel
The first step is to enter the data for the bandsaw as it is now. BandSel
has six indicators of where problems may be occurring.
Sawing deviation
Power requirements
Gullet Feed Index (GFI)
Bite per tooth
Guide offset and pressure
Bandsaw Fatigue Index (BFI)
Side clearance
Thin Kerf Technologies Inc.
BandSel User’s Guide
Subjective Factors
62
If these indicators are within the ranges recommended in BandSel and
this manual then re-evaluate the subjective variables, which include:
The level of tensioning, and the consistency of blade tensioning and
maintenance.
Gullet condition and grinding smoothness
Wheel condition
Specific gravity (density) of the wood
When using BandSel to track down a sawing problem, experiment by
making one or more of these factors worse than you think they are or
you would like to think they are. This comment applies especially to
tensioning and wheel condition.
If BandSel still indicates that your design should not have problems
then check some basic factors of sawing.
Bite per Tooth
Measure the bite per tooth. If the measured bite
is different than the bite calculated by BandSel
then the input value for feed speed or blade
speed is incorrect. The most accurate method is
to mark the distance of 10 bites and measure
this distance with calipers. The bite is quickly
calculated as one tenth the caliper reading.
Motor power
Measure the power with a recording wattmeter.
This would give some indication of the cutting
forces and the specific gravity. This can be
important if the wood supply changes.
Strain
Measure the strain with a load gauge. Also
ensure that the top wheel moves upward as the
wheels come up to speed. This gives some
indication that the strain system is working. As
a quick check of the strain, pull on the blade to
get a feel for the blade stiffness. Compare the
stiffness to that of another Bandmill that is
cutting well.
If the problem is still not solved then it is probably something that
BandSel was not designed to handle, such as:
Alignment
Feed system problems
Worn or inadequate wheel scrapers
Dead or sticking strain system
Washboarding
Thin Kerf Technologies Inc.
Thin Kerf Technologies Inc.
Power required
Guide pressure
Bite per tooth
Excessive guide wear
Rough surface
Large bite per tooth or
uneven tooth
preparation and
grinding.
Blade has too much
pressure on guide
Motor power or torque
is too low
Stress from bending
saw over guides
Guide pressure
Below Minimum
Critical side clearance
Side Clearance
Stresses in saw
Chip less than side
clearance
Bite per tooth
Bandsaw Fatigue Index
Saw pulled away from
guides
Guide pressure
Reduce feed speed or reduce the tooth pitch.
Side grind the teeth.
Reduce guide offset
Reduce feed speed or kerf; increase motor
size
Reduce guide offset
Reduce strain, tensioning. Check condition of
gullets and wheels
Increase the side clearance or reduce surface
roughness
Increase feed speed or tooth pitch.
Reduce the side clearance.
Increase guide offset or
increase the strain
Reduce feed speed, or increase gullet area
Reduce kerf, or feed speed
Cutting forces
Sawdust spillage
Increase strain, tensioning, or blade thickness.
Reduce the guide span
Solution
Saw stiffness
Source
Gullet Feed Index
Sawing Deviation
Indicator
Saw stalling
Gullet Cracking
High sawing deviation
Problem
Table 3. BandSaw Problem and Solution Grid
BandSel User’s Guide
63
BandSel User’s Guide
64
APPENDIX A: TEMPLATE FILES
Thin Kerf Technologies Inc.
BandSel User’s Guide
65
TEMPLATE NAME: 3foot.smp
DESCRIPTION: 3 Foot Bandmill
BANDMILL
Wheel diameter
Strain system
Indicated strain
Top wheel weight
Wheel speed
Maximum span
Minimum span
Wheel condition
Top span
Bottom span
Tare power
Ideal guide offset
36 in
Rubber
15000 lb
0 lb
600 rpm
19 in
18 in
Good
20.0 in
20.0 in
10 Hp
0.160 in
BLADE
Thickness
Width
Discard width
Blade speed
Tensioning
Blade length
Shift time
0.042 in
6 in
5 in
5655 sfpm
Medium
18.5 ft
4 hrs
Depth of Cut (in)
4
6
8
10
12
Feed Speed (fpm)
150
150
115
90
75
Cut Elevation (in)
2
2
2
2
2
Guide Span (in)
8
10
16
14
16
Minimum Bite Per Tooth (in)
0
0
0
0
0.005
Limitations: GFI
0.65
0.65
0.65
0.65
0.65
Limitations: Standard Deviation
(in)
0.01
0.01
0.01
0.01
0.01
Percentage Of Cut Length
35
35
15
10
5
Cut Time (min)
23.33
23.33
13.04
11.11
6.67
Thin Kerf Technologies Inc.
TOOTH
Side clearance
0.025 in
Pitch
1.5 in
Gullet depth
0.5 in
Hook angle
30 deg
Back clearance angle 12 deg
Gullet bottom radius 0.25 in
Grinding
Medium
WOOD PROPERTIES
Wood Species
Western Red Cedar
Specific Gravity
0.330
BandSel User’s Guide
66
TEMPLATE NAME: 4foot.smp
DESCRIPTION: 4 Foot Bandmill
BANDMILL
Wheel diameter
Strain system
Indicated strain
Top wheel weight
Wheel speed
Maximum span
Minimum span
Wheel condition
Top span
Bottom span
Tare power
Ideal guide offset
BLADE
Thickness
Width
Discard width
Blade speed
Tensioning
Blade length
Shift time
TOOTH
Side clearance
Pitch
Gullet depth
Hook angle
Back clearance angle
Gullet bottom radius
Grinding
48.0in
Air
8000 lb
0 lb
600 rpm
10.0 in
18.0 in
Good
25.0 in
24.0 in
15 Hp
0.480 in
WOOD PROPERTIES
Wood Species
Western Red Cedar
Specific Gravity
0.590
0.058 in
6.0 in
5.0 in
7540 sfpm
Medium
25.0 ft
8.0 hrs
Depth of Cut (in)
4
6
10
Feed Speed (fpm)
250
200
105
Cut Elevation (in)
2
2
2
Guide Span (in)
10
10
14
Minimum Bite Per Tooth (in)
0
0
0
Limitations: GFI
0.65
0.65
0.65
Limitations: Standard Deviation
(in)
0.01
0.01
0.01
Percentage Of Cut Length
40
35
25
Cut Time (min)
16
17.5
23.81
Thin Kerf Technologies Inc.
0.020 in
1.5 in
0.5 in
30 deg
12 deg
0.250 in
Medium
BandSel User’s Guide
67
TEMPLATE NAME: 5foot.smp
DESCRIPTION: 5 Foot Bandmill
BANDMILL
Wheel diameter
Strain system
Indicated strain
Top wheel weight
Wheel speed
Maximum span
Minimum span
Wheel condition
Top span
Bottom span
Tare power
Ideal guide offset
BLADE
Thickness
Width
Discard width
Blade speed
Tensioning
Blade length
Shift time
TOOTH
Side clearance
Pitch
Gullet depth
Hook angle
Back clearance angle
Gullet bottom radius
Grinding
60.0in
Air
15000 lb
0 lb
600 rpm
30.0 in
18.0 in
Good
32.0 in
38.0 in
15 Hp
0.427 in
0.025 in
1.75 in
0.625 in
30 deg
12 deg
0.375 in
Medium
WOOD PROPERTIES
Wood Species
Western Red Cedar
Specific Gravity
0.40
0.0625 in
9.0 in
7.0 in
9425 sfpm
Medium
31.33 ft
8.0 hrs
Depth of Cut (in)
6
10
12
14
16
Feed Speed (fpm)
337
225
190
140
125
Cut Elevation (in)
3
3
3
4
4
Guide Span (in)
30
20
20
25
25
Minimum Bite Per Tooth (in)
0
0
0
0
0.005
Limitations: GFI
0.65
0.65
0.65
0.65
0.65
Limitations: Standard Deviation
(in)
0.02
0.02
0.02
0.02
0.015
Percentage Of Cut Length
20
30
25
20
5
Cut Time (min)
5.93
13.33
13.16
14.29
4
Thin Kerf Technologies Inc.
BandSel User’s Guide
68
TEMPLATE NAME: 6foot.smp
DESCRIPTION: 6 Foot Bandmill
BANDMILL
Wheel diameter
Strain system
Indicated strain
Top wheel weight
Wheel speed
Maximum span
Minimum span
Wheel condition
Top span
Bottom span
Tare power
Ideal guide offset
BLADE
Thickness
Width
Discard width
Blade speed
Tensioning
Blade length
Shift time
72.0in
Air
15000 lb
0 lb
530 rpm
30.0 in
18.0 in
Good
32.0 in
38.0 in
15 Hp
0.512 in
TOOTH
Side clearance
Pitch
Gullet depth
Hook angle
Back clearance angle
Gullet bottom radius
Grinding
0.035 in
1.75 in
0.625 in
30 deg
12 deg
0.375 in
Medium
WOOD PROPERTIES
Wood Species
Western Red Cedar
Specific Gravity
0.40
0.0625 in
9.0 in
7.0 in
9990 sfpm
Medium
31.00 ft
8.0 hrs
Depth of Cut (in)
6
8
10
12
Feed Speed (fpm)
350
325
260
216
Cut Elevation (in)
4
4
3
3
Guide Span (in)
18
18
20
20
Minimum Bite Per Tooth (in)
0.005
0.005
0.005
0.005
Limitations: GFI
0.7
0.7
0.7
0.7
Limitations: Standard Deviation (in)
0.02
0.02
0.02
0.02
Percentage Of Cut Length
35
25
25
15
Cut Time (min)
10
7.69
9.62
6.94
Thin Kerf Technologies Inc.
BandSel User’s Guide
69
TEMPLATE NAME: 8foot.smp
DESCRIPTION: 8 Foot Bandmill
BANDMILL
Wheel diameter
Strain system
Indicated strain
Top wheel weight
Wheel speed
Maximum span
Minimum span
Wheel condition
Top span
Bottom span
Tare power
Ideal guide offset
BLADE
Thickness
Width
Discard width
Blade speed
Tensioning
Blade length
Shift time
36.0 in
Rubber
15000 lb
0 lb
600 rpm
19.0 in
18.0 in
Good
20.0 in
20.0 in
10 Hp
0.160 in
TOOTH
Side clearance
Pitch
Gullet depth
Hook angle
Back clearance angle
Gullet bottom radius
Grinding
0.025 in
1.50 in
0.500 in
30 deg
12 deg
0.250 in
Medium
WOOD PROPERTIES
Wood Species
Western Red Cedar
Specific Gravity
0.330
0.042 in
6.0 in
5.0 in
5655 sfpm
Medium
18.50 ft
4.0 hrs
Depth of Cut (in)
4
6
8
10
12
Feed Speed (fpm)
150
150
115
90
75
Cut Elevation (in)
2
2
2
2
2
Guide Span (in)
8
10
16
14
16
Minimum Bite Per Tooth (in)
0
0
0.01
0.01
0.01
Limitations: GFI
0.65
0.65
0.65
0.65
0.65
Limitations: Standard Deviation (in)
0.01
0.01
0.01
0.01
0.01
Percentage Of Cut Length
35
35
15
10
5
Cut Time (min)
23.33
23.33
13.04
11.11
6.67
Thin Kerf Technologies Inc.
BandSel User’s Guide
70
TEMPLATE NAME: Portable.smp
DESCRIPTION: Portable Bandmill
BANDMILL
Wheel diameter
Strain system
Indicated strain
Top wheel weight
Wheel speed
Maximum span
Minimum span
Wheel condition
Top span
Bottom span
Tare power
Ideal guide offset
BLADE
Thickness
Width
Discard width
Blade speed
Tensioning
Blade length
Shift time
TOOTH
Side clearance
Pitch
Gullet depth
Hook angle
Back clearance angle
Gullet bottom radius
Grinding
18.0 in
Rubber
4000 lb
0 lb
800 rpm
6.0 in
18.0 in
Good
20.0 in
20.0 in
10 Hp
0.300 in
0.020 in
1.25 in
0.250 in
20 deg
18 deg
0.050 in
Medium
WOOD PROPERTIES
Wood Species
Western Red Cedar
Specific Gravity
0.480
0.042 in
6.0 in
5.0 in
3770 sfpm
Medium
18.50 ft
4.0 hrs
Depth of Cut (in)
4
6
8
10
Feed Speed (fpm)
120
80
45
45
Cut Elevation (in)
2
2
2
2
Guide Span (in)
8
10
16
14
Minimum Bite Per Tooth (in)
0.01
0.01
0.01
0.01
Limitations: GFI
0.65
0.65
0.65
0.65
Limitations: Standard Deviation (in)
0.015
0.015
0.015
0.015
Percentage Of Cut Length
35
35
15
10
Cut Time (min)
29.17
43.75
33.38
22.22
Table
Continues...
Thin Kerf Technologies Inc.
BandSel User’s Guide
71
Depth of Cut (in)
12
20
24
Feed Speed (fpm)
35
19
18
Cut Elevation (in)
2
2
3
Guide Span (in)
16
30
30
Minimum Bite Per Tooth (in)
0.005
0.01
0.01
Limitations: GFI
0.65
0.7
0.7
Limitations: Standard Deviation
(in)
0.015
0.03
0.03
Percentage Of Cut Length
5
0
0
Cut Time (min)
14.29
0
0
Thin Kerf Technologies Inc.
BandSel User’s Guide
72
INDEX
Alignment . . . . . . . . . . . . . . . . . . . . 53
Bandmill . . . . . . . . . . . . . . . . . . . . . . 27
Strain system . . . . . . . . . . . . . . . 35
Tare power . . . . . . . . . . . . . . . . . 36
Top wheel weight . . . . . . . . . . . . 35
Wheel condition . . . . . . . . . . . . . 36
Wheel diameter . . . . . . . . . . . . . 35
Wheel speed . . . . . . . . . . . . . . . . 35
Bandmill Design Section . . . . . . . . . 35
Condition of the Wheels . . . . . . 36
Saw Speed . . . . . . . . . . . . . . . . . 36
Strain . . . . . . . . . . . . . . . . . . . . . 35
Strain System Design . . . . . . . . . 35
Tare Power . . . . . . . . . . . . . . . . . 36
Weight of Top Wheel . . . . . . . . 35
Wheel Diameter and Wheel Speed35
Bandsaw Fatigue Index . . . . 43, 56, 60
Warnings . . . . . . . . . . . . . . . . . . 43
Bandsaw Load Index . . . . . . . . . . . . 55
BFI
See Bandsaw Fatigue Index
Bite per tooth . . . . . . . . . . . . . . . . . . 60
Blade . . . . . . . . . . . . . . . . . . . . . . . . 27
Discard width . . . . . . . . . . . . . . . 33
Stiffness . . . . . . . . . . . . . . . . . . . 55
Tensioning . . . . . . . . . . . . . . . . . 33
Thickness . . . . . . . . . . . . . . . . . . 33
Width . . . . . . . . . . . . . . . . . . . . . 33
Blade
Length . . . . . . . . . . . . . . . . . . . . 33
Blade Design Section . . . . . . . . . . . . 32
Blade Length . . . . . . . . . . . . . . . 33
Blade Thickness
. . . . . . . . 33
Blade Width
. . . . . . . . . 33
Discard Width
. . . . . . . . . 33
Tensioning . . . . . . . . . . . . . . . . . 34
Time Between Saw Changes . . . 33
Blade stiffness . . . . . . . . . . . . . . . . . 53
Bottom span . . . . . . . . . . . . . . . . . . . 39
Creating A New Machine File . . . . . 18
Entering a Creator’s Name . . . . . 19
Entering a Machine Filename . . 19
Entering A Variation Description 18
Saving Your Machine File . . . . . 19
Selecting a Template . . . . . . . . . 18
Thin Kerf Technologies Inc.
Selecting the Machine File Location 19
The Master Variation . . . . . . . . . . . . 19
Cutting forces . . . . . . . . . . . . . . . . . . 53, 56
Cutting Time . . . . . . . . . . . . . . . . . . 29, 50
Data Directory . . . . . . . . . . . . . . . . . . . . 16
default directory . . . . . . . . . . . . . . . . 16
Description Section . . . . . . . . . . . . . . . . 42
Description. . . . . . . . . . . . . . . . . . . . . . . 27
Design Screen . . . . . . . . . . . . . . . . . . . . 27
The Calculations Area . . . . . . . . . . . 28
The User Entry Area . . . . . . . . . . . . 27
Discard width . . . . . . . . . . . . . . . . . . . . . 33
Feed Speeds . . . . . . . . . . . . . . . . . . . . . . 29
Feed system . . . . . . . . . . . . . . . . . . . . . . 53
Feeds and Speeds Section . . . . . . . . . . . 47
Adding a depth of cut . . . . . . . . . . . . 50
Bite Per Tooth . . . . . . . . . . . . . . . . . 48
Calculated Values . . . . . . . . . . . . . . 48
Cut Elevation . . . . . . . . . . . . . . . . . . 48
Depth of Cut . . . . . . . . . . . . . . . . . . . 48
Estimated Sawing Deviation . . . . . . 48
Feed Speed . . . . . . . . . . . . . . . . . . . . 48
GFI . . . . . . . . . . . . . . . . . . . . . . . . . . 48
Guide Span . . . . . . . . . . . . . . . . . . . . 48
Gullet Feed Index . . . . . . . . . . . . . . . 48
Minimum Bite Per Tooth . . . . . . . . . 48
Navigating Around . . . . . . . . . . . . . . 50
Power . . . . . . . . . . . . . . . . . . . . . . . . 48
Recommended Maximum . . . . . . . . 49
Recommended Minimum . . . . . . . . 49
Saving Your Changes . . . . . . . . . . . . 50
Standard Deviation . . . . . . . . . . . . . . 48
User Entries . . . . . . . . . . . . . . . . . . . 48
Files
Machine . . . . . . . . . . . . . . . . . . . . . . . 5
Master . . . . . . . . . . . . . . . . . . . . . . . . 5
Variation . . . . . . . . . . . . . . . . . . . . . . 6
GFI
See Gullet Feed Index . . . . . . . . . . . 48
Guide Location . . . . . . . . . . . . . . . . . . . . 27
Guide Location Section . . . . . . . . . . . . . 39
Bottom Span . . . . . . . . . . . . . . . . . . . 39
Current Guide Offset . . . . . . . . . . . . 39
Maximum Span . . . . . . . . . . . . . . . . 39
Minimum Span . . . . . . . . . . . . . . . . 39
BandSel User’s Guide
Top Span . . . . . . . . . . . . . . . . . . 39
Guide Offset . . . . . . . . . . . . . . . . 44, 60
Current . . . . . . . . . . . . . . . . . . . . 39
Guide Pressure . . . . . . . . . . . . . . . . . 29
Guide Pressure Section . . . . . . . . . . 44
Guide Offset . . . . . . . . . . . . . . . . 44
Ideal Guide Pressure . . . . . . . . . 44
Sine Bar Settings . . . . . . . . . . . . 44
Guides
Bottom span . . . . . . . . . . . . . . . . 39
Current offset . . . . . . . . . . . . . . . 39
Offset . . . . . . . . . . . . . . . . . . . . . 44
Pressure . . . . . . . . . . . . . . . . 44, 60
Sine bar settings . . . . . . . . . . . . . 44
Top span . . . . . . . . . . . . . . . . . . . 39
Wear . . . . . . . . . . . . . . . . . . . . . . 60
Gullet
Peening . . . . . . . . . . . . . . . . . . . . 58
Proctor rolling . . . . . . . . . . . . . . 58
Gullet area . . . . . . . . . . . . . . . . . . . . . 2
Actual . . . . . . . . . . . . . . . . . . . . . 38
Armstrong Formula 'D' . . . . . . . . 2
Gullet Condition Factor . . . . . . . 38, 59
Gullet cracking . . . . . . . . . . . 56, 59, 60
Gullet Cracking Section . . . . . . . . . . 43
Bandsaw Fatigue Index . . . . . . . 43
Gullet Feed Index . . . . . . . . . 48, 54, 60
Help Menu Options . . . . . . . . . . . . . 26
About . . . . . . . . . . . . . . . . . . . . . 26
Contents . . . . . . . . . . . . . . . . . . . 26
Find . . . . . . . . . . . . . . . . . . . . . . 26
Index . . . . . . . . . . . . . . . . . . . . . 26
Online Manual . . . . . . . . . . . . . . 26
Hook Angle . . . . . . . . . . . . . . . . . . . 37
Hook length . . . . . . . . . . . . . . . . . . . 46
Information from BandSel . . . . . . . . 2
Information from BandSel . . . . . 2
Input screen
Blade design . . . . . . . . . . . . . 30, 32
Feeds and speeds . . . . . . . . . . . . 19
Guide location . . . . . . . . . . . . . . 39
Wood properties . . . . . . . . . . . . . 41
Installing and Running BandSel . . . . . 7
Installing BandSel . . . . . . . . . . . . . . . 7
Adding a BandSel Icon . . . . . . . . 9
For Windows 95 Users . . . . . . . . . 8
Registering BandSel . . . . . . . . . . . 9
Thin Kerf Technologies Inc.
73
Screen Size . . . . . . . . . . . . . . . . . . . . . 8
Kerf . . . . . . . . . . . . . . . . . . . . . . . . . . . . 46
Managing Your Files and Variations . . . 15
Master File . . . . . . . . . . . . . . . . . . . . . . . . 5
Menu Options . . . . . . . . . . . . . . . . . . . . . 15
New . . . . . . . . . . . . . . . . . . . . . . . . . 15
Open . . . . . . . . . . . . . . . . . . . . . . . . 15
Opening A Machine File . . . . . . . . . . . . 15
navigate around . . . . . . . . . . . . . . . . 15
Option Buttons . . . . . . . . . . . . . . . . . . . . 29
Other Options in the File Menu . . . . . . . 21
Close . . . . . . . . . . . . . . . . . . . . . . . . 21
Delete . . . . . . . . . . . . . . . . . . . . . . . . 21
Exit . . . . . . . . . . . . . . . . . . . . . . . . . . 21
Save . . . . . . . . . . . . . . . . . . . . . . . . . 21
Save As . . . . . . . . . . . . . . . . . . . . . . 21
Save As Template . . . . . . . . . . . . . . 21
Overview of How to Use BandSel . . . . . . 5
Power required . . . . . . . . . . . . . . . . . 56, 60
Print Menu . . . . . . . . . . . . . . . . . . . . . . . 24
Print Preview . . . . . . . . . . . . . . . . . . 24
Text File . . . . . . . . . . . . . . . . . . . . . . 24
To Printer . . . . . . . . . . . . . . . . . . . . 24
Printer . . . . . . . . . . . . . . . . . . . . . . . . . . . 20
Production factors . . . . . . . . . . . . . . . . . 54
Purposes and Uses of BandSel . . . . . . . . . 1
Quick-Start Tutorial . . . . . . . . . . . . . . . . 12
Closing and Exiting . . . . . . . . . . . . . 14
Creating a New Variation . . . . . . . . 13
Exiting BandSel . . . . . . . . . . . . . . . . 14
Making Changes . . . . . . . . . . . . . . . 13
Moving to Another Variation . . . . . . 13
Opening . . . . . . . . . . . . . . . . . . . . . . 12
Printing Reports . . . . . . . . . . . . . . . . 14
Saving Your Changes . . . . . . . . . . . . 14
Viewing the Master . . . . . . . . . . . . . 12
Save . . . . . . . . . . . . . . . . . . . . . . . . . . . . 21
Sawing accuracy . . . . . . . . . . . . . . . . 53, 60
Side clearance . . . . . . . . . . . . . . . . . . . . 60
Critical minimum . . . . . . . . . . . . . . . 54
Sine bar . . . . . . . . . . . . . . . . . . . . . . . . . 44
Sine Bar Setting . . . . . . . . . . . . . . . . . . . 44
Span
Minimum, maximum . . . . . . . . . . . . 39
Specific cutting energy . . . . . . . . . . . . . . 56
Stalling . . . . . . . . . . . . . . . . . . . . . . . . . . 60
Starting BandSel . . . . . . . . . . . . . . . . . . . 10
BandSel User’s Guide
Stiffness
Bandsaw . . . . . . . . . . . . . . . . . . . 55
Strain system design . . . . . . . . . . . . . 35
Surface roughness . . . . . . . . . . . 55, 60
System Requirements . . . . . . . . . . . . . 7
Tare Power . . . . . . . . . . . . . . . . . . . . 36
Template . . . . . . . . . . . . . . . . . . . . . 21
Tensioning . . . . . . . . . . . . . . 33, 34, 58
The Calculations Area . . . . . . . . . . . 28
Power . . . . . . . . . . . . . . . . . . . . . 52
The Main Screen . . . . . . . . . . . . . . . 15
Menu options . . . . . . . . . . . . . . . 15
The User Entry Area . . . . . . . . . . . . 27
Bandmill Design Section . . . . . . 35
Description Section . . . . . . . . . . 42
Tooth Design Section . . . . . . . . . 37
Wood Properties Section . . . . . . 41
The Variations Menu . . . . . . . . . . . . 21
Close . . . . . . . . . . . . . . . . . . . . . 23
Delete . . . . . . . . . . . . . . . . . . . . . 24
New Variation . . . . . . . . . . . . . . 22
Open A Variation . . . . . . . . . . . . 21
Open All Variations . . . . . . . . . . 22
Open Master . . . . . . . . . . . . . . . . 21
Rename . . . . . . . . . . . . . . . . . . . 23
Save . . . . . . . . . . . . . . . . . . . . . . 23
Save As . . . . . . . . . . . . . . . . . . 23
Thickness . . . . . . . . . . . . . . . . . . . . . 33
Tooth . . . . . . . . . . . . . . . . . . . . . . . . 27
Back clearance angle . . . . . . . . . 37
Gullet area . . . . . . . . . . . . . . . . . 38
Gullet condition . . . . . . . . . . . . . 38
Hook angle . . . . . . . . . . . . . . . . . 37
Hook length . . . . . . . . . . . . . 37, 46
Pitch . . . . . . . . . . . . . . . . . . . . . . 37
Side clearance . . . . . . . . . . . . . . 37
Tooth Design . . . . . . . . . . . . . . . . . . 29
Tooth Design Section . . . . . . . . . 37, 46
Gullet Area . . . . . . . . . . . . . . . . 46
Actual Gullet Area . . . . . . . . . . . 38
Back Clearance Angle . . . . . . . . 37
Grinding Factor . . . . . . . . . . . . . 38
Gullet Depth . . . . . . . . . . . . . . . . 37
Gullet Radius . . . . . . . . . . . . . . . 37
Hook Angle . . . . . . . . . . . . . . . . 37
Hook Length . . . . . . . . . . . . . . . 46
Kerf . . . . . . . . . . . . . . . . . . . . . . 46
Thin Kerf Technologies Inc.
74
Tooth Pitch . . . . . . . . . . . . . . . . . . . . 37
Top span . . . . . . . . . . . . . . . . . . . . . . . . . 39
Top Wheel Assembly . . . . . . . . . . . . . . . 35
Weight . . . . . . . . . . . . . . . . . . . . . . . 35
Trouble-shooting . . . . . . . . . . . . . . . . . . 60
Variation . . . . . . . . . . . . . . . . . . . . . . . . . 5
Weight of top wheel . . . . . . . . . . . . . . . . 35
What’s New in BandSel for Windows . . . 2
Better Printing Capabilities . . . . . . . . 3
Direct Calculation of Sawing Deviation2
Extensive Feed Speed Analysis . . . . . 2
Improved Horsepower Calculations . . 3
Input Screens and Worksheets Have
Been Incorporated . . . . . . 3
Machine Files are Now Independant . 2
Several Variations Can Be Opened at
Once . . . . . . . . . . . . . . . . . 3
Template Files Used to Create New
Machine Files . . . . . . . . . . 2
Wheel condition . . . . . . . . . . . . . . . . 36, 57
Windows Menu . . . . . . . . . . . . . . . . . . . 24
Cascade . . . . . . . . . . . . . . . . . . . . . . 24
Tile Horizontally . . . . . . . . . . . . . . . 24
Tile Vertically . . . . . . . . . . . . . . . . . 24
Wood . . . . . . . . . . . . . . . . . . . . . . . . . . . 27
Factors affecting cutting . . . . . . . 42, 55
Wood Properties Section . . . . . . . . . . . . 41
Worksheet
Guide pressure . . . . . . . . . . . . . . . . . 44
Tooth design . . . . . . . . . . . . . . . . . . . 46