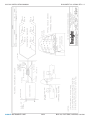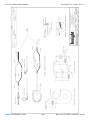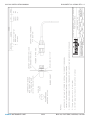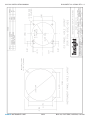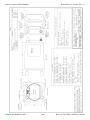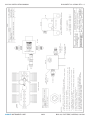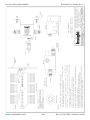
1
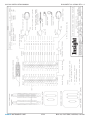
610C-001 INSTALLATION MANUAL
DOCUMENT No. 070906 REV. 1.2
INSTALLATION MANUAL
FOR INSIGHT GEM 610C-001
DOCUMENT No. 070906
READ THESE INSTRUCTIONS COMPLETELY
BEFORE PROCEEDING WITH INSTALLATION
Insight Instrument Corporation • Box 122 Fort Erie, ON L2A 5M6
Tel: 905-871-0733 • Fax: 905-871-5460 • Web: www.insightavionics.com
Copyright 2009
Instrument Corp.
INSIGHT INSTRUMENT CORP.
1/32
BOX 122, FORT ERIE, ONTARIO, L2A 5M6
610C-001 INSTALLATION MANUAL
DOCUMENT No. 070906 REV. 1.2
If You Read Nothing Else Read This page!
Follow these recommendations to minimize installation related problems.
GEM 610C (G3)
USE CAUTION when crimping the terminals onto the end of the GEM harness.
Test each crimp by tugging on it sharply.
It is almost impossible to pull off a properly crimped terminal.
KEEP the GEM harness at least 1 inch away from the ignition harness, P-leads, and alternator wiring.
Some aircraft produce electrical noise, which will cause erratic indications.
G3 Install Location Cautionary Notice
The G3 graphic engine monitor has EGT, CHT and TIT primary STC.
Mounting installation of the G3 should be in a clear and user friendly viewing location.
G3 display should be mounted within the pilot’s subpanel or the center panel and not on the copilots subpanel
unless the G3 can be canted towards the pilot.
G3 Fuel Totalizer Cautionary Notice
The Fuel Remaining display on the G3 is very useful but is not without limitations. Understand first that the factory fuel quantity gauges are the only instruments in the panel that physically measure fuel level. They are still
the primary indication of fuel level in the airplane.
The G3 doesn’t measure level, but instead measures only fuel flow rate. The G3 totalizes the rate information
to account for fuel used. If you know how much fuel you started with and how much you have used you can
figure fuel remaining by simple subtraction. The pilot must supply an accurate starting fuel level for this subtraction to produce the correct fuel remaining result. Should the pilot overstate the fuel quantity on board, the
G3 will dangerously overstate the fuel remaining and the endurance time as well. The pilot must be careful and
diligent when setting the fuel on board.
Getting the correct fuel total on board is in many cases pretty easy. If you fill up prior to takeoff the number is
obviously the total available on board. If you partially fill a known configuration (say tips empty) then the total
is easy to calculate. If you partially fill fuel tanks or add an accurately know quantity to a poorly known original
value - errors will abound. Unaccounted fuel loss from leakage, fuel vent overflow or theft will of course produce erroneous results.
So be careful and the G3 will deliver safe, reliable, and convenient fuel information. But be sure to cross reference the information on the primary fuel quantity gauges. Never trust a single source of fuel information when
you have two on board. Fuel exhaustion still ranks highly among accident causes. There is no excuse for this
- don’t let your engine stop until you’re parked.
INSIGHT INSTRUMENT CORP.
2/32
BOX 122, FORT ERIE, ONTARIO, L2A 5M6
610C-001 INSTALLATION MANUAL
DOCUMENT No. 070906 REV. 1.2
Warranty policy
The Insight Instrument Corp.’s 610C Graphic Engine Monitor (G3) temperature display unit is warranted
against defects in materials and workmanship for two years from date of purchase.
Insight Instrument Corp.’s temperature probes are warranted for one year from date of purchase or 100 hours
whichever comes first.
Insight will, at its option, repair or replace, without charge, those products that it finds defective. Material returned for repair or replacement will be returned prepaid by second day freight.
Insight will not be responsible for repairs that result from improper installation, unauthorized maintenance or
abuse.
Insight is not liable for consequential damages or any labor costs, either directly or indirectly.
No other warranty is expressed or implied.
INSIGHT INSTRUMENT CORP.
3/32
BOX 122, FORT ERIE, ONTARIO, L2A 5M6
610C-001 INSTALLATION MANUAL
DOCUMENT No. 070906 REV. 1.2
Table of Contents
IF YOU READ NOTHING ELSE READ THIS PAGE! ................................................................. 2
G3 INSTALL LOCATION CAUTIONARY NOTICE ...................................................................... 2
G3 FUEL TOTALIZER CAUTIONARY NOTICE .......................................................................... 2
WARRANTY POLICY .................................................................................................................. 3
TABLE OF CONTENTS ........................................................................................................... 4,5
TABLE OF DRAWINGS .............................................................................................................. 5
INTRODUCTION ......................................................................................................................... 6
UNPACKING THE GRAPHIC ENGINE MONITOR DISPLAY ..................................................... 6
INSTALLATION PLANNING ........................................................................................................ 7
TOOLS AND MATERIALS REQUIRED ....................................................................................... 7
INSTALLING THE GRAPHIC ENGINE MONITOR ..................................................................... 7
INSTALLING THE DISPLAY ........................................................................................................ 7
INSTALLING THE EXHAUST GAS TEMPERATURE PROBES ................................................. 8
INSTALLING THE CYLINDER HEAD TEMPERATURE PROBES ............................................. 8
INSTALLING THE TURBINE INLET TEMPERATURE PROBES (MODEL G3) .......................... 9
INSTALLING THE MANIFOLD TEE ............................................................................................ 9
INSTALLING THE OIL TEMPERATURE PROBE ....................................................................... 9
INSTALLING THE OIL PRESSURE PROBE .............................................................................. 9
INSTALLING THE TACHOMETER CABLE FOR RPM ............................................................... 9
PROBE CHARACTERISTICS ................................................................................................... 10
INSTALLING THE OUTSIDE AIR TEMPERATURE PROBE (MODELS G3) ............................ 10
WIRING CONSIDERATIONS .................................................................................................... 11
DISPLAY WIRING ..................................................................................................................... 11
POWER CONNECTIONS ......................................................................................................... 11
GROUNDING ............................................................................................................................ 11
EGT PROBE WIRING ............................................................................................................... 12
INSIGHT INSTRUMENT CORP.
4/32
BOX 122, FORT ERIE, ONTARIO, L2A 5M6
610C-001 INSTALLATION MANUAL
DOCUMENT No. 070906 REV. 1.2
Table of Contents
CHT PROBE WIRING ............................................................................................................... 13
ROUTING THE WIRING HARNESS ......................................................................................... 13
CONNECTING AND ROUTING THE OAT HARNESSES ......................................................... 13
CHECKING THE INSTALLATION ............................................................................................. 14
UPDATE GEM SOFTWARE ...................................................................................................... 14
FLIGHT TESTING THE GEM (MODEL G3) .............................................................................. 15
TROUBLE-SHOOTING ........................................................................................................ 16-18
DRAWINGS ......................................................................................................................... 20-28
WEIGHT AND BALANCE DATA ................................................................................................ 28
TECHNICAL SUPPORT ............................................................................................................ 29
SERVICE PROCEDURES ........................................................................................................ 29
Table of Drawings
DRAWING # 8252 - GEM CONNECTIONS FOR CONTINENTAL ENGINES .......................... 20
DRAWING # 8253 - GEM CONNECTION FOR LYCOMING ENGINE ..................................... 21
DRAWING # 8254 - GEM PROBE CONNECTIONS ................................................................ 22
DRAWING #1200-016 - OAT PROBE MOUNTING DETAIL ..................................................... 23
DRAWING #610C-315 – G3 DSUB 25-PIN INTERCONNECT DIAGRAM P1 ......................... 24
DRAWING #610C-315 – G3 DSUB 25-PIN INTERCONNECT DIAGRAM P2 ......................... 25
DRAWING #930309 – GEM/GEMINI DISPLAY OUTLINES ..................................................... 26
DRAWING #1200-018 – GEM 610/GEMINI 1200 WIRING DIAGRAM .................................... 27
DRAWING #610C-001 – G3 GRAPHIC ENGINE MONITOR ................................................... 28
DRAWING #1000-303 – G3 FUEL SENSOR MOUNTING DIAGRAM TYPE 1......................... 29
.
DRAWING #1000-303 – G3 FUEL SENSOR MOUNTING DIAGRAM TYPE 2 ........................ 30
DRAWING #1000-303 – G3 FUEL SENSOR MOUNTING DIAGRAM TYPE 3 ........................ 31
INSIGHT INSTRUMENT CORP.
5/32
BOX 122, FORT ERIE, ONTARIO, L2A 5M6
610C-001 INSTALLATION MANUAL
DOCUMENT No. 070906 REV. 1.2
INTRODUCTION
This Installation Manual will acquaint you with the installation requirements, operational functions and some
of the powerful features of the advanced 610C Graphic Engine Monitoring (G3). Please read it carefully and
completely before starting.
Insight Instrument Corp.’s G3 Graphic Engine Monitors provides simultaneous analog and digital) display of
engine temperatures for nearly all makes and models of piston-powered aircraft. These displays are designed
for rugged use. However, since they are constructed of computer-type components, standard precautions for
electronic equipment are required;
•
Do not expose to rain or water.
•
Handle with care - DO NOT DROP.
•
Be sure that all electrical connections are correct and properly made.
•
Follow anti-static procedures.
Temperatures are sensed through thermocouple type probes, which are installed in the engine (and other areas) for temperature data gathering. These probes are crucial to the proper and accurate operation of the GEM
display. Therefore, utmost care must be exercised during installation in the aircraft.
The GEM Model G3 displays are configured at Insight.
For a comprehensive description of functions and features, consult the G3 Pilot’s Guide.
Unpacking the G3 Graphic Engine Monitor Display
•
Carefully inspect the contents of this package for damage. If damage is found, save all
packaging so that a claim can be made against the carrier.
•
Inspect the contents of the shipment to ensure that all component parts and materials
have been supplied.
•
Visually inspect all components for proper identification or damage.
•
Immediately report any discrepancies to the Insight Customer Service Department.
INSIGHT INSTRUMENT CORP.
6/32
BOX 122, FORT ERIE, ONTARIO, L2A 5M6
610C-001 INSTALLATION MANUAL
DOCUMENT No. 070906 REV. 1.2
INTRODUCTION
Installation Planning
•
Plan the location of the display such that it is not positioned near any source of high cur
rent and is easily visible by the pilot.
•
The engine harnesses should be positioned away from sources of high energy, such as
ignition harnesses, P-leads, alternator wiring and high frequency radio antennas.
•
Some thought about the process and steps needed may save hours of installation time
and trouble-shooting.
Tools and Materials Required
•
•
•
•
•
•
Proper wire stripping tools.
Proper crimping tools, Insight recommends;
M22520/2-01Crimping tool and M22520/2-08 Positioner or equivalent.
Insertion/extraction tool for Amp pin #205089-1.
Trip-free, re-settable Circuit-breaker(1 AMP).
Hardware and plumbing for mounting and connection of the G3’s Oil Pressure Sensor, and the G3’s
Manifold Pressure connection.
INSTALLING THE G3 GRAPHIC ENGINE MONITOR
Installing the Display
Model G3 displays mount in a 2.25 inch diameter display cutout. Care should be given to provide sufficient
depth allowance for harness and cable routing at the rear of the display.
See Drawing #610C-001 on for display outline and hole layout.
A new GEM installation will require four mounting holes and two holes for the control knobs in addition to the
2.25 inch hole.
The G3 GEM will fit directly into the holes from a previously installed GEM Model 610.
Upgrading from GEM 602 or 603 will require a single new hole for the control knob.
Connections to the GEM G3 series displays shall be made in accordance with Drawing No’s. 610C-315 and
1200-018.
NOTE: Check for the possible existence of a “double” ground, particularly if the G3 is a replacement for a previously installed GEM display. The G3 must have only one ground connection.
INSIGHT INSTRUMENT CORP.
7/32
BOX 122, FORT ERIE, ONTARIO, L2A 5M6
610C-001 INSTALLATION MANUAL
DOCUMENT No. 070906 REV. 1.2
Installing The Exhaust Gas Temperature Probes
The Exhaust Gas Temperature (EGT) probe is designed fit into a hole in each exhaust stack and be secured
with an integral stainless steel clamp.
It is important that each probe is mounted a uniform distance from the exhaust stack flange. For normally aspirated engines, a nominal distance of 2 to 3 inches from the flange is recommended.
For turbo-charged engines, a nominal distance of 4 to 5 inches is recommended. See Drawing No. 8254.
If the recommended distance is impractical because of obstructions, slip joints, or bends in the exhaust system, position all the probes a uniform distance from the flange as space permits.
It is more important that all probes be positioned at a uniform distance from the flange rather than meeting the
preferred dimension. Probe locations closer to the flange may result in slightly higher (inconsequential) temperature indications. (Careful matching of probe position will provide best temperature readings.)
If the EGT probe must be located closer to the flange than recommended, compensating for the resultant
higher temperatures is accomplished using the “BAR HEIGHT” adjustment procedure.
If the probe must be positioned in a slip joint the inner tube must have a clearance hole of at least 1/4” diameter to prevent it from shearing the probe. Be certain to locate all holes to allow straight-in insertion of the probe
without bending or stressing the probe tip.
Before drilling, ensure that nothing interferes with the probe, clamp, clamp screw or wire. Center punch and
pilot drill each hole in the exhaust stack with a No. 28 or 9/64” drill bit. Use caution while drilling perpendicular
to the stack to prevent an elongated hole. NOTE: Tighten the clamp screw with hand-torqued nut driver only.
A right angle drill extension may be necessary in some locations. The probe will slip into a carefully drilled hole
and make a tight seal.
Installing The Cylinder Head Temperature Probes
There are three types of Cylinder Head Temperature (CHT) probes:
•
Spring Probe (Part Number 2852)
•
Spark Plug Gasket Probe (Part Number 2853)
•
Adapter Probes (Part Numbers 2855 Bayonet Adapter, and 2856 Threaded Adapter)
The Spring Probe (Part Number 2852) is equivalent to the “old style” Bayonet Probe and screws into threaded
thermo-wells in the cylinder head next to the lower spark plug (on top in some engines).
The Spark Plug Gasket Probe (Part Number 2853) replaces the copper 18 mm diameter spark plug gasket.
The Bayonet Adapter Probe (Part Number 2855) screws directly into the temperature well and replaces the
standard bayonet adapter to allow simultaneous utilization of the factory-installed Bayonet Probe.
The Threaded Adapter Probe (Part Number 2856) is similar to the 2855 except it is threaded on the inside to
allow simultaneous utilization of the factory-installed Threaded CHT Probe.
INSIGHT INSTRUMENT CORP.
8/32
BOX 122, FORT ERIE, ONTARIO, L2A 5M6
610C-001 INSTALLATION MANUAL
DOCUMENT No. 070906 REV. 1.2
Installing The Turbine Inlet Temperature Probes (Model G3)
There are three types of Turbine Inlet Temperature (TIT) probes which can be used with the GEM G3 series
system.
•
Clamp-Type TIT Probe (Part number 2871) - is identical to the EGT probe except that
the clamp diameter is larger
•
Threaded-Type TIT Probe, including a weld-on boss (Part Number 2872)
•
Threaded-Type, 1/4” NPT TIT probe (Part Number 2873)
For aircraft with a threaded fitting boss already welded to the turbine inlet, the two threaded type probes are
used - part number 2872 (7/16”-20 Thread) and part number 2873 (1/4 NPT Thread), as applicable. The 2872
Threaded fitting can be installed on any aircraft when a more permanent installation is desired, or when space
for the clamp-type probe is limited.
Probe Type 2872 fits in a 1/2” inch hole and should be welded by an approved exhaust repair facility.
Locate and drill the probe hole as described in Section “INSTALLING THE EXHAUST GAS TEMPERATURE
PROBES”, and refer to Drawing No. 8254 for the recommended location.
NOTE: If you have questions as to the correct type or location of TIT probes, call Insight Product Support for
technical assistance.
Installing The Manifold Tee
The G3 is supplementary for manifold pressure. The G3’s manifold pressure sensor is located internally inside
the G3 display. Refer to Drawing 610C-315 for the location of the G3 Manifold Pressure port (5/16”-24 #2 Flare
fitting). The installer must supply the tubing and a “Tee” fitting to connect the G3 to the existing manifold pressure indicator.
Installing The Oil Temperature Probe
The G3 is supplementary for oil temperature. Install the Insight Oil Temperature probe into an existing tapped
hole in an oil gallery in the engine. Insight can supply Oil Temperature probes in a variety of thread sizes to
suite most engine types. Consult with the engine manufacturer to determine the probe-hole location and thread
size. Ensure the probe does not interfere with any internal engine components. Refer to Drawing 610C-315 for
electrical connections.
Installing The Oil Pressure Probe
The G3 is supplementary for oil pressure. Install the Insight Oil Pressure Sensor (1/8 NPT) on a length of flexhose “Tee-ed” into the existing oil pressure sensor. The Installer must supply the “Tee” fitting, flexible hose and
mounting hardware. Refer to Drawing 610C-315 for electrical connections.
Installing The Tachometer Cable for RPM
The G3 is supplementary for Tachometer. Insight provides a shielded cable with included protection-resistor for
connection to a magneto. Refer to Drawing 610C-315 for electrical connections.
INSIGHT INSTRUMENT CORP.
9/32
BOX 122, FORT ERIE, ONTARIO, L2A 5M6
610C-001 INSTALLATION MANUAL
DOCUMENT No. 070906 REV. 1.2
Probe Characteristics
The Spring Probe (2852) has a probe bushing with a screwdriver slot to facilitate tightening into place. A drop
of anti-seizing lubricant on the threads before installation will ease installation, and subsequent removal. When
installing Spring Probes be sure you have correctly identified the standard thermo-well. Some aircraft have fuel
primer ports with the same thread size.
Many factory-installed CHT displays utilize a single threaded or bayonet-style resistive type probe that occupies one of the thermo-wells. This probe is not compatible with the thermocouple probes required for the
Graphic Engine Monitor.
A Spark Plug Gasket Probe (2853) may be used on this cylinder for the GEM series Display, so as to allow the
factory-installed display to remain functional.
The Spark Plug Gasket Probe replaces the standard copper spark plug gasket on one spark plug in the selected cylinder. The spark plug chosen should be the one that provides the best correlation with the other temperature probes. On common downdraft-cooled engines the selected cylinder will be the upper plug. Allow enough
wire length to move the probe to the other plug if necessary.
The Spark Plug Gasket must be removed and replaced by the Gasket Probe. Annealing of the Gasket Probe is
not required or recommended, and the Gasket Probe Does Not require replacement when the spark plugs are
changed.
Alternatively, an Adapter Probe may be used instead of a Gasket Probe. An adapter probe will allow both
displays to derive their CHT readings from the same thermo-well. For this reason, use of the Adapter Probe is
recommended instead of a Gasket Probe.
If the factory-installed CHT display has a bayonet-style probe, the Insight Bayonet Adapter Probe (2855) may
be used instead of the Gasket Probe.
The Bayonet Adapter Probe replaces the original bayonet adapter. It has a screwdriver slot to facilitate tightening in place, and placing a drop of non-seizing lubricant on the threads before installation will ease installation
and subsequent removal.
Once the Bayonet Adapter Probe has been installed, the original bayonet probe maybe locked in place with a
push and a twist.
If the factory-installed CHT display has a threaded probe located in the thermo-well, the Insight Threaded
Adapter Probe (2856) may be used. The Threaded Adapter Probe is installed in the thermo-well between the
cylinder head and the original CHT probe.
Installing The Outside Air Temperature Probe
The Outside Air Temperature (OAT) probe must be mounted in a location which is in free ambient air. Avoid
locating the probe adjacent to exhaust pipes, in a confined area, or on the top of the fuselage. Refer to Drawing No. 1200-016 for the mounting dimensions and appropriate hole size to drill.
Any location where the probe is exposed to direct sunlight or radiant heat from the runway pavement, will
cause increased temperature readings above ambient temperature. Mounting the probe near the engine induction air filter will often read well as soon as the engine is started.
Mount the OAT probe in the prepared hole and secure the nylon nut being careful not to over-tighten.
If the OAT probe is installed on a pressurized aircraft where bulkhead penetration is necessary and/or potting
of the OAT probe is required, be certain to apply “Proseal” or equivalent potting substance prior to tightening.
NOTE: Be careful not to get potting substance on the connector.
INSIGHT INSTRUMENT CORP.
10/32
BOX 122, FORT ERIE, ONTARIO, L2A 5M6
610C-001 INSTALLATION MANUAL
DOCUMENT No. 070906 REV. 1.2
Wiring Considerations
The G3 series system is supplied with a factory-assembled wiring harness configured for the specified number of cylinders. The harness edge connector contains a polarization pin which mates with a
slot in the display’s printed circuit board. This prevents improper engagement of the connector.
Before installing, confirm that the factory fabricated harness connector matches wiring diagram,
Drawing # 1200-018. All the red thermocouple wires should be on one side of the connector.
The G3 series Display circuit boards are supported during shipment by small anti-static shipping restraints. Leave these restraints in place during the installation of the display and remove only prior to
inserting the harness edge connectors.
Unlike most other EGT and CHT installations the probe wire length is not critical and may be trimmed
to any length as required to fit each probe.
Note: Plan your Installation to include a service loop in the GEM wiring harness to allow for future
adjustments.
CAUTION: Splicing of the thermocouple wire is not recommended.
Display Wiring Power Connections
The G3 series Display automatically accommodates both 14 and 28 Volt electrical systems.
Connect the “red” power lead to a separate trip-free, re-settable circuit breaker that receives power
from the avionics bus or aircraft bus.
If the aircraft does not include an Avionics Master switch circuit or bus, we recommend that one be
installed or a separate switch (user provided) to remove power from the Display unit during engine
starts.
Connect the ground wire (black) to a common avionics ground bus (airframe ground).
INSIGHT INSTRUMENT CORP.
11/32
BOX 122, FORT ERIE, ONTARIO, L2A 5M6
610C-001 INSTALLATION MANUAL
DOCUMENT No. 070906 REV. 1.2
CAUTION: For upgrade installations (GEM 602/603/610 to G3); harness is grounded to the engine case, disconnect the ground from the engine case and connect the ground wire to the ground bus (airframe ground).
Do not connect to two ground points.
NOTE: Double check the Display ground connection before applying power. Many aircraft have terminal strips
under the instrument panel that will appear to be connected to airframe ground and will even measure to
ground with an ohmmeter. The terminal strips may instead be connected to ground terminated loads such as
landing lights or gear motors. When these loads are activated the voltage on this supposed ground will rise to
full bus voltage (14 or 28V). [Extensive damage may result from improper grounding and is not covered under
warranty.]
The LCD display dims automatically with reductions in ambient light.. The instrument automatically configures
itself for 14 or 28V dimming bus voltage. Refer to Drawing No. 1200-018.
EGT Probe Wiring
The temperature probes must be wired with the correct polarity. The EGT probes connect to the harness wires
with the yellow jacket. The probe leads and harness wires are color coded (red and yellow) to facilitate correct
polarity. Each wire is marked with the cylinder number.
Slide the wire marker down the wire so it remains with the installation for trouble-shooting. Strip the wires according to Drawing No. 8254 and terminate with the crimp-on terminals (provided).
Verify the quality of each crimp with a “sharp” pull on the wire. The terminal should be almost impossible to pull
off when crimped correctly. Harness and probe wire colors should match as in Drawing No. 8254.
NOTE: The ring terminals may be crimped with a “service type” tool, however, AMP part number #47386 is recommended. Be sure to test each crimp by pulling on the wire to ensure it won’t come out. The most common
installation problems are the result of poor quality termination.
Installing Fuel Flow Sensor
Aircraft without existing FF sensors should have one Insight supplied sensor installed per engine. Existing
compatible FF sensors may be connected directly to the G3.
Install new sensors in accordance with Insight Drawing #610C-315. Refer to AC 43.13-1B, Chapter 8 Section
2, 8-30, 8-31, 8-37, 8-38.
Fuel flow case must be connected to airframe ground.
INSIGHT INSTRUMENT CORP.
12/32
BOX 122, FORT ERIE, ONTARIO, L2A 5M6
610C-001 INSTALLATION MANUAL
DOCUMENT No. 070906 REV. 1.2
CHT Probe Wiring
The CHT temperature probes must be wired with the correct polarity. The CHT probes connect to the harness
wires with the black jacket. The probe leads and harness wires are color coded (red and white) to facilitate correct polarity. Each wire is marked with the cylinder number.
Slide the wire marker down the wire so it remains with the installation for trouble-shooting. Strip the wires according to Drawing No. 8254.
Terminate with the crimp-on ring terminals provided. Verify the quality of each crimp with a “sharp” pull on the
wire. The terminal should be almost impossible to pull off when crimped correctly.
Harness and probe wire colors should match according to Drawing No. 8254. Insulate and bundle as discussed below.
Routing the Wiring Harness
It is essential to match the cylinder numbers on all the probes to display the proper information to the pilot.
The probe/harness connections should be insulated with the high temperature fiberglass sleeves provided and
routed away from high temperature areas, e.g. exhaust stacks, turbochargers, etc.
The probe wires must not be tied in with ignition, alternator or cabin heater ignition wires because of potential
errors in temperature readings.
All wires should be bundled and tied with nylon wire ties or lacing cord and attached to the airframe to prevent
damage from vibration and wind buffeting.
The probe wiring harnesses are made of special alloy wire that must not be substituted or extended with copper wire.
The power and ground wires are copper and may be extended if necessary.
When the installation is complete all wires should be secured using wire ties and carefully checked for interference, rubbing or chafing with flight control cables, or other moving parts.
Connecting and Routing the OAT Harnesses (Model G3)
Refer to Drawings 1200-016 and 610C-315 for wiring information.
Route the OAT harnesses (factory-terminated with probe connectors) to the probes, and secure.
Attach the harness connectors to the probes making certain that the connectors engage properly and that the
male pins on the probes are undamaged
INSIGHT INSTRUMENT CORP.
13/32
BOX 122, FORT ERIE, ONTARIO, L2A 5M6
610C-001 INSTALLATION MANUAL
DOCUMENT No. 070906 REV. 1.2
Checking The Installation
Verify the power and ground connections before applying aircraft power. Pin 15 on the G3 series Display is
aircraft ground and pin S is approximately +14V DC or +28V DC (See Drawing No. 1200-018).
For Model G3, pin 15 must be connected to the ground bus (airframe ground). When power is initially applied,
the GEM series Display will illuminate to full brightness.
Immediately upon power application the version number of the operating system software will appear in the G3
Display for approximately two seconds. After the version numbers extinguish, the G3 reverts to Monitor Mode
operation. Monitor Mode is the default power-on operating mode. EGT and CHT (and TIT) color-coded bar
graph columns indicate their respective cylinder temperatures, and supplementary values appear in cyan.
The G3 Display brightness level automatically adjusts to match the ambient light level.
The automatic dimming may be tested in bright ambient light by covering the entire face of the Display with the
palm of your hand for several seconds. The Display will dim and then brighten when your hand is removed.
In low ambient light, the auto-dimming feature may be tested by shining a flashlight on the display for several
seconds. It changes brightness slowly, in discrete steps, to prevent annoying flicker in response to rapid ambient light level changes.
After the tests described above have been performed, check for possible interference with existing avionics
by listening for audio interference on Com, Nav, DME, ADF, etc. Interference is uncommon, however, these
characteristics should be tested.
If interference is detected, remove power from the Display unit to check if it is the emitter of the interference.
If the GEM series Display is the interference source, re-route the wiring harnesses away from affected equipment.
Contact Insight Product Support if needed further assistance.
GEM G3 Software Updates
Contact Insight Instrument Corp. for information regarding software updates.
INSIGHT INSTRUMENT CORP.
14/32
BOX 122, FORT ERIE, ONTARIO, L2A 5M6
610C-001 INSTALLATION MANUAL
DOCUMENT No. 070906 REV. 1.2
FLIGHT TESTING THE G3
It is essential that the G3 series Display be flight tested.
The GEM must be observed in all phases of flight for consistency in performance. If a problem is noted during
the flight test, discontinue the flight test and trouble-shoot the system.
Should you have any questions or problems during installation or trouble-shooting of the G3 series don’t hesitate to contact Insight Product Support.
More to come!
INSIGHT INSTRUMENT CORP.
15/32
BOX 122, FORT ERIE, ONTARIO, L2A 5M6
610C-001 INSTALLATION MANUAL
DOCUMENT No. 070906 REV. 1.2
Trouble-shooting
The following is a compilation of the common symptoms and causes of problems which may be experienced
with the GEM Systems. Close examination of these symptoms should assist in identifying the cause of the
problem.
Symptom: The G3 series Display does not illuminate.
Cause: No ground return at Pin 15, of the edge connector either from the engine case or from airframe ground
Symptom: The G3 series Display does not illuminate.
Cause: Voltage is missing at Pin S, of the edge connector from the circuit breaker or bus.
Symptom: One or more columns will not illuminate.
Cause: Try recycling power to check the Display. If all columns do not illuminate, the GEM series display has
been damaged or is inoperative.
Symptom: One or more columns will not illuminate.
Cause: Check the probe connections, the display will blank columns with poor EGT and CHT connections. Columns 5 and 6 shouldn’t illuminate on a 4 cylinder engine. Turn top knob on G3 to the probe analysis page
to check probe Integrity.
For 8 foot harness on probe analysis page resistance should be 8 - 3 EGT / 1 - 6 CHT
For 24 foot harness on probe analysis page resistance should be 26 - 10 EGT / 4 - 18 CHT
Symptom: No EGT in one or more columns.
Cause: Errors in harness wiring. Visually check probe connections and polarity. Check for probe continuity
at the display connector. The resistance of the lead wire is approximately 1 ohm per foot. Take extreme care
to not damage the connector terminals with the meter probes. Turn top knob on G3 to the probe analysis
page to check probe Integrity.
Symptom: No CHT in one or more columns.
Cause: Faulty probe. Turn top knob on G3 to the probe analysis page to check probe Integrity.
For 8 foot harness on probe analysis page resistance should be 8 - 3 EGT / 1 - 6 CHT
For 24 foot harness on probe analysis page resistance should be 26 - 10 EGT / 4 - 18 CHT
INSIGHT INSTRUMENT CORP.
16/32
BOX 122, FORT ERIE, ONTARIO, L2A 5M6
610C-001 INSTALLATION MANUAL
DOCUMENT No. 070906 REV. 1.2
Symptom: No CHT in one or more columns.
Cause: Faulty probe. Turn top knob on G3 to the probe analysis page to check probe Integrity.
For 8 foot harness on probe analysis page resistance should be 8 - 3 EGT / 1 - 6 CHT
For 24 foot harness on probe analysis page resistance should be 26 - 10 EGT / 4 - 18 CHT
Symptom: Display goes out during engine start.
Cause: Voltage transient or over voltage condition. The display should not be turned on during engine
start. An Avionics Master or separate power switch should be installed to apply power to the display.
Symptom: Display is unstable.
Cause: Noisy or defective magneto or ignition harness. Check operation on left and right magnetos. The temperature should rise slowly and may stabilize slightly or completely on one or the other
magneto. Single magneto operation will pinpoint the problem to one ignition harness, unless both
are faulty. Verify that the probe wires and GEM series system harness are isolated from the ignition
harness. If necessary, repair or replace the faulty ignition harness to eliminate ignition related interference.
Symptom: Display is unstable.
Cause: Magneto ungrounded or defective P-lead. Check ignition harness for proper shielding,
grounding, and loose spark plug caps. Check magnetos for proper grounding or evidence of arcing.
Disconnect magneto P-leads one at a time. If this eliminates or reduces the problem, replace the Plead. A faulty ignition harness will typically cause all EGT readings to “dance” up and down. The GEM
series Display will detect this type of fault long before standard test methods, thus eliminating the
potential of more serious problems.
Symptom: Display is unstable.
Cause: Noisy or defective alternator, defective generator or faulty ground connection. Try operation
with alternator or generator off.
Symptom: Display is affected by radio transmissions.
Cause: Proximity of probe and/or display unit to the radio power wiring and away from radios and
antenna coax. Check radio rack connector for missing 50 ohm matching device. The 50 ohm matching device is a thick washer-like component part that is installed underneath the connector end cap.
The end cap will have to be unsoldered to check for the matching device. This seemingly unimportant component is supplied with all connectors and is required for proper operation of the connector.
Utilize shielded-twisted pair for power leads.
INSIGHT INSTRUMENT CORP.
17/32
BOX 122, FORT ERIE, ONTARIO, L2A 5M6
610C-001 INSTALLATION MANUAL
DOCUMENT No. 070906 REV. 1.2
Symptom: EGT indication is not uniform.
Cause: The EGT indication for a fuel-injected engine will typically vary a bar or two from perfectly uniform when
leaned for cruise. Clean the fuel injection nozzles. Non-uniformity is normal in carbureted engines. All cylinders
are measured by the same circuitry. It is almost impossible to not have identical response on all channels of
the GEM series.
Symptom: A sudden or gradual reduction in the EGT indication can be symptomatic of several engine
faults.
Cause: Exhaust leaks above the probe and poor compression due to bad rings, valves or valve guides. If a
probe substitution does not reveal a faulty probe, check for mechanical faults in the engine. Consult the GEM
series Pilot’s Guide for more detailed engine diagnostic information.
Symptom: All EGT readings too high.
Cause: Readjust the EGT “BAR HEIGHT” on the Display. Use DVM a (digital voltmeter) to measure the difference between the Display ground and engine block ground with the engine running and the battery charging. If
the difference is greater than or 2 V DC with the alternator charging, remove the G3 series ground and provide
an extension directly to the engine block. If this solution fixes the problem, a ground fault exists between the
engine and air-frame which should be remedied.
Symptom: Display indicates full scale or blanks out.
Cause: This can be symptomatic of an intermittent ground fault between engine and air-frame. See “All EGT
readings too high”.
INSIGHT INSTRUMENT CORP.
18/32
BOX 122, FORT ERIE, ONTARIO, L2A 5M6
610C-001 INSTALLATION MANUAL
DOCUMENT No. 070906 REV. 1.2
Drawings
Drawing No.
Revision #
Title
Date
#8252
E
GEM CONNECTIONS FOR CONTINENTAL ENGINES
MAR 31/08
#8253
E
GEM CONNECTIONS FOR LYCOMING ENGINES
MAR 31108
#8254
C
GEM PROBE CONNECTIONS
MAR 31108
#1200-016
C
OAT/IAT PROBE MOUNTING DETAIL
MAR 31/08
#610C-315
C
G3 DSUB 25-PIN INTERCONNECT DIAGRAM P1
NOV 16/10
#610C-315
C
G3 DSUB 25-PIN INTERCONNECT DIAGRAM P2
NOV 16/10
#930309
C
GEM/GEMINI DISPLAY OUTLINES
MAR 31/08
#1200-018
D
GEM 610/GEMINI 1200 WIRING DIAGRAM
MAR 31/08
#610C-001
C
G3 GRAPHIC ENGINE MONITOR
#1000-303
C
FLOW SENSOR MOUNTING DIAGRAM 1 - 3
INSIGHT INSTRUMENT CORP.
19/32
JUNE 21/10
MAY 26/03
BOX 122, FORT ERIE, ONTARIO, L2A 5M6
610C-001 INSTALLATION MANUAL
INSIGHT INSTRUMENT CORP.
DOCUMENT No. 070906 REV. 1.2
20/32
BOX 122, FORT ERIE, ONTARIO, L2A 5M6
610C-001 INSTALLATION MANUAL
INSIGHT INSTRUMENT CORP.
DOCUMENT No. 070906 REV. 1.2
21/32
BOX 122, FORT ERIE, ONTARIO, L2A 5M6
610C-001 INSTALLATION MANUAL
INSIGHT INSTRUMENT CORP.
DOCUMENT No. 070906 REV. 1.2
22/32
BOX 122, FORT ERIE, ONTARIO, L2A 5M6
610C-001 INSTALLATION MANUAL
INSIGHT INSTRUMENT CORP.
DOCUMENT No. 070906 REV. 1.2
23/32
BOX 122, FORT ERIE, ONTARIO, L2A 5M6
610C-001 INSTALLATION MANUAL
INSIGHT INSTRUMENT CORP.
DOCUMENT No. 070906 REV. 1.2
24/32
BOX 122, FORT ERIE, ONTARIO, L2A 5M6
610C-001 INSTALLATION MANUAL
INSIGHT INSTRUMENT CORP.
DOCUMENT No. 070906 REV. 1.2
25/32
BOX 122, FORT ERIE, ONTARIO, L2A 5M6
610C-001 INSTALLATION MANUAL
INSIGHT INSTRUMENT CORP.
DOCUMENT No. 070906 REV. 1.2
26/32
BOX 122, FORT ERIE, ONTARIO, L2A 5M6
610C-001 INSTALLATION MANUAL
INSIGHT INSTRUMENT CORP.
DOCUMENT No. 070906 REV. 1.2
27/32
BOX 122, FORT ERIE, ONTARIO, L2A 5M6
610C-001 INSTALLATION MANUAL
INSIGHT INSTRUMENT CORP.
DOCUMENT No. 070906 REV. 1.2
28/32
BOX 122, FORT ERIE, ONTARIO, L2A 5M6
610C-001 INSTALLATION MANUAL
INSIGHT INSTRUMENT CORP.
DOCUMENT No. 070906 REV. 1.2
29/32
BOX 122, FORT ERIE, ONTARIO, L2A 5M6
610C-001 INSTALLATION MANUAL
INSIGHT INSTRUMENT CORP.
DOCUMENT No. 070906 REV. 1.2
30/32
BOX 122, FORT ERIE, ONTARIO, L2A 5M6
610C-001 INSTALLATION MANUAL
INSIGHT INSTRUMENT CORP.
DOCUMENT No. 070906 REV. 1.2
31/32
BOX 122, FORT ERIE, ONTARIO, L2A 5M6
610C-001 INSTALLATION MANUAL
DOCUMENT No. 070906 REV. 1.2
If you have difficulty installing or using a G3 system, please read the G3’s documentation. Every G3 system is
shipped with complete instructions for installation and use on a CD. You may also find the same information on
our website www.insightavionics.com under G3 Documentation.
The answers to many technical questions can be found in these documents. Insight provides customer support
free of charge for as long as you own the instrument. If you have any questions concerning G3 operation do
not hesitate to call.
The Customer Service department accepts calls Monday through Friday between 9 am and 5 pm EST. Be sure
to have your instrument model number and serial number(s) ready when you call.
GEM Model No.
GEM Serial No.
Aircraft Type
Educational Video
To assist our customers in installing and using GEMs, Insight has produced an educational CD entitled Modern
Engine Management. Our video is available free of charge. Call or write to obtain your personal copy of this
classic production.
Service Procedures
Like many modern electronic devices, the Graphic Engine Monitor is extremely reliable. Other than initial configuration during installation, the G3 requires no adjustment or routine maintenance. The G3 routinely performs
a self-test on power-up to test its vital functions. Should the G3 fail this test, it will halt on a red screen with a
description of the error. Errors of this nature must be returned to the factory for service.
If the instrument performs the self-test successfully but you feel that the instrument is not functioning as expected discuss the problem with your dealer, or consult the troubleshooting section of the GEM Installation
Instructions. Keep in mind that in the vast majority of cases, erratic or unusual GEM operation can be traced to
an installation problem, a problem with probes, wiring harness or the aircraft’s electrical system.
Due to its reliability and the extensive testing that it undergoes, the instrument itself is the least likely source of
trouble. For this reason we strongly encourage you to contact Insight Customer Service at one of the numbers
listed below before returning an instrument to the factory, or any time you have any questions concerning the
operation of the Graphic Engine Monitor. By contacting us first we may be able to assist you in correcting your
problem without the hassle and downtime of sending in an instrument that is not the source of the difficulty.
Technical Support Contact Phone Numbers:
(905) 871-0733
Web: www.insightavionics.com
E-mail: [email protected]
INSIGHT INSTRUMENT CORP.
32/32
BOX 122, FORT ERIE, ONTARIO, L2A 5M6