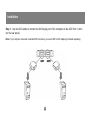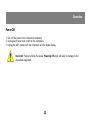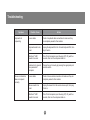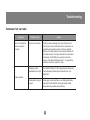
1
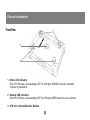
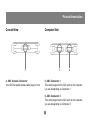
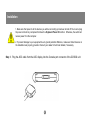
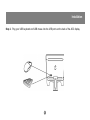
MiniView ADC™
2-Port ADC Switch
User Manual (GCS602)
®
Thank you for purchasing one of the first ADC KVM switches on the market. The two port MiniView™ ADC
KVM switch from IOGEAR allows you to use one keyboard, one mouse and one ADC display to control
two ADC Macintosh systems. This self-powered KVM switch supports most displays with ADC interface
(such as 15-inch Apple Studio Display, 17-inch Apple Studio Display, and 22-inch Apple Cinema Display,
etc.), and provides superior video quality of up to 1600x1024, DDC, DDC2, DDC2B. Other features
include LED displays for easy status monitoring, easy computer selection via a push button. It is easy to
install and requires no software. Just plug in the cables!
We hope you enjoy using your ADC KVM switch, yet another first-rate connectivity solution from IOGEAR®.
© 2003 IOGEAR® All Rights Reserved. PKG-M0047
IOGEAR and the IOGEAR logo are trademarks or registered trademarks of IOGEAR Inc. Microsoft and Windows are registered trademarks of
Microsoft Corporation. IBM is a registered trademark of International Business Machines, Inc. FireWire, MAC, Macintosh, G3, G4, iMac, Apple are
registered trademarks of Apple Computer, Inc. Classic is a registered trademark, licensed to Apple Computer, Inc. Finder is a trademark of Apple
Computer, Inc. All other brand and product names are trademarks or registered trademarks of their respective holders. IOGEAR makes no warranty
of any kind with regards to the information presented in this document. All information furnished here is for informational purposes only and is subject
to change without notice. IOGEAR assumes no responsibility for any inaccuracies or errors that may appear in this document. Reproduction in whole
or part without permission is prohibited.
Table of Contents
Package Contents
Overview
Features
Requirements
Introduction
Installation
Operation
Technical Support
Troubleshooting
Specifications
Radio & TV Interference Statement
○
○
○
○
○
○
○
○
○
○
○
○
○
○
○
○
○
○
○
○
○
○
○
○
○
○
○
○
○
○
○
○
○
○
○
○
○
○
○
○
○
○
○
○
○
○
○
○
○
○
○
○
○
○
○
○
○
○
○
○
○
○
○
○
○
○
○
○
○
○
○
○
○
○
○
○
○
○
○
○
○
○
○
○
○
○
○
○
○
○
○
○
○
○
○
○
○
○
○
○
○
○
○
○
○
○
○
○
○
○
○
○
○
○
○
○
○
○
○
○
○
○
○
○
○
○
○
○
○
○
○
○
○
○
○
○
○
○
○
○
○
○
○
○
○
○
○
○
○
○
○
○
○
○
○
○
○
○
○
○
○
○
○
○
○
○
○
○
○
○
○
○
○
○
○
○
○
○
○
○
○
○
○
○
○
○
○
○
○
○
○
○
○
○
○
○
○
○
○
○
○
○
○
○
○
○
○
○
○
○
○
○
○
○
○
○
○
○
○
○
○
○
○
○
○
○
○
○
○
○
○
○
○
○
○
○
○
○
○
○
○
○
○
○
○
○
○
○
○
○
○
○
○
○
○
○
○
○
○
○
○
○
○
○
○
○
○
○
○
○
○
○
○
○
○
○
○
○
○
○
○
○
○
○
○
○
○
○
○
○
○
○
○
○
○
○
○
○
○
○
○
○
○
○
○
○
○
○
○
○
○
○
○
○
○
○
○
○
○
○
○
○
○
○
○
○
○
○
○
○
○
○
○
○
○
○
○
○
○
○
○
○
○
○
○
○
○
○
○
○
○
○
○
○
○
○
○
○
○
○
○
Limited Warranty
○
○
○
○
○
○
○
○
○
○
○
○
○
○
○
○
○
○
○
○
○
○
○
○
○
○
○
○
○
○
○
○
○
○
○
○
○
○
○
○
○
○
○
○
○
○
○
○
○
○
○
○
○
○
○
○
○
○
○
○
○
○
○
○
○
○
○
○
○
○
○
○
○
○
○
○
○
○
○
○
○
○
○
○
○
○
○
○
○
○
○
○
○
○
○
○
○
○
○
○
○
○
○
○
○
○
○
○
○
○
○
02
03
04
05
06
08
12
11
14
16
17
18
Package Contents
The complete MiniView™ ADC package consists of:
1
2
1
1
2-Port ADC KVM Switch
ADC Cables
User Manual
Warranty/ Registration Card
If any of the items are missing or damaged please contact your dealer immediately.
2
Overview
The Miniview ADC KVM Switch is a two port control unit that allows access to Macintosh systems
equipped with ADC connectors or computers with a DVI connection (DVI to ADC adapter required), from a
single ADC console (USB keyboard, USB mouse, and ADC flat panel display).
ADC, or the Apple Display Connector, is a digital connection proprietary to Apple® Computer. Apple’s
Cinema and Studio flat panel displays utilize the ADC connector interface to manage the connection to the
latest Apple® Mac systems.
The Miniview ADC KVM Switch GCS602 provides a quick and convenient method to access the computers connected to the system: using the push button Port Selection Switch located on the unit’s top panel.
Setup is fast and easy; plugging the ADC cables into their appropriate ports is all that is entailed. The
convenient all-in-one cable carries digital video, USB and power signals, eliminating desktop clutter
caused by separate USB and power cables.
By allowing a single console to manage both computers, GCS602 eliminates the expense of purchasing a
separate keyboard, monitor, and mouse for each system. Additionally, it saves the extra space they would
consume, and eliminates the inconvenience and wasted effort involved in constantly having to move from
one computer to the other.
3
Features
- 1 ADC console controls 2 ADC computers
- Supports most displays with an ADC interface (such as 15-inch Apple Studio Display, 17-inch Apple
Studio Display, and 22-inch Apple Cinema Display, etc.)
- Easy to install – no software required – connecting cables to the computers is all it takes
- Easy to operate – computer selection via push button on KVM switch
- LED displays for easy status monitoring
- Superior video quality – up to 1600x1024 (22-inch Apple Cinema Display); DDC, DDC2, DDC2B
4
Requirements
Console
• Either 1 ADC Cinema / Studio Display or 1 Analog ADC CRT Monitor
Computer
• An ADC equipped computer system
• A DVI equipped system (additional ADC to DVI adapter required)
Please take note of the following:
1. The Apple Display Connector (ADC) cable carries digital and analog video (DVI-D) signals, power and USB, and is compatible with DVI
graphics cards, provided that you have the proper adapter/converter to separate out power and USB.
2. Mac Cube, G3 and G4 systems support both analog and digital signals.
3. If your computer uses a standard DVI connection socket, you will need a DVI-D to ADC adapter (purchased separately), in order to plug the
cable into the ADC port. It consists of an integrated power supply with an AC wall power cord and a Y cable that connects to both the DVI and
USB ports on your computer (see the installation diagram on p. 10).
4. If you use the DVI-to-ADC adapter make sure that the adapter and the ADC VGA card of the PC system/s, are both digital or both analog
devices.
5. ADC extension cables can be used to increase the distance from the Miniview ADC to up to 33 feet (10 meters).
5
Pictorial Introduction
Front View
1
3
2
1. Online LED indicators
Each CPU Port has a corresponding LED. The LED lights ORANGE when the connected
computer is powered on.
2. Selected LED indicators
Each CPU Port has a corresponding LED. The LED lights GREEN when its port is selected
3. CPU Port Indicator/Selection Buttons
6
Pictorial Introduction
Console View
Computer Side
5
4
4. ADC Console Connector
Your ADC flat panel display cable plugs in here
6
5. ADC Connector 1
This cable plugs into the ADC port on the computer
you are designating as Computer 1
6. ADC Connector 2
This cable plugs into the ADC port on the computer
you are designating as Computer 2
7
Installation
1. Make sure that power to all the devices you will be connecting up has been turned off. You must unplug
the power cords of any computers that have the Keyboard Power On function. Otherwise, the switch will
receive power from the computer.
2. To prevent damage to your equipment due to ground potential difference, make sure that all devices on
the installation are properly grounded. Consult your dealer for technical details, if necessary.
Step 1. Plug the ADC cable from the ADC display into the Console port connector of the GCS602 unit.
8
Installation
Step 2. Plug your USB keyboard and USB mouse into the USB ports on the back of the ADC display.
9
Installation
Step 3. Use the ADC cables to connect the ADC display port of the computers to the ADC Ports 1 and 2
(on the rear panel).
Note: If your computer comes with a standard DVI connectors, you need a DVI to ADC adapter (purchased separately).
➡
➡
10
Installation
Step 4. Turn on power to the ADC Display
Note: The Power On default is to link to ADC Port 1 . If the computer attached to ADC 2 is inactive, the display will be
blank so it may appear as if the unit is not functioning. This is not the case. Simply use the Port Selection push
button (described below), to switch to the active computer on the other ADC 2 port.
Step 5. Turn on power to the connected computers that is selected.
Note: GCS602 only allows computer to boot on the slected port.
11
Operation
Controlling the computers in your MiniView™ ADC installation from a single console is simple.
Manual Port Selection
Simply press the Port Selection push button on the Master View’s top panel to switch between computers
(ADC1, ADC2). The Selected LED on the top panel lights to indicate the active port.
Note:
➡
1. If any USB storage devices are attached to the ADC
installation, a warning message will appear when manually
switching from one computer to the other: “The device
you removed was not properly put away. Data might have
been lost or damaged. Before disconnecting a device, you
should select its icon in the finder and choose eject from
the file menu.”
Please ignore this warning message as it will not effect
the operation of the GCS602.
2. Miniview ADC does support simultaneous booting, in other
words, it only boots the computer that is selected.
3. If system is in sleep mode and you switch ports, the
system awakens.
12
Operation
Power Off
1. Turn off the power to the connected computers.
2. Unplug each power wall cord from the computers.
3. Unplug the ADC cables from the computers and the Apple display.
Important: Failure to follow the above Powering Off steps will result in damage to the
connected equipment.
13
Troubleshooting
Symptom
Keyboard not
responding
Mouse not deleted or
does not respond
correctly
Possible Cause
Action
OSD Operation
Loose cables
Check all keyboard cable connections to make sure they
are completely sealed in their sockets
Keyboard needs to be
reset
Unplug the keyboard from the Console Keyboard Por t, then
plug it back in.
MiniView™ ADC
needs to be reset
Turn off both computers (see Powering Off p.13), wait five
seconds, then turn the computers back on.
Selected por t connects
to a powered off
computer
Change the por t manually by pressing the appropriate por t
selection switch
Loose cables
Check all mouse cable connections to make sure they are
completely sealed in their sockets
Mouse needs to be
reset
Unplug the mouse from the console mouse por t, then plug
it back in
MiniView™ ADC
needs to be reset
Turn off both computers (see Powering Off p.13), wait five
seconds, then turn the computers back on.
14
Troubleshooting
Continued from last table
Symptom
Mouse not deleted or
does not respond
correctly
Possible Cause
Action
Incorrect mouse driver
Check your device manager to be sure that the correct
driver for your mouse (obtained from the manufacturer, or
supplied by the operating system), has been installed.
Because of the wide variety of mouse driver standards for
the modern series of mice (the ones with the extra buttons
and wheels), the GCS602 only suppor ts all the extra
features of the Microsoft® Intellimouse™. It suppor ts the
scrollwheel function of most other mice.
Resolution and/or
bandwidth set too high
The GCS602 MiniView™ ADC suppor ts Apple Studio and
Cinema Displays (Interfaced) with resolutions of up to
1920x1200.
Cable quality not good
enough
We strongly recommend that you use high quality cables
suppor ted with the ACS602. Using high quality cables
should eliminate possible video problems.
Video problems
15
Specification
Function
Specification
Computer Connection
Direct
2
Console Connectors
Keyboard, Mouse, and Monitor
1 x ADC-35 (F)
Dimensions (Depth x Height x Length)
4" x 1" x 5.75" (105mm x 25mm x 145mm)
Housing Case
Plastic
LEDs
On Line
Selected
2 x Orange
2 x Green
Storage Temperature
-4°F ~ 140°F (-20°C ~ 60°C)
Operating Temperature
32°F ~ 122°F (0°C ~ 50°C)
Operating Humidity
20 to 80% (Non Condensing)
Port Selection
Push Button
Weight
0.45 lbs (.20 kilograms)
Video Resolution
1600 x 1024, DDC, DDC2, DDC2B
16
Radio and TV Interference Statement
WARNING!!! This equipment generates, uses and can radiate radio frequency energy and, if not installed
and used in accordance with the instruction manual, may cause interference to radio communications.
This equipment has been tested and found to comply with the limits for a Class B computing device
pursuant to subpart J of Part 15 of FCC Rules, which are designed to provide reasonable protection
against such interference when operated in a commercial environment. Operation of this equipment in a
residential area is likely to cause interference, in which case the user at their own expense will be required
to take whatever measures may be required to correct the interference.
17
17
Limited Warranty
IN NO EVENT SHALL THE DIRECT VENDOR'S LIABILITY FOR DIRECT, INDIRECT, SPECIAL,
INCIDENTAL OR CONSEQUENTIAL DAMAGES RESULTING FROM THE USE OF THE PRODUCT,
DISK, OR ITS DOCUMENTATION EXCEED THE PRICE PAID FOR THE PRODUCT.
The direct vendor makes no warranty or representation, expressed, implied, or statutory with respect to
the contents or use of this documentation, and especially disclaims its quality, performance, merchantability, or fitness for any particular purpose.
The direct vendor also reserves the right to revise or update the device or documentation without
obligation to notify any individual or entity of such revisions, or updates. For further inquiries please
contact your direct vendor.
18
®
Contact info.
23 Hubble
•
Irvine, CA 92618
•
(P) 949.453.8782
•
(F) 949.453.8785
•
www.iogear.com