1
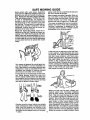
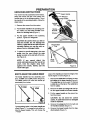
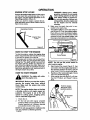
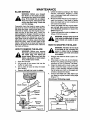
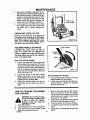
Model
22106x9A
This InstructionBookcontains informationfor several models.
Readand keepthis bookfor futurereference.
This bookcontainsimportantinformationon
SAFETY,,ASSEMBLY,OPERATION,AND MAINTENANCE.
PRODUCTINFORMATION
The ownermust be certainthat all
the productinformation is includedwiththe unit.
This informationincludes
the INSTRUCTIONBOOKS,
the REPLACEMENTPARTSand the WARRANTIES.
This informationmustbe includedto makesurestate laws
and other laws are followed.
RECORD THE FOLLOWING INFORMATION ABOUT YOUR UNIT,
THIS INFORMATION IS NECESSARY WHEN ORDERING PARTS
OR IN CASE OF LOSS OR THEFT.
WHERE
PURCHASED:
DATE
PURCHASB):
Month
MODEL
NO.;
F-98524
.Day.
Year
DATE
OFMANUFACTURE:
BUILT IN THE
MURRAY, INC. TwoYear Limited Warranty
Murray, Inc. warrants to the original purchaser that this unitshall be free from defects in material and workmanship under normal use and service for a period of Two (2) Years from
the date of purchase; however, this warranty does not cover engines, accessories (such as
snow blowers, snow blades, grass baggers and plows), transmissions, batteries and Normal Wear Parts (except as noted below) or transaxles as the companies that manufacture
these items furnish their own warranties and provide service through their authorized field
service facilities. For additional information, see the warranties covering these particular
parts. If you are uncertain whether your unit contains or is equipped with one or more of
these parts, consult your dealer priorto purchase. Subject to the terms and conditionsnoted
in this Limited Warranty, we shall, at our option, repair or replace at no cost to the original
purchaser any part covered by this Limited Warranty during the applicable warranty period.
In the event the battery proves defective within ninety (90) days from the date of purchase,
we will replace it without charge. If the battery proves defective after (90) days but within one
hundred twenty (120) days from the date of purchase, we will replace it for a charge of one
half (1/2) of the retail price of the battery in effect at the time of return.
Normal Wear Parts are defined as belts, blades, blade adapters, pneumatic tires, headlights
and seat covers. These parts are warranted to be free from defects in material and workmanship as delivered with the product. Any claim for repair or replacement of Normal Wear
Parts must be made within thirty(30) days of the date of purchase. No claims involvingdamage caused from material use, abuse or misuse will be honored.
This Murray, Inc. Two (2) Year Limited Warranty is your exclusive remedy; however, this
warranty is void or does not apply to any unit that has been tampered with, altered, misused,
abused or used for rental or other commercial and/or professional (non-homeowner) uses.
Your warranty does not cover minor mechanical adjustments which are not due to any defect in material or workmanship. For assistance in making such adjustments, consult your
Instruction Book.
To make a claim under this Murray, Inc. Two (2) Year Limited Warranty, return the unit (or
if authorized in advance, the defective part) along with your proof of purchase to an Authorized Service Center near you. To locate the nearest Authorized Service Center, call the
Central Parts Distributorfor your area shown in the list provided with your unit or check the
Yellow Page listings in your local telephone directory. If you return the entire unit, we will
repair the unit. If we authorize the return of the defective part only, we will either replace or
repair the part. In the case of a defect in a transmissionor differential (as distinguished from
a transaxle), the entire transmission or differential must be returned since they do not include user serviceable parts.
This Murray, Inc. Two (2) Year Limited Warranty gives you specific legal rights, and you
may also have other rights which vary from state to state. This Limited Warranty is given
in lieu of all other expressed and implied warranties including the implied warranty
of merchantability and warranty of fitness for a particular purpose. If you need additional information on this written warranty or assistance in obtaining service, write or call:
MURRAY, INC.
Outdoor Power Equipment
Customer Service Department
P.O. Box 268
Brantwood, Tennessee 37027
1-800-251-8007
F-98524
2
OWNER'S INFORMATION
This instructionbook is wdtten for a person with some mechanical ability.Like most service books,
not all the steps are described. Steps on how to loosen or tighten fasteners are steps anyone can
follow with some mechanical ability. Read and follow these instructions before you use the unit.
Know your product: If you understand the unit and how the unit operates, you will get the best
performance. As you read this manual, compare the illustrationsto the unit. Learn the locationand
the function of the controls. To help prevent an accident, follow the operating instructionsand the
safety rules. Keep this manual for future reference.
IMPORTANT: Many units are not assembled and are sold in cartons. It is the responsibility of the
owner to make sure the assembly instructionsin this manual are exactly followed. Other units are
purchased in an assembled condition. On assembled units, it is the responsibilityof the owner to
make sure the unit is correctly assembled. The owner must carefully check the unit according to
the instructions in this manual before it is first used.
RESPONSIBILITY
The responsibility
OF THE OWNER
of the owner is to follow the instructions below.
1.
Carefully read and follow the rules for safe operation.
2.
Follow all the assembly and preparation instructions.
3.
Inspect the unit.
4.
Make sure that the operator of the unit knows how to correctly use all standard and accessory
equipment.
5.
Operate the unit only with guards, shields,and other safety items in place and working correctly.
6.
Correctly adjust the unit.
7.
Service the unit only with authorized or approved replacement parts.
8.
Complete all maintenance on the unit.
The engine exhaust from this product
contains chemicals known to the State
of California to cause cancer, birth
defects or other reproductive harm,
F-98524
3
IMPORTANT
Safe Operation
Practices
for Walk-Behind
Mowers.
This cutting machine is capable of amputating hands and feet and throwingobjects. Failure to observe the following safety instructions could result in serious injury or death.
I.
General
Operation
Read, understand, and follow all instructions on the machine and in the manual(s).
Be thoroughly familiar with the controls and
the proper use of the mower before starting.
1.
2.
Do not put hands or feet near or under rotating parts. Keep clear of the discharge opening at all times.
3.
Only allow responsible individuals, who are
familiar with the instructions, to operate the
mower.
4.
Thoroughly inspect the mower and area
where the equipment is to be used. Clear
the area of objectssuch as rocks, toys, wire,
bones, sticks etc., which could be picked up
and thrown by the blade.
tion which can cause drowsiness or affect
your ability to operate this machine safely.
15. Never operate mower in wet grass. Always
be sure of your footing; keep a firm hold on
the handle and walk; never run.
16. Disengage the self-propelled mechanism
or drive clutch on mowers so equipped before starting the engine (motor).
17. If the equipment should start to vibrate abnormally, stop the engine (motor) and check
immediately for the cause. Vibration is generally a warning of trouble such as a blade
that is damaged, a loose blade, or the engine mounting bolts are loose.
18. Always wear safety goggles or safety
glasses with side shields when operating
mower to protectyour eyes from foreign objects which can be thrown from the unit.
5.
Be sure the area is clear of other people before mowing. Stop mower if anyone enters
the area.
19. Plan your mowing pattern to avoid discharge of material toward roads, sidewalks,
bystanders and the like.
6.
Do not operate the mower when barefoot or
wearing open sandals. Always wear substantial foot wear.
7.
Do not pull mower backwards unless absolutely necessary. Look down and behind before and while moving backwards.
20. After striking a foreign object, stop the engine. Remove the wire from the spark plug.
Inspect the blade and mower for damage. If
damaged, repair before starting and operating the mower.
8.
g.
Do not operate the mower without proper
guards, plates, grass catcher or other safety
protective devices in place.
See manufacturer's instructions for proper
operation and installation of accessories.
Only use accessories approved by the
manufacturer.
10. Stop the blade(s) when crossing gravel
drives, walks, or roads.
11. Stop the engine (motor) whenever you
leave the equipment, before cleaning the
mower or unclogging the chute.
12. Shut the engine (motor) off and wait untilthe
blade comes to complete stop before removing grass catcher.
13. Mow only in daylight or good artificial light.
14. Do not operate the mower while under the
influence of alcohol, drugs or other medicaF-98524
21. Keep any washout ports and other mower
housing service openings closed when
mowing.
II. Slope Operation
Slopes are a major factor related to slip and fall
accidents which can result in severe injury.All
slopes require extra caution, If you feel uneasy
on a slope, do not mow it.
DO:
Mow across the face of slopes; never up
and down. Do not mow excessively steep
slopes (maximum 15 degrees) or areas
where the ground is very rough. See the
=Guide" in the back of this manual to check
a slope. Exercise extreme caution when
changing direction on slopes.
Remove objects such as rocks, tree limbs,
etc.
Watch for holes, ruts, or bumps. Tall grass
can hide obstacles.
(Continued Following Page)
IMPORTANT
DO NOT:
nect the spark plug wire, and keep the wire
away from the plug to prevent accidental
starting. Always wear eye protection when
you make adjustments or repairs.
Do not mow near drop-offs, ditches, or embankments. The operator could lose footing
or balance.
Do not mow excessively steep slopes.
Keep all nuts and bolts, especially blade attachment bolts, tight and keep equipment in
good condition.
4.
Do not mow on wet grass. Reduced footing
could cause slipping.
Never tamper with safety devices. Check
their proper operation regularly.
5.
III. Children
Tragic accidents can occur if the operator is not
alert to the presence of children. Children are
often attracted to the mower and the mowing
activity. Never assume that children will remain
where you last saw them.
1.
2.
To reduce fire hazard, keep mower free of
grass, leaves, or other debris build-up.
Clean up oil or fuel spillage. Allow mower to
cool before storing.
.
Stop and inspect the equipment ifyou stdke
an object. Repair, if necessary, before restarting.
Keep children out of the mowing area and
under the watchful care of a responsible
adult.
Be alert and tum mower oft if children enter
the area.
3.
Before and while moving backwards, look
behind and down for small children.
4.
Never allow children to operate the mower.
5.
Use extra care when approaching blind corners, shrubs, trees, or other objects that
may obscure vision.
IV. Service
"1. Use extra care in handlinggasoline and other fuels. They are flammable and vapors are
explosive.
a. Use only an approved container.
b. Never remove gas cap or add fuel with
the engine running. Allow engine to cool
before refueling. Do not smoke.
c. Never refuel the machine indoors.
d. Never store the machine or fuel container inside where there is an open flame,
such as a water heater.
*2. Never run an engine indoors or inside a
closed area.
3.
6.
Never make adjustments or repairs to items
such as the height adjusters or grass catcher with the engine (motor) running. Discon-
F-98524
8.
Never attempt to make wheel height adjustments while the engine (motor) is running.
9.
Always disconnect electdc mowers (live operated) before cleaning, repairing, or adjusting.
10. Grass catcher components are subject to
wear, damage, and deterioration, which
could expose moving parts or allow objects
to be thrown. Frequently check components
and replace with manufacturer's recommended parts, when necessary. For storage, always make sure grass catcher is
empty.
11. Mower blades are sharp and can cut. Wrap
the blade(s) or wear gloves, and use extra
caution when servicing them.
12. Do not change the engine governor setting
or over-speed the engine.
13. Frequently check the blade for wear or damages such as cracks and nicks.A blade that
is bent or damaged must be immediately replaced with a factory replacement blade.
For safety and good cutting performance,
replace the blade every two years. Frequently check the blade boltand the engine
mounting bolts. Replace damaged bolts
and tighten loose bolts.
14. Use only original equipment or authorized
replacement parts.
* Asterisked items do not apply to electric mowers.
5
SAFE MOWING GUIDE
Every person who uses power equipment
must learn the difference between proper and
improper use, safe and unsafe mowing practices. Read the next few pages carefully.
They can help you learn. Too often the mower user is inexperienced, not properly instructed, or has not read the Instruction Book
and instructions on the unit before using itfor
the first time. This can result in unsafe use endangering the operator, bystanders, and the
equipment. Another result can be a poor appearance of the area mowed.
Read this Instruction Book. Read the instructions on the unit. Operate the mower accarding to the Safe Mowing Guide and other
safety rules and recommendations in this Instruction Book and on the unit. Make sure anyone who uses the unithas read the instructions
and has been told how to operate the mower
safely.
Your mower is designed to provide good service and durability in normal residential cutUng. If the mower is not propedy serviced and
maintained or used on unsuitable terrain or in
conditions not suitable for mowing, product
performance and safety will be reduced.
Proper attire is an important part of safe mowing. Safety glasses protect the eyes from
thrown objects. Safety shoes with steel toes
can protect a foot from being cut by the blade.
Shirts and pants that cover the arms and legs
can stop or deflect a thrown object.
Practice using the mower before you actually
begin cutting grass. Select a large open level
area. Learn the location and function of the
controls and how they work. It is important that
the blade can be stopped quickly in an emerF-98524
gency. Learn how to cut and how to keep control of the mower at all times.
Many mowers are started manually. When using a pul! start or rope start, place your feet
firmly and away frem the blade. Hold the rope
handle securely, but never wrap the rop,e
around your arm or fingers for a "better grip.
The mower is designed for use by one person.
Always mow alone. Never carry passengers.
Carrying a passenger is dangerous for the
passenger and the operator.A mower is not for
amusement or for carrying objects.
Is the area you are planningto mow wet?. Never cut a wet lawn. Cutting wet grass can cause
an accident. It can affect mower performance
and also cause problems with future lawn
growth and appearance. Wet grass is slippery
and might cause the operator to fall or the
mower to slip. Someone could be hurt by
touching the blade. Wet grass tends to clogthe
mower, causing poor discharge. Wet clippings
bunch up on the lawn retarding the growth of
grass. A wet mower can cause parts to rust
and reduce the useful life of the unit.
When you look over the lawn, refresh your
memory about hard, immovable obstacles
such as pipes, stumps, and recks and avoid
them. They can cause damage to the mower
or an accident injuring the operator or a bystander. Take a litter bag along and walk over
the area to be cut. Pick up any stones, toys,
wire, bones, or other loose objects. These
items can damage the mower or they can become dangerous flying objects if the mower
blade hits them. The blade of a power mower
travels very fast. It can throw rocks and other
objects with force over long distances. Objects
thrown by mowers can break windows, cause
SAFE MOWING GUIDE
bruises, or even put out an eye. Often the person hurt by a thrown object is a bystander such
as a child, another family member or a neighbor. Keep people and pets completely away
from the mowing area. Direct the mower's discharge away from areas where people can be.
Planning your mowing pattern has a double
benefit. It can reduce chances of an injury and
make the clean up after mowing easier.
Are there ditches,
walls, or major inclines in the area to be
cut?.Plan the mowing
pattern to avoid such
danger areas.
Inclines and rough terrain must be mowed
carefully and some
areas must not be cut
with a mower at all.
With walk behind_
equipment,
mow
across the incline so
that if you orthe mower slip, you won't run
into each other.
Never mow slopes greater than 15 degrees.
See the =Guide" in the back of this Instruction
Book to check any slopes.
Ready to start cutting? Not yet. Be sure the
mower has been fully assembled according to
directions in the Instruction Book. Even if assembly was done by a lawn and garden shop
or the store where the unit was purchased, it
must be checked. Are all nuts, bolts and
screws tight? Does the engine have oil? These
items must be checked periodicallythroughout
the life of the mower.
Your mower has a gasoline engine. Gas is
dangerous. Store fuel only in a approved gas
container. Do not store large amounts of gas.
Put out all cigarettes, pipes and cigars before
working with gasoline. Store fuel and the mower itself in a well ventilated area away from any
possible source of ignitionsuch a pilot light on
a furnace. If the mower is to be storedfor an extended time, remove the gas from the tank.
This minimizes the chance of a fire and keeps
the tank clear of deposits and old gasoline,
thus improving mower performance. Move the
mower outside before adding gasoline. Use a
funnel and wipe up any spilledfuel before starting. Remember, gasoline expands when
heated so leave some expansion room. Also,
most mower gas caps are vented to allow for
expansion. Always use the proper cap. People
are needlessly burned by fires, hurt in explosions, mowers and other property are damaged because of failure to follow basic safety
rules related to gasoline and fueling.
Never add gasoline to an engine that is running
or that is hot from recent use, this can cause an
accident. Remove dry grass and other debris
from the mower. Keeping the mower clean will
F-98524
improve the performance, help the engine stay
cooler, extend the life of moving parts, and
minimize the danger of fire. People get burned
working with and around their mowers for other reasons than fire and explosions. It takes
only a few seconds of operation for the engine
and the muffler to become hot. Do not touch
these parts when the mower is running. Stop
the engine and let it cool down before servicing
the mower. Remember, exhaust fumes can be
dangerous. Never operate the engine indoors
or in an enclosed area.
Getting a new mower can be a big event for a
family. Let family members satisfy their curiosity about the mower and at the same time, tell
them about its dangers. Remember, a mower
is not a toy and is not for use by childrenor anyone lacking in age, strength or experience.
As with any power equipment, a mower can be
dangerous if not assembled, misused, or not
propedy maintained. The most important rule
is to always use good judgement and common
sense.
Your mower will cut thick grass and heavy
plant stems with ease. Fingers and toes are co
more resistant to the mower's blade. Many
people are injured because they =forgot" and
reached into the discharge chute. Always treat
_lour lawn mower as if the blade is rotating.
ever perform any service or try to make any
adjustment,except carburetor, while the engine is running.
Use only accessories suited for your mower.
Use of improper accessories can reduce the
safety designed into both the mower and the
accessory, it can even damage the unit. Read
and follow the instructions which come with the
accessory and the mower.
SAFE MOWING GUIDE
Use only original equipment or approved substitutions as service parts. If you need professional service, select a shop that is an
Authorized Service Center for your brand of
mower. If you plan to service the unit yourself,
follow directions in the Instruction Book.
in the rain is no fun and it is dangerous. Always
seek shelter in an electrical storm. In extremely dry mowing conditions, your safetyglasses
can serve a dual purpose by protecting your
eyes from dust and thrown objects, also a dust
or pollen mask can be helpful.
As you mow, remember children and pets are
sometimes attracted to the activity. Be especially careful when trimming around shrubbery
or when backing up. If at all possible, don't
mow when moving backwards. It is dangerous
because vision is restricted. Also, blades are
designed to cut while the unit is moving forward so cutting performance is reduced when
mowing in reverse.
Never leave the mower running and unattended. Shut off the engine. Put the mower in
a position so that it can not roll. If the unit is
self-propelled, make sure the drive control is
disengaged.
Your mower isequipped with a number of safety features which are importantto the safety of
the operator and bystanders and must never
be altered or removed. If a safety feature becomes inoperable, lost,or damaged, it must be
repaired or replaced before the mower is used.
Engine speed is a key to safe mowing and a
nice looking lawn. The maximum speed of the
engine on your mower has been set at the factory. Do not change the engine governor in any
way.
Select the maximum engine and ground speed
that is right for the terrain and the height of
grass. You get the best cutting and bagging
performance when using a grass catcher by
operating the engine at maximum speed. Never walk fast or runjust to get the job done sooner. On inclines, reduce ground speed and
exercise extreme care.
When mowing, be aware of your condition and
the weather conditions. After mowing a long
time, you will be tired. This is the time when
reactions slow down, your attention wanders;
the time when you are wide open for an accident. Take a short break. If temperatures are
high, take precautions to avoid becoming dehydrated. If you are angry, tired, or unable to
give your full attention to mowing, if you have
been consuming alcohol, medicines, or drugs,
do not use your mower or any type of power
equipment.
If weather conditions become worse while you
are cutting, stop and finish later. Cutting grass
8
F-98524
It is best to mow only during daylight hours;
however, if you must mow in the late afternoon
or evening, make sure there is good artificial
light.
Your mower willrequire maintenance including
service and adjustments before and after use
as with any machine. The frequency of the
maintenance is generally based on hours of
use, however, the frequency can vary because
of mowing conditions. Check the Instruction
Book for more detailed instructions. Proper
maintenance protects your investment in the
mower and helps insure that it will function
safely and reliably.
Never attempt any
service (with the possible exception of carwith the engine running. After turning the
buretor off,
adjustment)
engine
always /_
disconnect the spark
plu9 wire to prevent
accidental restarting
while the unit is being
serviced.
SAFE MOWING GUIDE
While mowing, if you hit a foreign object, stop
the engine. Remove the spark plug wire. Carefully and thoroughly inspect the mower for
damage. Make necessary repairs before restarting. If the unitstarts to vibrate abnormally,
stop the engine immediately and check for the
cause. Vibration is generally a warning of
trouble. Keep all nuts, bolts, and screws tight.
The blade is the most dangerous part of the
mower and also the most important part in obtaining a nice lawn appearance. Check the
blade and the blade mounting hardware frequently. Keep it tight. If the blade hits a solid
object, check it thoroughly for deformation or
cracks and replaca if damaged. For safety,replace the blade every two years. A sharp blade
reduces the work load on the engine and cuts
grass more cleanly,for a better looking cut with
less work. The blade is always close to the outside of the mower housing. For best trimming
on side discharge mowers, cut with the left
side of the housing toward the area that needs
trimming.
position when mowing and bagging. When
bagging, slower ground speed will provide the
best results.
Change the mowing pattern slightlyeach time
you cut. If you always cut the same way, the
grass will develop a "set" and clippingswill accumulate more heavily in some areas more
than in others causing grass to get thinner in
those areas. Do not service your mower over
the grass. Spilled oil and gas can killthe grass.
In tall grass or very heavy grass, do not try to
cut it all at once. Raise the height of cut on the
first cutting and lower it for the next cutting the
same day or within a few days. Another way is
to cut only part of the width of the mower and
adjust your ground speed (not the engine) to
move more slowly so the mower can clear itself as it moves forward.
A useful accessory for your mower is a grass
catcher. There are grass catchers available for
most models. For best performance and safety, be sure the grass catcher is approved for
use with your mower. Assemble as directed
and follow operating and safety instructions
with the catcher and in the Instruction Book.
Before mounting, checking or emptying the
grass catcher, always turn the engine off. Remember to check the grass catcher before
each use for cracks, wear, or deterioration. Replace any part that is damaged with the manufacturer's recommended replacement part
before using the grass catcher again.
Proper cutting technique is important if you
want your lawn to look good. Avoid the temptation to cut grass too short. Cutting grass too
short can kill the plant, cause grass to turn yellow, or make the lawn look brown and thatchy.
Use the lower cutting heights in cool months
when the grass is lush. Use the higher cutting
heights in extremely dry periods. Cutting with
a dull blade or low engine speed bruises,
shreds, and can uproot some grass making
the lawn look dull and brown a few days after
cutting. Always put the throttle control in FAST
9
F-98524
When cutting with a walk behind mower, always push the unit. Do not pull it. Pushing the
unit keeps the operator behind the mower in
the =operator's zone" for better control. Pushing the unit also gives you a chance to see exactly where and what you are mowing. There
will be times while you are mowing that you will
have to pull the mower backwards (such as
when the front of the mower has come up
against a wall or fence). If you must back up,
make sure your feet are in the clear. Stand well
back from the mower, plant your feet firmly with
each step and back up being careful to look behind you. Resume normal mowing as soon as
possible.
If your unit is self-propelled, remember that
the drive mechanism is not designed to do all
the work, but the unit can move without your
help. Always keep your hands on the handle
near the controls when the engine is running.
Remember too that the self-propelled mechanism can be dangerous. Keep hands and feet
away from belts and chains. Always turn offthe
engine before attempting to remove anything
that becomes entangled in the self-propelled
system.
Remember, your mower is a useful tool, but it
can be dangerous. Follow the instructions in
this Instruction Book. Use the mower properly
and carefully and it will give you many hours of
trouble free, accident free operations.
STEPS TO FOLLOW
BEFORE MOWING
•
•
Be sure to dress correctly. Wear hard shoes, not sandals or tennis shoes.
Examine the blade. A blade that is bent, cracked, or damaged must be replaced with a factory
replacement blade.
Fill the fuel tank outside. Clean off spilled fuel.
Read and follow the Owner's Manual, the instructionswith the engine, and the instructionswith
any attachments. Owner's Manual instructions are for your safety and the safety of others.
Exhaust fumes are dangerous. Start the engine outside.
Make sure all safety devices are in place and working correctly.
Operation of the mower is only for a person that has experience.
Wet grass can be dangerous. Let the grass dry.
Instruct children and others to keep away from the work area.
Never cut the grass without good light.
Pick up loose objects. Remove them from the mowing area.
•
•
•
•
•
•
•
•
•
WHILE MOWING
•
•
•
Watch for fixed objects and avoid them. They can damage the mower or cause injury.
A hot engine and muffler will cause a burn. Do not touch.
Inclines and slopes must be carefully mowed. See the =Guide" in the back of this book to check
a slope.
Lack of daylight or good artificial light is cause to stop mowing.
Examine the mower, the blade, and other parts for damage after hittinga foreign object or ifthe
unit vibrates excessively.
Do not make adjustments or repairs without stopping the engine (except for carburetor). Disconnect the spark plug wire.
On or near reads, watch out for traffic. Direct discharge away from reads.
When mowing, avoid areas where traction is unsure. Before and while moving backwards, look
behind and down for small children.
•
•
•
•
•
•
In heavy grass, raise the cutting height. Cut slower. Stop the engine to remove clogged grass
from the mower.
•
•
Never remove any safety related parts.
Do not pour gasoline into a engine that is hot or running.
AFTER MOWING
•
•
•
•
•
•
•
•
•
•
•
Always let the mower cool before storing in an enclosed area.
Foreign material on the mower is dangerous. Clean off grass, leaves, grease and oil before
storing.
Tighten all loose nuts, bolts and screws before you use the unit.
Empty and clean any grass catcher or other accessory.
Remove the key or disconnect the spark plug wire to prevent unauthorized use.
Make sure the mower is not kept near a source of ignition.Gas fumes can cause an explosion.
Only original parts or factory approved substitutes can be used to service the mower.
When storing the mower for an extended period, remove the fuel from the fuel tank.
Instruct children to leave the mower alone. It is not a toy.
Never keep gasoline near a source of ignition. Always use an approved container. Keep
gasoline away from children.
Lubricate according to the Instruction Book. See "Lubrication".
IMPORTANT_ead
reference.
the Instruction Book. Keep this book for future use and
safety
precautions.
means: to"Attention!
Become
WARNING:
Look for thisIt symbol
point out important
Alert! Your Safety Is Involved."
F-98524
10
PREPARATION
UNPACKING
INSTRUCTIONS
The mower was fully assembled at the factory.
When the mower was put in the carton, the
handle was put in the storage position. To put
the handle in the operating position, follow the
steps below.
Wingnut
Offset Hole
Lockinc
Tabs.
1. Remove the mower from the carton.
2, Put the lower handle in the operating position. Make sure the lower handle is between the locking tabs (Figure 1).
Handle
Wir
3. Put the upper handle in the operating
position. Tighten the wingnuts.
CAUTION: Be careful when you fold or
raise the handle. Do not damage the
cables. A cable that is bent will not work
correctly. Before you use the unit, replace a bent or damaged cable.
4. To attach the recoil-start grip to the rope
guide, twist the rope through the rope
guide mounted on the dght side of the handle (Figure 2).
NOTE: If you cannot attach the
recoil-start grip because the rope is too
short, hold the engine atop lever
against the handle. Slowly pull the
recoil-start grip.
HOWTO ADJUSTTHEHANDLEHEIGHT
The lower handle has two assembly positions. A HIGH and a LOW position (Figure 3).
The HIGH position will raise the handle approximately four inches.
LOW
angle of the handle and make the heightof the
handle higher or lower (Figure 3).
1,
Remove the cable ties that fasten the control cables to the lower handle (Figure 4).
The cable ties can be re-used. To remove
a cable tie, pull the tab on the cable tie to
free the cable.
2. Remove the bolts and wingnuts that fasten the upper handle to the lower handle.
3. Put the upper handle on the ground behind the mower.
CAUTION:
Do not bend the control
cables. A cable that is bent or damaged
must be replaced.
Remove the wingnuts from the right and
left handle brackets (Figure 1).
The mounting holes in the lower handle are
5. Remove the lower handle from the hanoffset (Figure 1), To change the hole offset, rodle brackets (Figure 1).
tate the lower handle. This will change the
11
F-98524
4.
PREPARATION
6. Rotate
the lower
handle
around
(Figure 4). Mount the lower handle to the
handle brackets.
8. Fasten the upper handle to the lower
handle with the bolts and wingnuts
(Figure 4).
7. Attach the lower handle to the handle
9. Secure the control cables to the lower
handle with the cable ties.
brackets with the bolts and wingnuts.
(Figure 1).
Tab
\
Cable Tie
Bolt
Handle Bracket
Figure 4
F-98524
12
PREPARATION
HOW TO PREPARE THE ENGINE
ENGINE DOES NOT CONTAIN
OIL OR GASOLINE
See the engine manufacturer's instructionsfor
the type of gasoline and oil to use. Before you
use the unit, road the informationon safety, operation, maintenance, and storage.
WARNING: Follow the engine
manufacturer's
instructions for
the type of gasoline and oil to
use. Always usa a safety gasowhen
adding gasoline
to the
enline container.
Do not
smoke
gine. When inside an enclosure,
do not fill with gasoline. Before
you add gasoline,
stop the
engine. Let the engine cool for
several minutes.
IMPORTANT: This unit is equipped with an
internal combustion engine and must not
be used on or near any unimproved forestcovered, brush-covered or grass-covered
land unless the engine's exhaust system is
equipped with a spark arrester meeting
applicable local or state laws (if any). If a
spark arrester is used, it must be maintained in effective working order by the olP
eraton
,_
In the State of California the above is required by law (Section 4442 of the CalIfornia Public Resources Code). Other states
may have similar laws. Federal laws apply
on federal lands. See an Authorized Service Center for a spark arrester for the
muffien
FINAL ASSEMBLY
Before you use the mower, check the assembly of the wheels, the handle, and the controls.
Make sure all the fasteners are tight. Make
sure the throttle control and the engine stop lever work correctly.
F-98524
13
OPERATION
ENGINE STOP LEVER
WARNING: Always use a safety
gasoline container. Do not smoke
Release theengine stop lever and the engine
and the blade will automatically stop. To run
the engine, hold the engine stop lever in the
Operating position (Figure 5).
Before you start the engine, operate the engine stop lever several times. Make sure the
cable moves easily.
tank. When inside an enclosure,
when adding gasoline to the fuel
do not add gasoline. Before you
add gasoline, stop the engine and
let the engine cool for several
minutes.
3.
Position
4.
Engine Stop
Lever
Make sure the spark plug wire is connected to the spar:<plug.
The primer button ison the side of the engine (Figure 6). Push the primer button.
Every time you push the primer button,
wait two seconds. For the number of times
required to push the primer button, see
the engine manufacturer's instructions.
Figure 5
HOW TO STOP THE ENGINE
To stop the engine, release the engine stop
lever. Disconnect the wire from the spark plug
to prevent the engine from starting.
If the engine will not stop, hold a screwdriver
against the spark plug and against the engine
cooling fins. The spark will go to ground and
the engine will stop. Before you start the engine, check the engine stop cable. Make sure
the engine stop cable is assembled correctly.
Before you operate the unit, replace a bent or
damaged engine stop cable.
HOW TO START ENGINE
WARNING:
The blade
when
the engine
runs. will rotate
IMPORTANT: Before you start the engine,
operate the engine stop lever several
times. Make sure the engine stop cable
moves freely.
NOTE: The engine design does not include
a throRle control or an engine speed adjustment. The engine is set at the best
speed for cutting grass, bagging grass,
and for extended engine life.
1.
.
Check the oil.
Fillthe fuel tank with regular unleaded
gasoline. Make sure the gasoline is clean.
Leaded gasoline will increase deposits
and shorten the life of the valves.
NOTE: Do not use gasohol or methanol. Do
not use premium unleaded gasoline.
14
F-98524
NOTE: Do not use the primer button to
start a warm engine.
5. Stand behind the mower (Figure 7). Use
one hand to hold the engine stop lever in
the operating position as shown. Use the
other hand to hold the recoil-start grip.
6. Rapidly pull the recoil-start grip. Slowly
return the recoil-start grip.
7. If the engine does not start in 5 or 6 tries,
See the "Problem and Repair" Instructions.
Hold the engine
stop lever in the
operating postion.
Recoil-Start
Grip
MAINTENANCE
ENGINE MAINTENANCE
Hard starting.
Use the following maintenance sectionto keep
your unit in good operating condition. All the
maintenance information for the engine is in
the =Engine Instm_on Book'. Before you start
the engine, read this book.
WARNING: Before you
inspection, adjustment
carburetor), or repair,
engine and disconnect
from the spark plug.
Engine smoking.
Spark plug fouling.
Oil or gas saturation of the air filter.
make an
(except
stop the
the wire
ENGINE TIPPING
When you service the engine, inspect the
blade, or clean the underside of the mower
housing; make sure to always tip the engine
with the spark plug up (see Figure 8), TranSporting or tipping the engine with the spark
plug down will cause:
HOW TO CLEAN
THE MOWER HOUSING
WARNING: The blade will rotate
when the engine runs. Before
you clean the mower housing,
stop the engine and disconnect
the wire from the spark plug.
Grass and other debris can keep the mower
from working correctly. After you mow, clean
the mower housing as follows.
1.
Stop the engine.
2.
Disconnect the wire from the spark plug.
3.
Clean the top and the bottomof the mower
housing.
Figure 8
HOW TO ADJUST
THE HEIGHT OF CUT
WARNING: The blade will rotate
you
the height
cut,
whenchange
the engine
runs. of
Before
stop the engine and disconnect
the wire from the spark plug.
,_
To change the height of cut, move the position
of the adjuster arm at each wheel (Figure 9).
Make sure each adjuster arm is in the same
position so that the mower will cut level.
1.
Disengage the adjuster arm.
2.
Move the adjuster arm to another position.
_
Adjuster
Arm
LUBRICATION
1.
For maximum performance, lubricate the
wheels and all pivot points with engine oil
every 25 hours.
2.
To lubricate the engine, refer to the =Engine Instruction Book".
NOTE: Do not lubricate the engine stop
cable. Lubricants will damage the cable
and prevent the cable from moving freely.
Replace the cable if bent or damaged.
15
F-98524
_f
Figure 9
MAINTENANCE
BLADE SERVICE
5.
WARNING: Before you inspect
the blade or the blade adapter,
6.
plug.
If the the
blade
hits
isconnect
wire
to an
theobject,
spark
stop the engine. Disconnect the
wire to the spark plug. Check the
unit for damage.
A
7.
Frequently check the blade for wear or darnage such as cracks. Frequently check the bolt
that holds the blade. Keep the bolt tight. If the
blade hits an object, stop the engine. Disconnect the wire to the spark plug. Check the
blade adapter for damage. Check for a bent or
damaged blade, a badly worn blade, or other
damage. Before you operate the unit, damaged parts must be replaced with factory replacement parts. For safety, replace the blade
every two years. Keep a sharp edge on the
blade. A blade that is not sharp will cause the
ends of the grass to become brown. Remove
the blade as follows.
8.
Check the blade according to the "Blade
Service" instructions. Replace a badly
worn or damaged blade with a factory replacement blade.
Mount the blade with the curved edges toward the housing. If the blade is upside
down, the blade will not cut correctly and
can cause an accident.
Fasten the blade with the original washers and bolt. Make sure the outside rims
of the Belleville washers are toward the
blade (Figure 10).
Tighten the bolt that holds the blade to a
torque of 30 foot pounds.
that holds the blade tight. A loose
WARNING:
Always
keep the
bolt
bolt or blade
can cause
an accident.
A
HOW TO SHARPEN THE BLADE
WARNING: Vibration Is the result
HOW TO REMOVE THE BLADE
WARNING:
A
1.
2.
3.
4.
Before
you remove
the spark plug. The blade has
the
blade,
disconnect
thehold
wirethe
to
sharp
edges.
When you
blade, use gloves or cloth material to protect your hands.
Drain the fuel tank.
Lift the side of the mower that has the
muffler or spark plug.
Use a piece of wood to keep the blade
from rotating.
Remove the bolt that holds the blade.
A
anced.
A blade
thatcorrectly
is damaged
If the blade
is not
balwith cracks can break and cause
an accident.
1.
Sharpen the blade two times a year or every 25 hours.
If the blade is on the unit, do not sharpen.
Remove the blade according to the instructions in "How To Remove The Blade'.
Clean the blade with a brush, soap, and
water. Check the blade. Look for cracks,
nicks, or other damage. Replace a blade
that is badly worn, bent, or damaged with
a factory replacement blade.
Sharpen the blade with a file. Make sure
you keep the onginal beveled cutting edge
(Figure 11).
2.
3.
4.
'Continued
following
page)
Blade
File
Screwdriver
Belleville Washer
Flat Washer
Bolt
Figure 10
F-98524
I
I
16
Blade is balanced
when parallel to
the ground.
I
Ground
I
Figure 11
MAINTENANCE
5.
6.
Make sure the blade is balanced. Use a
screwdriver and hold the blade parallelto
the ground as shown. A blade that is balanced will stay parallel to the ground. If the
blade is not balanced, the heavy end will
rotate toward the ground. Sharpen the
heavy end until the blade is balanced.
A new blade will cut better than a badly
worn blade. Every two years replace the
old blade with a factory replacement
blade.
Push in on
lower handle.
J
CHECK THE LEVEL OF CUT
Test the unit in a small area. If the height of cut
is not level or if the cut grass is not discharged,
the cause can be: (1) the blade is bent or damaged, (2) the blade is not sharp, (3) a worn
blade, (4) or a broken blade adapter. Before
you use the unit, correct the problem.
Figure 12
FOLDING HANDLE STORAGE
Lower Handle
CAUTION: Be careful when you fold or
raise the handle. Do not damage the
cables. A cable that is bent will not work
correctly. Before you use the unit, replace a
bent or damaged cable.
Locking
Tabs,
Knob_
How To Fold The Handle
1,
2.
3.
Loosen the knobs that hold the upper part
of the handle to the lower part of the handle. As you fold the handle, make sure the
cables are not around the loose fasteners
and do not become damaged. Rotate the
upper part of the handle toward the back
of the unit (Figure 12).
Loosen the knobs on the lower handle
(Figure 13). Push in on the ends of the
lower handle, Move the ends of the lower
handle past the locking tabs.
Rotate the handle forward over the engine. Make sure the cables are not damaged.
HOW TO PREPARE THE MOWER
FOR STORAGE
WARNING: Do not remove gaaoa fire, or while you smoke,
line while inside a building, near
Gasoline fumes can cause an
explosion or a fire.
1. Drain the fuel tank.
2. Let the engine run until it is out of gasoline.
3. Drain the oil from the warm engine. Fill the
engine crankcase with new oil.
17
F-98524
Figure 13
How To Raise The Handle
1.
2.
4.
Pull the handle back until the ends of the
lower handle lock into position.
Lift the upper part of the handle intothe operator's position. Tighten the fasteners
that hold the handle.
Remove the spark plug from the cylinder.
Pour one ounce of oil into the cylinder.
Slowly pull the recoil-start grip so that the
oil will protect the cylinder, install a new
spark plug in the cylinder.
5. Clean the dirt and debris from the cylinder
cooling fins and the engine housing.
6. Clean the bottom of the mower housing.
7. Completely clean the mower to protectthe
paint.
8. Put the unit in a building that has good ventilation.
TROUBLE
The Engine
SHOOTING
CHART
will not start.
1.
2.
Move the throttle control lever to the FAST or START position.
Make sure the fuel tank is filled with clean gasoline. Do not use old gasoline.
3.
On a cold engine, push the primer button (optional on some models) five times.
4.
Make sure the wire for the spark plug is connected to the spark plug.
5.
Adjust the Carburetor. See the "Engine Instruction Book'.
6.
There is too much gasoline in the engine cylinder. Remove and dry the spark plug. Put the
throttle control in the SLOW position. Pull the recoil-start grip several times. Install the spark
plug. Connect the wire to the spark plug. Start the engine.
7.
The engine is difficultto start in heavy or high grass. Move the mower to a clean dry surface.
8.
Make sure the engine stop lever is in the operating position.
9.
Make sure the fuel valve is in the ON position. See the =Engine Instruction Book'.
10. On electdc start models, make sure the wiring harness is connected. Charge the battery.
The Engine will not stop.
1, Release the engine stop lever.
2,
Check the engine stop cable. Replace the cable if bent or damaged.
The Engine performance
is bad.
1. Check the height of cut settings. Raise the height of cut if the grass is high.
2.
Check the bottom of the blade housing. Clean the blade housing of grass and other debris.
3.
Check the wire to the spark plug. Make sure the wire is connected.
4.
Clean the engine cooling fins of grass and other debris.
5.
Check the carburetor adjustments. See the "Engine Instruction Book'.
6.
Check the spark plug gap. Sat the spark plug gap at 0.030".
7.
8.
Check the amount of oil in the engine. Fill with oil if necessary.
Check the engine air cleaner. See the "Engine Instruction Book".
9.
The gasoline is bad. Drain and clean the fuel tank. Fill the fuel tank with clean gasoline.
10. Check the throttle control. Make sure the lever is not in the CHOKE position.
Excessive
Vibration.
1.
Remove the blade. Check the blade and balance if necessary. See the blade maintenance
instructions.
2.
Check for a bent or broken blade. A DAMAGED BLADE IS DANGEROUS AND MUST BE
REPLACED.
3.
4.
Check the blade adapter. REPLACE A BROKEN BLADE ADAPTER.
If the vibration continues, take the mower to an Authorized Service Center.
The grass will not discharge correctly.
1. Clean the bottom of the mower housing.
2.
Check for a badly worn blade. Remove and sharpen the blade. For safety, replace the blade
every two years with a factory replacement blade.
3.
Move the throttle control lever to the FAST position. Check the speed of the engine according
to the "Engine Instruction Book".
The grass is not cut even.
I. Check the height adjustment at each wheel. The height adjustment must be the same for each
wheel.
2.
3.
Make sure the blade is sharp.
Check for a bent or broken blade. A DAMAGED BLADE IS DANGEROUS AND MUST BE
REPLACED.
4. Check for a broken blade adapter. REPLACE A BROKEN BLADE ADAPTER.
F-98524
18
MODEL 22106x9A
REPAIR PARTS
13
14
8
15
7
12
4
KEY
NO.
DESCRIPTION
PART NO.
1
Handle, Upper (Black)
672666E701
2
Handle, Lower(Black)
3
KEY
NO.
DESCRIPTION
PART NO.
8
Engine Stop Cable
672560
71137E701
12
Guide, Rope
71530
Bolt
2x77
13
Engine Stop Lever
43653E700
4
Knob,Plastic
71294
14
Bracket,Stop Lever
43628 BC
7
Locknut
15x116
15
Fastener,Cable
71372
F-98524
19
MODEL 22106x9A
REPAIR PARTS
22
/
23
24
\
7
6
21
5
3
19
4
2
/
18
/
10
!
/
11
F-98524
20
5
MODEL 22106x9A
KEY
NO.
REPAIR PARTS
DESCRIPTION
PART NO.
1
Engine :1:
2
Housing
776022
3
Height Adjuster, Left Rear
672637
4
Knob
71495
5
Wheel
6
Locknut, Flange
15x84
7
Bolt, Carriage
2x81
9
Bolt, Engine
25x6
10
N ut
15x68
11
Height Adjuster, Left Front
672635
12
Washer,
17x137
13
Washer
17x124
14
Bolt, Hex
lx142
15
Blade
42225E701
16
Adapter,
17
Height Adjuster, Right Front
672634
18
Height Adjuster, Right Rear
672636
19
Guard, Rear
672500
20
Screw
26x245
21
Deflector, Chute
672421
22
Push-On
28x42
23
Pin, Pivot
215xll
24
Spring
166x5
Book, Instruction
F-98524
-
and Tire #
Belleville
Blade
71056
Cap
Z
Parts are available from an Authorized
Engine Service Center. See "Engines,
Gasoline" or "Gasoline Engines" in the yellow pages of the telephone directory.
#
See the "Wheel
F-98524
And Tire Parts List" page.
21
MODEL 22106x9A
REPAIR PARTS
Look at the illustrations. Select the wheel and the tire you want and order
from the following chart.
E
A
B
WHEEL SIZE & TYPE
A
B
C
D
E
F
H
42174
6-inchPlastic,White
7-inchPlastic,White
71148
20270
7-inchPlastic,UghtGray
71596
672086
7-inchPlastic,DarkGray
71596
672085
42172
....................
8-inchPlastic,White
20104
....
20271
8-inchPlastic,LightGray
20104
....
672080 672081
8-inchPlastic,DarkGray
71598
....
672060
71599
71600
8-inchMetal,White
43273
....
43414
....
43274
42173
20105
....
43618
672082
71132
8-inchBallBearing,White
43724
8-inchBallBearing,LightGray
672087
8-inchBallBearing,DarkGray
71134
N-inch, White
14~inch,LightGray
G
672073 672063
........................
672075 672077
14~inch,DarkGray
672074 71841
14~inch,BallBeadng,White
71902
14~in,BailBearing,UghtGray
672076 672078
14~in,BallBearing,DarkGray
F-98524
71841
22
672064
71840
SLOPE GUIDE
SIGHT AND HOLD THIS GUIDE LEVEL WITH A VERTICAL TREE,
A CORNER OF A STRUCTURE, A POWER LINE POLE, OR A FENCE.
I
) Operate a walk-behind mower
across the face of slopes,
never up or down elopes.
I
03
I
mower
up or down slopes, never
across the face of slopes.
On s riding mower to determine if a slope is safe to mow: (1) disengage tho blade(s), (2) put the unit In reverse, end (3) try to back straight up the
elope. If you can bark up the slope It Is generally safe to mow. However, If you do not feel safe or If you are not completely sure, use this guide
end do not mow • alop.e that Is greater than 15 degrees. If the riding mower Is used with a pull-behind or rear mounted attachment,
do not operate the unit on • slops that Is greater than 10 degrees.
A lS degree elope Is s hill that increases in height at approximately 2.5 feet in 10 feet.
A 10 degree slope Is • hill that Increases In height at approximately 1.7 feet In 10 feet.
A
slopes.
Operate
rldlng
mower
upavoid
or down
slopes,
never
across the face
of slopes.
Operate a walk-behind
mower
across
face on
se extreme
carea at
all times,
end
sudden
turns
or maneuvers.
Follow
other instructions
In this manual
for safety
in the
mowing
of slopes, never up or down slopes. Use extra care when operating on or near slopes end obstructions.
_r
.................................
_u__E'.#fo'u_£s_6P__D'E .................................
(o
o3
I
U-
HOW TO ORDER REPAIR PARTS
Onlyusea factoryrepairpad,R.epak
parts,exceptfor_ _gi_ orthet_ansm._do,
n, .areavaila_,fr.orn
_ s_re V_moe
theunitwaspurchased,
a sent_ce
seeprecornmeneeo
eyme s_ore,
or anauroonzeo
ser_ceanoprounommeye,o
pagesofthetelephone
directory,
ffycucannotgeta repairpartors._. asdes.cdbecl
a_ve, _ _ _.e to_ Cen.
b'al
PartsDistributor
shownbelow.Whenyouorder,includethefollowing
mrormarmn:UI L,omplereMooelr_umoer
(.see
nameplate),(2) DateofManufacture,
(3) CompletePartNumber,(4) Dascdptlen,
(5) Quantity.
Repairpartsforthe engineorthetransmission
areavailablefTomthemanufacturer's
authorized
servicecenterfound
in theyellowpagesofthetelephone
directory.
See the individual
engineor transmissionwarranties.
MURRAY,INC, LAWNMOWERCENTRALPARTSDISTRIBUTORS
BEBCO,INC.
2221 2nd.Ave.
Sou_ Birmingham,
AL. 35233
(205)251-4600 1-800-828-8094
Alabama,Florida,Georgia,
PuertoRico
BILLIOU'S,INC.
1343SouthMainSt.
Porterville,
CA. 93257
t_X59)784-4102
1-877-245-5468
1-800-266-7337
Arizona,California,Hawaii,
Nevada
BROWN& WISER,INC.
9991 S.W.AveryStreet
P.O.Box1109
Tualetin,OR. 97062
(503)692-0330 1-800-882-4782
Alaska, Idaho (counties
Ada,
Adams,Bonewah,Boise,Bouner,
Boundry,
Canyon,Clearwater,
EImore,Gem,Idaho,Kooten,
Latah,Lewis,NEZ Perce,Owyee,
Payette,Ravalll,Shoshone,Valley,
Washington),
Montana(counties
Fletheed,Lake,Lincoln,Mineral,
Missoulo,
Ravaili,Sanders),
Oregon,Washington
CPT CANADAPOWER
TECHNOLOGYLIMITED
161WatlineAvenue
Mississauga,
Ontario
L4Z-1P2
(905)890-6900 1-800-861-9559
13315-146 Skeet
Edmonton,
Alberta
T5L 4,58
(403)453-5791 1-800-861-9559
234 MigneronSb'eet
VillaSt-Laurent,Quebec
H4T 1Y7
(514)731-3559 1-800-861-9559
Canada
CHILTONAIR COOLEDENGINE
319 4th.Ave.South
P.O.Box150806
Nashville,TN. 37215
(615)254-1637 1-800-621-6934
www.chiltencompanies.com
F-98524
Arkansas (counties
Clay,
GULFCOASTENGINE,INC.
Craighead,Cdttendan,
Cross,
4202 RussellDr.
P.O.Box9724
Greene,Jackson,Lawrence,Lee,
CorpusChristi,TX. 78408
Mississippi,
Monroe,Phillips,
Poinsett,Randolph,
St. Francis,
(512)088-6999 1-800-825-6999
Woodruff),Mlaelsslppl(counties Arkansas(countiesHempstead,
Howard,Lafayette,Ut_eRiver,
Deseta,Panola,Quitman,"rate,
Miller,Nevada,Pike,Sevler)New
Tunica),Missouri(counties
Dunkin,NewMaddd,Pemisoot),
Mexico,Oklahoma,Texas,
Mexico
Tennessee,Virginia(counties
Bland,Buchanan,
Dickensen,
Lee, OSCARWILSON
Russell,Scott,Smyth,Tazewell,
ENGINE& PARTS
Washington,
Wise)
826 LoneStarDr.
ENGINESSOUTHWEST
O'Fallon,MO. 63366
1255 NorthHearne
Iiiin314)978-1313
1-800-873-6722
Shreveport,
I.A. 71107
ols (S.of Hwy.80),/owa,
Kansas,Missouri(allcounties
PO BOX67
exceptDunkin,Now Madrid,
Shreveport,LA. 71161
Pemmcot)
Nebraska
(318)222-3871 1-800-388-6995
R.B.I.
CORPORATION
www.engmessw.com
Arkansas (exceptthese counties: P.O.Box9318
VA. 23227
Clay,Craig_ead,Cdttendan,
Cross, Richmond,
_:8
X04)550-22101-800-888-7149
Greene,Hempstead,
Howard,
1-800-947-1335
Jackson,Lafayette,Lawrence,Lee,
Conneollcut,Delaware,District
LittleRiver,Miller,Mississippi,
of Columbia,Maine,Maryland,
Monroe,Nevada,Phillips,Pike,
Massachusetts,NewHampshire,
Poinsett,Randolph,Sevler,St.
NewJersey,NewYork,N. & S.
Francis,Woodruff)
Louisiana,
Carolina,Pennsylvaniazips
Mississippi(exceptthese
counties:Dasota,Panola,Quitman 17000 & up,RhodeIsland,
Vermont,Virginia(allcounties
Tate,Tunica,)
exceptBland,Buchanan,
FRANKEDWARDSCO.
Dickenson,
Lee,Russell,Scott,
3626 ParkwayBlvd.
Smyth,Tazewell,Washington,
WestValleyCity,UT 84120
Wise)
}:/_X1)736-8060
1-800-318-0201
1-800-570-0491
WISCONSINMAGNETO
Colorado,Idaho (counties
4727 N. TeutoniaAve.
BannockBeadake,Bingham,
Milwaukee,Wl. 53209
Blaine,Booneville,
Butte,Camas,
11414)445-2800
1-808-733-7388
Cadbou,Cassia,Custer,Franklin,
Inols (N. ofHwy.80),Michigan
Fremont,Geeding,Jefferson,
(upperPeninsula),Wisconsin
Jerome,Lemhi,Lincoln,Madison,
Minidoka,Oneida,Power,Teton,
800 McKinleySt.
TwinFalls)Montana(ellcounties Anoka,MN. 55303
exceptBrownandWiser),Utah,
(612)323-7477 1-808-248-4016
Wyoming
Minnesota,North & South
Dakota
GARDNER,INC.
1150ChesapeakeAve.
Columbus,
OH. 43212
In614)488-79511-808-848-8946
diana, Kentucky,Mlcbigan
(exceptupperPeninsula),
Ohio,
WesternPennsylvaniawithzip
codesupto and including
16999,
WastVirginia