1
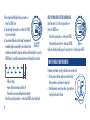
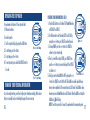
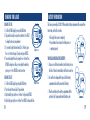
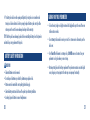
WEIGHT WATCHERS® GUARANTEE
If you are dissatisfied with your purchase for any reason, please return it to a meeting location for
an exchange, or refund by mail. If you made your purchase online, please contact customer service
at: [email protected] for a return authorization number.
CUSTOMER SERVICE
If you have any questions or need help with your PointsPlusTM Pedometer, please contact:
Weight Watchers International, Inc.
Corporate Affairs Department
300 Jericho Quadrangle
Jericho, New York 11753
PointsPlus Pedometer
TM
For pedometer-related questions only, please call 1-877-633-2903
WEIGHT WATCHERS is the registered trademark of Weight Watchers International, Inc. The PointsPlus Weight Loss System,
trademark and formula are proprietary to Weight Watchers International, Inc. Patent Pending. Printed in China.
24
U S E R
G U I D E
HEADER
TABLE
OFGOES
CONTENTS
HERE
YOUR PointsPlusTM PEDOMETER AND ITS FEATURES...................................................... 4
GETTING TO KNOW YOUR PointsPlusTM PEDOMETER ................................................... 5
ACTIVATING YOUR PEDOMETER....................................................................................... 6
ENTERING YOUR PERSONAL INFORMATION ................................................................. 7
HOW TO WEAR AND USE YOUR PointsPlusTM PEDOMETER .......................................... 9
REVIEWING PAST DAILY TOTALS ................................................................................... 14
OPERATING THE STOP WATCH ....................................................................................... 16
CHANGING YOUR PERSONAL INFORMATION ............................................................. 16
CHANGING TIME & DATE................................................................................................. 18
BATTERY INFORMATION.................................................................................................. 19
CARING FOR YOUR PEDOMETER ................................................................................... 21
QUICK TIPS........................................................................................................................ 22
FCC COMPLIANCE ............................................................................................................. 23
Congratulations! By purchasing this PointsPlus Pedometer, you’ve taken the first step towards
increasing your activity level and reaching your weight-loss goal.
This pedometer is designed specifically for you – here are some key features of your PointsPlus
pedometer:
• Your personal information is programmed and stored.
• It’s the only pedometer that can show total distance, your steps taken, AND activity PointsPlus
values earned!
• Stores daily totals for up to 7 days
• There are two different modes to earn activity PointsPlus values, ACTIVE and ALL DAY mode
• Shows date and time
• Includes a stop watch and alarm feature
• Powered with a digital motion sensor which can more accurately measure your body
movement and step filter technology so that certian body movements are filtered out and
not recorded as steps.
Please consult your physician before beginning any exercise or fitness program.
3
TM
TM
YOUR PointsPlus PEDOMETER AND ITS FEATURES
GETTING TO KNOW YOUR PointsPlus PEDOMETER
+ (INCREASE) BUTTON
FUNCTION FIELD
UPDATE BUTTON
BUTTONS
FUNCTIONS
FIELDS
WHAT IT TELLS YOU
DATA
Allows you to scroll through STEPS,
PointsPlus values, DISTANCE, STOP
WATCH, TIME and DATE screens
FUNCTION
The information currently on
screen (STEPS, PointsPlus values,
DISTANCE, etc.)
UPDATE
• Change/update personal profile
• Confirms information entered during
set-up
TOTALS
Daily total (STEPS, PointsPlus values,
DISTANCE), stop watch, time or date.
PROGRESS
BAR
Shows your progress towards earning
an activity PointsPlus value
MODE
• Shows if you are in ACTIVE or
ALL DAY mode
• Displays alarm icon (if alarm is
activated)
• Also displays timing icon when
stop watch is running
PointsPlus
TOTALS FIELD
DATA BUTTON
PROGRESS BAR
• Increases/decreases values during
- (DECREASE) BUTTON
BACK VIEW
ALARM ICON
RESET BUTTON
TOP VIEW
RESET
4
+ (INCREASE) data entry
- (DECREASE) • Scrolls through daily totals in memory
PAUSE (ON TOP)
• Pauses the pedometer
• Resumes tracking
RESET (ON BACK)
• Resets daily information (STEPS,
activity PointsPlus values, DISTANCE)
• Allows you to adjust the time/date
PAUSE BUTTON
5
ACTIVATING YOUR PEDOMETER
HERE’S HOW TO DO IT:
1. First, you need to remove the battery insulator tab inside
the battery compartment. To do this, lift up the back clip
and unscrew the battery compartment door with a coin or
flat head screwdriver.
2. Remove the tab. Be sure that the battery is in the correct
position with the positive (+) side of the battery visible,
facing upwards.
3. Place the battery compartment door back into place and
tighten with a coin or flat head screwdriver.
ENTERING YOUR PERSONAL INFORMATION
You will need to set your personal information (height, weight, gender) to your pedometer so it can
accurately track your progress.
AFTER YOU ACTIVATE YOUR PEDOMETER, FOLLOW THESE EASY STEPS:
1. Select language (English or French) by pressing the + or button. Set language by pressing the UPDATE button.
2. Select units of measure (Imperial or Metric; see below for
clarification) by pressing the + or - button. Press UPDATE to
set measurement.
Press UPDATE to set
3. Select gender (male or female) by pressing the + or - button.
Press UPDATE to set your gender.
UNITS OF MEASUREMENT:
IMPERIAL: inches, yards, miles, lbs.
METRIC: centimeters, meters, kilograms.
6
7
4. Next, change the default height shown by pressing the + or button. Press UPDATE to set.
5. Then adjust weight by pressing the + or - button. Press UPDATE
to set your current weight.
6. Your pedometer will then ask your stride length. The pedometer will
+SET:
or -UPDATE
to adjust
UPDATE to set
automatically display an average length for your stride based on the
information you just entered. We suggest you select the provided stride length; to do so, press the
UPDATE button. If you would like to measure and enter your stride length, here’s how to do it:
10
8
9
4
6
7
5
2
3
0
1
– Walk/run 10 steps
– Measure the distance traveled, and divide by 10.
– That number is your average walking/running stride length.
Adjust (if necessary) by pressing the + or - button. Press UPDATE to set your stride length.
8
NEXT, YOU WILL NEED TO SET THE TIME AND DATE:
Adjust Time Format (12- or 24-hour) by pressing the + or button. Press UPDATE to set.
• Adjust hour by pressing the + or - button, press UPDATE.
• Adjust minute by pressing the + or - button, press UPDATE.
ADJUST:
Adjust: ++oror- Finally, enter the date by month, day, year. For each, press the + or - button and press UPDATE.
HOW TO WEAR YOUR PEDOMETER
By wearing your pedometer correctly, you will achieve more accurate results.
• The loop on the security strap simply loops around the belt clip,
which opens when you push down on its stringed end.
• Attach the pedometer securely to your belt or at your waist level
using the clip on the back of the unit.
RESET
9
• So your pedometer is more secure, you may also use the
pedometer security strap to attach to your clothing, belt loop or
waist band. To open the clip on the end of the strap: push the tab
upward. Close the clip by pushing the tab down.
Your PointsPlus Pedometer is ready to use. Start walking!
TM
USING YOUR PointsPlus PEDOMETER
Your pedometer can keep track of your activity PointsPlus values earned through walking. You can
earn activity PointsPlus values in two different ways by using ALL DAY mode and ACTIVE mode. Here is
more information on which mode to choose and when.
ALL DAY MODE
The ALL DAY mode is designed to track your regular steps that you don’t usually think of as exercise.
You’ll use ALL DAY mode in your daily life, walking the kids to the bus or down the hall to the fax
machine, for instance. You will need to take a qualifying number of steps in order to begin earning an
activity PointsPlus values. These qualifying steps are ones considered part of everyday life and
10
PointsPlus
counted as part of your daily PointsPlus Target.
The Progress Bar at the bottom of the display will show the qualifying steps
you have taken in increments of 10% until one full activity PointsPlus
Progress
PROGRESSBar
BAR
value is complete.
Once the qualifying steps have been taken, the Progress Bar will display your progress toward
earning an activity PointsPlus value! The large squares represent 10% of an activity PointsPlus
value earned and the smaller dashes below represent 1% of an activity PointsPlus value earned.
ACTIVE MODE
The ACTIVE mode is designed for those who do not want to track steps during the entire day but
just want to track the steps taken during exercise. ACTIVE mode bypasses the number of qualifying
steps required to earn an activity PointsPlus value in ALL DAY mode because in ACTIVE mode the
pedometer assumes you are already taking those qualifying steps as part of your daily life and are
using the pedometer to track only the steps/activity PointsPlus values earned for that fitness
walk. Therefore, when the pedometer is set to ACTIVE mode, you will see the Progress Bar start to
fill up indicating earned activity PointsPlus values for your fitness walk.
11
SWITCHING BETWEEN ACTIVE OR ALL DAY MODE:
ALL DAY mode is the default setting on the PointsPlusTM Pedometer
so you can track your steps throughout the day. To switch between
ALL DAY and ACTIVE mode:
1. Press the DATA button to get you to the activity PointsPlus value
display screen; press the UPDATE button.
2. Press + or - to choose between ACTIVE or ALL DAY. Press the
UPDATE button to select mode.
When you switch modes in the middle of the day, your accumulated
steps or PointsPlus values will be applied as follows:
PointsPlus
NOTE: For the most accurate results, it is recommended that you select ALL DAY or ACTIVE mode
for the entire day rather than switch between them.
PAUSE Button
Press UPDATE
PRESS
UPDATE
PointsPlus
Adjust: + +oror
- ADJUST:
• Going from ALL DAY to ACTIVE: You are awarded PointsPlus values credit for your qualifying
steps and activity PointsPlus values earned for the day.
12
• Going from ACTIVE to ALL DAY: PointsPlus values earned are converted to steps and applied
toward qualifying steps and PointsPlus values (if daily target has been met).
PAUSING THE PEDOMETER
You may pause the unit at any time by pressing and holding the
PAUSE button on the top of the pedometer case for 2 seconds.
(PAUSE will appear in the center display field). To resume tracking,
simply press the PAUSE button again.
NOTE: Because your pedometer counts steps by detecting vibrations through the digital sensor
when your body moves, it may not be able to tell the difference when there is body movement
other than walking, such as when you are in a transportation vehicle. For this reason, it is
important to always PAUSE the pedometer when riding in any type of vehicle so that body
movement does not register any false steps.
13
REVIEWING PAST DAILY TOTALS
The pedometer stores the steps, activity PointsPlusTM values, and distance totals from the previous
days (up to seven days, including the current day). To review past days:
• Press the DATA button to scroll to the information you would like to review (STEPS, PointsPlus
values or DISTANCE).
• When you get to the information you would like to review, press the + or - button to review
previous day totals. The day of the week (Sunday, Monday, etc.) will be displayed in the
center display field. Since only seven days of data are stored at once, the oldest day’s data
will automatically be deleted.
• Press the DATA button to resume pedometer tracking.
NOTE: The pedometer automatically resets to a new day at 12:00 midnight and data totals will
then be available in the memory.
14
RESETTING THE CURRENT DAY’S TOTALS
Occasionally, you may want to delete your current day’s steps, PointsPlus values and distance totals.
In order to reset the current day’s information, follow these easy steps:
1. Scroll to either steps, PointsPlus values, or distance display by pressing the DATA button.
2. On the back of the pedometer, flip open the clip to view the battery compartment and reset
button. Press and hold the RESET button on the back of the pedometer.
3. The pedometer will ask you to confirm resetting, so press the
+ or - button to choose YES or NO. Then press the UPDATE button
to confirm (or not confirm) the reset. Your tracking will now start
over or continue.
NOTE: If you confirm reset, ALL TOTALS (steps, PointsPlus values
and distance) will be erased for that day. Any previous day’s totals
will not be affected.
Select YES
+ or+ -or SELECT
YESororNO:
NO:
UPDATE to set
UPDATE TO SET
15
OPERATING THE STOP WATCH
Your pedometer also features a 10-hour stop watch with
1/100-second resolution.
To use the stop watch:
1. Scroll to stop watch display by pressing the DATA button.
2. To start timing, press the + button.
3. To stop timing, press the - button.
4. To reset stop watch, press and hold the UPDATE button for
2 seconds.
Press + to start timing
Press
- toTIMING:
stop timing
STOP
-
CHANGING YOUR PERSONAL INFORMATION
As you lose weight over time, you will need to adjust your information accordingly. We also advise
that you occasionally check your stride length (see page 8) to ensure accuracy.
16
UPDATING YOUR INFORMATION IS EASY:
1. Press the DATA button to scroll to either STEP, PointsPlus values
or DISTANCE. Press UPDATE.
2. You will then need to select the mode (ACTIVE or ALL DAY) by
Adjust: ++or
ADJUST:
or-pressing the + or - button; press UPDATE to confirm the mode.
3. To change WEIGHT press the + or - button. Press UPDATE to
confirm or set your current weight.
4. Then, if you would like to adjust STRIDE, press UPDATE, then
press the + or - button to your new stride length. Press UPDATE
to confirm or set.
PressSET:
UPDATE
to set
UPDATE
5. Finally, you can turn the ALARM ON or OFF by pressing the + or
- button. Press UPDATE to set it for ON or OFF. The ALARM is an audible signal that beeps
when you have completed all of the required steps in ALL DAY mode. The ALARM also beeps
whenever you earn a PointsPlus value in ALL DAY mode. When the ALARM is activated, the
ALARM icon ( ) will display.
NOTE: If no button is pressed for 5 seconds, the pedometer will resume operating mode.
17
CHANGING TIME & DATE
CHANGING THE TIME:
1. Scroll to the TIME display by pressing the DATA button.
2. Flip open the back clip to expose the reset button. Press RESET
to change the time on your pedometer.
3. If you want to adjust the time format (12 or 24 hours), press
Adjust:
ADJUST:++oror-the + or - button to change. To keep format, press UPDATE.
4. You can then adjust the hour by using the + or - button. Press
UPDATE to change hour. Then, you can update the minute by
pressing + or -. Press UPDATE to reset to new time.
CHANGING THE DATE:
UPDATE
to set
1. Scroll to the DATE display by pressing the DATA button.
UPDATE TO
SET
2. Press the reset button on back of the pedometer.
3. Adjust month by pressing the + or - button. Set by pressing UPDATE.
4. Adjust day by pressing the + or - button. Press UPDATE to change the date.
18
BATTERY INFORMATION
This device is powered by a CR 2032 3V lithium battery. Battery replacement will be required from
time to time, and should occur when:
• The display fades in part or completely.
• Your pedometer does not respond to button presses or
is operating properly.
TO INSTALL OR REPLACE THE BATTERY:
1. Using a coin or flat head screwdriver, turn the battery door on
the back of the unit counterclockwise until the door comes free.
2. Be careful not to damage the O-ring seal for the battery
compartment and carefully remove the old battery.
3. Place the new battery in the battery compartment with the
positive (+) side facing upward toward the battery door.
19
4. Put battery door back over the opening and tighten it by using the coin or screwdriver and
turning in a clockwise direction. Failure to properly replace the battery and correctly seal the
unit may cause the unit to become damaged and may void the warranty.
TIP: If the O-ring has been damaged, replace it before reinstalling the battery door. Most jewelers
and watch shops carry replacement O-ring seals.
BATTERY SAFETY INFORMATION
•
•
•
•
•
20
CAUTION
Exhausted batteries are to be removed.
Do not dispose of batteries or product in fire; batteries may explode or leak.
Batteries are to be inserted with correct polarity (positive facing up).
Clean the battery contacts and also those of the product prior to battery installation.
As always, dispose of batteries in an eco-friendly manner.
CARING FOR YOUR PEDOMETER
• To clean the unit, simply use a lightly moistened cloth. Apply mild soap to the area if there are
stubborn stains or marks.
• Do not attempt to disassemble or service your unit. For customer service information, see the
back cover.
• Your PointsPlus Pedometer is not waterproof, so DO NOT immerse it in water. Store your
pedometer in a dry place when you are not using.
• Most importantly, be careful with your pedometer! Your pedometer contains a sensitive digital
sensor; dropping or strong impact to the unit may cause improper functionality.
21
QUICK TIPS
• For best use of the pedometer, your personal information needs to be entered so you can easily
track your progress.
• We suggest you occasionally check to ensure the pedometer is properly positioned for the most
accurate pedometer measurements.
• If this product will not be used for an extended period of time, remove the battery from the
pedometer to preserve battery life.
• If the battery is removed, this will reset the entire pedometer and you will have to enter your
personal data (page 7).
• Get familiar with the pedometer diagram at the beginning of this guide as a reminder of buttons
and functions.
• Be sure that you accurately select AM or PM when you set the time and date (page 9). Because the
pedometer resets every night at midnight (so you can begin each day with a fresh start towards your
daily steps target), it is important AM or PM is correct so your pedometer does not reset midday.
22
FCC COMPLIANCE
The device complies with Part 15 of the FCC Rules. Operation is subject to the following two
conditions: (1) this device may not cause harmful interference, and (2) this device must accept any
interference received, including interference that may cause undesired operation.
Changes or modifications not expressly approved by the party responsible for compliance could void the user’s
authority to operate the product.
NOTE: This equipment has been tested and found to comply with the limits for a Class B digital device, pursuant to
Part 15 of the FCC Rules. These limits are designed to provide reasonable protection against harmful interference in
a residential installation. This equipment generates, uses and can radiate radio frequency energy and, if not installed
and used in accordance with the instructions, may cause harmful interference to radio communications. However,
there is no guarantee that interference will not occur in a particular installation. If this equipment does cause harmful
interference to radio or television reception, which can be determined by turning the equipment off and on, the user
is encouraged to try to correct the interference by one or more of the following measures:
• Reorient or relocate the receiving antenna.
• Increase the separation between the transmitting equipment and receiver.
• Connect the equipment into an outlet on a circuit different from that to which the receiver is connected.
• Consult the dealer or an experienced radio technician for help.
23