1
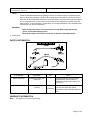
Service Bulletin
Mazda North American Operations
Irvine, CA 92618-2922
© 2009 Mazda Motor of America, Inc.
Subject:
Bulletin No:
07-002/09
Last Issued:
06/24/2009
AIR CONDITIONING MUSTY / MILDEW ODOR
MULTI-MODEL - AIR CONDITIONING MUSTY / MILDEW ODOR
BULLETIN NOTE
• This bulletin supersedes the previous bulletins 07-001/03 issued 05/02/03, 07-001/07 issued 06/08/07, and
07-006/08 issued 10/15/08. The APPLICABLE MODEL(S)/VINS and REPAIR PROCEDURE have been
revised.
• Changes are noted below in Red beside the change bar.
APPLICABLE MODEL(S)/VINS
2007-2009 CX-9
2007-2009 CX-7
2006-2008 MX-5
2004-2009 Mazda3
2003-2008 Mazda6
2000-2003 MPV
1998-2002 626
1998-2003 Protege
2002-2003 Protege5
1998 MPV
1998-2002 Millenia
1999-2005 Miata
DESCRIPTION
A musty/mildew type odor may come from the vents when the air conditioning (A/C) system is operating. It is
most noticeable when the A/C is first turned ON. This odor is the result of mold growth in the A/C evaporator/
cooling unit which is caused by condensation, dust, and pollen within the cooling unit. This condition is usually
worse during high humidity conditions. “Mazda Air Cooling Coil Coating” is available to encapsulate the mold to
reduce odors. If the product is properly applied, it can effectively reduce the musty/mildew odor for up to three
years.
NOTE: See parts information for Mazda Air Cooling Coil Coating and Kit part numbers.
Page 1 of 32
CONSUMER NOTICE: The information and instructions in this bulletin are intended for use by skilled technicians. Mazda technicians utilize the proper tools/
equipment and take training to correctly and safely maintain Mazda vehicles. These instructions should not be performed by “do-it-yourselfers.” Customers
should not assume this bulletin applies to their vehicle or that their vehicle will develop the described concern. To determine if the information applies,
customers should contact their nearest authorized Mazda dealership. Mazda North American Operations reserves the right to alter the specifications and
contents of this bulletin without obligation or advance notice. All rights reserved. No part of this bulletin may be reproduced in any form or by any means,
electronic or mechanical---including photocopying and recording and the use of any kind of information storage and retrieval system ---without permission in
writing.
Bulletin No: 07-002/09
Last Issued: 06/24/2009
© 2009 Mazda Motor of America, Inc.
This treatment provides a durable coating that will aid to prevent biological reactions that lead to odor concerns.
It is applied to the evaporator in a misted form that is introduced by way of the cabin air filter, the re-circulate
door, the blower motor resistor access, or the blower motor air intake. Proper application requires the evaporator surface to be:
- Relatively clean and free of leaves, dust build-up and debris.
- Thoroughly dried, and the product cured onto it after application.
NOTE:
•
•
A/C odor is not unique to Mazda vehicles as it will occur in other makes and models.
To minimize A/C odor, suggest the following to the customers:
- Keep the cooling unit dry by leaving the blower fan ON (at least on low), even if the A/C is not
being used.
- In low humidity (dry) conditions, keep the ventilation system in the “FRESH” mode all the time,
or as much as possible.
- In high humidity conditions, or if the air has a lot of dust or pollen, keep the system in the
“RECIRCULATION” mode.
- A few minutes before reaching a destination, turn the A/C OFF, but leave the blower fan ON.
This stops the accumulation of condensation on the evaporator/cooling unit, and it helps dry the
inside of the cooling unit.
Customers having this concern should have their vehicle repaired using the following procedure.
REPAIR PROCEDURE
1. Verify customer concern.
2. Verify the evaporator drain has no blockage.
3. Apply “Mazda Air Cooling Coil Coating” according to the attached instructions. Refer to the table below for
the applicable repair instructions.
Repair Procedure
2007-2009 CX-9 Front A/C
2007-2009 CX-9 Rear A/C
2007-2009 CX-7
2003-2008 Mazda6
1998-2002 626
2004-2009 Mazda3
1998-2003 Protege and Protege5
2000-2003 MPV Front A/C
2000-2003 MPV Rear A/C
1998 MPV Front A/C
1998 MPV Rear A/C
2001-2002 Millenia
1998-2000 Millenia
2006-2008 MX-5
1999-2003 Miata
Page(s)
4-6
6-7
8-10
11-12
13-14
15-17
18-19
20-21
21-22
23-24
24
25-26
27-28
29-30
31-32
Page 2 of 32
Bulletin No: 07-002/09
Last Issued: 06/24/2009
© 2009 Mazda Motor of America, Inc.
NOTE:
•
•
Follow the attached instructions completely to ensure an effective repair. If insufficient care is
taken on the drying sequence of product, the coating will not last, and the concern will reoccur.
If the odor is still present after treatment, it may be necessary to remove and clean the evaporator, the evaporator foam, and the inside of the cooling unit housing with a mild dish soap and
water solution. To avoid damage to components, do not clean with bleach. See Workshop Manual section 07 for removal instructions.
WARNING:
•
•
When using this product, avoid skin and eye contact. Wear safety glasses and
gloves, and avoid breathing vapors.
Read all the safety and first aid instructions on the back of the Mazda bottle.
4. Verify repair.
PART(S) INFORMATION
Part Number
Description
Qty.
0000-77-570K-01
Mazda Air Cooling Coil
Coating Kit
1
Includes applicator, UltiFlex flexible
applicator tool, and 4- bottles of
Mazda Air Cooling Coil Coating 118
ml (4 fl oz)
0000-77-550E-01
Mazda Air Cooling Coil
Coating
1=
Replacement bottles 118 ml (4 fl oz),
requires one-bottle per vehicle
(4 bottles)
Notes
(two-bottles required for MPV with rear
air)
WARRANTY INFORMATION
Note:
This repair is not covered by warranty.
Page 3 of 32
Bulletin No: 07-002/09
Last Issued: 06/24/2009
© 2009 Mazda Motor of America, Inc.
2007-2009 CX-9 Front A/C
1. Dry the evaporators using the following procedure:
WARNING: Running the engine inside an enclosed area, such as a garage, is dangerous. Exhaust gas,
which contains poisonous carbon monoxide, could easily enter the cabin. Loss of consciousness or even death could occur. Don’t run the engine when inside an enclosed area.
A. Start the engine.
B. Set the HVAC controls as follows.
• RECIRCULATE
• FULL HEAT (front and rear)
• FAN HIGH (front and rear)
• A/C OFF
• AIRFLOW - FACE (front and rear)
C. Open one window approximately one half inch.
D. Let the engine run for 15 minutes.
Page 4 of 32
Bulletin No: 07-002/09
Last Issued: 06/24/2009
© 2009 Mazda Motor of America, Inc.
2. Remove the glove compartment service hole cover.
3. Stop the engine. Switch OFF the fan motor.
4. Remove the cabin air filter cover, then the filter.
5. Shake a bottle of the Mazda Air Cooling Coil Coating well and attach it to the applicator, then connect the
applicator to compressed shop air.
6. Insert the applicator through the the cabin air filter opening, then into the blower motor air intake opening.
Point the nozzle tip downward and outward, and place it along the edge of the blower motor air intake opening.
Page 5 of 32
Bulletin No: 07-002/09
Last Issued: 06/24/2009
© 2009 Mazda Motor of America, Inc.
7. Switch the fan motor ON.
8. Spray the entire contents of the bottle in short bursts, 3 seconds ON, 3 seconds OFF around the outer edge
and into the rotating fan. A fine mist may exit from the ducts.
9. When the bottle is empty, switch the fan motor off, then remove the applicator.
NOTE: For reuse, clean the applicator by flushing a bottle of clean water through it.
10. Reinstall the cabin air filter.
11. Reinstall the glove compartment service hole cover.
12. Use STEP 1 to dry and cure the product for 5 minutes instead of 15 minutes.
13. Note application date in service record.
2007-2009 CX-9 Rear A/C
14. Remove the console. Refer to MS3 online instructions or Workshop Manual section 09-17.
15. Attach the rear connector to the console cover so that the rear climate control will operate.
16. Remove the Power MOS FET, but do not disconnect.
WARNING: Power MOS FET may be extremely hot.
Page 6 of 32
Bulletin No: 07-002/09
Last Issued: 06/24/2009
© 2009 Mazda Motor of America, Inc.
17. Put duct tape over the Power MOS FET opening, and then cut a slit in the duct tape to put the applicator
through.
18. Shake a bottle of the Mazda Air Cooling Coil Coating well and attach it to the applicator, then connect the
applicator to compressed shop air.
19. Insert the applicator inside the hole. Point the nozzle tip in direction of the evaporator.
20. Switch the rear fan motor ON.
21. Spray the entire contents of the bottle in short bursts, 3 seconds ON, 3 seconds OFF moving up and down
and side to side across the evaporator. A fine mist may exit from the ducts.
22. When the bottle is empty, stop the engine and remove the applicator.
NOTE: For reuse, clean the applicator by flushing a bottle of clean water through it.
23. Use STEP 1 to dry and cure the product for 5 minutes instead of 15 minutes.
24. While the product is drying, re-install the removed parts.
25. Note application date in service record.
Page 7 of 32
Bulletin No: 07-002/09
Last Issued: 06/24/2009
© 2009 Mazda Motor of America, Inc.
2007-2009 CX-7
1. Dry the evaporator using the following procedure:
WARNING: Running the engine inside an enclosed area, such as a garage, is dangerous. Exhaust gas,
which contains poisonous carbon monoxide, could easily enter the cabin. Loss of consciousness or even death could occur. Don’t run the engine when inside an enclosed area.
A. Start the engine.
B. Set the HVAC controls as follows.
• RECIRCULATE
• FULL HEAT
• FAN HIGH
• A/C OFF
• AIRFLOW (FACE)
C. Open one window approximately one half inch.
D. Let the engine run for 15 minutes.
Page 8 of 32
Bulletin No: 07-002/09
Last Issued: 06/24/2009
© 2009 Mazda Motor of America, Inc.
2. Remove the glove box by:
A. Pressing the damper stay in the direction shown by the arrow and detach it from the glove compartment
lid.
B. Bending the stoppers inward to remove.
C. Turn the glove compartment downward and pull the pins.
3. Stop the engine. Switch OFF the fan motor.
4. Remove the cabin air filter cover, then the filter.
5. Shake a bottle of the Mazda Air Cooling Coil Coating well and attach it to the applicator, then connect the
applicator to compressed shop air.
6. Insert the applicator through the the cabin air filter opening, then into the blower motor air intake opening.
Point the nozzle tip downward and outward, and place it along the edge of the blower motor air intake opening.
Page 9 of 32
Bulletin No: 07-002/09
Last Issued: 06/24/2009
© 2009 Mazda Motor of America, Inc.
7. Switch the fan motor ON.
8. Spray the entire contents of the bottle in short bursts, 3 seconds ON, 3 seconds OFF around the outer edge
and into the rotating fan. A fine mist may exit from the ducts.
9. When the bottle is empty, switch the fan motor off, then remove the applicator.
NOTE: For reuse, clean the applicator by flushing a bottle of clean water through it.
10. Reinstall the cabin air filter.
11. Reinstall the glove box.
12. Use STEP 1 to dry and cure the product for 5 minutes instead of 15 minutes.
13. Note application date in service record.
Page 10 of 32
Bulletin No: 07-002/09
Last Issued: 06/24/2009
© 2009 Mazda Motor of America, Inc.
2003-2008 Mazda6
1. Dry the evaporator using the following procedure:
WARNING: Running the engine inside an enclosed area, such as a garage, is dangerous. Exhaust gas,
which contains poisonous carbon monoxide, could easily enter the cabin. Loss of consciousness or even death could occur. Don’t run the engine when inside an enclosed area.
A. Start the engine.
B. Set the HVAC controls as follows.
• RECIRCULATE
• FULL HEAT
• FAN HIGH
• A/C OFF
• AIRFLOW (FACE)
C. Open one window approximately one half inch.
D. Let the engine run for 15 minutes.
2. Remove the glove box by:
A. Removing the damper clip.
B. Bending the stoppers inward to remove.
Page 11 of 32
Bulletin No: 07-002/09
Last Issued: 06/24/2009
© 2009 Mazda Motor of America, Inc.
C. Opening the lid until it is completely horizontal and remove the lid by pulling it in the direction of the arrow.
3. Stop the engine. Switch OFF the fan motor.
4. Remove the cabin air filter cover, then the filter.
5. Shake a bottle of the Mazda Air Cooling Coil Coating well and attach it to the applicator, then connect the
applicator to compressed shop air.
6. Insert the applicator through the the cabin air filter opening, then into the blower motor air intake opening.
Point the nozzle tip downward and outward, and place it along the edge of the blower motor air intake opening.
7. Switch the fan motor ON.
8. Spray the entire contents of the bottle in short bursts, 3 seconds ON, 3 seconds OFF around the outer edge
and into the rotating fan. A fine mist may exit from the ducts.
9. When the bottle is empty, switch the fan motor off, then remove the applicator.
NOTE: For reuse, clean the applicator by flushing a bottle of clean water through it.
10. Reinstall the cabin air filter.
11. Reinstall the glove box.
12. Use STEP 1 to dry and cure the product for 5 minutes instead of 15 minutes.
13. Note application date in service record.
Page 12 of 32
Bulletin No: 07-002/09
Last Issued: 06/24/2009
© 2009 Mazda Motor of America, Inc.
1998-2002 626
1. Dry the evaporator using the following procedure:
WARNING: Running the engine inside an enclosed area, such as a garage, is dangerous. Exhaust gas,
which contains poisonous carbon monoxide, could easily enter the cabin. Loss of consciousness or even death could occur. Don’t run the engine when inside an enclosed area.
A. Start the engine.
B. Set the HVAC controls as follows:
• RECIRCULATE
• FULL HEAT
• FAN HIGH
• A/C OFF
• AIRFLOW (FACE)
AIR FLOW
(FACE)
0
1 2
3
4
A/C
FAN HIGH
FULL HEAT
A/C OFF
RECIRCULATE
02_1053b
C. Open one window approximately one half inch.
D. Let the engine run for 15 minutes.
2. Remove the glove box by:
A. Pushing the top stops inward (plastic will flex).
REMOVE GLOVE BOX
02_1053c
B. At the right side hinge, lift the clip out of its seat.
C. Pull the left side axle pin out towards the right side and remove the glove box.
3. Shake a bottle of the Mazda Air Cooling Coil Coating well and attach it to applicator, then connect the applicator to compressed shop air.
Page 13 of 32
Bulletin No: 07-002/09
Last Issued: 06/24/2009
© 2009 Mazda Motor of America, Inc.
4. Insert the applicator in the grille of the recirculation door. Point the nozzle tip downwards (approximately at
the 7 o’clock position) and towards the center of the cooling unit.
END OF APPLICATOR
POINTING AT
SEVEN-O-CLOCK POSITION
02_1053d
5. Spray the entire contents of the bottle in short bursts, 3 seconds ON, 3 seconds OFF into the rotating fan. A
fine mist may exit from the ducts.
02_1053e
STAND OUTSIDE VEHICLE
WHILE SPRAYING
6. When the bottle is empty, stop the engine and remove the applicator.
NOTE: For reuse, clean the applicator by flushing a bottle of clean water through it.
7. Use STEP 1 to dry and cure the product for 5 minutes instead of 15 minutes.
8. While product is drying, re-install the glove box.
9. Note application date in service record.
Page 14 of 32
Bulletin No: 07-002/09
Last Issued: 06/24/2009
© 2009 Mazda Motor of America, Inc.
2004-2009 Mazda3
1. Dry the evaporator using the following procedure:
WARNING: Running the engine inside an enclosed area, such as a garage, is dangerous. Exhaust gas,
which contains poisonous carbon monoxide, could easily enter the cabin. Loss of consciousness or even death could occur. Don’t run the engine when inside an enclosed area.
A. Start the engine.
B. Set the HVAC controls as follows.
• RECIRCULATE
• FULL HEAT
• FAN HIGH
• A/C OFF
• AIRFLOW (FACE)
C. Open one window approximately one half inch.
D. Let the engine run for 15 minutes.
2. Stop the engine. Switch OFF the fan motor.
3. Record the radio preset stations.
4. Set the ignition to the LOCK position.
5. Disconnect the negative battery cable for 1 minute or more.
6. Remove the console sidewall on the passenger side footwell.
PASSENGER-SIDE
SIDE WALL
1811h
Page 15 of 32
Bulletin No: 07-002/09
Last Issued: 06/24/2009
© 2009 Mazda Motor of America, Inc.
7. Remove the PJB and PJB bracket. Refer to appropriate Workshop Manual section 09-40 - PASSENGER
JUNCTION BOX (PJB) REMOVAL/INSTALLATION.
NOTE: PJB module configuration does not need to be performed since the same module will be used.
8. Remove the metal bracket.
REMOVE
METAL BRACKET
1811i
9. Disconnect the evaporator temperature sensor connector.
EVAPORATOR
TEMPERATURE
SENSOR
CONNECTOR
1811j
10. Disconnect the the Power MOS FET connector (full-auto climate control).
WARNING: Power MOS FET may be extremely hot.
11. Remove the cabin air filter cover, then remove the two cabin air filters.
Page 16 of 32
Bulletin No: 07-002/09
Last Issued: 06/24/2009
© 2009 Mazda Motor of America, Inc.
12. Shake a bottle of the Mazda Air Cooling Coil Coating well and attach it to the applicator, then connect the
applicator to compressed shop air.
13. Insert the applicator inside the hole. Point the nozzle tip in direction of the evaporator.
14. Begin spraying by gently moving the nozzle tip back and forth from the top to the bottom to evenly coat the
evaporator.
15. When the bottle is empty, remove the applicator.
NOTE: For reuse, clean the applicator by flushing a bottle of clean water through it.
16. Reinstall the cabin air filters, then the cabin air filter cover.
17. Connect the Power MOS FET connector.
18. Connect the evaporator temperature sensor connector.
19. Reinstall the metal bracket.
20. Reinstall the PJB and PJB bracket. Refer to appropriate Workshop Manual section 09-40 - PASSENGER
JUNCTION BOX (PJB) REMOVAL/INSTALLATION.
21. Reinstall the console side wall.
22. Use STEP 1 to dry and cure product for 5 minutes instead of 15 minutes.
23. Note application date in service record.
Page 17 of 32
Bulletin No: 07-002/09
Last Issued: 06/24/2009
© 2009 Mazda Motor of America, Inc.
1998-2003 Protege and Protege5
1. Dry the evaporator using the following procedure:
WARNING: Running the engine inside an enclosed area, such as a garage, is dangerous. Exhaust gas,
which contains poisonous carbon monoxide, could easily enter the cabin. Loss of consciousness or even death could occur. Don’t run the engine when inside an enclosed area.
A. Start the engine.
B. Set the HVAC controls as follows.
• RECIRCULATE
• FULL HEAT
• FAN HIGH
• A/C OFF
• AIRFLOW (FACE)
AIR FLOW
(FACE)
A/C OFF
0
1 2 3
4
A/C
02_1053f
FULL HEAT
FAN HIGH
RECIRCULATE
C. Open one window approximately one half inch.
D. Let the engine run for 15 minutes.
2. Remove the glove box by:
A. Pushing the top stops inward (plastic will flex).
REMOVE GLOVE BOX
02_1053c
B. At the left side hinge, lift the clip out of its seat.
C. Pull the right axle pin out towards the left side and remove the glove box.
3. Stop the engine. Switch OFF the fan motor.
Page 18 of 32
Bulletin No: 07-002/09
Last Issued: 06/24/2009
© 2009 Mazda Motor of America, Inc.
4. Remove the fan resistor and inspect the evaporator for debris; remove debris using an appropriate vacuum
cleaner
WARNING: Blower motor resistor may be extremely hot.
REMOVE FAN
RESISTOR
02_1053g
5. Reinstall the fan resistor.
6. Shake a bottle of the Mazda Air Cooling Coil Coating well and attach it to the applicator, then connect the
applicator to compressed shop air.
7. Insert the applicator in the grille of the recirculation door. Point the nozzle tip in the direction of the evaporator.
END OF APPLICATOR
POINTING AT
SEVEN-O-CLOCK POSITION
02_1053d
8. Switch the fan motor ON.
9. Begin spraying by gently moving the nozzle tip in front of the evaporator surface. Spray the entire contents
of the bottle in short bursts, 3 seconds ON, 3 seconds OFF onto the evaporator. A fine mist may exit from
the ducts.
10. When the bottle is empty, switch the fan motor off, and remove the applicator.
NOTE: For reuse, clean the applicator by flushing a bottle of clean water through it.
11. Reinstall the glove box.
12. Use STEP 1 to dry and cure the product for 5 minutes instead of 15 minutes.
13. Note application date in service record.
Page 19 of 32
Bulletin No: 07-002/09
Last Issued: 06/24/2009
© 2009 Mazda Motor of America, Inc.
2000-2003 MPV Front AC
1. Dry the evaporator using the following procedure:
WARNING: Running the engine inside an enclosed area, such as a garage, is dangerous. Exhaust gas,
which contains poisonous carbon monoxide, could easily enter the cabin. Loss of consciousness or even death could occur. Don’t run the engine when inside an enclosed area.
A. Start the engine.
B. Set the HVAC controls as follows:
• RECIRCULATE
• FULL HEAT
• FRONT A/C FAN HIGH
• REAR A/C FAN HIGH
• A/C OFF
FRONT FAN HIGH
A/C OFF
1
A/C
2
0
3
4
02_1053i
FULL HEAT
0
REAR
1
2
3
AIR FLOW
(FACE)
RECIRCULATE
FAN HIGH
C. Open one window approximately one half inch.
D. Let the engine run for 15 minutes.
2. Remove the glove box by:
A. Pushing the top stops inward.
B. At the right side hinge, lift the clip out of its seat.
C. Pull the left axle pin out towards the right side and remove the glove box.
3. Remove the dust filter cover located over the fan assembly by depressing the clip on the inner side of the
cover.
4. Remove the dust filter by pulling it out of the filter housing. Discard the filter if dirty.
REMOVE DUST
FILTER
02_1053j
Page 20 of 32
Bulletin No: 07-002/09
Last Issued: 06/24/2009
© 2009 Mazda Motor of America, Inc.
5. Shake a bottle of Mazda Air Cooling Coil Coating well and attach it to the applicator, then connect the applicator to compressed shop air.
6. Insert the applicator into the empty filter housing (approximately 4-1/4 inches from the tip of the applicator).
Point the nozzle tip downwards and towards the center (approximately the 7 o’clock position).
02_1053k
INSERT
APPLICATOR
7. Spray the entire contents of the bottle in short bursts, 3 seconds ON, 3 seconds OFF into the rotating fan. A
fine mist may exit from the ducts.
8. When the bottle is empty, stop the engine and remove the applicator.
NOTE: For reuse, clean the applicator by flushing a bottle of clean water through it.
9. Install the previously cleaned or new filter as needed and reinstall the filter cover
10. Reinstall the glove box.
11. Use STEP 1 to dry and cure product for 5 minutes instead of 15 minutes.
2000-2003 MPV Rear AC (if equipped)
12. Remove the right side cup holder.
13. Remove and disconnect the rear fan control panel and convenience tray, if equipped.
14. Be sure the HVAC controls are set per STEP 1B (see page 16).
NOTE: The rear fan will operate even though the rear fan control panel is disconnected.
15. Shake a new bottle of Mazda Air Cooling Coil Coating well and attach it to the applicator, then connect the
applicator to compressed shop air.
Page 21 of 32
Bulletin No: 07-002/09
Last Issued: 06/24/2009
© 2009 Mazda Motor of America, Inc.
16. Begin inserting the applicator through the opening of the control panel/convenience tray front to back with
the tip pointed up (for space). While inserting the probe, rotate the tip outward toward the fan air intake
opening. When inserted (depth of insertion is approximately half the length of the applicator), point the tip
side center into the cage without touching it.
02_1053o
INSERT APPLICATOR
17. Spray the entire contents of the bottle in short bursts, 3 seconds ON, 3 seconds OFF into the rotating fan. A
fine mist may exit from the ducts.
18. When the bottle is empty, stop the engine and remove the applicator.
NOTE: For reuse, clean the applicator by flushing a bottle of clean water through it.
19. Use STEP 1 to dry and cure the product for 5 minutes instead of 15 minutes.
20. While the product is drying, re-install the removed parts.
21. Note application date in service record.
Page 22 of 32
Bulletin No: 07-002/09
Last Issued: 06/24/2009
© 2009 Mazda Motor of America, Inc.
1998 MPV Front A/C
1. Dry the evaporator using the following procedure:
WARNING: Running the engine inside an enclosed area, such as a garage, is dangerous. Exhaust gas,
which contains poisonous carbon monoxide, could easily enter the cabin. Loss of consciousness or even death could occur. Don’t run the engine when inside an enclosed area.
A. Start the engine.
B. Set both front and rear (if applicable) HVAC controls as follows:
• RECIRCULATE
• FULL HEAT
• FAN HIGH
• A/C OFF
• AIRFLOW (FACE and FLOOR)
AIR FLOW
(FACE & FLOOR)
FULL HEAT
RECIRCULATE
OFF
OFF
REAR
S.W.
A/C
OFF
REAR
S.W.
1
2
3 4
A/C OFF
FAN HIGH
HEATER
02_1053L
A/C OFF
C. Open one window approximately one half inch.
D. Let the engine run for 15 minutes.
2. Remove the glove box, removing the side fascia plate on the right door side.
REMOVE RIGHT SIDE
FASCIA PLATE TO
REMOVE GLOVE BOX
02_1053m
3. Remove the six (6) phillips screws to remove the glove box assembly.
Page 23 of 32
Bulletin No: 07-002/09
Last Issued: 06/24/2009
© 2009 Mazda Motor of America, Inc.
4. Shake a bottle of Mazda Air Cooling Coil Coating well and attach it to the applicator, then connect the applicator to compressed shop air.
5. Insert the applicator into the grille of the re-circulate door. Point the nozzle tip down and towards the center
of the cooling unit (approximately 7 o’clock position).
INSERT APPLICATOR
02_1053n
6. Spray the entire contents of the bottle in short bursts, 3 seconds ON, 3 seconds OFF into the rotating fan. A
fine mist may exit from the ducts.
7. When the bottle is empty, stop the engine and remove the applicator.
NOTE: For reuse, clean the applicator by flushing a bottle of clean water through it.
8. Use STEP 1 to dry and cure product for 5 minutes instead of 15 minutes.
1998 MPV Rear A/C (if equipped)
9. Remove the four (4) screws holding down the tailgate sill, then remove the sill.
10. Remove the one (1) screw holding down the left inner panel, then lift the complete panel out of the clips.
11. Be sure the HVAC controls are set per STEP 1B (see page 19).
12. Shake a new bottle of Mazda Air Cooling Coil Coating well and attach it to the applicator, then connect the
applicator to compressed shop air.
13. Position the applicator with the nozzle tip pointing down into the air intake of the fan motor.
14. Spray the entire contents of the bottle in short bursts, 3 seconds ON, 3 seconds OFF into the rotating fan. A
fine mist may exit from the ducts.
15. When the bottle is empty, stop the engine and remove.
NOTE: For reuse, clean the applicator by flushing a bottle of clean water through it.
16. Use STEP 1 to dry and cure product for 5 minutes instead of 15 minutes.
17. While the product is drying, re-install removed parts.
18. Note application date in service record.
Page 24 of 32
Bulletin No: 07-002/09
Last Issued: 06/24/2009
© 2009 Mazda Motor of America, Inc.
2001-2002 Millenia (with cabin air filter)
1. Dry the evaporator using the following procedure:
WARNING: Running the engine inside an enclosed area, such as a garage, is dangerous. Exhaust gas,
which contains poisonous carbon monoxide, could easily enter the cabin. Loss of consciousness or even death could occur. Don’t run the engine when inside an enclosed area.
A. Start the engine.
B. Set the HVAC controls as follows:
• RECIRCULATE
• FULL HEAT (display indicates 90°F)
• FAN HIGH
• A/C OFF (<blank>)
• AIRFLOW (FACE)
FULL HEAT
AIR FLOW
(FACE & FLOOR)
H-SET-M RESET
RECIRCULATE
AMB
OFF
AUTO
MODE
A/C
02_1053p
A/C OFF
NOTE: There are three A/C positions on the LCD panel (A/C, A/C econ, <blank>). Depress the A/C
button until <blank> is selected.
C. Open one window approximately one half inch.
D. Let the engine run for 15 minutes.
2. Remove the lower panel by pulling downward at both ends.
REMOVE LOWER
PANEL
02_1053v
Page 25 of 32
Bulletin No: 07-002/09
Last Issued: 06/24/2009
© 2009 Mazda Motor of America, Inc.
3. Remove the 10 mm nut retaining the cabin air filter bracket.
AIR FILTERS
02_1053w
COOLING UNIT SEAL
RETAINING NUT
4. Remove the bracket by sliding downward.
5. Remove the cabin air filters by sliding downward. Discard the filters if dirty.
6. Cover the cabin air filter access hole with duct tape.
7. Pierce a hole in the center of the duct tape with a knife.
8. Shake a bottle of Mazda Cooling Coil Coating well and attach it to applicator, then connect the applicator to
compressed shop air.
9. Insert the applicator into the pierced hole through the duct tape.
POINT APPLICATOR
TOWARDS DRIVER'S SIDE
02_1053x
10. Point the nozzle tip in the direction of the driver’s side.
11. Spray the entire contents of the bottle in short bursts, 3 seconds ON, 3 seconds OFF into the rotating fan. A
fine mist may exit from the ducts.
12. When the bottle is empty, stop the engine and remove the applicator.
NOTE: For reuse, clean the applicator by flushing a bottle of clean water through it.
13. Use STEP 1 to dry and cure the product for 5 minutes instead of 15 minutes.
14. Remove the duct tape and install the previously cleaned or new filters as needed.
15. Reinstall the cabin air filter bracket.
16. Reinstall the lower panel.
17. Note application date in service record.
Page 26 of 32
Bulletin No: 07-002/09
Last Issued: 06/24/2009
© 2009 Mazda Motor of America, Inc.
1998-2000 Millenia
1. Dry the evaporator using the following procedure:
WARNING: Running the engine inside an enclosed area, such as a garage, is dangerous. Exhaust gas,
which contains poisonous carbon monoxide, could easily enter the cabin. Loss of consciousness or even death could occur. Don’t run the engine when inside an enclosed area.
A. Start the engine.
B. Set the HVAC controls as follows:
• RECIRCULATE
• FULL HEAT (display indicates 90°F)
• FAN HIGH
• A/C OFF (<blank>)
• AIRFLOW (FACE)
FULL HEAT
AIR FLOW
(FACE & FLOOR)
H-SET-M RESET
RECIRCULATE
AMB
OFF
AUTO
MODE
A/C
02_1053p
A/C OFF
NOTE: There are three A/C positions on the LCD panel (A/C, A/C econ, <blank>). Depress the A/C
button until <blank> is selected.
C. Open one window approximately one half inch.
D. Let the engine run for 15 minutes.
2. Remove the glove box by removing the two (2) screws on the bottom of the glove box assembly.
3. Shake a bottle of Mazda Cooling Coil Coating well and attach it to the applicator, then connect the applicator
to compressed shop air.
Page 27 of 32
Bulletin No: 07-002/09
Last Issued: 06/24/2009
© 2009 Mazda Motor of America, Inc.
4. Insert the applicator through the right side the glove box guide into the grille of the recirculation door. Point
the nozzle tip downwards and towards the center (approximately 7 o’clock position).
INSERT APPLICATOR
02_1053q
5. Spray the entire contents of the bottle in short bursts, 3 seconds ON, 3 seconds OFF into the rotating fan. A
fine mist may exit from the ducts.
6. When the bottle is empty, stop the engine and remove the applicator.
NOTE: For reuse, clean the applicator by flushing a bottle of clean water through it.
7. Use STEP 1 to dry and cure the product for 5 minutes instead of 15 minutes.
8. While the product is drying, re-install the glove box.
9. Note application date in service record.
Page 28 of 32
Bulletin No: 07-002/09
Last Issued: 06/24/2009
© 2009 Mazda Motor of America, Inc.
2006-2008 MX-5
1. Dry the evaporator using the following procedure:
WARNING: Running the engine inside an enclosed area, such as a garage, is dangerous. Exhaust gas,
which contains poisonous carbon monoxide, could easily enter the cabin. Loss of consciouness or even death could occur. Don’t run the engine when inside an enclosed area.
A. Start the engine.
B. Set the HVAC controls as follows:
• Air source: re-circulate
• Heater control: full heat
• Fan: high
• A/C switch: off
• Airflow (Face)
C. Open one window approximately one half inch.
D. Let the engine run for 15 minutes.
2. Remove the glove box by:
A. Remove the dumper clip.
B. Bend the stoppers inward, then remove.
C. Turn the glove compartment downward and pull the pins.
3. Shake a bottle of Mazda Cooling Coil Coating well and attach it to the applicator, then connect the applicator
to compressed shop air.
Page 29 of 32
Bulletin No: 07-002/09
Last Issued: 06/24/2009
© 2009 Mazda Motor of America, Inc.
4. Insert the applicator in the grille of the the recirculation door. Point the nozzle tip downwards and towards
center (approximately the 7 o’clock position).
5. Spray the entire contents of the bottle in short bursts, 3 seconds ON, 3 seconds OFF into the rotating fan. A
fine mist may exit from the ducts.
6. When the bottle is empty, stop the engine and remove the applicator.
NOTE: Clean the empty bottle by flushing it with clean water.
7. Use STEP 1 to dry and cure the product for 5 minutes instead of 15 minutes.
8. While the product is drying, re-install the glove box.
9. Note application date in service record.
Page 30 of 32
Bulletin No: 07-002/09
Last Issued: 06/24/2009
© 2009 Mazda Motor of America, Inc.
1999-2005 Miata
1. Dry the evaporator using the following procedure:
WARNING: Running the engine inside an enclosed area, such as a garage, is dangerous. Exhaust gas,
which contains poisonous carbon monoxide, could easily enter the cabin. Loss of consciousness or even death could occur. Don’t run the engine when inside an enclosed area.
A. Start the engine.
B. Set the HVAC controls as follows:
• Air source: re-circulate
• Heater control: full heat
• Fan: high
• A/C switch: off
• Airflow (Face)
AIR FLOW
(FACE)
A/C OFF
FAN HIGH
1
0
2
3
4
A/C
FULL HEAT
RECIRCULATE
02_1053s
C. Open one window approximately one half inch.
D. Let the engine run for 15 minutes.
2. Open the glove box and remove by lifting the left side and pulling the right side in a downward direction.
3. Shake a bottle of Mazda Cooling Coil Coating well and attach it to the applicator, then connect the applicator
to compressed shop air.
4. Insert the applicator in the grille of the the recirculation door. Point the nozzle tip downwards and towards
center (approximately the 7 o’clock position).
INSERT APPLICATOR
02_1053t
5. Spray the entire contents of the bottle in short bursts, 3 seconds ON, 3 seconds OFF into the rotating fan. A
fine mist may exit from the ducts.
Page 31 of 32
Bulletin No: 07-002/09
Last Issued: 06/24/2009
© 2009 Mazda Motor of America, Inc.
6. When the bottle is empty, stop the engine and remove the applicator.
NOTE: Clean the empty bottle by flushing it with clean water.
7. Use STEP 1 to dry and cure the product for 5 minutes instead of 15 minutes.
8. While the product is drying, re-install the glove box.
9. Note application date in service record.
Page 32 of 32